
Razor Components Succinctly®

CHAPTER 5
Templating
By using a feature of Blazor known as templates, it is easy to have a consistent UI throughout the various components of a Blazor application, which is what we are going to explore now.
In our case, our application has an HTML table with some data that is displayed on the Weather forecast page.
The table displays the information in a basic way that works fine, but it is not very appealing. The look and feel of the table could be improved.
The case for component templating
At the moment, our application has a single table, so we could add the CSS style and HTML markup improvements directly to the table and we would solve the problem, right?
In our app’s current state, yes, that would be enough because the app has only one table. But what happens if we need to add additional tables to our application due to an increase in the scope or functionality of the app?
In such a scenario, we would need to apply CSS styling and improvements to the HTML markup on any additional tables as well. This means that in a way, we would be duplicating the effort required to bring all tables in our application to a common style or functionality.
This problem can be solved by using a feature that Blazor provides allowing us to create components based on a template.
So, effectively, instead of making changes when required to for every CSS style or HTML markup for each independent table, by using a component template, we only need to make these changes to the template, not every table. This can be a huge time-saver.
Table template
Creating a table component template is very easy. In the previous chapters, we already covered the fundamental techniques that allow us to achieve that. We just haven’t seen how to apply them for templating purposes.
Using Solution Explorer, click on the Shared folder, right-click, then click Add, and then click Razor Component.
Let’s call the new component TableTemplate.razor, and click Add to finish creating the file. Once the file has been created, open it and add the following code.
Code Listing 5-a: TableTemplate.razor
<table class="table"> <thead> @TableHeader </thead> <tbody> @TableBody </tbody> </table> @code { [Parameter] public RenderFragment TableHeader { get; set; } [Parameter] public RenderFragment TableBody { get; set; } } |
As you can see, what we’ve done is taken the table HTML markup from the FetchData.razor file, removed the content from the thead and tbody sections, and added it as RenderFragment parameters, which will be passed from the parent component.
By making this simple change, we now have a table component template that we can use on any page of the application where we need to display a table.
Now, let’s adjust the code within the FetchData.razor file to start using the table component template.
Using Solution Explorer, open the FetchData.razor file that resides in the Pages folder. Then, replace the existing code with the following. The changes are highlighted in bold.
Code Listing 5-b: Updated FetchData.razor
@page "/fetchdata" @using BlazorApp.Data @inject WeatherForecastService ForecastService @using Microsoft.Extensions.Logging; @inject ILogger<Counter> logger; <h1>Weather forecast</h1> <p>This component demonstrates fetching data from a service.</p> @if (forecasts == null) { <p><em>Loading...</em></p> } else { <TableTemplate> <TableHeader> <tr> <th>Date</th> <th>Temp. (C)</th> <th>Temp. (F)</th> <th>Summary</th> </tr> </TableHeader> <TableBody> @foreach (var forecast in forecasts) { <ForecastRow @key="forecast" Forecast="forecast" InputAttributes="inputAttributes" OnShowHide="ShowHide" /> } </TableBody> </TableTemplate> <CoolDialog @ref="coolDlg" /> } @code { private WeatherForecast[] forecasts; private Dictionary<string, object> inputAttributes; private CoolDialogBase coolDlg;
protected override async Task OnInitializedAsync() { inputAttributes = new Dictionary<string, object>() { { "Region", "Spain" }, { "City", "Valencia" }, { "State", "Comunidad Valenciana" }, { "Day", "01" }, { "Month", "11" }, { "Year", "2020" } }; forecasts = await ForecastService.GetForecastAsync(DateTime.Now); } protected void ShowHide(bool toggle) { logger.LogWarning("Event callback triggered..."); coolDlg.OnOpen(); } } |
So, what have we done here? Maybe the easiest way to understand the changes made is by looking at the following diagram.
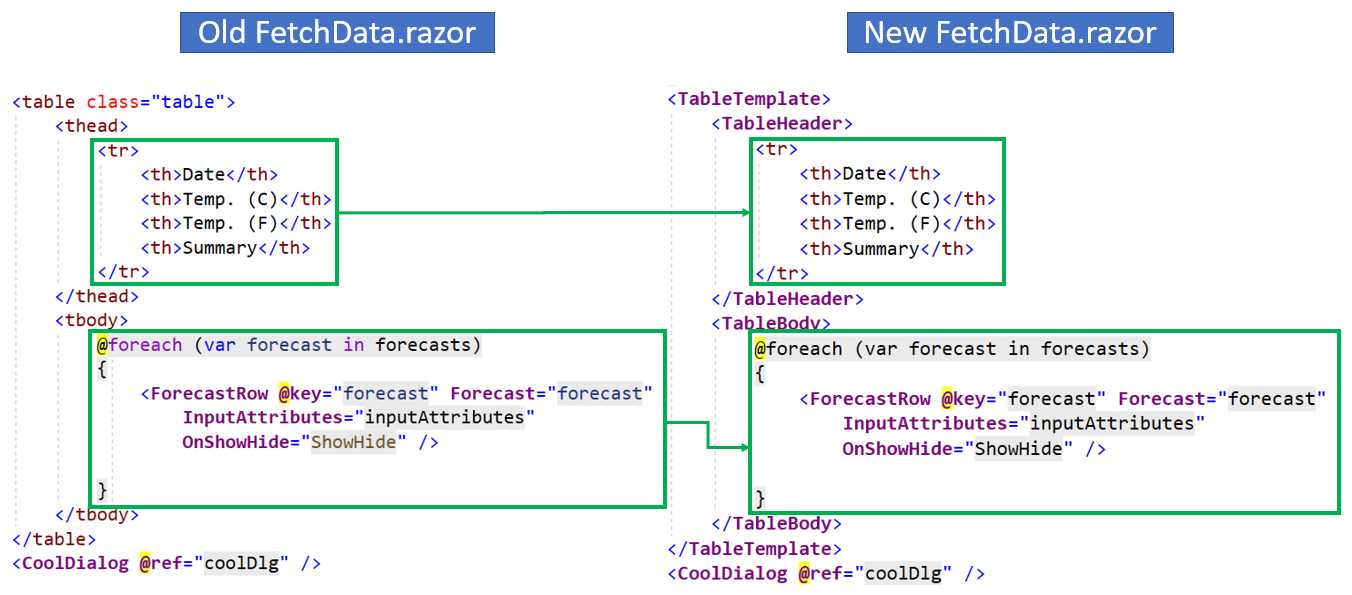
Figure 5-a: Old and New FetchData.razor Comparison
By looking at the diagram, we see that the amount of code between both approaches is almost the same.
So, you might be asking yourself, what was the point of doing all this if we ended up with the same amount of code on the FetchData.razor page, and on top of that, we had to create new files to host the TableTemplate component code?
Well, we have added a bit of extra code by creating the TableTemplate component, but if we have to create several additional tables for our application in the future, we’ll end up saving a lot of time (and code), given that we can reuse the TableTemplate component for all other tables.
By using the RenderFragment properties, we can pass from the parent component (FetchData) to the child component (TableTemplate), the header section (by using TableHeader), and the body section (by using TableBody).
If we now run the application by pressing Ctrl+F5, and then navigate to the Weather forecast page, we can see that the application behaves the same way.
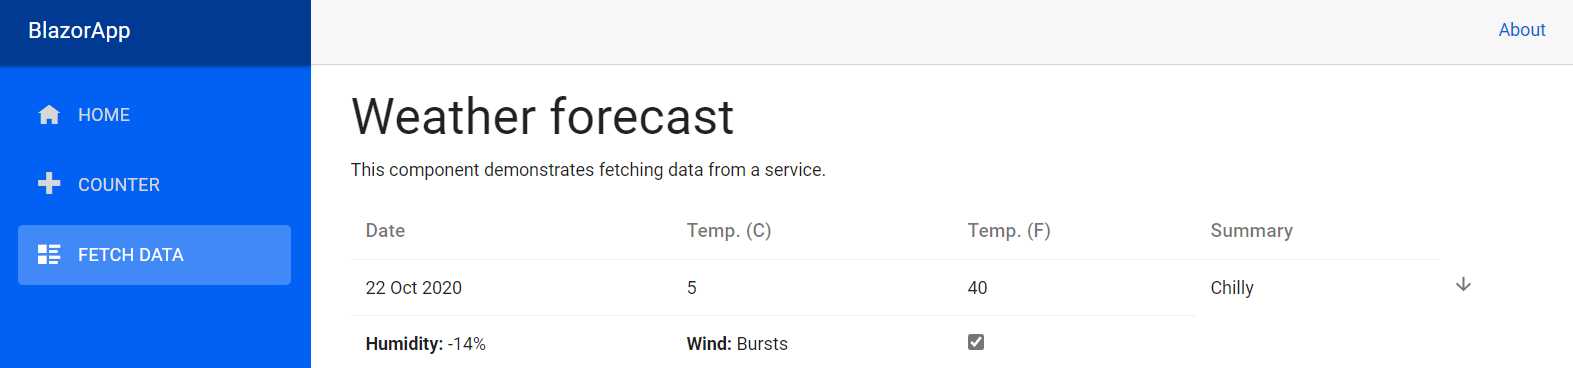
Figure 5-b: The FetchData Page Component Rendering the Table with the TableTemplate Component
Awesome—our application continues to work with its familiar look and feel.
Closing comments
We’ve reached the end of this brief but important chapter and also reached the end of this book. The book’s goal was to highlight the benefits of working with components in Blazor applications using the Razor syntax—in other words, Razor components.
Throughout the book, we explored interesting techniques on how to structure parent and child components, and how to pass information between them, and explored various ways components can enhance Blazor applications by providing reusability, modularity, and better code organization.
Blazor is a fascinating technology that Microsoft has been working on for a couple of years. It has quickly evolved into a rapid application framework that has shortened the gap between back-end and front-end development.
Two excellent resources to help you stay up to date with the latest Blazor trends are the main Blazor website and the Awesome Blazor GitHub repo, which contains a wealth of links to other useful Blazor resources.
Although this book focused on a server-side Blazor app, the concepts covered here are mostly applicable when developing Blazor WebAssembly applications, as well. If you would like to learn more about Blazor WebAssembly development, the Succinctly series has you covered with Blazor WebAssembly Succinctly by Michael Washington, which gives you in-depth information on Blazor WebAssembly development in an easy-to-comprehend way.
I invite you to continue exploring the fascinating world of Blazor app development, and if you build something cool with the concepts covered in this book, please feel free to reach out to me at [email protected]. I’d love to hear from you!
Thanks for reading this book. I hope you have enjoyed it, and until next time, go, be awesome.
- 80+ high performance Blazor components.
- Lightweight and user friendly.
- Stunning Built-in themes with customization.