
Razor Components Succinctly®

CHAPTER 1
Setup and Fundamentals
Overview
We are about to embark on a captivating journey and are almost ready to begin exploring Razor components.
Before we can jump into Razor components though, we’ll need to bootstrap a Blazor Server application, which is what this chapter is all about.
To make the most of the concepts that will be covered throughout this book, I recommend that you explore Blazor Succinctly by Michael Washington, which is an amazing resource to get you up to speed with Blazor development—as we won’t cover the fundamentals of creating full-blown Blazor applications, but instead focus mainly on Razor components.
The concepts that we will cover throughout this book are applicable for both Blazor Server applications as well as Blazor WebAssembly apps. Sounds exciting, so let’s get started.
The full source code and Visual Studio solution for the application that will be developed through the course of this book can be downloaded from this URL.
Defining a component
A Razor component is nothing more than a reusable piece of the user interface in a Blazor application.
Blazor applications are made of multiple components. Some of these components are organized into Blazor pages; however, some of them might be reusable components that can be shared among multiple pages.
Bootstrapping the app
Throughout this book, we will use and add components to a Blazor Server application, which we will bootstrap using the excellent Skclusive-UI library. The code for the bootstrapped app, which we will use as our starting point, can be found here.
To get started, make sure you have Visual Studio 2019 installed. Once Visual Studio is up and running, go to File > New > Project, and type Blazor in the search box. There, choose the Blazor App template.

Figure 1-a: The Blazor App Template
Once you have selected the Blazor App template and clicked Next, you’ll be presented with a screen where you can change the name of the project and the directory where it resides.

Figure 1-b: Configuring the Blazor Project Name and Folder
You can leave the default project name (BlazorApp1) as it is, but for the example code in this book I renamed the project to just BlazorApp. In a real-world scenario, I would recommend that you choose a more descriptive project name. Once you have chosen the project folder (Location), you can create the project.
Once you have clicked the Create button, you’ll be shown the following screen. There, you will be able to choose the Project Type.

Figure 1-c: Selecting the Blazor Server App Project Type
In my case, I’ll be choosing the Blazor Server App template. You are also free to choose Blazor WebAssembly App.
Nevertheless, if you want to follow along easily with the steps that will be described in this book, I suggest you choose the Blazor Server App template, as there are some slight differences between the templates when making changes to the bootstrapped application.
The Razor components concepts that will be described in this book apply to both Blazor Server and Blazor WebAssembly apps.
Once you have selected the template, click the Create button to finalize the creation of the application.
Once the application has been created, you will be able to see it within Solution Explorer in Visual Studio, which we can see as follows.

Figure 1-d: The Application within Solution Explorer (Visual Studio)
Next, we can execute the application by clicking the button highlighted in the following figure.

Figure 1-e: The Execute App Button in Visual Studio
Once the application executes, a browser window will open and we’ll see the following screen.

Figure 1-f: The Application Running
Awesome—we have successfully scaffolded a Blazor Server application. Now, let’s add the Skclusive-UI library.
Adding the Skclusive-UI library
To add the Skclusive-UI library, within Visual Studio, click on the Tools menu, go to the Command Line option, and then click the Developer Command Prompt item. This will open a command prompt.

Figure 1-g: The Developer Command Prompt
From the Developer Command Prompt, run the following command.
Code Listing 1-a: Adding the Skclusive-UI Library
dotnet add package Skclusive.Material.Component |
After this command has been executed, the Skclusive-UI library will be installed. Before we start to dive into the fundamentals of Razor components, let’s make some changes to the Blazor application we’ve just created.
These changes include modifying the NavBar color, adding all the references to the Skclusive-UI library, replacing Bootstrap (which comes out of the box with Blazor) with Material Design for Bootstrap, and also adding hot reload (which doesn’t come out of the box with Visual Studio 2019) for Blazor projects.
Changing the NavBar color
In Visual Studio, open Solution Explorer, and within the wwwroot folder, under the css subfolder, open the site.css file.
Within the site.css file, locate the sidebar CSS class and remove the background-image line, which is highlighted in bold in the following listing.
Code Listing 1-b: The sidebar CSS Class (Before)
.sidebar { background-image: linear-gradient(180deg, rgb(5, 39, 103) 0%, #3a0647 70%); } |
Replace the line that was removed with the following background-color line (highlighted in bold).
Code Listing 1-c: The sidebar CSS Class (After)
.sidebar { background-color: #0061f4; } |
By doing this, our application’s NavBar will have a color that will be more aligned with the Material Design look and feel.
Adding Skclusive-UI references
With Visual Studio open, go to Solution Explorer and open the Startup.cs file, which can be found in the project’s root folder.
Within the ConfigureServices method, we need to add a new service—highlighted in bold in the following code listing.
Code Listing 1-d: ConfigureServices Method (Startup.cs)
public void ConfigureServices(IServiceCollection services) { services.AddRazorPages(); services.AddServerSideBlazor(); services.AddSingleton<WeatherForecastService>(); // New service services.TryAddMaterialServices(new MaterialConfigBuilder().Build()); } |
For this to work, we need to add the using statement highlighted in bold in the following listing to the Startup.cs file.
Code Listing 1-e: Using Statements (Startup.cs)
using System; using System.Collections.Generic; using System.Linq; using System.Threading.Tasks; using Microsoft.AspNetCore.Builder; using Microsoft.AspNetCore.Components; using Microsoft.AspNetCore.Hosting; using Microsoft.AspNetCore.HttpsPolicy; using Microsoft.Extensions.Configuration; using Microsoft.Extensions.DependencyInjection; using Microsoft.Extensions.Hosting; using BlazorApp.Data; using Skclusive.Material.Component; // New |
The complete code for the updated Startup.cs file is shown in the next code listing. Notice that the namespace name is the same as the project name, so if you used a different project name when you created the application, your namespace name will not be BlazorApp.
Code Listing 1-f: Updated Startup.cs File
using System; using System.Collections.Generic; using System.Linq; using System.Threading.Tasks; using Microsoft.AspNetCore.Builder; using Microsoft.AspNetCore.Components; using Microsoft.AspNetCore.Hosting; using Microsoft.AspNetCore.HttpsPolicy; using Microsoft.Extensions.Configuration; using Microsoft.Extensions.DependencyInjection; using Microsoft.Extensions.Hosting; using BlazorApp.Data; using Skclusive.Material.Component; // New namespace BlazorApp { public class Startup { public Startup(IConfiguration configuration) { Configuration = configuration; } public IConfiguration Configuration { get; } public void ConfigureServices(IServiceCollection services) { services.AddRazorPages(); services.AddServerSideBlazor(); services.AddSingleton<WeatherForecastService>(); services.TryAddMaterialServices( new MaterialConfigBuilder().Build()); // New } public void Configure(IApplicationBuilder app, IWebHostEnvironment env) { if (env.IsDevelopment()) { app.UseDeveloperExceptionPage(); } else { app.UseExceptionHandler("/Error"); app.UseHsts(); } app.UseHttpsRedirection(); app.UseStaticFiles(); app.UseRouting(); app.UseEndpoints(endpoints => { endpoints.MapBlazorHub(); endpoints.MapFallbackToPage("/_Host"); }); } } } |
Updating App.razor
Next, we need to update the App.razor file, which can be found within the project’s root folder. So, to do that, go to Solution Explorer and open the App.razor file.
Add the following lines before the Router component, highlighted in bold as follows.
Code Listing 1-g: Updated App.razor File
<!--New--> <MaterialScripts /> <MaterialStyles /> <!--New--> <ThemeProvider Theme="@Theme.Light" /> <Router AppAssembly="@typeof(Program).Assembly"> <Found Context="routeData"> <RouteView RouteData="@routeData" DefaultLayout="@typeof(MainLayout)" /> </Found> <NotFound> <LayoutView Layout="@typeof(MainLayout)"> <p>Sorry, there's nothing at this address.</p> </LayoutView> </NotFound> </Router> |
Notice that we are configuring the app to use the light theme of the Skclusive library, which is done by setting the Theme property of the ThemeProvider component to @Theme.Light.
Updating the _Imports.razor file
To be able to make the components from the Skclusive library available to all the pages of our Blazor application, we need to add the required references to use the Skclusive library.
To do this, go to Solution Explorer and open the _Imports.razor file, which can be found in the project’s root folder.
There, add the following statements that reference the Skclusive library (highlighted in bold).
Code Listing 1-h: Updated App.razor File
@using System.Net.Http @using Microsoft.AspNetCore.Authorization @using Microsoft.AspNetCore.Components.Authorization @using Microsoft.AspNetCore.Components.Forms @using Microsoft.AspNetCore.Components.Routing @using Microsoft.AspNetCore.Components.Web @using Microsoft.JSInterop @using BlazorApp @using BlazorApp.Shared // New @using Skclusive.Core.Component @using Skclusive.Transition.Component; @using Skclusive.Script.DomHelpers @using Skclusive.Material.Core @using Skclusive.Material.Component @using Skclusive.Material.Theme @using Skclusive.Material.Form @using Skclusive.Material.Input @using Skclusive.Material.Text @using Skclusive.Material.Typography @using Skclusive.Material.Progress @using Skclusive.Material.Transition @using Skclusive.Material.Button @using Skclusive.Material.Icon @using Skclusive.Material.Paper @using Skclusive.Material.Avatar @using Skclusive.Material.Badge @using Skclusive.Material.Selection @using Skclusive.Material.Toolbar @using Skclusive.Material.AppBar @using Skclusive.Material.Divider @using Skclusive.Material.Grid @using Skclusive.Material.Table @using Skclusive.Material.Baseline @using Skclusive.Material.Card @using Skclusive.Material.Hidden @using Skclusive.Material.List @using Skclusive.Material.Modal @using Skclusive.Material.Script @using Skclusive.Material.Drawer @using Skclusive.Material.Dialog @using Skclusive.Material.Popover @using Skclusive.Material.Menu @using Skclusive.Material.Tab @using Skclusive.Material.Container |
Replacing Bootstrap with Material Design for Bootstrap
Next, let’s replace Bootstrap with Material Design for Bootstrap. This can be done by going to Solution Explorer, navigating to the Pages folder, and opening the _Host.cshtml file.
With the file open, comment out the references to the Bootstrap and Font Awesome libraries, which are highlighted in bold and green in the next code listing, add a new reference to Font Awesome that includes Material Design icons, and add a reference to the Material Design for Bootstrap library hosted on unpkg.com.
The modified head section of the _Host.cshtml file is shown in the following Code Listing.
Code Listing 1-i: Updated Head Section of _Host.cshtml
<head> <meta charset="utf-8" /> <meta name="viewport" content="width=device-width, initial-scale=1.0" /> <title>BlazorApp</title> <base href="~/" /> <!--<link rel="stylesheet" href="https://fonts.googleapis.com/css?family=Roboto:300,400,500,700&display=swap" />--> <!--<link rel="stylesheet" href="css/bootstrap/bootstrap.min.css" />-->
<link rel="stylesheet" href="https://fonts.googleapis.com/css?family=Roboto:300,400,500,700|Material+Icons"> <link rel="stylesheet" href="https://unpkg.com/[email protected]/dist/css/bootstrap-material-design.min.css" integrity="sha384-wXznGJNEXNG1NFsbm0ugrLFMQPWswR3lds2VeinahP8N0zJw9VWSopbjv2x7WCvX" crossorigin="anonymous"> <link href="css/site.css" rel="stylesheet" /> </head> |
Hot reload
When creating the UI of a Blazor Server application, it is useful to see the changes without having to rebuild the project every time.
This is known as hot reloading, and it is a feature that is widely used when building React, Vue, or Flutter applications.
Ideally, the browser should be able to refresh automatically after making a change to the UI. However, that is something that is not yet available in Visual Studio 2019 at the time of writing of this book.
Fortunately, through a workaround, it is possible to implement hot reloading using a public Blazor API, which can trigger a browser reload when it loses a SignalR connection.
So, let's add this capability to our project. To do so, go to Solution Explorer and open the _Host.cshtml file, which resides in the Pages folder.
Just before the </body> tag, add the following code.
Code Listing 1-j: Adding Hot Reload (_Host.cshtml)
<!--New--> <environment include="Development"> <script src="~/Scripts/HotReload.js"></script> </environment> |
If you read carefully, you’ll notice that the HotReload.js file doesn’t exist within the project folder structure and neither does the Scripts folder.
Going back to Solution Explorer, navigate to the wwwroot folder, and within it create a new folder called Scripts.
In this folder, let’s create a new JavaScript file called HotReload.js. This can be done by right-clicking on the Scripts folder within Solution Explorer, and then choosing the Add > New Item menu option.

Figure 1-h: Adding HotReload.js
To create the HotReload.js file, click Add. Once the file has been created, open it and add the following code.
Code Listing 1-k: HotReload.js
window.Blazor.defaultReconnectionHandler.onConnectionDown = function () { window.location.reload(); }; |
As you can see, what the preceding code does is bind an anonymous function to the onConnectionDown event. This executes the window.location.reload method, which forces the page to reload after the UI changes.
Running the app
Now that we have modified the application, let’s execute it and test the hot reload functionality. To do that, go to Visual Studio and press Ctrl+F5. This will open a browser window, which in my case looks as follows.
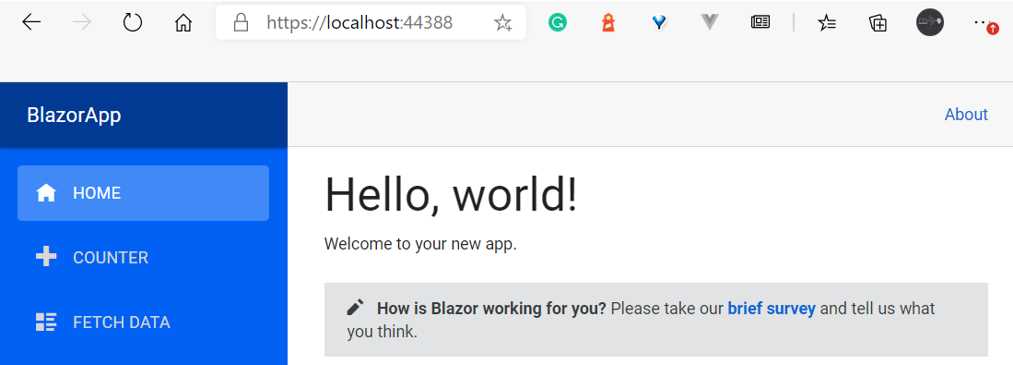
Figure 1-i: The App Running (with Hot Reload, Before Any UI Changes)
Look at that! With the changes we’ve made so far, we can see that the application has a Material Design look and feel.
Let’s make a change to the UI to see the hot reload functionality in action. Open Solution Explorer, navigate to the Pages folder, and then open the Index.razor file.
Within the h1 section, change the text from “Hello, world!” to “Hi, world!”. Then, in Visual Studio, press Ctrl+S to save the change.
If you look at the browser window, the change should be visible. In my case, it appears as follows.
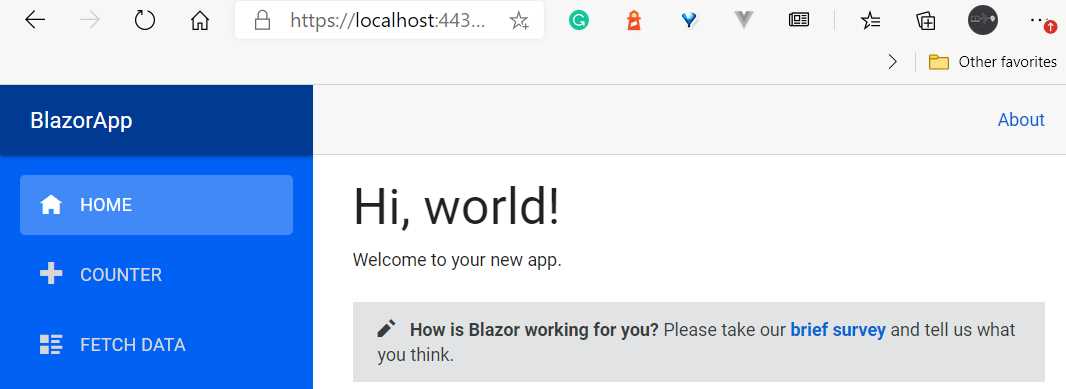
Figure 1-j: The App Running (with Hot Reload, After the Change)
Awesome! Not only do we have a nice-looking Blazor Server app, but we also have hot reloading working in Visual Studio 2019.
Summary
Alright—we’ve reached the end of this chapter and now have a basic Blazor Server application we can work with.
In the next chapter, we will start by writing a basic component and then build up our knowledge by looking at how components are rendered and how to organize components into class libraries.
After that, we will look at how code is structured within components, and how components handle events, child content, and one-way data binding.
- 80+ high performance Blazor components.
- Lightweight and user friendly.
- Stunning Built-in themes with customization.