
Prism 4 Succinctly®

CHAPTER 13
The Virtual Calculator Solution
In this chapter we're going to look at the Virtual Calculator solution with an eye toward the parts that we have yet to explain. In this chapter I'll talk about some of the reasons why things were done the way they were and talk about some of the ways that the solution could be refractored.
The Virtual Calculator Solution:
The first step in building a Prism 4 solution is to create the solution. I prefer to create a solution only. This allows me to use the naming conventions for my projects that conform to my standards.
If a project is selected (such as a WPF Application), both the solution and WPF project is created. The Project name is the same as the solution name, for instance, PRISM4.PRISM4. Dot notation is used to separate the solution name from the project name. I prefer to name my solutions and projects in the following manner.
- PRISM4.MAIN
- PRISM4.INFRASTRUCTURE
- etc.
I feel that using this type of notation better describes each project in the solution.
Tip: The techniques and layout that I use in this book I have found work best for me. I suggest that if you are just starting to work with Prism 4 that you start out by using my techniques and layout. As you become more proficient with Prism 4, you can setup your solutions to your taste.
The Main project is the project where WPF and Prism 4 solutions start. The Main project is a WPF Application project. This project is where the composition root and bootstrapper reside. It is also where the shell form for the solution is located.
Other necessary classes and files also reside in this project. Region adapters are typically located in the Main project and images and other files such as the App.config file are located in this project.
Before we can use Prism 4 with the project, we'll need to load the Prism 4 library. When we downloaded Prism 4 the required DLLs were included in the files.
Tip: When working with Prism 4 solutions I move all of the needed DLL files (Prism 4 and other necessary files) into a central folder. This allows me to quickly find the needed DLLs. The Prism 4 WPF DLLs are located in the \Bin\Desktop folder of the Prism 4 download.
You also have the option to automatically load Prism 4 DLL files into your Visual Studio solutions by using the RegisterPrismBinaries tool. This tool is located in the downloaded Prism 4 folder.
The following selected DLL files need to be added to the project.
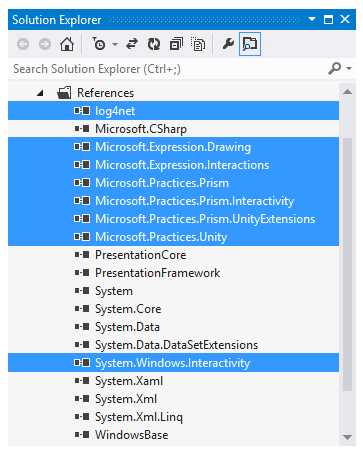
- The Main project DLL References
The highlighted references are the added DLL files.
Although we won't talk about using the Log4Net DLL, this is a frequently used library in my Prism 4 solutions so it was added also. Prism 4 has a default logging mechanism that logs all activity to the Output Console. You don't have to really do anything to get this functionally in Prism 4 solutions. You also have the option of using a third party logger and that is where the Log4Net logger comes into the picture.
The Microsoft.Expression.Drawing DLL is used to draw Vector graphics. This and all of the Microsoft.Expression DLLs are from Expression Blend.
We need the Microsoft.Expression Interactions and Interactivity libraries to work with triggers and behaviors in our solutions.
The Microsoft.Practices.Prism DLL is the main Prism4 library. It contains classes that allow for working with Event Aggregation, Regions, Modules, Navigation and any other Prism 4 features.
The Microsoft.Practices.Unity and UnityExtensions DLLs are of course used with the Unity DI container. This is the DI container that we will be working with in this solution.There are libraries for the Managed Extensibility Framework (MEF) DI container also, but it is not necessary to add the DLL because we won't use MEF.
These are the minimum libraries that is needed to work with all of the features of Prism 4. There are other libraries such as Service Location but they are not necessary to use the Prism 4 framework.
Setting Up the Main Project Folder Structure:
Now that we have the necessary project references our next step is to setup the project folders. There are any number of ways that this can be done, I have found that the following folder structure works best for me.
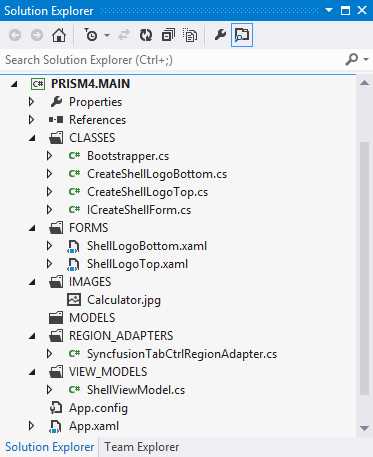
- The Main Project Folder Layout
Notice that I use all upper case for the folder names. This differentiates folders that I have added from Visual Studio folders.
For now think of the Prism 4 shell form as the main display that the solution will use. This Windows form is where we will compose the views that make up the solution. We talked about the Virtual Calculator shell forms in chapter 7.
Unlike regular WPF forms, shell forms - as a rule - don't contain a lot of content at design time. In fact, shell forms can be designed without any content initially. In the Virtual Calculator solution we dynamically added views to the shell form from modules at run time. We went into detail about this process in chapter 9 when we talked about Prism 4 modules.
The App.xaml file is the normal starting point (Composition Root) for WPF solutions. The App.xaml file uses the StartupUri tag to point to the Windows form (MainWindow.xaml in this case) in the Main project. As we progressed with setting up our Prism 4 WPF solution, we changed this file in order to have the project conform with Prism 4. In Listing 60, the bold StartupUri property was removed.
Listing 60: The App.xaml File Markup.
<Application x:Class="PRISM_4.MAIN.App"
xmlns="http://schemas.microsoft.com/winfx/2006/xaml/presentation" xmlns:x="http://schemas.microsoft.com/winfx/2006/xaml"
StartupUri="MainWindow.xaml">
<Application.Resources>
</Application.Resources>
</Application> |
While the App.xaml file works well for simple WPF solutions, Prism 4 solutions are started by calling a Bootstrapper class. The simplest way to do this is to remove the StartupUri from the App.xaml file and call the Bootstrapper class from the App.xaml.cs file. This file serves as a code behind file for the App.xaml file and can replace it as the startup file for WPF solutions. We talked about this file when we built the Hello Prism 4 solution in chapter 3.
The App.config file is the configuration file for the Main project and is also used by all of the other projects in the solution. This file is used to provide late binding to the solution and can also be used to create appenders for third party loggers used with Prism 4. If Microsoft Entity Framework is used, connection strings and in fact many other string based items can be added to this file.
The App.config file is used in the Virtual Calculator solution to load modules at solution startup. Each of the three modules in the solution have XAML markup that defines the module and is used to load the module. Listing 61 shows an example of the App.config file for the Virtual Calculator solution.
Listing 61: The Virtual Calculator App.config File Markup.
<?xml version="1.0" encoding="utf-8" ?> <configuration> <configSections> <section name="modules" type= "Microsoft.Practices.Prism.Modularity.ModulesConfigurationSection, Microsoft.Practices.Prism"/> </configSections> <modules> <module assemblyFile="MODULES/PRISM4.APPLICATION_LOGO_MODULE.dll"
moduleType= "PRISM4.APPLICATION_LOGO_MODULE.APPLICATION_LOGO_MODULE, PRISM4.APPLICATION_LOGO_MODULE, Version=1.0.0.0, Culture=neutral, PublicKeyToken=null"
moduleName="APPLICATION_LOGO_MODULE"
startupLoaded="True"> </module> <module assemblyFile="MODULES/PRISM4.COMPANY_LOGO_MODULE.dll"
moduleType= "PRISM4.COMPANY_LOGO_MODULE.COMPANY_LOGO_MODULE, PRISM4.COMPANY_LOGO_MODULE, Version=1.0.0.0, Culture=neutral, PublicKeyToken=null"
moduleName="COMPANY_LOGO_MODULE"
startupLoaded="True"> </module> <module assemblyFile="MODULES/PRISM4.MATH_MODULE.dll"
moduleType= "PRISM4.MATH_MODULE.MATH_MODULE, PRISM4.MATH_MODULE, Version=1.0.0.0, Culture=neutral, PublicKeyToken=null"
moduleName="MATH_MODULE"
startupLoaded="True"> </module> </modules> <startup> <supportedRuntime version="v4.0" sku=".NETFramework,Version=v4.5" /> </startup> </configuration> |
First a module section is created in the App.config file's configSections section. The modules section is where all of the Prism 4 module markup for the solution will reside. The Virtual Calculator solution has three modules.
- The Company Logo Module
- The Application Logo Module
- The Math Module
Each of the three modules have markup in the App.config file that identifies the module. The markup is used to load each module when the solution is started. Let's take a look at one of the module loaders.
Listing 62: The App.config File Math Module Markup.
<module assemblyFile="MODULES/PRISM4.MATH_MODULE.dll"
moduleType= "PRISM4.MATH_MODULE.MATH_MODULE, PRISM4.MATH_MODULE, Version=1.0.0.0, Culture=neutral, PublicKeyToken=null"
moduleName="MATH_MODULE"
startupLoaded="True"> </module> |
The first property that we encounter after the module tag, is the assemblyFile property. This property points to the path and filename of the module's DLL file. The Virtual Calculator solution stores all of its module DLL files in the MODULES folder which is located in the debug or release folder of the solution.
The moduleType property is the namespace and name of the module class that is associated with the module project. The solution name and project name is second part of this property. The version, culture and a null PublicKeyToken are also added to this property.
The moduleName property is the name of the module class.
The startupLoaded property is a Boolean type that will load the module at solution startup if true and will not load the module if set false.
Each module in the solution uses the same markup with its associated module data.
Note: Keep in mind that the App.config file is not a secure file! Don't save data that could compromise securety -such as passwords - in this file.
The Bootstrapper CreateModuleCatalog Method:
Even though each module is added to the App.config file, this is not enough to load that Prism 4 modules. The bootstrapper class needs to know how modules will be loaded. This is done with the bootstrapper CreateModuleCatalog method. Listing 63 shows an example of this method.
Listing 63: The Bootstrapper CreateModuleCatalog Method.
protected override IModuleCatalog CreateModuleCatalog() { ConfigurationModuleCatalog configurationCatalog = new ConfigurationModuleCatalog(); return configurationCatalog; } |
First the configurationModuleCatalog is created this type of catalog defaults to the App.config file in the startup project. It is then returned. This is all that is needed to configure the solution for App.config file loading.
This method of loading modules works well for solutions with a small number of modules. As the number of modules increase this kind of module loading can become error prone. Working with App.config files (or XAML files for that matter) and large numbers of modules are problematic because these files are case sensitive and therefore brittle. If it is anticipated that large numbers of modules will be used in a solution using directory scan for module loading is suggested.
There is one more issue that needs to be addressed before we leave the main project. How do we insure that the DLLs that are generated for modules are moved to the MODULES folder?
Each time that we build the solution the changes that were added are appended to an updated DLL file for each project. These updated files need to be synchronized with the DLL files in the MODULES folder that Prism 4 uses. There is no reason why these files can't be manually copied each time that a build is completed, but using this method to update the DLL files would be error prone and time consuming.
An automatic method of updating the DLL files can be implemented by using each module project's post build event.
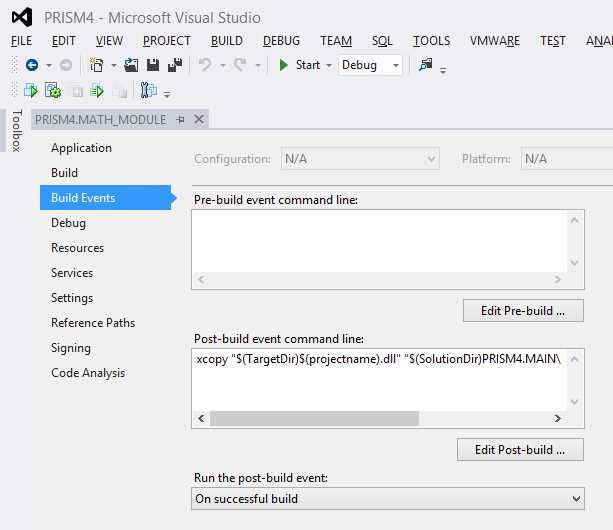
- The Post Build Event for the Math Module project
Listing 64 shows an example of the command line that I use to update the DLL files.
Listing 64: Using the XCopy command to Automatically Synchronize Module DLL Files.
xcopy "$(TargetDir)$(projectname).dll" "$(SolutionDir)PRISM4.MAIN\bin\$(ConfigurationName)\MODULES\" /Y |
This command line simply copies the DLL file that is located in the module project to the MODULES folder that is located in the debug or release folder of the main (Startup) project. The ConfigurationName place holder copies the DLL file to the correct folder (debug or release), depending on the solution's configuration setting.
Each time that a Build Solution or Rebuild Solution is executed in Visual Studio, the post build event copies the project's updated DLL file to the MODULES folder. It is important to use the post build event because this event is triggered after the DLL file has been updated.
The Infrastructure project can be thought of as a global project that can be safely referenced by all other projects in the solution. This type of project is a Class Library project.
One of Prism 4's main objectives is to promote loose coupling by creating an environment where modules and the main project are autonomous entities that are not tightly coupled to one another. One way that this is achieved is by eliminating references between projects.
Why is the Infrastructure Project Needed?
In the case of the Infrastructure project, entities that need to be accessed by multiple modules and other projects in the solution can use this project as a central location for services and other entities. Global services, data services, referenced custom DLL files and any other entity that may need to be accessed across many projects in the solution can use the Infrastructure project as a source for these entities.
Loading Prism 4 DLL Files in the Infrastructure Project:
The Infrastructure project should have the same Prism 4 references loaded as the Main project. This will insure that the needed libraries are available for Event Aggregation, Commanding and any other Prism 4 functionally that needs to be used by this project.
Loading Other DLL Files in the Infrastructure Project:
Because the Infrastructure project will serve as a central warehouse for global entities, there is no set group of libraries that need to be added to this project. For instance if Entity framework is used in your solution you'll want to load the System.Data.Entity library. If on the other hand you use ADO .NET you'll want the System.Data.SqlClient library. So, the basic rule with the Infrastructure project references is to load whatever is needed.
Tip: As I stated earlier, how you layout this project should reflect what works best for you. I use Microsoft Entity Framework - Code First with the Fluent API and my folder layout reflects this organizational structure. The bottom line is to use what works best for you.
The Infrastructure Project Folder Structure:
Figure 15 is an example of the initial folder layout that I use for my Prism 4 Infrastructure projects.
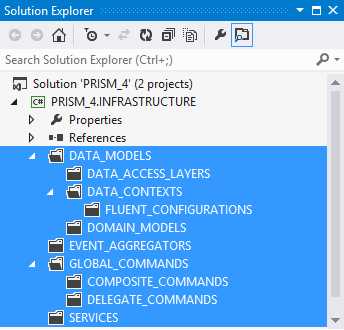
- The Infrastructure Project Folder Structure
The highlighted items are the added folders.
The DATA_MODELS folder contains all of the folders and entities that are needed to use Microsoft Entity Framework - Code First. I group my data access layers, Data contexts and domain models into the root DATA_MODELS folder. If it becomes necessary to split the different folders into separate projects, I can just move the folder and modify the code. Notice that the FLUENT_CONFIGURATIONS folder is nested in the DATA_CONTEXTS folder. I prefer to use separate fluent classes for each data context and I find that this is a good manner in which to organize the classes. Relational databases are not used in the Virtual Calculator solution, so these folders are empty.
The EVENT_AGGREGATORS folder is used to hold event aggregator classes that must be global to all modules in the solution. This is one way to implement module to module communications in a loosely coupled manner. We talked about Prism 4 event aggregation in chapter 11.
The GLOBAL_COMMANDS folder is used for two types of commands. Composite commands and Global Delegate commands. I tend to use delegate commands locally in module View Models but they can also be used for module to module communication when created globally in the Infrastructure project. I try to use event aggregation exclusively for module to module communications but find that global commands make sense in some cases. We talked about local delegate commands in chapter 10.
The COMPOSITE_COMMANDS folder contains all of the solutions composite commands. Composite commands are a single command that is used to trigger any number of other commands. This type of command can come in handy when you need to (for instance), save data across more than one module. We won't be using composite commands in this book, but there is a wealth of information about it on the internet and in the Prism 4 manual.
The SERVICES folder contains all of the global services that are used in the solution. This folder is used to supply each project with entities that may be used by any module or project in the solution.
Prism 4 module projects are the most prevalent type of project in Prism 4 solutions. These are the projects that supply the views and provide the business rules for the solution. They are also where the Model View - View Model (MVVM) design pattern is implemented. Module projects are the entities that provide loose coupling and separation of concerns in Prism 4 projects.
These are the projects that define the solution's look and actions. They populate the shell form with the user interfaces (Views) that the users of the solution interact with and provide an infrastructure for view navigation. In a nutshell, a Prism 4 solution without at least one module doesn't make a lot of sense.
Prism 4 Module projects are Class Library projects. So use the Class Library project selection in the Add New Project dialog when adding modules.
Prism 4 modules are designed to be standalone entities. Although modules can set dependencies between one another, this is limited to the order in which the modules are created. Tightly bound dependencies (references) are discouraged.
A module's job is to define a discrete part of a Prism 4 solution. The module can include a view or views (The User Interface (UI)), validation, data access and business rules (though the model) coordination between views and models is supplied though the View Model. The module can also allow the user to take actions (Commands, Triggers, Behaviors and Event Aggregation to name a few).
So modules are used to define an self contained but complete part of a Prism 4 solution. Internally, separation of concerns are enforced with the use of the MVVM design pattern.
Loading Prism 4 DLL Files into each Module Project:
The Module project should have the same Prism 4 references loaded as the Main project. This will insure that the needed libraries are available for the IModule interface, Regions and any other Prism 4 functionally that needs to be used by the project.
Loading Other DLL Files in the Module Project:
The System.Xaml and WindowsBase classes should be added to all Prism 4 Module projects. Add other classes as needed.
The Module Project Folder Structure:
Figure 16 is an example of the initial folder layout that I use for my Prism 4 Module projects.
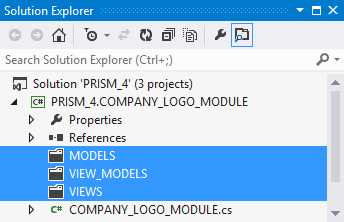
- The Module Project Folder Structure
The highlighted items are the added folders.
The MODELS folder is used for business rule and data access classes. Although the VIEW_MODELS classes are aware of the classes in this folder, the VIEWS user controls have no knowledge of this folder's classes. This insures that the separation of concerns between the View and Model are enforced.
The VIEW_MODELS folder is used as an intermediary between Views and Models. The view model has knowledge of the model classes but no knowledge of any views. The view model classes are where most of the work is done in each module. Its job is to expose functionally and data to the view even though it has no knowledge of the view. It also is responsible for calling methods in the model that enforce business rules and gathers data from remote data stores.
The VIEWS folder is where user interfaces reside. These user interfaces can be User Controls, Data Templates or Windows forms. XAML is used to build and format each view. Views use bindings to access functionally and data from the View Model by using the view's data context. We talked about the data context in chapter 6. The View has knowledge of the View Model though the data context but has no knowledge of the module's model.
The module class is what makes a project a Prism 4 module. This class is responsible for initialization of each module.
The module class implements the IModule interface, this interface is what is used to convert the project into a Prism 4 module. The IModule interface exposes a single method, Initialize. This method is used by the module to setup its initial environment. This usually entails loading views contained in the module to regions in the shell form or to regions in other views.
The Company Logo Module Project:
The company logo module project is responsible for loading the animated company logo graphic into the shell form.
The graphic was created with Microsoft Expression Design. The animations were added using Expression Blend. Expression Design and Expression Blend are components of the Microsoft Expression Studio Ultimate suite. Expression Design is used in the same manner as Adobe Illustrator, it is a vector based graphic design tool. Expression Design can also be used with photos. Expression Blend on the other hand is a XAML code generator. Using these two tools in combination allows for the fast creation of powerful graphic and XAML constructs.
One interesting aspect of the company logo module is that instead of using a local user control, I opted to use a DLL file for the graphic and animation content. The reason for this is to allow the company logo DLL to be used across different solutions. Using the DLL file in this manner allows for a consistent look and layout across any number of applications that the company creates.
One important fact to remember, is if a DLL file is used in a module that renders a view, you must also reference that file in the Main project. Failure to do so will result in an exception.
The application logo project is responsible for loading the application logo into the shell form. This module uses a local user control to display the application logo. A local user control was used because the application logo is specific to each application and does not need to be shared.
Tip: It is not really necessary to create two modules, (one for each logo view) in the solution. I could have just as easily created a Logo Module project and loaded each module (Company Logo and Application Logo), from the single module. I added the two modules in the demostration solution to show more examples of module loading in Prism 4 solutions.
Another interesting fact about the two logo modules is that there is no View Model or Model code in either project. Each view has no need for the other classes because they use XAML exclusively, even the automation code in the company logo view is XAML.
The math module project is where most of the work is done in the solution. This project is where the two math views (AddTwoView and SubtractView) are located. The views not only define their look and layout, but also contain the behaviors and states that are used to update the UI as user interaction progresses during the solution's lifetime.
The view model exposes an interface that allows the view to set the different states and provides properties that make the data entered into the view available to the model for processing.
I use the model classes as intermediaries between the services in the infrastructure project and the view model and views. I find that using intermediate classes allow me to better use design patterns such as decorator to add functionally to my existing classes without violating design principles such as the open / closed principle.
The unit test project uses NUnit to test most of the service classes in the solution. I am not going to go into detail about this project because testing is not within the purview of this book. Feel free to look at my tests to get a feel of how you may want to setup your test projects.
- 1800+ high-performance UI components.
- Includes popular controls such as Grid, Chart, Scheduler, and more.
- 24x5 unlimited support by developers.