
PowerShell Succinctly®

CHAPTER 8
Microsoft Office Interop
Microsoft named its set of interaction capabilities with Microsoft Office as Primary Interop Assemblies (PIAs), a package that contains all the major assemblies of the various Microsoft Office Suite products. These packages allow you to interact with objects created by the Office products. For example, if you create an Excel file with two sheets, through the Interop assemblies you can get these objects and iterating with them. To use it, you just need to install the PIAs assemblies and have Microsoft Office installed on your computer.
Note: Download PIAs assemblies here.
A scenario that can portray the advantages of using Interop is simply trying to answer this question: "How many sheets of your Excel file contain links to SQL databases?"
It is possible to manually answer this question just using your Excel files, but if you have two hundred Excel files, how long do you think that will take? I'll show you how to quickly make a PowerShell script that runs through all these files and returns a CSV file with all this information processed and available in a tabular list. Answering these kinds of questions can be important in analysis projects in which you need to identify dependencies between artifacts of your project files.
Although my exercise will be about Excel files (workbooks and sheets), PIAs allow you to work with almost all Office products. The following is a complete list of allowed products:
- Microsoft Access
- Microsoft Excel
- Microsoft InfoPath
- Microsoft Outlook
- Microsoft PowerPoint
- Microsoft Project
- Microsoft Publisher
- Microsoft SharePoint Designer
- Microsoft Visio
- Microsoft Word
Using PIAs Assemblies
Using any PIAs assembly always has the same algorithm. You start by loading the assembly to your script and then you create the primary Office file type object and use it as you wish.
To load an assembly in PowerShell, you can use the same method often used in .NET projects, which is LoadWithPartionName from the Reflection.Assembly namespace.
[Reflection.Assembly]::LoadWithPartialname("AssemblyName") |
To load an Office assembly, you have the following options:
#Load Microsoft Office Excel Assembly [Reflection.Assembly]::LoadWithPartialname("Microsoft.Office.Interop.Excel") #Load Microsoft Office Access Assembly [Reflection.Assembly]::LoadWithPartialname("Microsoft.Office.Interop.Access") #Load Microsoft Office InfoPath Assembly [Reflection.Assembly]::LoadWithPartialname("Microsoft.Office.Interop.InfoPath") #Load Microsoft Office OneNote Assembly [Reflection.Assembly]::LoadWithPartialname("Microsoft.Office.Interop.OneNote") #Load Microsoft Office Outlook Assembly [Reflection.Assembly]::LoadWithPartialname("Microsoft.Office.Interop.Outlook") #Load Microsoft Office PowerPoint Assembly [Reflection.Assembly]::LoadWithPartialname("Microsoft.Office.Interop.PowerPoint") #Load Microsoft Office Publisher Assembly [Reflection.Assembly]::LoadWithPartialname("Microsoft.Office.Interop.Publisher") #Load Microsoft Office Visio Assembly [Reflection.Assembly]::LoadWithPartialname("Microsoft.Office.Interop.Visio") #Load Microsoft Office Word Assembly [Reflection.Assembly]::LoadWithPartialname("Microsoft.Office.Interop.Word") |
Using PIAs is similar from assembly to assembly, so I will only show you how to use the Excel assembly for simple scenarios. You can use Word, Access, or any other as a similar script structure.
Create an Instance of an Excel Application
To create an instance of an Excel application, you should use the ApplicationClass within the PIAs Excel assembly. Note that PIAs always use ApplicationClass in every assembly to instantiate a new application, in this case Excel. This is like opening Excel through an executable file; PowerShell will create that Excel process as well.
Tip: Because PowerShell creates a new Excel process and the only way to close it is killing the process, its a good idea to kill every Excel process before creating the Excel application; to do so, run the following command: Get-Process | where{$_.ProcessName -like "*EXCEL*"} | kill.
$excel = new-object Microsoft.Office.Interop.Excel.ApplicationClass |
#TIP: Kill every Excel application before creating a new one. Get-Process | where{$_.ProcessName -like "*EXCEL*"} | kill $excel = new-object Microsoft.Office.Interop.Excel.ApplicationClass |
Retrieve Data from Excel File
After loading the assembly and creating your Excel application object, you are ready to start pulling data out of it. For this example, we will use an Excel 2013 worksheet with a table in it and we will try to get that data.
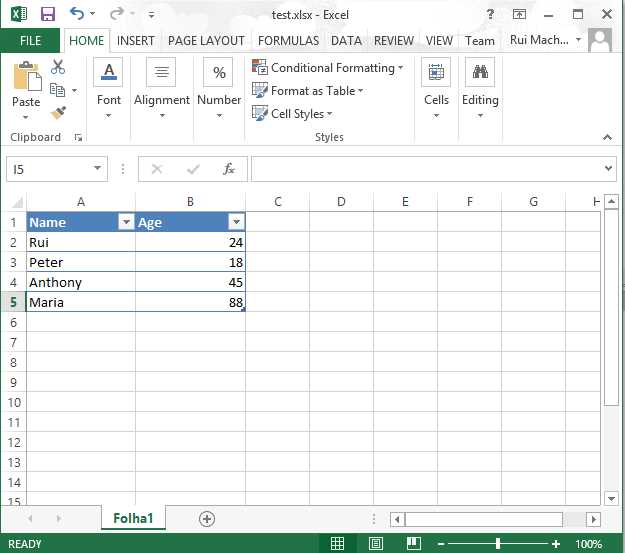
Excel File
To build our script, we need all previous knowledge about PIAs assemblies, as we will initialize a new Excel application, load that specific file shown in the previous image, and query the sheet for its table data. The following example is just a way of doing a retrieval of an Excel workbook; the main goal is to learn some PIAs artifacts usage.
#Load Excel PIAs assembly. [Reflection.Assembly]::LoadWithPartialname("Microsoft.Office.Interop.Excel")
#Kill all Excel processes. Get-Process | where{$_.ProcessName -like "*EXCEL*"} | kill
#Instantiate a new Excel application $excel = new-object Microsoft.Office.Interop.Excel.ApplicationClass
#Path to our Excel file. $filePath="c:\temp\test.xlsx" #Instatiate a new workbook and then its path. $book = $excel.Workbooks.Open("$filePath") #Get the sheet - In this case we just have one. $sheet = $book.Worksheets.Item(1) #Get all list objects. $lObjects = $sheet.ListObjects #Get the range of data. $range = $lObjects.Item(1).Range #Print all cell data. $lObjects.Item(1).Range.Rows | %{ $row = $_.Row $lObjects.Item(1).Range.Columns | % { $col = $_.Column
#Cell item write $range.Item($row,$col).Value2 } } |
The result should be displayed as in Figure 51.
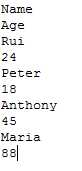
Result of an Excel Data Retrieval
Exercise: How Many SQL Server Connections are in That Excel File?
In this exercise, I will answer that first challenge I mentioned in the beginning of this chapter, how to identify how many SQL Server connections in an Excel workbook. I will retrieve the number of connections; however, you can increase the complexity of this exercise and also retrieve the connection string of that SQL Server connection and even the range in which it is used.
#Load Excel PIAs Assembly [Reflection.Assembly]::LoadWithPartialname("Microsoft.Office.Interop.Excel")
#Kill all Excel processes. Get-Process | where{$_.ProcessName -like "*EXCEL*"} | kill
#Instantiate a new Excel application. $excel = new-object Microsoft.Office.Interop.Excel.ApplicationClass
#Path to our Excel file. $filePath="c:\temp\test.xlsx" #Instatiate a new workbook and then its path. $book = $excel.Workbooks.Open("$filePath")
#Get all book connections. $bookConnections = $book.Connections #Get total number of connections. $totalConnections = $bookConnections.Count #Initialize the counter of SQL connections. $conSql = 0 #Foreach connection check if it is SQL Server. $bookConnections | %{ if($_.Type -eq 1){ $conn = $_.OLEDBConnection.Connection $conn = $conn.ToString() if($conn -like "*SQL*"){ $conSql++ } } } #Build an array with file name and number of connections. $infoToExport = $book | select @{n="FileName";e={$_.FullName};}, @{n="NumberConnectionsSQL";e={$conSql};} #Close the book. $book.Close($false, [System.Type]::Missing, [System.Type]::Missing)
#Show information as a grid view. $infoToExport | Out-GridView
|
As a result you should now see a grid with your result.
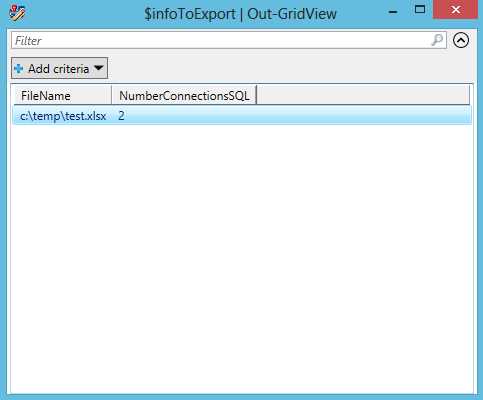
Result Grid
- Shared infrastructure for efficient resource management
- Self-service analytics for easy data exploration
- Enhanced security with row-level security and SSO
- Customizable dashboards to meet your specific needs