
PowerShell Succinctly®

CHAPTER 1
Basics
PowerShell Version
PowerShell is now in version 4.0 and this book has been written in version 3.0. This means that some features will not be available for you if you are using a version under 3.0. To check your PowerShell version, run the command Get-Host and then look for the version property. If you have any version under 3.0, please download it in the this link, which will install the Windows Management Framework 3.0 in which PowerShell is included (click here). Be careful, as it is only available for Windows 7 or higher, and for Windows Server 2008 or higher.
PowerShell Interactive Shell
The Shell and Existing Tools
To start using the interactive shell of PowerShell, you just need to run PowerShell.exe instead of the more commonly used shell cmd.exe. If you have a 64-bit system, you will have two versions of PowerShell to choose from, a 32-bit version and a 64-bit version.

Interactive Shell
Once you open this interactive shell, you can start typing PowerShell commands (cmdlets) and getting results. A nice feature of this PowerShell command prompt is that it is compatible with the former DOS commands and UNIX commands. This might be useful if you are accustomed to navigating between directories and files with this kind of syntax.
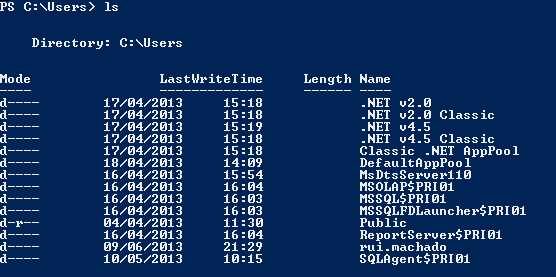
Executing Scripts with UNIX and DOS syntax
This interactive shell is all you need to run simple commands; however, when it comes to automating tasks and managing scripts, this shell can become insufficient and it is useful to start using a script editor. You can use Notepad if you like, but there are several tools that provide syntax highlighting and intelligent editing features along with script debugging and an integrated shell for compiling. Along with your interactive shell, you also have, out of the box, a nice script editor from Microsoft, PowerShell ISE, which provides better script management and a full list of the available PowerShell commands. This tool is integrated with Windows and it’s applied for PowerShell versions 2.0, 3.0, and 4.0.
To open the PowerShell ISE tool, click Start, select Run, and then execute the following command: “powershell_ise.exe”. This will open a new PowerShell ISE instance, which looks like the following figure:
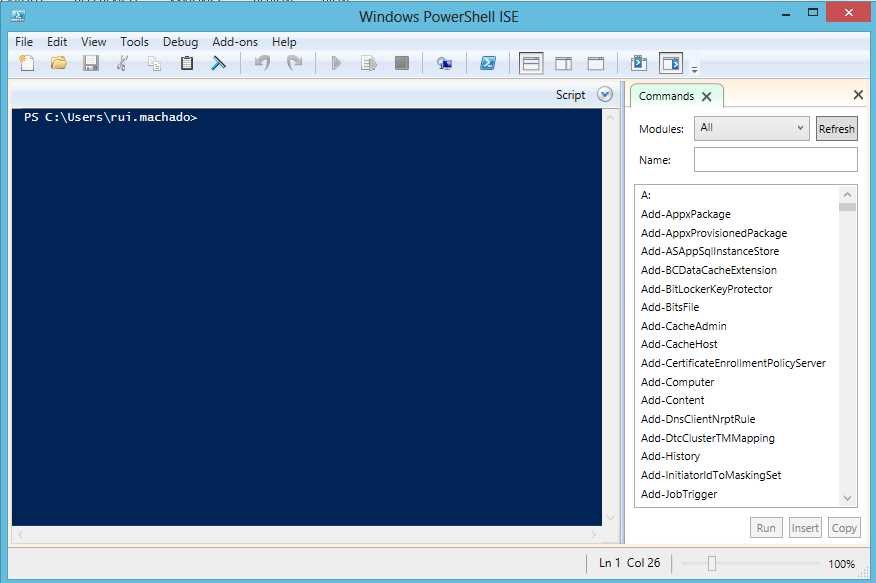
PowerShell ISE
Although it’s better that the simple interactive shell, PowerShell ISE might not be enough for you, as it still uses the command prompt to write scripts. It also doesn’t have different colors for methods, attributes, and commands, what I call Color Sense, or more often described by many IDEs as syntax highlighting. To optimize your productivity with PowerShell even more, you might think about using PowerGui, a free script editor often used for development.

PowerGui script editor
This script editor provides you with a list of variables in use and its last value for debugging, a PowerShell console for you to check the result of your commands, and many more features you can try later. If you are a daily developer of PowerShell, I recommend you use a script editor like this one. You can download PowerGui here.
Execution Policies
PowerShell has a very unique security protocol, referred to as the execution policy, which allows you to define the type of scripts that can run on your machine or workgroup. As I mentioned previously, choosing one of the five available execution policies will determine if the execution of all scripts is allowed, only execution of scripts typed in the interactive shell is allowed, or if permission to execute scripts is based on a rule. If you want to run scripts in an external script editor like PowerGui, you must change your execution policy or you will receive the error shown in Figure 5.

Error running scripts without permission
By default, PowerShell will only allow you to execute scripts through its interactive shell, which prevents external script execution. However, by setting the maximum level of security, you can easily set other levels of security. The full list of execution policies are shown in the following table.
Table 1: Execution Policies
Execution Policy | Level of Security |
Restricted | Will only allow interactive shell execution. |
AllSigned | Runs only scripts with a digital signature. Executing a script for the first time will prompt a trust publisher message. |
RemoteSigned | All scripts from the Internet must be signed. |
Unrestricted | Allows any script execution. Scripts from the Internet must be trusted. |
ByPass | Every script execution must be validated by the user. |
To change your execution policy, you must use the interactive shell. To open the interactive shell, click Start and select Accessories. Run Windows PowerShell and make sure you start it with elevated privileges (Run as Administrator). Type the command to change it to the one you want. To do so, right-click the Windows PowerShell icon in the Accessories tab and then click Run as Administrator.
Set-ExecutionPolicy -ExecutionPolicy RemoteSigned |

Change Execution Policy
To see the execution policy currently activated in your system, you can use the Get-ExecutionPolicy command. You should now see RemoteSigned as your current execution policy.
How to Run a Program
PowerShell allows you to start a program from its own shell, so that you won´t waste all your existing executables like Perl scripts or a simple batch file. To start that program you want, type in PowerShell its name followed by any arguments you might need or want. If the program name has spaces, enclose its name in quotation marks after you type an ampersand and followed by its arguments. An example of this is shown in the following code sample.
$args = ".\My File.txt" & 'C:\Windows\System32\notepad.exe' $args |
Executing this command on my computer will open a text file I have already created, as you can see in the following figure.
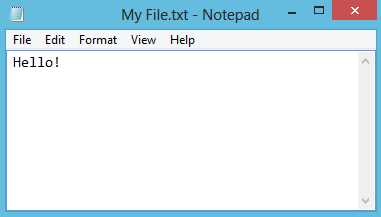
Run a Program
How to Run a Script
If the execution policy you have set up allows you to execute external scripts, type the name of your script in the command prompt, just like any cmdlet.
.\RUN_PROGRAM.ps1 |
If your script has parameters, you can also pass them directly from the command prompt.
.\RUN_PROGRAM.ps1 -argmts "c:\temp\File.txt" |
How to Run Commands
Running commands is as easy as typing them in the interactive shell command prompt or any other script editor and the result will be shown to the user. An example of this scenario can be invoking the command to retrieve all script execution history.
Get-History |
Clean the shell |
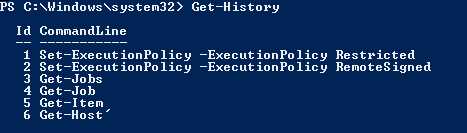
Run a Command (Cmdlet)
Get Help with Existing Commands
To get information about a specific command, you can use the Get-Help command, followed by the command name.
Get-Help -Name Get-History |
When you run this command for the first time, PowerShell might ask you to download the most recent help library, as shown in Figure 9, to provide you with the newest information about its commands.

Update Help
Read and Write from the Interactive Shell
To write a value to the shell, you can use the Write-Host command. This not only writes a value to the console, but also allows you to customize its output, such as the color of text by using the ForegroundColor parameter, or the background color by using the BackgroundColor parameter.
Write-Host -ForegroundColor White "SyncFusion" -BackgroundColor Black |
Invoking the previous command will result in the following display in the interactive shell.
![]()
Write-Output Customization
Tip: When PowerShell finds a string that is not captured by a context, it will print its value. If you want to write a variable, just write its name in the console.

To read a value from the interactive shell, you can use the Read-Host, which reads a line of input from the console.
$value = Read-Host |
PowerShell Snap-Ins
A PowerShell snap-in is a way of extending the commands available in the shell with your own or some downloaded from the Internet. These snap-ins originated from a C# block of code, an implementation of a PSSnapin class to be more precise, compiled and imported to a script with its DLL (dynamic-link library). This might be useful if you have a set of methods in an already finished helper class that you want to reuse to save time developing those methods again. You can´t use this DLL directly, as you need to add some metadata to your methods so that PowerShell can identify a cmdlet, but it’s a huge advantage for developers.
Add a Snap-In to a Script
To add a snap-in to your script, you can invoke the following code:
Add-PSSnapin -Name "MySnap-in" |
You will only need to add the snap-in to one of your scripts to use it in your session; while your PowerShell Scripts are running, that snap-in is available.
Note: You can only add to your session registered snap-ins. To check the full list of registered snap-ins, run "Get-PSSnapin –registered". If you have downloaded or created a new snap-in, you can register it with the InstallUtil tool included with the Microsoft .NET Framework.
To register a snap-in, launch the PowerShell interactive shell with elevated privileges and do the following:
- Change the directory to C:\Windows\Microsoft.NET\Framework\v4.0.30319.
- Run InstallUtil.exe “MySnapin.dll”.
![]()
Register a New Snap-In
Add a Script Reference to Another Script
Referencing scripts is a useful task to reuse existent code blocks like your own functions, which will allow you to save time making the same scripts several times. This way you will only develop once and can use it several times. To add a script reference to another script, you just need to use the command Import-Module.
Import-Module "MyOtherScript.ps1" |
Note: All of these commands have optional parameters to fulfill special needs. This way you can always use the command Get-Help “Command Name“ to see the full parameter list.
Using .NET classes
To use a .NET class in PowerShell, you just need to identify the namespace between brackets and then use a double colon to call the method you want. Parameters are passed the same way in .NET. For example, you can see what today’s date and time are by invoking [DateTime]::Now.
Pipelines
Pipelines are an important and heavily used feature in PowerShell. A concept borrowed from UNIX, pipelines let you use the result of a command execution as input to another command. This way you don´t need to save the result in variables, but instead just create a flow of data in a logic block of code. In PowerShell, the pipe character is “|” and you can use it with any command.
A key feature about PowerShell pipelines is that they don´t pass the result of a command as text, but rather as an object, allowing you to invoke other complementary commands on a particular result set. By using commands like Where-Object to filter the set or Select-Object to select specific properties of an object, pipelines can be an extremely advanced concept to query result sets of commands.
In the previous code block, there is a simple example. I used the command Get-Process to retrieve all active processes and then filtered the result list to get only the processes that have the name “PowerShell” with the command Where. I then selected only the property ID from the object with the command Select.
Get-Process | where{$_.Name -like "PowerShell"} | Select Id |
Another important concept surrounding pipelines is the current pipeline element, accessible by the command $_. This special variable is used to reference the current value in the pipeline. In this case, $_ is a collection of rows produced by the Get-Process command, in which each row contains a Name property. The where command filters the rows by comparing the Name property to “PowerShell” and sends the resulting rows to the next stage of the pipeline.
While using pipelines, you might need to break lines to make a more readable flow. To do that, you need to use the PowerShell break line special character (line continuation character) which is the back quote “`” for breaking strings or the pipeline “|” character to break after a pipe element.
Note: Be careful with the usage of several pipelines, the resulting flow might become difficult to understand for developers and system administrators.
Get-Process | ` where{$_.Name -like "powershell"} | ` Select Id |
Variables
Variables are used in every programming language to store information that you wish to manipulate later in your program or script structure. The same is true in PowerShell; variables are used to store information about a command result to use it later or to pass it to a different pipeline level.
In PowerShell, variables start with the character $ (dollar symbol) and are followed by almost any character. The only restrictions are the PowerShell special characters. PowerShell only releases the contents of variables when the user session ends, which means that if you don’t need to use a variable anymore, clean it by assigning the $null variable to it.
$var1=$null |
Variable object type is resolved dynamically, which means that if you assign a string type object, the variable object type will be string, if it is XML then it will be XML. However, you can cast a variable to a different type using the type between brackets ([]) before the variable name. This can be useful when you don´t want to create a new instance of a .NET object; instead you can just cast it to the expected type and PowerShell will resolve it.
$var1 = "PowerShell" $var2 = $var1 #Casting to DateTime [System.DateTime]$var3="2013-06-13" #Casting to Xml $var4 = [System.Xml.XmlDocument]"<xml><node>HERE</node></xml>" |
Variables in PowerShell can be defined with different scopes, so that you can set either a variable to be accessible only from a specific script, only within a session, or make it accessible to the entire shell. The variables full scope list possibilities are shown in the following table.
The default scope of a variable differs according to the place in which you define that variable. If it is defined in the interactive shell it is Global, if outside any function or script block it is Script and otherwise it is local.
Table 2: Variable Scopes
Scope Name | Scope |
|---|---|
Script | Only available in that script. |
Local | Available only on a specific scope or sub-scopes, like a loop and any loops inside. |
Private | Available only on a specific scope, like a loop inside. |
Global | Available in the entire shell. |
Get properties from an Item
Listing the properties of an item is one of the main activities for system administrators so that they can make decisions based on a particular object property value. PowerShell provides you with a command to list detailed information about a particular object. To show that list, use the command Format-List on any object.
Get-Process | ` where{$_.Name -like "powershell"} | ` Format-List |
This property list can also be stored in variables for any future usage.
$var1 = Get-Process | ` where{$_.Name -like "powershell"} | ` Format-List |
PowerShell allows you not only to save the result of that command, but also to store the command itself by enclosing them in curve brackets “{}”.
$var1 = {Get-Process | ` where{$_.Name -like "powershell"} | ` Format-List} |
The difference between these two calls is shown in the following figure.
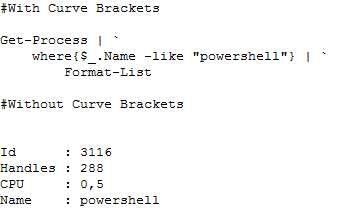
Using Curve Brackets in Commands
Format Variable Output
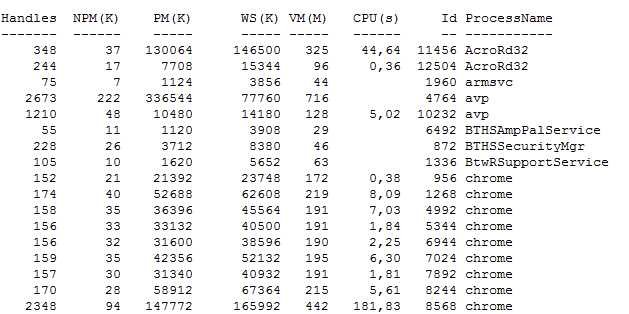
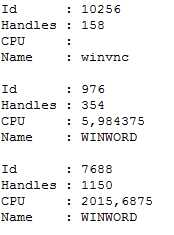
There are three commands to format the output of a variable. You can use Format-List to format your output as a vertical list, Format-Table to output your result as a table and Format-Wide to retrieve single-data item and show it as multiple columns.
Get-Process | Format-List Get-Process | Format-Table Get-Process | Format-Wide #Choose how many columns you want Get-Process | Format-Wide -Column 3 |
|
|
Format-Table | Format-List |
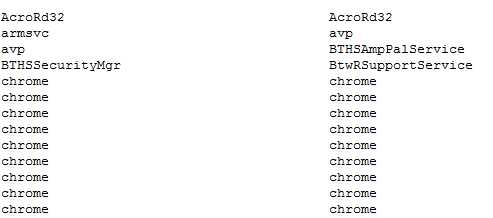
Format-Wide with two columns
Strings
Strings are one of the most commonly used variable types in programming languages and PowerShell is no exception. Strings are used to compare usernames, to evaluate an OS version, and even to compare XML nodes. By default, strings in PowerShell are .NET System.String objects, which means that when you initialize a variable with a string, PowerShell will instantiate a System.String object with all its properties and methods.
$myVar = "PowerShell" ($myVar -is [System.String]) |
![]()
Evaluate System.String type
Although using strings is simple in PowerShell, it introduces a new concept that usually confuses developers, which is literal and expanding strings. In literal strings, enclosure between single quotes (‘) and all text between commas are part of the string. When you enclose text with double quotes (“), PowerShell replaces all variable names and special characters with their values.
$a="SyncFusion" #Literal strings $literal = '$a`n and PowerShell' #Expanding strings $expanding = "$a`n and PowerShell" |
The result of the previous code block is shown in Figure 18.
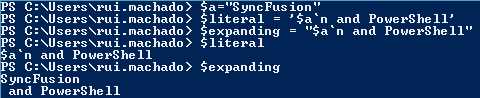
Literal vs Expanding Strings
PowerShell Here Strings
PowerShell introduces a nice feature that simplifies the way you manage large text strings. This allows you to define multi-line strings without having to concatenate several string parts. To use a here string, you start by typing the special character “@” followed by a new line, and end your string with a new “@” character.
#simple string $simpleString="Example String" #Empty here string @" "@ #PowerShell here string $largeString= @" Hello, this is a PowerShell here string. You can define multiple string lines into one single text block. You can even use special characters like `n or expand it with another string $simpleString "@ |
If you run this script in the interactive shell, you will see that PowerShell interprets this here string as an expanding multiline string. This allows you not only to simplify the way you initialize a multi-line string, but also the way you build the expanding stringNote that here strings can be either expanding or literal strings.
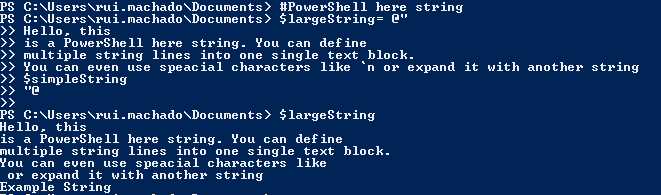
PowerShell Here Strings
Regular Expressions
Regular expressions are an easy and very efficient way of searching for patterns of characters in strings. While developing PowerShell scripts, you will need to use regular expressions in several contexts, which may include replacing text inside strings, retrieving all elements inside an XML document that contain a certain text or grouping blocks of text depending on a certain pattern. To use regular expressions in PowerShell, you can use the –match operator if you just want to evaluate a pattern inside a string or the –replace operator if you want to replace characters inside a string based on a given pattern. The following code block shows you how to use the –match operator.
#Text to evaluate. $text = @" This is a PowerShell string! We will use it to test regular expressions "@ #Evaluate a pattern. Returns:True $text -match "\w" #Evaluate a pattern. Returns:False $text -match "!\w+" |
Although evaluating a pattern in a string is a common task in PowerShell, replacing text is also important to make replacements based on patterns occurrence. The following code block shows you how to use the –replace operator. If you don´t understand regular expressions and don´t understand the meaning of “\w” or “\w+!”, you can learn more on this in the MSDN webpage Regular Expression Language - Quick Reference. You will find a full list of characters you can use inside regular expressions and their purpose.
#Text to evaluate. $text = @" This is a PowerShell string! We will use it to test regular expressions "@ #Replace every character with the A character. $text -replace "\w","A" #Replace every string followed by !, with the B character. $text -replace "\w+!","B" |
Invoking the previous code block will result in the following string.

Using -replace operator
Lists of Items
Arrays
To create an array in PowerShell, you can use one of two options: declare it explicitly by enclosing all your values inside @() and separated by commas, or implicitly by just separating them with commas as you can see in the following code block:
#Explicitly $array1 = @(1,2,3,4,5,6,7,8,9,10) #Implicitly $array2 = 1,2,3,4,5,6,7,8,9,10 #Accessing with a literal index $array1[2] #Accessing with a variable index $index=4 $array2[$index] |
To access a value of the array, just invoke the variable and the index you want in square brackets i.e. $array1[$index].
.NET Lists
Since you can use .NET classes and objects, you are able to use any kind of list from Collections.Generic collections. An example of using a list of strings is shown in the code block below.
$myList = New-Object Collections.Generic.List[string] $myList.Add("Rui") $myList.Item(0) |
Hash Tables
Hash Tables in PowerShell are declared using the @ character and your Key=Value items enclosure in curly braces and separated by semicolons.
$values= @{ "KEY1" = "VAL1" ; "KEY2" = "VAL2" ; "KEY3" = “VAL3" } |
To access a value of your hash table, just invoke the variable with the key of the entry in square brackets i.e. $values["KEY1"].
Tip: Separate your values with semicolons at the start of each entry; it is easier to exclude one by commenting it at the start of its declaration.
Flow Control
Logical and Comparison Operators
To make decisions along your PowerShell scripts, you need to use conditional statements like in any other programming language. These conditional statements allow you to interact with data flowing in your script to define behaviors by its values.
All PowerShell operators start with a hyphen (“-“) followed by the desired operator name.
Note: PowerShell default operators are case insensitive; to use case sensitive operators, you need to prefix the operator with the “-c“ parameter.
In the following table, you can check all available PowerShell operators.
Table 3: Comparison Operators
Operator | Definition |
|---|---|
-eq | Equals. Allows you to compare two values and returns true if there is a match and false if not. When using lists, PowerShell will return all elements in left value that match the right value. |
-ne | Not Equals. Allows you to compare two values and returns true if there is not a match and false if there is. When using lists, PowerShell will return all elements in left value that don’t match the right value. |
-ge | Greater Than Or Equal. Allows you to compare two values and returns true if the left value is greater than or equal to the right. When using lists, PowerShell will return all elements in left value that are greater than or equal to the right value. |
-gt | Greater Than. Allows you to compare two values and returns true if the left value is greater than the right. When using lists, PowerShell will return all elements in left value that are greater than the right value. |
-lt | Less Than. Allows you to compare two values and returns true if the left value is less than the right. When using lists, PowerShell will return all elements in left value that are less than the right value. |
-le | Less Than Or Equal. Allows you to compare two values and returns true if the left value is less than or equal to the right. When using lists, PowerShell will return all elements in left value that are less than or equal to the right value. |
-like | Like. Evaluates a pattern against the right value and returns true if there is a match or false if there isn´t. This operator supports wildcards, such as:
|
-notlike | Not Like. Evaluates a pattern against the right value and returns true if there is not a match or false if there is. This operator also supports wildcards, the same as the Like operator. |
-match | Match. Evaluates a regular expression against the right value and returns true if there is a match or false if there is not. |
-notmatch | Not Match. Evaluates a regular expression against the right value and returns true if there is not a match or false if there is. |
-contains | Contains. Returns true if a specified list has a particular value. |
-notcontains | Contains. Returns true if a specified list doesn´t have a particular value. |
-is | Is. Compares a value to a .NET type and return true if they match, false if they don´t. |
-isnot | Is Not. Compares a value to a .NET type and return true if they don´t match, false if they do. |
#Strings to evaluate $a="Hello" $b="Hi" #EQUALS Returns False ($a -eq $b) #NOT EQUALS Returns True ($a -ne $b) #GREATER THAN OR EQUAL Returns True (10 -ge 10) #GREATER THAN Returns False (10 -gt 10) #LESS THAN Returns True (3 -lt 7) #GREATER THAN Returns True (3 -le 7) #LIKE Returns true ($a -like "H*") #LIKE Returns false ($a -like "H?") #MATCH Returns true ($a -match "(.*)") #CONTAINS Returns true (1,2,3,4,5 -contains 5) #CONTAINS Returns False (1,2,3,4,5 -contains 15) #IS Returns true ($a -is [System.String]) |
Table 4: Logical Operators
Operator | Definition |
-and | Returns true if all evaluations in a conditional statement are true. Otherwise returns false. |
-or | Returns false if all evaluations in a conditional statement are false. Otherwise returns true. |
-xor | Returns false if either one of the evaluations in a conditional statement is true but not if both are. Otherwise returns false. |
-not | Inverts the logical evaluation in a conditional statement. |
#AND Return False ($a -ne $b) -and (1 -eq 1) -and ($a -eq "PowerShell") #OR Return True ($a -ne $b) -or (1 -eq 1) -or ($a -eq "PowerShell") #XOR Returns True ($a -eq $b) -xor ($a -like "H*") #NOT Returns False -not ($a -ne $b) #Combining multiple operators - Returns False (($a -eq $b) -xor ($a -like "H*") -and (1,2,3,4 -contains 1)) -xor ("A" -ne "B") |
Conditional Statements
Conditional statements are similar to any other language; you have the traditional if, then, else, and the switch statement.
#Example $myVar=1 if($myVar –lt 2){ “small” }else{ “large” } |
Although the traditional declaration is available, there is another form of this statement that plays with a hash table to create what can be declared in a single line and to exactly the same as the traditional. I like to use this in simple conditions, like a value of a variable. The hash table keys need to be $true and $false because they present the two Boolean possibilities of a Boolean evaluation.
#@{$true=TRUE VALUE;$false=FALSE VALUE}[CONDITION] #Example $var1=2 $var2=2 $value = @{$true=12345;$false=67890}[$var1 –eq $var2] #The result should be 12345 |
Switch
The switch statement is a simpler way, when compared with the if-then-else, to test multiple input cases.
$int = 15 switch($int) { 0 {“You need to sum 15”; break} 1 {“You need to sum 14”; break} 2 {“You need to sum 13”; break} 3 {“You need to sum 12”; break} 4 {“You need to sum 11”; break} 5 {“You need to sum 10”; break} 6 {“You need to sum 9”; break} 7 {“You need to sum 8”; break} 15 {“GOOD!!”; break} default {“You are close”;break} } |
Loops
In PowerShell, you have several ways to loop (iterate) an object. However, the possibilities you have depend on your logic, code organization goals, and your object type. The simplest of them is the while loop. Using a while in PowerShell is the same as in any other C based language.
#EXAMPLE $array = 1,2,3,4,5,6 $var=0 while($var -lt 6){
write $array[$var]
$var++ } |
Another looping structure you can use is the “for loop”, which again is similar to any C based language.
#EXAMPLE $array = 1,2,3,4,5,6 for($i=0;$i -lt $array.Count;$i++){ write $array[$i] } |
The last is one of the most used in PowerShell, the for each loop structure, because of its appliance to pipeline objects. However, there are two different kinds of for each structures, one to iterate in collections of objects that implement IEnumerable and another for input object collections, often used to iterate pipeline objects.
As you will see in the following code block, by using the PowerShell foreach input object, code becomes simpler and cleaner. The results are exactly the same.
Tip: The foreach object has commonly used aliases, the character % (Percent) and foreach. The first in most script editors assume a green color and the second a blue one.
#BASE $array = 1,2,3,4,5,6 #Traditional way - classic foreach foreach($var in $array){ write $var } <# Using the most common way to iterate objects in PowerShell - input object foreach #> $array | %{ write $_ } |
Managing the Flow
PowerShell lets you manage delays, pauses, and breaks in your scipts. To do that, you have a set of commands to help you. The Read-Host command pauses your scipt until the user presses the Enter key. The Start-Sleep command pauses your scipt for a given amount of time.
#Sleeps for 15 seconds. Start-Sleep -Seconds 5 #Pause until user presses the Enter key. Read-Host |
Schedule Script Execution
Scheduling a script execution is a basic operation to automate a specific task in PowerShell. It could be to store a log, either for an integration task or even creating a backup for an SQL database table. There are plenty of situations in which you might think about letting PowerShell automate things for you.
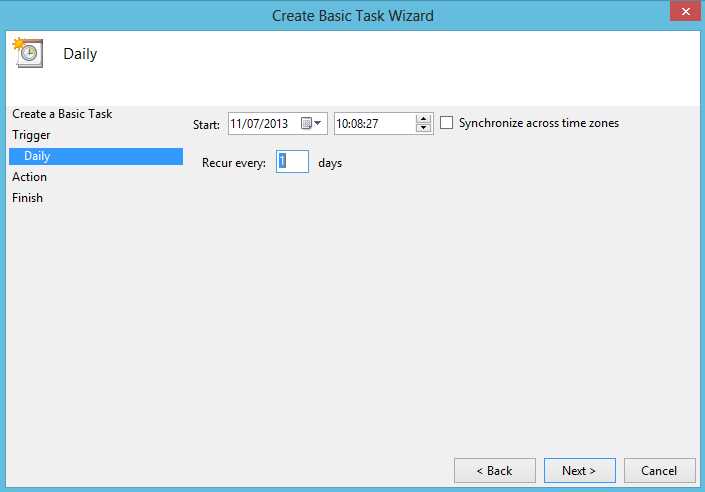
Although you might be thinking about coding a Windows Communication Foundation (WCF) or something else, there is an easy strategy to schedule a script execution using Windows Task Scheduler. This allows you to separate the script development from its execution management. To use it, start by opening it in Windows (Start > All Programs > Accessories > System Tools and select Task Scheduler). Once it opens, select Create Basic Task.
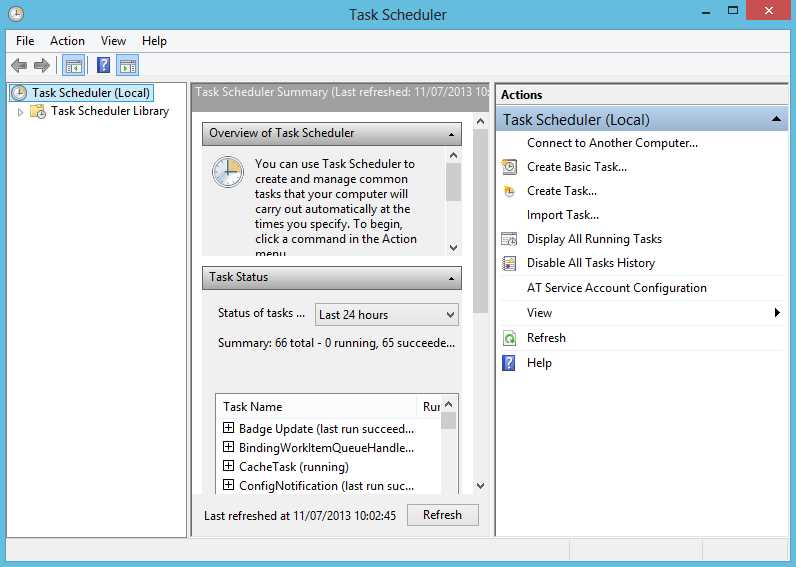
Open Task Scheduler
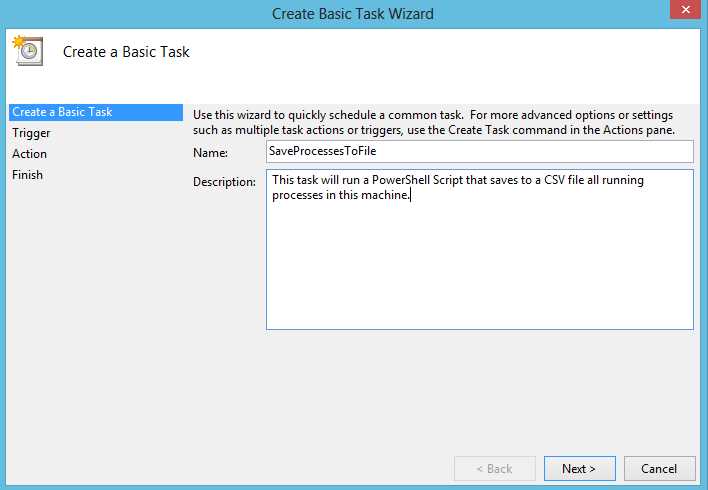
Create Basic Task
Now select when you want to run this task. This is just the first schedule configuration, as you need to specify later more details about this execution. For example, if you choose Daily, you can define the hours at which this script will run.

Scheduling Selection
Second level Scheduling
After you define the execution schedule you choose the action, which in this case you must select Start a Program. On the program/script selection, type PowerShell.exe in the program textbox and as an argument type –file and after the path to the script you want to run. After that you are done. The script will execute at the selected time with a plus, you can change the script whenever you want and the changes are automatically available.
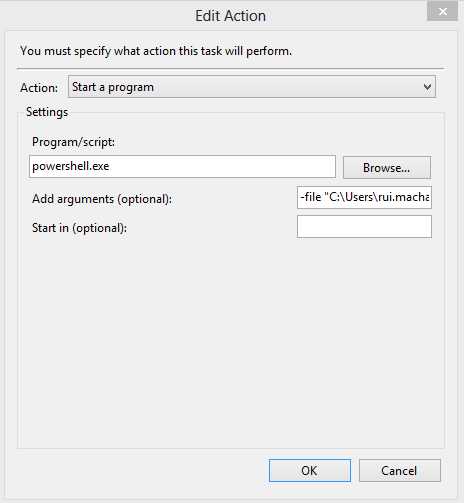
Finish Schedule Task
Extensibility and Code Reuse
Create instances of objects
Creating instances of objects in PowerShell is easy thanks to the new New-Object cmdlet. You can invoke New-Object indicating which object you want to instantiate, whether it’s a .NET or COM object.
#example using New-Object and ArgumentList to pass parameter to the object constructor $eventLog = New-Object System.Diagnostics.EventLog -ArgumentList "Application" #Object is available. $eventLog.Entries | Out-GridView |
Functions and Parameters
Let’s start by taking a look at functions. Functions are named code blocks, preferably with simple and single tasks, built to reuse code within your scripts. Parameters, on the other hand, are a simple mechanism of communication to send external values to a function. In the following code sample, you can find several application scenarios for functions and parameters.
#Using a simple Function function GetAllProcess{ Get-Process } #Using a simple Function two parameters. function MyFunction($param1,$param2){ Write "This is param 1 : $param1" write "This is param 2 : $param2" } #You can also use the param block to define your parameters. function MyFunction{ param( $param1 ,$param2 ) #Even declare where you process your logic. process{ Write "This is param 1 : $param1" write "This is param 2 : $param2" } } #Calling GetAllProcess GetAllProcess #Calling MyFunction MyFunction -param1 65 -param2 3 |
Tip: As you can see in the previous code block, you can declare parameters inside the param block as well as declare your logic inside of a process block. This will make your code more readable and better organized.
When calling functions, there are two ways to pass parameters into them, either by including them in the function signature or simply displaying the value in front of the function call.
#Included in method signature. [string]::Equals("Rui","Machado") #Using PowerShell front function parameters. MyFunction -param1 65 -param2 3 |
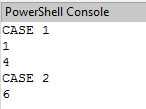
function SumTwoValues($a,$b) { return $a + $b }
<#CASE 1 Calling a function with its parameters inside its signature doesn´t give you the expected result (evaluating the parameters as a sub expression), which in this case is an array. In PowerShell you can declare an array as 1,2,3,4,5,...,n, so it prints the values of the array #> "CASE 1" SumTwoValues(1,4)
<#CASE 2 Correct calling: Using this method you will get the expected result #> "CASE 2" SumTwoValues -a 1 -b 5 |
Tip: You should be careful with this parameter passing. The use of parentheses in function calls or cmdlets is interpreted as a sub-expression of PowerShell and not as a parameter. In this situation, the parameters must be passed by specifying the parameter in question. We can only use parameter passing in methods within the method signature (between parentheses). In the following code sample, you can see the differences between these situations.
Figure 26 shows the results produced when calling the SumTwoValues method using both syntactical options. CASE 1 displays the array (1,4) and CASE 2 displays the sum of 1 and 5.
Passing Parameters in Functions
Parameters can be used not only in functions but in scripts as well. PowerShell allows you to use script parameters, making the entire script reusable just by calling it as a function, which is very useful when you want to create a data flow based on scripts instead of functions. To add parameters to your scripts, you need to use the block param at the beginning of your script, which will only work if it is the first line of code in your script.
Param( $param1, $param2 ) #Start your script definition. |
As you can see, parameters are defined inside that param block, but there is much more to tell about these parameters and their special attributes. In this param block, as in any function, you can add the following attributes.
Table 4: Parameter Attributes
Attribute | Definition |
|---|---|
Mandatory (Boolean) | Specifies if the parameter is mandatory; True for yes, False for no. |
ParameterSetName (String) | Specifies the parameter set that the command parameter belongs to. |
Position (Integer) | Specifies the position in which the parameter is in that command signature. |
ValueFromPipeline (Boolean) | Specifies if the parameter comes from a pipeline object. Default value is False. |
ValueFromPipelineByPropertyName (Boolean) | Specifies if the parameter cames from a property of a pipeline object. Default value is False. |
ValueFromRemainingArguments (Boolean) | Specifies that the parameter accepts any value from remaining command parameters. |
HelpMessage | Set a description for the parameter. |
HelpMessageBaseName | Specifies an external reference for the Help message description. |
HelpMessageResourceId | Specifies the resource identifier for a Help message. |
To use any of these parameters, you need to declare them between square brackets right before or on top of the parameter declaration. The following code block shows an example of this attributes usage.
function TestParameters{ param( #You need to write the attributes inside Parameter()
#That parameter is Mandatory [Parameter(Mandatory=$true)] $name,
#That parameter is Mandatory and Add a Help Message [Parameter(Mandatory=$true,HelpMessage="You must enter an Age!")] $age,
#This parameter comes from a pipeline object. [Parameter(ValueFromPipeline =$true)] $address ) } |
As you can see in Figure 27, by using a help message, the user can see more information about a specific parameter when trying to invoke the function.

Help Message
If you don´t provide a value from a mandatory parameter, PowerShell will raise an input box telling you that mandatory parameters are missing and asking you to provide them.
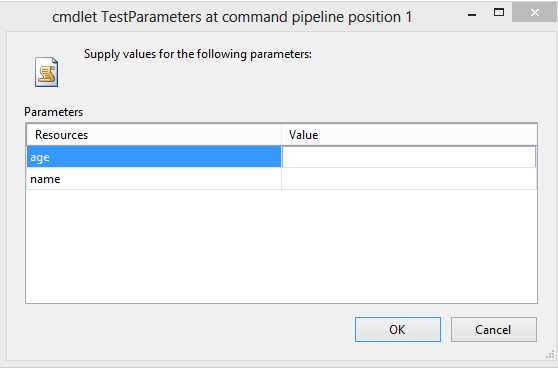
Missing Parameters
Another nice feature about parameters is that you can add validators to evaluate if your parameters match a validation rule set by you.
Note: There are several validators for PowerShell and it’s important that you know about them, as they will save you time with validations on values for particular parameters. The following table defines every possible validator.
Validator | Definition | Definition |
|---|---|---|
ValidateCount | Validates the minimum and maximum parameters allowed for a command. | [ValidateCount($min,$max)] |
ValidateLength | Validates the minimum and maximum number of characters for a parameter | [ValidateLength($min,$max)] |
ValidatePattern | Validates a string parameter with a regular expression. | [ValidatePattern($regexString)] |
ValidateSet | Validates a parameter according to a set of possible values. | [ValidateSet($arrayValidValues)] |
ValidateRange | Validates a parameter according to a range of possible values. | [ValidateRange($min, $max)] |
The following example uses the ValidateSet attribute to enforce a constraint on the $type parameter, which limits the values that can be passed to that parameter to three distinct values. The ChangeUserType function then uses that parameter to change the user type.
function ChangeUserType{ param( $userID, [ValidateSet("Admin","User","SuperAdmin")] $type ) ChangeType -User $userID -Type $type } |
If you try to call that function with a type that is not specified in the validation set, you will get an error indicating that a particular value is not defined for that parameter.
ChangeUserType -userID 1 -type "Regular" |
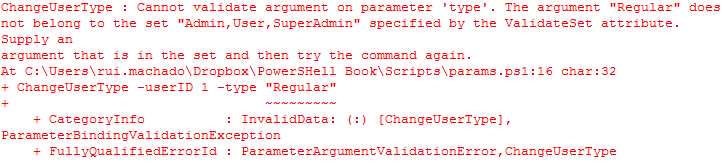
Error with Attribute outside ValidationSet
Create a Windows Form
Creating Windows Forms in PowerShell is as simple as in C#. By having the ability to interact with .NET classes, we just need to reference the class in which our Windows Form Item is defined and then instantiate it using the method shown in the previous topic, Create instances of objects. To show you how simple it is, I am going to build an example in which I create a form with a header label and a data grid to list items from our Get-Process command. Next I will add a button that will invoke a save file dialog so that we can export our data grid data source as a CSV file. The expected result is shown in Figure 30.
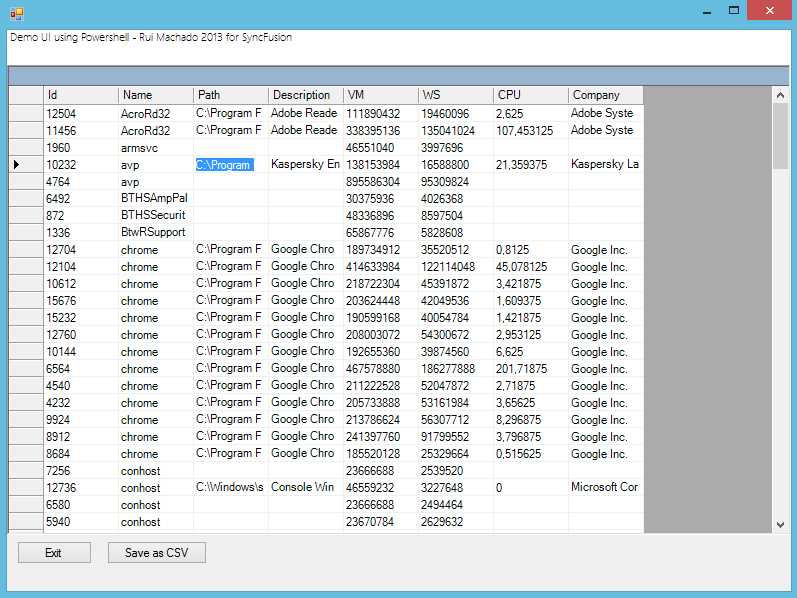
Windows Form Get-Process
#Create a new .NET array list. $processList = New-Object System.Collections.ArrayList #Get all processes. $allProcesses = Get-Process | Select Id,Name,Path,Description,VM,WS,CPU,Company | sort -Property Name #Add all processes to an array list which is easier to manipulate. $processList.AddRange($allProcesses)
#Instantiate a new Windows Form $form = New-Object Windows.Forms.Form #Sets the Windows Form size and start position. $form.Size=New-Object Drawing.Size @(800,600) $form.StartPosition = [System.Windows.Forms.FormStartPosition]::CenterScreen #This will create panels to display our items. $panelLabel = New-Object Windows.Forms.Panel $panelMain = New-Object Windows.Forms.Panel $panelButton = New-Object Windows.Forms.Panel
#Creates the save file dialog so that we can export it as CSV. $saveDialog = new-object System.Windows.Forms.SaveFileDialog $saveDialog.DefaultExt = ".csv" $saveDialog.AddExtension = $true
#Create the save to CSV button. $buttonSave = New-Object Windows.Forms.Button $buttonSave.Text = "Save as CSV" $buttonSave.Left = 100 $buttonSave.Width =100 #Add the OnClick save button event. $buttonSave.add_Click( { $resultSave=$saveDialog.ShowDialog() #If the user clicks ok to save. if($resultSave -eq "OK"){ #Save as CSV $allProcesses | Export-Csv -Path $saveDialog.FileName MessageBox("Guardado com sucesso") } })
#Create the exit application button. $button = New-Object Windows.Forms.Button $button.Text = "Exit" $button.Left = 10 #Add the OnClick exit button event. $button.add_Click( { $form.Close() })
#Create datagrid $dataGrid=New-Object Windows.Forms.DataGrid $dataGrid.Dock = "Fill" $dataGrid.DataSource = $processList
#Create a new label to show on the header. $label = New-Object System.Windows.Forms.Label $label.Text= "Demo UI using Powershell - Rui Machado 2013 for SyncFusion" $label.Font = "Segoe UI Light" $label.Width= 300
#Add the header label to its panel. $panelLabel.Controls.Add($label) $panelLabel.Height =35 $panelLabel.Dock = "Top" $panelLabel.BackColor = "White"
#Add datagrid to its panel. $panelMain.Controls.Add($dataGrid) $panelMain.Height =470 $panelMain.Dock = "Top"
#Adds buttons to its panel. $panelButton.Controls.Add($button) $panelButton.Controls.Add($buttonSave) $panelButton.Height=50 $panelButton.Dock = "Bottom"
#Add all panels to the form. $form.Controls.Add($panelMain) $form.Controls.Add($panelButton) $form.Controls.Add($panelLabel)
$form.Refresh() #Show the form. $result = $form.ShowDialog() | Out-Null
if($result -eq "Cancel") { MessageBox("Program is closing...") $form.Close() }
#OPTIONAL: Function to create new MessageBoxes function MessageBox([string]$msgToShow) { [System.Windows.Forms.MessageBox]::Show($msgToShow) } |
Clicking on the Save CSV button will save the file to a destination in your file system.
- Shared infrastructure for efficient resource management
- Self-service analytics for easy data exploration
- Enhanced security with row-level security and SSO
- Customizable dashboards to meet your specific needs