
Power Automate Desktop Succinctly®

CHAPTER 3
Working with Files
Quick intro
Now that we’ve seen the basic concepts behind Power Automate Desktop, it’s time to create a more realistic automated workflow and explore how to work with files.
To do that, let’s create a new flow and name it WorkingWithFiles. Click Create to complete the flow.
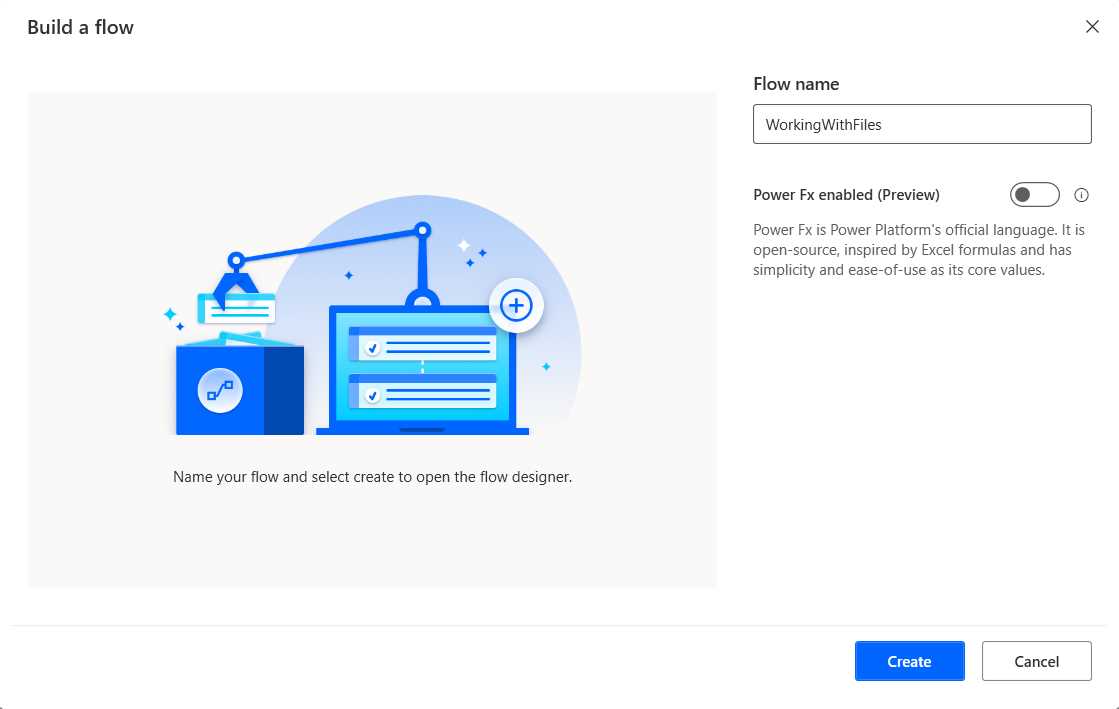
Figure 2-a: Power Automate Desktop (Creating a New Flow—WorkingWithFiles)
Flow functionality
We will build a flow that copies two files from an origin folder to a destination folder, zips those files into an archive, renames the copied files, deletes the renamed files, and finally, unzips the original files. By doing this, we’ll get all the necessary knowledge to work with files using Power Automate Desktop.
Checking for files
To begin, the first thing we need to do is check if the files we intend to work with exist. To check whether a specific file exists, we need to add an If file exists action to the flow—so let’s begin by doing that. The If file exists action can be found under File.
After you drag the action to the flow, within the file path text box, specify the name of the file whose existence you want to check. In my case, I’m checking if the C:\Tmp\Test\origin\index.html file exists.
I highly suggest you use the same file path and name. You may choose another file, but be consistent and use the same file name throughout the flow.

Figure 2-b: Power Automate Desktop (The First If file exists Action—Changed Details)
Once you have specified the file name you want to check, click Save. The flow should now look as follows.
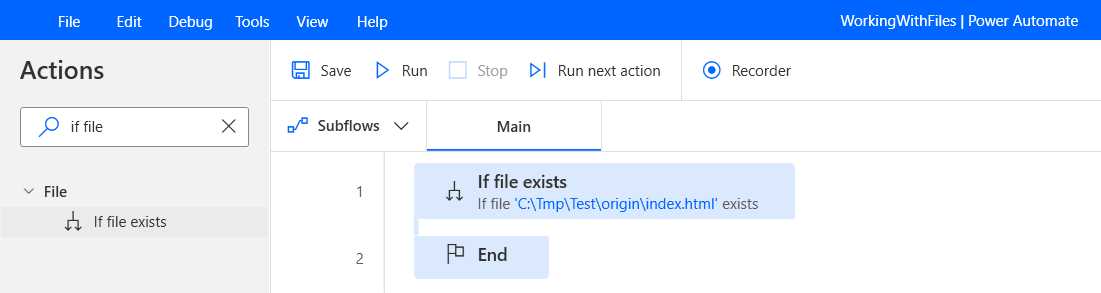
Figure 2-c: Power Automate Desktop (The WorkingWithFiles Flow—Step 1)
Furthermore, there’s a second file to process, and I also want to check if it exists. To do that, I will add another If file exists action to the flow by dragging and placing it within the first If file exists action.
Then, indicate the file name to check—in my case: C:\Tmp\Test\origin\missing.html. You may choose another file—but again, be consistent and use the same file name throughout the flow.
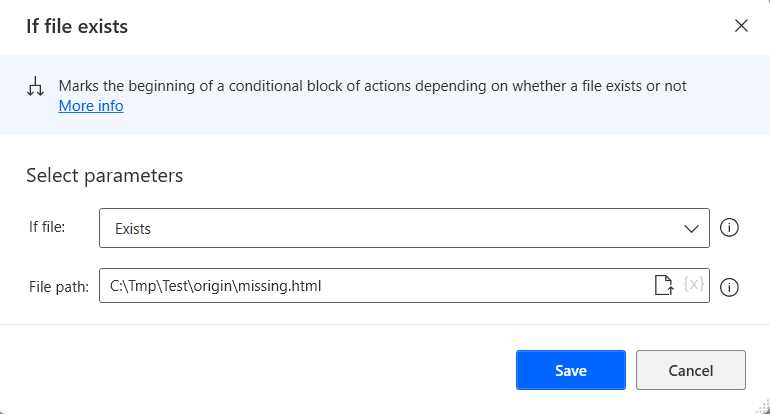
Figure 2-d: Power Automate Desktop (The Second If file exists Action—Changed Details)
Once you have specified the file name you want to check, click Save. The flow should now look as follows.
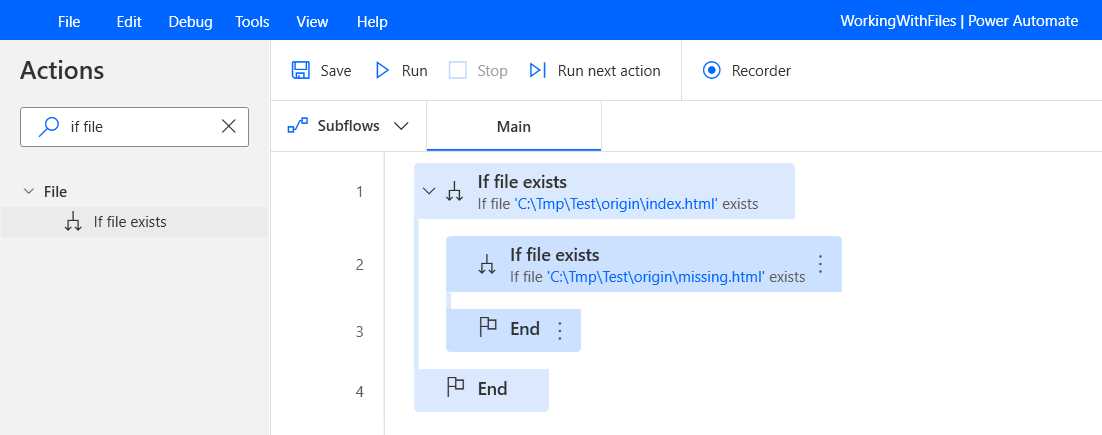
Figure 2-e: Power Automate Desktop (The WorkingWithFiles Flow—Step 2)
Copying the files
Now that we have checked if the files we will process throughout the flow exist, we can copy these files to the destination folder. We can add the Copy file(s) action to the flow and place this action within the second If file exists action. The Copy file(s) action is under File within the Actions pane.
When the Copy file(s) action dialog displays, within the File(s) to copy text box, add the following values:
%['C:\\Tmp\\Test\\origin\\index.html', 'C:\\Tmp\\Test\\origin\\missing.html']%.
So, we are creating a variable (%%) that is a list ([]), which contains two elements, where each element is a string (''). Each element indicates the file name of a file to copy.
Because we are specifying both file names within a list of strings, and as a Power Automate Desktop variable, we must escape the (\) character to indicate that it represents a file path, so we write it twice (\\).
Note: If you used different file paths, use those instead within the previous list variable (%[ … ]%).
As for the value of the Destination folder, we can indicate the folder path where we want to copy the files. In my case, C:\Tmp\Test\destination. We don’t need to use double backslashes (\\) because this is not a variable, but a hard-coded value.
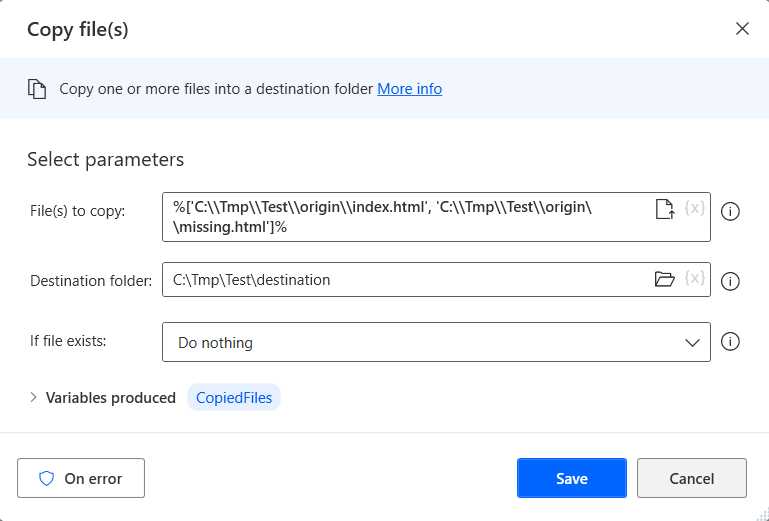
Figure 2-f: Power Automate Desktop (The Copy file(s) Action—Changed Details)
Once you have specified the values, click Save to continue.
Zipping the files
With the original files copied to the destination folder, we can next compress those files into a zip archive. We can add the Zip files action to the flow and place it after the Copy file(s) action.
The Zip files action can be found under Compression within the Actions pane. Within the Zip files action, we need to indicate the Archive path, which is the file path of the compressed file that will be created, and the File(s) to zip, which will be the value of the CopiedFiles variable (%CopiedFiles%) from the previous action.
The Zip files action will produce a ZipFile variable, which can be used in subsequent flow actions.
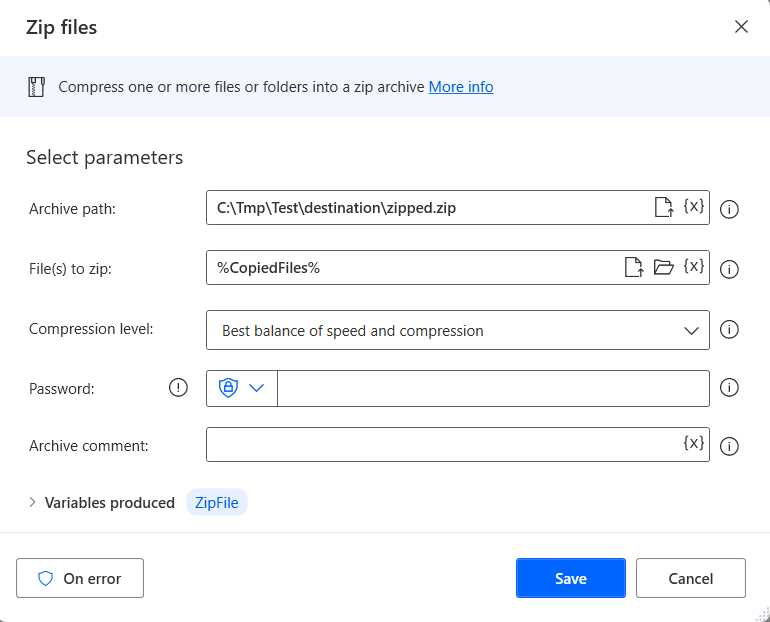
Figure 2-g: Power Automate Desktop (The Zip file Action—Changed Details)
Once you have indicated these values, click Save to add this action to the flow. At this stage, the flow looks as follows.
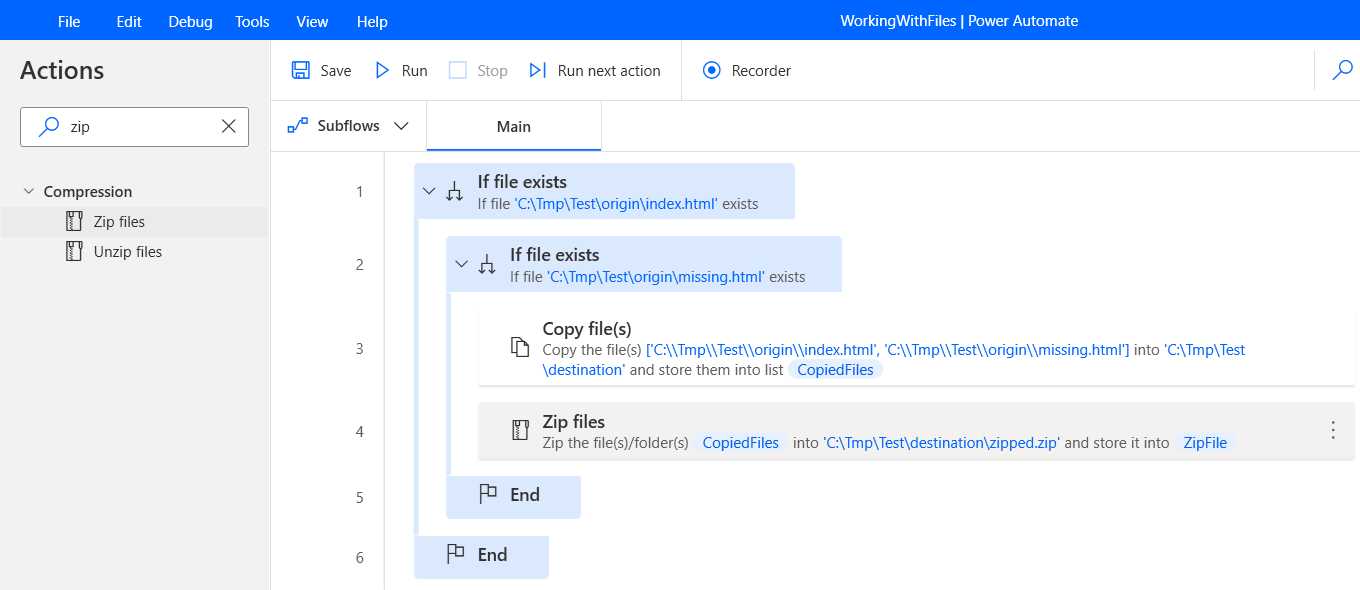
Figure 2-h: Power Automate Desktop (The Updated WorkingWithFiles Flow)
Displaying a message
With the flow as is, we can copy and compress files. Now, let’s add a Display message action to the flow and display the value of the CopiedFiles variable (%CopiedFiles%).
Let’s add the Display message action after the Zip files action. The Display message action can be found under Message boxes within the Actions pane.
To the Message box title text box, we can assign the Files string. To the Message to display text box, we can assign the value of the CopiedFiles variable (%CopiedFiles%).
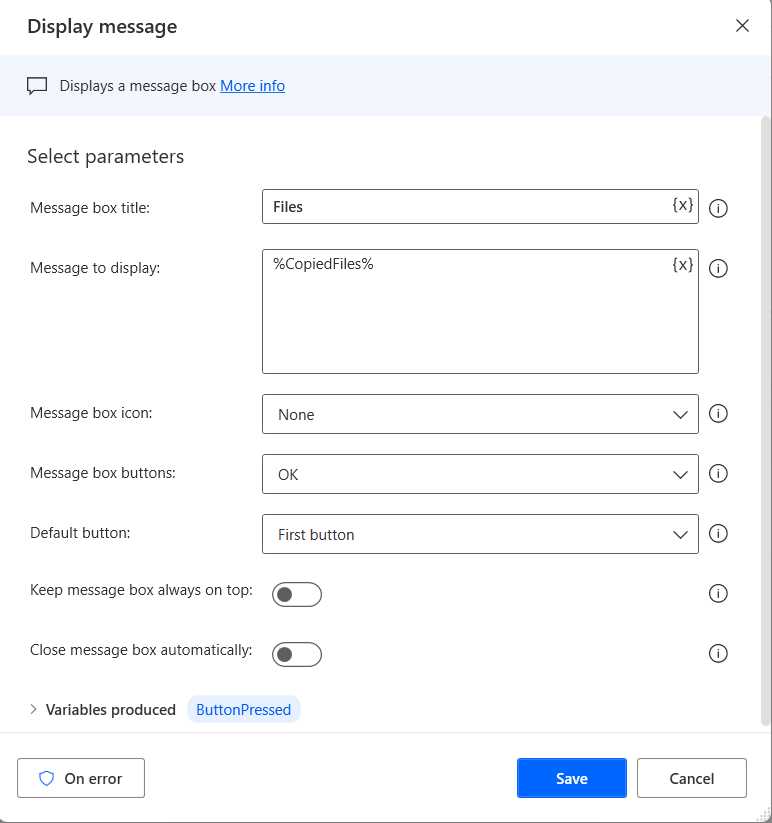
Figure 2-i: Power Automate Desktop (The Display message Action)
Once done, we can click Save. By doing this, we can see the file paths of the copied files.
Renaming files
The next thing we can do is rename the copied files. To do this, we need to loop through the list of copied files by using the For each action.
The For each action is found under Loops within the Actions pane. So, let’s drag this action to the flow and place it after the Display message action.
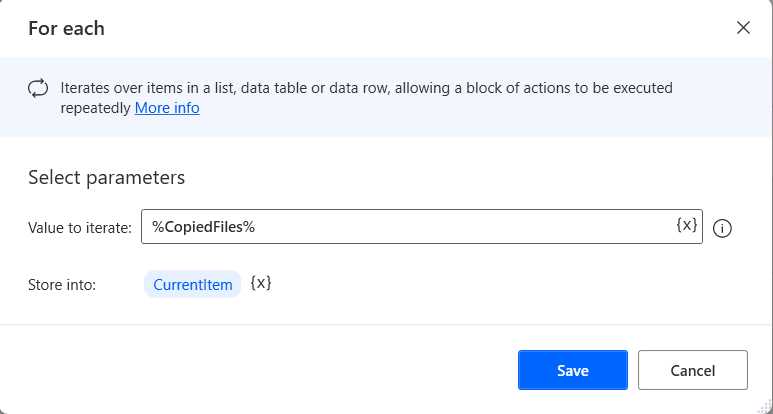
Figure 2-j: Power Automate Desktop (The For each Action)
Within the Value to iterate text box, let’s assign the value of the CopiedFiles variable (%CopiedFiles%). Once done, click Save.
Let’s add a Rename file(s) action within the loop. We can find this action under File within the Actions pane.
To the File to rename text box, we can assign the value of the CurrentItem variable (%CurrentItem%), which represents each copied file.
As for the Rename scheme, we need to choose the Add text option explicitly, and then set the value of the Text to add text box as renamed-.
We also need to choose the Before name option as the value of the Add text dropdown.
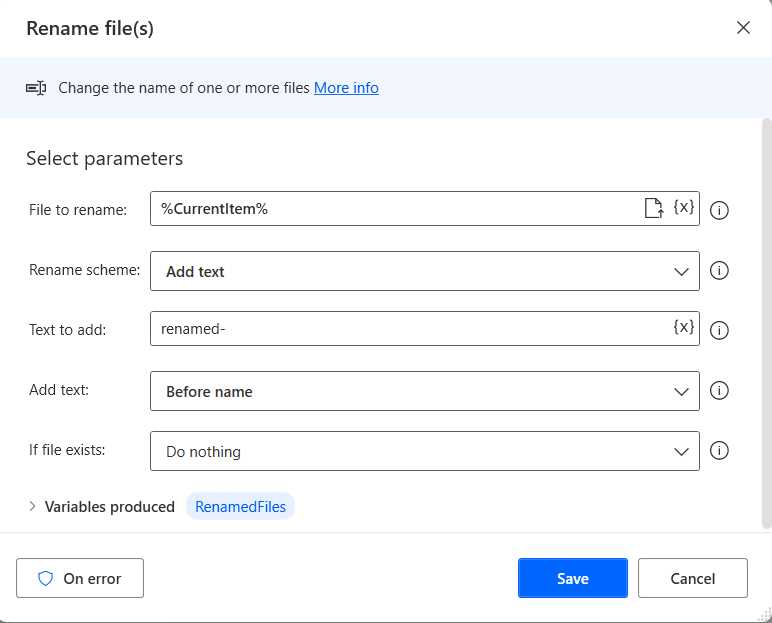
Figure 2-k: Power Automate Desktop (The Rename file(s) Action—Changed Details)
By selecting these options, we can prepend the renamed- string prefix to the file name of each copied file. So, in essence, if the name of one of the copied files is C:\Tmp\Test\origin\index.html, the renamed file will be C:\Tmp\Test\origin\renamed-index.html.
Once those options have been selected, click Save. Once done, the flow will look as follows.
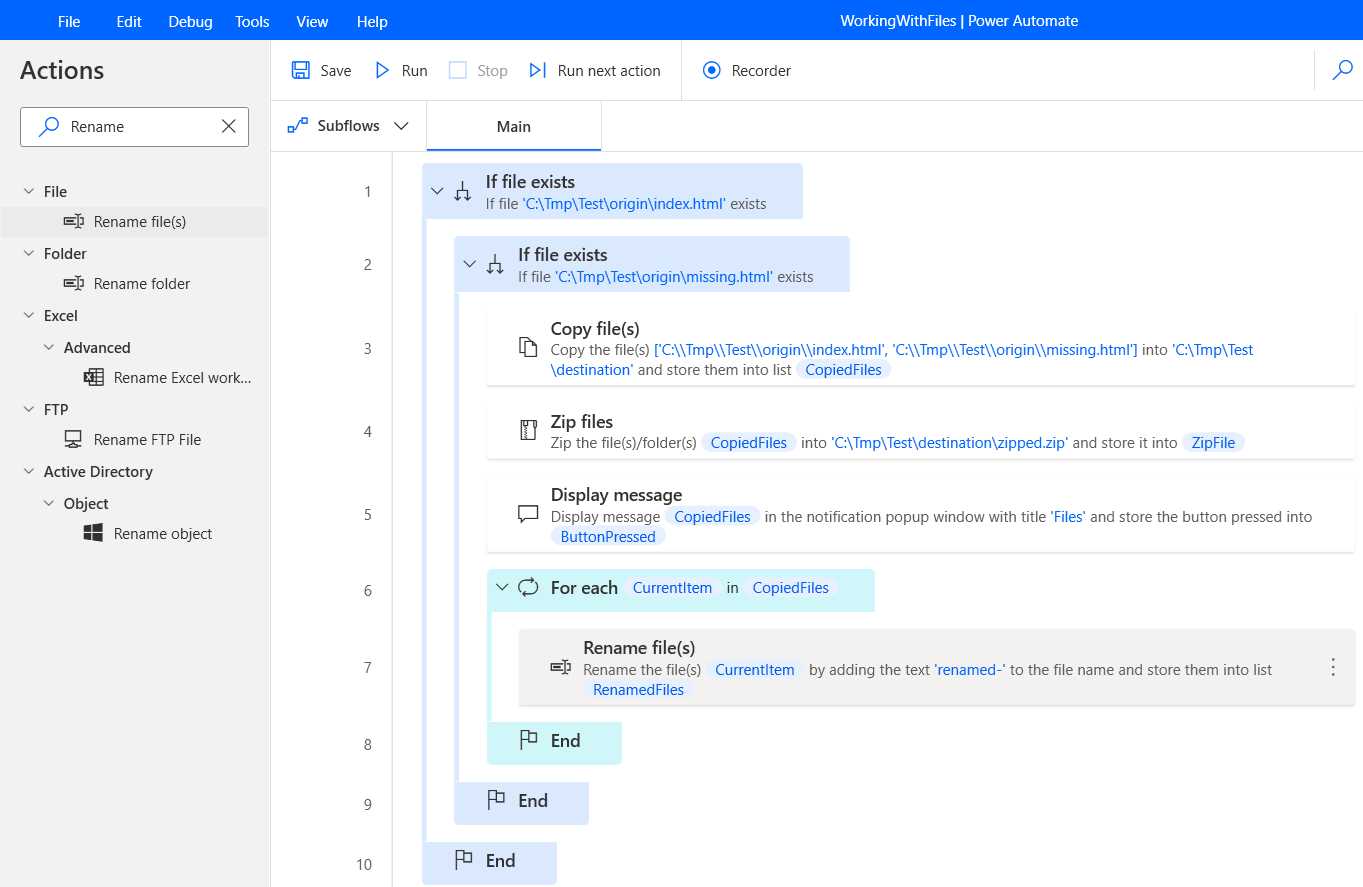
Figure 2-l: Power Automate Desktop (The Updated WorkingWithFiles Flow)
Displaying another message
Now that we have renamed the copied files, let’s add another Display message action to the flow after the For each action to see the names of the files. As you know, the Display message action is under Message boxes within the Actions pane.
We can assign the Files string to the Message box title text box and assign the value of the CopiedFiles variable (%CopiedFiles%) to the Message to display text box.
Once done, we can click Save.
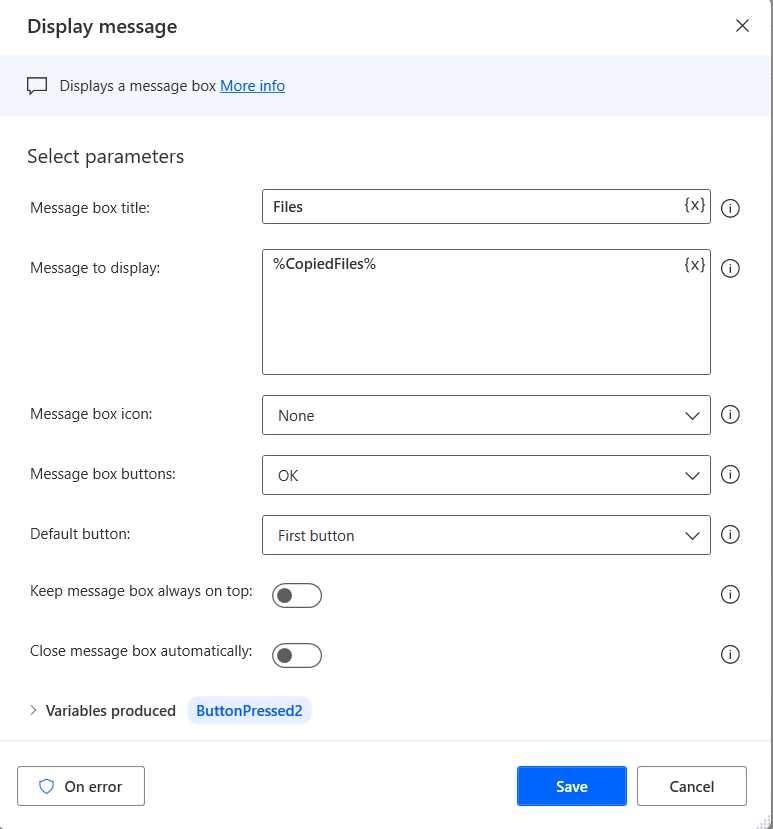
Figure 2-m: Power Automate Desktop (The Display message Action—Changed Details)
After these changes, the flow should now look as follows.
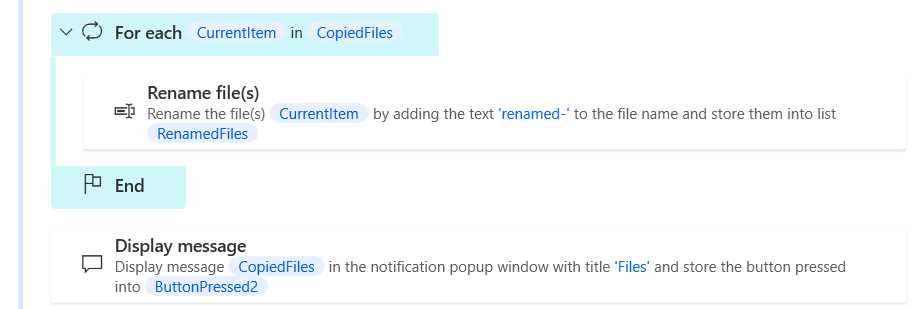
Figure 2-n: Power Automate Desktop (The Updated WorkingWithFiles Flow—Partial View)
Deleting files
After renaming the files, the next thing we want to do is delete them. To achieve that, we’ll have to loop through the list of copied files, get the file path of each file we want to delete, and then delete each file in each iteration.
So, let’s add a For each action to the flow after the Display message action we just added. The For each action is under Loops within the Actions pane.
Let’s assign the value of the CopiedFiles variable (%CopiedFiles%) to the Value to iterate text box. We’ll store these details in the CurrentItem (%CurrentItem%) variable.
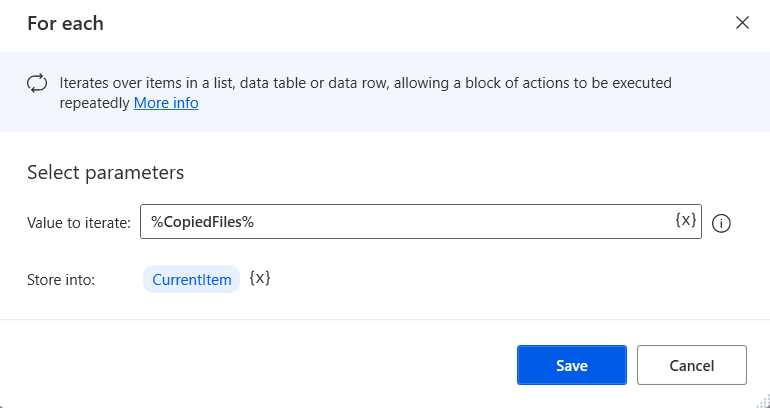
Figure 2-o: Power Automate Desktop (The For each Action—Changed Details)
Once done, we can click Save. Following that, the flow should look as follows.
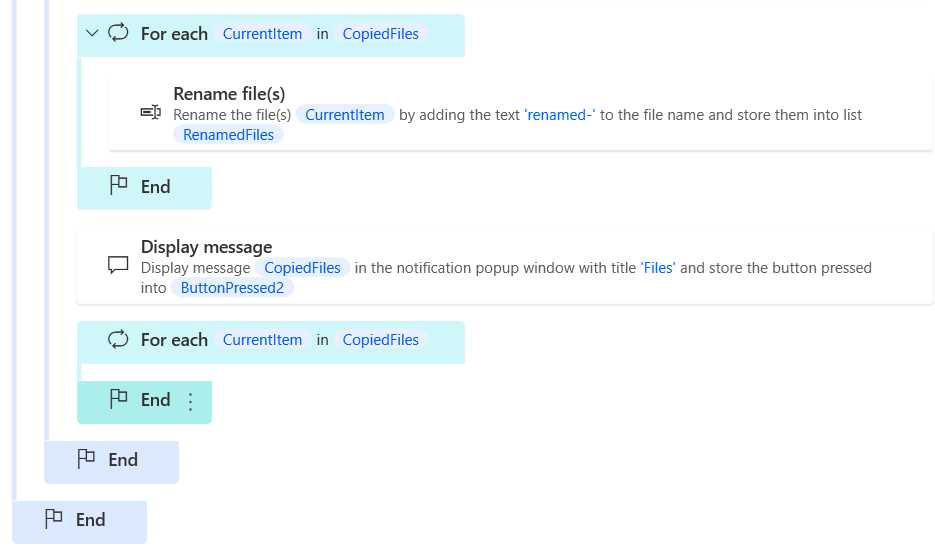
Figure 2-p: Power Automate Desktop (The Updated WorkingWithFiles Flow—Partial View)
Get file path
To delete the renamed files, inside the For each action we just added, we need to add a Get file path part action, allowing us to get the exact file name for each file we want to delete. The Get file path part action is under File within the Actions pane. So, let’s drag this action and place it within the For each action we just added.
Let’s assign the value of the CurrentItem (%CurrentItem%) variable to the File path text box. The CurrentItem variable represents the name of each file in the copied file list.
Once done, click Save.

Figure 2-q: Power Automate Desktop (The Get file path part Action—Changed Details)
The Get file path part action returns a few variables we’ll use in the following action, notably the Directory and FileName variables.
Deleting files
Now that we have the partial file path for each renamed file we want to delete, we can use the Delete file(s) action. Let’s add the Delete file(s) action to the flow and place it after the Get file path part action that we just added. The Delete file(s) action is under File under the Actions pane.
To the File(s) to delete text box, we can assign the following value:
%Directory%\renamed-%FileName%
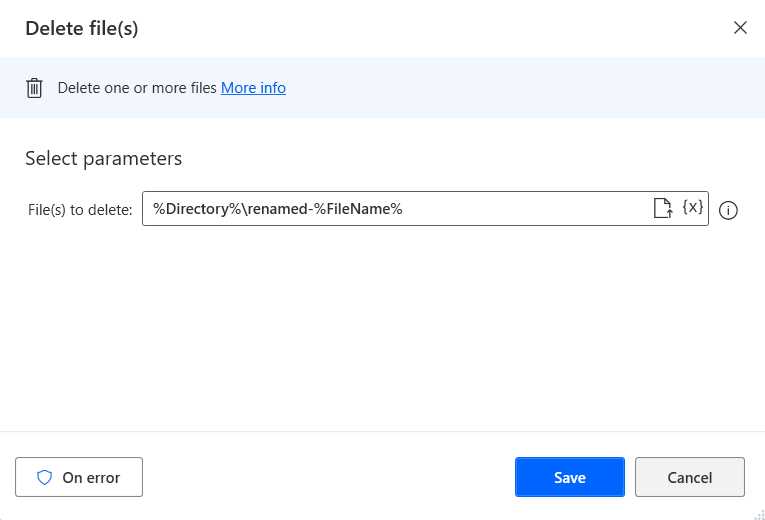
Figure 2-r: Power Automate Desktop (The Delete file(s) Action—Changed Details)
This means we can get the complete file path of each renamed file we want to delete by concatenating the folder name (%Directory%) where the file is contained, plus the \renamed- prefix and the name of the file itself to delete (%FileName%).
Once done, click Save. The flow should now look as follows.
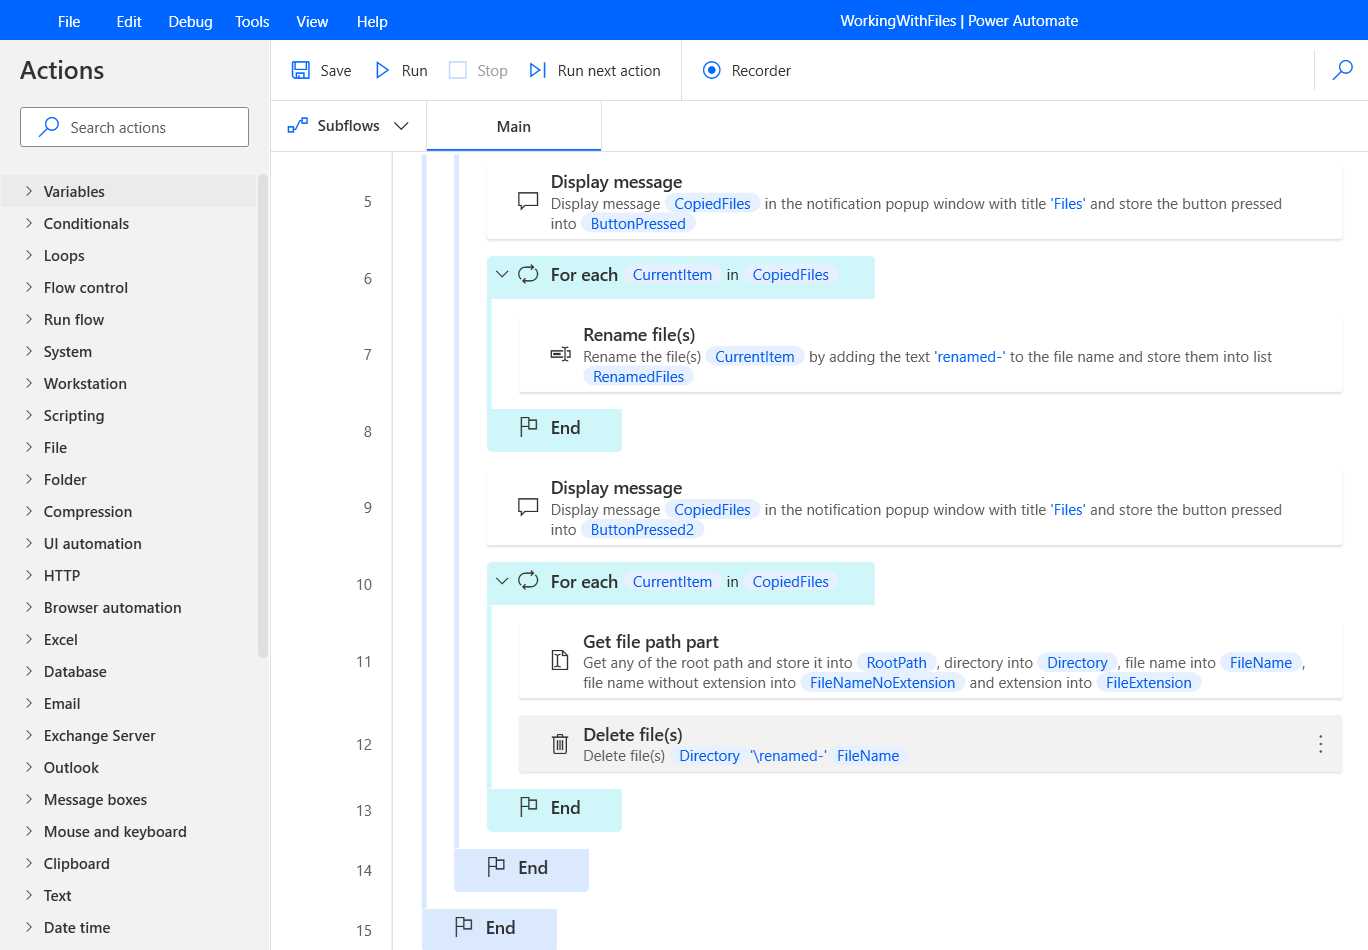
Figure 2-s: Power Automate Desktop (The Updated WorkingWithFiles Flow—Partial View)
Unzipping files
Now that we have added the functionality to delete files, let’s unzip the copied files that we previously compressed.
To do that, let’s add the Unzip files action to the flow after the end of the most recent For each action we added. The Unzip files action can be found under Compression in the Actions pane.
Let’s assign the file path of the zip file we created using a previous action to the Archive path text box. In my case, it is C:\Tmp\Test\destination\zipped.zip.
Let’s also assign the path of the destination folder where the zip file's contents will be unzipped. In my case, it is C:\Tmp\Test\destination\unzipped.
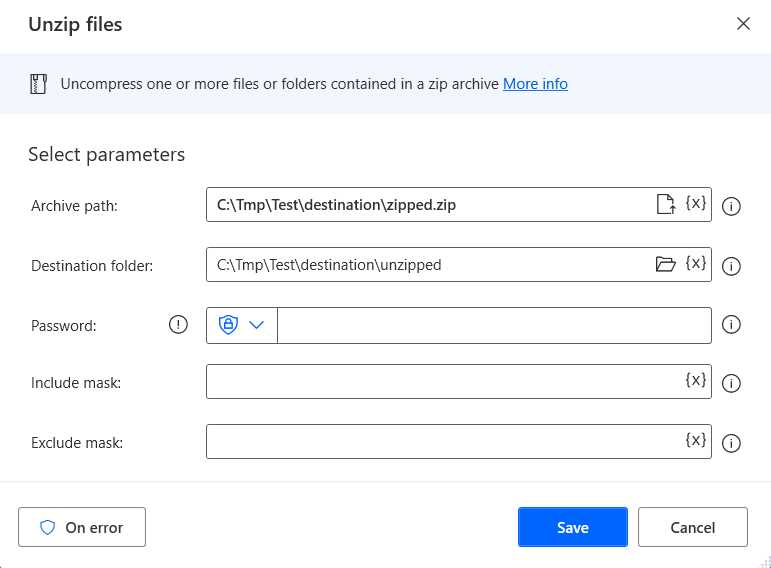
Figure 2-t: Power Automate Desktop (The Unzip files Action—Changed Details)
Once done, click Save. The flow should now look as follows.
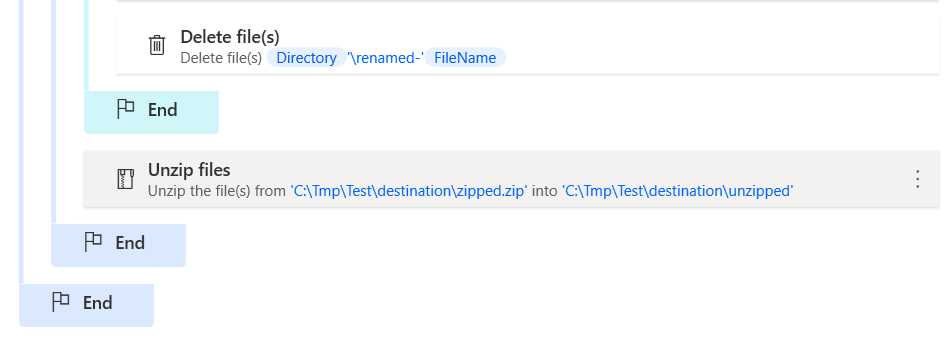
Figure 2-u: Power Automate Desktop (The Updated WorkingWithFiles Flow—Partial View)
Great, we now have the flow ready!
Running the flow
It’s time to run the flow to see it in action. But before we do that, open a Windows Explorer window pointing to the C:\Tmp\Test\destination folder (if that’s the destination folder you used throughout the flow) to see what the flow does during execution.
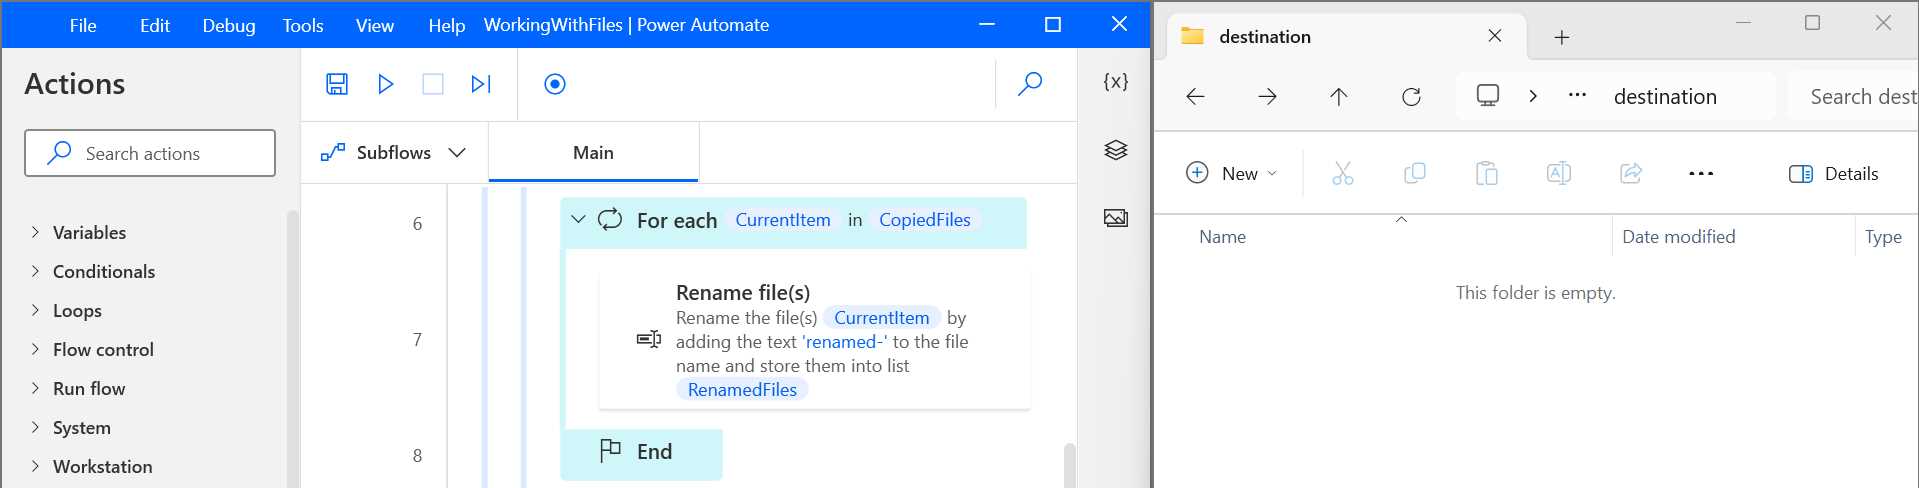
Figure 2-v: Power Automate Desktop (The Finished WorkingWithFiles Flow—Partial View) and Destination Folder, Side-by-Side
To begin the execution, click the Run icon (which is to the right of the Save icon). Shortly after the execution starts, we can see the message with the names of the copied files and how these files have been copied and zipped to the destination folder.
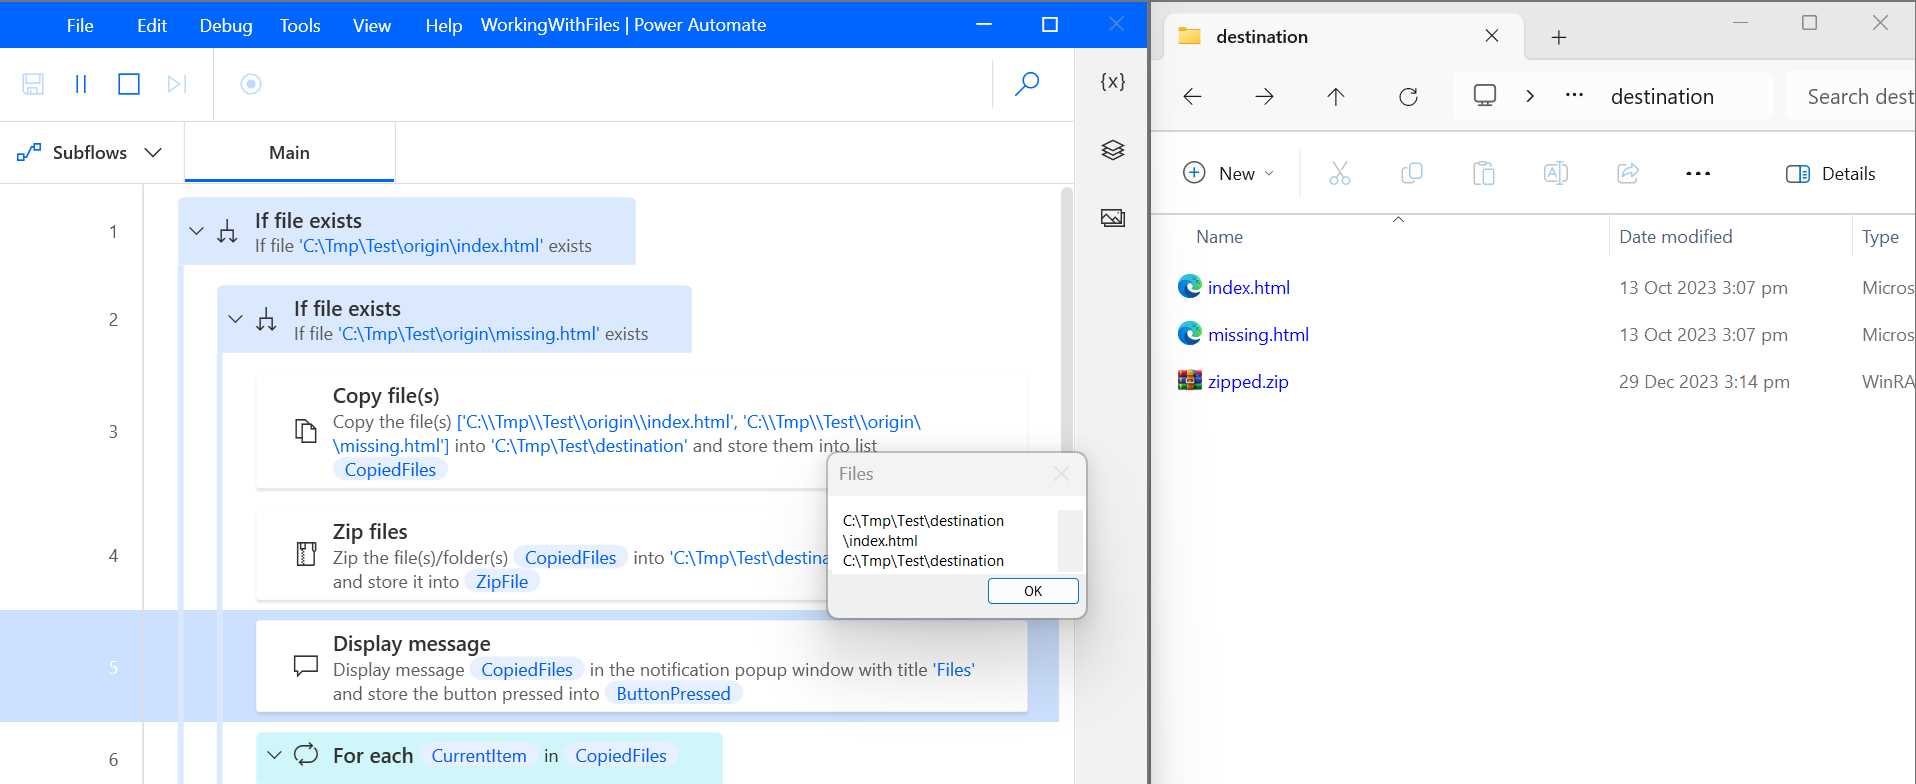
Figure 2-w: Power Automate Desktop (WorkingWithFiles Flow Execution—Partial View) and Destination Folder (During Execution—Part 1)
Let’s click OK to continue the flow execution. Shortly after, we can see that the copied files have been renamed.
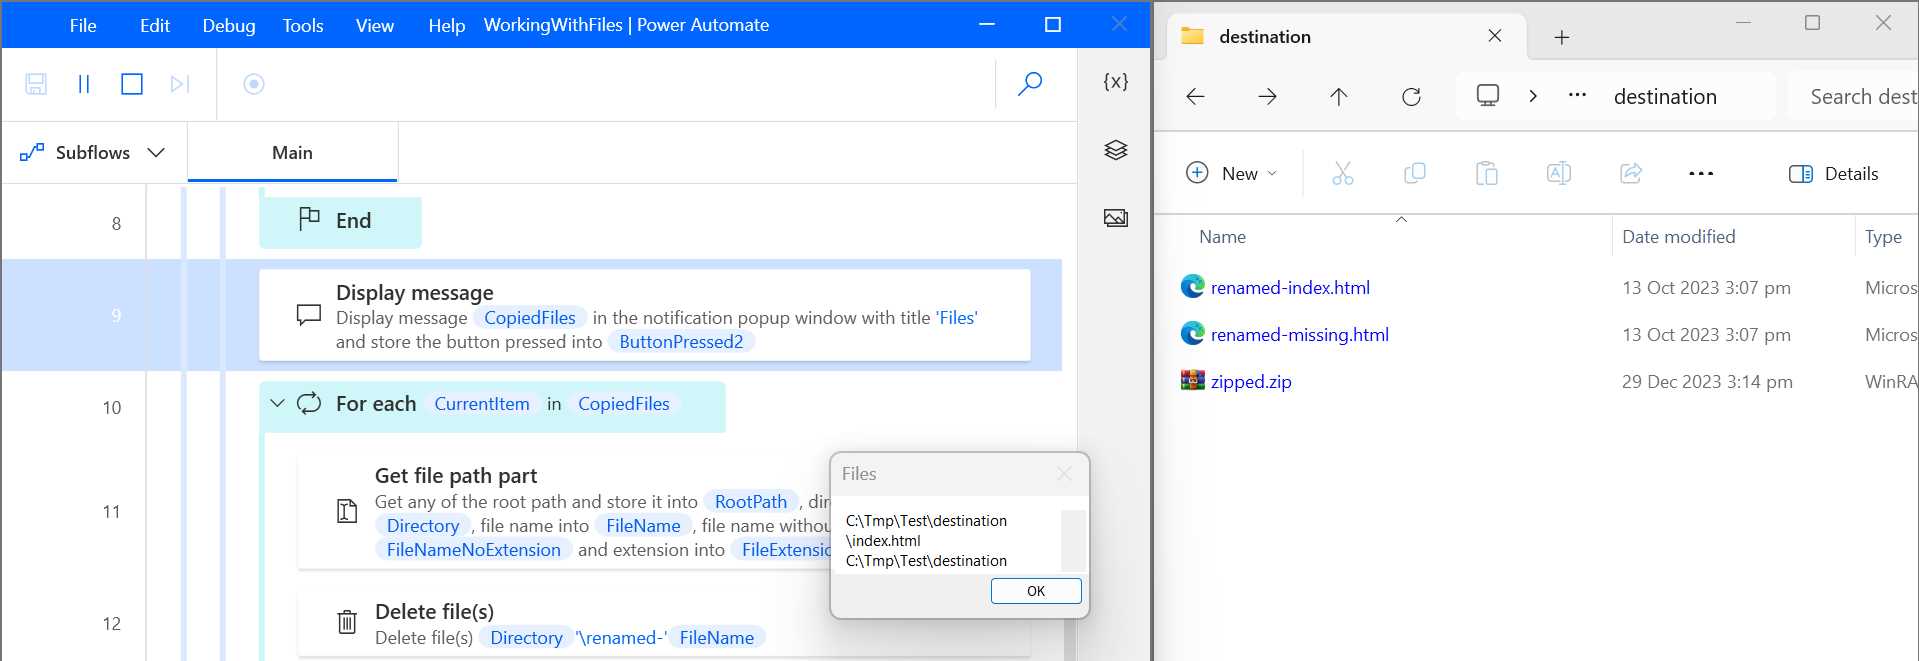
Figure 2-x: Power Automate Desktop (WorkingWithFiles Flow Execution—Partial View) and Destination Folder (During Execution—Part 2)
Let’s click OK again to continue the flow execution. Shortly after, we will see that the renamed files have been deleted, and the compressed file has been unzipped.
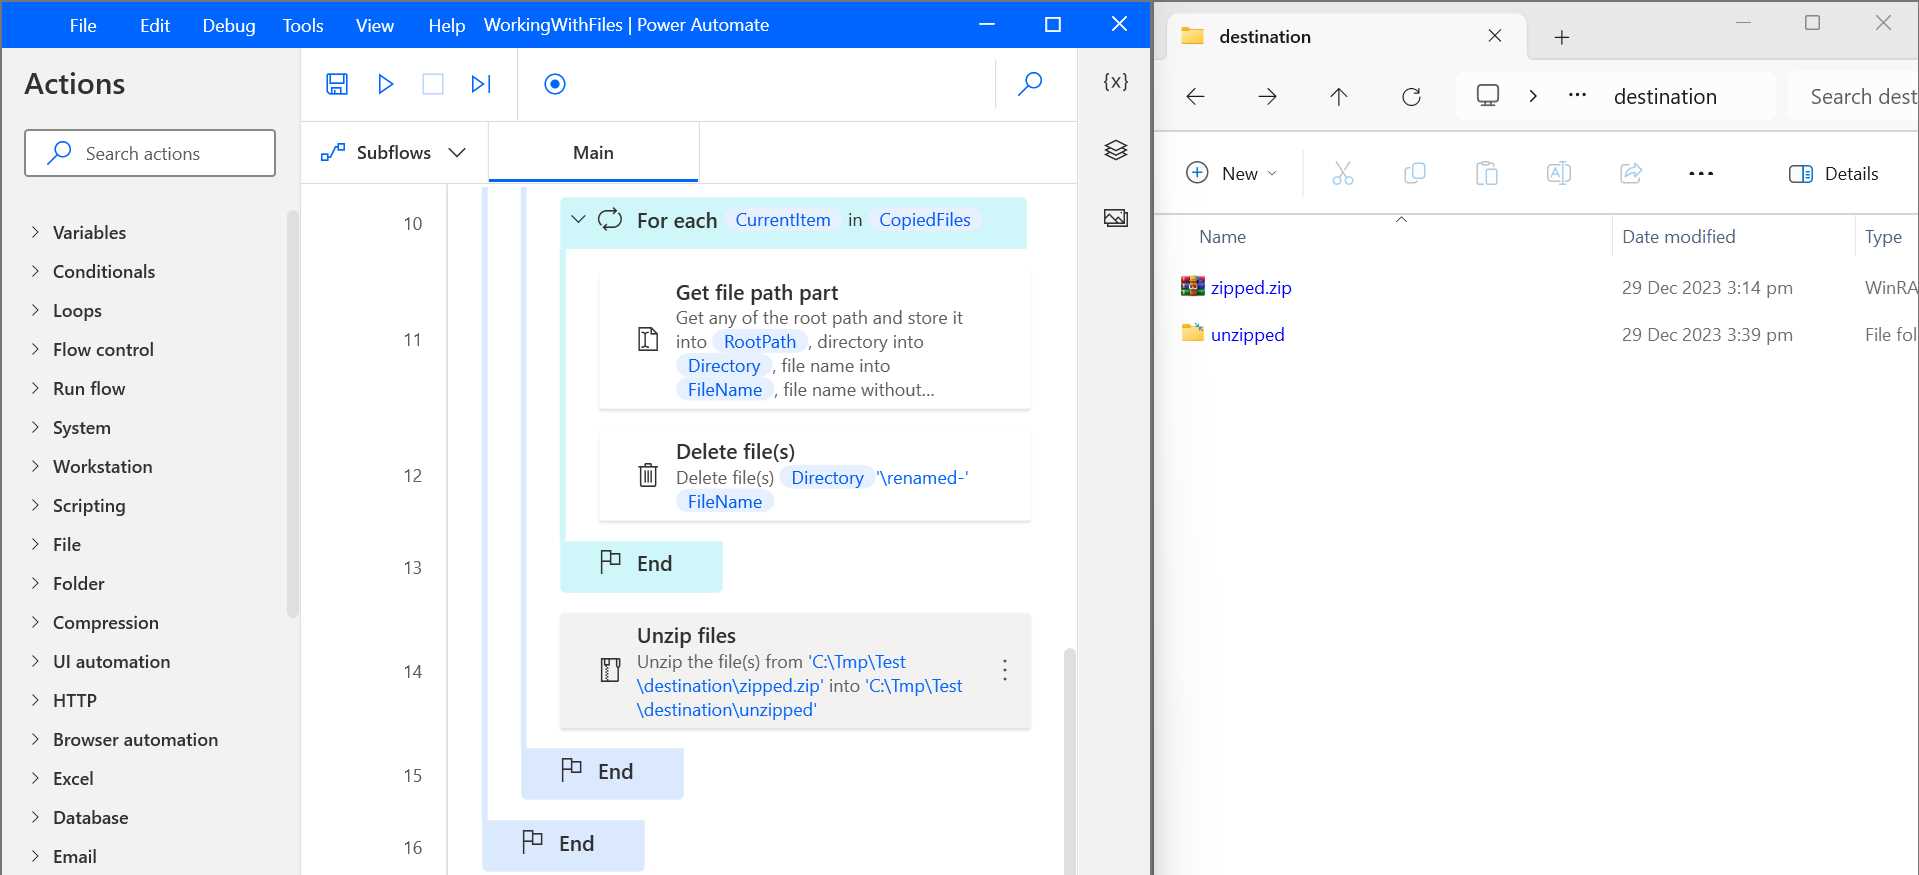
Figure 2-y: Power Automate Desktop (WorkingWithFiles Flow Execution—Partial View) and Destination Folder (During Execution—Part 3)
Ctrl+A/Ctrl+C trick
Now, here’s a trick you were probably not expecting to learn. You can select all the flow actions if you press Ctrl+A within Power Automate Desktop.
Once all the actions are selected, press Ctrl+C to copy them. You can then open your text editor and paste the details copied using Ctrl+V.
Here is what those copied details look like.
Code Listing 2-a: Pseudo-Code Representation of the Flow
|
FUNCTION Main_copy GLOBAL IF (File.IfFile.Exists File: $'''C:\\Tmp\\Test\\origin\\index.html''') THEN IF (File.IfFile.Exists File: $'''C:\\Tmp\\Test\\origin\\missing.html''') THEN File.Copy Files: ['C:\\Tmp\\Test\\origin\\index.html', 'C:\\Tmp\\Test\\origin\\missing.html'] Destination: $'''C:\\Tmp\\Test\\destination''' IfFileExists: File.IfExists.DoNothing CopiedFiles=> CopiedFiles Compression.ZipFiles ArchivePath: $'''C:\\Tmp\\Test\\destination\\zipped.zip''' FilesOrFoldersToZip: CopiedFiles CompressionLevel: Compression.CompressionLevel.BestBalanceOfSpeedAndCompression ArchiveComment: $'''''' ZipFile=> ZipFile Display.ShowMessageDialog.ShowMessage Title: $'''Files''' Message: CopiedFiles Icon: Display.Icon.None Buttons: Display.Buttons.OK DefaultButton: Display.DefaultButton.Button1 IsTopMost: False ButtonPressed=> ButtonPressed LOOP FOREACH CurrentItem IN CopiedFiles File.RenameFiles.RenameAddText Files: CurrentItem TextToAdd: $'''renamed-''' TextPosition: File.AddTextPosition.BeforeName IfFileExists: File.IfExists.Overwrite RenamedFiles=> RenamedFiles END Display.ShowMessageDialog.ShowMessage Title: $'''Files''' Message: CopiedFiles Icon: Display.Icon.None Buttons: Display.Buttons.OK DefaultButton: Display.DefaultButton.Button1 IsTopMost: False ButtonPressed=> ButtonPressed2 LOOP FOREACH CurrentItem IN CopiedFiles File.GetPathPart File: CurrentItem RootPath=> RootPath Directory=> Directory FileName=> FileName FileNameWithoutExtension=> FileNameNoExtension Extension=> FileExtension File.Delete Files: $'''%Directory%\\renamed-%FileName%''' END Compression.UnzipFiles ArchivePath: $'''C:\\Tmp\\Test\\destination\\zipped.zip''' DestinationFolder: $'''C:\\Tmp\\Test\\destination\\unzipped''' END END END FUNCTION |
Recap
Great! We have now seen how to work with files using Power Automate Desktop and copy, rename, delete, zip, and unzip files.
Behind the scenes, Power Automate Desktop uses a lightweight programming language called Microsoft Power Fx.
- 1800+ high-performance UI components.
- Includes popular controls such as Grid, Chart, Scheduler, and more.
- 24x5 unlimited support by developers.