
Power Automate Desktop Succinctly®

CHAPTER 4
Automated Data Entry
Quick intro
Now, imagine the following scenario. Your organization has set up a Google Form, which users cannot fill in themselves, and you have been tasked with filling in this form for them.
If you have to fill in this form two or three times, it’s not an issue. However, it's a different story if you must manually fill in this form 100 times. That’s where Power Automate Desktop can be a lifesaver.
Throughout this chapter, we will create an automated flow that can automatically submit the details of a Google Form multiple times based on information read from a text file with various records.
Customer Feedback form
Most people have a Gmail account—it’s free to sign up for one if you don't have one. The Google Forms template we’ll use is Customer Feedback. If you don’t see the Customer Feedback form, click the Template gallery dropdown in the upper-right corner.
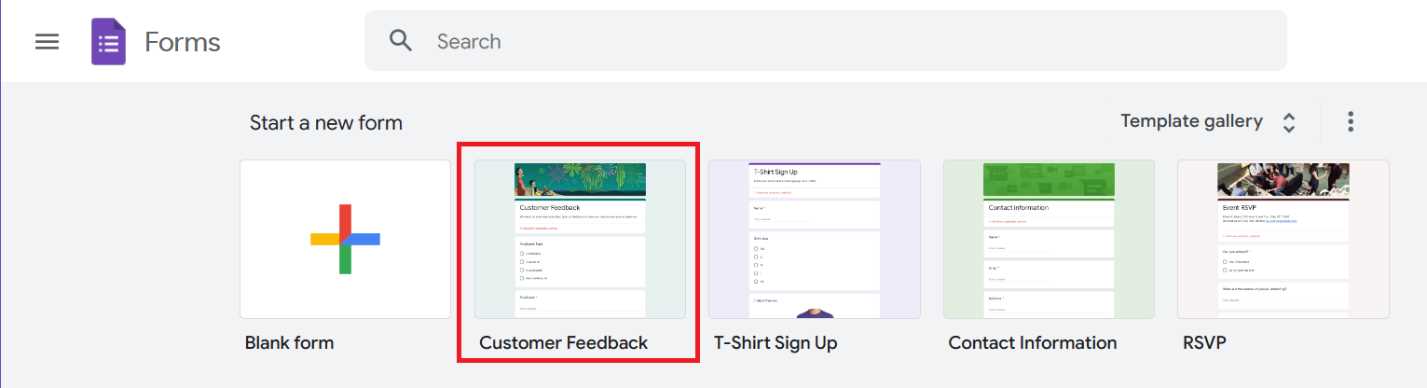
Figure 3-a: Google Forms—The Customer Feedback Form (Template Highlighted)
Click the Customer Feedback template to create the form. Once the form has been created, we need to get the form’s URL, which we can use within Power Automate Desktop to automate the process.
To access the URL that we can use within Power Automate Desktop to automate the data entry of this form, we first need to click the Send button at the top of the form.
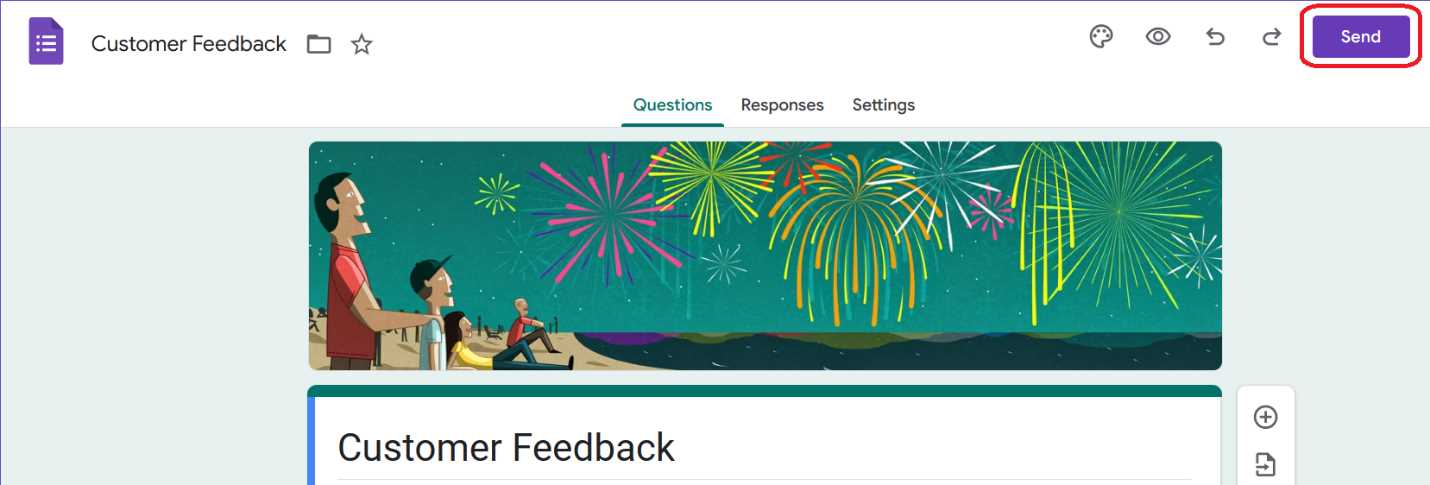
Figure 3-b: Google Forms—The Customer Feedback Form (Send Button Highlighted)
Once we click the Send button, we’ll see a pop-up window; let’s click the tab with the link icon to see the URL. Click Copy to copy the URL.
Once copied, paste it into Notepad and save it as a text file, as we’ll need to use this URL later.
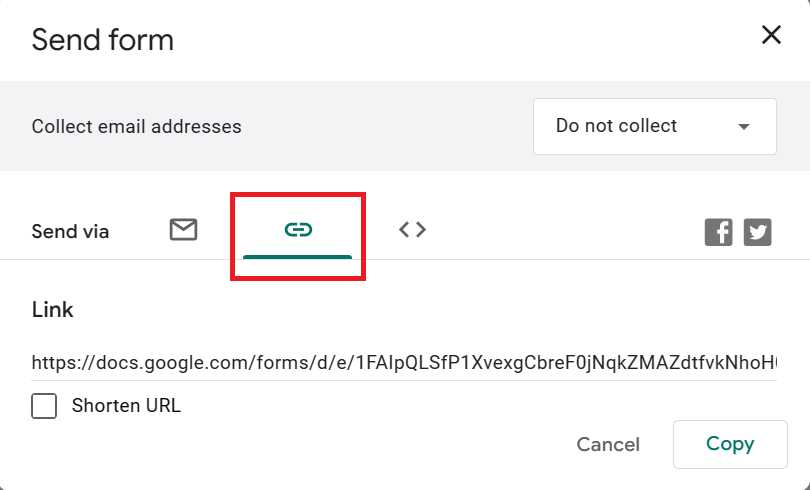
Figure 3-c: Google Forms—Send form Pop-up (Copy Link Tab Highlighted)
Now that we have copied the form’s URL, let’s look at the fields we need to populate. In my case, I've used the Shorten URL checkbox option and obtained the following URL:
https://forms.gle/JYhWMhc3bSNjxiQ98
Note: I strongly suggest you use the URL that your Customer Feedback form provides you rather than mine, as at some point, I will remove this form, and it is possible that by the time you are reading this book, that form and URL might not work any longer.
Form fields
Our Power Automate Desktop flow will need several input fields to populate automatically. The first is the Feedback Type field, which contains four options, as seen in the following figure.

Figure 3-d: The Feedback Type Field—Customer Feedback Form
Next, we have the Feedback, Suggestions for improvement, and Name fields.
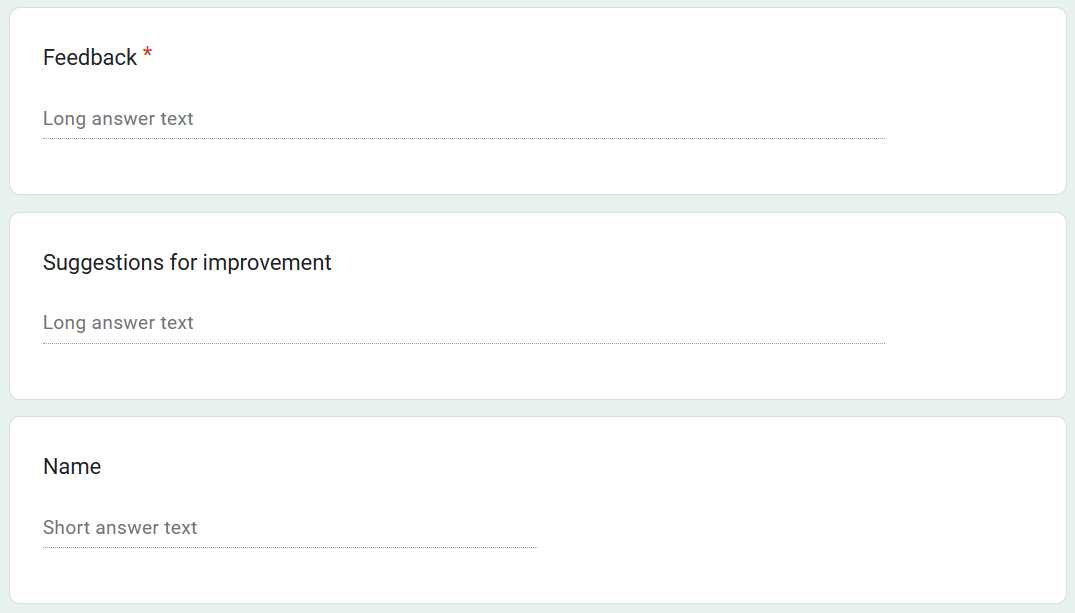
Figure 3-e: The Feedback, Suggestions for improvement, and Name Fields—Customer Feedback Form
Following these fields, we also need to populate the Email field.

Figure 3-f: The Email Field—Customer Feedback Form
Those are all the fields we need to populate with Power Automate Desktop automatically.
Creating the flow
Now that we know what fields to populate for the online form, let’s create a new workflow. Let’s call this flow PopulateOnlineForm.
Note: We’ve previously explored creating a new flow, so we won’t cover how to do this again.
Setting the form URL
The first action we need to add to the flow is one that automatically sets the URL to the online form we want to populate. The action that does this is the Set variable action. We can find this action under Variables within the Actions pane. So, let’s drag that action to the flow to add it.
Then, click on the default variable name, NewVar (%NewVar%), and change it to Url (%Url%). Let’s also assign the online form URL to the Value text box, which you previously copied to Notepad and saved as a text file.

Figure 3-g: The Set variable Action—(Changed Details)
Once you have changed the default values, click Save.
Launch a browser instance
Now that we have set the URL for the online form that we will populate, let’s launch a browser instance.
To do that, let’s add the Launch new Chrome action to the flow, which we can find under Browser automation within the Actions pane. Let’s assign the Url variable (%Url%) to the Initial URL text box and set the Window state property as Maximized.
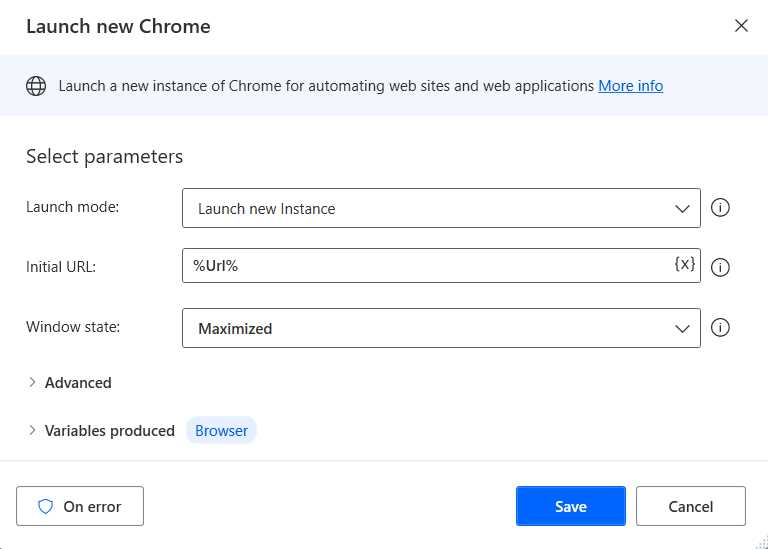
Figure 3-h: The Launch new Chrome Action—(Changed Details)
Once done, click Save to continue.
Note: Under Browser automation, you’ll also find the Launch new Internet Explorer, Launch new Firefox, and Launch Microsoft Edge actions. In my case, I’m used to working with Chrome, so that’s why I’ve chosen the Launch new Chrome action instead.
Loading the data to populate
To populate the online form, we need some data. I’ve prepared a feedback.txt file with three test records, which we can read and use to populate the form:
Comments|This is a comment|A great suggestion|John Diego|[email protected]
BugReports|This is a bug report|Get rid of all the bugs, please|Pepe Trueno|[email protected]
FeatureRequest|This is a feature request|Make an amazing product|Juan Josh|[email protected]
So, to read and load this file, we need to use the Read text from file action. We can find this action under File within the Actions pane.
Let’s assign the file path of the feedback.txt file (where the data resides) to the File path text box.
Let’s also set the value of Store content as to List (each is a list item). We can leave the Encoding property with the default value of UTF-8.
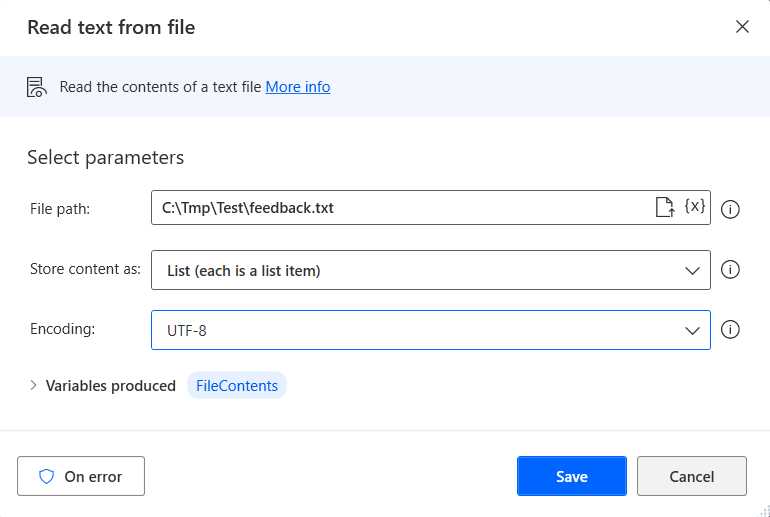
Figure 3-i: The Read text from file Action—(Changed Details)
Once done, let’s click Save. Doing this allows us to read and load all the data from the feedback.txt file, which we’ll use to populate the online form.
Iterating through the data loaded
Now that the data is loaded, we need to iterate through it. We can do this using a For each action. We can find the For each action under Loops within the Actions pane. So, let’s add it to the flow.
Let’s assign the FileContents variable (%FileContents%) to the Value to iterate text box, which contains the data loaded from the previous action.
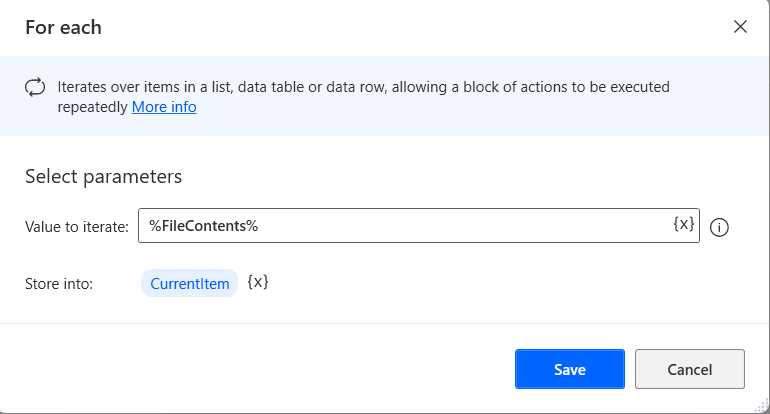
Figure 3-j: The For each Action—(Changed Details)
Each loaded record will be available within the CurrentItem (%CurrentItem%) variable. Once done, click Save.
Splitting each record
Looking closely at each record, we see a pipe (|) separator character between each data item. To access each data item, we need to separate each record using every occurrence of the pipe (|) character.
Comments|This is a comment|A great suggestion|John Diego|[email protected]
To do that, we need to use the Split text action, which we can find under Text within the Actions pane. Let’s add this action to the flow.
Once the action has been added, let’s assign the CurrentItem variable (%CurrentItem%) to the Text to split text box.
To the Delimiter type property, we must assign the Custom option, and as the Custom delimiter, we need to indicate the pipe (|) character.
Let’s also change the Variables produced from the default name to LineParts.
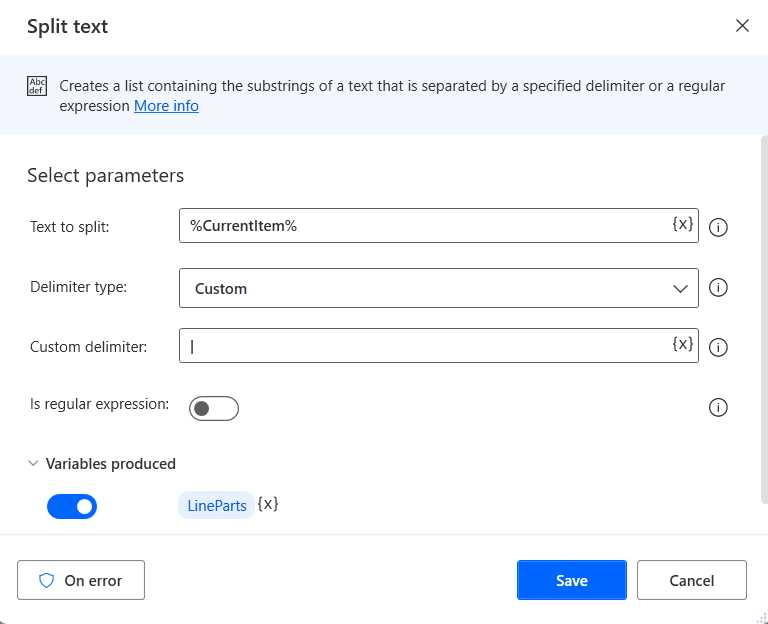
Figure 3-k: The Split text Action—(Changed Details)
Once done, click Save. After this action executes, we’ll go from this:
Comments|This is a comment|A great suggestion|John Diego|[email protected]
To this (contained within the LineParts variable (%LineParts%)):
Comments
This is a comment
A great suggestion
John Diego
We are splitting each record into parts because each corresponds to a field within the online form we must populate.
Looping through fields
With the fields now available as LineParts (%LineParts%), we must iterate through them to determine how to assign each value to its counterpart on the online form.
To do that, we’ll need to add another For each action to the flow after the Split text action we previously added. But before we add this new For each action to the flow, we need to add a Set variable action to keep track of each iteration.
Let’s add the Set variable action to the flow. We can find this action under Variables within the Actions pane. Let’s rename the Variable name to Index rather than use the default name. Let’s set the Value to 0.
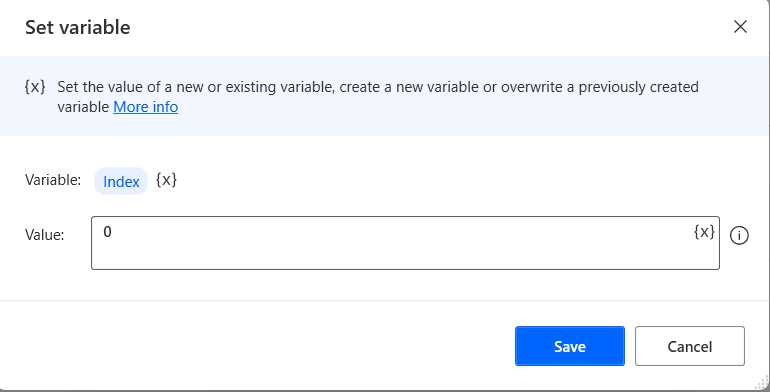
Figure 3-l: The Set variable Action—(Changed Details)
Once these values have been set, let’s click Save. We’ll use the Index variable (%Index%) later within the For each action that we will add next.
For each action
Let’s add the For each action to the flow. We can find it under Loops within the Actions pane. We can assign the LineParts variable (%LineParts%) to the Value to iterate text box.
Let’s also rename the name of the Store into property to Field instead of the default value.
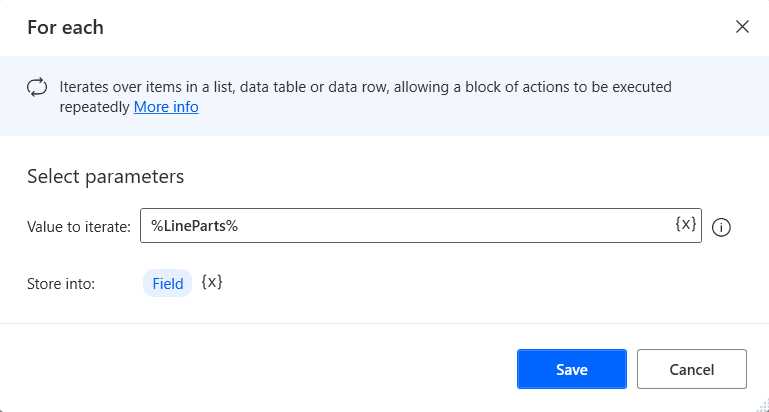
Figure 3-m: The For each Action—(Changed Details)
Once those values have been changed, click Save. The flow should now be as follows.
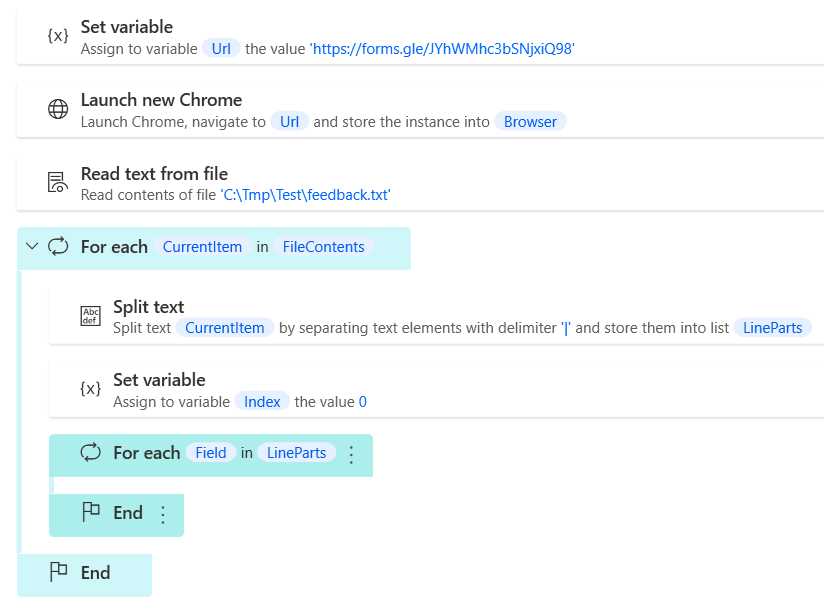
Figure 3-n: The Current Flow So Far
UI Elements tab
Now that we can iterate through each field, we must determine how to assign those values to their respective fields on the online form.
To do that, we must instruct Power Automate Desktop to find those fields on the online form and then use If and Else if actions to determine how they are populated. To identify the field on the form, we need to add the UI elements that correspond to them. We can do this by accessing the UI elements tab.

Figure 3-o: The UI elements Tab
In principle, we’ll need to add at least one UI element for every text field of the form, and in the case of the multiple-choice field, we’ll need to add one UI element per choice.
Online form (design mode vs. runtime mode)
Before we add any UI elements, there’s one crucial thing you need to know. The online form is, by default, shown in design mode.
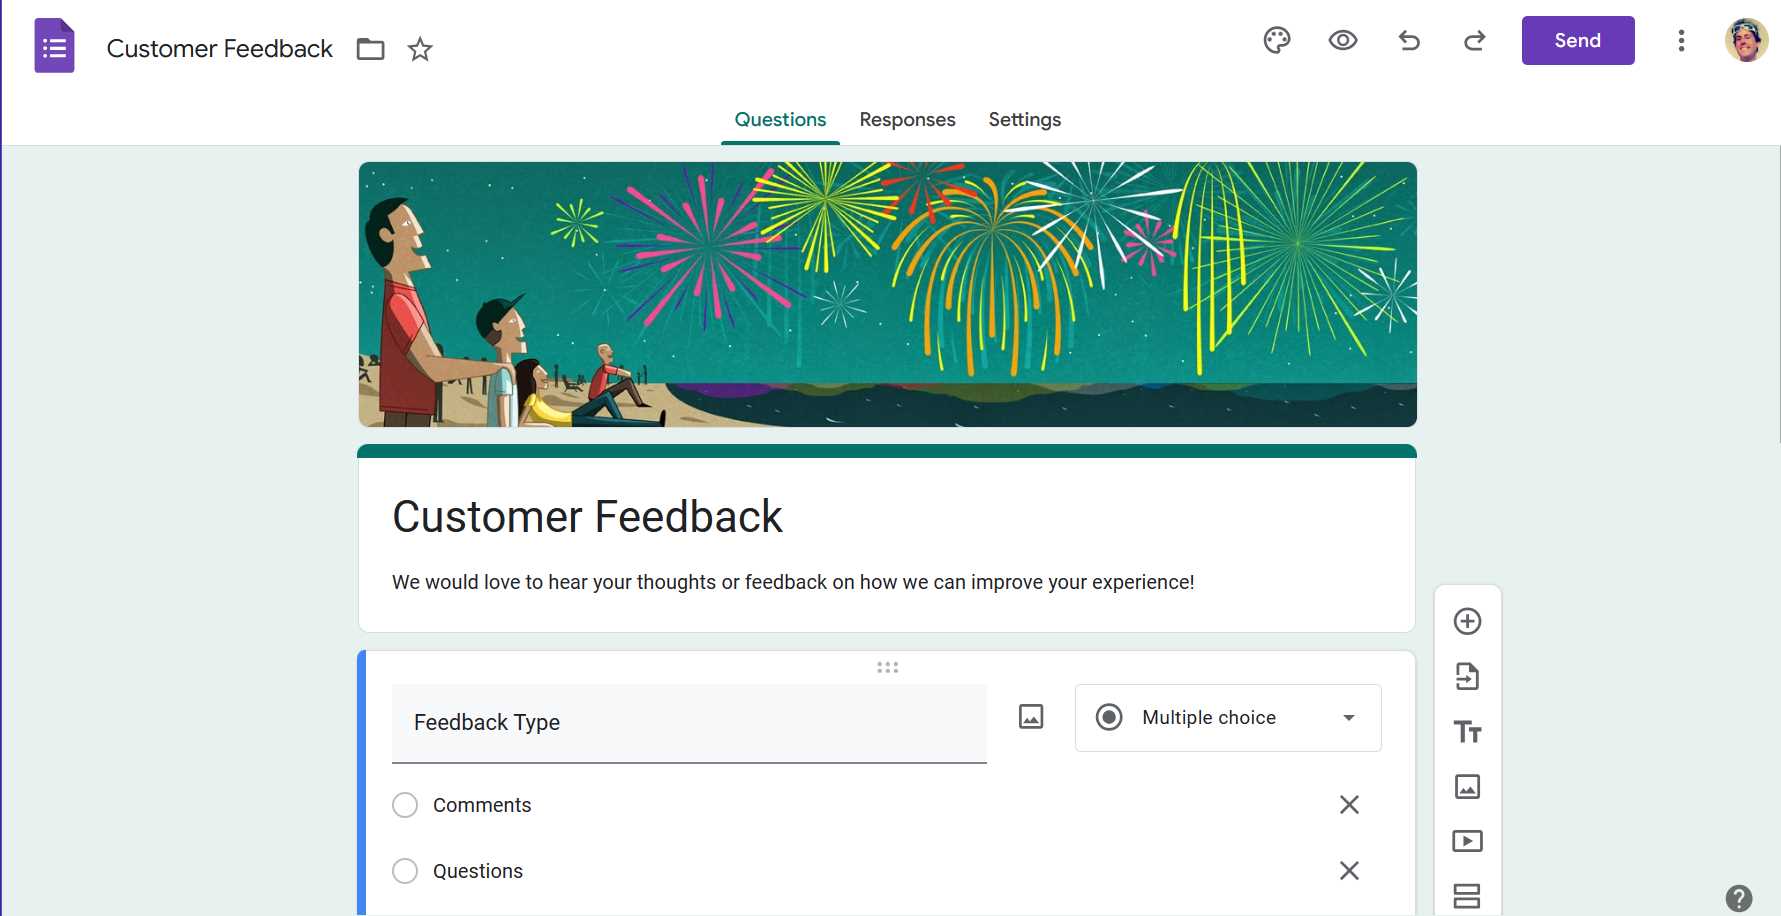
Figure 3-p: The Online Form (Design Mode)
When inspecting and adding UI elements, we never add those elements from the online form in design mode. We add them instead from the online form in runtime mode.
To access the online form in runtime mode, we must click the Send button and then retrieve the URL of the form, which, in the real world, we would provide to users to fill in the form manually.
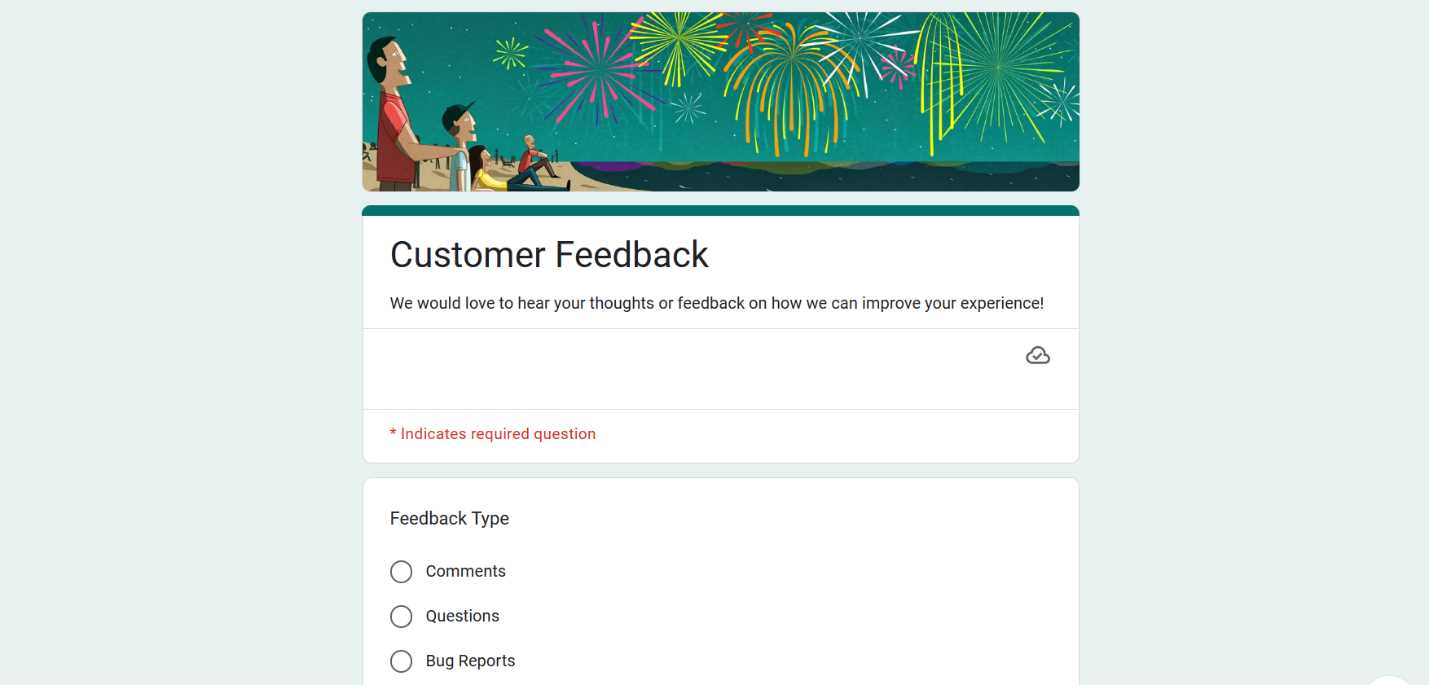
Figure 3-q: The Online Form (Runtime Mode)
We previously saw how to get this URL, so I won’t cover that again. In any case, you can get this URL from the flow’s initial Set variable action.
Feedback Type UI elements
The Feedback Type is a multiple-choice field with four possible answers, each representing a UI element: Comments, Questions, Bug Reports, and Feature Requests. We need to add a UI element for each choice.
First, let’s ensure the online form (in runtime mode) is visible. So, using the same form URL you added to the flow’s initial Set variable action, manually open a new browser instance and navigate to that URL. You should now see the runtime version of the online form that we’ll be populating.
Note: You must manually open the online form using the URL you added to the flow’s initial Set variable action, because you must inspect the UI elements of the online form in runtime mode (when users would manually fill in the form). You mustn’t check the UI elements of the online form in design mode.
Within Power Automate Desktop, we need to click the downward-facing arrow to the right of the Add UI element button, and then click Inspect UI elements.
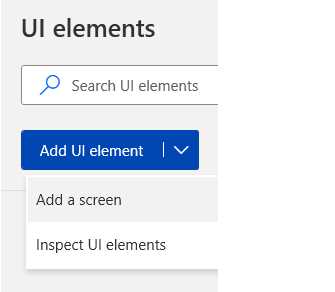
Figure 3-r: The Add UI element Options
The following UI element picker window will appear once you have clicked the Inspect UI elements option.
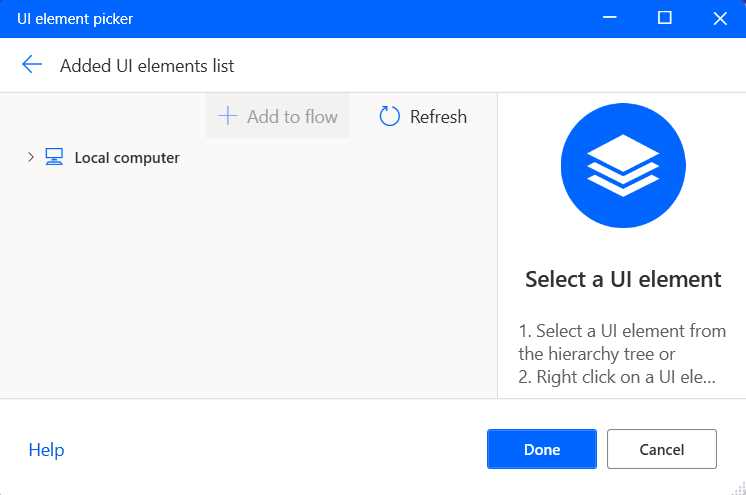
Figure 3-s: The UI element picker Window
The UI element that you’ll add will be shown within this UI element picker window. So, to capture the Comments UI element, we need to hover over the Comments radio button, press the Ctrl key, and simultaneously do a mouse click.
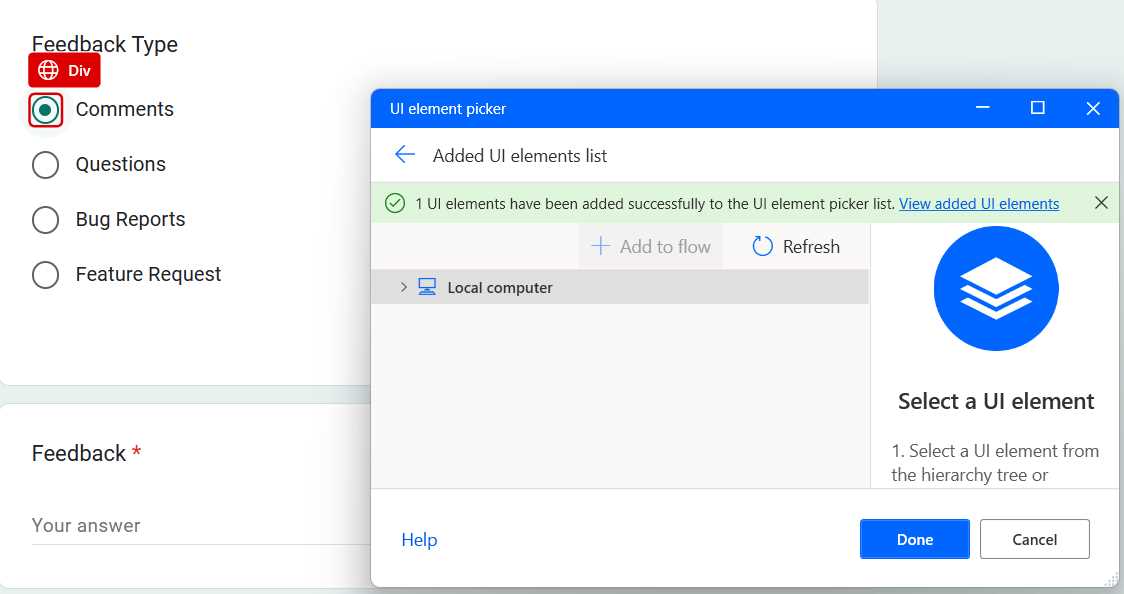
Figure 3-t: Selecting the Comments UI Element
Once done, you’ll see that the UI element picker will show a message indicating that the UI element has been added to the UI element picker list. To finalize the process, click Done.
We’ll then see the UI element on the list within the Power Automate Desktop flow window.
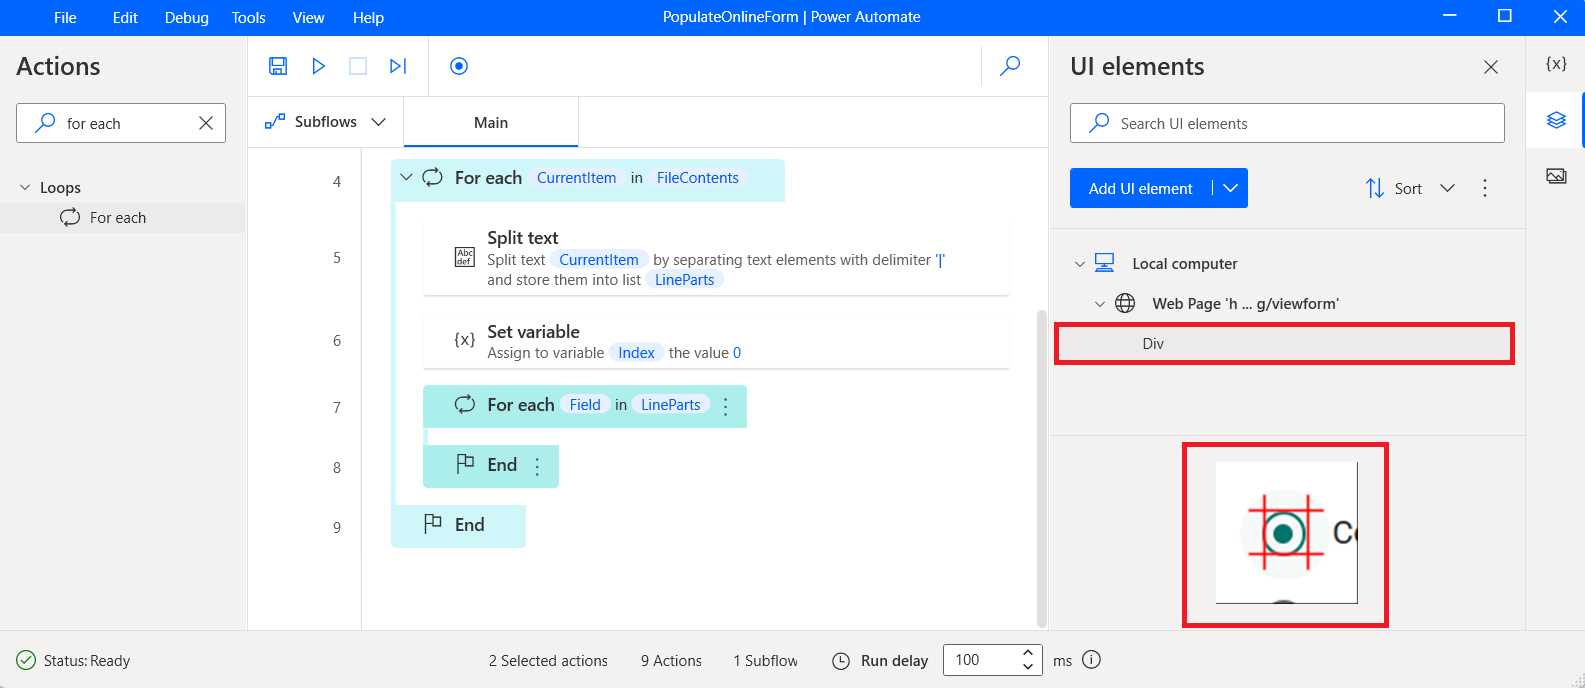
Figure 3-u: The UI Element Added (Flow Windows—UI elements Section)
So far, we’ve just added the Comments option as a UI element, but we still have to add the Questions, Bug Reports, and Feature Request options.
So, let’s repeat the process. Click the downward-facing arrow to the right of the Add UI element button, and then click Inspect UI elements.
When the UI element picker appears, select the radio button corresponding to the Questions UI element, press Ctrl, and click the mouse to add the element. Then, click Done so the UI element appears in the list of UI elements.
Repeat those steps to add the Bug Reports and Feature Request UI elements.
Other input UI elements
Now that we have added the four UI elements corresponding to the Feedback Type field, we need to add the UI element to the Feedback field. The process is essentially the same. Click the downward-facing arrow to the right of the Add UI element button, and then click Inspect UI elements.
When the UI element picker appears, select the text box corresponding to the Feedback field, press the Ctrl key, and click the mouse to add the element.
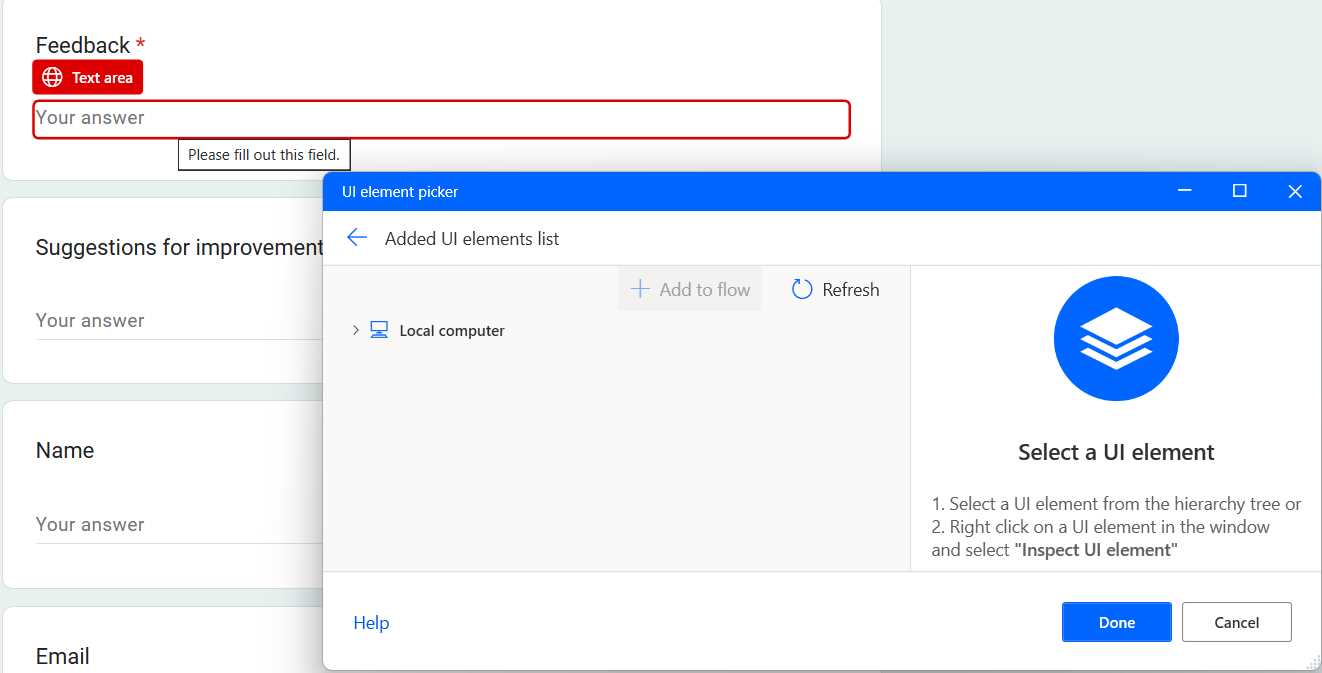
Figure 3-v: Adding the Feedback UI Element (Before Ctrl + Mouse Click)
Then, click Done so the UI element appears in the list of UI elements on the Power Automate Desktop flow window.
Complete the same steps to add the UI elements for the Suggestions for improvement, Name, and Email fields.
The Submit button UI element
The final UI element that we need to add is the Submit button. The steps are the same. Click the downward-facing arrow to the right of the Add UI element button and then click Inspect UI elements.
When the UI element picker appears, select the Submit button, press the Ctrl key, and click the mouse to add the element.
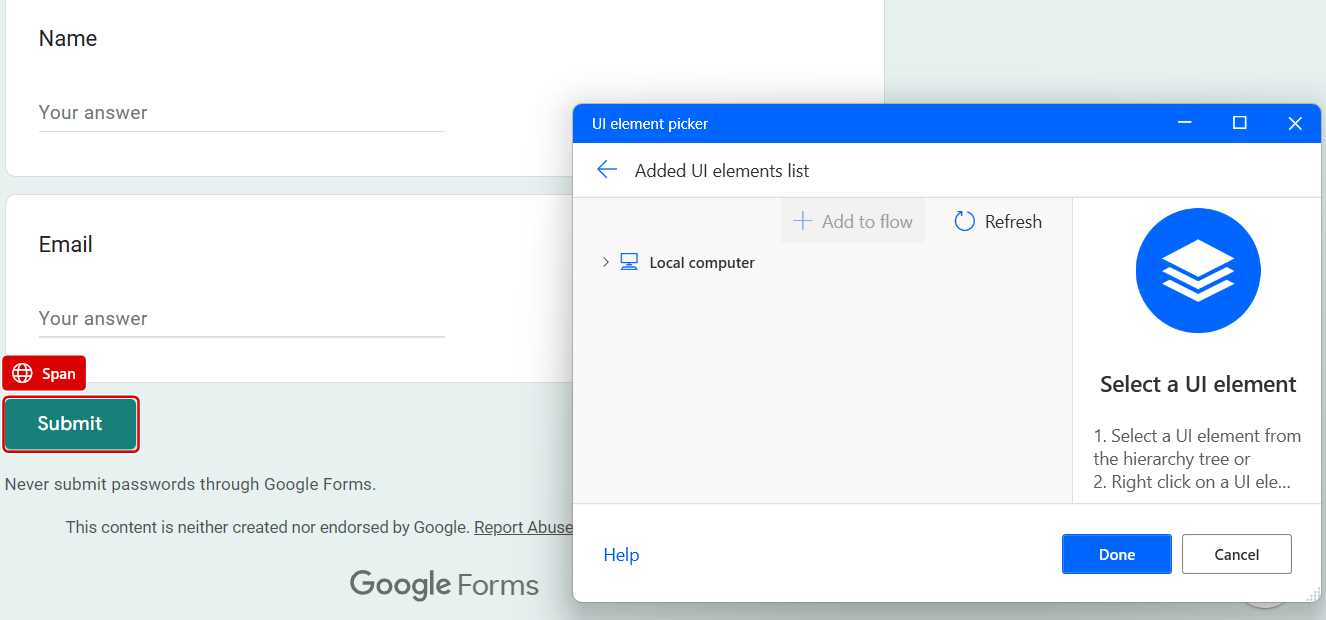
Figure 3-w: Adding the Submit Button Element (Before Ctrl + Mouse Click)
Then, click Done so the UI element appears in the list of UI elements on the Power Automate Desktop flow window.
Awesome! We now have all the UI elements identified, and can focus on adding the rest of the flow’s functionality.
Determining the input values
Previously, we added a Set variable action to the flow, which we called Index, and assigned a value of zero to it. The purpose of this variable is to determine what input field will be automated when entering data into the form.
If the Index variable has a value of 0, we can assume that we are automating the data entry of the Feedback Type field of the form, as it’s the first field that appears on the form.
If the Index variable has a value of 1, we can assume that we are automating the data entry of the Feedback field, as it’s the second field that appears on the form.
If the Index variable has a value of 2, we can assume that we are automating the data entry of the Suggestions for improvements field, as it’s the third field that appears on the form.
If the Index variable has a value of 3, we can assume that we are automating the data entry of the Name field, as it’s the fourth field that appears on the form.
If the Index variable has a value of 4, we can assume that we are automating the data entry of the Email field, as it’s the fifth field that appears on the form.
Regarding the Feedback Type field, we must evaluate if the selected UI element corresponds to the Comments, Questions, Bug Reports, or Feature Request option. So, based on this logic, we need to add two levels of conditionals to the flow when looping through the LineParts variable (%LineParts%).
The outer level evaluates the value of the Index variable, and the inner level only applies to the Feedback Type field and checks what type of option was selected for the Feedback Type.
Outer-level conditions
Let’s add an If action to the flow and place it within the second For each action that iterates through the LineParts variable (%LineParts%). The If action is under Conditionals within the Actions pane.
We can assign the Index variable’s (%Index%) value to the First operand and 0 to the Second operand. Once done, click Save. This If action evaluates whether we are on the Feedback Type field.
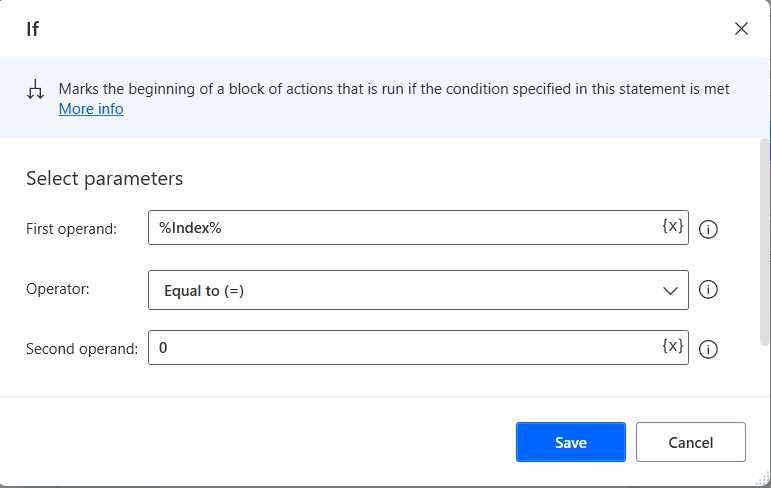
Figure 3-x: If Action (Changed Details)
Next, let’s add an Else if action and place it after the If action we just added. The Else if action is also under Conditionals within the Actions pane.
We can also assign the Index variable’s (%Index%) value to the First operand and 1 to the Second operand. Once done, click Save.
This If action evaluates whether we are on the Feedback field.
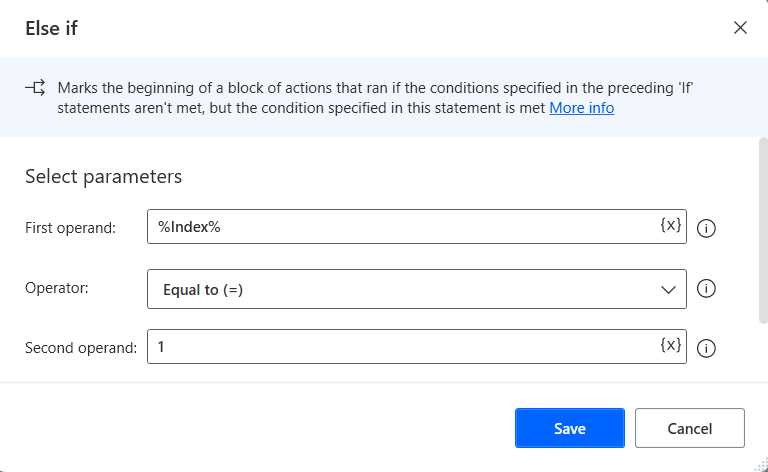
Figure 3-y: Else if Action (Changed Details)
Next, let’s add another Else if action and place it after the Else if action we just added. We can also assign the Index variable’s (%Index%) value to the First operand and 2 to the Second operand. Once done, click Save.
This Else if action evaluates whether we are on the Suggestions for improvement field.
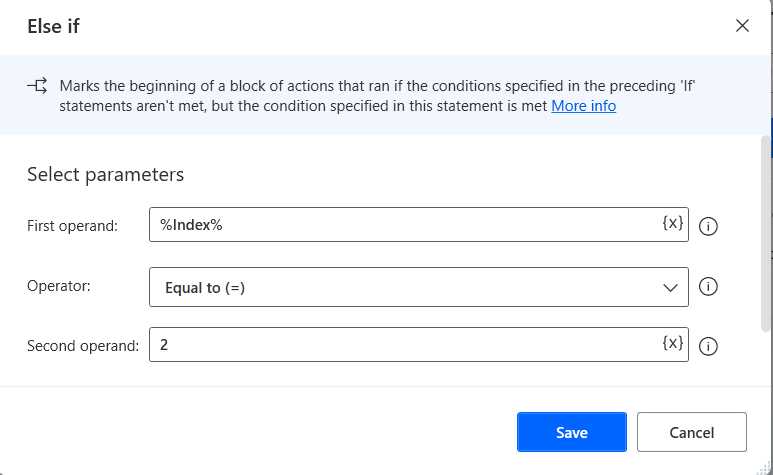
Figure 3-z: Another Else if Action (Changed Details)
Next, let’s add another Else if action and place it after the Else if action we just added. We can also assign the Index variable’s (%Index%) value to the First operand and 3 to the Second operand. Once done, click Save.
This Else if action evaluates whether we are on the Name field.
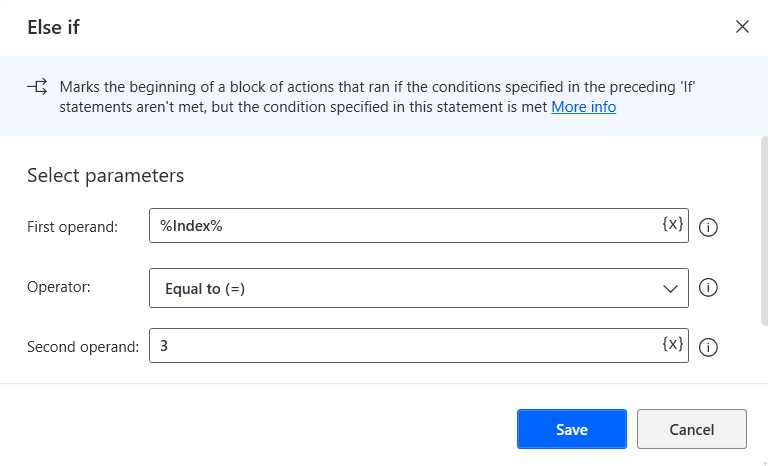
Figure 3-aa: Another Else if Action (Changed Details)
Finally, let’s add another Else if action and place it after the Else if action we just added. We can also assign the Index variable’s (%Index%) value to the First operand and 4 to the Second operand. Once done, click Save.
This Else if action evaluates whether we are on the Email field.
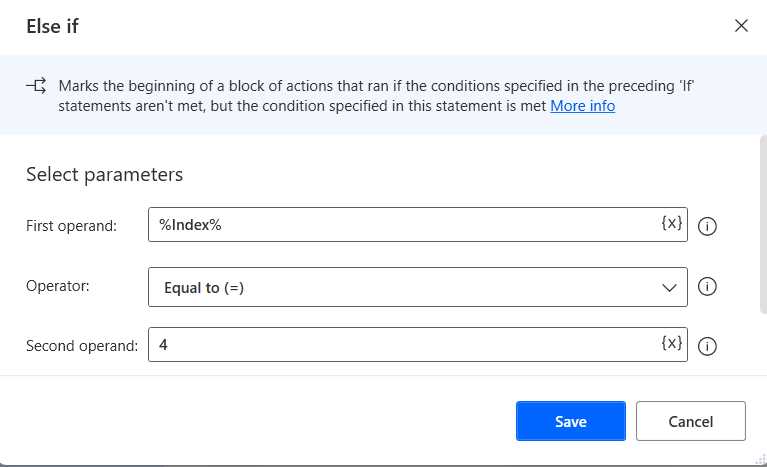
Figure 3-ab: Another Else if Action (Changed Details)
After adding these conditions, the flow should now look as follows.
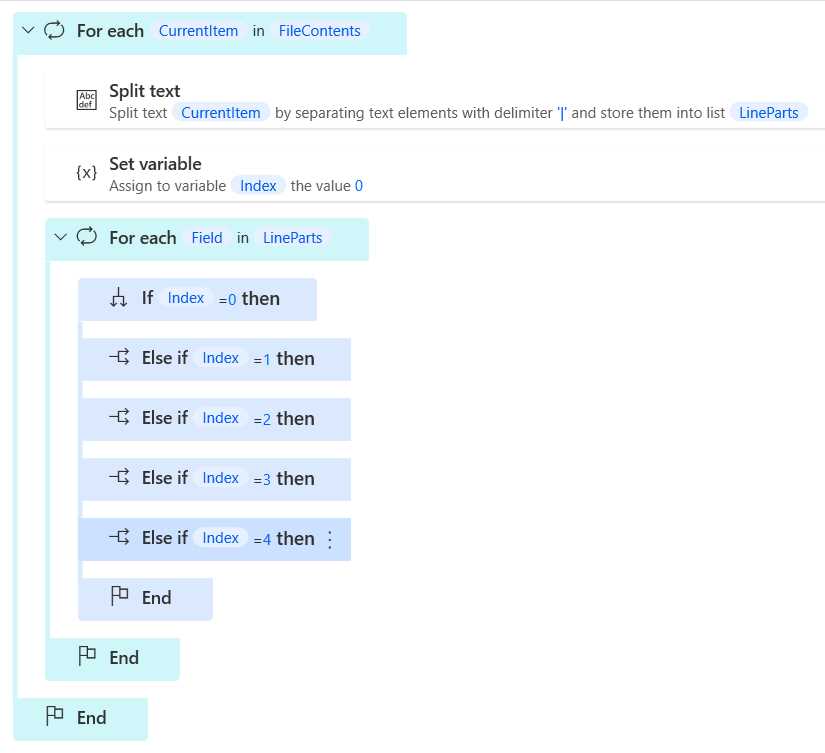
Figure 3-ac: The Updated Flow (Outer-Level Conditions)—Partial View
Now that we have the outer-level conditions defined, let’s add the conditions required to evaluate inner-level conditions, which will be used to determine the choice for the Feedback Type field.
Inner-level conditions
Let’s add another If action, and this time, place it within the If action where we check if the Index variable (%Index%) equals zero (0).
Let’s assign the Field variable (%Field%) to the First operand and Comments to the Second operand. By doing this, we are checking whether the Feedback Type field has the Comments option as the selected choice. Once done, click Save.
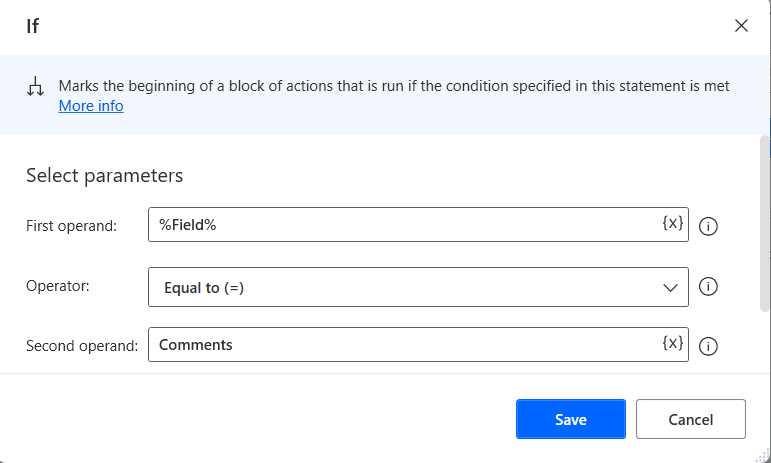
Figure 3-ad: Inner-Level If Action (Changed Details)
Now, let’s add an Else if action right after the If action we just added. This action will be used to check whether the choice for the Feedback Type field is the Questions option.
Let’s assign the value of the Field variable (%Field%) to the First operand and Questions to the Second operand. Once done, click Save.
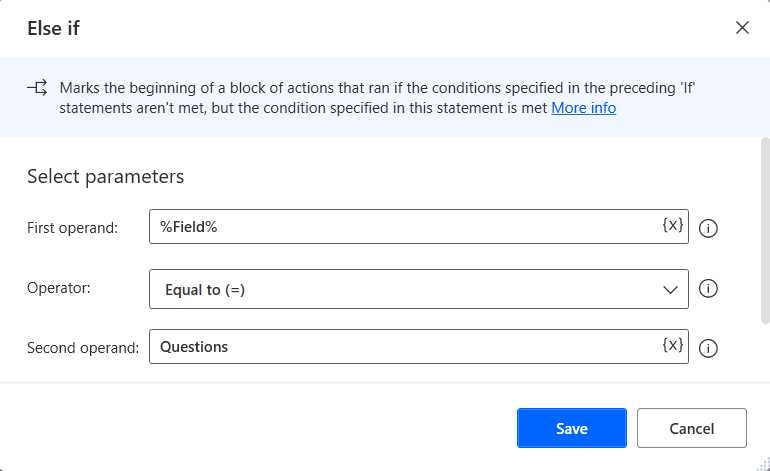
Figure 3-ae: Inner-Level Else if Action (Changed Details)
Moving on, let’s add another Else if action to the flow after the Else if action we just added. This action will be used to check whether the choice for the Feedback Type field is the Bug Reports option.
Let’s assign the value of the Field variable (%Field%) to the First operand and BugReports to the Second operand. Once done, click Save.
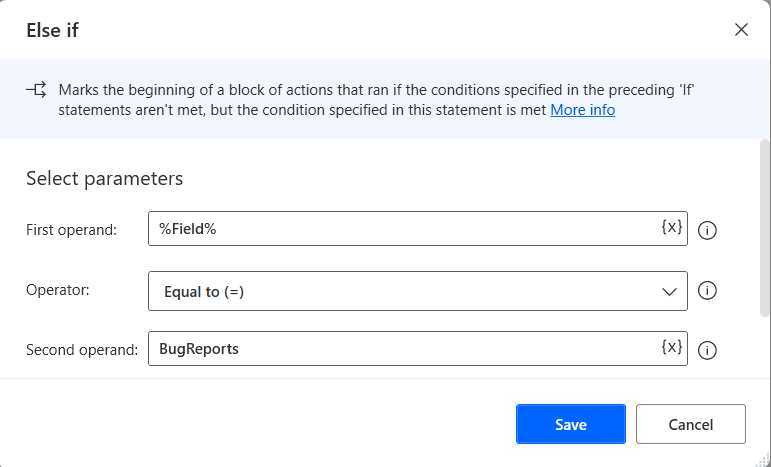
Figure 3-af: Inner-Level Else if Action (Changed Details)
Next, let’s again add another Else if action to the flow after the Else if action we just added. This action will be used to check whether the choice for the Feedback Type field is the Feature Request option.
Let’s assign the value of the Field variable (%Field%) to the First operand and FeatureRequest to the Second operand. Once done, click Save. If we now look at the flow, it should be as follows.
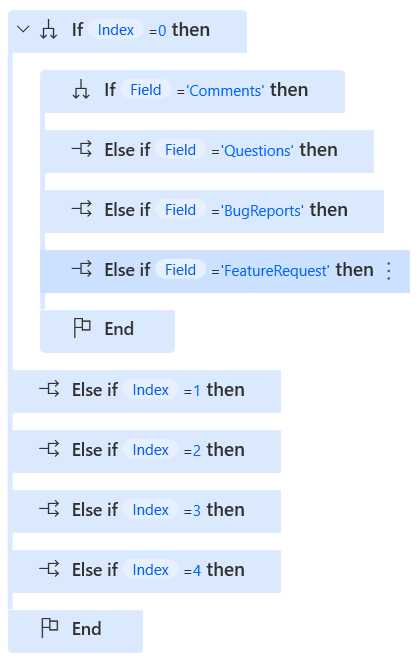
Figure 3-ag: Updated Flow—Partial View
Populating the Feedback Type field
Now that we have defined the logic required to automate how the form fields should get populated, let’s add the actions that populate those fields. We’ll get started by populating the Feedback Type field.
Add the Select radio button on web page action to the flow to do that. This action is under Browser automation and Web form filling within the Actions pane. Let’s place it within the If action that evaluates if the Field variable equals Comments.

Figure 3-ah: The Select radio button on web page Action (Comments Option)
By default, when the action opens, the value of the Browser variable (%Browser%) is assigned to the Web browser instance property.
However, the UI element property is not populated by default. You’ll need to click the downward arrow on the dropdown and select the UI element corresponding to the radio button (option) we want to populate automatically. In this case, we want to set the UI element corresponding to the Comments option (from the list of available UI elements), which, in my case, is the Div element highlighted in Figure 3-ai.
Note: The names of your UI elements might differ from mine. For example, the Div element highlighted in the following figure might have a completely different name in your case. Although Power Automate Desktop takes the names of the UI elements from the names of the web form elements, those UI element names might not always match the names of the web form elements.
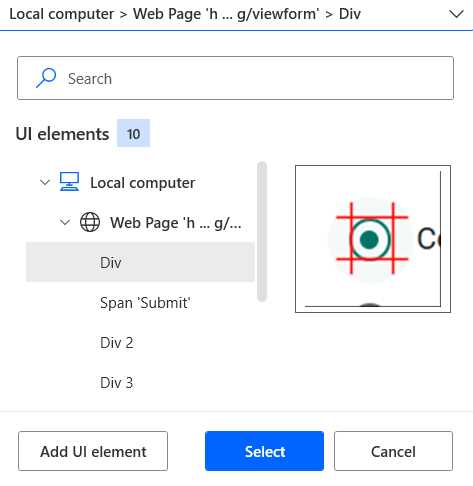
Figure 3-ai: The List of Available UI Elements (When Setting the UI element property)
Now that we have added the Select radio button on web page action corresponding to the Comments option, we need to add another Select radio button on web page action to match it to the Questions option. Let’s place it within the Else if action that evaluates if the Field variable equals Questions.
By default, when the action opens, the value of the Browser variable (%Browser%) is assigned to the Web browser instance property.
However, the UI element property is not populated by default. You’ll need to click the downward arrow on the dropdown and select the UI element corresponding to the Questions option, which, in my case, is the Div 2 element highlighted in the following figure.
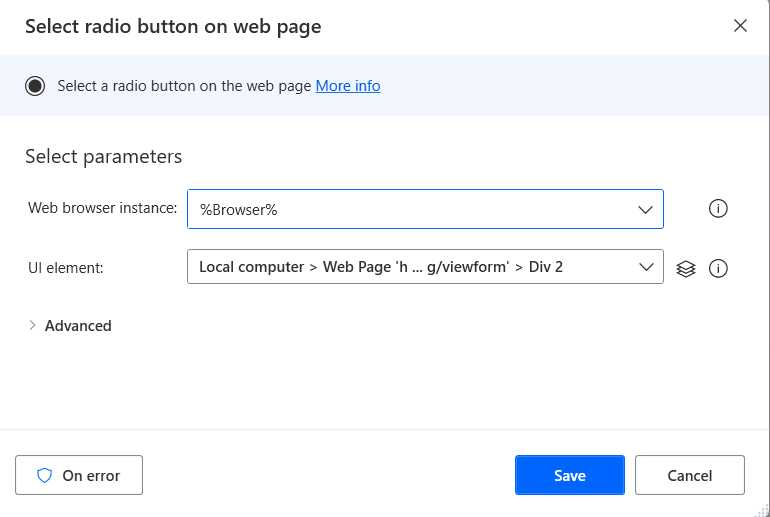
Figure 3-aj: The Select radio button on web page Action (Questions Option)
Let’s add another Select radio button on web page action to match it to the Bug Reports option. Let’s place it within the Else if action that evaluates if the Field variable equals BugReports.
Note: The reason the Else if action checks if the Field variable equals BugReports and not Bug Reports is because, within the text file that contains the data that we will use to populate the online form, the value is stored as BugReports, whereas Bug Reports refers to the label of the field on the online form.
By default, when the action opens, the value of the Browser variable (%Browser%) is assigned to the Web browser instance property.
The UI element property is not populated by default. You’ll need to click the downward arrow on the dropdown and select the UI element corresponding to the Bug Reports option, which, in my case, is the Div 3 element.
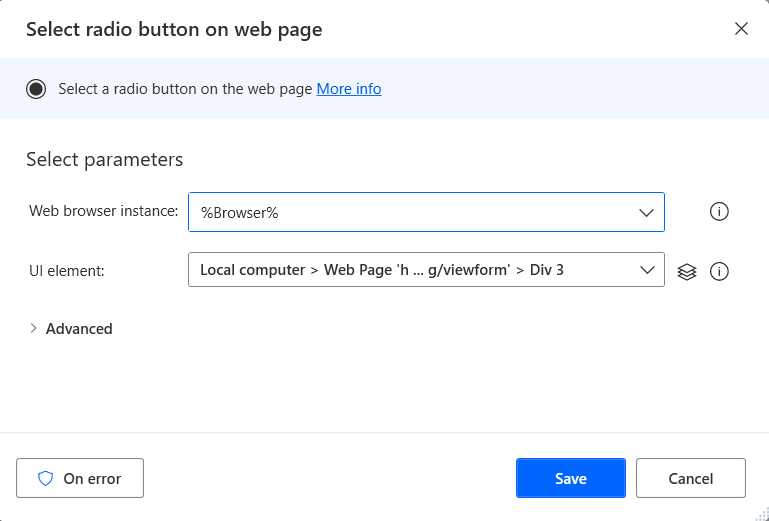
Figure 3-ak: The Select radio button on web page Action (Bug Reports Option)
Finally, let’s add another Select radio button on web page action to match it to the Feature Request option. Let’s place it within the Else if action that evaluates if the Field variable equals FeatureRequest.
Note: The reason the Else if action checks if the Field variable equals FeatureRequest and not Feature Request is because, within the text file that contains the data that we will use to populate the online form, the value is stored as FeatureRequest. Feature Request refers to the label of the field on the online form.
By default, when the action opens, the value of the Browser variable (%Browser%) is assigned to the Web browser instance property.
The UI element property is not populated by default. You’ll need to click the downward arrow on the dropdown and select the UI element corresponding to the Feature Request option, which, in my case, is the Div 4 element.

Figure 3-al: The Select radio button on web page Action (Feature Request Option)
Here’s what the conditions for the Feedback Type field look like.
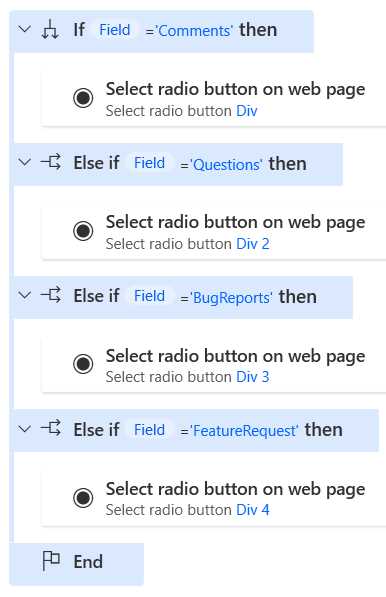
Figure 3-am: The Conditions for Populating the Feedback Type Field
Populating the Feedback field
Now, let’s add a Populate text field on web page action within the Else if action that checks if the value of Index equals 1. We can find this action under Browser automation and Web form filling within the Actions pane.
By default, when the action opens, the value of the Browser variable (%Browser%) is assigned to the Web browser instance property.
The UI element property is not populated by default. You must click the downward arrow on the dropdown and select the UI element corresponding to the Feedback text box.
To the Text property, we assign the value of the Field variable (%Field%). Once done, click Save.
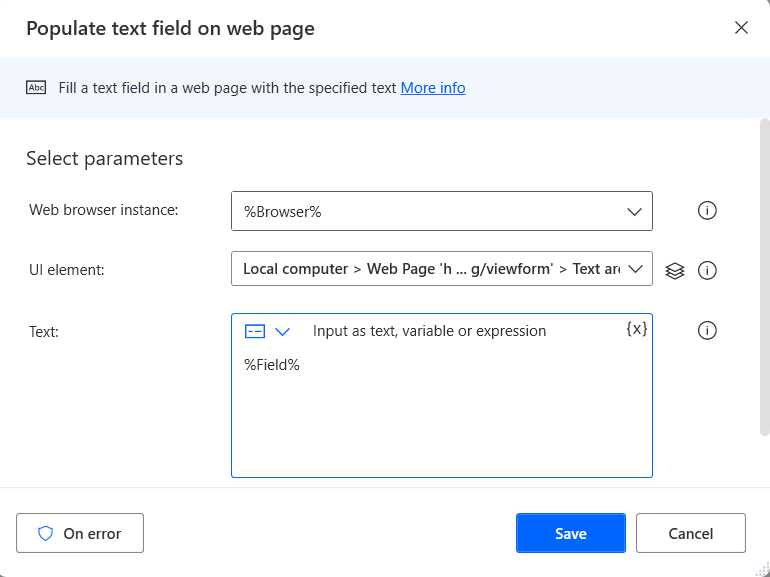
Figure 3-an: The Populate text field on web page Action (Feedback Field)
Populating the Suggestions field
The next thing we must do is to populate the Suggestions for improvement field of the online form. To do that, we must add a Populate text field on web page action within the Else if action that checks if the value of Index equals 2. We can find this action under Browser automation and Web form filling within the Actions pane.
By default, when the action opens, the value of the Browser variable (%Browser%) is assigned to the Web browser instance property.
The UI element property is not populated by default. You must click the downward arrow on the dropdown and select the UI element corresponding to the Suggestions for improvement text box.
To the Text property, we assign the value of the Field variable (%Field%). Once done, click Save.
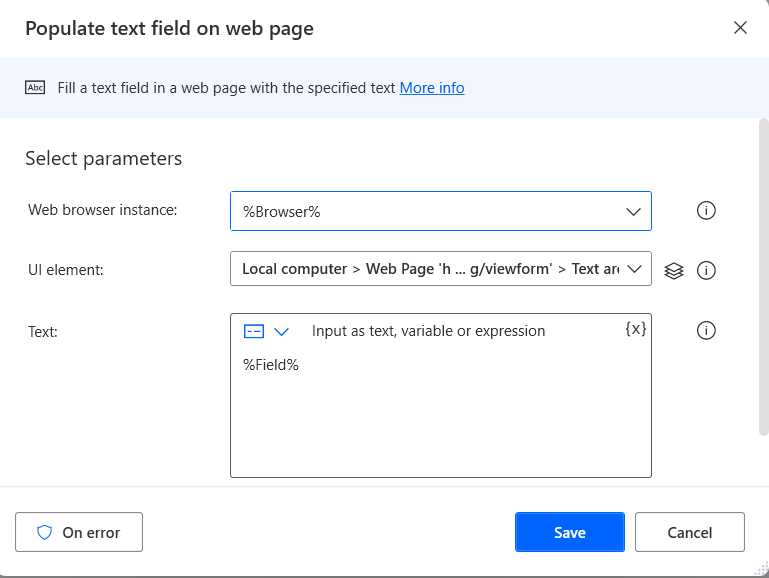
Figure 3-ao: The Populate text field on web page Action (Suggestions for improvement Field)
Populating the Name field
Next, we must populate the Name field on the online form. We can do this by adding another Populate text field on web page action within the Else if action that checks if the value of Index equals 3.
By default, when the action opens, the value of the Browser variable (%Browser%) is assigned to the Web browser instance property.
The UI element property is not populated by default. You must click the downward arrow on the dropdown and select the UI element corresponding to the Name text box.
To the Text property, we assign the value of the Field variable (%Field%). Once done, click Save.
Populating the Email field
The last form field we must populate is the Email field. We can do this by adding another Populate text field on web page action within the Else if action that checks if the value of Index equals 4.
Again, when the action opens, the value of the Browser variable (%Browser%) is assigned to the Web browser instance property.
The UI element property is not populated by default. You must click the downward arrow on the dropdown and select the UI element corresponding to the Email text box.
To the Text property, we assign the value of the Field variable (%Field%). Once done, click Save.
Following that, these conditions should now appear on the flow as follows.
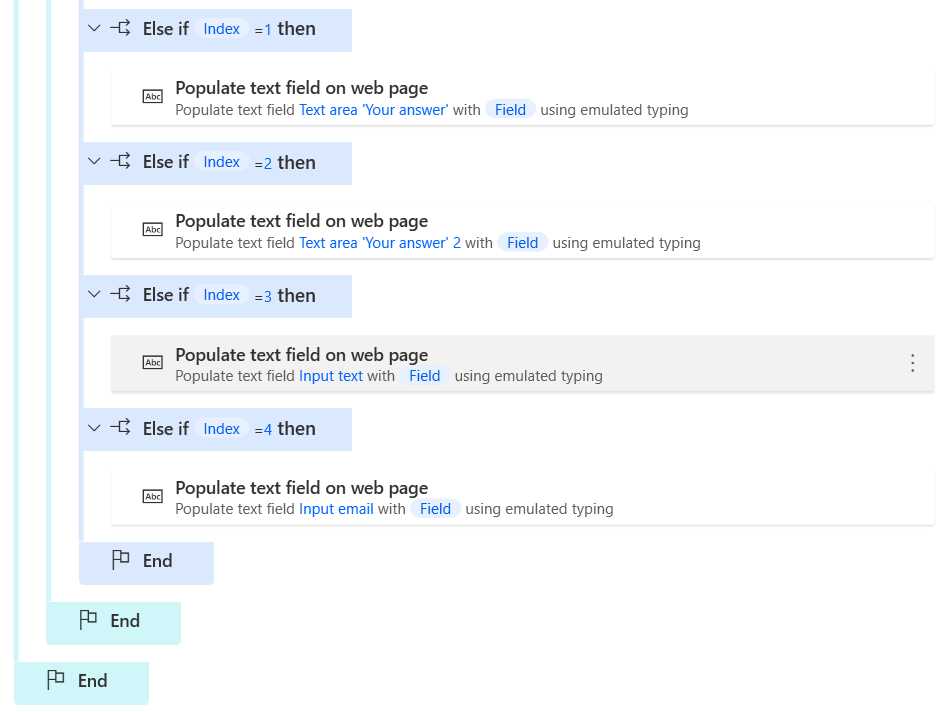
Figure 3-ap: The Conditions for Populating the Remaining Fields
Increasing the Index variable
During each iteration, we can only populate one online form field. So, after every iteration, we must increase the value of the Index variable. We do this so that the following field on the online form can be populated in the next iteration.
So, let’s add the Increase variable action to the flow and place it after the End that belongs to the last Else if action we added to the flow. The Increase variable action can be found under Variables within the Actions pane.
Let’s assign the value of the Index variable (%Index%) to the Variable name property and set the value of the Increase by property to 1. Once done, click Save.
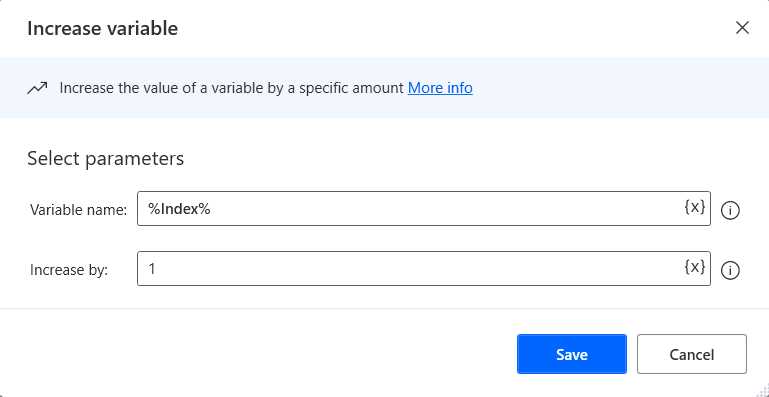
Figure 3-aq: The Increase variable Action (Changed Details)
After adding this action, the flow should now look as follows.
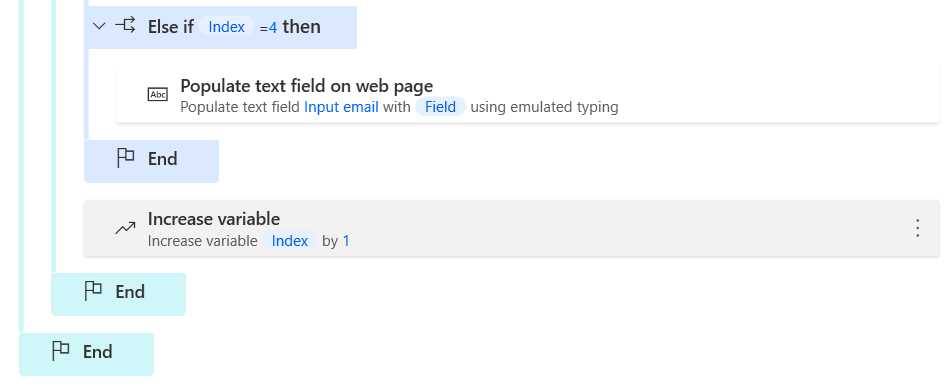
Figure 3-ar: The Updated Flow (Partial View)
Submitting the form
Now that we have populated all the online form fields, we must submit the form. To do that, let’s add the Press button on web page action to the flow. The Press button on web page action can be found under Browser automation and Web form filling within the Actions pane.
By default, when the action opens, the value of the Browser variable (%Browser%) is assigned to the Web browser instance property.
The UI element property is not populated by default. You must click the downward arrow on the dropdown and select the UI element corresponding to the Submit button. Once done, click Save.
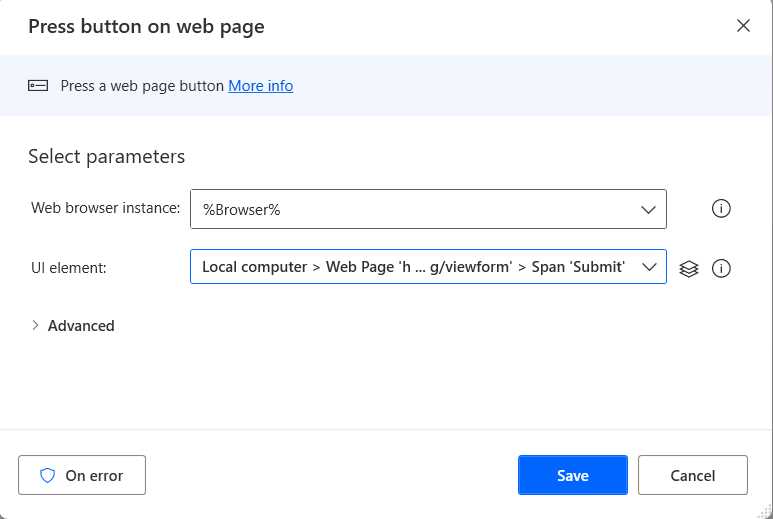
Figure 3-as: The Press button on web page Action
Moving to the next record
At this stage, we have populated all the online form fields; however, we’ve only managed to do it for one record. So, how can we replicate this automated process for other records? The answer is more straightforward than you would expect.
To move on to the next record and populate the online form with new data, we must add the Go to web page action to the flow after the End of the inner (second) For each loop.
By default, when the action opens, the value of the Browser variable (%Browser%) is assigned to the Web browser instance property. The Navigate property also has a default value, which is To Url. This means that this action, by default, will navigate to any URL we specify.
So, to the URL property, we can assign the value of the Url variable (%Url%)—this is the URL of the online form in runtime mode, which was added initially to the flow using the Set variable action. Once done, click Save.
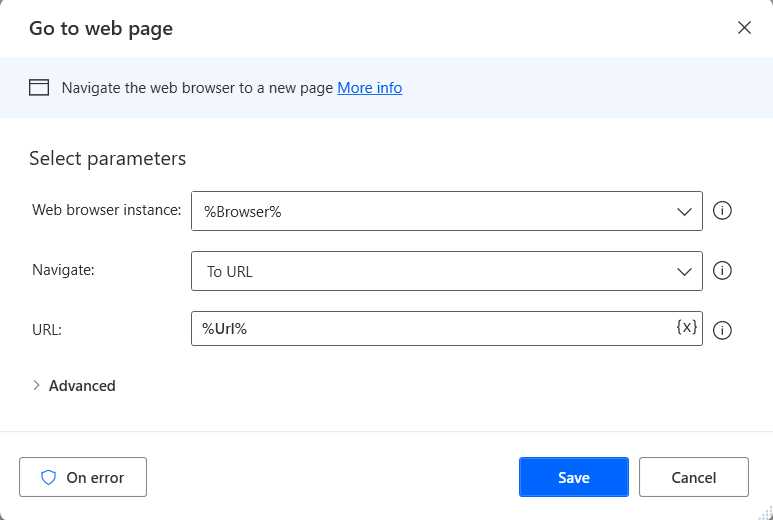
Figure 3-at: The Go to web page Action
After adding this action, the flow now looks as follows.
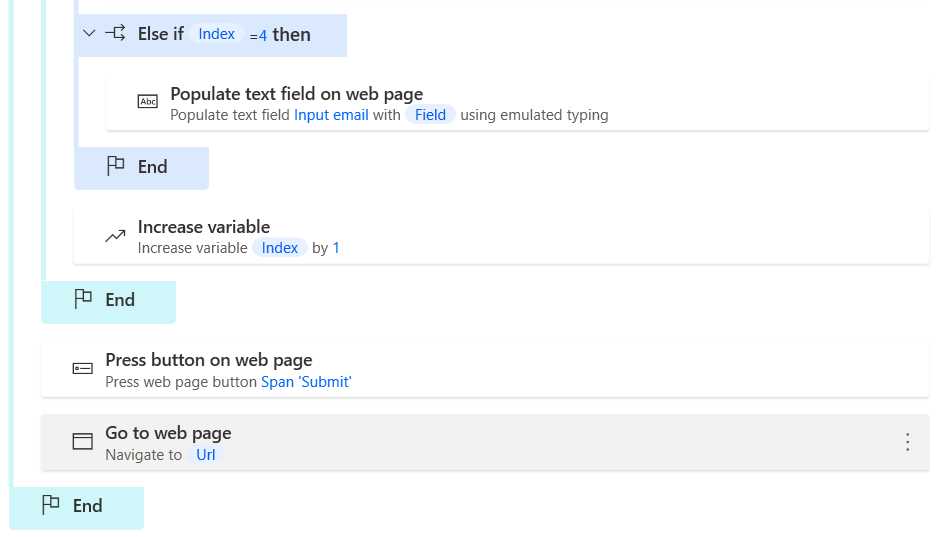
Figure 3-au: The Updated Flow (Partial View)
We can now populate the online form for multiple records using this Go to web page action.
Closing the Browser instance
One final thing we must do before finishing the flow is to close the browser instance we opened at the beginning. To do that, let’s add the Close web browser action to the end of the flow.
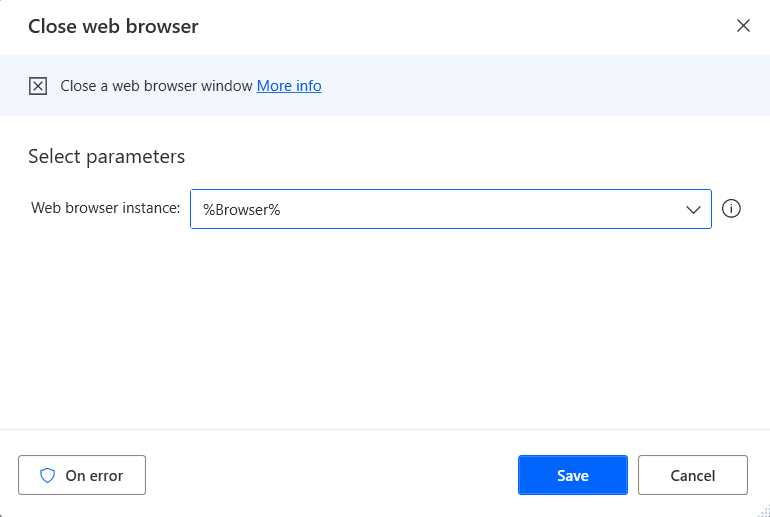
Figure 3-av: The Close web browser Action
By default, when the action opens, the value of the Browser variable (%Browser%) is assigned to the Web browser instance property. Once done, click Save.
Well done! We have finished the flow, and this is how it looks.
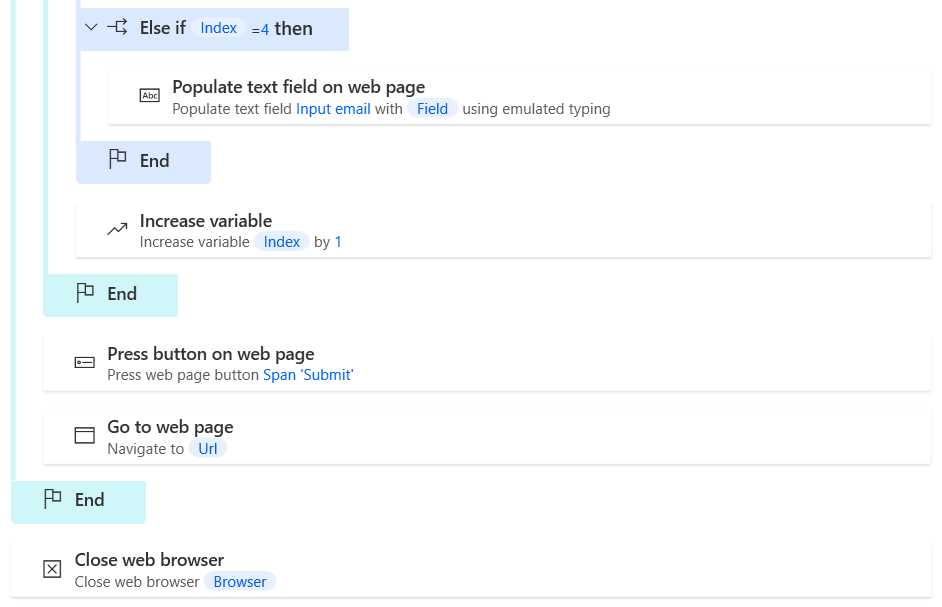
Figure 3-aw: The Updated Flow (Partial View)
Running the flow
Now that we have the flow ready, let’s run the flow. The flow will read the information in the feedback.txt file and use that to populate the online form for each row found within the feedback.txt file. When the flow execution begins, a new browser window will be opened, showing the online form, and the data will be automatically added.
Before running the flow, let me show you the admin view of the customer feedback form. Notice how it doesn’t contain any data or responses.
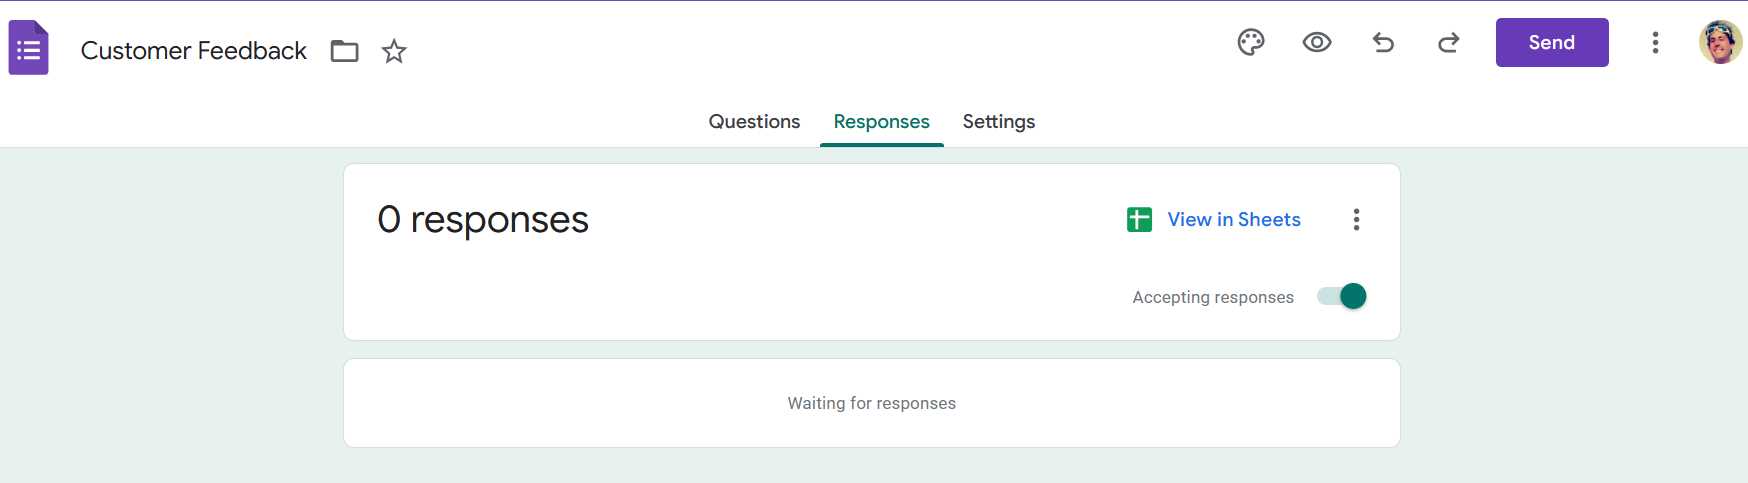
Figure 3-ax: The Customer Feedback Form (Admin View—No Responses)
Once the flow executes, the admin view will show the data entered automatically. Let’s run the flow by clicking the Run button within Power Automate Desktop.

Figure 3-ay: The Run Button (Power Automate Desktop)
Shortly after this, you should see that the browser opens, and the data is automatically entered into the online form. After the execution, you should see the results in the online form admin view.

Figure 3-az: The Customer Feedback Form (Admin View—3 Responses)
Recap
So, throughout this chapter, we’ve created an excellent and helpful flow, which takes rows from a text file and automatically enters them into an online form. A similar logic could be used to enter data from an Excel file into an online CRM, such as Salesforce or another system.
- 1800+ high-performance UI components.
- Includes popular controls such as Grid, Chart, Scheduler, and more.
- 24x5 unlimited support by developers.