
PHP Succinctly®

CHAPTER 5
Files and Databases
Managing Files with PHP
PHP provides a series of functions that help us manipulate files, performing operations such as opening, reading, writing, and closing a file.
Reading a file
If we want to read the contents of a file, the functions fopen(), filesize(), fread(), and fclose() should be used together. The following code sample demonstrates how to read a file and display its contents using a webpage.
Code Listing 33: Reading a File
<?php $filename = "license.txt"; $file = fopen( $filename, "r" );
if( $file == false ) { echo ( "Error when opening file" ); exit(); }
$filesize = filesize( $filename ); $filecontents = fread( $file, $filesize ); fclose( $file );
echo "<html>\n"; echo "<head>\n<title>Reading a file using PHP</title>\n</head>\n"; echo "<body>\n<pre>$filecontents</pre></body>\n"; echo "</html>\n";
?> |
This code attempts to open the file named license.txt, by using the fopen() function. The "r" parameter value passed to the function indicates that the file should be opened as read-only. If the operation fails, an error message is displayed, and the script execution is halted with the exit() function.
A file pointer is saved into the $file variable. This pointer is going to be used to perform the rest of file operations in the script.
After the file is opened, we need to calculate the size of it in order to tell PHP how many bytes we need to read. This task is executed using the filesize() function, and the actual size is stored in the $filesize variable.
Now, we store the contents of the license.txt file, which is assumed to be in the same directory as the PHP script, using the fread() function. To perform this operation, fread() needs to receive the file pointer stored previously in the $file variable, and the file size stored in the $filesize variable. The file contents are placed into the $filecontents variable. After that, we close the file using the fclose() function and the file pointer is saved in the $file variable.
The last statements send the HTML code needed to create the webpage, including the contents of the text file that were read previously, enclosed in a HTML <pre> tag.
Writing text to a file
We can also write text to a file using PHP. This is similar to reading a file, but we need to use the fwrite() function instead. The following code writes a webpage into a text file, and then uses the file contents to display the page in the web browser.
Code Listing 34: Writing Text to a File
<?php require("commonfunctions.php"); function createwebpage() { $greetingfunction = getgreetingfunction(); $greeting = $greetingfunction(true);
$webpagecontent = "<html>\n<head>\n<title>Writing a file using PHP</title>\n</head>\n"; $webpagecontent = $webpagecontent . "<body>\n<pre>$greeting</pre>\n<pre>This web page was created writing a file with PHP</pre>\n</body>\n</html>\n"; $filename = "webpage.txt"; $file = fopen($filename,"w"); fwrite($file,$webpagecontent); fclose($file); }
createwebpage();
$filename = "webpage.txt"; $file = fopen( $filename, "r" );
if( $file == false ) { echo ( "Error when opening file" ); exit(); }
$filesize = filesize( $filename ); $filecontents = fread( $file, $filesize ); fclose( $file );
echo "$filecontents";
?> |
In this sample, we’re employing file inclusion in order to use the set of functions defined in the commonfunctions.php file. The createwebpage() function stores the webpage’s HTML code in a variable named $webpagecontent, and then writes this content in the webpage.txt file, assuming the PHP script has permissions that allow writing to the current directory. Now, to display the webpage, we call createwebpage() first, and then we read the webpage.txt file into the $filecontents variable. At the end, we display the $filecontents variable, which is the webpage itself.
Connecting to MySQL databases
As explained in Chapter 1, PHP supports a wide range of Database Management Systems (RDBMS), with MySQL being the most-used database system. PHP 7 includes an extension named mysqli (MySQL improved), which allows us to access MySQL 4.1 and above. This extension is implemented through a class named mysqli. For the purposes of this book, we’re going to use this class for making connections to MySQL databases.
Prerequisites
In order to work with the exercises explained in this section, your computer should have the latest version of MySQL and the MySQL Workbench utility installed.
Installing MySQL in the local computer
MySQL provides an installation program for the Windows environment. This program can be downloaded here.
Once the program is downloaded, we just need to double-click the filename, and the installation process will display the following dialog box.
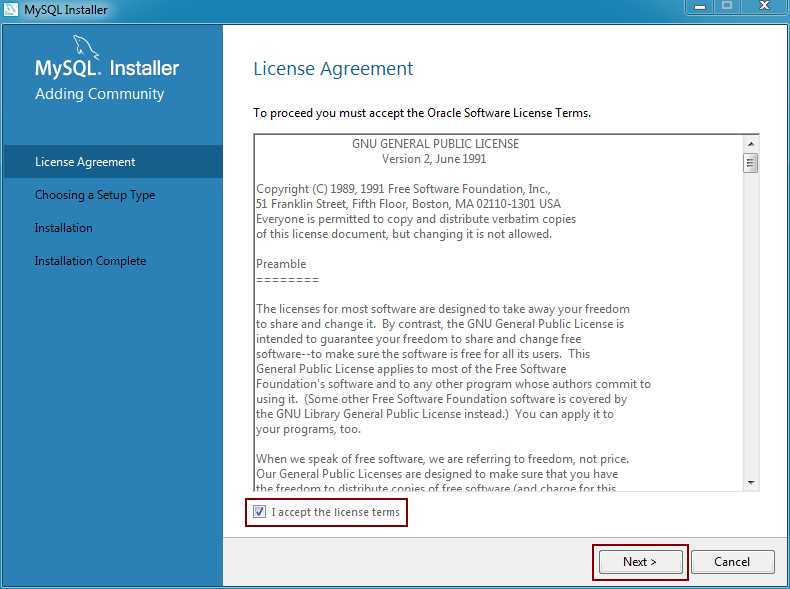
Figure 29: MySQL Installer License Agreement
To continue the process, we should check the I accept the license terms checkbox, and then click Next.
Now, the installer asks for a setup type that suits our installation case. Since we’re practicing connecting MySQL using PHP, a Developer Default type would be okay for us. This is the default setup type for the installation process, so we only need to click Next, and the process will continue.

Figure 30: Choosing Setup Type
The MySQL Installer now checks the computer system for all external requirements needed to install the products selected in the previous dialog. The installer can download and install some prerequisites, but in some cases a manual intervention is required. In these cases, we should click over those requirements tagged with a Manual legend in order to download the files needed. Once we finish installing manual prerequisites, we can use the Check button to review if those requirements are now met. Then, we need to click on the Execute button to perform an automatic installation of those requirements still missing. At the end, when all requirements are installed, we should click Next to continue with the process.

Figure 31: Checking Installation Requirements
The next dialog box displayed by the MySQL installer lists all products scheduled for installation. Click the Execute button, and the installation program will begin to deploy the products. A progress bar will be displayed below the Status column of the list. When a product deployment is finished, a status of “Complete” will be shown.

Figure 32: Ready to Install Dialog Box
After all products are installed, the installation program displays the Configuration dialog box, listing all the products that need to be configured. Usually, MySQL Server, Samples, and Examples products are configurable, so they appear listed in the dialog box with a “Ready to Configure” status. We should click Next to begin product configuration.

Figure 33: Product Configuration Dialog Box
At this point, a dialog box will appear showing the installation type we chose at the beginning of the installation process, and asking for changes to the default connectivity values. This dialog box allows us to display or hide the advanced configuration options. Even though the next figure shows the Advanced Options checked, hiding this dialog and letting MySQL installer set the default advanced values is recommended. It is also recommended that you leave the default connectivity values, since they ensure proper database functionality.
To continue the configuration process, click Next.

Figure 34: MySQL Server Configuration
The next dialog box displayed is Accounts and Roles. This is where we’re going to establish the password for the root user. I recommend entering a password that the configuration program considers strong. After doing this, click Next to continue.

Figure 35: Setting the Root Account Password
The next step is to configure the Windows Service details, such as service name, how MySQL Server Windows service is executed, and whether or not MySQL server should be loaded at startup. The configuration program displays a series of default values. If you have no particular needs related to this specific configuration, I recommend using the default values.

Figure 36: Setting up Windows Service
Plug-ins and extensions are beyond the scope of this book, and since the Advanced Options checkbox was disabled, the Apply Server Configuration dialog box will appear next. Click the Execute button to begin the configuration process. When this process is finished, the opening dialog box is reloaded and we can perform another installation and configuration.

Figure 37: Applying Configuration Values to the Server
Using MySQL Workbench to create a database
A utility program called MySQL Workbench is installed along with the MySQL Server Development installation type. This program will help us to manage our server, including the ability to create databases. I recommend making a desktop shortcut for this program so you can quickly access it anytime you need it.
After you create the shortcut, double-click it to launch the MySQL Workbench utility. Once the program is launched, the following dialog box will appear.

Figure 38: MySQL Workbench Utility Main Screen
Figure 38 shows the MySQL Workbench main screen. This main screen is divided in three areas: MySQL connections, which holds one or more shortcuts pointing to a particular MySQL server; Models, which holds shortcuts that point to a database model file (discussion of these files are beyond the scope of this book); and Shortcuts, which holds shortcuts to other MySQL utilities or forums.
By default, a shortcut to our local MySQL server instance appears in the main screen. So, to connect to this instance, we should click the shortcut. Then, main screen will look like the following figure.

Figure 39: MySQL Local Instance Main Window
Figure 39 shows the MySQL Local Instance Manager. This is the place where we are going work with the database server. The area indicated by the red arrow is called the Query Tab, which is used to enter all SQL statements needed to manage the server. These statements include database and table creation. The area surrounded by the red square is where all available schemas in the server are displayed. For practical purposes, a database is the same as a schema.
Now, we’re going to create our database.
The contactinfo database
The exercises discussed in the following sections will rely on a database named contactinfo, which will contain a single table to save our contacts’ information. The following code snippet will create this database using MySQL Workbench utility.
Code Listing 35: Creating the contactinfo Database
CREATE SCHEMA contactinfo; USE contactinfo; CREATE TABLE contacts (ID INT AUTO_INCREMENT PRIMARY KEY, NAME VARCHAR(200) DEFAULT '' NOT NULL, EMAIL VARCHAR(300) DEFAULT '' NOT NULL, PHONENUMBER VARCHAR(50) DEFAULT '' NOT NULL, SUBJECT VARCHAR(200) DEFAULT '' NOT NULL, MESSAGE TEXT); |
Now, the query tab of MySQL Workbench will look like the following figure.

Figure 40: Creating the Database from a Query Tab
As shown in Figure 40, we need to click the lightning icon to execute the code and create the database. After code execution, the contactinfo database will be displayed in the schemas list. (You may have to click on the Refresh icon to see it.)

Figure 41: contactinfo Database in the Schemas List
Now, we are ready to use PHP to access our database.
Our first database connection
The first thing we’re going to do is test a MySQL connection to the contactinfo database. This can be done by executing the following code.
Code Listing 36: Testing a Connection to the contactinfo Database
<?php $dbhost = 'localhost'; $dbuser = 'root'; $dbpass = 'your password'; $database = 'contactinfo'; $mysqli = new mysqli($dbhost, $dbuser, $dbpass, $database); if ($mysqli->connect_errno) { echo "We're sorry. The website can not connect to the database"; echo "Error: MySQL connection failed: \n"; echo "Errno: " . $mysqli->connect_errno . "\n"; echo "Error: " . $mysqli->connect_error . "\n";
exit; } echo "MySql connection succeeded"; $mysqli->close(); ?> |
This code attempts to connect to the contactinfo database. The connection credentials are supplied in the $dbhost, $dbuser, and $dbpass variables, and the database name is stored in a variable named $database. We use the mysqli class in order to create the connection. The credentials for establishing the connection are passed when we attempt to create an instance of the class and save it into the $mysqli variable. If the property connect_errno of the class evaluates to true, a series of error messages are displayed, indicating that it was not possible to make a connection. Then, the exit statement ends the script.
Assuming everything is executed successfully, the output displayed by the web browser should look like the following figure.

Figure 42: A Successful Connection to MySQL
Inserting a row in the contacts table
Since our database is recently created, it is empty. So, we are not able to perform any kind of query because there’s no data to view. Therefore, the first thing we will do is insert a couple of rows into the contacts table.
Code Listing 37: Inserting Rows in Contacts Table
<?php $dbhost = 'localhost'; $dbuser = 'root'; $dbpass = 'mypassword'; $database = 'contactinfo'; $mysqli = new mysqli($dbhost, $dbuser, $dbpass, $database); if ($mysqli->connect_errno) { echo "We're sorry. The website can not connect to the database <br />"; echo "Error: MySQL connection failed: <br />"; echo "Errno: " . $mysqli->connect_errno . "<br />"; echo "Error: " . $mysqli->connect_error . "<br />";
exit; } $sql = "INSERT INTO contacts (name,email,phonenumber,subject,message) VALUES ('John Doe', '[email protected]', '(253)001-2345','Test data row','Testing data insertion')"; if ($mysqli->query($sql) === TRUE) { echo "New record created successfully"; } else { echo "Error: " . $sql . "<br>" . $mysqli->error; } $mysqli->close(); ?> |
The previous code uses a SQL INSERT statement assigned to the variable $sql to add a new row in the contacts table. The first thing the code does is try to connect to the database. If connection succeeds, the SQL INSERT statement is executed by the query() method of the $mysqli class instance. If the value returned by the method evaluates to true, a message indicating a successful operation is displayed. Otherwise, an error message is shown. In both cases, the connection is closed at the end using the close() method of mysqli class.
Inserting data using parameters
SQL statements allow the use of parameters so that a query can receive data to be processed as a function does. The following code shows a parameterized SQL statement.
Code Listing 38: A Parameterized SQL Statement
INSERT INTO contacts (name, email, phonenumber, subject, message) VALUES (?,?,?,?,?); |
The question marks (?) in this code sample correspond to the parameters’ declaration. In this case, the statement has five parameters to receive the data that will be inserted in the table. In order to execute the statement successfully, the SQL statement must receive the corresponding data before its execution. To perform this action, we need to bind the parameters with the variables that hold the data. This can be done by using the bind_param method of the mysqli class statement property. But, unlike the insertion code sample discussed in the previous section, statement demands the SQL statement to be compiled before binding data. Compiling the statement does not mean executing it, but reviewing it to check if it is okay. To perform this operation, we should use the prepare method of the statement property. Now, let’s take a look at the following code.
Code Listing 39: Inserting Rows Using Parameters
<?php $dbhost = 'localhost'; $dbuser = 'root'; $dbpass = 'mypassword'; $database = 'contactinfo'; $mysqli = new mysqli($dbhost, $dbuser, $dbpass, $database); if ($mysqli->connect_errno) { echo "We're sorry. The website can not connect to the database <br />"; echo "Error: MySQL connection failed: <br />"; echo "Errno: " . $mysqli->connect_errno . "<br />"; echo "Error: " . $mysqli->connect_error . "<br />";
exit; } $contact_name = "Another John Doe"; $email_addr = "[email protected]"; $phonenumber = "(654)290-4567"; $subject = "Adding rows with parameters"; $message = "This row was added using parameters"; $sql = "INSERT INTO contacts (name,email,phonenumber,subject,message) VALUES (?,?,?,?,?)"; $statement = $mysqli->stmt_init(); if ($statement->prepare($sql)) { $statement->bind_param("sssss",$contact_name,$email_addr,$phonenumber,$subject,$message); $statement->execute(); $statement->close(); } $mysqli->close(); ?> |
The first thing to note in this code is the parameterized SQL statement that is assigned to the $sql variable. Before the statement is assigned, a set of five variables are declared, and the data that will be inserted in the new row are assigned to each one of them. The $statement variable receives a statement object by means of the stmt_init() method. Now, the SQL sentence is compiled by using the prepare() method, and if it is alright, the program binds the parameters declared in the SQL sentence with the variables that hold the data.
To perform data binding, the method bind_param() is employed. The first parameter of this method is a string formed by a sequence of characters, as long as the number of parameters to be bound. In this case, there are five parameters that appear in the SQL statement, so the string is five characters long. The s in the first position of the string stands for the string data type of the first parameter appearing in the SQL sentence. Because all parameters for the sentence are string data typed, the sequence of characters is formed by s only.
Now, to do the insert operation, the execute() method of the statement object is performed. After that, the close() method of the statement object is executed to free all resources employed. At the end, the connection is closed using the close() method of mysqli class.
Querying the contacts table
Now that the contacts table has data that can be queried, we’re going to create a PHP script that displays the contents of the first three columns from all rows in the contacts table.
Code Listing 40: A Script Which Queries the Contacts Table
<?php $dbhost = 'localhost'; $dbuser = 'root'; $dbpass = 'mypassword'; $database = 'contactinfo'; $mysqli = new mysqli($dbhost, $dbuser, $dbpass, $database); if ($mysqli->connect_errno) { echo "We're sorry. The website can not connect to the database <br />"; echo "Error: MySQL connection failed: <br />"; echo "Errno: " . $mysqli->connect_errno . "<br />"; echo "Error: " . $mysqli->connect_error . "<br />";
exit; } $sql = "SELECT contacts.* FROM contacts ORDER BY contacts.name"; $resultset = $mysqli->query($sql); if ($resultset->num_rows > 0) { while ($datarow = $resultset->fetch_assoc()) { echo "Contact Id: " . $datarow["ID"] . " - Contact Name: " . $datarow["NAME"] . " - Contact Email: " . $datarow["EMAIL"] . "<br />"; } } else { echo "No contacts available"; } $mysqli->close(); ?> |
As we can see in Code Listing 40, the contents of the $sql variable have changed to a SQL SELECT statement. Although the query method of mysqli class is used, the approach in this sample is a little different. The result returned from the method is stored in a variable named $resultset, and it should be a dataset containing all rows from the contacts table. The conditional if statement inquires about the number of rows returned. If this number is greater than zero, a while loop iterates through all the dataset and displays the contents of the ID, NAME, and EMAIL columns for each row. Now, assuming that the previous sample was saved in a file named queryingcontacts.php, if we type http://127.0.0.1/queryingcontacts.php into the address bar of the web browser, the output displayed should look like the following figure.

Figure 43: Displaying Contacts in the Web Browser
Displaying contacts in a webpage
In this section we’re going to use data from the contacts table to display an HTML table in the web browser. The following code should be saved in a file named contactswebpage.php.
Code Listing 41: Displaying Contacts in an HTML Table
<?php $dbhost = 'localhost'; $dbuser = 'root'; $dbpass = 'mypassword'; $database = 'contactinfo'; $mysqli = new mysqli($dbhost, $dbuser, $dbpass, $database); if ($mysqli->connect_errno) { echo "We're sorry. The website can not connect to the database <br />"; echo "Error: MySQL connection failed: <br />"; echo "Errno: " . $mysqli->connect_errno . "<br />"; echo "Error: " . $mysqli->connect_error . "<br />";
exit; } $sql = "SELECT contacts.* FROM contacts ORDER BY contacts.name"; $resultset = $mysqli->query($sql); echo "<!DOCTYPE html>\n<html>\n"; echo "<title>Displaying Contacts List</title>\n"; echo "</head>\n"; echo "<body>\n"; if ($resultset->num_rows > 0) { echo "<section>\n"; echo "<div style=" . '"color:#FFFFFF; background-color:#5F5F5F; text-align: center;"' . ">\n"; echo "<h3>OUR CONTACT LIST</h3>\n"; echo "</div>\n"; echo "<div>\n"; echo "<table width=100%>\n"; echo "<thead>\n"; echo "<tr><th style=" . '"color:#FFFFFF; background-color:#5F5F5F; text-align: center;"' . ">ID</th>\n"; echo "<th style=" . '"color:#FFFFFF; background-color:#5F5F5F; text-align: center;"' . ">Contact Name</th>\n"; echo "<th style=" . '"color:#FFFFFF; background-color:#5F5F5F; text-align: center;"' . ">Contact Email</th>\n</tr>\n</thead>\n"; echo "<tbody>\n"; while ($datarow = $resultset->fetch_assoc()) { echo "<tr>\n<td>".$datarow["ID"]."</td><td>".$datarow["NAME"]."</td> <td>".$datarow["EMAIL"]."</td>\n</tr>\n"; } echo "</tbody>\n"; echo "</table>\n</div>\n"; echo "</section>\n"; } else { echo "<section>\n<p>No Contacts available</p>\n</section>"; } echo "<footer>\n<div style=" . '"color:#FFFFFF; background-color:#5F5F5F; text-align: center;"' . ">\n<p>Copyright (C)2016 All PHP Web Developers</p>\n</div>\n</footer>\n"; echo "</body>\n</html>\n"; $mysqli->close();
?> |
This code starts making a connection to MySQL in localhost, as the previous data access code samples did. If the connection fails, the script ends. Otherwise, the script queries the contacts table using the query method of the mysqli class. Data returned by the query is stored in the $resultset variable. After that, the script begins to create the HTML document that will be displayed in the web browser. In this case, the HTML head and the beginning of the body section are sent as a part of the response from the web server. The next part of the HTML document depends on the number of rows returned by the query method. If no rows are returned, a paragraph with the sentence “No Contacts available” is placed in the HTML document; otherwise, an HTML table is created using the contents of all data rows in the $resultset variable. Every data row corresponds to an HTML table row. The script ends by creating the footer section of the webpage and closing the connection to MySQL.
Now, if we type http://127.0.0.1/contactswebpage.php into the address bar of the web browser, we should get the following output.

Figure 44: Contacts Displayed in an HTML Table
The HTML that is generated by the PHP script is the following:
Code Listing 42: HTML Dynamically Generated Code
<!DOCTYPE html> <html> <title>Displaying Contacts List</title> </head> <body> <section> <div style="color:#FFFFFF; background-color:#5F5F5F; text-align: center;"> <h3>OUR CONTACT LIST</h3> </div> <div> <table width=100%> <thead> <tr><th style="color:#FFFFFF; background-color:#5F5F5F; text-align: center;">ID</th> <th style="color:#FFFFFF; background-color:#5F5F5F; text-align: center;">Contact Name</th> <th style="color:#FFFFFF; background-color:#5F5F5F; text-align: center;">Contact Email</th> </tr> </thead> <tbody> <tr> <td>3</td><td>Another John Doe</td> <td>[email protected]</td> </tr> <tr> <td>2</td><td>Jane Doe</td> <td>[email protected]</td> </tr> <tr> <td>1</td><td>John Doe</td> <td>[email protected]</td> </tr> </tbody> </table> </div> </section> <footer> <div style="color:#FFFFFF; background-color:#5F5F5F; text-align: center;"> <p>Copyright (C)2016 All PHP Web Developers</p> </div> </footer> </body> </html> |
This was created dynamically at the server side. This means that this code will grow larger as the number of contact data rows increases in the table.
Chapter summary
The purpose of this chapter was to explain how to perform input and output operations with files using PHP, and how to connect to a MySQL database to insert or retrieve data.
PHP provides a series of functions that help us to manipulate files by doing operations such as opening, reading, writing, and closing a file. The functions fopen(), filesize(), fread(), and fclose() should be used together, in order to read the contents of a file. If we want to write text to a file, we need to use fwrite() function instead of fread().
As explained in Chapter 1, PHP supports a wide range of Database Management Systems (RDBMS), and MySQL is the database system most-often used in conjunction with PHP. PHP 7 includes an extension named mysqli (MySQL improved), which allows you to access MySQL 4.1 and above. For the purposes of this book, using MySQL with PHP requires that you have an active instance of MySQL installed in the computer used as a web server and have the MySQL Workbench utility installed.
The exercises discussed in this chapter relied on a database named contactinfo, which contains a single table to save our contacts information. We used MySQL Workbench utility to create this database. After that, a series of exercises to insert data and query the contacts table were explained. These exercises used the mysqli extension through a class also named mysqli. This class works in the following way: the constructor mysqli() creates a connection to a MySQL server and uses the property connect_errno to inform if the connection was successful. In case of success, we can use the query() method to insert or retrieve data. Also, we can use parameterized SQL sentences through the statement object, binding parameters to data variables with the bind_param() method.
Finally, we explained a code sample in order to create an HTML table with the contents of the contacts table.
- 1800+ high-performance UI components.
- Includes popular controls such as Grid, Chart, Scheduler, and more.
- 24x5 unlimited support by developers.