
PHP Succinctly®

CHAPTER 2
Deploying PHP
Installing PHP in a Windows environment
Prerequisites
In order to install PHP on Windows, the following requirements must be fulfilled:
- The computer should have a Windows operating system installed and running
- IIS (Internet Information Services) should be installed and configured.
Installation process
Setting up IIS
To install IIS on Windows 10, we will open the Control Panel and click on the Programs category link.
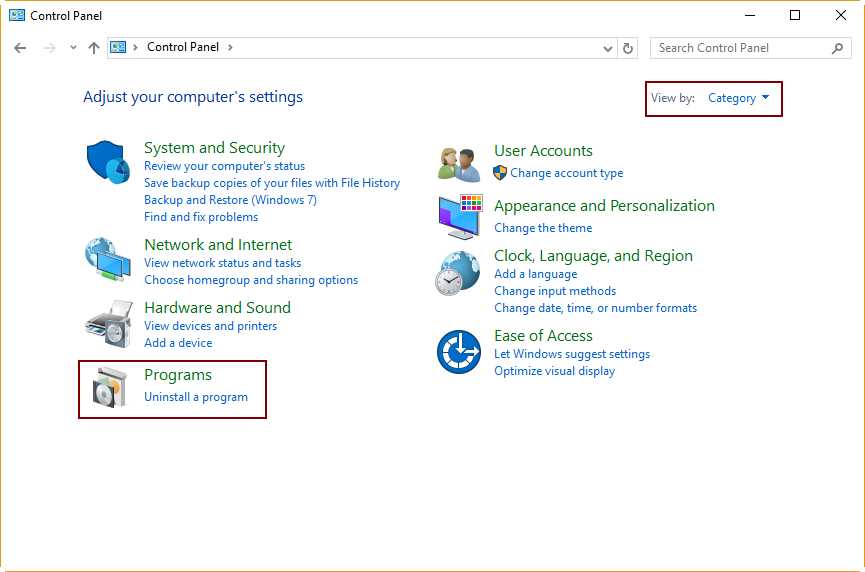
Figure 1: Programs Section in the Control Panel
After the Programs dialog is displayed, click Turn Windows features on or off to show the Windows Features dialog box.
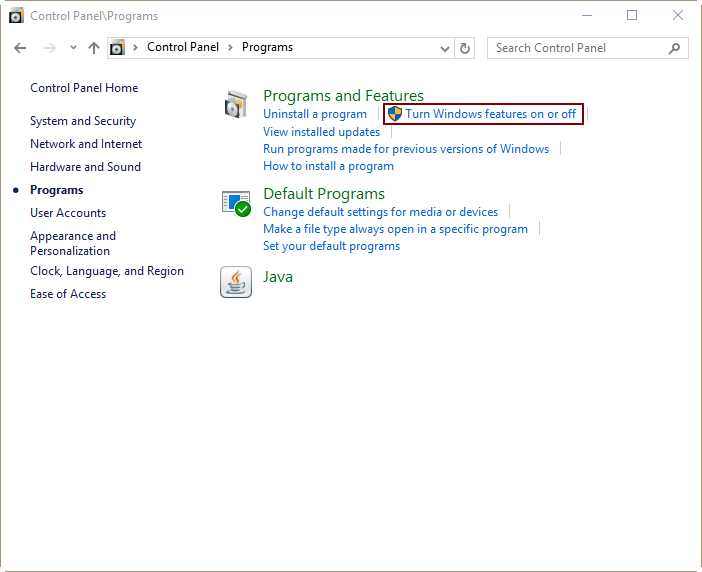
Figure 2: Turning Windows Features On or Off in the Programs Section
In the Windows Features dialog box, click on the Internet Information Services checkbox to choose all the features needed to host a website in the computer. You must also select the CGI entry under World Wide Web Services | Application Development Features, because PHP uses CGI, as you’ll see shortly.
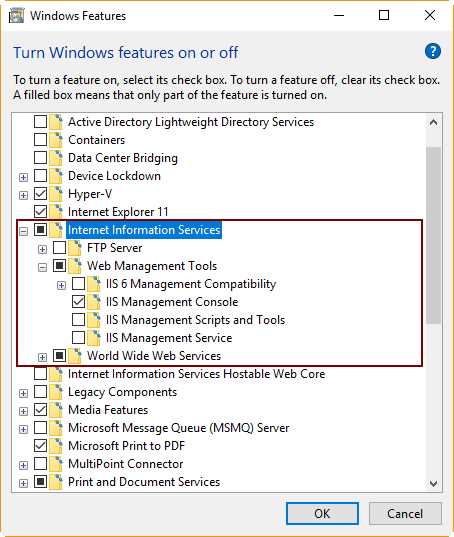
Figure 3: Internet Information Services Feature Selected
After that, click OK to begin the installation process.

Figure 4: Features Installation Progress
When the process finishes, run your web browser and navigate to http://127.0.0.1 in order to test the installation.
The browser should display the page shown in the following figure.
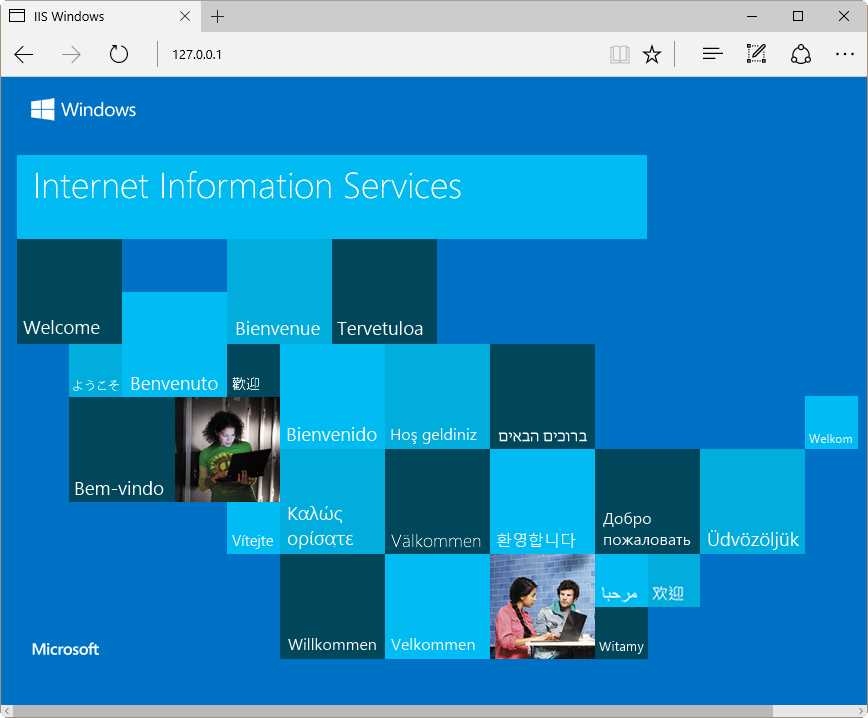
Figure 5: Internet Information Services Home Page
If the page shown in Figure 5 appears in the browser, IIS was installed successfully.
Installing PHP
The fastest and easiest way to install PHP on Windows is by using the Microsoft Web Platform Installer, which automates the process of installing and configuring PHP in the target system. A second way to install PHP is by using a compressed zip file installation. In this case, installing and configuring PHP should be done manually.
For the purposes of this book, we will explain the zip file installation process and manual PHP configuration.
Downloading PHP
Every PHP version has two builds available: a thread-safe version and a non-thread-safe version (NTS). The thread-safe version is intended for environments where a web server can keep the PHP engine in memory, being able to run multiple threads of execution for different web requests simultaneously. Since the architecture of IIS and its FastCGI extension provide an isolation model that keeps requests separate, there is no need for a PHP thread-safe version. The result is an important performance improvement on IIS, because the NTS version of PHP avoids unnecessary thread-safety checks.
According to the previous explanation, we will download the NTS version of PHP and install it in our computer. For a 32-bit system, the PHP NTS version can be obtained from this location. For a 64-bit system, the download URL is here.
Deploying PHP
Once the PHP package is downloaded, we should unpack the files from the zip PHP package into a directory of our discretion in the computer system where IIS is installed (C:\PHP is recommended).

Figure 6: The C:\PHP folder with PHP Files Unpacked
Figure 6 shows the PHP files in the C:\PHP directory. We can see that the php.ini-development and php.ini-production files are highlighted. Those files contain the configuration settings that make PHP work. As suggested by their names, one version of the file is for development purposes, and the other is for deploying in a production environment. For the purposes of this book, we’re going to make a copy of the php.ini-development file and save it as php.ini (so we have the original file as a backup).
Configuring PHP
We’re going to open the php.ini file using a text editor (commonly Notepad.exe), and then we will uncomment and modify the following settings.
- Uncomment and set fastcgi.impersonate = 1. The FasctCGI IIS extension supports the ability to impersonate security tokens coming from the calling client, allowing IIS to define the security context under which the request will run.
- Uncomment and set cgi.fix_pathinfo = 0. This setting indicates to PHP that PATH_TRANSLATED will be set to SCRIPT_FILENAME).
- Set cgi.force_redirect = 0.
- Set open_basedir to point to the directory where the content of the website is located (typically C:\inetpub\wwwroot).
- Uncomment and set extension_dir to point to the directory where PHP extensions reside (typically extension_dir = "./ext").
- Uncomment and set error_log="php_errors.log". This is useful to deal with troubleshooting.
- Uncomment every line that corresponds to a Windows extension DLL needed by PHP, as shown in Figure 7.
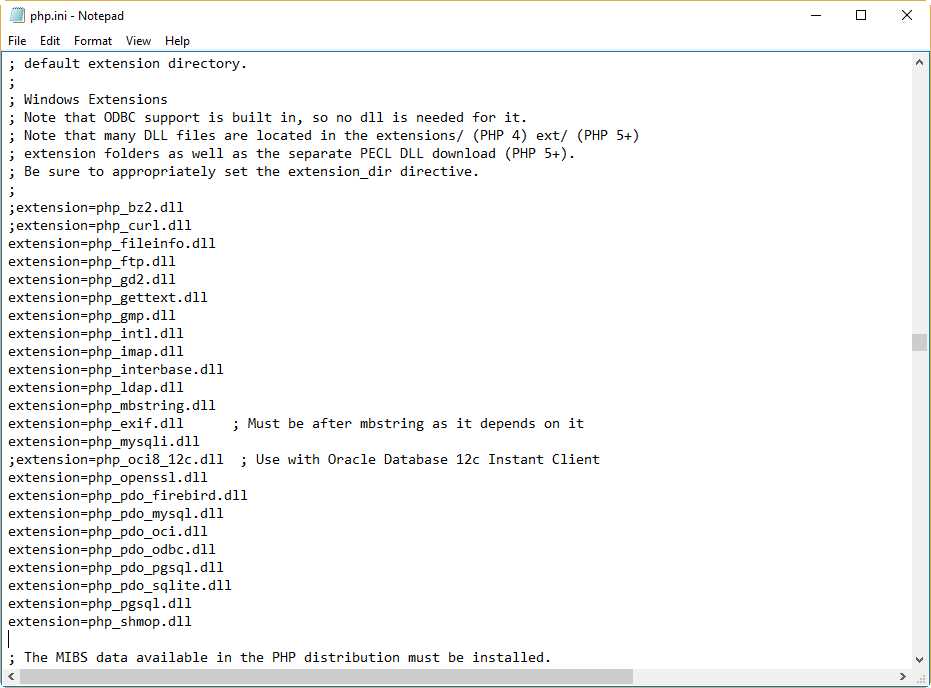
Figure 7: php.ini with Needed Extensions Uncommented
Now, we are going to save and close the php.ini file.
Adding PHP location to system path
We need to add the PHP location (commonly C:\PHP) to the system path variable in order to make the PHP engine available for execution. We should perform the following steps to accomplish this task.
First, right-click on the This PC icon located in the desktop. Then, click on the Properties option from the context menu displayed. The following dialog box will appear.
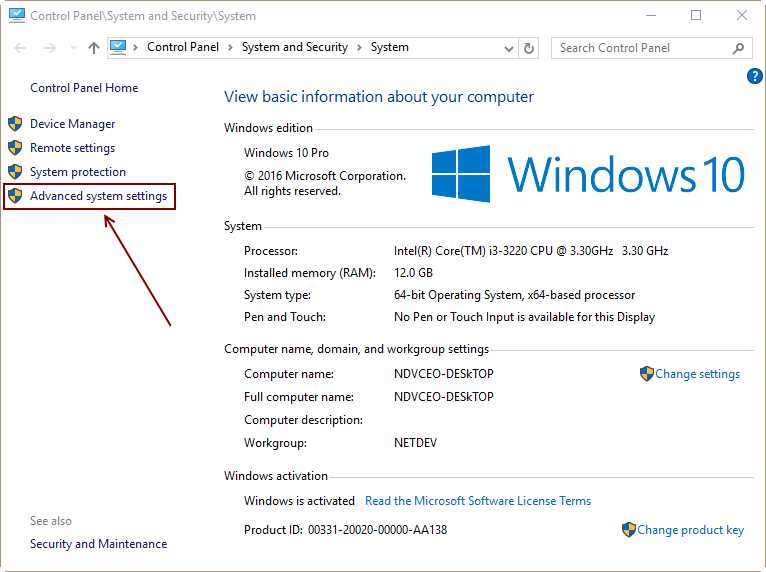
Figure 8: Advanced System Settings Link
Now, click on the Advanced system settings link, located in the left panel of the dialog box, and the System Properties dialog box will appear. Next, click the Environment Variables button.
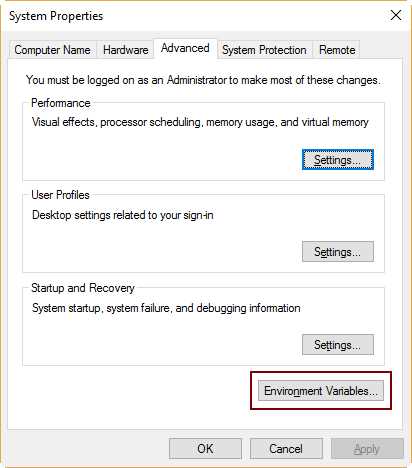
Figure 9: The Environment Variables Button
The Environment Variables dialog box will appear. Now, we need to select the Path variable within the System Variables section.
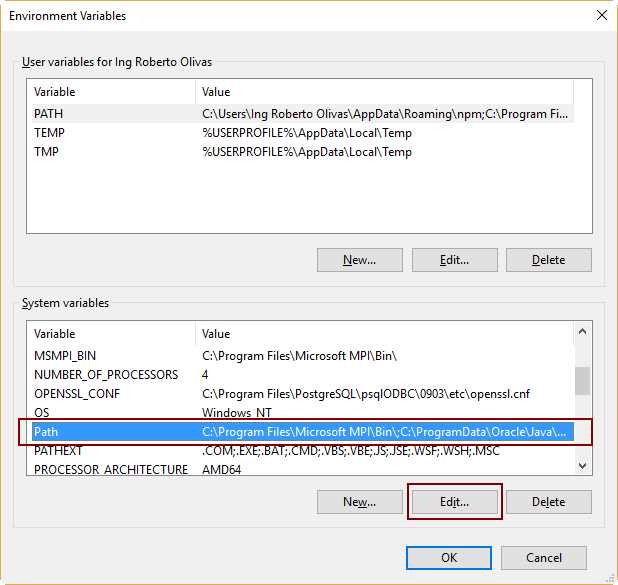
Figure 10: The Path System Variable in the Environment Variables Dialog Box
Next, click Edit to display the Edit Environment Variable dialog box.
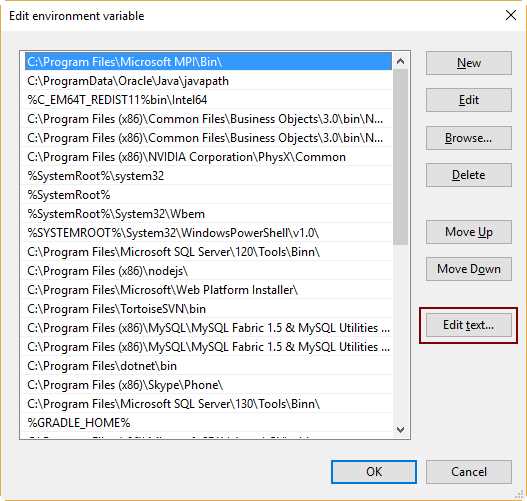
Figure 11: The Values of the Path System Variable in a List
As shown in Figure 11, all values for the Path system variable are displayed in a list that can be edited to add new variables or remove some of the values displayed. Click the Edit text button, which is available for modifying the values using a single line of text. Add the C:\PHP path leading with a semicolon at the end of the text line, as shown in the following figure.
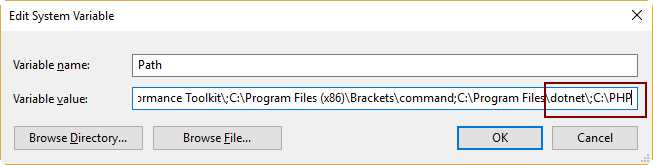
Figure 12: Adding C:\PHP Path to the Path System Variable
Now, we’re going to click OK until we have exited the System Properties window.
Configuring PHP on IIS
Launch the IIS Manager from the Windows Administrative Tools section located in the Start menu.
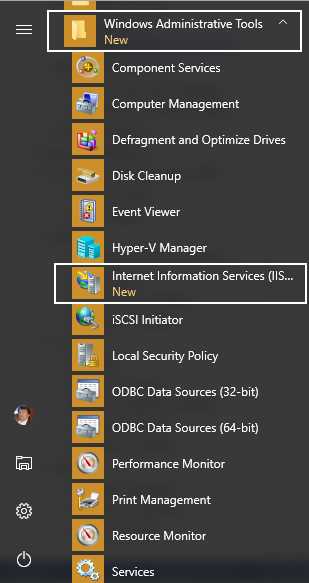
Figure 13: Windows Administrative Tools in the Start Menu
Now, when the IIS Manager window is displayed, click on the hostname that identifies the computer used as a server. This hostname is placed in the panel located at the left side of the window.
When the hostname is highlighted, double-click on the Handler Mappings icon, placed in the IIS section within the panel situated at the middle of the window, as shown in the following figure.
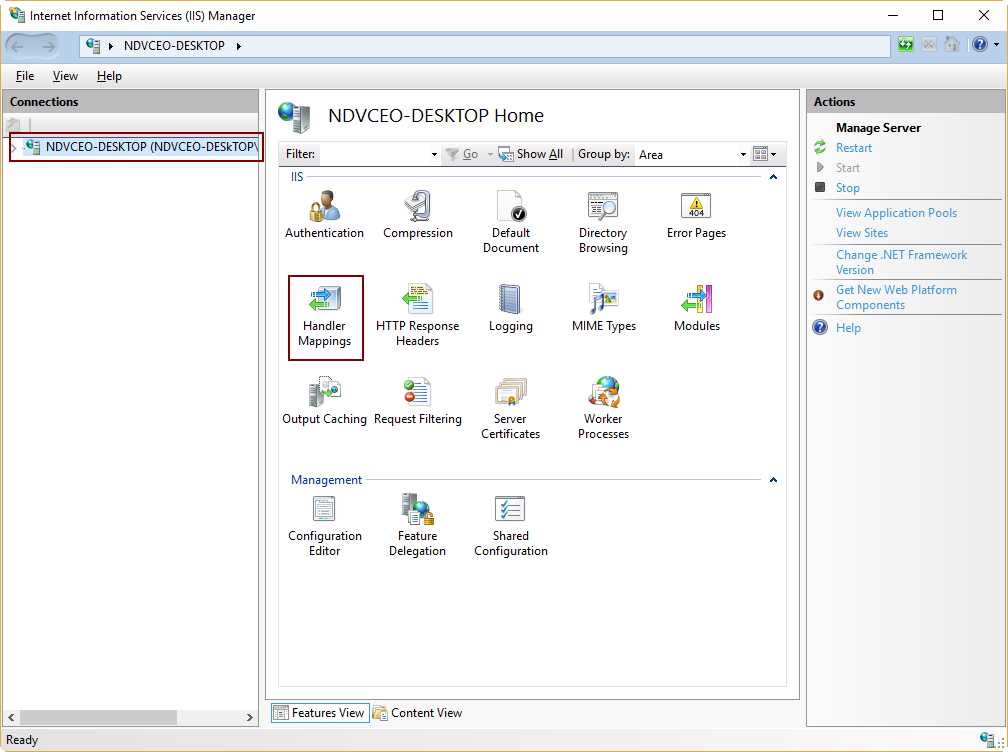
Figure 14: The Hostname and the Handler Mappings Button
The Handler Mappings action panel is displayed. Now, we should tell IIS which module is in charge of handling all PHP requests from the clients. In other words, we’re going to establish which program or library will process all PHP code located in the server. To accomplish this task, click the Add Module Mapping link situated in the Actions panel, placed at the right of the window, as displayed in the following figure.
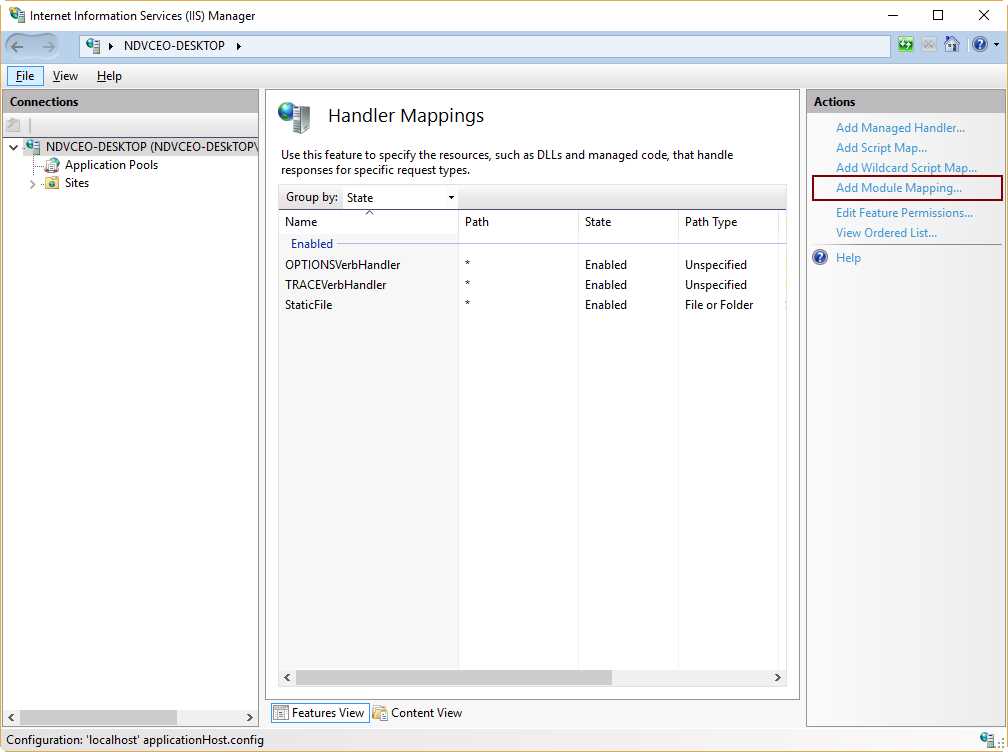
Figure 15: Handler Mappings Action Panel
Now, we’re going to provide the following data:
- Request path: *.php
- Module: FastCGImodule
- Executable: C:\PHP\php-cgi.exe
- Name: FastCGI
With this data, we are telling to IIS that all requests ending with a php file extension will be handled by the FastCGImodule extension, using the php-cgi.exe program located in the PHP installation folder (C:\PHP in this case). The name FastCGI is used to identify the module mapping in the system. The following figure shows this data in the Add Module Mapping dialog box.
Note: If the FastCGIModule entry is not in the Module dropdown control, that means you did not enable CGI in IIS Manager.
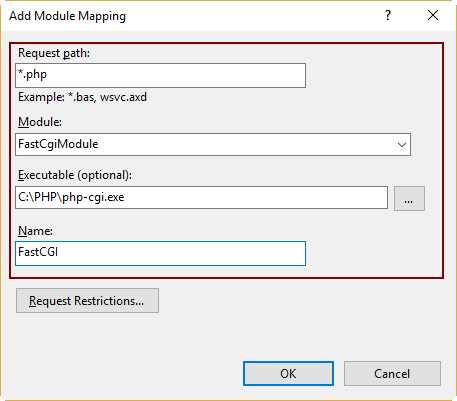
Figure 16: Adding PHP Module Mapping
Once the PHP module mapping is added to the system, we need to tell IIS which files will be treated as the default documents to process every time a web request is received. In other words, we’re going to indicate which php files will be executed every time a user types http://127.0.0.1 in the address bar of a web browser.
In order to do this, click on the computer’s hostname located at the left side of the IIS Manager window. Then, double-click the Default Document icon, as displayed in the following figure.
![]()
Figure 17: The Default Document Icon in the IIS Section
Now the Default Document actions panel will be displayed and all default document definitions will appear on the screen. To add a new default document, click on the Add link placed at the right of the window, as displayed in the following figure.
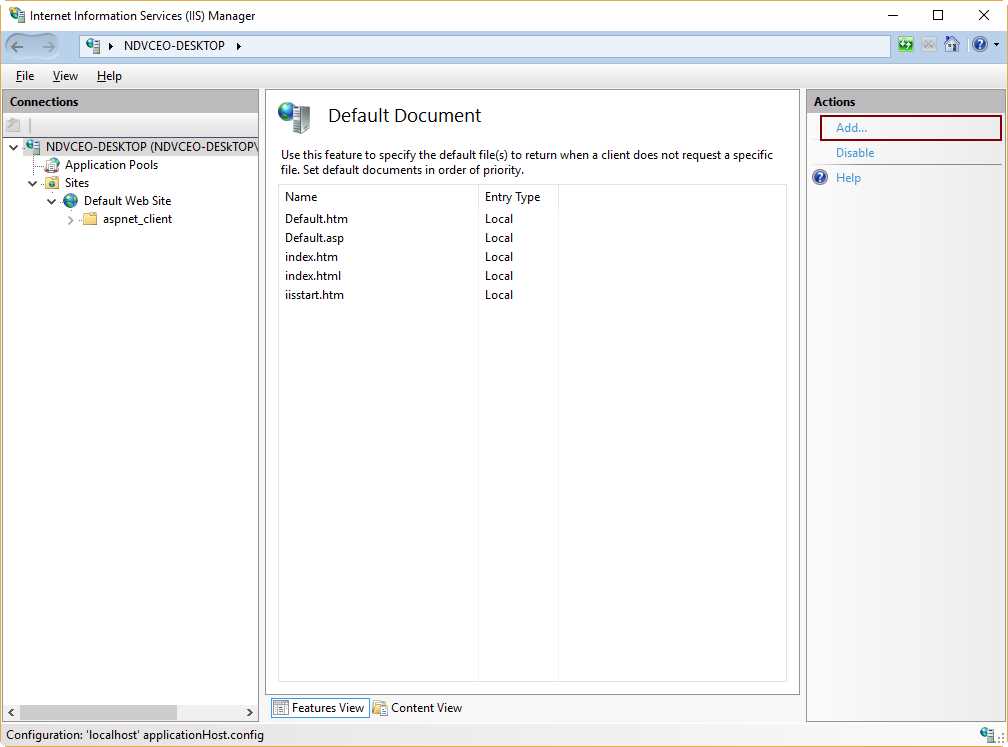
Figure 18: Default Document Actions Panel
Now, we’re going to add index.php as a default document by entering the name in the Add Default Document dialog box, then clicking OK. The following figure shows this task.
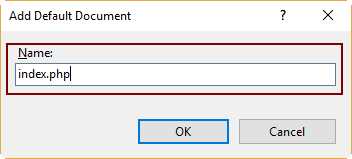
Figure 19: Adding a Default Document
We’re going to repeat the process if we want to add default.php as a default document, too.
To apply all these changes, we need to restart IIS. To do this, click on the computer hostname located at the left of IIS Manager window. Then, click Restart on the right-hand side of the window.
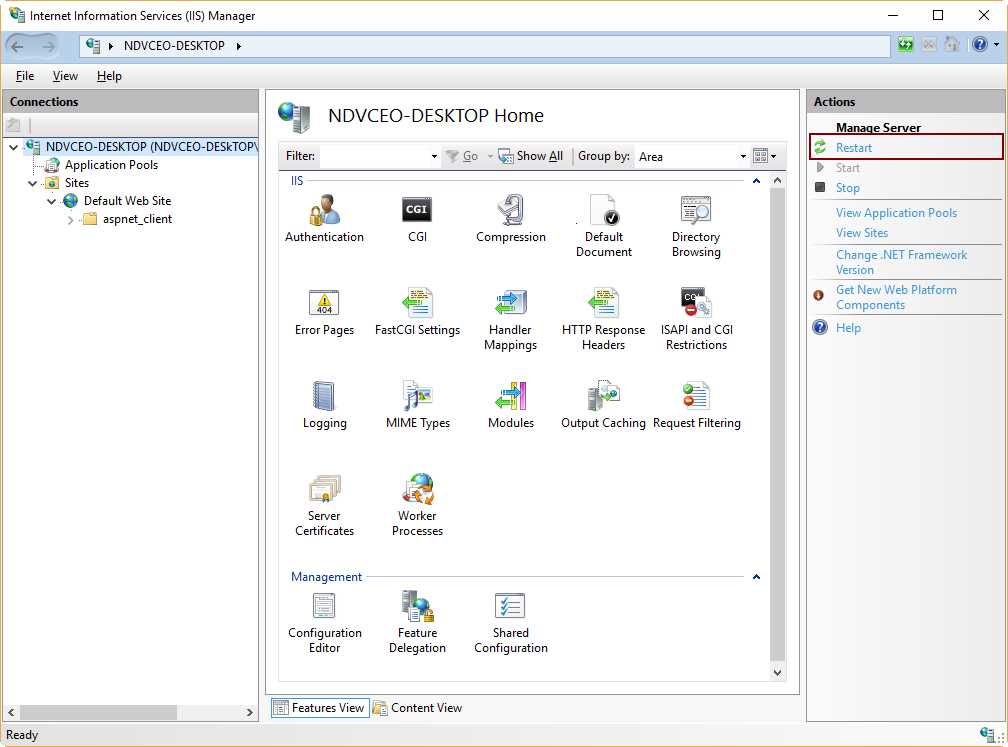
Figure 20: The Restart Link in the IIS Manager Window
Note: IIS searches default documents from top to bottom according to the list displayed in the Default Document actions panel. When one of these documents is found, this is executed and the search stops.
Testing the installation process
Now we should test the installation process. To accomplish this task, create a text file named phpinfo.php and save it into the website root folder (commonly C:\inetpub\wwwroot). The file should contain the following code.
Code Listing 1: PHP Test Program
<?php phpinfo(); ?> |
Testing in the local computer
Launch an instance of Microsoft Edge, type http://127.0.0.1/phpinfp.php in the address bar, and press Enter. The result should be like the one displayed in the following figure.
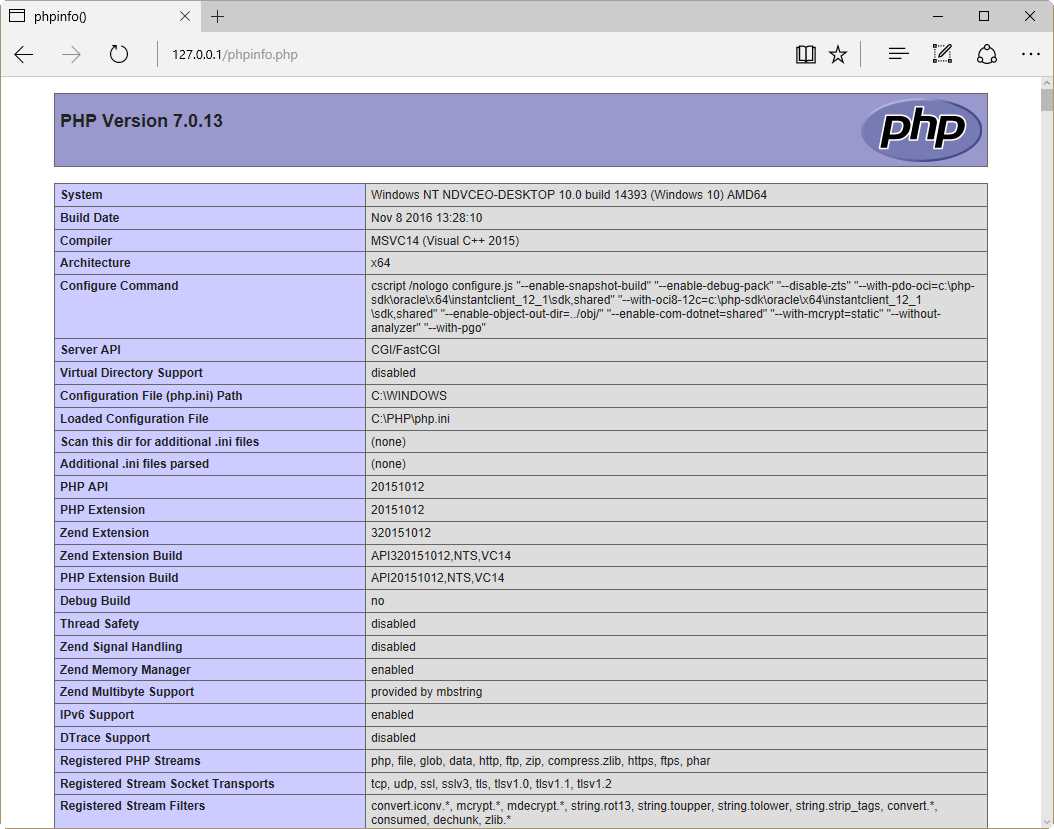
Figure 21: Testing PHP Installation from the Local Computer
Testing from a remote computer
Launch an instance of a web browser in a computer connected to the same network where the IIS computer is plugged in. Then, assuming that the IIS computer IP address is 192.168.0.67, type http://192.168.0.67/phpinfo.php in the address bar and press Enter. In my case, I used a computer with Ubuntu Desktop as an operating system, and Mozilla Firefox as a web browser. The result looked like the one displayed in the following figure.
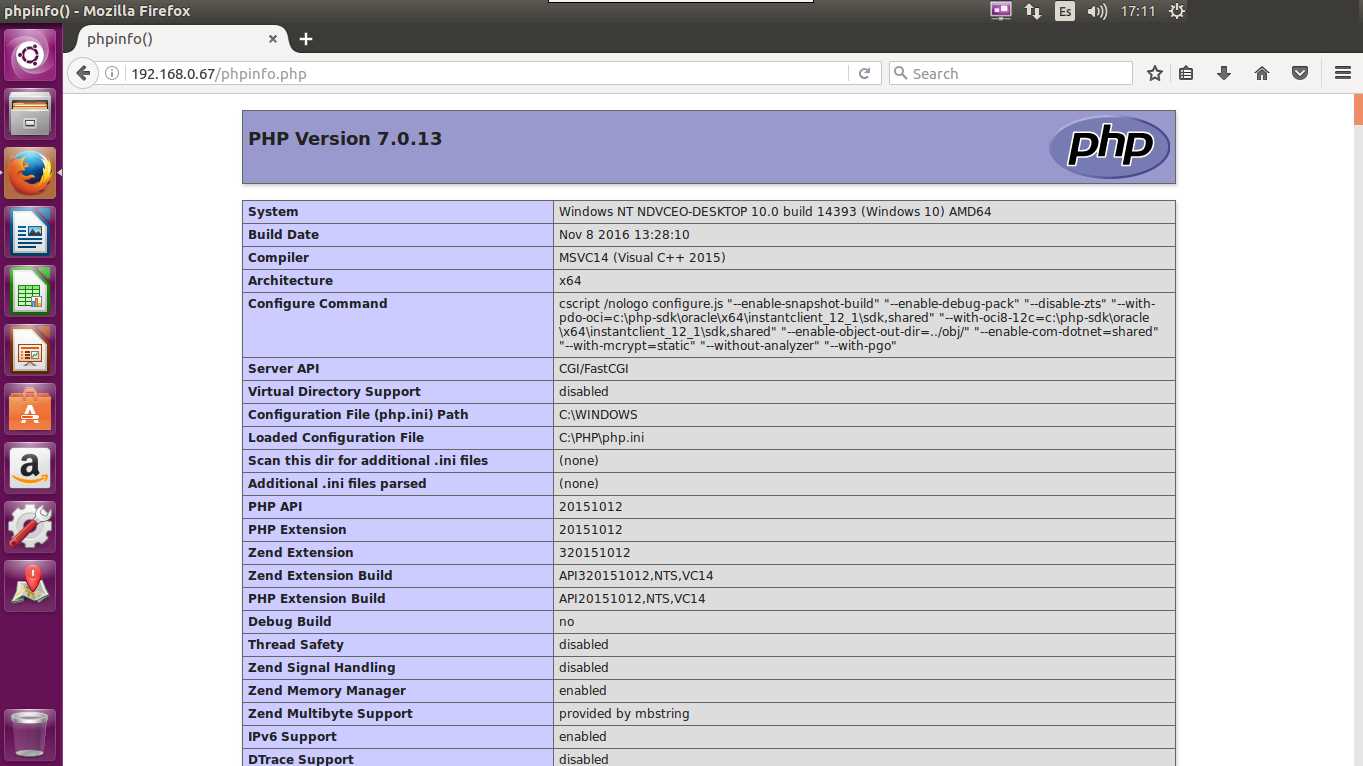
Figure 22: Testing PHP from a Remote Computer Running Ubuntu
Chapter summary
This chapter explained how to deploy PHP in a Windows environment using IIS (Internet Information Services) as a web server. To perform this deployment, the following requirements should be fulfilled:
- The computer should have a Windows operating system installed and running.
- IIS installed and configured.
To install IIS in a Windows 10 computer, you should go to the Programs section in the Control Panel and click Turn Windows features on or off. After that, you should click on the Internet Information Services checkbox in the Windows Features dialog box, in order to install IIS with the default features for a web server. The IIS installation process could be started by clicking the OK button.
Now, to install PHP on the computer, you should download a zip installation package from this location for a 32-bit system, or from this location for a 64-bit system. After the download is complete, you should unpack the zip file in a folder named C:\PHP.
To configure PHP, the file php.ini-development should be renamed to php.ini. Then, it should be edited in order to adjust some PHP working parameters to comply with IIS requirements.
As a final step, you should add C:\PHP to the Path system variable, and open the IIS Manager to set up PHP as the program that will handle all .php web requests coming from any client within the network.
Now, you should test the installation process by creating a text file named phpinfo.php in the website root folder (commonly C:\inetpub\wwwroot). The file should contain the following programming code: <?php phpinfo(); ?>. Then, you should type http://127.0.0.1/phpinfo.php from a web browser, and the PHP installation info should be displayed as a result.
- 1800+ high-performance UI components.
- Includes popular controls such as Grid, Chart, Scheduler, and more.
- 24x5 unlimited support by developers.