
PHP Succinctly®

CHAPTER 6
A Contact List Website
The purpose of this chapter is to gather all the themes discussed previously, and turn them into a simple contact list website using the contacts database. The final result should look like the following figure.
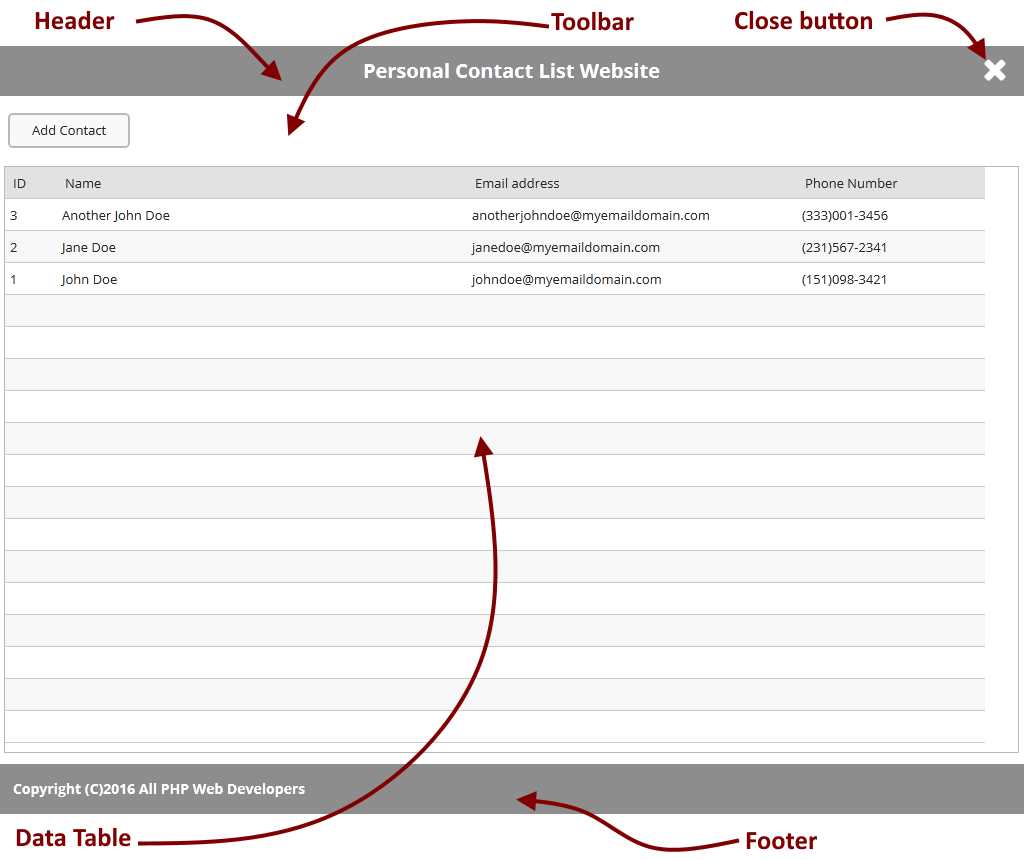
Figure 45: The Personal Contact List Website
As noticed in the previous design, the website homepage has been divided into four sections: a header, which shows the name of the website; a toolbar, which holds a button that allows you to add contacts to the table; a data table, which displays all contacts stored in the database; and a footer, which displays some copyright information. Also, a Close button should be displayed at the right side of the header section.
This kind of design suggests a complex programming. Coding this website into a single file seems very impractical and hard to maintain. So, we’re going to employ the file inclusion technique discussed in Chapter 4. As a result, we’re going to create a main program file and one program file for each section described in the design. We’re also going to code database connections in another separate file.
Website entry point: index.php
During PHP deployment, which was explained in Chapter 2, we defined a default document named index.php. In other words, we established that document as one of the entry points for our deployed website, so every time we type http://127.0.0.1 into the address bar of the web browser, the server executes index.php automatically, if it exists. So, for the purposes of the exercise detailed in this section, we’re going to save the code for our main file as index.php.
Creating a basic HTML structure
The first thing we’re going to program is a basic HTML document structure. A file named contactswebsitehtmlsections.php will store a couple of functions to create this structure.
Code Listing 43: contactswebsitehtmlsections.php
<?php function GetHtmlHeader() { $result = "<!DOCTYPE html>\n<html>\n<head>\n<title>Personal Contact List</title>\n"; $result .= '<link rel="stylesheet" type="text/css" href="css/contactform.css">'; $result .= '<script src="https://ajax.googleapis.com/ajax/libs/jquery/3.1.1/jquery.min.js"></script>'; $result .= '<script src="js/contactform.js"></script>'; $result .= "\n</head>\n<body>\n"; $result .= '<div class="container">' . "\n";
return $result; }
function GetHtmlFooter() { $result = "</div>\n</body>\n</html>"; return $result; }
?> |
The GetHtmlHeader() and GetHtmlFooter() functions of this code return each one a string, with the opening and closing tags needed to create an empty HTML document. Now, we’re going to use this file in index.php, as shown in the following code sample.
Code Listing 44: index.php
<?php
require("contactswebsitehtmlsections.php");
echo GetHtmlHeader(); echo GetHtmlFooter();
?> |
Note the use of the require() function. This function includes the contents of the contactswebsitehtmlsections.php file into index.php. After that, the echo statement calls each one of the functions coded in the included file. Now, if we type http://127.0.0.1 in the address bar, the web browser will show a blank page. However, if we ask for the source code of the webpage, we will look at the following HTML document.
Code Listing 45: Basic HTML Document Structure
<!DOCTYPE html> <html> <head> <title>Personal Contact List</title> </head> <body> <div class="container"> </div> </body> </html> |
Creating the website header
Now, we’re going to create the website header. This header will display the website’s title and a button to close the web browser’s window. The code for doing this will be saved in a file named websiteheader.php.
Code Listing 46: websiteheader.php
<?php function GetWebSiteHeader() { $result = '<header style="width:100%; height:50px; background-color: #8D8D8D; color: white;">'; $result .= '<div style="display: inline-block; width:90%; text-align: center;"><h1 style="margin: 0px 0px 0px 0px;">Personal Contact List Website</h1></div>'; $result .= '<div style="display: inline-block; width:10%;"><a href="#" onclick="window.close();return false;"><img src="images/closebutton.png" alt="Close" height="36" width="36" /></a></div></header>'; return $result; } ?> |
This code constructs a string with the <header> HTML tag. This tag is used to define a header section into our webpage. Let’s look at the style attribute defined in the tag. This attribute controls the way any element is displayed in the web browser by assigning to it a series of properties enclosed in double quotes. In this case, the width property tells the web browser that the header will cover the entire width of the browser window (100%). The height property tells the browser that the header will be 50 pixels in height (50px). The background-color property sets a gray scale color for the header background, and the color property sets a white color for all text displayed.
According to the design displayed at the beginning of this chapter, the website’s header will display a title for the site and a button to close the web browser’s window. In order to do this, the header section needs to be divided in two subsections. The <div> tag is used to accomplish this task.
The first <div> tag creates the subsection in which the title will be displayed. The style attribute for this subsection tells the browser that the title will cover 90% of the web browser’s window width, the text will be centered within the boundaries of the subsection, and the subsection belongs to the same row in which the close button will be displayed (display: inline-block;).
The second <div> tag will show the Close button. For this purpose, an image named closebutton.png saved in the images folder (located into the website’s root folder) is used as a hyperlink (<a> tag). Two lines of code are assigned to the onclick hyperlink event’s attribute. This code will be executed when the user clicks over the Close button’s image. The first line calls the close() method of the window object (the window object is equal to the web browser’s window), and the second line of code returns a false value in order to prevent the browser from jumping to an nonexistent link.
Creating the website toolbar
After the header section, the website should display a toolbar with one command button: Add Contact. By clicking on this button, the user can display a dialog box in order to insert data for a new contact in the database.
Code Listing 47: websitetoolbar.php
<?php function GetWebSiteToolbar() { $result = '<section style="margin-top: 5px; height: 60px;"><div class="container">'; $result .= '<button type="button" style="height: 56px;" onclick="div_show(); return false;">Add Contact</button>'; $result .= '</div></section>'; return $result; } ?> |
The code for creating the toolbar begins with a <section> tag. In HTML, this tag is used to define sections in a document, such as headers, footers, and of course, custom sections such as a toolbar. The style attribute defined in the <section> tag will use the margin-top property to apply a five-pixel margin top, starting from the end of the previous section (the website’s header). The height property assigns a 60-pixel height to the <section>.
Now, to display the command button in the toolbar, we will create a subsection using the <div> tag. Then, the command button is created by using the <button> tag along with the type="button" attribute. The button is set with a 56-pixel height using the style attribute along with the height property, and a function to handle the click event is assigned with the onclick attribute.
Creating the website footer
Even though the data table section is placed before the website footer, we’re going to review the code for website footer creation first, since the data table section requires the most of our attention.
The purpose of the website footer is to display a copyright message. The footer was considered in the design in order to include all main elements for a webpage. We’re going to save this code in a file named websitefooter.php.
Code Listing 48: websitefooter.php
<?php function GetWebSiteFooter() { $result = '<footer style="clear: both; position: fixed; left: 0; bottom: 0; height: 50px; margin-top: -50px; width: 100%; background-color: #8D8D8D; color: white;">'; $result .= '<div style="display: inline-block; width:80%; text-align: left;"><p style="margin: 12px 0px 0px 0px;">Copyright (C)2016 All PHP Web Developers</p></div>'; $result .= "</footer>"; return $result; }
?> |
Likewise, in the website header’s code, we have a <footer> tag to define the webpage’s footer section. Looking at the design displayed at the beginning of this chapter, we can see that the footer for the webpage should be placed at the bottom of the browser’s window. To accomplish this task, we should assign values to a series of properties and assign them to the style attribute. These properties are:
- clear – Prevents floating elements beside the declaring element. In this case, the value avoids floating elements at both the left and right sides of the <footer> section.
- position – Specifies the method used for positioning an element. The fixed value positions the <footer> section relative to the browser window.
- left – Specifies the left coordinate at which to place the element.
- bottom – Specifies the y coordinate at which to place the element, starting from the bottom of the browser window. In this case, 0 indicates that the footer will be drawn starting at the bottom of the window.
- height – Defines a 50-pixel height for the footer section.
- margin-top – The negative value is equal to the footer height, and ensures the footer section is always pulled up, starting from the bottom of the browser’s window.
To display the copyright message, we use a <div> section that covers the 80 percent of the <footer> section. A top margin of 12 pixels is assigned to the message’s paragraph.
At this point, the code for index.php should look like the following sample.
Code Listing 49: index.php, So Far
<?php
require("contactswebsitehtmlsections.php"); require("websiteheader.php"); require("websitetoolbar.php"); require("websitefooter.php");
echo GetHtmlHeader(); echo GetWebSiteHeader(); echo GetWebSiteToolbar(); echo GetWebSiteFooter(); echo GetHtmlFooter();
?> |
If we type http://127.0.0.1 into the address bar of the web browser, the output should look like the following figure.
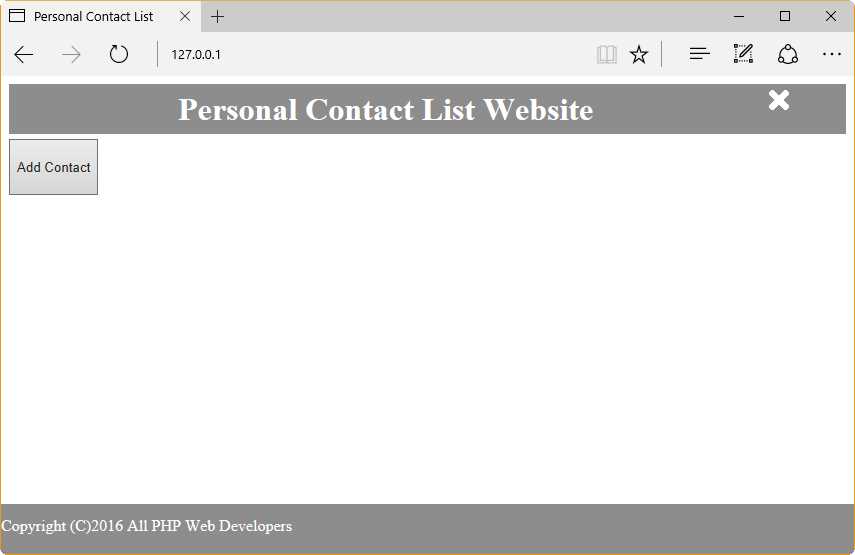
Figure 46: Personal Contact List Website, So Far
Note: The X icon in the upper-right corner is the image file closebutton.png, which you must generate yourself or get from the files that accompany this e-book.
Creating the data table section
The data table section displays contacts info using a HTML table. To accomplish this task, the following requirements should be fulfilled:
- Create a <section> tag to contain the data table section.
- Create a <div> tag to contain the HTML table.
- Create the HTML table using the <table> tag.
- Create the HTML table headers using the <th> tag.
- Connect to the contacts database using the mysqli class.
- Perform a SQL SELECT query using the query() method.
- Iterate through all rows in the returned dataset to create each HTML table row using <tr> and <td> tags.
We’re going to create a script to perform all these steps. The script will be saved in a file named datatablesection.php.
Code Listing 50: datatablesection.php
<?php require("contactsquery.php");
function GetDataTableSection() { $result = "<section>\n"; $result .= '<div style="width: 100%; height: 90%; overflow: auto;">'; $result .= "\n"; $result .= '<table width="100%">'; $result .= "\n"; $result .= '<tr style="background-color: #E1E1E1; color: #000000; text-align: center;">'; $result .= "\n"; $result .= '<th width="5%">ID</th>'; $result .= "\n"; $result .= '<th width="35%">Name</th>'; $result .= "\n"; $result .= '<th width="35%">Email address</th>'; $result .= "\n"; $result .= '<th width="25%">Phone number</th>'; $result .= "\n</tr>\n";
$resultset = ContactsDataSet();
if ($resultset != null) { if ($resultset->num_rows > 0) { $rownumber = 0;
while ($datarow = $resultset->fetch_assoc()) { $rownumber++;
if ($rownumber % 2 == 0) { $result .= '<tr style="background-color: #E1E1E1; color: #000000;">'; } else { $result .= '<tr style="background-color: #FFFFFF; color: #000000;">'; }
$result .= '<td style="text-align: right;">' . $datarow["ID"] . '</td>'; $result .= '<td>' . $datarow["NAME"] . '</td>'; $result .= '<td>' . $datarow["EMAIL"] . '</td>'; $result .= '<td>' . $datarow["PHONENUMBER"] . '</td>'; $result .= '</tr>'; $result .= "\n"; } } }
$result .= "</table>\n"; $result .= "</div>\n"; $result .= "</section>\n";
return $result; }
?> |
The first line of Code Listing 50 includes a file named contactsquery.php. This file contains a script with a function named ContactsDataSet(), which connects to the contacts database and returns a data set that is used to populate the table. After file inclusion, the script defines a function called GetDataTableSection(). This function will return the necessary HTML code to create the table that will display all rows from the contacts database. The table is built within the <section> and the <div> tags. The <section> tag delimits the DataTable section into the webpage. The <div> tag is used to contain the table. The overflow property defined in the style attribute tells the web browser that scroll bars should be displayed if the contents of the table are larger than the section height (overflow: auto). Then, the table headers are created, and the script calls the ContactDataSet() function, storing the result in the $resultset variable. If a null value is returned from the function, or if the $resultset variable contains no rows, table population does not happen. Otherwise, the script iterates through all rows and fills the table.
Code Listing 51: contactsquery.php
<?php function ContactsDataSet() { $dbhost = 'localhost'; $dbuser = 'root'; $dbpass = 'userpassword'; $database = 'contactinfo'; $mysqli = new mysqli($dbhost, $dbuser, $dbpass, $database); if ($mysqli->connect_errno) { return null; } $sql = "SELECT contacts.* FROM contacts ORDER BY contacts.name"; $resultset = $mysqli->query($sql); $mysqli->close(); return $resultset; } ?> |
At this point, index.php should look like the following code sample.
Code Listing 52: index.php, So Far
<?php
require("contactswebsitehtmlsections.php"); require("websiteheader.php"); require("websitetoolbar.php"); require("datatablesection.php"); require("websitefooter.php");
echo GetHtmlHeader(); echo GetWebSiteHeader(); echo GetWebSiteToolbar(); echo GetDataTableSection(); echo GetWebSiteFooter(); echo GetHtmlFooter();
?> |
Creating the Add New Contact dialog box
Now, we’re going to add the HTML code needed to create a dialog box to add a new contact. This dialog box should look like the following figure.

Figure 47: Add New Contact Dialog Box
The code for including this dialog box should be saved in a file named getcontactform.php.
Code Listing 53: getcontactform.php
<?php function GetContactForm() { $result = '<div id="newcontact" style="display: none;">'; $result .= "\n"; $result .= '<div id="popupContact">'; $result .= "\n"; $result .= '<form action="#" id="form" method="post" name="form">'; $result .= "\n"; $result .= '<img id="close" src="images/close.png" onclick ="div_hide()">'; $result .= "\n"; $result .= '<h2>Add New Contact</h2>'; $result .= "\n"; $result .= '<hr>'; $result .= "\n"; $result .= '<input id="name" name="name" placeholder="Name" type="text">'; $result .= "\n"; $result .= '<input id="email" name="email" placeholder="Email" type="text">'; $result .= "\n"; $result .= '<input id="phonenumber" name="phonenumber" placeholder="Phone Number" type="text">'; $result .= "\n"; $result .= '<input id="subject" name="subject" placeholder="Subject" type="text">'; $result .= "\n"; $result .= '<textarea id="message" name="message" placeholder="Message"></textarea>'; $result .= "\n"; $result .= '<button type="button" name = "submit" id="submit" onclick="savecontact()">Save</button>'; $result .= "\n"; $result .= '</form>'; $result .= "\n"; $result .= '</div>'; $result .= "\n"; $result .= '</div>'; $result .= "\n"; return $result; } ?> |
As noticed in the previous code, the dialog box is an HTML form placed into a <div> section. The way in which the dialog box is displayed is established by using CSS styles properties. These properties are saved in a file named css/contactform.css. The display: none property inside the style attribute prevents the dialog box from being displayed when we load the website for the first time.
At this point, some JavaScript functions were added to the website in order to manage the Add Contact button’s click event, the Save button’s click event, the Close button, the validation of data entries, and the process of inserting contact info in the database.
Code Listing 54: js/contactform.js
function savecontact() { if ( document.getElementById('name').value == "" || document.getElementById('email').value == "" || document.getElementById('subject').value == "" || document.getElementById('message').value == "" || document.getElementById('phonenumber').value == "") { alert("You must fill all entries!"); return; }
document.getElementById('submit').disabled = true;
$.post("insertcontact.php", { name: document.getElementById('name').value, email: document.getElementById('email').value, phone: document.getElementById('phonenumber').value, subject: document.getElementById('subject').value, message: document.getElementById('message').value }, function(data, status){ if (data == "OK") { window.location.reload(); } else { alert(data); } }).fail(function(data,status){alert("Error " + status);});
document.getElementById('submit').disabled = false; } //Function to Display Popup function div_show() { document.getElementById('newcontact').style.display = "block"; } //Function to Hide Popup function div_hide(){ document.getElementById('newcontact').style.display = "none"; } |
There are three functions in the previous code. The last two allow you to display or hide the Add New Contact dialog box. The trick is simple: to show the dialog box, the display property for the 'newcontact' div section receives a value of "block" after the div_show() function is executed. Hiding the dialog box is performed by the div_hide() function, by setting the value of the display property to "none".
Note: The div_show() function is executed when the user clicks over the Add Contact button located at the toolbar, and the div_hide() function is executed when the user clicks on the Close button located at the top-right corner of the Add New Contact dialog box.
Now, let’s review the savecontact() function. First, the function checks for values stored in all entries. If one of these entries has no value, the function fires an alert and finishes the execution. Otherwise, the function disables the Save button and uses the $.post jQuery method to execute the insertcontact.php script, passing its name and location as the first parameter of the method. The second parameter of the $.post method is an array with the variables, and their values, which will be passed to the script. The third parameter of the $.post method is a function that is performed if the execution of the script is successful. This function will be used to know if the contact was added to the database. That happens if the data variable passed to the function has an "OK" value. In this case, we use the window.location.reload() method to refresh the web browser window and display new data.
The script that inserts contact info in the database is displayed in the following code sample.
Code Listing 55: insertcontact.php
<?php $name = $_POST['name']; $email = $_POST['email']; $phone = $_POST['phone']; $subject = $_POST['subject']; $message = $_POST['message']; $dbhost = 'localhost'; $dbuser = 'root'; $dbpass = 'Netdevserver'; $database = 'contactinfo'; $mysqli = new mysqli($dbhost, $dbuser, $dbpass, $database); if ($mysqli->connect_errno) { echo "We're sorry. The website can not connect to the database <br />"; echo "Error: MySQL connection failed: <br />"; echo "Errno: " . $mysqli->connect_errno . "<br />"; echo "Error: " . $mysqli->connect_error . "<br />";
exit; }
$sql = "INSERT INTO contacts (name,email,phonenumber,subject,message) VALUES ('$name', '$email', '$phone','$subject','$message')"; if ($mysqli->query($sql) === TRUE) { echo "OK"; } else { echo "Error: " . $sql . "<br>" . $mysqli->error; } $mysqli->close(); ?> |
This script is similar to the one explained in Chapter 5, except that the values to be inserted in the contacts database are taken from the $_POST associative array. In this case, the name of the parameters sent by the $.post method are used as keys to retrieve the corresponding value for each parameter. These values are passed to a set of variables used later as a part of the INSERT SQL statement. If data insertion is successful, the echo statement sends "OK" as a response. Otherwise, the response is an error message.
The result: A functional Personal Contact List Website
At the end, we should get a functional website that looks like the following figure.
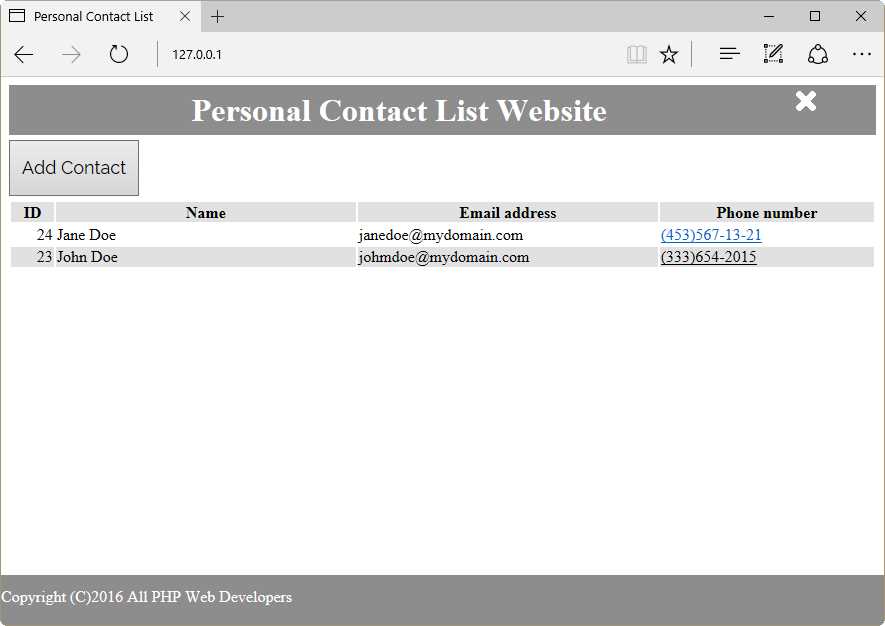
Figure 48: Personal Contact List Website
Chapter summary
The purpose of this chapter was gathering all themes discussed previously to turn them into a simple contact list website. The design for the website divided the homepage into four sections: a header, intended to show the name of the website; a toolbar, which holds a button intended to add contacts to the table; a data table, intended to display all contacts stored in the database; and a footer, which displays some copyright information. Also, a Close button was placed at the right side of the header section. This kind of design employs a complex programming, so we used the file inclusion technique, discussed in Chapter 4, to develop this website.
We used the index.php document as the website point of entry. Then, we programmed every section of the website’s home page in a separate file. After that, we used the require() statement to include all those files in index.php.
- 1800+ high-performance UI components.
- Includes popular controls such as Grid, Chart, Scheduler, and more.
- 24x5 unlimited support by developers.