
OWIN Succinctly®

CHAPTER 2
Katana
Introduction
In the previous chapter, we learned what OWIN is, when it is a good idea to use it (if you have forgotten, the answer is always), its specifications, and how Microsoft came to embrace this standard by building its own implementation called Katana.
In this chapter, you will learn how exactly Katana implements the OWIN specs, how it enhances them, and how to write your first "Hello World" web application with Katana and its different hosting options.
Later in the chapter, you will also learn how to customize the startup process by choosing which Startup class to use.
What is Katana
As seen in Chapter 1, Katana is the Microsoft implementation of the OWIN specs, and provides all the layers, sometimes in more than one flavor, specified by OWIN. In addition to implementing hosts and servers, Katana provides a series of APIs to facilitate the development of OWIN applications, including some functional components like authentication, diagnostics, static files serving, and bindings for ASP.NET Web API and SignalR. To avoid confusion, remember that Katana is not a full-fledged web server, but just the “glue” between the OWIN world and IIS.
The Principles of Katana
In line with the guiding principles of OWIN, Katana was built with three main objectives in mind:
- Portable: Every component in the pipeline should be replaceable, from the server and host to the web frameworks. Frameworks built by other companies or open source projects should be able to run on top of Microsoft OWIN servers and Microsoft middleware components; frameworks should potentially run on top of server and hosts coming from other OWIN-based projects.
- Modular: All components shipped with Katana should be very focused and provide just one functionality so that application developers can mix and match the components that they need. This keeps the size of the application small, instead of giving developers a myriad of features they don't need.
- Lightweight and performant: A consequence of the modular approach is that applications will consume only the resources that are really needed. In addition, since components are developed to be portable, they can be replaced with more performant implementations whenever they become available.
Katana Architecture
Before diving into coding your first Katana application, it is important to understand its architecture, and how the layers defined by the OWIN specs, Host, Server, Middleware, and Application, map on top of Katana components.
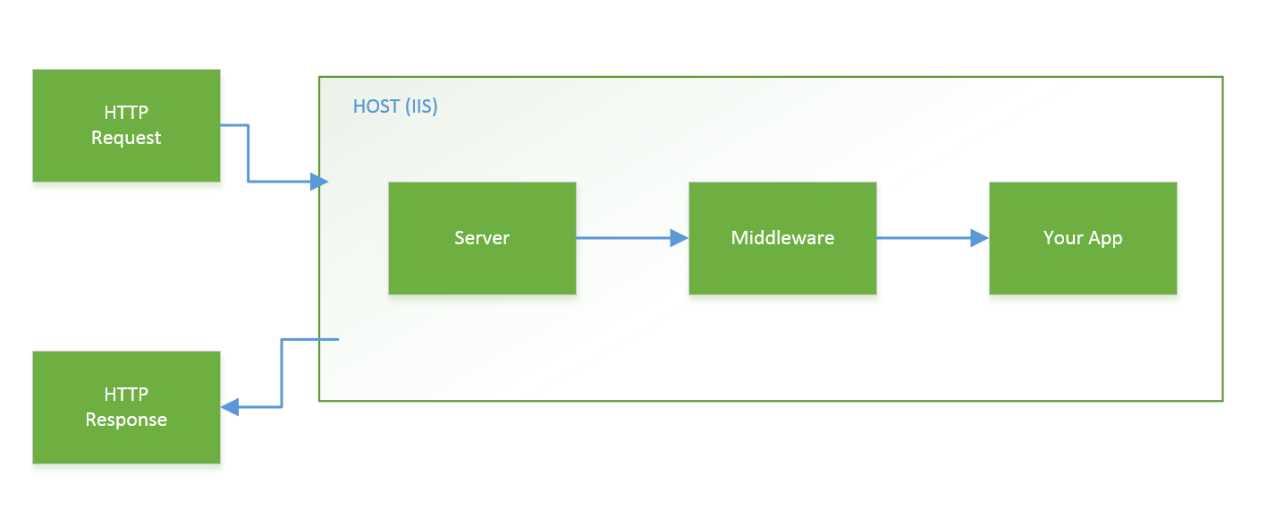
Architecture of Katana
Host
The first and lower layer defined in the OWIN specs is the host. It is responsible for the management of the underlying process (startup, shut down, and so on) and the initialization of the OWIN pipeline that will later be used to process incoming requests.
There are three options for Katana-based applications:
- IIS/ASP.NET—The easiest and more backward compatible option is using IIS: in this scenario the OWIN pipeline is started via a standard HttpModule and HttpHandler. Using this hosting option you are also obliged to use the OWIN server that relies on System.Web as IIS is both host and server.
- Custom Host—If you want the option to use a different server instead of System.Web, or want to have more control on the hosting process and application configuration, another option is to build a custom hosting process. This allows developers to host their server in a Windows Service, a console application, or even, for example, easily embed their own server inside a desktop application.
- OwinHost—The last option is for developers who don't want to use IIS/ASP.NET to host their application but also don't want to build their own custom host and would rather rely on something already built. For this purpose, the Katana suite includes OwinHost.exe: a command line application that, when launched from a project's root folder, starts the server using the HttpListener server and finds the startup class by convention. It has a few command line options that can be set to customize the way it behaves. You can, for example, point it manually to the application startup class or change the server used (if you don't want to use the default HttpListener).
Server
The next layer is the server, which is responsible for opening the network socket connection on which the application will respond. It listens for requests and, once one arrives, it populates the environment dictionary with the values coming from the HTTP request and sends it down through the pipeline of OWIN middleware defined by the developer in the application startup code.
System.Web
As previously mentioned, System.Web and the IIS/ASP.NET hosting option cannot be chosen independently one from the other. When using this option, the Katana System.Web-based server registers itself as HttpModule and HttpHandler and will process the requests sent to it by IIS. It will then map the well-known HttpRequest and HttpResponse objects to OWIN's environment dictionary and send the request to the OWIN pipeline.
HttpListener
The other option currently available is based on the lower-level networking class HttpListener. This is the default server when using OwinHost or self-host.
WebListener
This is the super lightweight OWIN server that will come with ASP.NET vNext. It can’t currently be used with Katana, but it’s worth knowing what's in the pipeline.
Middleware
After the first two layers, which basically just wire up the process, the request finally enters the pipeline of OWIN middleware. Middleware is a small component that implements the OWIN application delegate AppFunc.
Middleware should process the request and pass the execution to the next component defined in the pipeline. What middleware does while processing the request can be either very simple or very complicated. It could just be a simple logging component, but it can also be a full web framework like Nancy, SignalR, or ASP.NET Web API. It can even be a small, self-contained web application that you just want to plug into your web project.
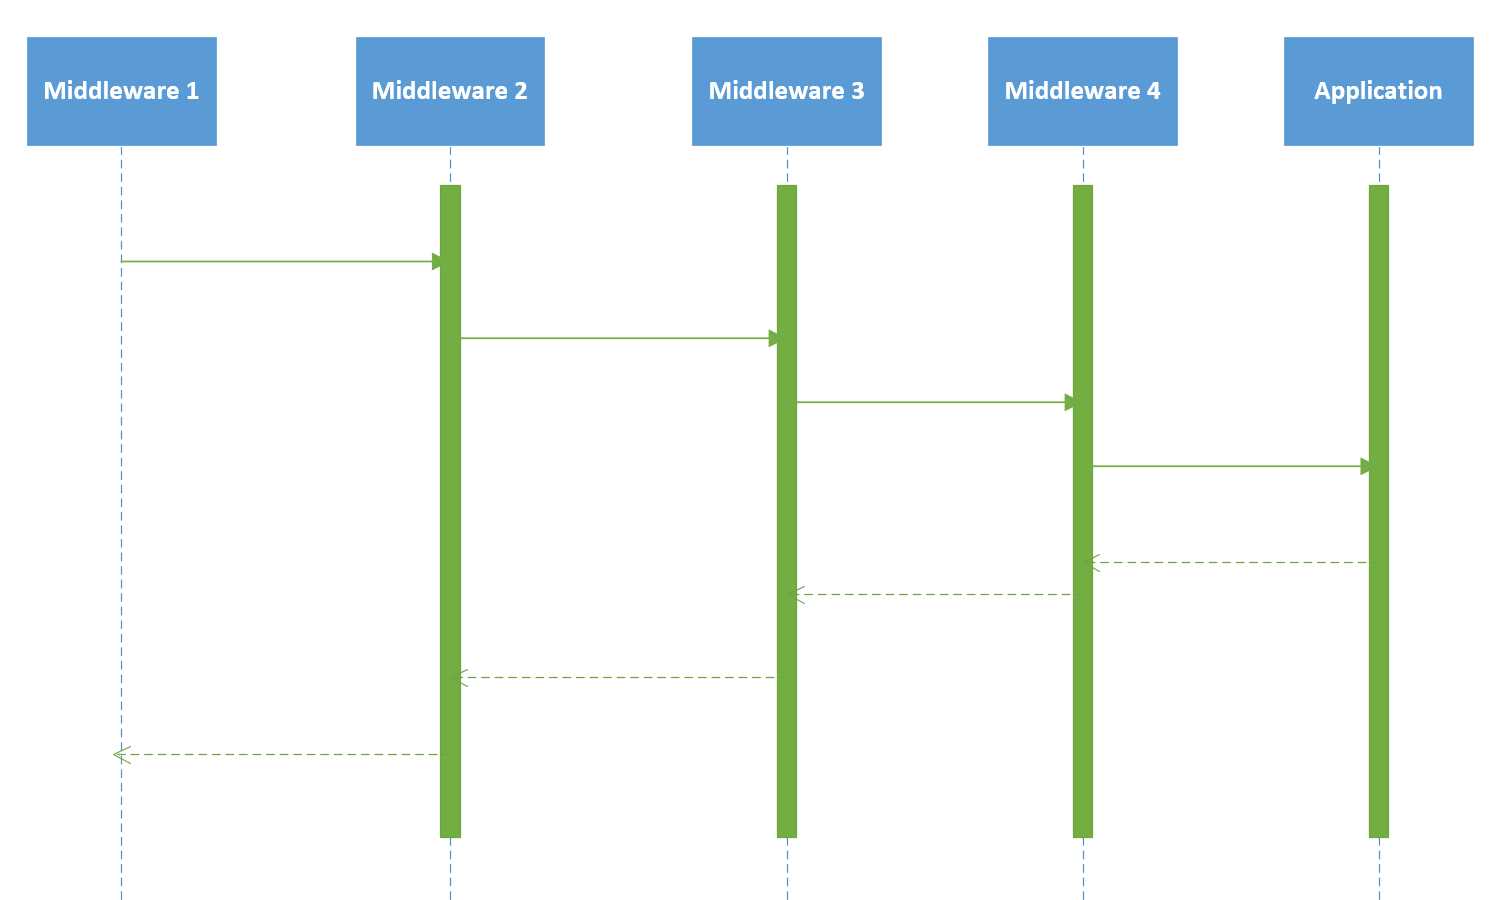
Sequence diagram of the invocation of middleware
In Chapter 4, you will learn how to build your own middleware component.
Application
Finally, the top layer of the OWIN specs is the code of your application.
Katana on IIS
Now that you’ve learned about the architecture and the options available with the Katana suite, it is time to get your hands dirty writing a Katana-based application. The application will just print the message Hello World! in the output, which is a webpage in this case.
Create the Project
We will first start with building a Katana application that runs using the IIS/ASP.NET host and the System.Web server. To do so, first you need to open Visual Studio and start by creating a new ASP.NET Web Application on the .NET Framework 4.5.
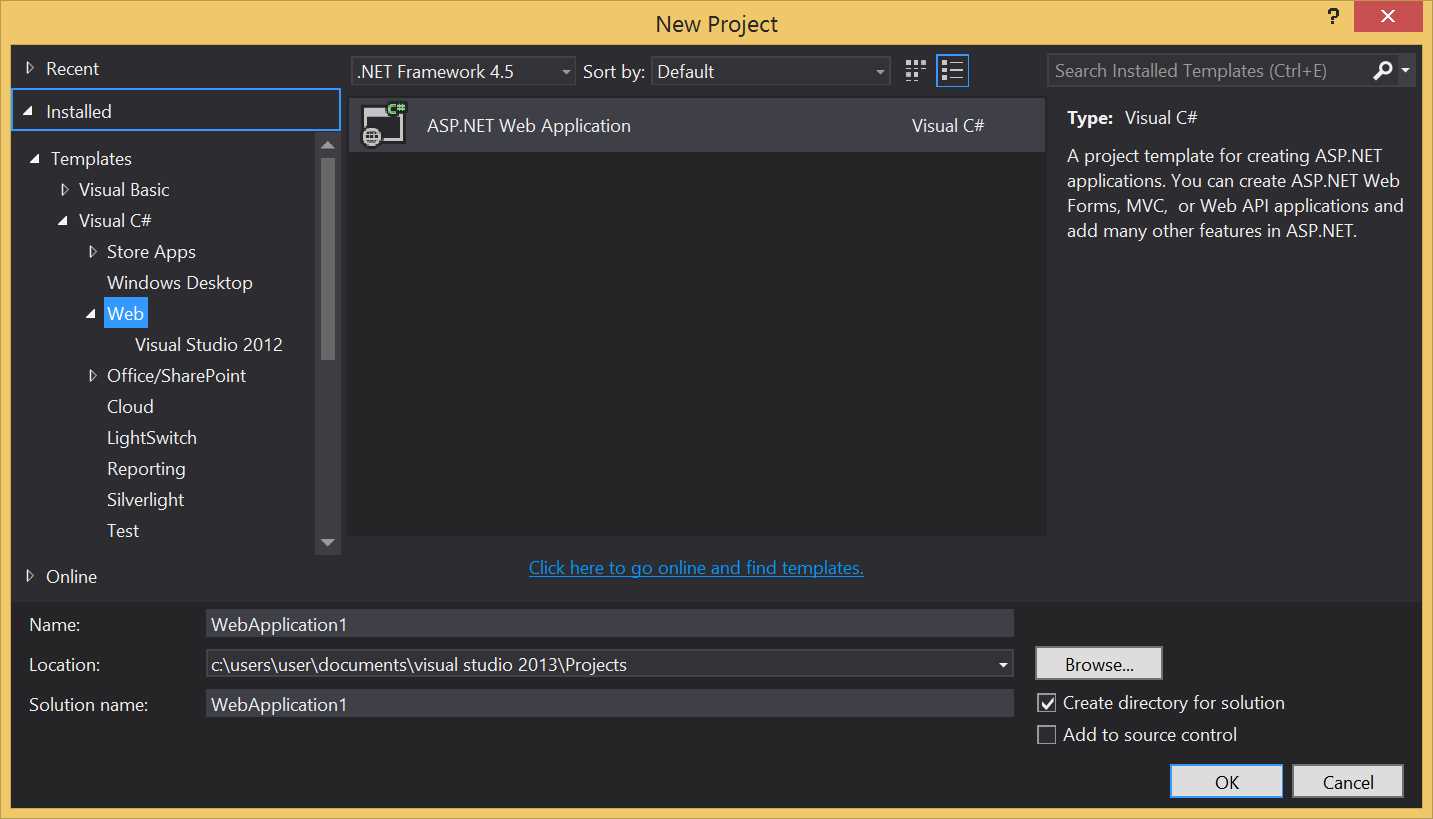
New Project window
Once you’ve chosen the kind of project, the New ASP.NET Project creation wizard will appear. Make sure you use the following settings:
- Select the Empty template.
- Select No Authentication.
- Do not select any additional folder or core reference.
- Do not host in Azure.
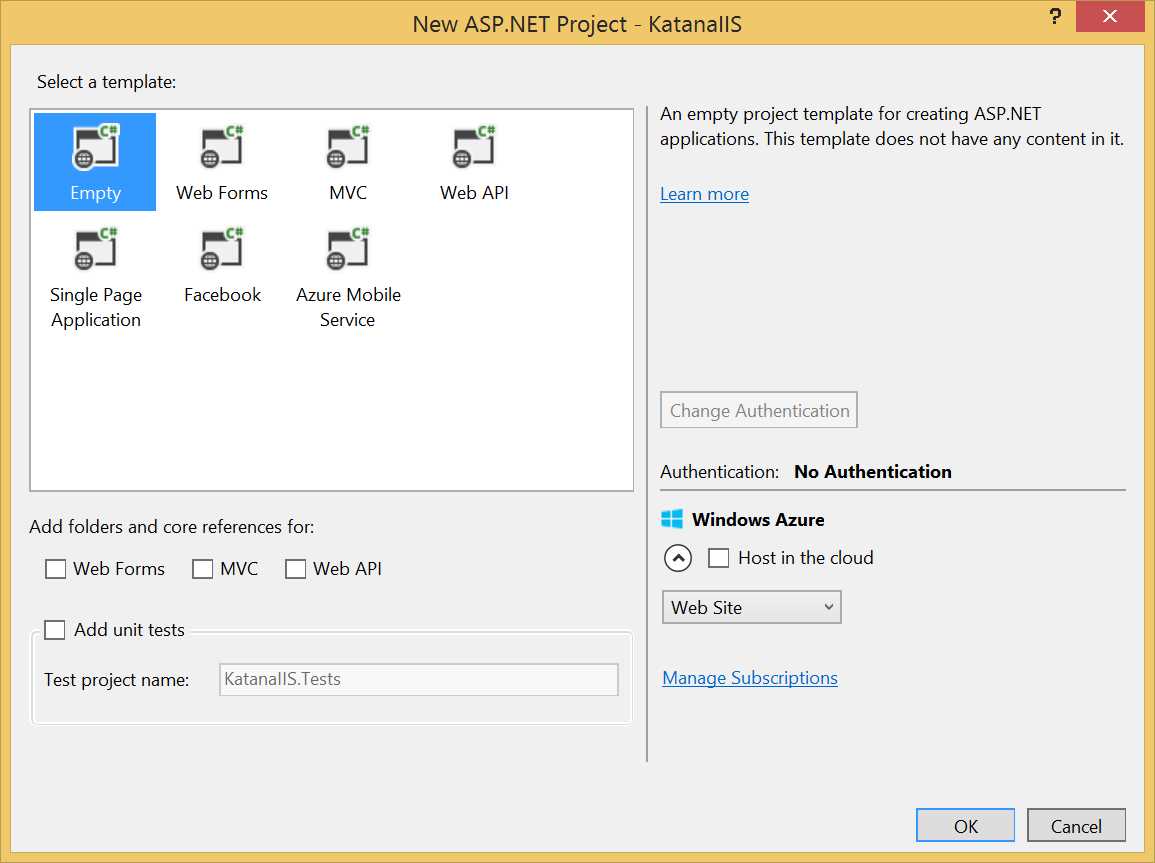
New ASP.NET Project window
The previous figure shows how the New ASP.NET Project window should look.
Include the Relevant NuGet Packages
The project has been created; now it is time to include Katana via NuGet.
There are many NuGet packages available to build Katana-based applications, often organized with a very granular approach. While this makes it better for modularity, it makes it harder to know which package to choose for the feature needed by an application. And to make things a bit more complicated, none of the packages have Katana in the name, but all are referred to as Owin. The Appendix at the end of the book describes the features of each OWIN NuGet package released by Microsoft as part of the Katana suite.
From within Visual Studio, open the NuGet Package Manager, and search using the keyword owin. The first package in the list will be Microsoft.Owin.Host.SystemWeb, which is the package you have to install.
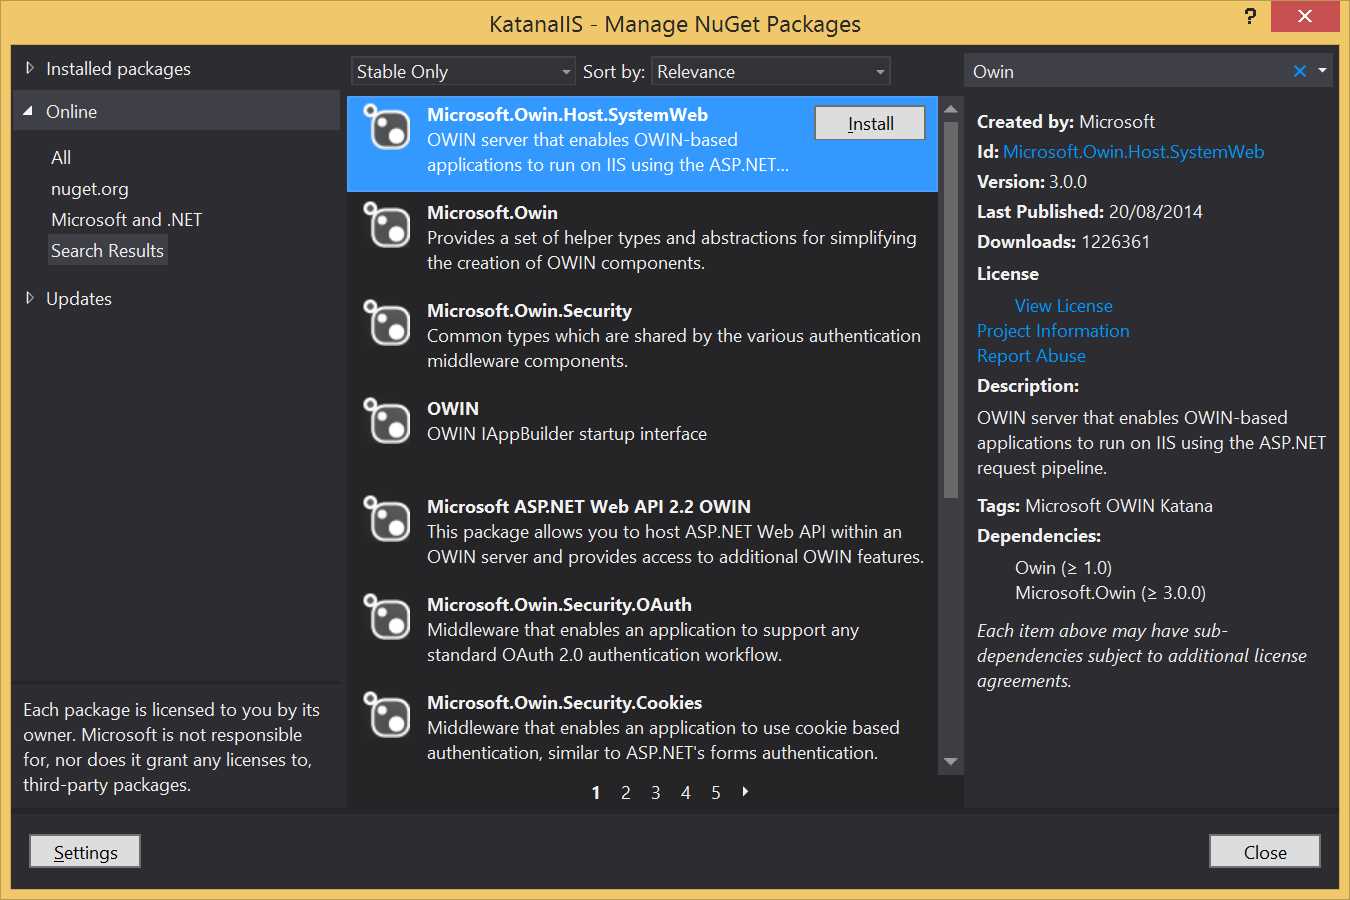
Manage NuGet Packages window with package to install
If you prefer using the package manager console, you can install the needed package by typing:
PM> Install-Package Microsoft.Owin.Host.SystemWeb |
The System.Web-based hosting package depends on two other NuGet packages, Owin and Microsoft.Owin. After having installed the package, the Manage NuGet Packages window will look like the following figure.
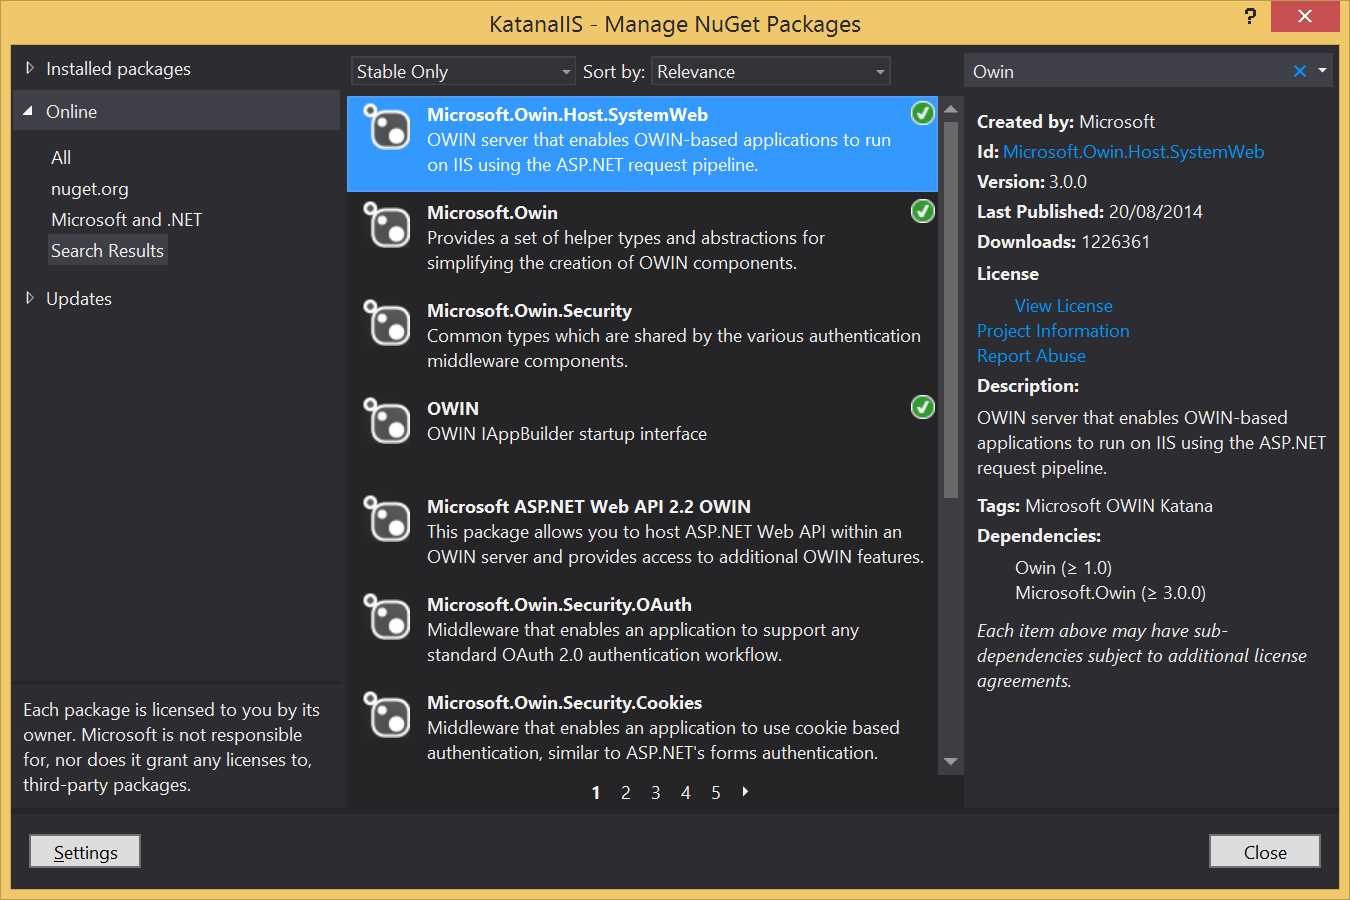
Manage NuGet Packages window with installed packages
Adding the Startup Class
It is finally time to write some code and instruct the application how to respond to web requests. This is done in the Startup class, which by convention is nothing but a class named Startup in the root of the assembly. The code to configure the application is specified by convention in the Configuration method.
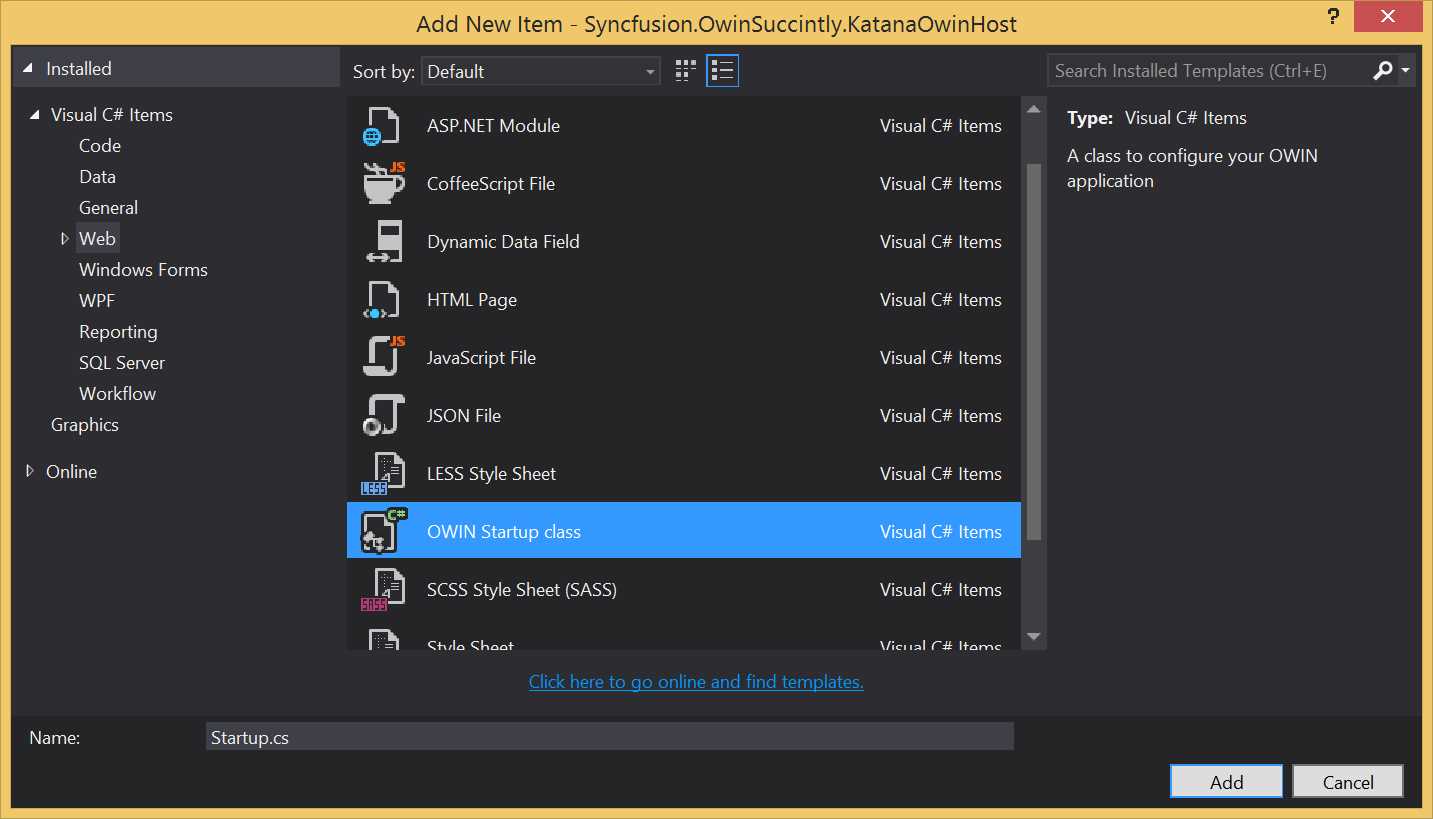
Now open the Add New Item window, drill down inside the Web > General tree (or type owin in the search box in the top right corner of the window), and select the OWIN Startup class template, as shown in the following figure.
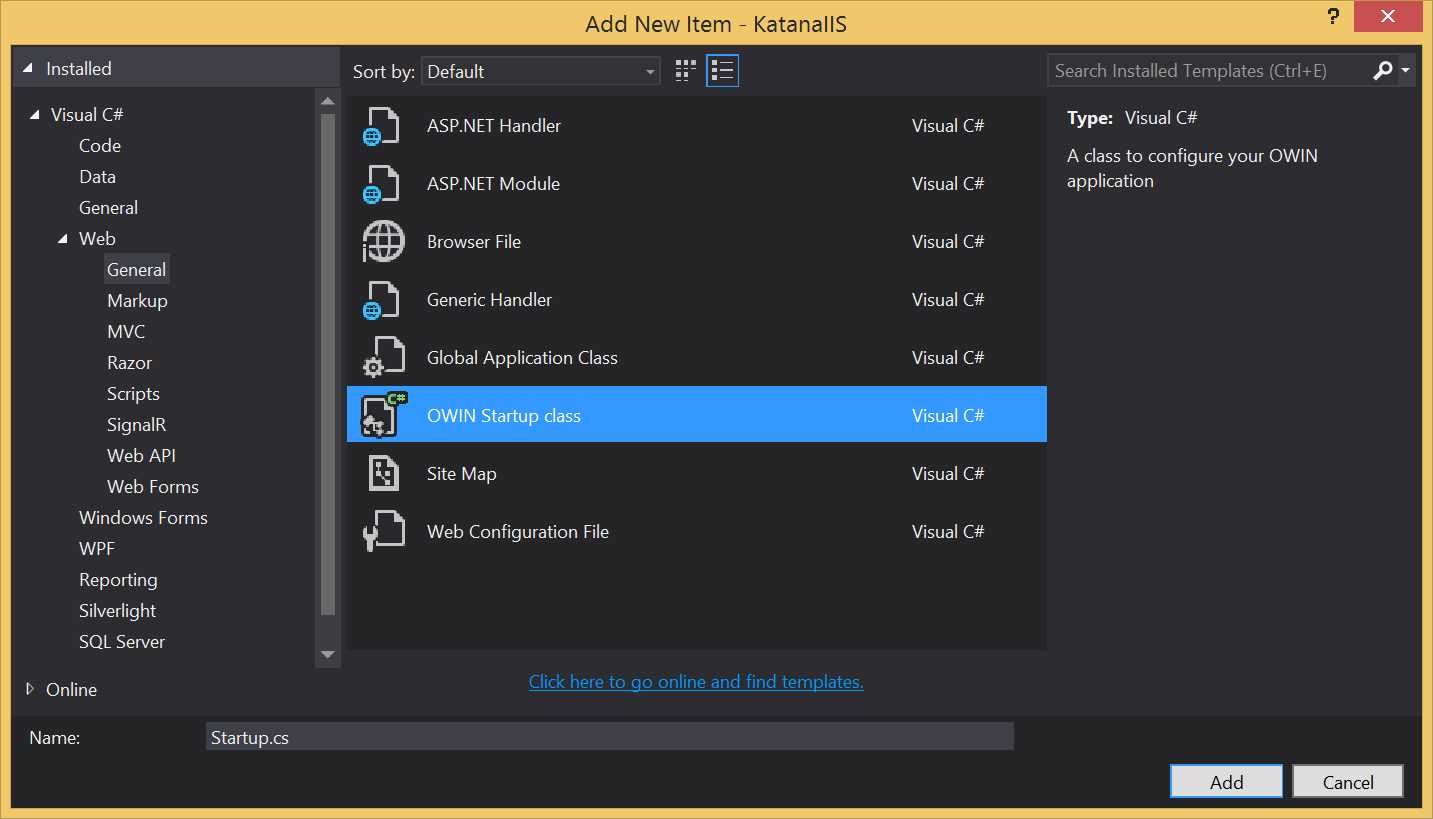
Add New Item window with OWIN Startup class
This will create a Startup.cs file in the root of the application folder with the following code.
using Microsoft.Owin; using Owin;
[assembly: OwinStartup(typeof(Syncfusion.OwinSuccinctly.KatanaIIS.Startup))]
namespace Syncfusion.OwinSuccinctly.KatanaIIS { public class Startup { public void Configuration(IAppBuilder app) { // For more information on how to configure your application, visit http://go.microsoft.com/fwlink/?LinkID=316888 } } } |
As you can see, besides creating a class following the conventions, the template also added an assembly-level attribute to specify the startup class.
[assembly: OwinStartup(typeof(Syncfusion.OwinSuccinctly.KatanaIIS.Startup))] |
The attribute is needed in case the name of the class is different from Startup. It will come in handy later in the chapter where you will learn other ways to specify the startup class which also use the web.config file.
To add your own logic, you have to implement the Configuration method by adding operations in the OWIN pipeline as demonstrated in the following code.
public void Configuration(IAppBuilder app) { app.Run(context => { context.Response.ContentType = "text/plain"; return context.Response.WriteAsync("Hello World!"); }); } |
The previous method inserts as the last element of the OWIN pipeline a lambda function that receives an IOwinContext object as input, sets the response type to text/plain, and asynchronously writes to the response stream the text "Hello World!".
In this short sample, you already see two of the helpers that Katana adds on top of OWIN specs, as well as the de-facto standard IAppBuilder interface:
- The IOwinContext class, which wraps the OWIN environment dictionary with a strongly typed and easier to use class.
- The Run extension method, used to add a component as a final step of the OWIN pipeline. Its signature is Run(System.Func<IOwinContext,Task> handler).
Using the bare OWIN specs and only Owin.dll, the same class would have been a little more complicated to write.
using AppFunc = Func<IDictionary<string, object>, Task>; ... app.Use(new Func<AppFunc, AppFunc>(next => (env => { string text = "Hello World!"; var response = env["owin.ResponseBody"] as Stream; var headers = env["owin.ResponseHeaders"] as IDictionary<string, string[]>; headers["Content-Type"] = new[] { "text/plain" }; return response.WriteAsync( Encoding.UTF8.GetBytes(text), 0, text.Length); }))); |
Notice that without the Katana helpers, you have to call the Use method to instruct the pipeline to run the OWIN middleware object with that long signature, and ignore the next parameter, which contains the following element in the pipeline. Also, you have to get the response keys out of the environment dictionary and cast them to the right type before using.
Note: You are never going to use this syntax, but I put it in the chapter to show how things would be using only the OWIN specs. It is more code, but not that much more.
Going a Bit Further
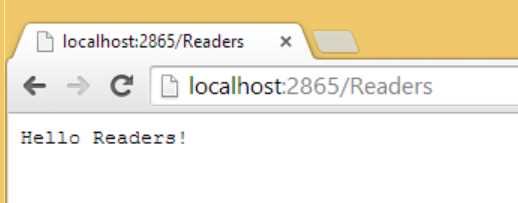
Inside the handler function you can also write more logic, for example, like reading a query parameter to write a personalized Hello Readers! message.
public void Configuration(IAppBuilder app) { app.Run(context => { var name = context.Request.Query["name"]; context.Response.ContentType = "text/plain"; return context.Response.WriteAsync("Hello " + name + "!"); }); } |
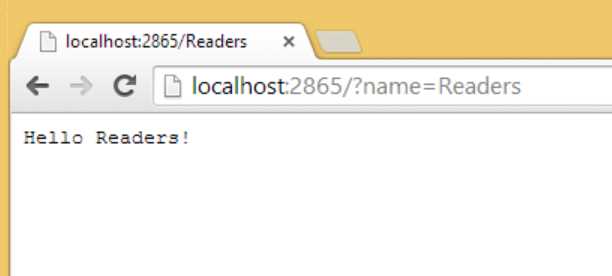
Hello Readers! via query string
If you are not a big fan of query string parameters and prefer a more RESTful approach with clean URLs, you could parse the requested path and extract the segments.
public void Configuration(IAppBuilder app) { app.Run(context => { var name = "World"; var uriSegments = context.Request.Uri.Segments; if (uriSegments.Length > 1) name = uriSegments[1]; context.Response.ContentType = "text/plain"; return context.Response.WriteAsync("Hello " + name + "!"); }); } |
Hello Readers via path segment
Now the code is becoming too complicated to fit just into a lambda expression. It is time to move it to an external method. This way you will also better understand what the handler is: a function that takes in an IOwinContext and returns a Task (in this case using the async/await paradigm).
public void Configuration(IAppBuilder app) { app.Run(WriteResponse); }
private Task WriteResponse(IOwinContext context) { var name = "World"; var uriSegments = context.Request.Uri.Segments; if (uriSegments.Length > 1) name = uriSegments[1]; context.Response.ContentType = "text/plain"; return context.Response.WriteAsync("Hello " + name + "!"); } |
With this working simple web app, we will now take it out of IIS and host it inside a custom host.
Katana via a Custom Host
Hosting the Katana application inside a custom host doesn't differ much from hosting it inside IIS. The startup class and the code of the application remain exactly the same as before. The only things that change are the project type used to create the application—a console application—and the NuGet packages to install.
Note: Hosting your application inside a custom host like a console application, a Windows service, or even a WPF desktop application, is an easy way to add a web interface for your applications. Be careful when choosing this option instead of choosing IIS. You’ll lose all the features that come with IIS (like SSL, event logging, easy management console, etc.) and will have to implement them yourself.
Create the project
As before, start by creating a new project, this time by selecting Console Application as shown in Figure 11.
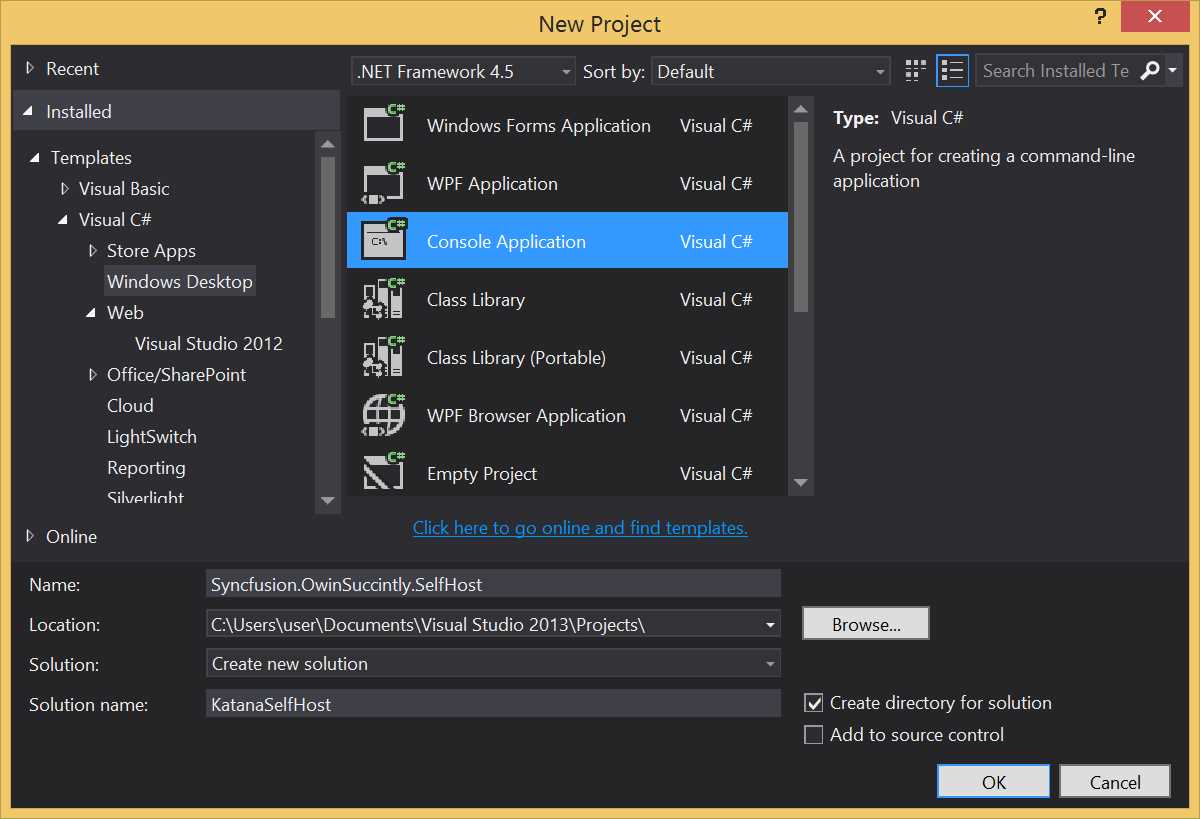
New Project window
Include the Relevant NuGet Packages
With the empty console application created, open the NuGet Package Manager, and search using the keyword owin selfhost and choose Microsoft.Owin.SelfHost.
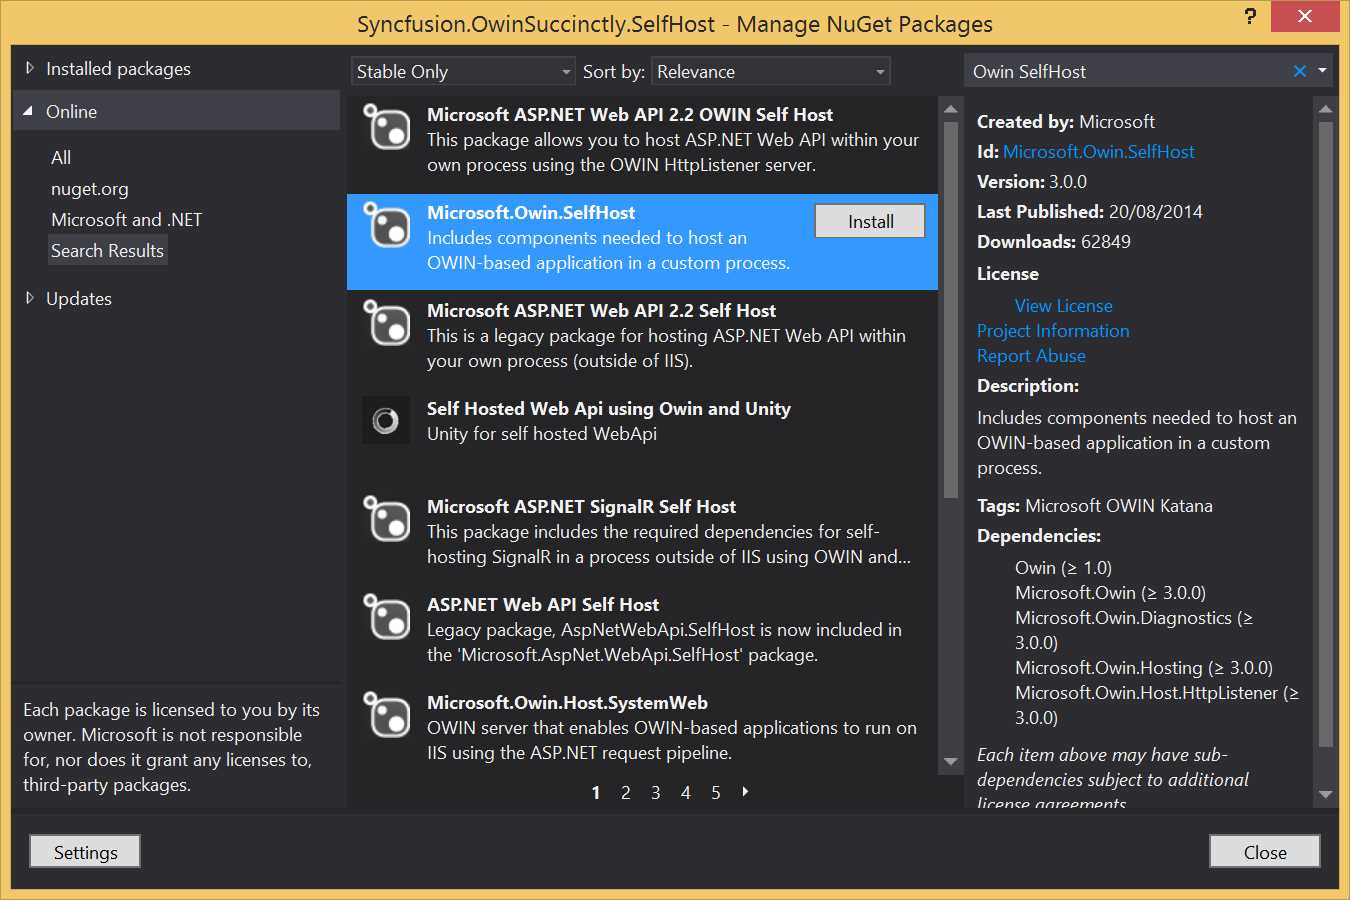
Manage NuGet Packages window showing package to install
Or you can also use the following command in the Package Manager console.
PM> Install-Package Microsoft.Owin.SelfHost |
When the download and installation are finished, you will see seven NuGet packages installed.
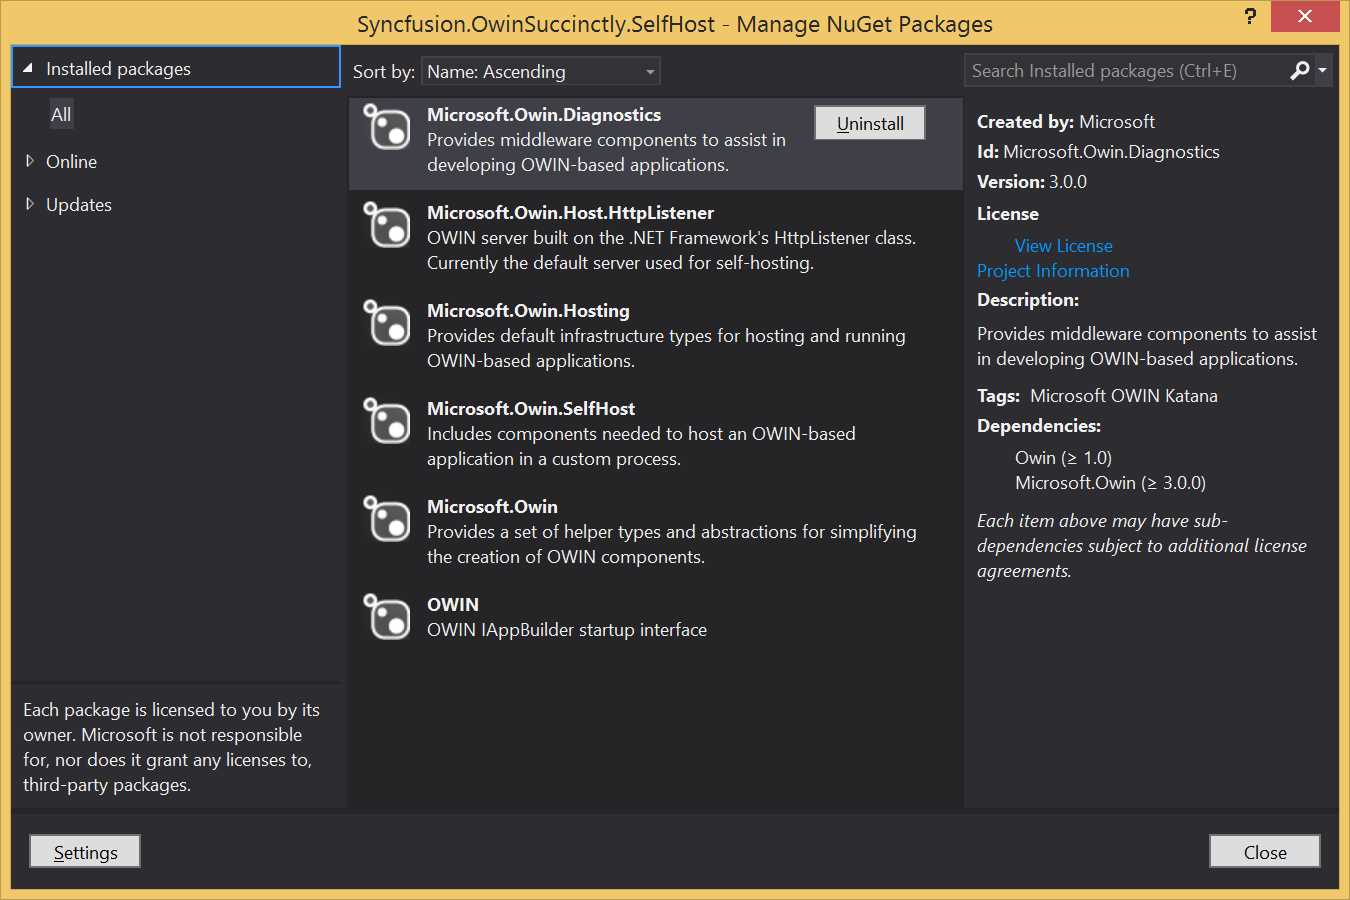
Manage NuGet Packages window with installed packages
In addition to Owin and Microsoft.Owin, it will also download the Microsoft.Owin.Hosting package, which contains the infrastructure for hosting OWIN-based applications, Microsoft.Owin.Host.HttpListener. It will include the implementation of the OWIN host layer based on the .NET networking class HttpListener and Microsoft.Owin.Diagnostic, which contains some useful components. You need these components now that you are not relying on IIS anymore, including the default welcome page and the equivalent of the Yellow Screen of Death (YSOD).
Write the Hosting Code
Everything is in place now, so the next step is writing the code to launch the server and host the OWIN-based application.
static void Main(string[] args) { using (WebApp.Start<Startup>("http://localhost:9000")) { Console.WriteLine("Launched site on http://localhost:9000"); Console.WriteLine("Press [enter] to quit..."); Console.ReadLine(); } } |
Basically, the only relevant line of code is the WebApp.Start<Startup>("http://localhost:9000") you specify with the generics notation, which is the class that contains the startup configuration, and you specify which domain and port to listen to as its parameter.
Starting and Running the Server
Now we can add the startup class by writing the same code as before, and the application will run perfectly fine. Just press F5 and the console application will launch and show that the server has been started.
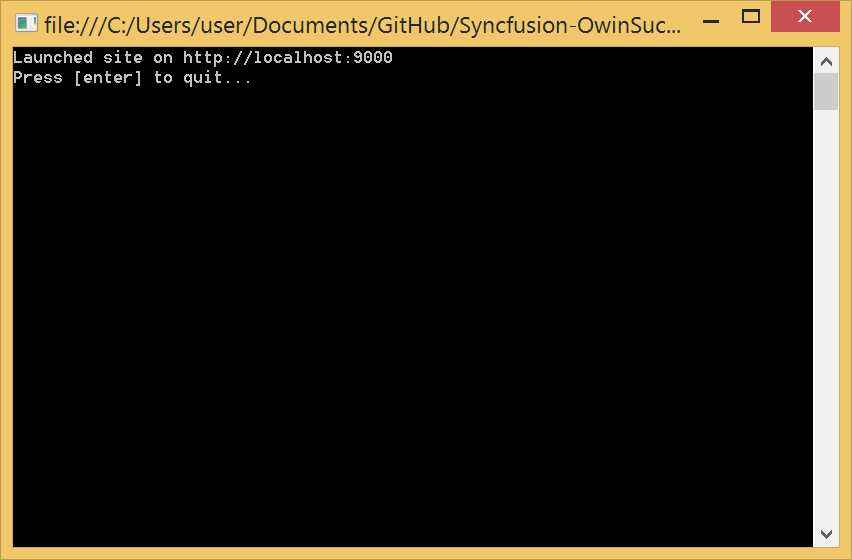
Console application with custom host
Using the Diagnostic Helpers
By running our application in a custom host, we are losing all the management and diagnostic features of IIS. By using the features included in the Microsoft.Owin.Diagnostic package, we can at least bring back the welcome screen and a debugging view to show in case of unhandled exceptions.
public void Configuration(IAppBuilder app) { app.UseWelcomePage("/"); app.UseErrorPage(); app.Run(context => { Trace.WriteLine(context.Request.Uri); //Line to show the ErrorPage if (context.Request.Path.ToString().Equals("/dotnotcallme")) { throw new Exception("You requested the wrong URL :)"); } context.Response.ContentType = "text/plain"; return context.Response.WriteAsync("Hello, world."); }); } |
The previous code listing shows the basic Configuration class with a few additional lines.
The first is app.UseWelcomePage("/"), which adds into the pipeline an OWIN middleware component that shows the default welcome page. It is added when the URL specified as parameter is requested, which is the root of the site in this case.
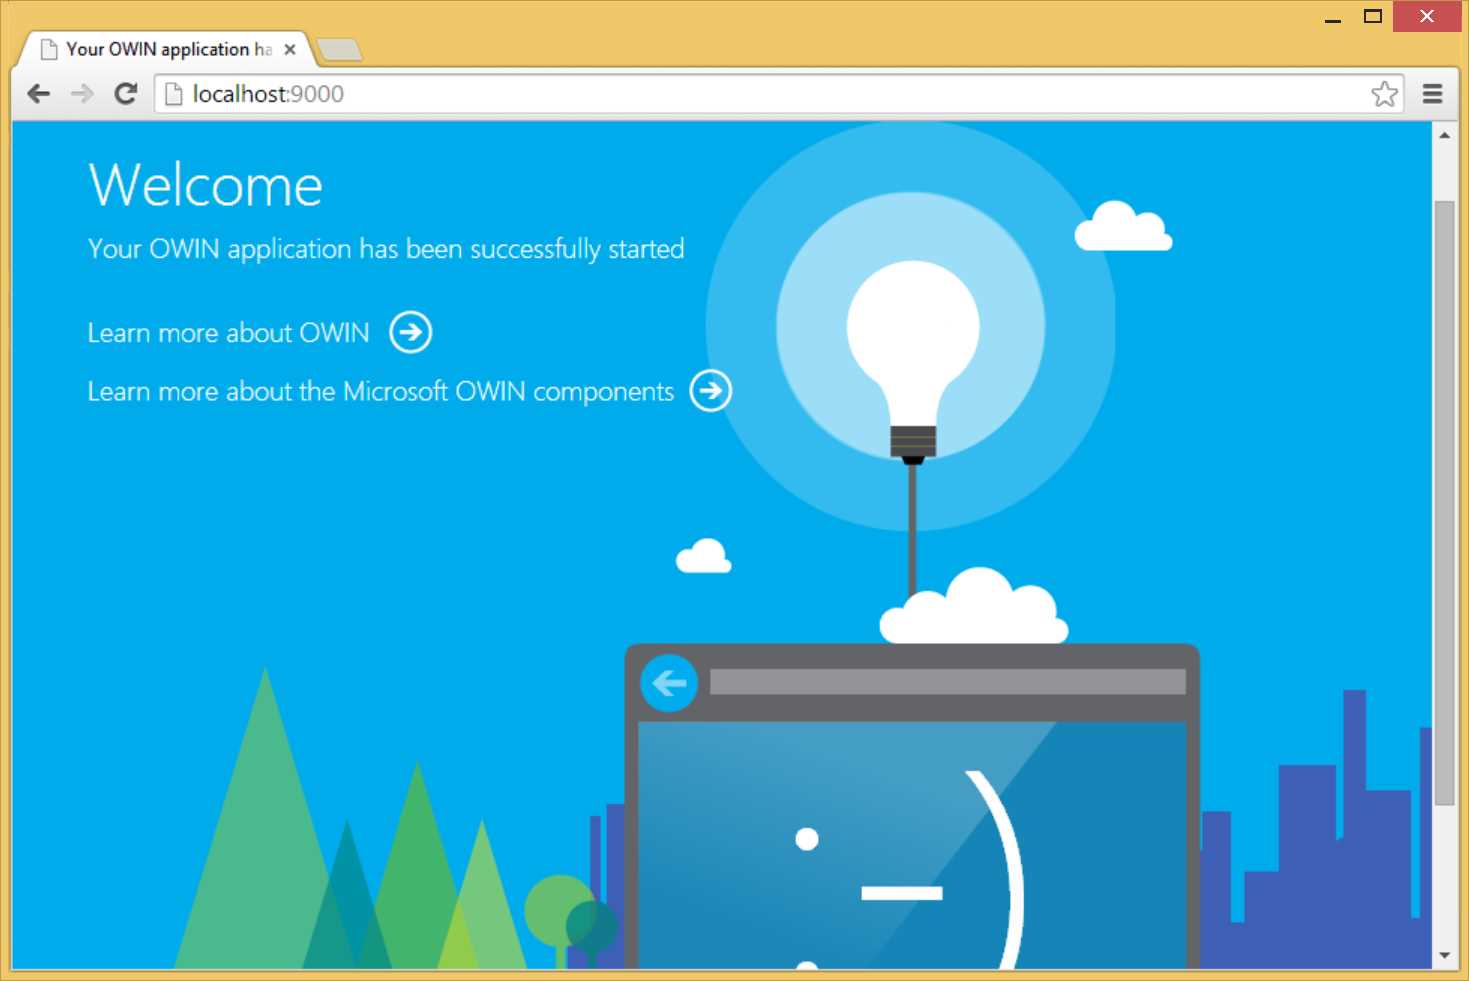
Welcome page
The second line app.UseErrorPage() configures the pipeline to show an error page if an unhandled exception happens during the execution of the request.
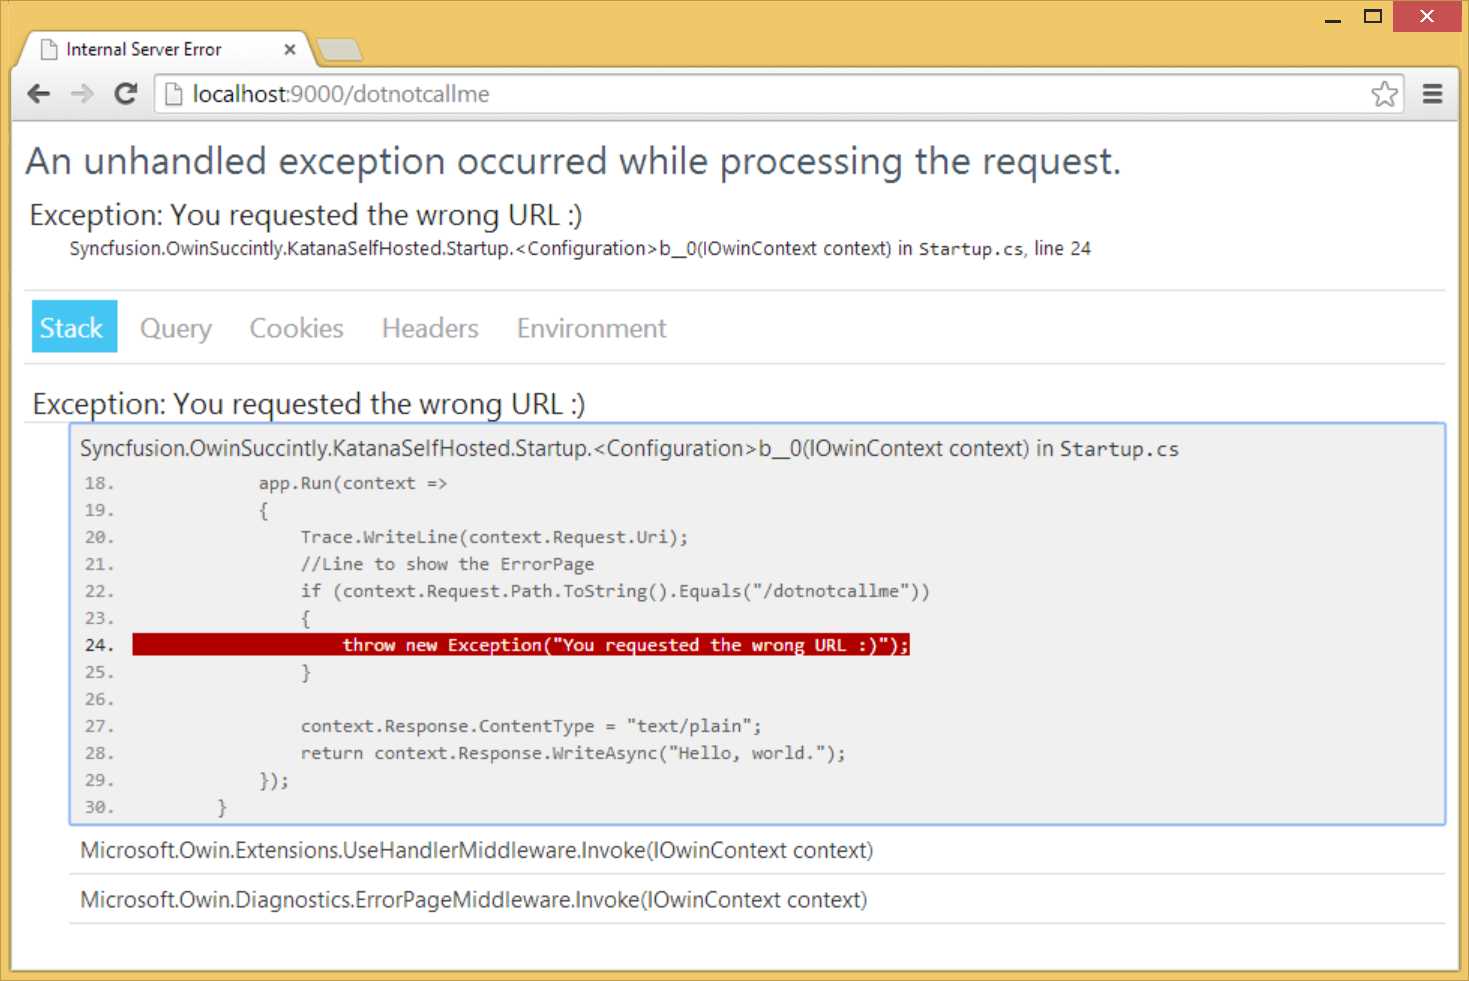
Error page, stack trace tab
Figure 16 shows the default view of the error page, with the stack trace tab that is equivalent to the YSOD. It shows the stack trace and source code with the line of code that generated the exception highlighted.
As you can see, there are many others panes: Query, Cookies, Headers, and, most interesting for an OWIN application, Environment, with a list of all the entries in the OWIN environment dictionary.
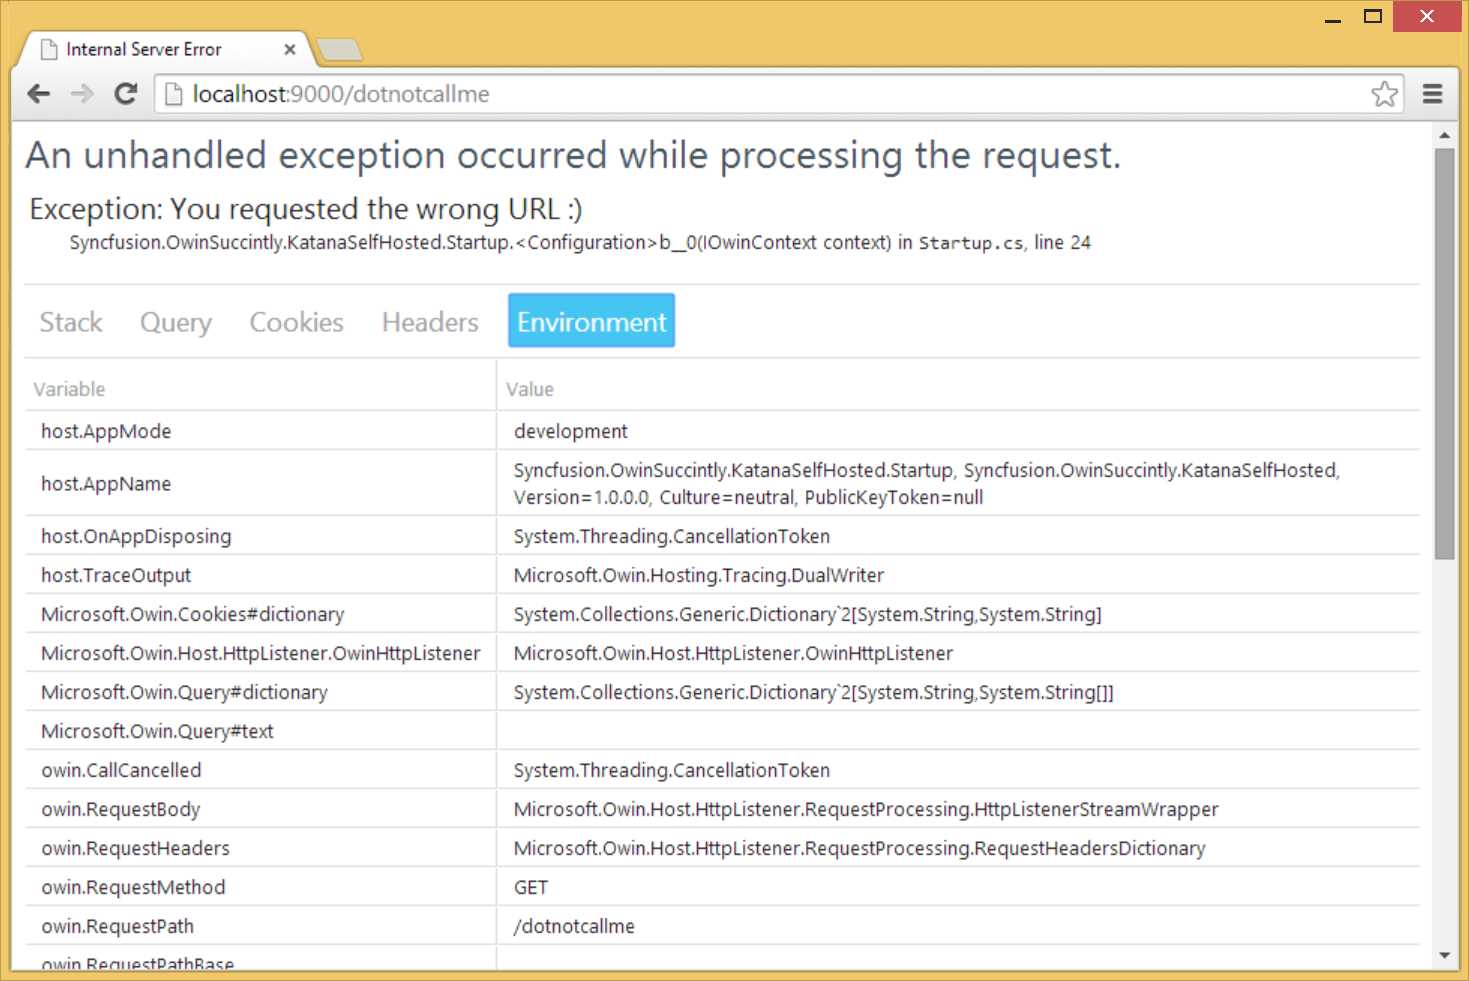
Error page, environment dictionary tab
Note: If you want to see the error page in action, the code listing above is made to throw a fake exception when the URL /donotcallme is requested.
Using Tracing
Another diagnostic possibility is to use the Trace class from System.Diagnostic and write directly to the trace output stream, which in the case of the console application is the console window. For example, you can add the following line of code inside the request handler to print on the console window all the URLs requested.
Trace.WriteLine(context.Request.Uri); |
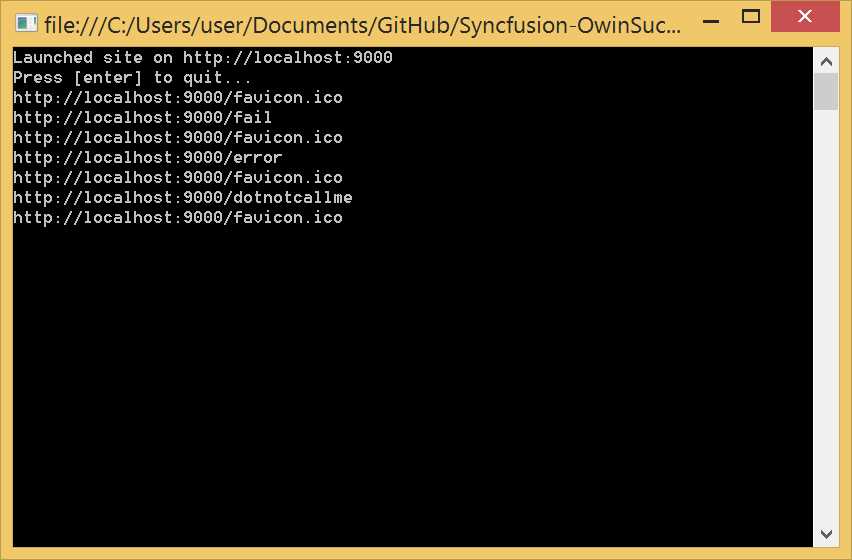
Tracing in the console window
Note that the http://localhost:9000/ is never printed in the console window. This is because the root URL is intercepted by the WelcomePage OWIN component that renders the welcome page and then closes the response without forwarding the execution to the rest of the OWIN pipeline. If you wanted to also trace the welcome page, you should have registered a custom middleware before registering the WelcomePage component.
Katana via OwinHost.exe
The last hosting option is using the OwinHost.exe application, which, unsurprisingly, is also distributed via a NuGet package.
The configuration code for the Katana-based application doesn't change from what you have seen so far. Also, you can create the application either as a normal class library or as a web application.
The difference between the two approaches is mainly the development and debugging experience:
- With a class library you get a very easy setup of the project with the bare minimum references needed, but you need to manually launch the host and attach it manually to the process for debugging. Also, you do not have all the web tooling available with other options.
- With a web application, after you create the project, you have to do a bit of cleaning up of unneeded references, but you will have an integrated debugging experience (using Visual Studio 2013) and the web tools.
Use a Class Library
Let's start by creating a new project. This time select the Class Library project.
Write the Application
Once you have the project ready, delete the default Class1.cs file and add a new OWIN Startup class like you did when creating the startup class in the previous approaches.
Add OWIN Startup class
This will automatically add the reference to both Owin.dll and Microsoft.Owin.dll (by referencing their NuGet packages).
[assembly: OwinStartup(typeof(Syncfusion.OwinSuccinctly.KatanaOwinHost.Startup))]
namespace Syncfusion.OwinSuccinctly.KatanaOwinHost { public class Startup { public void Configuration(IAppBuilder app) { app.Run(context => context.Response.WriteAsync("Hello World!")); } } } |
After writing the usual Configuration method in the Startup class like the one in Code Listing 11, your class library project should look like the one in Figure 20.
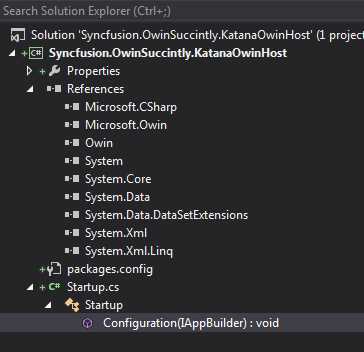
Visual Studio Solution Explorer
Pay attention to the list of references: the two OWIN DLLs were automatically referenced when you added the Owin Startup Class, and the others are only the bare minimum needed for a class library to run.
Launch and Debug the Application
Now that you have the class library with the application, you need to launch OwinHost.exe and then possibly debug it.
First open the NuGet Package Manager and download the OwinHost package.
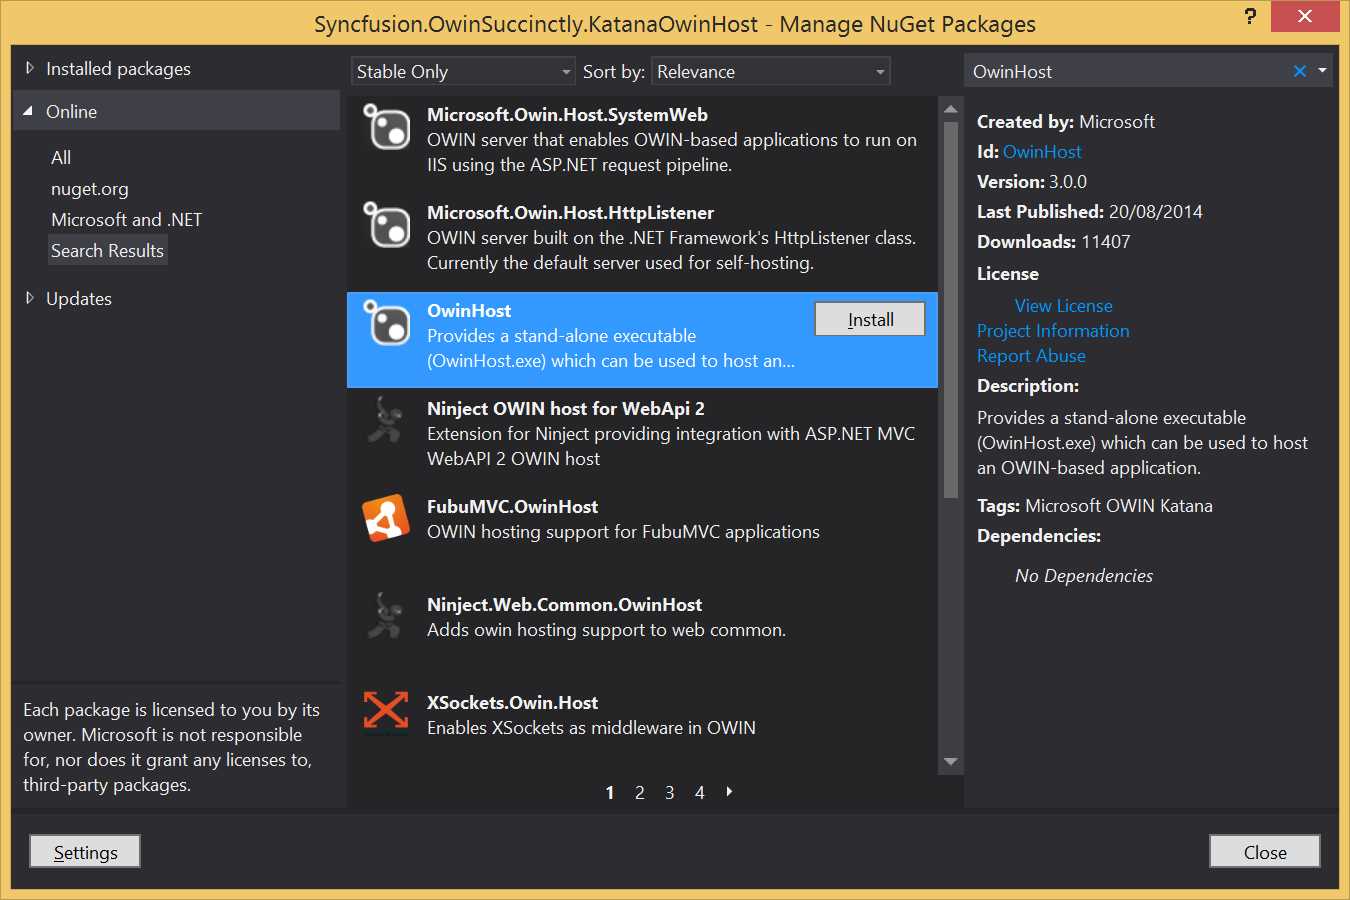
OwinHost NuGet Package
The OwinHost.exe file, like all NuGet packages, will be installed in the <solution root>/packages/OwinHost.(version)/tools folder (at the time of writing, the location is <solution root>/packages/OwinHost.3.0.0/tools).
By convention, when called without any parameters, OwinHost.exe will load all the assemblies in the .\bin folder relative to where the application is called from, and will call the startup class as specified with the OwinStartup assembly attribute.
Unfortunately, a Class Library project, after it is built, puts the DLLs in a .\bin\Debug folder, so we have to tell Visual Studio to save the files in another folder. To do this, open the Project Properties window, select the Build tab, and change the Output path property to bin\.
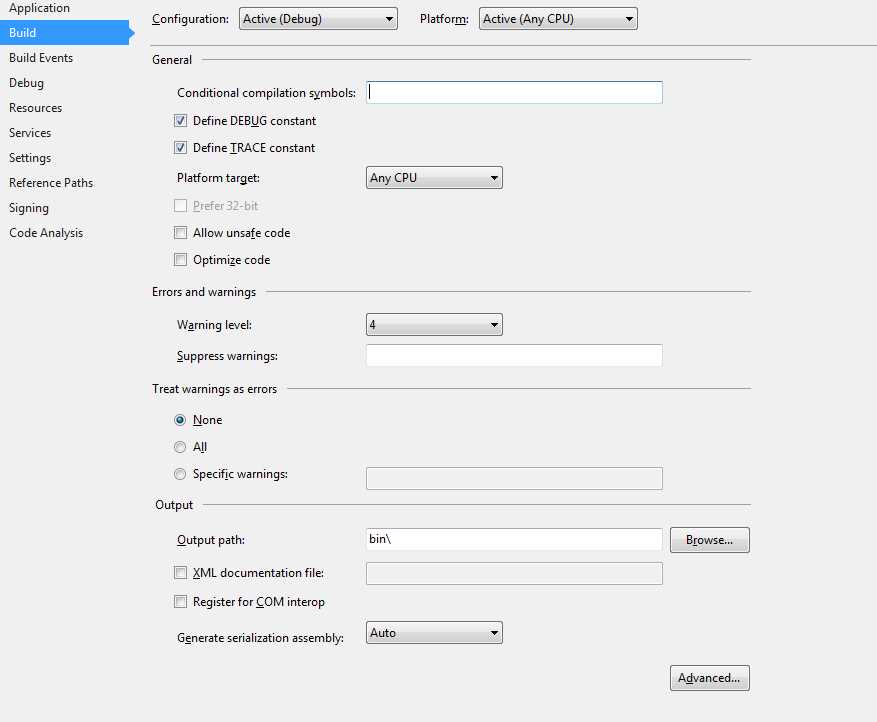
Project Properties window
Finally, open a console window, move to the root of the project, and launch OwinHost.exe without any parameters using the relative path.
C:\..\Syncfusion.OwinSuccinctly.KatanaOwinHost>..\packages\OwinHost.3.0.0\tools\OwinHost.exe |
The host will start, listening by default on port 5000 of localhost.
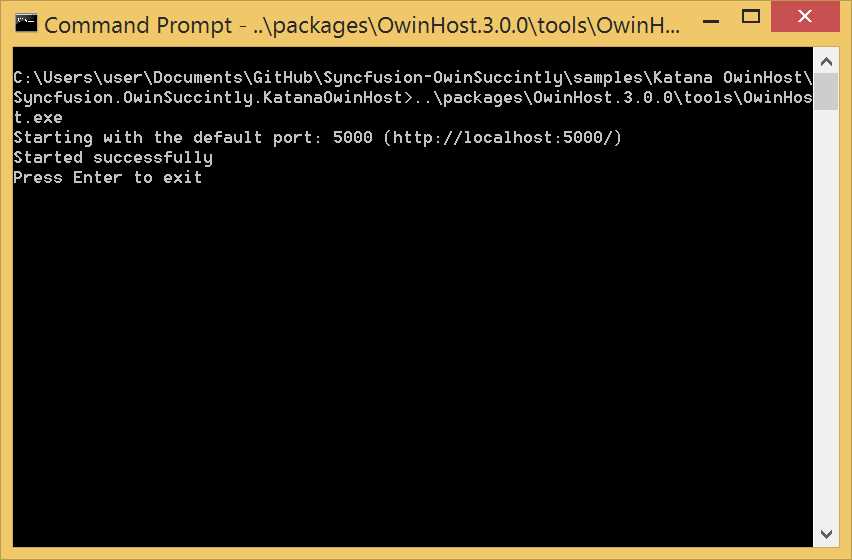
OwinHost.exe console output
You can change the default behavior using command line options and by manually specifying the startup class as an argument. To see the help screen with all the options, just launch the application with the-h parameter.
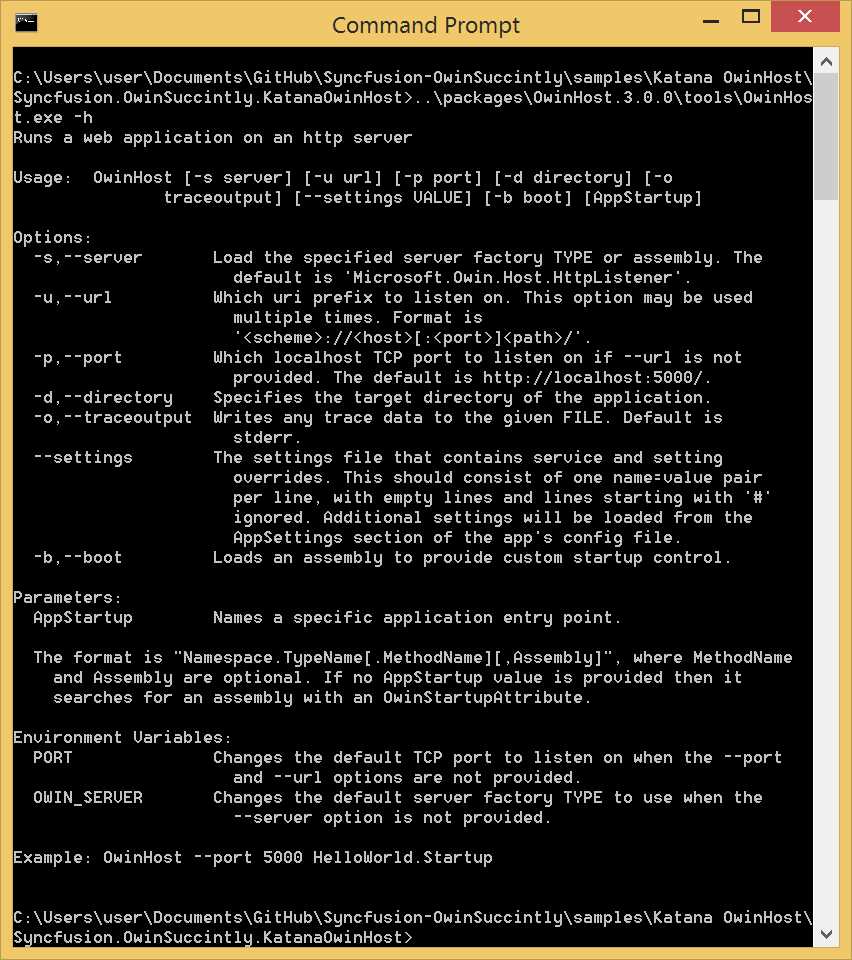
OwinHost.exe help
If you want to debug, you have also to attach the debugger to the OwinHost.exe process.
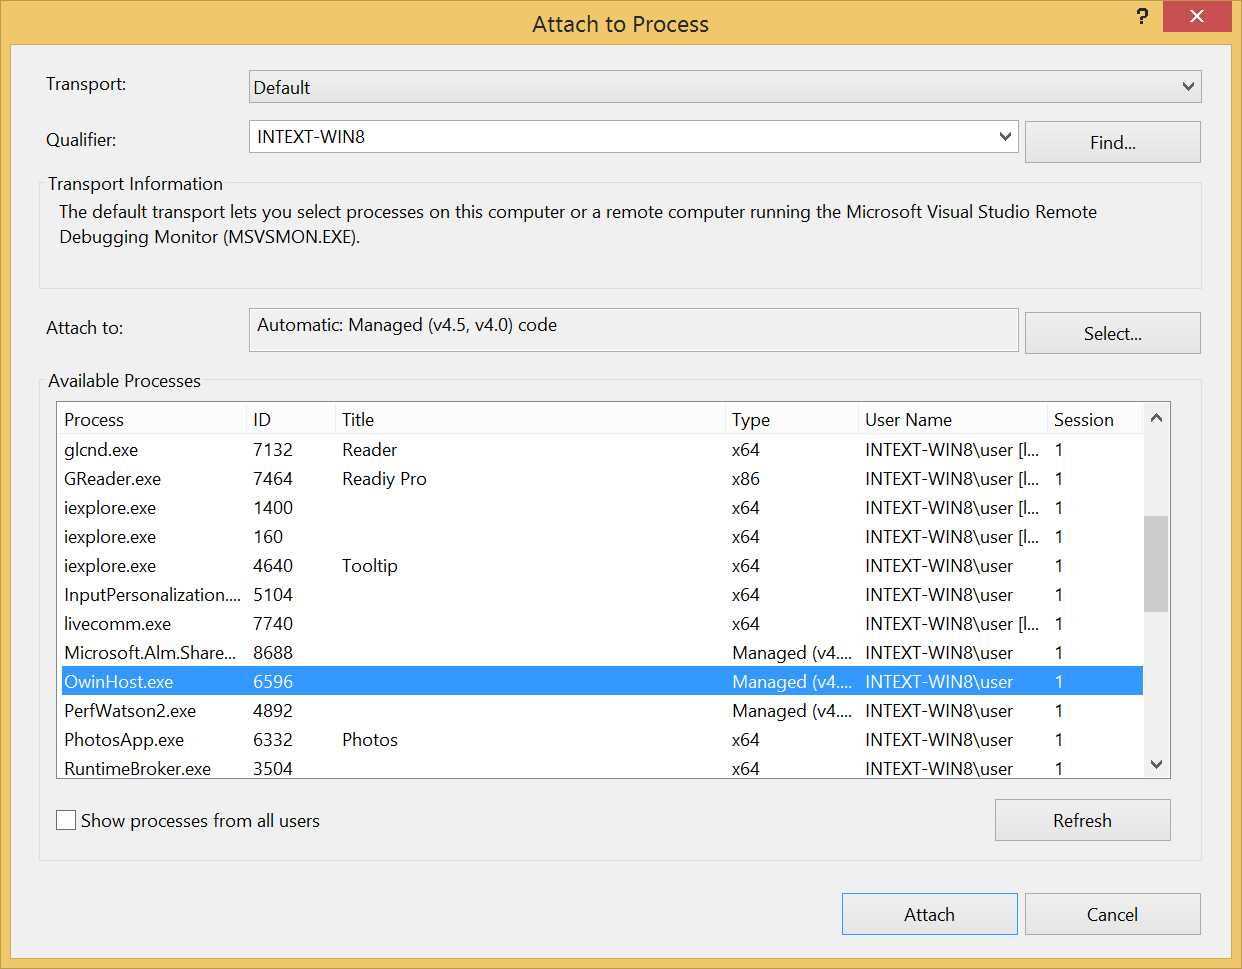
Attach to Process
It’s not very convenient, but if you want a better debugging experience like using F5 to debug in Visual Studio, you have to create your project as a web application.
Get the F5 Debugging Back
When you reference the OwinHost NuGet package inside a Web Application project, its installation procedure leverages a new feature introduced with Visual Studio 2013: external host extensibility. This powerful feature allows tools to easily register an additional custom host together with the default IIS Express and local IIS.
The OwinHost NuGet package does so, and adds itself to the list of servers Visual Studio can launch to debug the application. The following figure shows how the Project Properties window looks after having installed the OwinHost NuGet package.
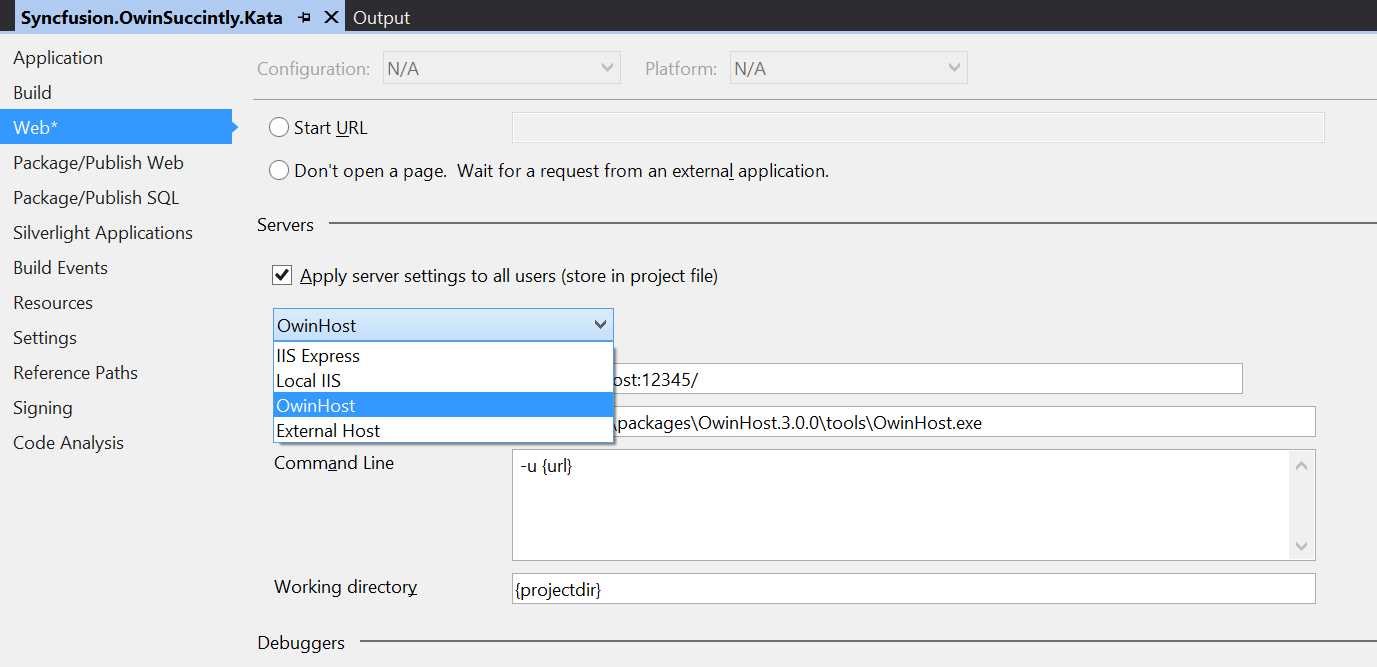
Project Properties window, Web tab
But registering an additional custom host works only within a Web Application project, so instead of building the Katana application as a console application, create a Web Application using the Empty template. Then, like you did for the console application, add the OWIN Startup class. Afterwards, delete all the unneeded references (for example, System.Web) until your Solution Explorer tree looks like the one shown for the console application in Figure 20.
Finally, install the OwinHost NuGet package and configure the project to use OwinHost as the server when launching the application from Visual Studio.
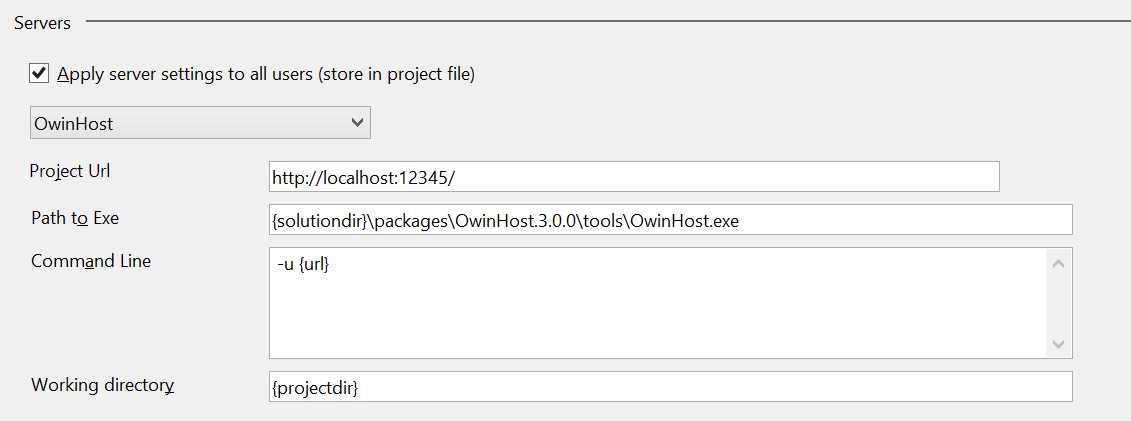
Configuring servers in the Web tab of the Project Properties window
From the form that appears when you choose OwinHost as the server, you can customize the URL to listen to and pass custom parameters in the command line.
Now you can press F5 and directly launch your OWIN application from within Visual Studio
Note: This works only in Visual Studio 2013. Do not install the additional server option (you will be prompted by the NuGet Manager for this) if you want to open the same project in Visual Studio 2012, as you won’t be able to open it anymore in Visual Studio 2013.
Katana on Azure
OWIN and Katana are great for on-premise applications, but are even better on the cloud. They fit very well with all Windows Server installations, virtual machines, or something more powerful like a full-scaling application.
Microsoft Azure is one of the most complete cloud services with different options. Basically, you can deploy your application wherever you want, but the most used services are:
- Azure Website
- Cloud Service (Worker Role and Web Role)
Because everything on Azure is hosted on a Windows installation (except for some Linux virtual machines), there aren't differences between using OWIN and Katana on-premise or on Microsoft Azure. In fact, your websites will run on IIS.
The only thing to do if you are going to use Microsoft Azure is to follow the instructions explained at the beginning of the chapter about running Katana with IIS, and then deploy it to Azure.
Other Ways to Specify the Startup Class
By now, you understand that an OWIN application needs a startup class that contains the bootstrapping code, and that this class is normally found by convention based on its name, Startup, or by specifying the class name with the OwinStartupAttribute. But these are not the only ways to specify the startup class. Let's review the options available:
- Naming convention: By default, the host looks for a class called Startup in the root of the application namespace.
- OwinStartup Attribute: An assembly-level attribute of type OwinStartupAttribute specifies which class contains the startup class.
[assembly: OwinStartup("Default", typeof(Syncfusion.OwinSuccinctly.KatanaStartup.StartupDefault))] |
With this attribute, you can also specify a friendly mnemonic name for the class, which can be used later to refer to this particular startup class, and even the name of the method to call if you don't want to use the Configuration method.
- appSettings in a configuration file: By using an entry in the appSettings section of the web.config or app.config files, you can override both naming conventions and OwinStartup attributes.
<appSettings> <add key="owin:appStartup" value="Syncfusion.OwinSuccinctly.KatanaStartup.StartupDefault" /> </appSettings> |
You can also use the fully qualified name of the type if the startup class is in another assembly, or you can specify the friendly name. We will come back to the friendly name later.
- Startup option: If you are hosting your application in a custom host, you can specify which class to use when you spin up the host by specifying the class as a generic parameter for the Start method.
WebApp.Start<StartupDefault>("http://localhost:9000"); |
- Command line argument: If you are using OwinHost, you can also specify the startup class as an argument of the command line tool.
..\packages\OwinHost.3.0.0\tools\OwinHost.exe Syncfusion.OwinSuccinctly.KatanaStartup.StartupDefault |
Using the Friendly Name
Let's look a bit more in detail at using the friendly name to refer to configurations. For this to work, you have to combine two of the five options explained previously:
- The OwinStartup attribute.
- Either appSettings or OwinHost.exe argument.
You need to have at least two startup classes, both with the OwinStartupAttribute specified (okay, here we will have three).
[assembly: OwinStartup("Development",typeof(Syncfusion.OwinSuccinctly.KatanaStartup.StartupDevelopment))]
namespace Syncfusion.OwinSuccinctly.KatanaStartup { public class StartupDevelopment { public void Configuration(IAppBuilder app) { app.Run(context => { return context.Response.WriteAsync("Hello from Development!"); }); } } } [assembly: OwinStartup("Test",typeof(Syncfusion.OwinSuccinctly.KatanaStartup.StartupTest))]
namespace Syncfusion.OwinSuccinctly.KatanaStartup { public class StartupTest { public void Configuration(IAppBuilder app) { app.Run(context => { return context.Response.WriteAsync("Hello from Test!"); }); } } } [assembly: OwinStartup("Production",typeof(Syncfusion.OwinSuccinctly.KatanaStartup.StartupProduction))]
namespace Syncfusion.OwinSuccinctly.KatanaStartup { public class StartupProduction { public void Configuration(IAppBuilder app) { app.Run(context => { return context.Response.WriteAsync("Hello from Production!"); }); } } } |
Since each of the three classes has a different friendly name associated with it, we can now decide via a setting in the configuration file which of them to use as a startup class. The following configuration will launch the application using the Test configuration.
<appSettings> <add key="owin:appStartup" value="Test" /> </appSettings> |
Or using OwinHost.exe, the same result will be achieved by typing:
..\packages\OwinHost.3.0.0\tools\OwinHost.exe Test |
In these examples, the difference between the configurations is nonexistent, but in a real life scenario you might want to add different middleware components based on the configuration. For example, you could enable the diagnostic page only in development and testing, but not in production, or enable caching, JavaScript bundling, and minification only in production.
Conclusions
In this chapter, you have learned what Katana is and how its architecture maps on top of the OWIN specs.
Later in the chapter, you also saw how to create Katana applications and host them inside IIS, inside a custom host, and finally inside the provided OwinHost.exe. You also learned about a little-known feature of Visual Studio 2013, and how to deploy a Katana-based application on Azure.
Finally, you've also seen the many ways in which you can change the startup class of an OWIN application.
In the next chapter, you will learn how to use Katana to run applications built with the web frameworks you already know, like ASP.NET Web API, MVC frameworks, and SignalR.
- 1800+ high-performance UI components.
- Includes popular controls such as Grid, Chart, Scheduler, and more.
- 24x5 unlimited support by developers.