
Object-Oriented Programming in C# Succinctly®

CHAPTER 4
Design Patterns
Have you ever had that problem that you know you’ve solved before somewhere else? Many people have. Design Patterns are general solutions to specific problems that many people face. Design Patterns were first systematically organized for the C++ language in the book Design Patterns: Elements of Reusable Object-Oriented Software, by Erich Gamma et al. in 1995[2].
In general there are three kinds of Design Patterns: Creational, Structural, and Behavioral. Not only do they solve recurring problems, a formalized solution to a problem means that we don’t re-invent the wheel and that we can communicate more clearly about our code. Any programmer will (hopefully) recognize your use of pattern X and then know how to change your code accordingly.
In this chapter, I’m going to discuss a few (of many) Design Patterns. I’ll include a Unified Modeling Language (UML) class diagram of each pattern. UML is outside the scope of this book, so I can’t explain how the diagrams should be interpreted. I’ve added them for reference and they’re the “official” UML diagrams, so the class and method names don’t match those in the examples. You can use them for visual explanation, but if you don’t get them don’t worry, it’s all explained in the text.
The patterns I’m discussing are mentioned by the Design Patterns book as good starting patterns. They’re pretty easy to get into and you’ll probably use them a lot as well.
Creational Patterns
Creational Patterns deal with, as the name implies, the creation of objects. With Creational Patterns we can abstract away the process of object instantiation. As we’ve seen before, we can use composition rather than inheritance. Creating a set of objects that work together as a group can be beneficial, but rather than hard-coding which concrete types to use we can abstract this process like we’ve seen with DI. In the next section we’re going to look at a few Creational Patterns. It’s not a full list, but it shows the power they can bring.
Abstract Factory
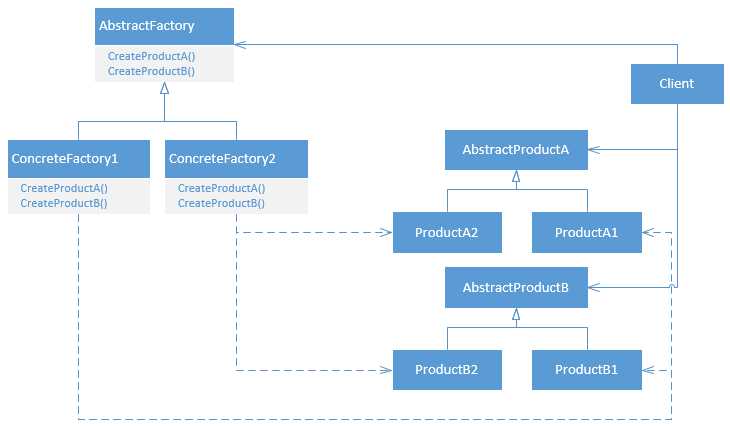
Figure 3: Class Diagram of the Abstract Factory Pattern
One of the easiest, yet most useful, Creational Design Patterns is the Abstract Factory. The Abstract Factory defines an interface for the creation of closely related objects. Imagine, again, that we’re building a dynamic user interface. We need textboxes, buttons, checkboxes, radio buttons, etc. So let’s say we have the following Interface, analogous to the example I’ve used before, but in WinForms:
Code Listing 37: An Abstract Factory
public interface IControlFactory { Control CreateTextBox(); Control CreateCheckBox(); } |
And let’s say it’s used as follows (which creates a pretty much unusable user interface):
Code Listing 38: Usage of the Abstract Factory
private void CreateGui(IControlFactory factory) { Control textBox = factory.CreateTextBox(); textBox.Location = new Point(10, 10); Controls.Add(textBox); Control checkBox = factory.CreateCheckBox(); checkBox.Location = new Point(10, 50); Controls.Add(checkBox); } |
We can now create concrete types for this Interface.
Code Listing 39: Concrete Factories
public class RedControlFactory : IControlFactory { public Control CreateTextBox() { return new TextBox { BackColor = Color.Red }; } public Control CreateCheckBox() { return new CheckBox { BackColor = Color.Red }; } } public class GreenControlFactory : IControlFactory { public Control CreateTextBox() { return new TextBox { BackColor = Color.Green }; } public Control CreateCheckBox() { return new CheckBox { BackColor = Color.Green }; } } |
Now our application can create either a red or a green GUI using the specified concrete type.
Code Listing 40: Using the Concrete Factory
private void Form1_Load(object sender, EventArgs e) { CreateGui(new RedControlFactory()); } |
The result is stunning:
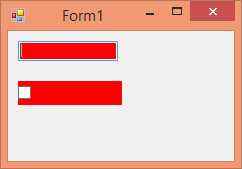
Figure 4: Form Using the RedControlFactory
And of course, changing RedControlFactory to GreenControlFactory changes the rendered Form from red to green.

Figure 5: Form Using the GreenControlFactory
Notice how easy it would be to add a BlueControlFactory without breaking any existing code? Or even better, we can swap our ugly WinForms controls with custom controls or with third party controls.
In .NET you can find the Abstract Factory Pattern when working with databases. The DbProviderFactory base class is such an Abstract Factory, although it’s typically not necessary to implement it yourself.
Code Listing 41: Abstract Factory in .NET
public class SqlProviderFactory : DbProviderFactory { public override DbConnectionStringBuilder CreateConnectionStringBuilder() { return new SqlConnectionStringBuilder(); } public override DbConnection CreateConnection() { return new SqlConnection(); } public override DbCommand CreateCommand() { return new SqlCommand(); } // ... } |
Factory Method
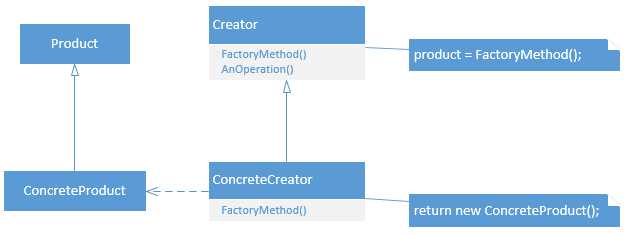
Figure 6: Class Dagram of the Factory Method Pattern
Sometimes it does not make sense to create an Abstract Factory. What if there are no closely related objects, like TextBox, CheckBox, Button, etc.? Having an Abstract Factory to create a single object (which may contain other objects, of course), while possible, feels weird (although can be useful). Suppose we’re building some class that generates our UI. The UIGenerator could make use of an IControlFactory to construct the UI. Furthermore we may have multiple UIGenerators to build UIs for different kinds of users.
With the Factory Method Pattern we can delegate the creation of objects to subclasses. This is especially useful when a base class can’t anticipate which subclass it’ll need to perform its functionality.
The next example is, again, in WinForms.
So here is the BaseUIGenerator (which will serve as a base class for all UIGenerators).
Code Listing 42: A Base Class for UIGenerators
public abstract class BaseUIGenerator { public void GenerateUI(Control container) { IControlFactory factory = CreateControlFactory(); Control textBox = factory.CreateTextBox(); textBox.Location = new Point(10, 10); container.Controls.Add(textBox); Control checkBox = factory.CreateCheckBox(); checkBox.Location = new Point(10, 50); container.Controls.Add(checkBox); } protected abstract IControlFactory CreateControlFactory(); } |
We can now easily create new UIGenerators.
Code Listing 43: Concrete UIBuilders
public class RedUIGenerator : BaseUIGenerator { protected override IControlFactory CreateControlFactory() { return new RedControlFactory(); } } public class GreenUIGenerator : BaseUIGenerator { protected override IControlFactory CreateControlFactory() { return new GreenControlFactory(); } } |
The creation of the IControlFactory is now delegated to subclasses of BaseUIGenerator. Now you can use a generator to generate the UI.
Code Listing 44: Usage of the Generator Class
private void Form1_Load(object sender, EventArgs e) { BaseUIGenerator generator = new RedUIGenerator(); builder.GenerateUI(this); } |
This will build the form as in the previous example:
Figure 7: Form Using the RedUIGenerator
It’s also possible to use something else as a container, for example a Panel.
Code Listing 45: Using the Generator with Panels
private void Form1_Load(object sender, EventArgs e) { BaseUIGenerator red = new RedUIGenerator(); red.GenerateUI(panel1); BaseUIGenerator green = new GreenUIGenerator(); green.GenerateUI(panel2); } |
The result is that each Panel now has the same Controls, but in a different color.
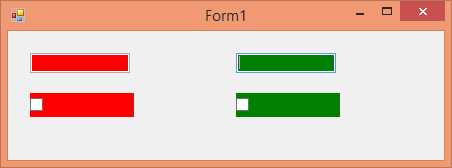
Figure 8: Panels with Different UIGenerators
This example also demonstrates the power of the Abstract Factory and Factory Method patterns.
The .NET Framework uses the Factory Method Pattern too, such as when working with database connections.
Code Listing 46: Factory Method in .NET
using (SqlConnection connection = new SqlConnection("connString")) using (DbCommand cmd = connection.CreateCommand()) // Factory Method { DbParameter param = cmd.CreateParameter(); // Factory Method //... } |
Singleton
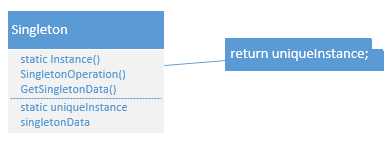
Figure 9: Class Diagram of the Singleton Pattern
The Singleton Pattern is pretty fun. It’s easy, but often implemented incorrectly. It’s loved, and it’s hated. So why do I want to include it here? First, the Singleton limits the amount of created objects of a specific type to exactly one, which is pretty neat and can be necessary (examples of Singletons are your print spooler, the file system, etc.). Also, since it’s often used incorrectly, I’d like to educate a little and hope to clear up when to use this. Last, since it’s so often incorrectly implemented, we’re going to do it correctly now, once and for all.
At the base of the Singleton is a private constructor. You read that right. When the constructor of a class is private no other class can create instances of this class. That may come in handy, as the class can now create instances of itself and keep track of those instances. That’s a bit counter-intuitive, but with a static field completely possible.
Code Listing 47: The Start of a Singleton
public class SomeSingleton { private static SomeSingleton instance; private SomeSingleton() { } } |
At this point no other class can create or reach an instance of this class. Next, we’ll need another static method (or property) to give access to the instance of this class. We’ll also need to create that instance.
Code Listing 48: The Complete Singleton
public class SomeSingleton { private static SomeSingleton instance; private SomeSingleton() { } public static SomeSingleton Instance { get { if (instance == null) { instance = new SomeSingleton(); } return instance; } } } |
And now the Singleton is complete. Indeed, this is the implementation we’ll often find in code bases (you’ll also often find Singletons with public constructors a.k.a. not Singletons at all).
So what is wrong with this Singleton? Nothing, if your application is completely single-threaded. When you’re going multi-threaded, this implementation can still result in multiple instances. This happens when two threads try to get the instance at the same time. Both threads will see that instance is null because neither thread has actually created the new instance yet, so we’ll need to lock this code for multiple threads. And as a small optimization, we won’t lock after the instance is created. Here is the full thread-safe Singleton:
Code Listing 49: The Thread-Safe Singleton
public class SomeSingleton { private static SomeSingleton instance; private static object syncRoot = new object(); private SomeSingleton() { } public static SomeSingleton Instance { get { if (instance == null) { lock(syncRoot) { if (instance == null) { instance = new SomeSingleton(); } } } return instance; } } public void SomeMethod() { // Just an instance method like any other. } } |
The double null check may look weird, but remember that when two threads access Instance at the same time, both will see that instance is null, and one thread will be locked while the other creates the instance. After the locked thread is released, it should check for null again or it will create a second instance.
Other methods on the Singleton can now simply be public instance methods and will behave like any other. Just keep in mind that the state of a Singleton object is shared throughout the entire application because it’s static!
So what’s the problem with Singletons? They’re used far too often. I’ve seen Singletons that, after a year, needed a second instance somewhere in the application! As it turned out, this Singleton wasn’t a Singleton at all!
Second, Singletons can’t be subclassed. Since the constructor is not accessible by any part of the application except the Singleton itself, not even subclasses can access it (meaning they won’t be able to construct themselves).
Last, Singletons are hard to test. Suppose you’re testing a part of the application that internally uses a Singleton. For a long time there was no way for you to mock the Singleton. It’s now possible using newer testing frameworks that use code weaving and Aspect Oriented Programming (AOP), but it still doesn’t feel completely right.
So when should you use a Singleton? Basically when you’re absolutely sure your application will never need a second instance of an object (or when another instance may even be harmful for the system). It may also come in handy to provide one-point access to shared resources (like the print spooler). Logging is often noted as an acceptable use of the Singleton Pattern.
While many objects in .NET logically have only one instance (like Application), I am not aware of any Singleton implementations in .NET (that’s not to say you can create instances of Application, the constructor is just internal instead of private). If a rather huge framework like .NET doesn’t need Singletons, you should think very carefully if you need them or if you can solve your problem differently.
Structural Patterns
Structural Patterns are about making objects work together and structuring your code accordingly. Where Creational Patterns are about the creation of objects, structural patterns are about making objects work together, but without these objects knowing about each other’s internals.
Adapter
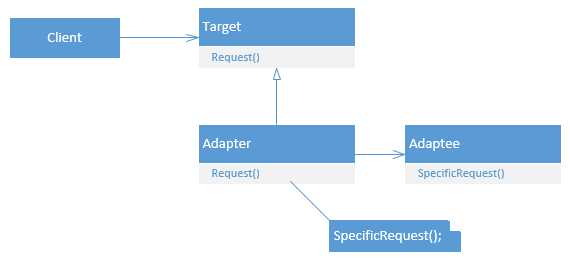
Figure 10: Class Diagram of the Adapter Pattern
An easy and well known Structural Pattern is the Adapter Pattern, or Wrapper. With the Adapter Pattern, we can make two classes work together even though they have incompatible interfaces. Suppose we’re creating a data retrieval system, but the client hasn’t decided on Oracle or SQL Server yet, or they might switch in the future. And let’s say both databases come with some API with different classes and methods (of course, both already have compatible .NET API’s). The following code is simplified, but does show the use of the Adapter:
Code Listing 50: External database API's
public class SqlServerApi { public DataTable GetData() { return new DataTable(); } public void SendData(DataTable data) { // ... } } public class OracleApi { public object GetQuery() { return new object(); } public void ExecQuery(object data) { // ... } } |
The problem here is that if we choose one API, we can’t easily replace it with the other. SqlServerApi works with DataTables while Oracle works with plain objects, the methods have different names, and on and on. In the real world you’ll find both interfaces use different classes, have many different methods (that the other doesn’t have), and more. So let’s create an interface that can tie these two incompatible API’s together. The problem is what we’ll do with the DataTables. Our interface can work with DataTables, and then we should make that work for Oracle, or we can work with objects and convert it to DataTables for SQL Server. A third option is to create a custom object which can be converted to both a plain object and a DataTable. For simplicity we’ll work with object.
Code Listing 51: IDbApiAdapter
public interface IDbApiAdapter { object GetData(); void SendData(object data); } |
Now we can implement this for both SQL Server and for Oracle.
Code Listing 52: IDbApiAdapter Implementations
public class SqlServerApiAdapter : IDbApiAdapter { private SqlServerApi api = new SqlServerApi(); public object GetData() { DataTable table = api.GetData(); object o = ConvertToObject(table); return o; } private object ConvertToObject(DataTable table) { // ... return null; // Placeholder. } public void SendData(object data) { DataTable table = ConvertToDataTable(data); api.SendData(table); } private DataTable ConvertToDataTable(object obj) { // ... return new DataTable(); } } public class OracleApiAdapter : IDbApiAdapter { private OracleApi api = new OracleApi(); public object GetData() { return api.GetQuery(); } public void SendData(object data) { api.ExecQuery(data); } } |
As you can see, converting from and to DataTables is now an “implementation detail.” We don’t really care how the SqlServerApiAdapter does it (probably using Reflection), as long as the public API is correct. You can now work with the IDbApiAdapter and leave the creation of a specific adapter to another part of the system (using a Factory or Dependency Injection).
Code Listing 53: Usage of IDbApiAdapter
static void Main(string[] args) { IDbApiAdapter adapter = DbApiFactory(); object o = adapter.GetData(); adapter.SendData(new object()); } static IDbApiAdapter DbApiFactory() { return new SqlServerApiAdapter(); } |
The Adapter Pattern is used in .NET when working with legacy COM objects. When referencing a COM object, .NET creates a wrapper (or adapter) that can be used within .NET to call the corresponding COM methods.
Composite
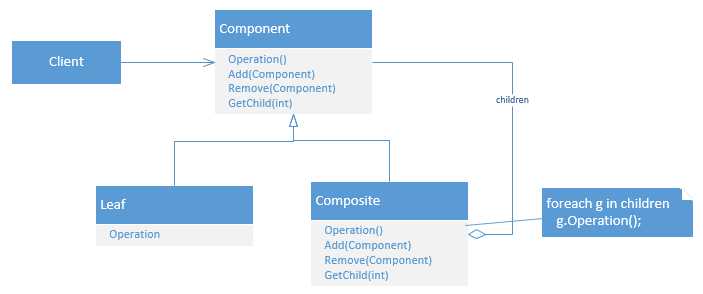
Figure 11: Class Diagram of the Composite Pattern
Composite is also one of the easier patterns. Let’s say you have a collection of something, a List<Something> if you like. And maybe all these “somethings” have a collection of those same things too, child somethings. In that case we’ll have a tree of somethings. Now something has some operation, and when that operation is performed the same operation should be performed on all child somethings. Sounds abstract, but let’s say that something is a Control (like TextBox, CheckBox, DataGrid, etc.). So we have a Control which has child Controls and each child Control can have child Controls as well. And the operation is rendering the Control. So when we render our topmost Control all child Controls and children of those children should render too.
The next example may seem a bit farfetched, but it’s not easy to create an example of the Composite Pattern, so bear with me. In the example, we’re going to print sentences symbol by symbol. So our operation will be Print. We need to be able to print a single symbol, like “c” or “#” so let’s create a class that can do just that.
Code Listing 54: IPrintable for our Composite
public interface IPrintable { void Print(); } public class Symbol : IPrintable { private char symbol; public Symbol(char c) { symbol = c; }
public void Print() { Console.Write(symbol); } } |
With that, we can create an IPrintable containing any single symbol. Let’s create some additional IPrintables for our convenience (and for the example).
Code Listing 55: Additional IPrintable Implementations
public class LineBreak : IPrintable { public void Print() { Console.WriteLine(); } } public class Space : IPrintable { public void Print() { Console.Write(" "); } } |
Now we need a composite class that can contain multiple symbols (or IPrintables), a Writing.
Code Listing 56: The (Composite) Writing Class
public class Writing : IPrintable { private List<IPrintable> printables = new List<IPrintable>(); public void Add(IPrintable printable) { printables.Add(printable); } public void Remove(IPrintable printable) { printables.Remove(printable); } public IPrintable GetPrintable(int index) { return printables[index]; } public void Print() { foreach (IPrintable printable in printables) { printable.Print(); } } } |
And that’s it. We can now use these classes to compose words and sentences and print them on screen. In a simple Console application, the usage looks as follows:
Code Listing 57: Composite Usage
// Create the writing 'hello'. Writing hello = new Writing(); hello.Add(new Symbol('h')); hello.Add(new Symbol('e')); hello.Add(new Symbol('l')); hello.Add(new Symbol('l')); hello.Add(new Symbol('o')); // Add a line break. LineBreak br = new LineBreak(); hello.Add(br); // Print hello. hello.Print(); // Remove the line break, so we can re-use hello. hello.Remove(br); // Create the writing 'bye'. Writing bye = new Writing(); bye.Add(new Symbol('b')); bye.Add(new Symbol('y')); bye.Add(new Symbol('e')); // Create a writing consisting of the writings // hello and bye separated by a space. Writing helloBye = new Writing(); helloBye.Add(hello); helloBye.Add(new Space()); helloBye.Add(bye); // Print all the printables. helloBye.Print(); Console.ReadKey(); |
In .NET, this pattern is used, as mentioned, in WinForms when rendering Controls (and probably in WPF and ASP.NET as well).
Decorator
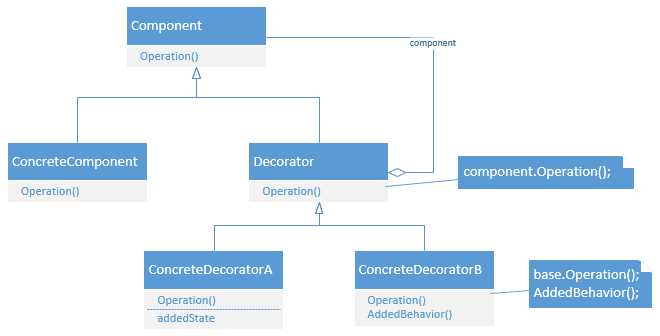
Figure 12: Class Diagram of the Decorator Pattern
The Decorator Pattern can be used to add functionality to an object dynamically. It’s especially useful when one object can have multiple functionalities that aren’t always used at the same time, like different representations of the same data. In that respect it offers a flexible alternative to inheritance.
Let’s say we have some text message and we want to print and/or email and/or fax (yes, people still do that) and/or send it to an external system. Additionally, the message must always be saved to the database. First we’ll need our Message class that contains the message we want to process and we can implement the default process (after all, we always need to send the message to the database).
Code Listing 58: The Message Class
public interface IMessage { string Msg { get; set; } void Process(); } public class Message : IMessage { public string Msg { get; set; } public void Process() { Console.WriteLine(String.Format("Saved '{0}' to database.", Msg)); } } |
We can now create a base decorator. Notice that we always need another IMessage passed to the constructor (or we’ll get a NullReference, you may want to add a check there). The Msg property is simply delegated to the root IMessage.
Code Listing 59: A Base Decorator
public abstract class BaseMessageDecorator : IMessage { private IMessage innerMessage; public BaseMessageDecorator(IMessage decorator) { innerMessage = decorator; } public virtual void Process() { innerMessage.Process(); } public string Msg { get { return innerMessage.Msg; } set { innerMessage.Msg = value; } } } |
Now that we have our base decorator, we can create some sub decorators.
Code Listing 60: Sub Decorators
public class EmailDecorator : BaseMessageDecorator { public EmailDecorator(IMessage decorator) : base(decorator) { } public override void Process() { base.Process(); Console.WriteLine(String.Format("Sent '{0}' as email.", Msg)); } } public class FaxDecorator : BaseMessageDecorator { public FaxDecorator(IMessage decorator) : base(decorator) { } public override void Process() { base.Process(); Console.WriteLine(String.Format("Sent '{0}' as fax.", Msg)); } } public class ExternalSystemDecorator : BaseMessageDecorator { public ExternalSystemDecorator(IMessage decorator) : base(decorator) { } public override void Process() { base.Process(); Console.WriteLine(String.Format("Sent '{0}' to external system.", Msg)); } } |
We can now process our message in many different ways; we can just save it to the database, we can save it and email or fax or send it to an external system; we can save, email and fax; save, email, and send it to the external system; or save, fax, and send it to the external system. The beauty is that we can easily add new functionality without breaking the already existing functionality.
In a simple Console application, the usage could be as follows:
Code Listing 61: Usage of the Decorators
IMessage msg = new Message(); msg.Msg = "Hello"; IMessage decorator = new EmailDecorator( new FaxDecorator( new ExternalSystemDecorator(msg))); decorator.Process(); Console.WriteLine(); decorator = new EmailDecorator(msg); decorator.Msg = "Bye"; decorator.Process(); Console.ReadKey(); |
In .NET we can find the Decorator Pattern when using streams. Many streams, like MemoryStream, BufferedStream, and FileStream offer the same base functionality (provided by the Stream base class), but they work differently internally. So the different streams decorate the Stream class. In the usage of these classes we can often find a Strategy Pattern (explained later).
Behavioral Patterns
Behavioral Patterns are about changing runtime behaviors of algorithms and classes. If Creational Patterns are about the creation of objects, and Structural Patterns about how the objects work together, then Behavioral Patterns are more about changing the implementation of those objects. With the three kinds of Patterns, you can build highly scalable and maintainable software that is neatly organized into small pieces of code.
Observer
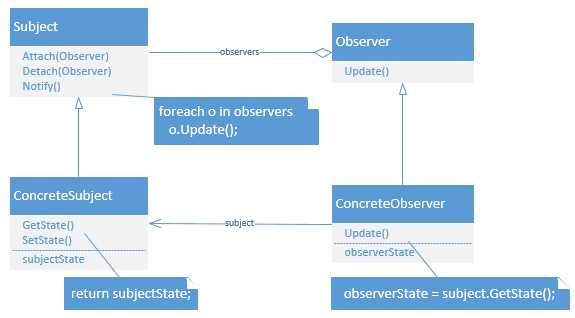
Figure 13: Class Diagram of the Observer Pattern
With the Observer Pattern it’s possible for a class, a so-called observable, to notify other classes, observers, of changes. .NET events are implemented using this pattern.
A few quick notes regarding the Observer Pattern in .NET. First of all, because .NET already has events, it shouldn’t be necessary to implement this pattern yourself. Let’s assume for a moment that you still want to. You’re probably going to start out with two interfaces: IObservable and IObserver. Then you find out .NET already has those interfaces (in a generic variant). Do not use them. I’ve seen the .NET interfaces being used in the Observer Pattern, but those interfaces are meant to be used primarily with Reactive Extensions (Rx). I can’t explain Rx here, but the interfaces make little sense for the “traditional” Observer Pattern that I’m going to discuss here.
So let’s start out by defining the IObservable and IObserver interfaces.
Code Listing 62: Observer Pattern Interfaces
public interface IObservable { void Attach(IObserver observer); void Detach(IObserver observer); void Notify(); } public interface IObserver { void Update(IObservable observable); } |
Now let’s implement the IObservable. We’re going to create a product stock, and every time the stock changes we’re going to notify observers (also called listeners). The code is a bit lengthy, mostly due to the properties at the bottom. Notice that these properties have nothing to do with the Observer Pattern, they’re simply necessary to identify the stock.
Code Listing 63: IObservable Implementation
public class Stock : IObservable { private List<IObserver> observers = new List<IObserver>(); private string productName; private int noOfItemsInStock; public Stock(string name) { productName = name; } public void Attach(IObserver observer) { observers.Add(observer); } public void Detach(IObserver observer) { observers.Remove(observer); } public void Notify() { foreach (IObserver observer in observers) { observer.Update(this); } } public string ProductName { get { return productName; } } public int NoOfItemsInStock { get { return noOfItemsInStock; } set { noOfItemsInStock = value; Notify(); } } } |
And now we can create some observers.
Code Listing 64: Observers
public class Seller : IObserver { public void Update(IObservable observable) { Console.WriteLine("Seller was notified about the stock change."); } } public class Buyer : IObserver { public void Update(IObservable observable) { Console.WriteLine("Buyer was notified about the stock change."); } } |
The usage in a simple Console application is now pretty easy.
Code Listing 65: Usage of the Observer
Stock stock = new Stock("Cheese"); stock.NoOfItemsInStock = 10; // Register observers. Seller seller = new Seller(); stock.Attach(seller); Buyer buyer = new Buyer(); stock.Attach(buyer); stock.NoOfItemsInStock = 5; Console.ReadKey(); |
You’ll find a big caveat with this approach though. The buyer and seller get notified, but they don’t know about what. It’s just some IObservable. There are a few options here. First we can simply cast the IObservable to Stock. For example, the Seller class would now look as follows:
public class Seller : IObserver { public void Update(IObservable observable) { Stock stock = (Stock)observable; Console.WriteLine(String.Format("Seller was notified about the stock change of {0} to {1} items.", stock.ProductName, stock.NoOfItemsInStock)); } } |
This approach is taken in a WinForm event where every Control event has the signature of (object sender, EventArgs e). The sender can be any type of Control and should be cast if you’d like to do anything useful with the sender (the initiator of the event).
A second approach is to make your IObservable less generic (or more specific). In that case, IObservable would get the ProductName and NoOfItemsInStock properties (and you might want to rename it to IStock).
Code Listing 66: A More Specific IObservable
public interface IObservable { void Attach(IObserver observer); void Detach(IObserver observer); void Notify(); string ProductName { get; } int NoOfItemsInStock { get; set; } } { public void Update(IObservable observable) { Console.WriteLine(String.Format("Seller was notified about the stock change of {0} to {1} items.", observable.ProductName, observable.NoOfItemsInStock)); } } |
Of course, the problem with this approach is that you can’t reuse IObservable for other classes.
So last, but not least, you might want to use Generics. This should solve all your problems. Remember that IObserver<T> and IObservable<T> already exist for Reactive Extensions, so we’ll have to use another name. I’ve used INotifier and IListener. Not much changes, but the implementation is slightly more difficult.
Code Listing 67: Generic IObservable
public interface INotifier<T> { void Attach(IListener<T> observer); void Detach(IListener<T> observer); void Notify(); } public interface IListener<T> { void Update(T observable); } public class Stock : INotifier<Stock> { private List<IListener<Stock>> observers = new List<IListener<Stock>>(); private string productName; private int noOfItemsInStock; public Stock(string name) { productName = name; } public void Attach(IListener<Stock> observer) { observers.Add(observer); } public void Detach(IListener<Stock> observer) { observers.Remove(observer); } public void Notify() { foreach (IListener<Stock> observer in observers) { observer.Update(this); } } public string ProductName { get { return productName; } } public int NoOfItemsInStock { get { return noOfItemsInStock; } set { noOfItemsInStock = value; Notify(); } } } public class Seller : IListener<Stock> { public void Update(Stock observable) { Console.WriteLine(String.Format("Seller was notified about the stock change of {0} to {1} items.", observable.ProductName, observable.NoOfItemsInStock)); } } |
Strategy
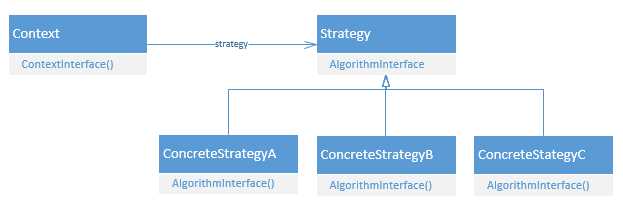
Figure 14: Class Diagram of the Strategy Pattern
The Strategy Pattern allows you to encapsulate a family of algorithms and use them interchangeably. You can think of many applications for the Strategy Pattern, for example a video game where units on a battlefield all behave the same in many aspects, such as moving and rendering, but differ by attack strategy. One unit may be offensive while another is defensive. The offensive or defensive algorithm can be injected into each unit.
Another example is the sorting of a list. Depending on the size of the list you might want to use another sorting algorithm, but you don’t want to hard code each algorithm into the list class.
So let’s make a little game. It’s a simple Console application and we’ll just be pressing any button which will move our units and which may result in an enemy encounter (keep pressing buttons or press escape to quit). Each unit reacts differently to an enemy encounter. So first let’s define a generic Unit class.
Code Listing 68: The Strategy Pattern
public interface IUnitBehavior { void ReactToOpponent(); } public class Unit { private string name; private IUnitBehavior behavior; public Unit(string name, IUnitBehavior behavior) { this.behavior = behavior; this.name = name; } public void Render() { Console.WriteLine(@"\o/ "); Console.WriteLine(@" O "); Console.WriteLine(@"/ \"); } public void Move() { Console.WriteLine(String.Format("{0} moves...", name)); } public void ReactToOpponent() { behavior.ReactToOpponent(); } } |
So as you can see the Render and Move methods are the same for each Unit. ReactToOpponent, however, is injected through the constructor. The IUnitBehavior interface defines the ultimate strategy to use. So let’s define some strategies.
Code Listing 69: Some Strategies
public class WarriorBehavior : IUnitBehavior { public void ReactToOpponent() { Console.WriteLine("\"ATTACK!!!\""); } } public class DefenderBehavior : IUnitBehavior { public void ReactToOpponent() { Console.WriteLine("\"Hold the line!\""); } } |
And now let’s glue the Unit and IUnitBehavior together.
Code Listing 70: The Final Game
Unit warrior = new Unit("Warrior", new WarriorBehavior()); Unit defender = new Unit("Defender", new DefenderBehavior()); List<Unit> units = new List<Unit>(); units.Add(warrior); units.Add(defender); foreach (Unit unit in units) { unit.Render(); Console.WriteLine(); } Console.WriteLine("Your troops are on an important mission!"); Console.WriteLine("Press Escape to quit or any other key to continue."); Console.WriteLine(); Random rnd = new Random(); while (Console.ReadKey().Key != ConsoleKey.Escape) { foreach (Unit unit in units) { unit.Move(); } Console.WriteLine(); if (rnd.Next(3) == 0) { Console.WriteLine("The enemy attacks!"); foreach (Unit unit in units) { unit.ReactToOpponent(); } } else { Console.WriteLine("Nothing happened..."); } Console.WriteLine(); } |
That’s quite a bit of code, but it’s really the first two lines that matter. We’re defining two Units, but with another IUnitBehavior. When an enemy attacks (chance 1 in 3) you’ll see that each Unit behaves according to its strategy. It also becomes easy to add another strategy.
Code Listing 71: Adding a New Strategy
// ... Unit priest = new Unit("Priest", new PriestBehavior()); // ... units.Add(priest); // ... { public void ReactToOpponent() { Console.WriteLine("\"Heal our troops!\""); } } |
The .NET Framework makes use of the Strategy Pattern as well, such as when calling List<T>.Sort(). You can pass in an optional IComparer<T>. Let’s check that out as it’s another good example. We’re going to sort people by their first and last names.
Code Listing 72: Person Class and IComparers
public class Person { public string FirstName { get; set; } public string LastName { get; set; } } public class FirstNameSorter : IComparer<Person> { public int Compare(Person x, Person y) { return x.FirstName.CompareTo(y.FirstName); } } public class LastNameSorter : IComparer<Person> { public int Compare(Person x, Person y) { return x.LastName.CompareTo(y.LastName); } } |
We can now create a list, put some people in it, and sort them by first or last name.
Code Listing 73: Sorting a List with Strategy
Person bill = new Person { FirstName = "Bill", LastName = "Gates" }; Person steve = new Person { FirstName = "Steve", LastName = "Ballmer" }; Person satya = new Person { FirstName = "Satya", LastName = "Nadella" }; List<Person> ceos = new List<Person>(); ceos.Add(bill); ceos.Add(steve); ceos.Add(satya); ceos.Sort(new FirstNameSorter()); foreach (Person p in ceos) { Console.WriteLine(String.Format("{0} {1}", p.FirstName, p.LastName)); } Console.WriteLine(); ceos.Sort(new LastNameSorter()); foreach (Person p in ceos) { Console.WriteLine(String.Format("{0}, {1}", p.LastName, p.FirstName)); } Console.ReadKey(); |
Template Method
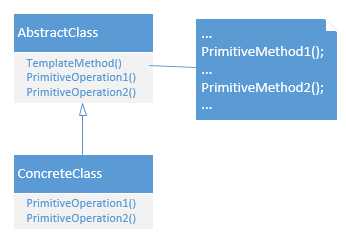
Figure 15: Class Diagram of the Template Method
The Template Method Pattern is really very simple. In fact, it’s not much more than simple inheriting and method overriding. It’s the inheritance variant of the Strategy Pattern (Inheritance vs. Delegation).
Let’s say we have a general pattern of connecting to a database, constructing a query, executing the query, retrieving the results, and finally closing the connection. We can quite literally write down this example in code without worrying about the details.
Code Listing 74: Template Method
public abstract class BaseDataRetriever { public DataTable RetrieveData() { Connect(); string query = GetQuery(); DataTable result = ExecQuery(query); Close(); return result; } protected abstract void Connect(); protected abstract string GetQuery(); protected abstract DataTable ExecQuery(string query); protected abstract void Close(); } |
Let’s say we need to retrieve the Product table from a SQL Server database. We can inherit the BaseDataRetriever and fill in the blanks.
Code Listing 75: Inheritance of the Template Class
public class ProductRetriever : BaseDataRetriever { private string connString; private SqlConnection connection; public ProductRetriever(string connString) { this.connString = connString; } protected override void Connect() { connection = new SqlConnection(connString); } protected override string GetQuery() { return "SELECT Id, Name, Price FROM Product"; } protected override DataTable ExecQuery(string query) { using (SqlDataAdapter adapter = new SqlDataAdapter(query, connection)) { DataTable result = new DataTable(); adapter.Fill(result); return result; } } protected override void Close() { connection.Dispose(); connection = null; } } |
Likewise, we can implement it for ODBC, Oracle, or what have you.
It would make sense to add another level of depth, so we can implement this for SQL Server, but not make it query specific. Just rename ProductRetriever to SqlDataRetriever, make it abstract, and remove the GetQuery method. Now the ProductRetriever would look as follows:
Code Listing 76: ProductRetriever
public class ProductRetriever : SqlDataRetriever { public ProductDataRetriever(string connString) : base(connString) { } protected override string GetQuery() { return "SELECT Id, Name, Price FROM Product"; } } |
And it’s now very easy to create a CustomerRetriever.
Code Listing 77: CustomerRetriever
public class CustomerRetriever : SqlDataRetriever { public CustomerRetriever(string connString) : base(connString) { } protected override string GetQuery() { return "SELECT Id, FirstName, LastName, Address FROM Customer"; } } |
The usage of the CustomerRetriever class (or any BaseDataRetriever class) is as straight forward as it gets.
Code Listing 78: Usage of the Template Method
CustomerRetriever retriever = new CustomerRetriever("connString"); DataTable table = retriever.RetrieveData(); // Do stuff with the data. |
In .NET we find the Template Method frequently. Basically, every method that you can override is a Template Method. One such example is the Collection<T> class, which was meant as a base class for custom collections.
Code Listing 79: A Custom Collection
public class UniqueCollection<T> : Collection<T> { // Only insert or set items if // the item is not yet in the collection. protected override void InsertItem(int index, T item) { if (!this.Contains(item)) { base.InsertItem(index, item); } } protected override void SetItem(int index, T item) { if (!this.Contains(item)) { base.SetItem(index, item); } } } |
More Patterns
The patterns discussed so far are “classic” patterns that were systematically described in the book Design Patterns: Elements of Reusable Object-Oriented Software. However, there are many more Design Patterns. Many of these are discussed in the book Patterns of Enterprise Application Architecture by Martin Fowler[3] (in Java). The patterns discussed in Fowler’s book cover different areas of your code base, such as patterns specific for you domain logic, communication with your data source, concurrency and web session. I will discuss a few of these patterns that are widely known and used.
Martin Fowler uses a lot of UML sequence diagrams. Like UML class diagrams, sequence diagrams are outside the scope of the book, but I will add them for reference and visual explanation.
Lazy Load
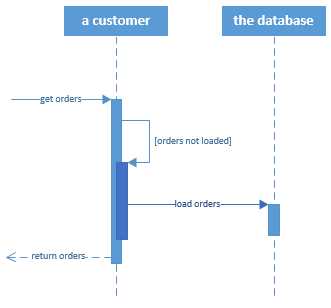
Figure 16: Sequence Diagram of the Lazy Load Pattern
The Lazy Load Pattern is about not getting data until you actually use it. It comes in four flavors: lazy initialization, virtual proxy, value holder, and ghost. We’ll look at lazy initialization only, as it’s the most common and discussing all of them takes up too much space. I also want to discuss this one because it has become more and more relevant and widely used. Functional languages, such as Haskell, have a default lazy loading strategy for everything. Such practices are becoming more common in .NET as well.
We have actually already seen the Lazy Loading Pattern when we implemented the Singleton Pattern. The Singleton instance was not created until the object was actually used. Let’s take a look at the (simple) implementation again.
Code Listing 80: Lazy Initialization
public class SomeSingleton { private static SomeSingleton instance; private SomeSingleton() { } public static SomeSingleton Instance { get { if (instance == null) { instance = new SomeSingleton(); } return instance; } } } |
If SomeSingleton.Instance is not referenced anywhere in your code, then SomeSingleton will never be initialized. This is what’s called lazy initialization. It’s especially useful when an object takes a long time to load and you don’t want to execute the code unless you really have to.
The .NET Framework has a Lazy<T> class for lazy loading any class. Let’s say we have a class that takes five seconds to initialize.
Code Listing 81: A heavy initialization
public class Something { public Something() { // Fake some heavy computation. Thread.Sleep(5000); } public void PrintUse() { Console.WriteLine("Something is used."); } } |
By using a Lazy<T> wrapper we won’t actually need to create the instance until we use it.
Code Listing 82: Usage of Lazy<T>
Stopwatch sw = new Stopwatch(); sw.Start(); Lazy<Something> lazy = new Lazy<Something>(); sw.Stop(); Console.WriteLine(String.Format( "Initializing the Lazy<Something> cost: {0} ms.", sw.ElapsedMilliseconds)); sw.Restart(); lazy.Value.PrintUse(); sw.Stop(); Console.WriteLine(String.Format( "Using the Lazy<Something>.Value cost: {0} ms.", sw.ElapsedMilliseconds)); Console.ReadKey(); |
The result should not be surprising.
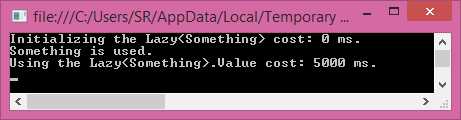
Figure 17: Result of Using the Lazy<T>
We can use complex initialization, too, using a lambda method.
Code Listing 83: Lazy<T> with Complex Initialization
// ... // ... { public Something(object someParam) { // ... |
The .NET Framework uses lazy loading extensively with the Entity Framework, an Object Relation Mapper (ORM). The Entity Framework maps database tables to classes within .NET and can update your database using these classes. Now imagine you have a SalesOrder table; each SalesOrder has SalesOrderLines, which is another table. You have classes in C# with the same name and attributes. Additionally, your C# class has a property, SalesOrderLines, which is in fact a collection of SalesOrderLines. When loading your SalesOrders, your SalesOrderLines will be empty until you actually request the SalesOrderLines of a SalesOrder. This is not necessarily faster if you need ALL SalesOrderLines, but if you only need some of them, it can be pretty fast and convenient. See the sequence diagram at the beginning of this section for a visualization.
Model View Controller
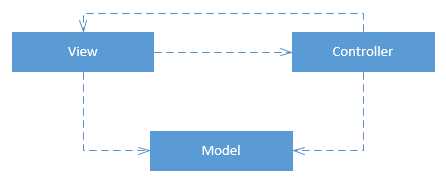
Figure 18: Class Diagram of the MVC Pattern
The Design Patterns book already mentions the Model View Controller pattern, MVC for short, used in Smalltalk-80, but only to say this pattern makes use of the Observer, Composition, and Strategy Design Patterns. There is more to the MVC pattern though. It makes use of three components: the Model, the View, and the Controller [insert Ennio Morricone soundtrack here]. The Model contains some information on the domain, such as a product, a customer, or a sales order. The Model is strictly non-UI. The UI information is in the View object. If this is a web page, the view might contain HTML. Or maybe it contains some UI widgets that are displayed on-screen. The third component, the Controller, glues these two together. It handles requests from the View, retrieves and manipulates data that is then put in a Model, which is returned to the View, which can use the Model for display on-screen.
The entire MVC model is about separation of concerns (SoC). Indeed, using MVC it becomes easy to swap one part of the system in favor of something else. In web development you could swap the Views or have multiple Views to represent the same data.
The Model View Controller pattern is so prevalent today that Microsoft created an entire framework around it and named it after the pattern, ASP.NET MVC. The best way to check this out is to simply start up Visual Studio and create a new ASP.NET MVC project (ASP.NET Web Application). You’ll get a whole lot of files and folders (an often heard complaint about ASP.NET MVC), but the classes we’ll be interested in are Controllers, Models and Views folders. The HomeController, for example, has three methods, Index, About, and Contact. All of them return a View without a Model. The AccountController has some methods that return a View and pass in a Model, but they’re a bit complex to discuss here (this isn’t a book about ASP.NET MVC after all). If you look at the Models, for example the classes in AccountViewModels, you’ll see that these are just classes with some properties and attributes. The Models are initialized in the AccountController and used in the Account Views (which is composed of many cshtml files). For some simpler Views check out the Home Views, About.cshtml, Contact.cshtml and Index.cshtml.
As a simple example, I’m going to create a new ASP.NET MVC project, rename it to “MyMvcApp”, change the authentication type to “No Authentication” and create a very simple, static website. First, throw away all Views, except Home/Index.cshtml. Now I want to show some data in my View, so I’m going to create a Model, the PersonModel.
Code Listing 84: The Model
public class PersonModel { public string FirstName { get; set; } public string LastName { get; set; } } |
Next, I’m going to change the HomeController so it will pass a PersonModel to the View.
Code Listing 85: The Controller
public class HomeController : Controller { public ActionResult Index() { PersonModel model = new PersonModel(); model.FirstName = "Bill"; model.LastName = "Gates"; return View(model); } } |
And finally I’m going to change my Home/Index View (which isn’t exactly valid HTML, but it’ll do) so it will show the data in the Model.
Code Listing 86: The View
@using MyMvcApp.Models @model PersonModel <p>The person that was passed in the PersonModel is: @Model.FirstName @Model.LastName</p> |
And that will show the following web page:

Figure 19: The Resulting View
Now if you change the name in the Controller to something else it will be reflected in the View. You don’t have to change the Model or the View. To recap, a user requests a View from the Controller. The Controller (optionally) creates a Model, passes it to the View, and returns the View. The View displays the data in the Model on the screen.
Two Design Patterns related to MVC are Model View ViewModel (MVVM) and Model View Presenter (MVP).
MVP is a pattern for the user interface. The Presenter sits between the Model and the View and formats data so the View can use it.
In MVVM, the ViewModel is an abstraction of the View that the View uses for display. Because of the abstraction of the View, two-way binding is made possible (updates in the Model are directly presented in the View and updates in the View are directly pushed to the Model). MVVM was created for Microsoft’s Windows Presentation Foundation (WPF), but can now also be found in many JavaScript frameworks like KnockoutJS and AngularJS.
Together MVC, MVP, and MVVM are referred to as the MV* Patterns. Note that they are not mutually exclusive.
Repository
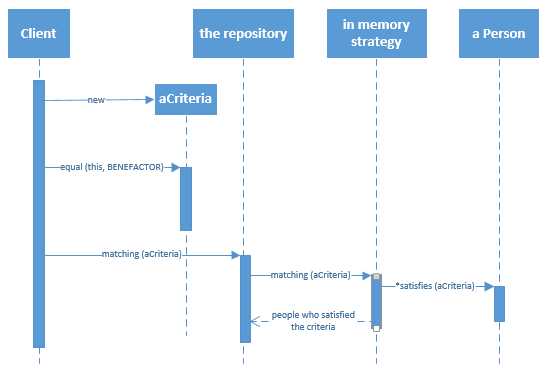
Figure 20: Sequence Diagram of the Repository Pattern
The Repository Pattern is a difficult pattern that, luckily, you don’t have to implement yourself. It makes use of other patterns, the Data Mapper and the Query Object. A Data Mapper is a piece of code that maps database records to C# domain objects. The database and the domain objects are unaware of each other. A Query Object is a C# object that behaves like a database WHERE clause and which can be passed to the Data Mapper (“aCriteria” in the diagram).
The Repository, finally, is a collection-like interface that can retrieve domain objects and sits between your domain and data mapping layers. Once again, the benefit to be had is separation of concerns. Your domain objects don’t know about your database and can be reused for other purposes. Your database layer can be swapped (for example, going from Oracle to SQL Server) and you’ll only have to change your Data Mapper. Your Data Mapper, Query Object, and Repository can also be reused in other projects.
As much as I’d like building a Data Mapper, Query Object, and Repository, we’re not going to do that. That costs a lot of time and can be a book on its own. Instead, I’m going to create a simple Console application, save it, add an ADO.NET Entity Model to my project, and connect to some database where I have a Person table. The Entity Framework will generate the Person class for me (I’m not taking the code first approach).
Code Listing 87: Generated Person Class
public partial class Person { public int Id { get; set; } public string FirstName { get; set; } public string LastName { get; set; } public Nullable<DateTime> DateOfBirth { get; set; } } |
It will also generate the Repository, which inherits from DbContext, and which gives access to my Person objects like they were just in memory C# objects.
Code Listing 88: Generated DbContext
public partial class ApplicationEntities : DbContext { public ApplicationEntities() : base("name=ApplicationEntities") { } protected override void OnModelCreating(DbModelBuilder modelBuilder) { throw new UnintentionalCodeFirstException(); } public virtual DbSet<Person> People { get; set; } } |
And here comes the beauty. The usage of the Repository Pattern (when done right) is just really easy.
Code Listing 89: Usage of the Repository
using (ApplicationEntities context = new ApplicationEntities()) { // Construct a query. // context.People is the Repository. // The Query Object (an Expression) is constructed using .Where(lambda). // The Data Mapper is not visible, but is used by the Entity Framework internally. IQueryable<Person> query = context.People.Where(p => p.FirstName.Contains("Sand")); // ToList() will actually call the database. List<Person> people = query.ToList(); } |
Personally I’m a fan of the whole “lambda creates Expression (Query Object)” philosophy, but it does obscure the pattern a bit. Other APIs that I’ve used have a more explicit Query Object.
Code Listing 90: Explicit Query Object
List<Person> people = SomeApi.People.Select(Query.Contains("FirstName", "Sand")); |
It still beats writing SQL!
A word of caution when using a Repository: everything may look like plain C#, but the dark truth is that it isn’t. Ultimately, some query will be sent to your database, and if you’re not careful it’s not going to be pretty. The Entity Framework (and other ORM’s) are capable of joining, aggregating, using inner queries, what have you. Some SQL code will have to be generated and if you don’t know what you’re doing it will be ugly and slow. Sometimes it’s just a lot quicker to write some SQL and be done with it!
The Takeaway
There are many more patterns. Some patterns can be generally applied in any (object-oriented) language, while others are language specific. Some patterns are even specific to a certain programming paradigm. For example, JavaScript, which has no access modifiers, has Design Patterns, like Module, to still be able to hide object internals. When you’re building a multi-threaded application, you might want to use patterns specifically designed to simplify multi-threaded code. To discuss all these patterns, you’d need many books that aren’t exactly succinct. Design Patterns, like most things in life, have fans and opponents. While it’s true that Design Patterns do not guarantee beautiful software, and may even lead to overly complex software, it’s also important that you know the tools and methods that are available to you. Design Patterns are in no way the holy grail of programming, but, when applied correctly, can help you in creating robust and maintainable software.
The .NET Framework makes use of many other Design Patterns that aren’t discussed here, for example; the Iterator Pattern, with IEnumerable and IEnumerator, making it possible to loop through collections; the Builder Pattern, for constructing complex objects, see for example the ConnectionStringBuilder; the Visitor Pattern in the ExpressionVisitor (when working with Expressions/the Entity Framework); the Proxy Pattern when working with Windows Communication Foundation (WCF); and the Unit of Work Pattern to gracefully handle database transactions in the Entity Framework.
- 1800+ high-performance UI components.
- Includes popular controls such as Grid, Chart, Scheduler, and more.
- 24x5 unlimited support by developers.