
Nuxt.js Succinctly®

CHAPTER 3
App Foundations
Getting started
It’s time to look at some code and put in place the foundations of the application we’ll be building, which will be an app to manage a list of favorite books.
The application we will build has been inspired by these excellent GitHub repositories: nuxt-blog-starter-kit and online-store-nuxt3.
With VS Code open, let's open the nuxt-app project we created for Nuxt.js 3. To do so, click File > Open Folder and select the nuxt-app folder where it resides.
With the nuxt-app project open, let’s click the app.vue file to make our first change.
Code Listing 3-a: Original app.vue File
<template> <div> <NuxtWelcome /> </div> </template> |
The first thing I'm going to do is replace <NuxtWelcome /> with <NuxtPage />. What this does is replace the boilerplate code (<NuxtWelcome />) with the content of the app's current page (<NuxtPage />).
Code Listing 3-b: Modified app.vue File
<template> <div> <NuxtPage /> </div> </template> |
Once you’ve made this change, press Ctrl+S to save this change or click File > Save.
Pages folder
The next thing we are going to do is create a pages folder. We can do this by clicking on the New Folder icon within the VS Code EXPLORER panel.
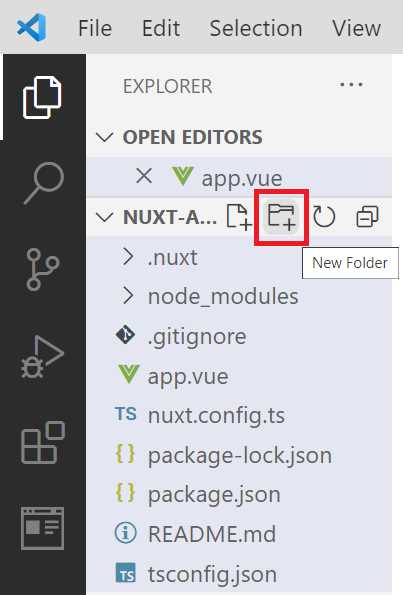
Figure 3-a: New Folder Button (VS Code—EXPLORER)
We can place the app’s pages within the pages folder. After creating the pages folder, let's select it, and then click the New File icon to add a new file to that folder, which we will call index.vue.
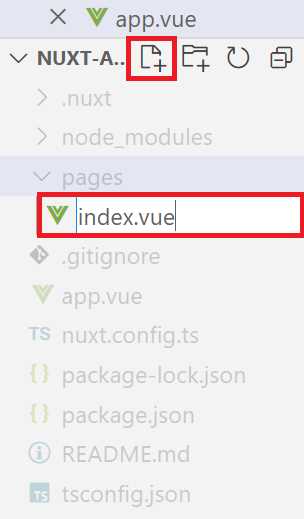
Figure 3-b: New File (VS Code—EXPLORER)
We'll come back to index.vue, as this will be our starting point. For now, let's switch gears and install the latest version of Bootstrap, which is one of the world's most popular front-end toolkits.
Installing Bootstrap
Installing the Bootstrap toolkit is straightforward. Let's open the nuxt.config.ts file using the EXPLORER panel within VS Code.
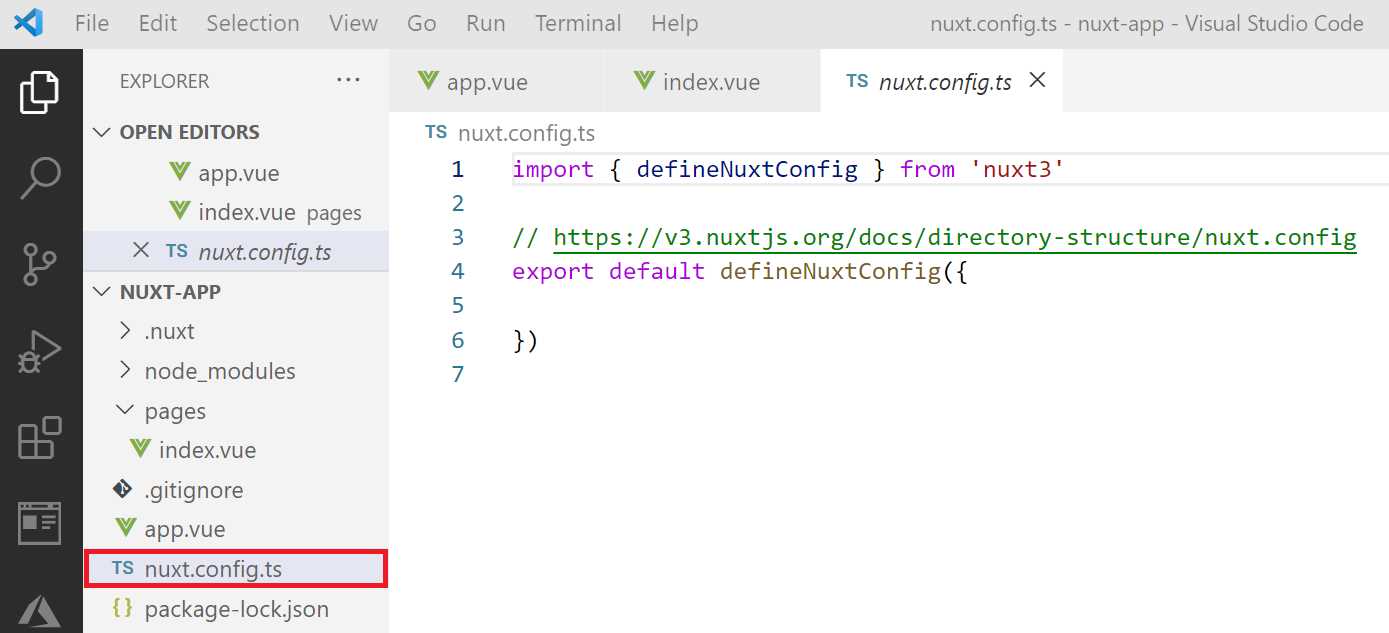
Figure 3-c: The nuxt.config.ts File—VS Code
First, we need to copy two links from the official documentation, one for the Bootstrap CSS styles, and another for the Bootstrap JavaScript Bundle, as you can see highlighted in red in the following figure.
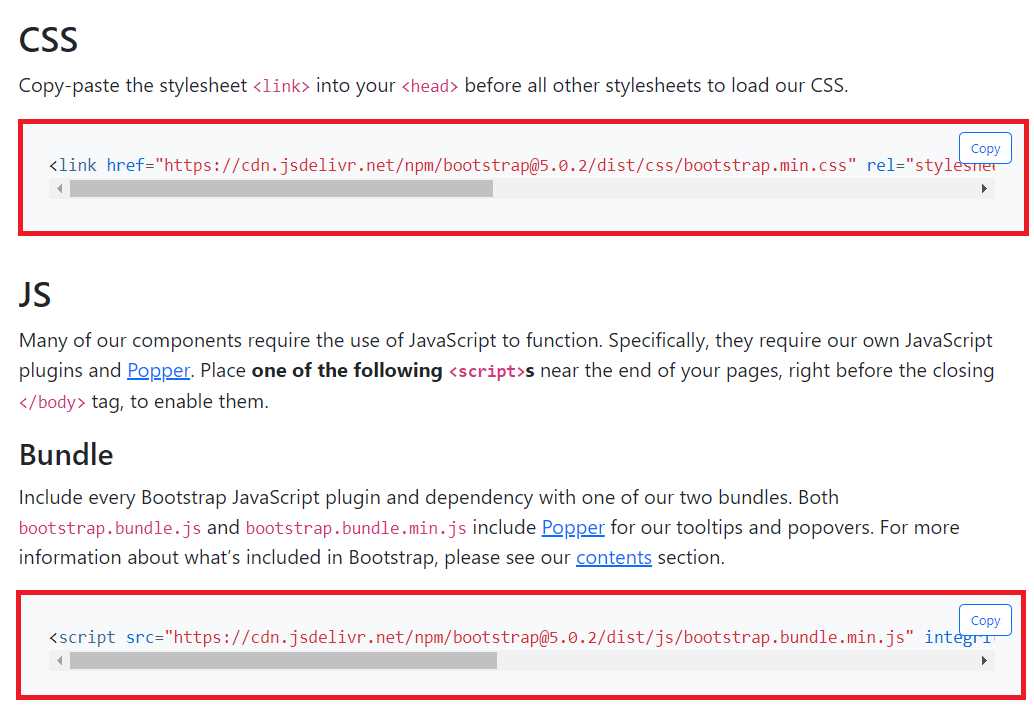
Figure 3-d: Bootstrap CSS and JavaScript Bundle (Bootstrap Official Documentation)
First, manually copy the CSS link (just the string contained within src, and not using the Copy button) and paste it (highlighted in bold) into the modified nuxt.config.ts file, which looks as follows.
Code Listing 3-c: Modified nuxt.config.ts File (Includes Bootstrap CSS)
import { defineNuxtConfig } from 'nuxt3' // https://v3.nuxtjs.org/docs/directory-structure/nuxt.config export default defineNuxtConfig({ meta: { link: [ { rel: 'stylesheet', href: 'https://cdn.jsdelivr.net/npm/[email protected]/ dist/css/bootstrap.min.css' } ] } }) |
Note: I've written the CSS link in two lines (for readability); however, when you paste it in your nuxt.config.ts file, do not split it into two lines—make sure it remains in a single line.
Next, let's add the Bootstrap JavaScript Bundle to the nuxt.config.ts file. Manually copy the Bundle link (just the string contained within src, and not using the Copy button) and paste it (highlighted in bold) into the modified nuxt.config.ts file. This will look as follows.
Code Listing 3-d: Modified nuxt.config.ts File (Includes Bootstrap CSS & JavaScript Bundle)
import { defineNuxtConfig } from 'nuxt3' // https://v3.nuxtjs.org/docs/directory-structure/nuxt.config export default defineNuxtConfig({ meta: { link: [ { rel: 'stylesheet', href: 'https://cdn.jsdelivr.net/npm/[email protected]/ dist/css/bootstrap.min.css' } ], script: [ { type: 'text/javascript', src: 'https://cdn.jsdelivr.net/npm/[email protected]/ dist/js/bootstrap.bundle.min.js' } ] } }) |
Note: I've written the Bundle link in two lines (for readability); however, when you paste it in your nuxt.config.ts file, do not split it into two lines—make sure it remains in a single line.
Once you’re done, save the changes to the nuxt.config.ts file. Now, Bootstrap has been installed and is ready to be used.
Components folder
Now that we have Bootstrap, we need to create a components folder that we will use to add various components our application will utilize. We can do this by clicking the New Folder icon within the VS Code EXPLORER panel, as seen in Figure 3-a.
Once the folder has been created, select it, and click the New File icon within the VS Code EXPLORER panel. Let's name the new file NavBar.vue.
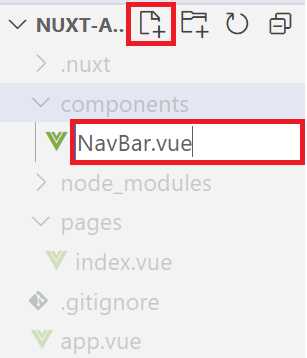
Figure 3-e: Creating NavBar.vue (VS Code—EXPLORER)
After you’ve created the file, click to open it in VS Code.
Navbar component
The next thing we want to do is write the navbar component code. Open NavBar.vue and paste in the following code.
Code Listing 3-e: The NavBar Component (NavBar.vue)
<template> <div> <nav class="navbar navbar-expand-lg navbar-light" style="background-color: #e3f2fd;"> <div class="container-fluid"> <a class="navbar-brand" href="#">Books List</a> <button class="navbar-toggler" type="button" data-mdb-toggle="collapse" data-mdb-target="#navbarTogglerDemo02" aria-controls="navbarTogglerDemo02" aria-expanded="false" aria-label="Toggle navigation" > <i class="fas fa-bars"></i> </button> <div class="collapse navbar-collapse" id="navbarTogglerDemo02"> <ul class="navbar-nav me-auto mb-2 mb-lg-0"> </ul> <div class="d-flex input-group w-auto"> <button class="btn btn-outline-primary" type="button" data-mdb-ripple-color="dark" data-bs-toggle="offcanvas" data-bs-target="#offcanvasWithBothOptions" aria-controls="offcanvasWithBothOptions" > Favorites </button> </div> </div> </div> </nav> </div> </template> |
To understand this code and how it relates to the finished navbar component, let's look at the following diagram.
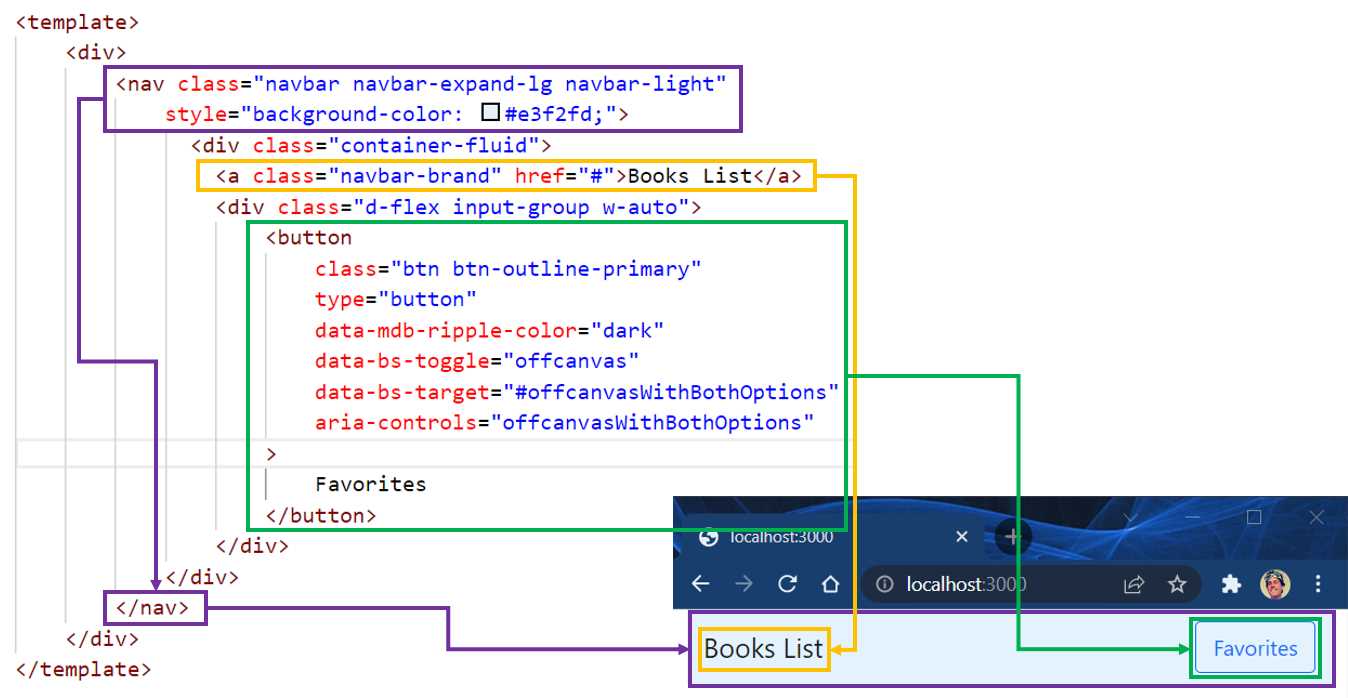
Figure 3-f: Navbar Code and UI Relationship
We define a nav component wrapped around the main div using regular Bootstrap CSS classes (highlighted in purple). This nav contains an anchor (a) tag (highlighted in yellow) and a Favorites button component (highlighted in green).
Like Vue.js, Nuxt.js HTML code must be embedded within the template tags. As you have seen, that wasn't difficult at all.
Now, here comes the exciting part. Notice that the button component includes the data-bs-target attribute. What does this attribute do? It’s related to another Bootstrap component called offcanvas, which is a hidden sidebar that we'll use to keep a list of favorite books.
In essence, the data-bs-target attribute is used to reference an offcanvas component that will appear when the Favorites button is clicked.
To keep our code clean, let's create the offcanvas functionality in a separate component that we'll name FavList (FavList.vue). The following diagram illustrates how both components are related using the offcanvasWithBothOptions attribute name.
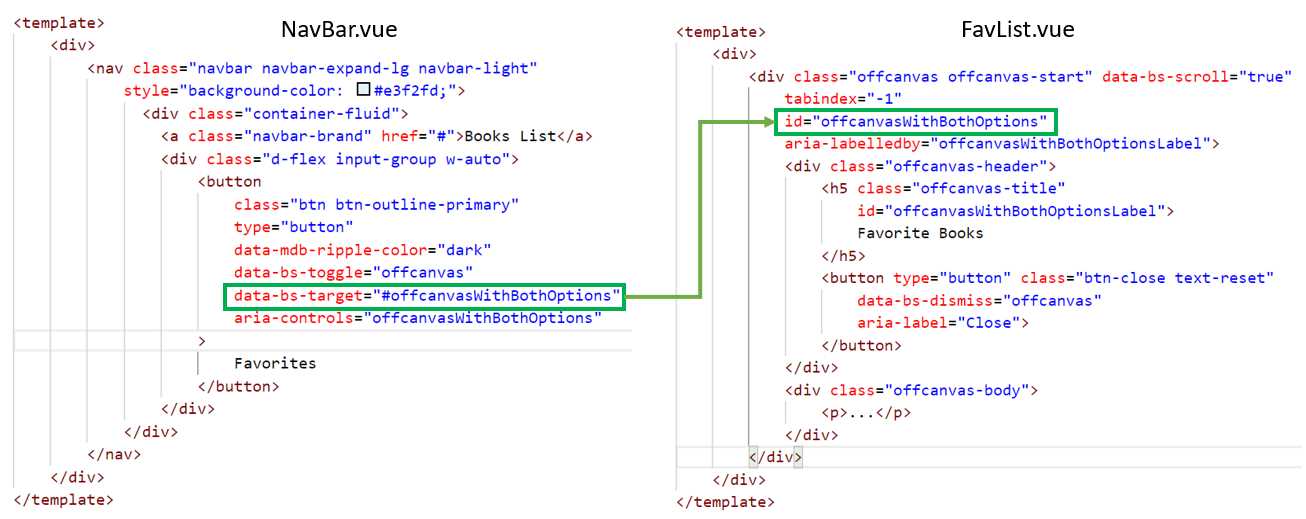
Figure 3-g: NavBar—FavList Relationship (Using the offcanvasWithBothOptions Attribute Name)
FavList component
Now that we have the navbar component ready, we need to create a new FavList.vue file. We can do this by selecting the components folder and clicking the New File icon within the VS Code EXPLORER panel.
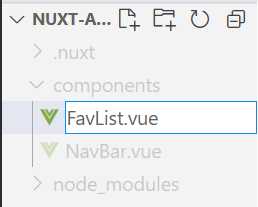
Figure 3-h: Creating FavList.vue (VS Code—EXPLORER)
After you’ve created the file, click to open it in VS Code, and paste in the following code.
Code Listing 3-f: The FavList Component (FavList.vue)
<template> <div> <div class="offcanvas offcanvas-start" data-bs-scroll="true" tabindex="-1" id="offcanvasWithBothOptions" aria-labelledby="offcanvasWithBothOptionsLabel"> <div class="offcanvas-header"> <h5 class="offcanvas-title" id="offcanvasWithBothOptionsLabel"> Favorite Books </h5> <button type="button" class="btn-close text-reset" data-bs-dismiss="offcanvas" aria-label="Close"> </button> </div> <div class="offcanvas-body"> <p>...</p> </div> </div> </div> </template> |
To understand this code and how it relates to the finished offcanvas component functionality, let's look at the following diagram.
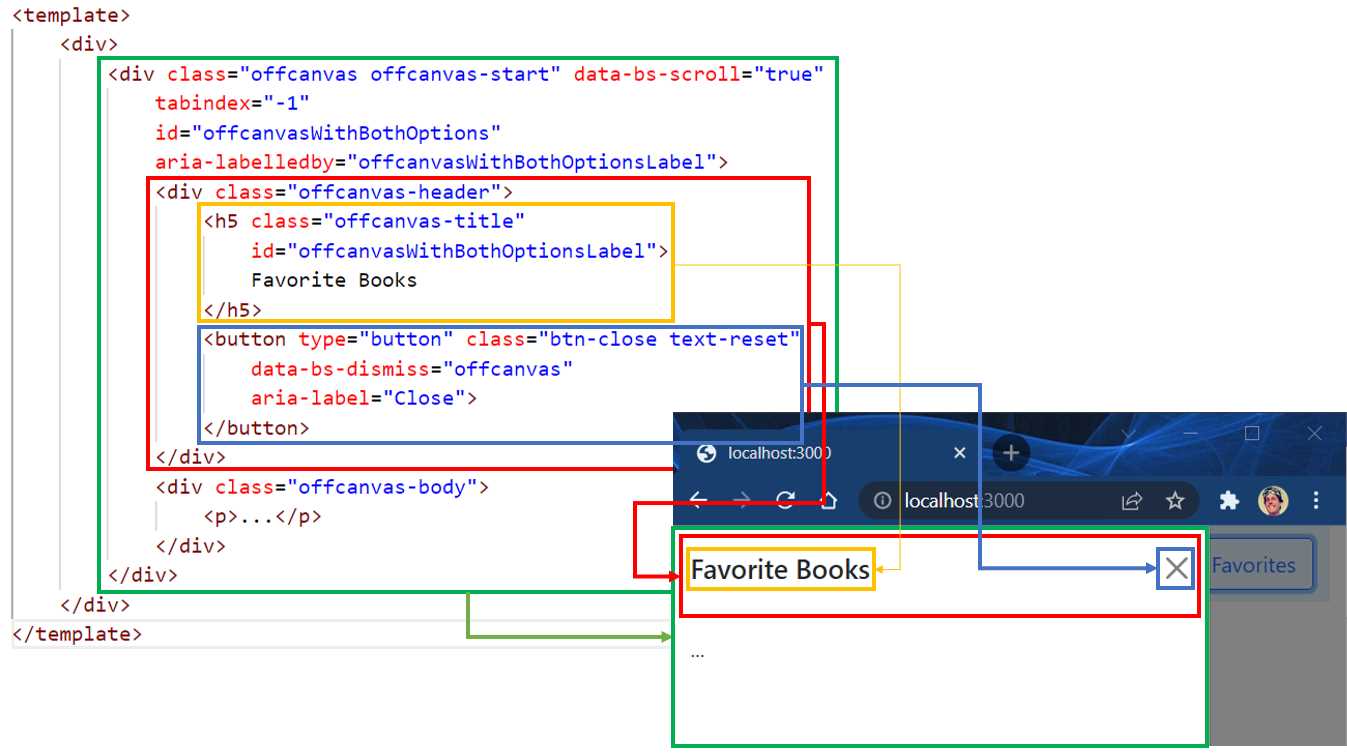
Figure 3-i: FavList Code and UI Relationship
We see that we have the div with the id offcanvasWithBothOptions (highlighted in green) contained within the main div.
This div contains two child div tags—one represents the offcanvas-header div (highlighted in red), and the other represents the offcanvas-body div (for which we'll add the HTML code later).
The offcanvas-header div contains an h5 tag (highlighted in yellow) with the title of the offcanvas and a button that closes the offcanvas when clicked (highlighted in blue).
As you have seen, that wasn't difficult to implement either.
Initial objects
Now that we have the application's main UI components partially ready, it's time to add some hardcoded objects to represent the book data our application will display. As you might have guessed, this book data will be about the Succinctly series books.
Let’s open the index.vue file contained within the pages folder using the EXPLORER panel in VS Code and add the following code.
Code Listing 3-g: The Initial Objects Data (index.vue)
<script> export default { data() { return { books: [ { uuid: 'cde4664e-afb8-47b2-b4e0-ecedad4ebbf6', name: 'Razor Components Succinctly', description: 'Razor components are specific building blocks within the Blazor framework.', author: 'Ed Freitas', url: 'https://www.syncfusion.com/succinctly-free- ebooks/razor-components-succinctly', picUrl: 'https://cdn.syncfusion.com/content/images/ downloads/ebook/ebook-cover/ Razor-Components-Succinctly.png' }, { uuid: 'e3d063c7-57bf-4df6-a626-137bfc658e04', name: 'Azure Virtual Desktop Succinctly', description: 'Put simply, Azure Virtual Desktop is a way to serve Windows resources over the internet.', author: 'Marco Moioli', url: 'https://www.syncfusion.com/succinctly-free- ebooks/azure-virtual-desktop-succinctly', picUrl: 'https://cdn.syncfusion.com/content/ images/downloads/ebook/ebook-cover/ azure-virtual-desktop-succinctly.png' }, { uuid: '86af8093-7ba9-4178-9c19-0eeb9e75bcf0', name: 'Ansible Succinctly', description: 'Ansible is an open-source software, automation engine, and automation language.', author: 'Zoran Maksimovic', url: 'https://www.syncfusion.com/succinctly-free- ebooks/ansible-succinctly', picUrl: 'https://cdn.syncfusion.com/content/ images/downloads/ebook/ ebook-cover/ansible-succinctly.png' } ] } } } </script> |
Note: I've written some of the strings in multiple lines per attribute (for readability); however, if you paste these in your index.vue file, do not split these into numerous lines—make sure each value remains in a single line.
The book data contains a books array returned by the data method. The uuid is a universally unique ID, sometimes called a GUID.
Books UI
Now that we have the book information ready, let's create the UI to display the book data, as seen in the following listing.
Code Listing 3-h: Books UI (index.vue)
<template> <div class="container"> <br /> <div class="row"> <div v-for="(book, index) in books" :key="book.uuid + '_' + index" class="col-md-4" > <div class="card-mb-3"> <a target="_blank" :href="book.url"> <img :src="book.picUrl" class="card-img-top"> </a> <div class="card-body"> <h5 class="card-title"> {{ book.name }} </h5> <p class="card-text"> {{ book.description }} </p> <p class="card-text"> {{ book.author }} </p> </div> </div> </div> </div> </div> </template> |
To understand this better, let's look at the following diagram.
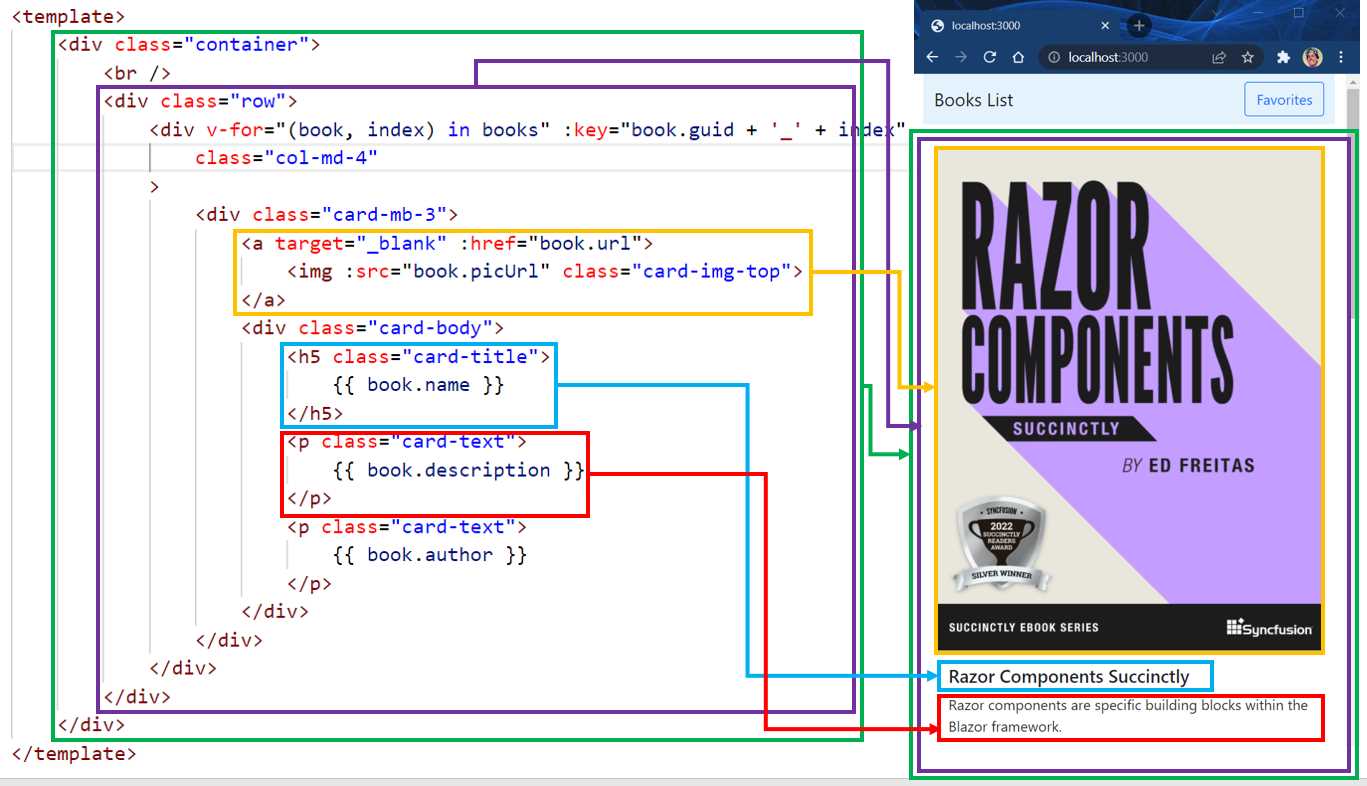
Figure 3-j: Books Code and UI Relationship
We can see that we have the main div using Bootstrap's container CSS class (highlighted in green). This container div contains a row (highlighted in purple), and within it, we find another div used to display a list of books.
The list of books is displayed by iterating over them using the v-for directive from Vue.js. Notice that each book rendered using the v-for directive requires a unique key: the concatenation of the book.uuid and the index value.
Then, we have an anchor (a) tag (highlighted in yellow) that points to the book's URL (book.url). It contains the book's cover image that uses the book.picUrl as its source (src).
When clicking on the book cover's image, we are directed to the book's website on a separate browser tab/window—which is why the anchor's target is set to _blank.
Following that, we find an h5 tag that displays the book.name (highlighted in green), a p tag that shows the book.description (highlighted in red), and finally, another p tag that displays the book.author.
Favorites button
Now that we have most of the book UI ready, I'd like to add an Add to Favorites button for each book displayed, which will allow a book to be added to the offcanvas component that will contain the list of favorite books. The new code is highlighted in bold.
Code Listing 3-i: Updated Books UI (index.vue)
<template> <div class="container"> <br /> <div class="row"> <div v-for="(book, index) in books" :key="book.uuid + '_' + index" class="col-md-4" > <div class="card-mb-3"> <a target="_blank" :href="book.url"> <img :src="book.picUrl" class="card-img-top"> </a> <div class="card-body"> <h5 class="card-title"> {{ book.name }} </h5> <p class="card-text"> {{ book.description }} </p> <p class="card-text"> {{ book.author }} </p> <div class="d-grid"> <button class="btn btn-outline-primary"> Add to Favorites </button> </div> </div> </div> </div> </div> </div> </template> |
The updated UI would look as follows—with the Add to Favorites button appearing after each author name.
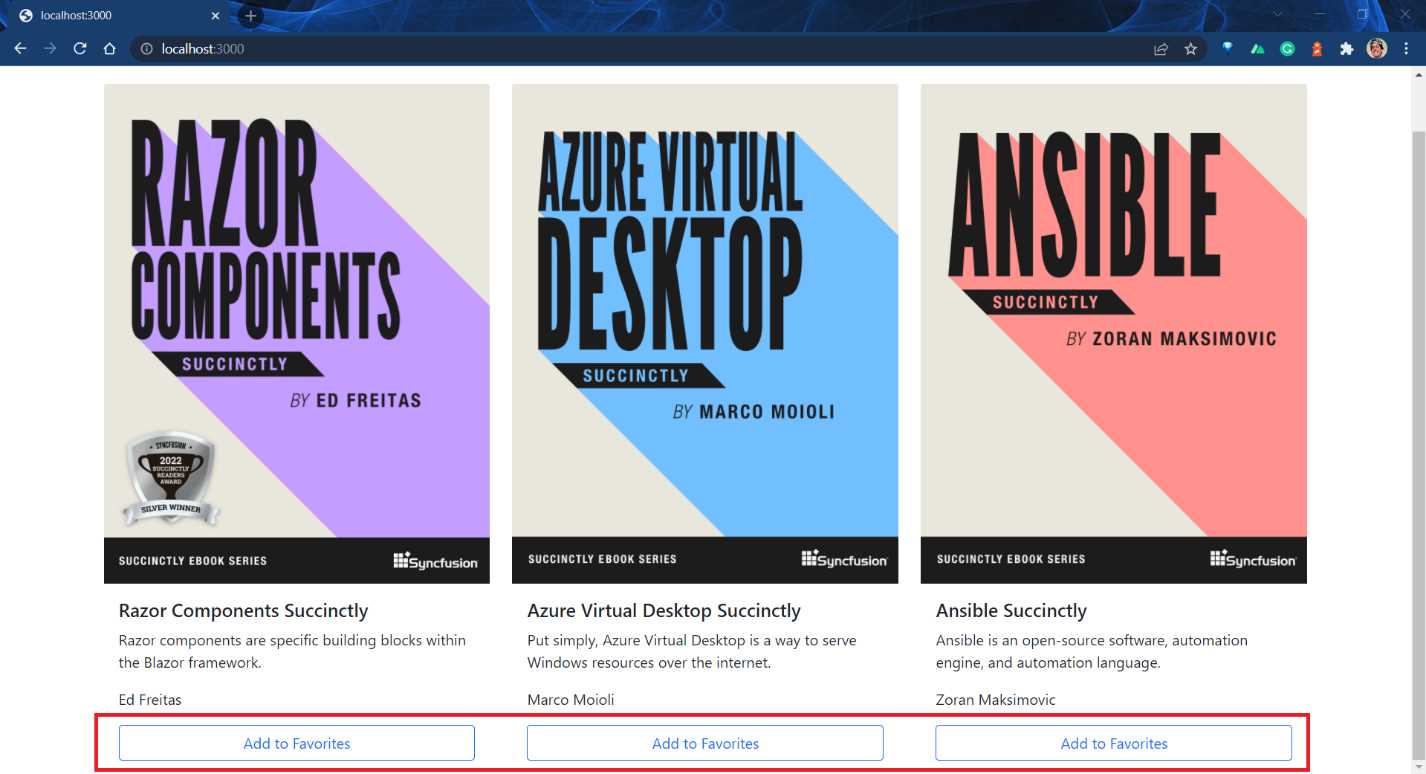
Figure 3-k: Finished Books UI (Main Screen)
You'll be able to verify this shortly in your browser, but first, let's wrap up the remaining changes for index.vue.
Code Listing 3-j: Books UI (index.vue)—Full Code
<template> <div class="container"> <br /> <div class="row"> <div v-for="(book, index) in books" :key="book.uuid + '_' + index" class="col-md-4" > <div class="card-mb-3"> <a target="_blank" :href="book.url"> <img :src="book.picUrl" class="card-img-top"> </a> <div class="card-body"> <h5 class="card-title"> {{ book.name }} </h5> <p class="card-text"> {{ book.description }} </p> <p class="card-text"> {{ book.author }} </p> <div class="d-grid"> <button class="btn btn-outline-primary"> Add to Favorites </button> </div> </div> </div> </div> </div> </div> </template> <style scoped> .img { width: 80%; height: auto; } .center { display: block; margin-left: auto; margin-right: auto; width: 100%; } </style> <script> export default { data() { return { books: [ { uuid: 'cde4664e-afb8-47b2-b4e0-ecedad4ebbf6', name: 'Razor Components Succinctly', description: 'Razor components are specific building blocks within the Blazor framework.', author: 'Ed Freitas', url: 'https://www.syncfusion.com/succinctly-free- ebooks/razor-components-succinctly', picUrl: 'https://cdn.syncfusion.com/content/ images/downloads/ebook/ebook-cover/ Razor-Components-Succinctly.png' }, { uuid: 'e3d063c7-57bf-4df6-a626-137bfc658e04', name: 'Azure Virtual Desktop Succinctly', description: 'Put simply, Azure Virtual Desktop is a way to serve Windows resources over the internet.', author: 'Marco Moioli', url: 'https://www.syncfusion.com/succinctly-free- ebooks/azure-virtual-desktop-succinctly', picUrl: 'https://cdn.syncfusion.com/content/images/ downloads/ebook/ebook-cover/ azure-virtual-desktop-succinctly.png' }, { uuid: '86af8093-7ba9-4178-9c19-0eeb9e75bcf0', name: 'Ansible Succinctly', description: 'Ansible is an open-source software, automation engine, and automation language.', author: 'Zoran Maksimovic', url: 'https://www.syncfusion.com/succinctly-free- ebooks/ansible-succinctly', picUrl: 'https://cdn.syncfusion.com/content/ images/downloads/ebook/ ebook-cover/ansible-succinctly.png' } ] } } } </script> |
Note: I've written some of the strings in multiple lines per attribute (for readability); however, if you paste these in your index.vue file, do not split these into numerous lines—make sure each value remains in a single line.
Notice that I've also included some scoped CSS styles (highlighted in bold). Even though we are not using these CSS classes, I've included them if you want to style the HTML of index.vue later.
This will open the browser and allow you to view the changes implemented. (If you're not running the application, execute the npm run dev command from the built-in VS Code terminal to run the app.)
Summary
In this chapter, we have laid out the foundation of our app, implemented the application's main UI, and enabled the usage of Bootstrap's offcanvas component—which we will use to keep our favorite books.
We still have to add all the necessary logic for the application to work and finish the UI of the favorites list—which only makes sense to complete once we have the app's logic laid out. That's what we are going to look at next.
- 80+ high-performance, modular, and responsive Vue UI components.
- Popular components like Data Grid, Charts, and Diagram.
- Incredibly lightweight and user-friendly.