
NuGet In-House Succinctly®

CHAPTER 4
Creating and Publishing the Package in a Local NuGet Server
Creating a folder structure to build the package
Let us go back to the myextensionmethods project created in Chapter 3. We will share the compiled code for this project as a NuGet package. In order to do this, we should make a few changes to our project. First, we are going to add a couple of folders in order to save the necessary files for building and deploying the package.
To create these folders, right-click the myextensionmethods node in Solution Explorer, and then click Add > New Folder in the context menu. For the purposes of this book, we will create two folders: packagesource and packagedeploy.
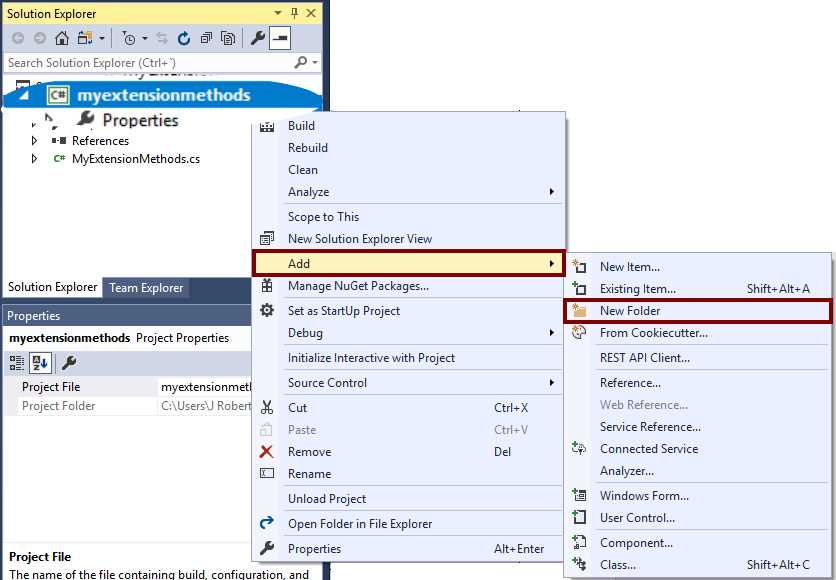
Figure 54: Creating the folders for our project
After creating the folders, the Solution Explorer will look like the following figure.
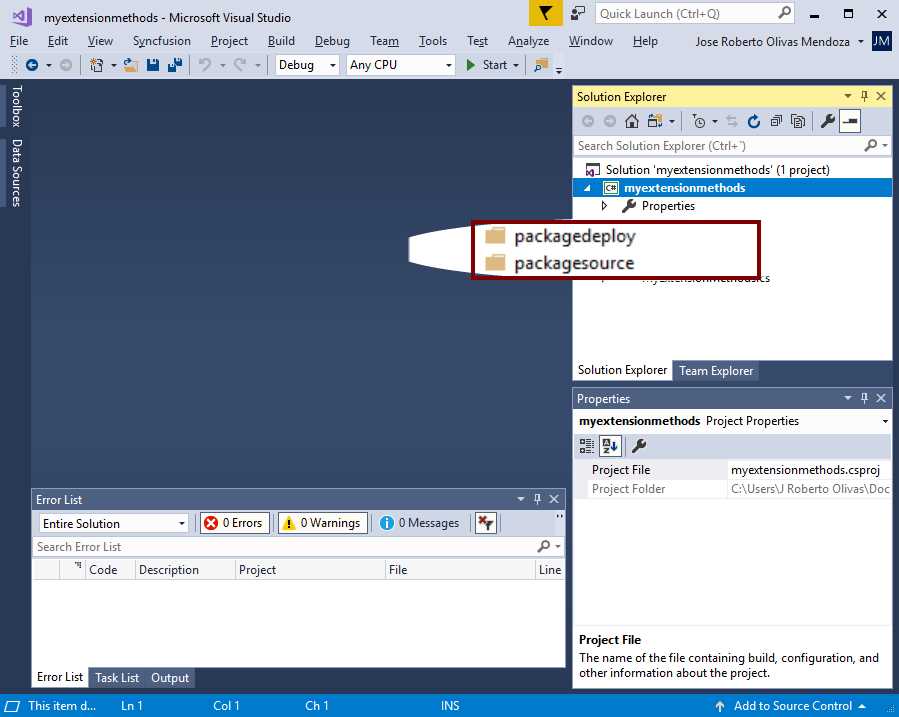
Figure 55: The Solution Explorer after creating the folders
At this point, we are ready to start the process for building our NuGet package.
The .nuspec file
A .nuspec file is a text file in XML format. This file contains the metadata used to build the NuGet package and to offer information to consumers. The package will always contain the .nuspec file.
The .nuspec file bases its syntax and structure in the nuspec.xsd schema file. We can download this file from GitHub. According to this schema, a general form for a .nuspec file should look like the following example.
Code Listing 2: A generic .nuspec file
<?xml version="1.0" encoding="utf-8"?> <package xmlns="http://schemas.microsoft.com/packaging/2010/07/nuspec.xsd"> <metadata> <!-- Required elements--> <id></id> <version></version> <description></description> <authors></authors> <!-- Optional elements --> <!-- ... --> </metadata> <!-- Optional 'files' node --> </package> |
We can see in Code Listing 2 that some elements appear as required, and other elements appear as optional. The following table summarizes the most relevant required and optional elements.
Table 2: .nuspec file metadata elements
Element | Description | Required |
|---|---|---|
id | The package identifier. This identifier must be unique across the gallery the package resides in (nuget.org or a private host). IDs should not contain spaces or characters that are invalid for a URL. They usually follow .NET namespace rules. | Yes |
version | The version of the package. It should follow the major.minor.patch pattern. We may include one of the following prerelease suffixes.
| Yes |
description | A long description of the package, for UI display purposes. | Yes |
authors | A comma-separated list of packages authors. When the package is hosted at nuget.org, these names should match the profile names on the NuGet Gallery because the gallery displays them and also uses them to cross-reference packages by the same authors. | Yes |
title | A human-friendly title of the package. This is typically for UI display purposes. Also, it appears at nuget.org if we host the package there, and at the Package Manager in Visual Studio. The package ID replaces this element if this is not specified. | No |
owners | A comma-separated list of the package creators. This is similar to the list in authors, and is ignored when we host the package at nuget.org. | No |
projectUrl | The URL for the package's home page, for UI display purposes. This URL is also shown when we host the package at nuget.org. | No |
summary | This is a short description of the package for UI display purposes. A truncated version of description is used if this element is omitted. | No |
copyright | Copyright credits for the package. | No |
files | This is a node contained in the package node, and specifies which assembly files are included in the package and its target location at consuming time. | No |
Note: An in-depth explanation of all .nuspec file elements is outside the scope of this book.
Creating the .nuspec file for the project
Using nuget.exe
We need to build a .nuspec file before creating a NuGet package. We will use the NuGet Command Line Interface to accomplish this task. Assuming that the myextensionmethods assembly is in the Documents\Visual Studio 2017\Projects\myextensionmethods\myextensionmethods\bin\Debug folder, we will launch the Command Prompt application and use the cd command to navigate to the folder, so that it is the working directory. After that, we are going to use nuget.exe to create the .nuspec file by using the command shown in the following example.
Code Listing 3: Command for creating the .nuspec file
C:\Users\Your user name\Documents\Visual Studio 2017\Projects\myextensionmethods\myextensionmethods\bin\Debug> nuget spec myextensionmethods Created 'myextensionmethods.nuspec' successfully. |
We can notice in the previous example that nuget.exe tells us when the myextensionmethods.nuspec file is created. Now, if we open the file using the Notepad application, the contents should look like the following example.
Code Listing 4: The contents of the myextensionmethods.nuspec file
<?xml version="1.0"?> <package > <metadata> <id>myextensionmethods</id> <version>1.0.0</version> <authors>Your user name</authors> <owners>Your user name</owners> <licenseUrl>http://LICENSE_URL_HERE_OR_DELETE_THIS_LINE</licenseUrl> <projectUrl>http://PROJECT_URL_HERE_OR_DELETE_THIS_LINE</projectUrl> <iconUrl>http://ICON_URL_HERE_OR_DELETE_THIS_LINE</iconUrl> <requireLicenseAcceptance>false</requireLicenseAcceptance> <description>Package description</description> <releaseNotes>Summary of changes made in this release of the package.</releaseNotes> <copyright>Copyright 2019</copyright> <tags>Tag1 Tag2</tags> <dependencies> <dependency id="SampleDependency" version="1.0" /> </dependencies> </metadata> </package> |
Tuning up the .nuspec file
The previous example displays the default myextensionmethods.nuspec file created by nuget.exe. It is our responsibility to make the necessary changes to this file before creating the package. Therefore, we need to delete all unnecessary elements and add those not included by nuget.exe. After that, our myextensionmethods.nuspec file should look like the following example.
Code Listing 5: The myextensionmethods.nuspec file after tune-up
<?xml version="1.0"?> <package > <metadata> <id>myextensionmethods</id> <version>1.0.0</version> <authors>Your username</authors> <owners>Your username</owners> <description>Extension Methods for NuGet In-House Succinctly</description> <copyright>Copyright 2019 NuGet In-House Succinctly</copyright> </metadata> <files> <file src="..\bin\Debug\myextensionmethods.dll" target="lib\net46" /> </files> </package> |
In this example, the <files> node allows us to declare all the assemblies and files to include in the package. Every file declared corresponds to a <file> child node, which employs two attributes for file declaration. The first attribute is src, which points to the path of the included file or files (we can use wild cards). The second attribute, target, points to a relative path to the folder within the package, where the NuGet Command Line Interface (or NuGet Package Explorer) places the file. According to NuGet conventions, this path should start with lib. We will explain this attribute later in this book.
After saving the modified file, we should copy it into the Documents\Visual Studio 2017\Projects\myextensionmethods\myextensionmethods\packagesource folder, created in the first section of this chapter.
Replacement tokens
As noted in Code Listing 5, the values for the <metadata> child nodes are string constants, meaning we hard-coded these values. Sometimes, we need to supply variable values to these nodes. To make this happen, NuGet offers a set of replacement tokens. We should place these tokens instead of values, and we can send values to them from the NuGet Command Line Interface (nuget.exe) at the time of creating the package. The following table summarizes the available replacement tokens.
Table 3: NuGet replacement tokens
Token | Value source | Value |
|---|---|---|
$id$ | Project File | Assembly name (title) from the project file. |
$version$ | Assembly Info | AssemblyInformationalVersion if present, otherwise AssemblyVersion. |
$description$ | Assembly Info | Assembly Description |
$author$ | Assembly Info | Assembly Company |
$title$ | Assembly Info | Assembly Title |
$copyright$ | Assembly Info | Assembly Copyright |
$configuration$ | Assembly DLL | Configuration used to build the assembly (Debug is the default). |
Note: For the $configuration$ token, when using the Release configuration, we should always employ –properties Configuration=Release on the NuGet Command Line Interface. We will explain this later in this book.
Adding support for multiple .NET Framework versions
We can add support for multiple framework versions in a single package. We can accomplish this by using the target attribute of the <file> node. As we explained in the previous section, the value of this attribute points to a relative path to the folder within the package, where NuGet Command Line Interface (or NuGet Package Explorer) places the file.
NuGet conventions for relative paths
There are some NuGet conventions about how to specify a relative path in the <file> node. Let’s look at a couple of them in the following table.
Table 4: NuGet folder naming conventions
Folder | Description | Action upon package install |
|---|---|---|
(root) | Location for the readme.txt file. | Visual Studio displays a readme.txt file in the package root when the package is installed. |
lib\{tfm} | Location for the assemblies (.dll), documentation (.xml), and symbol (.pdb) files for the specified target framework moniker (TFM). | Visual Studio adds the assemblies as references for compile time as well as runtime. Also, it copies .xml and .pdb files into project folders. The target framework moniker corresponds to a subfolder for a specific framework version. |
ref\{tfm} | Location for the assemblies (.dll) and symbol (.pdb) files for the specified target framework moniker (TFM). | Visual Studio adds the assemblies as references only for compile time; therefore, nothing will be copied into the project bin folder. |
content | Arbritary files, according to the project’s architecture. | Visual Studio copies these files to the project root of the target application that consumes the package. Therefore, if we need to add a file named transform.xsd in the target application’s xmlstylesheets folder, we should place this file in the package’s content\xmlstylesheets folder. |
Target framework monikers
A target framework moniker (TFM) is a standardized token format for specifying the target framework of a .NET application or library. The following table summarizes the available target framework monikers.
Table 5: NuGet folder naming conventions
Target Framework | Target Framework Monikers |
|---|---|
.NET Standard | netstandard1.0 |
.NET Core | netcoreapp1.0 |
.NET Framework | net11 |
Windows Store | netcore [netcore45] |
.NET Micro Framework | netmf |
Universal Windows Platform | uap [uap10.0] |
Now, we will modify the .nuspec file displayed in Code Listing 5 in order to support both .NET Framework 4.7 and .NET Framework 4.6. After making changes, we should save the file. The contents should look like the following example.
Code Listing 6: .nuspec file with multiple frameworks support
<?xml version="1.0"?> <package > <metadata> <id>myextensionmethods</id> <version>1.0.0</version> <authors>Your username</authors> <owners>Your username</owners> <description>Extension Methods for NuGet In-House Succinctly</description> <copyright>Copyright 2019 NuGet In-House Succinctly</copyright> </metadata> <files> <file src="..\bin\Debug\myextensionmethods.dll" target="lib\net47" /> <file src="..\bin\Debug\myextensionmethods.dll" target="lib\net46" /> </files> </package> |
Using NuGet Package Explorer to view the .nuspec file
We can use the NuGet Package Explorer to view our .nuspec file. The first step is to launch the application and click Open a local package.
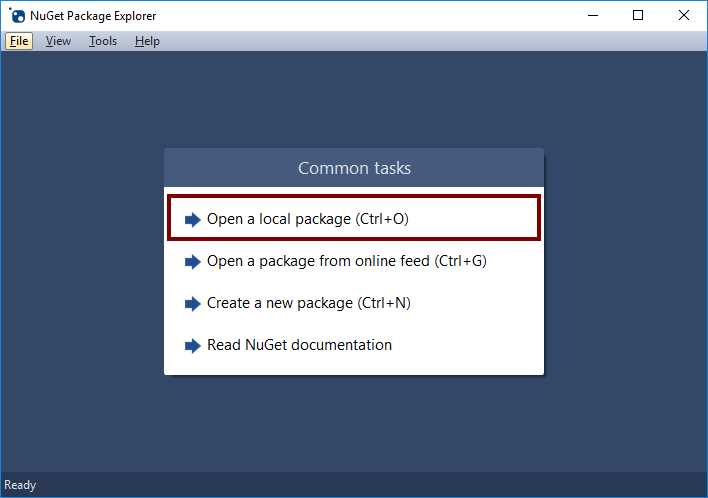
Figure 56: Using the NuGet Package Explorer to view a .nuspec file
Now, when the Select File dialog box appears, we should go to the Documents\Visual Studio 2017\Projects\myextensionmethods\myextensionmethods\packagesource folder and double-click the myextensionmethods.nuspec file name. The package explorer should look like the following figure.
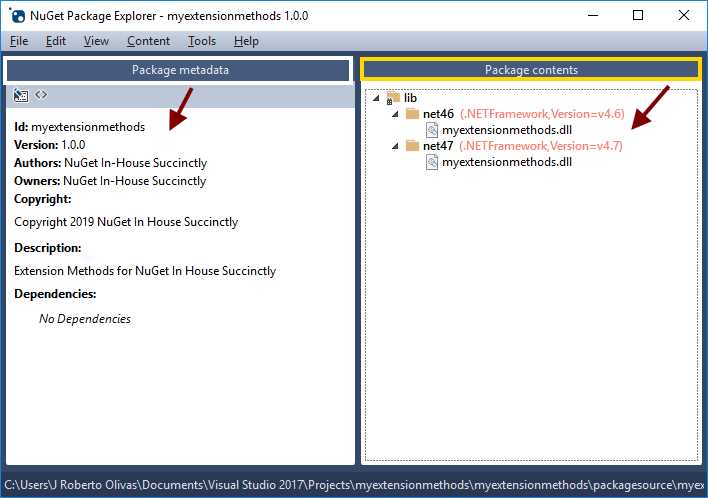
Figure 57: NuGet Package Explorer after opening .nuspec file
Creating the package
Using the NuGet Command Line Interface
With our .nuspec file ready for use, it is time to create the NuGet package for publishing on our local server.
Using replacement tokens
We will make a few changes to our .nuspec file before creating the package: we will place replacement tokens (discussed previously) in some child nodes of the <metadata> and <file> nodes in order to send values to them at package creation time. The following example displays our .nuspec file after making these changes.
Code Listing 7: .nuspec file with replacement tokens
<?xml version="1.0"?> <package > <metadata> <id>myextensionmethods</id> <version>$version$</version> <authors>$author$</authors> <owners>$author$</owners> <description>$description$</description> <copyright>$copyright$</copyright> </metadata> <files> <file src="..\bin\$configuration$\myextensionmethods.dll" target="lib\net47" /> <file src="..\bin\$configuration$\myextensionmethods.dll" target="lib\net46" /> </files> </package> |
In this example, we can identify the use of replacement tokens for the <version>, <copyright>, and <file> nodes. The $configuration$ token in the <file> node tells NuGet the name of the configuration used to create the assembly, either Debug or Release. Therefore, depending on the value sent to this token, the path for the assembly file could be ..\bin\Debug\myextensionmethods.dll or ..\bin\Release\myextensionmethods.dll. We also need to send values for the rest of these tokens when executing the NuGet Command Line Interface. Table 3, displayed previously, shows the values for each one of the tokens that we could use in the .nuspec file.
Note: A .nuspec file with replacement tokens should not be used with NuGet Package Browser.
Executing NuGet Command Line Interface
We should open a command prompt instance by pressing the Windows logo key+R, typing cmd in the text box of the Run dialog box that appears, and then pressing Enter. In the Command Prompt window, we should go to the Documents\Visual Studio 2017\Projects\myextensionmethods\myextensionmethods\packagesource folder. After that, we should type the command displayed in the following example, and then press Enter.
Code Listing 8: Creating our NuGet package from the command line
nuget pack myextensionmethods.nuspec -OutputDirectory ..\packagedeploy -Properties Configuration=Debug;Version=1.0.0.0;Description="Extension Methods for NuGet in House Succinctly";Author="NuGet In House Succinctly" |
Let us dig a little bit into the previous example. The pack command of the NuGet Command Line Interface creates our NuGet package. This command takes a list of parameters; the first one is the name of our .nuspec file. Then, the –OutputDirectory parameter tells the interface where to place the package. For the purposes of this book, we will save the package in the packagedeploy folder created previously. Now, the –Properties parameter sends the values for the replacement tokens that appear in the .nuspec file. Every replacement token has its equivalent property in the –Properties command. We specify the value for each token to the right of every property, led by an equal sign. In addition, we need to separate properties with a semicolon.
Now, if we go to the packagedeploy folder, we can see our NuGet package as displayed in the following figure.
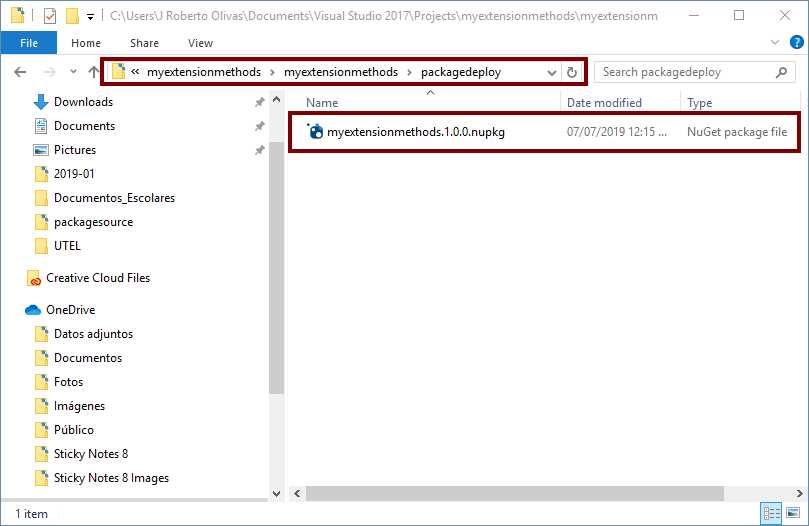
Figure 58: Our NuGet package in the output folder
Using NuGet Package Explorer
We also can use the NuGet Package Explorer to create our NuGet package. The difference here is the replacement tokens—the NuGet Package Explorer cannot use them. Therefore, we need to change our .nuspec file and place constant values directly, instead of using replacement tokens in our file. After these changes, the .nuspec file should look like the following example.
Code Listing 9: The .nuspec file for use with NuGet Package Explorer
<?xml version="1.0"?> <package > <metadata> <id>myextensionmethods</id> <version>1.0.0.0</version> <authors>NuGet In-House Succinctly</authors> <owners>NuGet In-House Succinctly</owners> <description>Extension Methods for NuGet In-House Succinctly</description> <copyright> NuGet In-House Succinctly</copyright> </metadata> <files> <file src="..\bin\Debug\myextensionmethods.dll" target="lib\net47" /> <file src="..\bin\Debug\myextensionmethods.dll" target="lib\net46" /> </files> </package> |
Now, launch the NuGet Package Explorer and click Open a local package. Then, using the Select File dialog box, select our .nuspec file and click Open. The NuGet Package Explorer should look like the following figure.
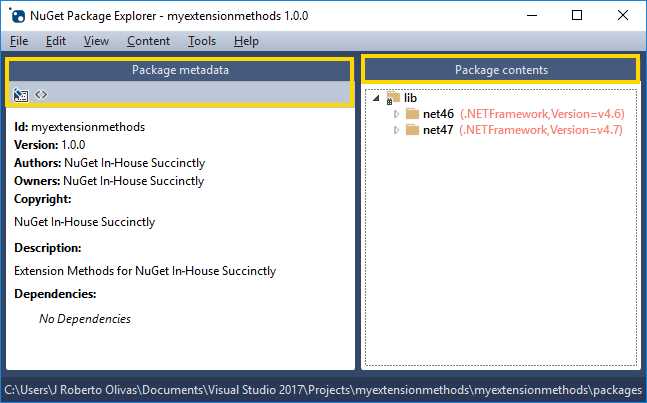
Figure 59: Our .nuspec file in NuGet Package Explorer
We can create our NuGet package by clicking File > Save in the NuGet Package Explorer’s menu bar. NuGet Package Explorer first saves every change we made to our .nuspec file. Then, it asks for the NuGet Package output folder. For the purposes if this book, we should go to the packagedeploy folder created previously, and click Save. Now, the NuGet Package Explorer will create the NuGet package.
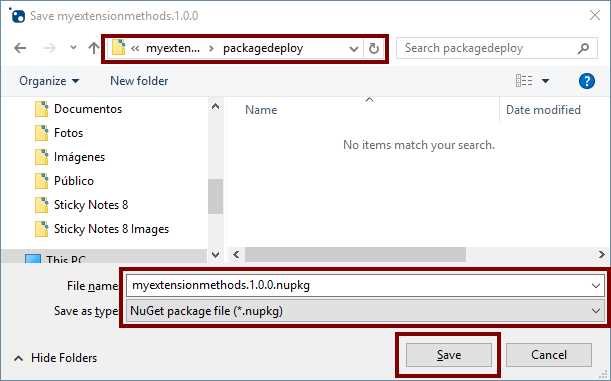
Figure 60: Saving the NuGet package
Publishing the package in the local server
With our package created, we are ready to publish it in our local server. As in package building, we can use the NuGet Command Line Interface or the NuGet Package Explorer to perform this action.
Using the NuGet Command Line Interface
In the NuGet Command Line Interface, the push command is responsible for publishing NuGet packages. The following example displays the syntax for this command.
Code Listing 10: push command syntax
nuget push {package file} {apikey} -Source {NuGet Host URL} |
The {package file} parameter corresponds to the name of our NuGet package. The {apikey} parameter matches the API key used to identify the NuGet host. According to Chapter 2 of this book, the value for this parameter is MyNuGetServer. Finally, the –Source parameter tells the NuGet Command Line Interface the location of the NuGet host. In this case, for our local NuGet server, the location is http://localhost/mynugetserver/nuget. Therefore, for the purposes of this book, we should go to the packagedeploy folder and employ the following command to publish our NuGet package.
Code Listing 11: Publishing our NuGet package to the local server
nuget push myextensionmethods.1.0.0.nupkg MyNuGetServer -Source http://localhost/mynugetserver/nuget |
The following example displays the response from the command.
Code Listing 12: Response from NuGet push command
nuget push myextensionmethods.1.0.0.nupkg MyNuGetServer -Source http://localhost/mynugetserver/nuget Pushing myextensionmethods.1.0.0.nupkg to 'http: //localhost/mynugetserver/nuget'... PUT http://localhost/mynugetserver/nuget/ Created http://localhost/mynugetserver/nuget/ 811ms Your package was pushed. |
Note: We need to make sure that the Packages folder in our local NuGet server has write permissions for IIS_IUSRS.
Using NuGet Package Explorer
We can also use NuGet Package Explorer to publish our package. First, we need to launch NuGet Package Explorer and open our NuGet package in the same way we opened our .nuspec file previously. Click File > Publish in the menu bar to display the Publish Package dialog box.
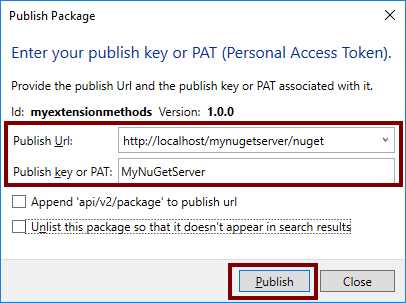
Figure 61: NuGet Package Explorer Publish Package dialog box
In Figure 61, we can see the location for the NuGet host URL and the server API key. In addition, we can see a couple of check boxes located above the Publish button. These check boxes should be cleared for the purposes of a local NuGet server. At the end, we should click Publish to publish our package.
Note: Since the package was previously published with NuGet Command Line Interface, the process with NuGet Package Explorer will fail.
Chapter summary
This chapter explained how to create our NuGet package and publish it to our local NuGet server. First, we modified the myextensionmethods project, and added two folders to its structure: packagesource and packagedeploy. Next, we explained the concept of a .nuspec file: a text file in XML format that contains the metadata required for creating NuGet packages. This file bases its syntax and structure on the nuspec.xsd schema file available on GitHub. We created the .nuspec file using the NuGet Command Line Interface, and for the purposes of this book, we saved the file to Documents\Visual Studio 2017\Projects\myextensionmethods\myextensionmethods\bin\Debug.
After that, we used the Notepad application to review and modify the file before creating our package. We changed the string constants of the file for replacement tokens. A replacement token is a special identifier that allows us to send variable values to the .nuspec file when using the NuGet Command Line Interface for creating a NuGet package. In addition, we added support for multiple target .NET Framework versions using the target attribute of the <file> node, and following the NuGet naming conventions for relative paths, along with the use of target framework monikers.
A target framework moniker (TFM) is a standardized token format for specifying the target framework of a .NET application or library. For the purposes of this book, we supported .NET Framework 4.7 and .NET Framework 4.6. We also used the NuGet Package Explorer to view a modified version of our .nuspec file with no replacement tokens, because NuGet Package Explorer does not support these tokens. Then, we created the NuGet package using the pack command of the NuGet Command Line Interface. Once we created the package, we published it to our local server using the push command in the command line. In addition, we discussed how to create and publish packages using the NuGet Package Explorer.
- 1800+ high-performance UI components.
- Includes popular controls such as Grid, Chart, Scheduler, and more.
- 24x5 unlimited support by developers.