
Node.js Succinctly®

CHAPTER 11
Socket Programming
A socket is one of the most fundamental technologies of computer networking. Sockets allow applications to communicate using standard mechanisms built into network hardware and operating systems. In this chapter, we will learn how to create a socket application using Node.js. Please note that the content in this chapter assumes you already know the basics of socket programming.
Socket Module
We can create an application based on socket stack using a net module. You can find further information on net modules at http://nodejs.org/api/net.html.
Hello World
To get started, we create a simple application to get a list of IP addresses from the local machine. We can use the os module and call networkInterfaces() to get a list of network interfaces in our local machine. Each network interface provides information about an IP address.
Here is a sample code:
var os = require('os'); var interfaces = os.networkInterfaces(); for (item in interfaces) { console.log('Network interface name: ' + item); for (att in interfaces[item]) { var address = interfaces[item][att]; console.log('Family: ' + address.family); console.log('IP Address: ' + address.address); console.log('Is Internal: ' + address.internal); console.log(''); } console.log('=================================='); } |
This code describes profiling for local networks. Run this code. The sample program output can be seen in Figure 69.

Figure 69: Getting the information from the local network
Client/Server Socket
The client/server model has become one of the central ideas of network computing. Most business applications being written today use the client/server model, including the TCP/IP network protocol.
Now we will create a client/server socket using Node.js. We will use a net module to build the client/server application. For our purposes, we will create a server socket and a client socket.
Server Socket
It is easy to create a server socket. The following is a simple algorithm on how to build a server socket:
- Create the server socket.
- Listen for the incoming client on the specific port.
- If the client is connected, listen for incoming data and client disconnected events.
Now we can implement a server application using the socket with Node.js. Let’s write this code:
var serverPort = 9099; var net = require('net'); var server = net.createServer(function(client) { console.log('client connected'); console.log('client IP Address: ' + client.remoteAddress); console.log('is IPv6: ' + net.isIPv6(client.remoteAddress)); console.log('total server connections: ' + server.connections); // Waiting for data from the client. client.on('data', function(data) { console.log('received data: ' + data.toString()); // Write data to the client socket. client.write('hello from server'); }); // Closed socket event from the client. client.on('end', function() { console.log('client disconnected'); }); }); server.on('error',function(err){ console.log(err); server.close(); }); server.listen(serverPort, function() { console.log('server started on port ' + serverPort); }); |
Save this code into a file called socket-server.js
Explanation
First, we create the server socket:
var server = net.createServer(function(client) {
}); |
Inside the server socket, we’re waiting for the incoming client socket. After the client is connected, we’re waiting for the incoming message from the client using the on(‘data’) event.
// Waiting for data from the client. client.on('data', function(data) { console.log('received data: ' + data.toString()); // Write data to the client socket. client.write('hello from server'); }); // Closed socket event from the client. client.on('end', function() { console.log('client disconnected'); }); |
We also try to catch errors that may occur.
server.on('error',function(err){ console.log(err); server.close(); }); |
The server is running on port 9099.
var serverPort = 9099; var net = require('net'); server.listen(serverPort, function() { console.log('server started on port ' + serverPort); }); |
Client Socket
A client socket is client application that connects to the server and then sends and receives data from the server. We should know the IP address and port from the target server. We can call connect() to connect to the server. Use write() for sending data. To wait for incoming data from the server, we can use the data event.
The following sample code implements a client application:
var serverPort = 9099; var server = 'localhost'; var net = require('net'); console.log('connecting to server...'); var client = net.connect({server:server,port:serverPort},function(){ console.log('client connected'); // send data console.log('send data to server'); client.write('greeting from client socket'); }); client.on('data', function(data) { console.log('received data: ' + data.toString()); client.end(); }); client.on('error',function(err){ console.log(err); }); client.on('end', function() { console.log('client disconnected'); }); |
Save this code into a file called socket-client.js
The client app must know the server port and IP/hostname server.
After it is connected, the client app sends the data.
// Send the data. console.log('send data to server'); client.write('greeting from client socket'); |
The client app also waits for the incoming message from the server and the occurred errors. After it has received the server message, the client disconnects.
client.on('data', function(data) { console.log('received data: ' + data.toString()); client.end(); }); client.on('error',function(err){ console.log(err); }); |
Testing
Now we can test our client/server application. First, we run the server application.
node socket-server.js |
Then, execute the client application.
node socket-client.js |
Here is the sample of program output for the server application:
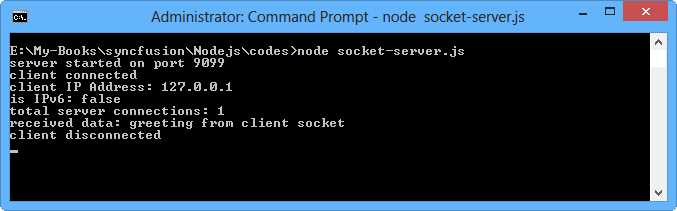
Figure 70: Program output of server application
And the following is the program output for the client application:
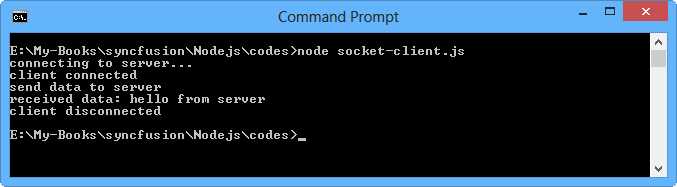
Figure 71: Program output of client application
UDP Socket
We can create a client/server application with a UDP socket. This means we use connectionless-oriented communication. To implement the UDP socket, we will use the dgram module.
UDP Server
First, we call createSocket() to create the UDP socket from the dgram module. Pass the parameter udp4 for the IPv4 environment or udp6 for the IPv6 environment. After that, we start to listen for the incoming message using the message event and get a callback function with data and client object parameters. Don't forget to call bind() to bind to the listening port.
var dgram = require('dgram'); var server = dgram.createSocket('udp4'); var message = 'this server message'; server.on('message', function (data, client) { console.log('received data: ' + data); console.log('client ' + client.address + ':' + client.port); }); server.on('listening', function () { var address = server.address(); console.log('server listening on ' + address.address + ':' + address.port); }); server.bind(9094); |
Save this code into a file called udp-server.js.
You can see that the server app waits for the incoming client connection.
server.on('listening', function () { var address = server.address(); console.log('server listening on ' + address.address + ':' + address.port); }); server.bind(9094); |
The server app also waits for the incoming message from the client.
server.on('message', function (data, client) { console.log('received data: ' + data); console.log('client ' + client.address + ':' + client.port); }); |
UDP Client
You should create a UDP socket by calling createSocket() with the udp4 or udp6 parameter. To send a message to the UDP server, we can use the send() function with the message and server parameters.
var dgram = require('dgram'); var client = dgram.createSocket("udp4"); var server = 'localhost'; var serverPort = 9094; // send message var message = new Buffer("this is client message"); client.send(message, 0, message.length, serverPort, server, function(err, bytes) { if(err) console.log(err); else client.close(); }); |
Save this code into a file called udp-client.js
As you can see in the code, the client app sends data and then closes the active connection.
client.send(message, 0, message.length, serverPort, server, function(err, bytes) { if(err) console.log(err); else client.close(); }); |
Testing
First, we run the server application.
node udp-server.js |
After that, execute the client application.
node udp-client.js |
Here is sample of program output for the server application:
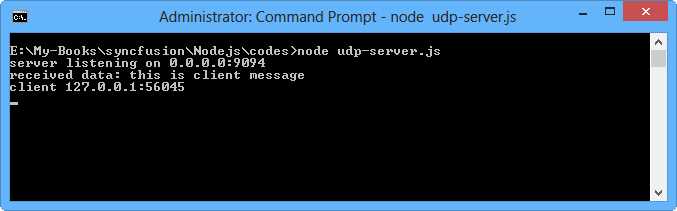
Figure 72: Program output for the UDP server
DNS
Domain Name System (DNS) is a database system that translates a computer's fully qualified domain name into an IP address. For further information about DNS modules, visit the Node.js documentation website, http://nodejs.org/api/all.html#all_dns.
We can use the DNS module to manipulate dns tasks, for example resolving the domain name. To resolve the domain name, we can call resolve4() for the IPv4 environment and resolve6() for the IPv6 environment. You can also use lookup() to resolve the domain name. It will return the IP address and family (IPv4 or IPv6).
Let’s write the simple DNS app.
var dns = require('dns'); dns.resolve4('www.pecollege.net', function (err, addresses) { if (err) console.log(err); console.log('addresses: ' + JSON.stringify(addresses)); }); dns.lookup('www.pecollege.net', function (err, address, family) { if (err) console.log(err); console.log('addresses: ' + JSON.stringify(address)); console.log('family: ' + JSON.stringify(family)); }); |
Save this code into a file called dns-demo.js. Run this code.
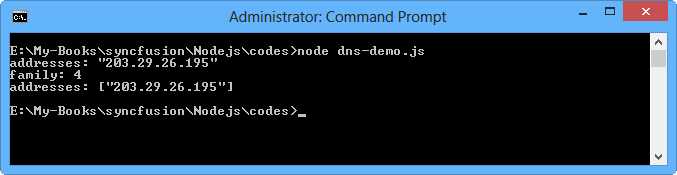
Figure 73: Simple app for DNS usage
- 1800+ high-performance UI components.
- Includes popular controls such as Grid, Chart, Scheduler, and more.
- 24x5 unlimited support by developers.