
Node.js Succinctly®

CHAPTER 13
Database Programming
A database consists of a collection of data such as text, file, audio, and video. Database programming may seem very complicated, but the reality is that it can be simple when you know the main steps. In this chapter, we're going to learn the basics of database programming.
Node.js Module for Database
Node.js can communicate with a database server through a database driver. We must install a database driver and the Node.js database module before we start to develop a database application.
Here is a list of Node.js database modules that we can use in our application:
- Microsoft SQL Server, https://github.com/joyent/node/wiki/Modules#wiki-db-mssql
- PostgreSQL, https://github.com/joyent/node/wiki/Modules#wiki-db-pg
- MySQL, https://github.com/joyent/node/wiki/Modules#wiki-db-mysql
- Sqlite, https://github.com/joyent/node/wiki/Modules#wiki-db-sqlite
- Oracle, https://github.com/joyent/node/wiki/Modules#wiki-db-oracle
- NoSQL, https://github.com/joyent/node/wiki/Modules#wiki-db-nosql
In this chapter, we will learn database programming for Sqlite, MySQL, and NoSQL (MongoDB database).
SQLite
In this section, we use node-sqlite3 module for node.js SQLite driver. You can get it on https://github.com/developmentseed/node-sqlite3 .
Execute the following script to install the SQLite driver for Node.js:
npm install sqlite3 |
I tried to install it on Windows but I got many problems due to SQLite library compatibility. The driver for SQLite is not only in JavaScript and hence requires Visual Studio to be installed in Windows. After installing Visual Studio a lot of tweaks need to be made. I recommend using the Linux or Mac platform for this scenario, or you may want to look for another SQLite for Node.js which supports the Windows platform. Another solution, you can compile node-sqlite3 from source code. Please read the installation document at https://github.com/mapbox/node-sqlite3#building-from-the-source .
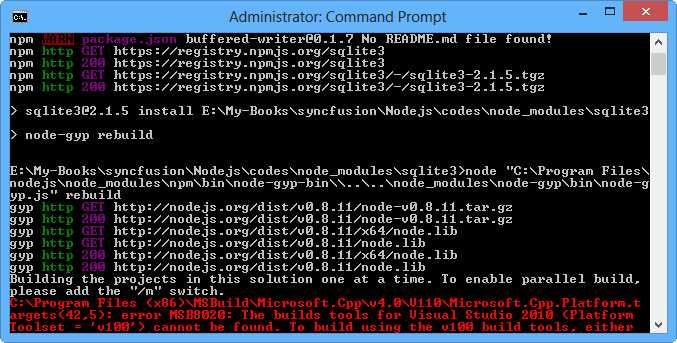
Figure 78: Installation problem for SQLite and Node.js on the Windows platform
For the Linux and Mac platforms, you must install the SQLite3 module via the npm manager as follows:
sudo npm install sqlite3 |
If you got an error, it may need required libraries as follows:
sudo apt-get install build-essential sudo apt-get install sqlite3 libsqlite3-d |
Now we can develop an application to access SQLite.
Here is the sample code for SQLite data manipulation, such as creating, inserting, and deleting:
var sqlite3 = require('sqlite3').verbose(); var db = new sqlite3.Database('mydatabase'); db.serialize(function(){ // Create the table. db.run('CREATE TABLE customer(id NUMERIC,name TEXT)'); // Insert the data. var query = db.prepare('INSERT INTO customer VALUES(?,?)'); for(var i=0;i<5;i++){ query.run(i+1,'customer ' + (i+1)); } query.finalize(); // Select the data. db.each('SELECT * FROM customer', function(err,row){ if(!err){ console.log(row.id + '----' + row.name); }else{ console.log(err); } }); }); db.close(); |
MongoDB
To access MongoDB, we can use the node-mongodb-native module as the database driver. You can get further information about this module at https://github.com/christkv/node-mongodb-native.
First, install MongoDB. If you have already installed it, skip these steps.
For the Ubuntu platform, update the repository:
sudo apt-key adv --keyserver keyserver.ubuntu.com --recv 7F0CEB10 sudo apt-get update |
Install MongoDB and its driver for Node.js:
sudo apt-get install mongodb-10gen sudo npm install mongodb |
For the Mac and Windows platforms, you can download MongoDB and install it directly from the website, http://www.mongodb.org/.
To get started, we can create a simple app to connect to the MongoDB engine. Assume we have the MongoDB server in the local computer and database test.
We use the mongodb module and initiate the Server and Db objects. Call open() from the Db object to connect to the MongoDB server.
var mongo = require('mongodb'), Server = mongo.Server, Db = mongo.Db; var server = new Server('localhost', 27017, {auto_reconnect: true}); var database = new Db('test', server); database.open(function(err, db) { if(!err) { console.log("connected"); // close connection db.close(); } }); |
The open() function gives a callback with the parameter error and database object. To close the database connection, call close().
We continue to create the application to insert data. First, we must open a collection (a table in the conventional database) that we want to use to insert data. Create the data, for example, employee with collection attributes, and call the insert() function to insert the data.
var mongo = require('mongodb'), Server = mongo.Server, Db = mongo.Db; var server = new Server('localhost', 27017, {auto_reconnect: true}); var database = new Db('test', server); database.open(function(err, db) { if(!err) { console.log("connected"); db.collection('employee',function(err,coll){ var employee = {name:'user1', email:'[email protected]', country: 'germany'}; //Insert. coll.insert(employee,function (err){ if(err) console.log(err); else console.log('inserted data was success'); // Close connection. db.close(); }); }); } }); |
- 1800+ high-performance UI components.
- Includes popular controls such as Grid, Chart, Scheduler, and more.
- 24x5 unlimited support by developers.