
NHibernate Succinctly®

CHAPTER 3
Domain Model
Scenario
Let’s consider a simple model, a blogging system:
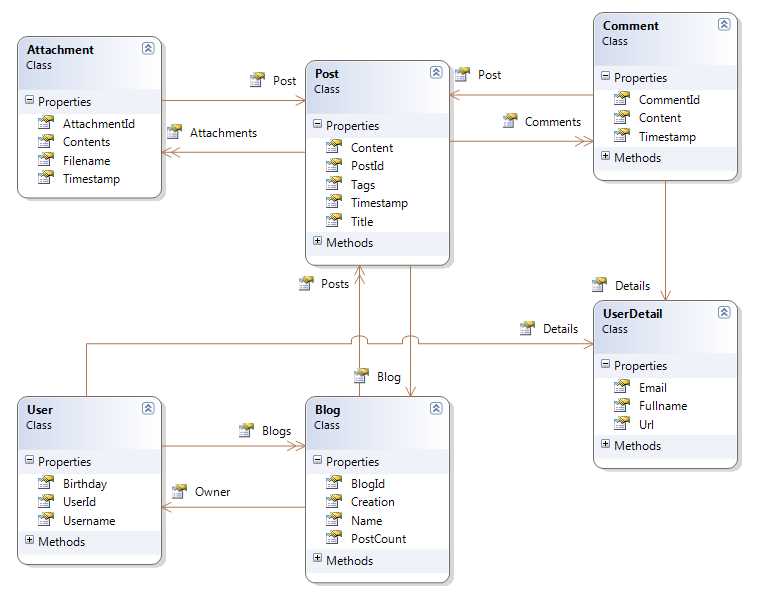
- Class Model for a Blogging System
It can be described as this: A Blog is owned by a User and has a collection of Posts. Each Post may have Comments and Attachments, each referring to a single Post. A User may have several Blogs. Both User and Comment have UserDetails.
Occasionally, I will also refer another model, a classical ordering system, which will look like this:
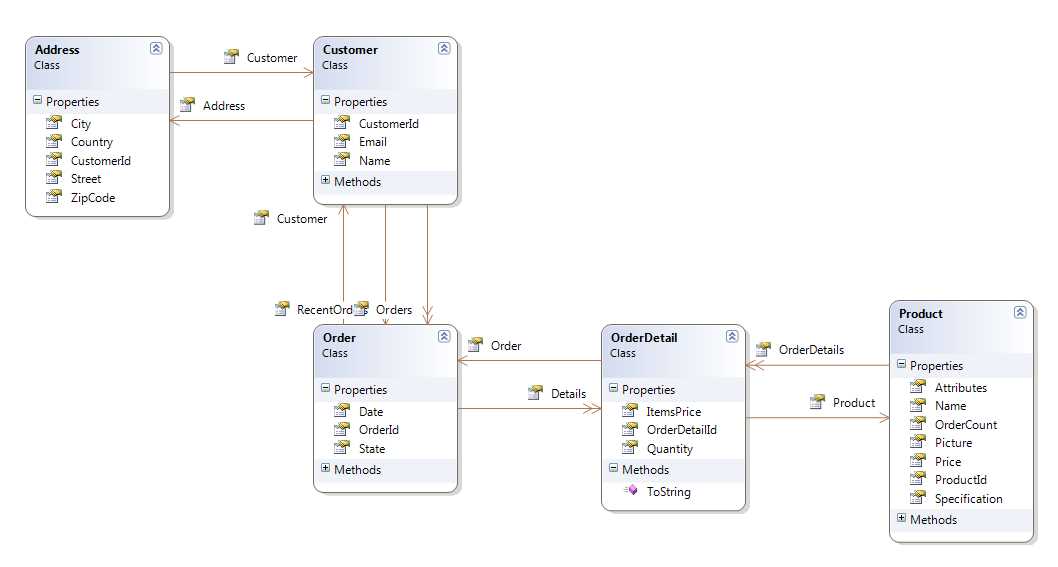
- Class Model for the Orders System
These are the concepts that we will want to represent and manipulate in our code. However, I will only include code for the blogging model. You will be able to find the classes and mappings for the ordering model on the book’s Bitbucket repository.
Entities
We have several ways to represent these concepts. I chose one. Here are the classes that we will be using throughout the book:
The User class:
|
{ public User() { this.Blogs = new Iesi.Collections.Generic.HashedSet<Blog>(); this.Details = new UserDetail(); }
public virtual Int32 UserId { get; protected set;}
public virtual String Username { get; set; }
public virtual UserDetail Details { get; set; }
public virtual DateTime? Birthday { get; set; }
public virtual Iesi.Collections.Generic.ISet<Blog> Blogs { get; protected set; } } |
The Blog class:
|
{ public Blog() { this.Posts = new List<Post>(); }
public virtual Int32 BlogId { get; protected set; } public virtual System.Drawing.Image Picture { get; set; } public virtual Int64 PostCount { get; protected set; } public virtual User Owner { get; set; }
public virtual String Name { get; set; }
public virtual DateTime Creation { get; set; }
public virtual IList<Post> Posts { get; protected set; } } |
Tip: Because the Blog class has a property of type System.Drawing.Image, you need to add a reference to the System.Drawing assembly.
The Post class:
|
{ public Post() { this.Tags = new Iesi.Collections.Generic.HashedSet<String>(); this.Attachments = new Iesi.Collections.Generic.HashedSet<Attachment>(); this.Comments = new List<Comment>(); }
public virtual Int32 PostId { get; protected set; }
public virtual Blog Blog { get; set; }
public virtual DateTime Timestamp { get; set; }
public virtual String Title { get; set; } public virtual String Content { get; set; } public virtual Iesi.Collections.Generic.ISet<String> Tags { get; protected set; }
public virtual Iesi.Collections.Generic.ISet<Attachment> Attachments { get; protected set; }
public virtual IList<Comment> Comments { get; protected set; } } |
The Comment class:
|
{ public Comment() { this.Details = new UserDetail(); }
public virtual Int32 CommentId { get; protected set; }
public virtual UserDetail Details { get; set; }
public virtual DateTime Timestamp { get; set; } public virtual String Content { get; set; }
public virtual Post Post { get; set; } } |
The Attachment class:
|
{ public virtual Int32 AttachmentId { get; protected set; }
public virtual String Filename { get; set; }
public virtual Byte[] Contents { get; set; }
public virtual DateTime Timestamp { get; set; }
public virtual Post Post { get; set; } } |
And, finally, the UserDetail class (it is the implementation of the Details component of the User and Comment classes):
|
{ public String Url { get; set; }
public String Fullname { get; set; }
public String Email { get; set; } } |
Some notes:
- As you can see, there is no base class or special interface that we need to implement. This does not mean that NHibernate can’t use them; it is actually quite the opposite.
- All classes are non-sealed. This is not strictly a requirement but a recommended practice.
- Some properties are virtual, basically all except those from the UserDetail component class. Also, a recommended practice; we will see why when we talk about lazy loading in the next chapter.
- Properties that will represent the primary key have a protected setter. This is because NHibernate will be providing this key for us so there is no need. In fact, it is dangerous to change it.
- Collections also have protected setters because the operations that we will be performing with them won’t require changing the actual collection reference, but rather, merely adding, removing, and eventually clearing it.
- All collections are instantiated in the constructor of their declaring classes so that they are never null.
Before We Start
Because NHibernate is an ORM, it will transform tables into classes, columns into properties, and records into object instances and values. Exactly how this transformation occurs depends on the mapping. A mapping is something that you add to the configuration instance. You can add multiple mappings—typically one for each .NET class that you want to be able to persist to the database. At the very minimum, a mapping must associate a table name to a class name, the column that contains the primary key to a related class property, and probably some additional columns into the properties they will be turned to.
As far as NHibernate is concerned, an entity is just a Plain Old CLR Object (POCO). You have to make a fundamental choice when it comes to creating these entities:
- You start from code, following a Domain Driven Design (DDD) approach. You define your classes without much concern about how they will be stored in the database. Instead, you focus on getting them right. This may include creating inheritance relationships and complex properties.
- You start from the database and you have to craft your entities so that they match the data model. This may be because it’s the way your company works, you have a legacy database, or it is just a matter of personal preference.
We won’t go into what is the best approach; that is up to you. Either way is fully supported by NHibernate. If you start from code, NHibernate will happily generate the database for you or validate it. In both cases—database first or code first—NHibernate will also give you the option to check the database against your entities and either update the database to match the entities or warn you if there are discrepancies. There’s a SchemaAction setting for this on the Configuration class, using loquacious configuration:
Configuration cfg = new Configuration() .DataBaseIntegration(db => { //… db.SchemaAction = SchemaAutoAction.Validate; }) |
As well as in XML configuration, as a property:
<property name="hbm2ddl.auto">validate</property> |
The possible values you can pass to SchemaAction/hbm2ddl.auto are:
- Create/create: Will always drop existing tables and recreate them from the current mappings.
- Recreate/create-drop: Identical to Create, with the difference being that it will drop everything again when NHibernate finishes using the database (the session factory is disposed of).
- Update/update: NHibernate will compare the existing tables to the current mappings and will update the database, if necessary, including creating missing tables or columns.
- Validate/validate: An exception will be thrown if the comparison between the actual tables and the current mapping detects mismatches.
Tip: Create and Recreate are dangerous, and you should only use them for scenarios such as unit tests or demonstrations where you need to quickly set up a database or where you have no important information because every mapped table will be dropped—not mapped tables will be left alone, though. Update will also create any missing tables and columns so it is safe to use in real-life scenarios, but it may take some time to check all tables if you have a lot of mapped classes. If no value is set by calling SchemaAction or by setting the hbm2ddl.auto attribute on the XML configuration, no validation will be performed and no schema update/creation will occur.
- 1800+ high-performance UI components.
- Includes popular controls such as Grid, Chart, Scheduler, and more.
- 24x5 unlimited support by developers.