
NancyFX Succinctly®

CHAPTER 13
Pipeline Interception
All good web frameworks have a request-processing pipeline, and Nancy is up there with the best of them. What does it mean to have a request pipeline? Maybe the following diagram will help clear things up:
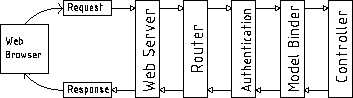
Figure 30: Typical web pipeline diagram
Exactly as the name portrays, a typical web request goes through a number of modules before it reaches its final response, and then it often goes back through all of these modules on its way back to the browser.
How many and what type of these modules the request goes through is highly dependent on the framework used; some have more, some have less. The more there is to process, the slower the response often is.
Nancy, being as lightweight and modular as it is by default, has very few steps in its pipeline, and it gives the developer a LOT of control on how and where these modules interact with the framework as a whole.
When we talk about pipeline interception, we’re referring to the three main hook points that Nancy exposes, allowing you to hook your own modules or snippets of code into this processing chain.
You've seen so far that Nancy has a remarkable amount of functionality—authentication is a great example—and you might be thinking that there's a lot of code in the pipeline to support it.
The fact of the matter is, Nancy has almost no code in its pipeline to make authentication and other similar things happen. Even when you add an authentication method, no code is added to the pipeline. It's only when you add the this.RequiresAuthentication(); line to your routing modules that the pipeline is actually hooked into and intercepted.
Why?
Well, the authentication extensions are actually just thin wrappers around a small piece of in-line code that adds a lambda (an anonymous function for you Java and JavaScript types) to the Before and After pipes for that routing module.
In the example shown on Nancy’s Authentication page, you can see the following example:
Code Listing 60
using Nancy; using Nancy.Responses; using Nancy.Security; namespace nancybook.modules { public class AuthRoutes : NancyModule { public AuthRoutes() : base("/auth") { Before += ctx => { return (this.Context.CurrentUser == null) ? new HtmlResponse(HttpStatusCode.Unauthorized) : null; }; Get[@"/"] = _ => View["auth/index"]; } } } |
This actually performs the same function as RequiresAuthentication, but in a shorter and more succinct way.
Within the bit of code used by the authentication system, you can see straightaway that it has two possible outcomes. First off, you can return null, in which case the processing then continues on to run the actual code defined in your route, and has no effect on anything else further down.
The second option is to return a Nancy response object (in this case a 403 Unauthorized). Anything you can return from a route handler, you can return from the Before pipeline, and if you do, this will be returned straight back to the calling client without ever calling the code in your route handler module.
You should be able see straightaway that this has many uses, not just authentication. However, you could check for other resources, services, or all manner of other conditions and send an error or differing response back to your client before anything else is acted on.
If you wanted to provide some form of front-end caching, for example, you might intercept the Before pipe and see if that request is already cached, returning the cached version if it is, and only allowing the request to progress through to the route handler if it's not, or if the data needs renewing.
You can also provide an After handler by doing the following:
Code Listing 61
After += ctx => { //... Code here ... } |
With the After pipeline, you'll already have a response object (the one generated by the route that handled the request), and from the Nancy context (available in the ctx variable in the example), you’re free to change that as you see fit.
For example, you could check some other environment variable, and decide to change the already-generated 200 ok response to a 403 response before it gets back to the browser.
You would, however, be more likely to use the After pipeline to grab the response that's about to be sent back to the requesting client, and add it to your cache service, so that the next request that comes in will find it pre-cached and not need to re-request it from the database.
The possibilities for the uses of the Before and After pipeline handlers are limited only by your imagination and how fast you can do something.
Remember that these snippets of code are called for every request into the route module to which they’re attached. This means if your code takes a long time to execute, then you WILL slow down the speed at which Nancy serves your requests.
Application-wide hooking
You can also wire up before and after pipeline hooks for your entire application, rather than just on a module basis. Using the application-wide hooks means that your hook will fire for EVERY route and module in the application, no matter where it is. Furthermore, if you have an application-wide hook, and then an individual hook on a specific module, both hooks will be called, with the application hook getting called first.
This also means that if you return a response in the application hook, then your module hook will never get called, in exactly the same manner as your route would never get called if you returned a response from your module hook.
You hook up your application pipelines in a custom bootstrapper, either by overriding ApplicationStartup or RequestStartup. One of the parameters to either of these functions is the Pipelines parameter, which includes the BeforeRequest and AfterRequest properties. You assign to these properties in exactly the same way as you assign to the Before and After hooks in an individual module.
You'll also find that you have access to an OnError property, which can come in handy to implement custom error-handling in your application. For example, in your database access code, you might want to throw a custom Database Object not found exception when a requested entity is not present in the database. You could then use your custom bootstrapper to intercept this error and return a 404 File not found error, something like the following:
Code Listing 62
using System.Text; using Nancy; using Nancy.Authentication.Forms; using Nancy.Bootstrapper; using Nancy.Conventions; using Nancy.Session; using Nancy.TinyIoc; namespace nancybook { public class CustomBootstrapper : DefaultNancyBootstrapper { protected override void ApplicationStartup( TinyIoCContainer container, IPipelines pipelines) { base.ApplicationStartup(container, pipelines); // Add an error handler to catch our entity not found exceptions pipelines.OnError += (context, exception) => { // If we've raised an EntityNotFound exception in our data layer if (exception is EntityNotFoundException) return new Response() { StatusCode = HttpStatusCode.NotFound, ContentType = "text/html", Contents = (stream) => { var errorMessage = Encoding.UTF8.GetBytes("Entity not found"); stream.Write(errorMessage, 0, errorMessage.Length); } }; // If none of the above handles our exception, then pass it on as a 500 throw exception; }; } } } |
In your data access code, you can then just add throw new EntityNotFoundException(); at any appropriate point, and Nancy will convert it to a 404 and return it to the client.
Output caching
To give you a good example of how to use the various hooks, I'll close this chapter with an example that provides a simple but useful sliding output cache for your routes.
The example will cache the output from a route, and providing that it's called again within 30 seconds of the last access, it will continue to cache the response, only clearing the cached version if a period longer than 30 seconds has elapsed before another request is made.
The first thing we need is a small class that acts as the cache provider. Create a new class within your application called CacheService.cs, and add the following code to this class:
Code Listing 63
using System; using System.Collections.Specialized; using System.Runtime.Caching; using Nancy; namespace nancybook { public class CacheService { private static readonly NameValueCollection _config = new NameValueCollection(); private readonly MemoryCache _cache = new MemoryCache("NancyCache", _config); private readonly CacheItemPolicy _standardPolicy = new CacheItemPolicy { Priority = CacheItemPriority.NotRemovable, SlidingExpiration = TimeSpan.FromSeconds(30) // This can be changed to FromMinutes/FromHours etc it's 30 secs for testing purposes }; public void AddItem(string itemKey, Response itemToAdd) { _cache.Add(new CacheItem(itemKey, itemToAdd), _standardPolicy); } public Response GetItem(string itemKey) { return (Response)_cache.Get(itemKey); } } } |
This class provides two public methods for getting items from and adding them to the cache. You'll notice that these objects are Nancy response objects.
Since we need this class to be registered as a singleton instance, we need to add a configuration to our bootstrapper to configure the IoC container correctly:
Code Listing 64
protected override void ConfigureApplicationContainer(TinyIoCContainer container) { base.ConfigureApplicationContainer(container); container.Register<CacheService>().AsSingleton(); } |
This will ensure that every request that has to deal with the cache is interacting with the same instance, and not a new one in each request.
Next, create a route module that implements a route to display a view, and implements module-level pipelines to check and set the cache for that route as needed:
Code Listing 65
using System; using System.Collections.Generic; using System.Runtime.InteropServices; using nancybook.Models; using Nancy; namespace nancybook.modules { public class CachingRoutes : NancyModule { private readonly CacheService _myCache; public CachingRoutes(CacheService myCache) : base("/caching") { _myCache = myCache; Get["/"] = x => { var cacheData = new CacheDemo() {WhenRequested = DateTime.Now}; return View["caching/index.html", cacheData]; }; Before += ctx => { string key = ctx.Request.Path; var cacheObject = _myCache.GetItem(key); return cacheObject; }; After += ctx => { if(ctx.Response.StatusCode != HttpStatusCode.OK) { return; } string key = ctx.Request.Path; if(_myCache.GetItem(key) == null) _myCache.AddItem(key, ctx.Response); }; } } } |
Finally, add a view to your Views folder and a model to the project, so you have something to demonstrate that the caching is taking place: caching/index.html.
Code Listing 66
<!DOCTYPE html> <html lang="en"> <head> <meta charset="utf-8"> <meta http-equiv="X-UA-Compatible" content="IE=edge"> <meta name="viewport" content="width=device-width, initial-scale=1"> <title>Nancy Demo | Caching Example</title> <link href="~/content/bootstrap.min.css" rel="stylesheet" type="text/css"/> </head> <body> <div class="container"> <div class="page-header"> <h1 style="display: inline-block">Nancy Demo <small>Caching Example</small></h1> <h1 style="display: inline-block" class="pull-right"><small><a href="~/" title="Click to return to demo home page">home <span class="glyphicon glyphicon-home"></span></a></small></h1> </div> <h4>This page was requested at <strong class="text-success">@Model.WhenRequested</strong></h4> <br/><br/> <p class="lead">This example uses before and after filters attached directly to the module servicing this request.</p> <p>If you observe the time this page was created when refreshing it, you'll see the page is handled by an output cache; this cache has a sliding window of 30 seconds.</p> <p> As long as you’re refreshing the page, you'll reset the timer and the cache will continue to wait 30 seconds after the last request before expiring. If you request the page then leave it for 30 seconds before re-requesting it, you'll see you get a new copy. </p> </div> <script src="~/scripts/jquery-2.1.3.min.js"></script> <script src="~/scripts/bootstrap.min.js"></script> </body> </html> |
CacheDemo.cs
Code Listing 67
using System; namespace nancybook.Models { public class CacheDemo { public DateTime WhenRequested { get; set; } } } |
Summary
In this chapter, you learned about Nancy's pipeline hooking mechanism, allowing you to freely perform all sorts of pre- and post-request operations on anything within your Nancy-based application.
You learned how to handle exceptions at a global level, and how to implement a very simple frontend output cache.
In the next chapter, we have something to please the hard core TDD purists among you: Nancy's built-in testing framework.
- 1800+ high-performance UI components.
- Includes popular controls such as Grid, Chart, Scheduler, and more.
- 24x5 unlimited support by developers.