
NancyFX Succinctly®

CHAPTER 8
Model Binding and Validation
With any good framework, you need to be able to pass data back to it. Back in the chapter on routing, we saw how easy it is to pass simple values into your routes using the URL parameter routing available in Nancy.
Being able to pass in simple values like this is fine, especially if all you’re doing is building an API that looks up and returns database entries. However, in many cases you'll want to provide complex objects of data back to your route.
This might be something as simple as a set of login credentials for the admin section of your admin panel, or it could be a large, flattened record representing several entries in a database table. Either way, you need to be able to pass in more than simple values, and not have a URL that's longer than the average hard drive’s deeply nested folder path.
This is where Nancy's model-binding features come into play.
If you've used ASP.NET MVC at all, then you'll already know what model binding is all about: it’s the process of looking at the incoming request and any payload it may have, then attempting to match it to the object variables you’re looking for.
A picture speaks a thousand words
For simplicity's sake, imagine that we have an address book, and as part of this address book, we want to save an entry into our address database. The first thing we'll likely do is build an object/class that represents what we want an address in our database to look like. It might look something like this:
Code Listing 28
namespace nancybook.Models { public class Address { public int RecordId { get; set; } public string Name { get; set; } public string BuildingAddress { get; set; } public string Town { get; set; } public string County { get; set; } public string PostalCode { get; set; } } } |
Looking at this class, you can immediately make an assumption that when populating it, we'll use an integer to identify the record, and that each record will include five pieces of information that make up the address.
When this data is posted from a form in your web page or AJAX action, you'll likely have either a standard form post containing those five pieces of information, or a single JSON object sent from JavaScript to your Nancy route:

Figure 13: Diagram showing post variables being posted
As you can see from Figure 13, when you post a complex object using a web form, the names of each element in your input form are concatenated with any values entered into those text fields. That large string is then posted to your Nancy endpoint as a single string in the body of the request. This also applies to requests sending JSON and XML, except the data is a single, concatenated JSON- or XML-formatted string.
The model binder’s job is to take this string apart and match each of the input fields to the names of the properties in your object.
If only some of the fields are present, then only those fields will be matched, and the others will remain at their default. If no fields can be matched to properties, then the result is an object with all default values in your Nancy route handler when the request is received.
A simple example
Create a folder in your views called aAddress, and add an initial HTML page called index.html into this new folder, containing the following HTML code:
<!DOCTYPE html> <html lang="en"> <head> <meta charset="utf-8"> <meta http-equiv="X-UA-Compatible" content="IE=edge"> <meta name="viewport" content="width=device-width, initial-scale=1"> <title>Nancy Demo | Data Binding Example</title> <link href="~/content/bootstrap.min.css" rel="stylesheet" type="text/css" /> </head> <body> <div class="container"> <div class="page-header"> <h1 style="display: inline-block">Nancy Demo <small>Data Binding Example</small></h1> <h1 style="display: inline-block" class="pull-right"><small><a href="~/" title="Click to return to demo home page">home <span class="glyphicon glyphicon-home"></span></a></small></h1> </div> <p class="lead">Please fill in the form below and click 'Send Data' to perform a data bind to the post action.</p> <input id="RecordId" name="RecordId" type="hidden" value="1"/> <div class="form-group"> <label for="Name">Name</label> <input type="text" class="form-control" id="Name" name="Name" placeholder="Enter Persons Name here"/> </div> <div class="form-group"> <label for="BuildingAddress">Building Address</label> <input type="text" class="form-control" id="BuildingAddress" name="BuildingAddress" placeholder="Enter Building Address here" /> </div> <div class="form-group"> <label for="Town">Town</label> <input type="text" class="form-control" id="Town" name="Town" placeholder="Enter Town here" /> </div> <div class="form-group"> <label for="County">County</label> <input type="text" class="form-control" id="County" name="County" placeholder="Enter County here" /> </div> <div class="form-group"> <label for="PostalCode">Postal Code</label> <input type="text" class="form-control" id="PostalCode" name="PostalCode" placeholder="Enter Postal Code here" /> </div> <button type="submit" class="btn btn-primary">Send Data</button> </form> </div> <script src="~/scripts/jquery-2.1.3.min.js"></script> <script src="~/scripts/bootstrap.min.js"></script> </body> </html> |
Add a new class to your modules folder called AddressRoutes.cs with the following C# code in it:
Code Listing 29
using Nancy; namespace nancybook.modules { public class AddressRoutes : NancyModule { public AddressRoutes() : base("/address") { Get[@"/"] = _ => View["address/index"]; } } } |
Compile and run your project, then request /address in your browser. You should see the following:

Figure 14: Form generated by the HTML code and route used to return our test address form
Note: I'm using an ASP.NET web application, and I have Bootstrap, JQuery, and Font Awesome installed in the project, so if your form doesn't look exactly the same as mine, don't worry. The important part is that it's a form, and that it's set up to post to a Nancy Route action; how it looks has no bearing on how it works.
Now we have a way of adding our data; it's just a simple matter of binding to that request. There are currently three different ways of binding to your model in Nancy, and which you choose is entirely up to you. You can use type-binding directly:
Address myAddress = this.Bind();
Or you can use var-based binding, passing in the model type as a generic parameter:
var myAddress = this.Bind<Address>();
Finally, if you have an existing instance of a TModel already allocated, you can use BindTo to attach to it:
var myAddress = this.BindTo(existingModelInstance);
This last form is generally used only in special circumstances, such as in extensions (this is the only circumstance in which I’ve seen it used), with the first two forms being the more popular.
Personally, I tend to use the second form, var-based binding.
Whichever form you use, the result should be the same: an object containing any properties and fields bound from the incoming data, or an object containing default values if nothing could be bound. There is a small chance that the object you’re binding to could also come out as null, so it's often a good idea to try and handle that by checking the model for null.
Extend your address route’s module, so that it now looks like this:
Code Listing 30
using nancybook.Models; using Nancy; using Nancy.ModelBinding; namespace nancybook.modules { public class AddressRoutes : NancyModule { public AddressRoutes() : base("/address") { Get[@"/"] = _ => View["address/index"]; Post[@"/save"] = _ => { var myAddress = this.Bind<Address>(); if (myAddress != null) { return View["address/display", myAddress]; } return View["address/error"]; }; } } } |
Save this route module, then add two more files to your address folder in views as follows:
display.html:
Code Listing 31
<!DOCTYPE html> <html lang="en"> <head> <meta charset="utf-8"> <meta http-equiv="X-UA-Compatible" content="IE=edge"> <meta name="viewport" content="width=device-width, initial-scale=1"> <title>Nancy Demo | Data Binding Example</title> <link href="~/content/bootstrap.min.css" rel="stylesheet" type="text/css" /> </head> <body> <div class="container"> <div class="page-header"> <h1 style="display: inline-block">Nancy Demo <small>Data Binding Example</small></h1> <h1 style="display: inline-block" class="pull-right"><small><a href="~/" title="Click to return to demo home page">home <span class="glyphicon glyphicon-home"></span></a></small></h1> </div> <p class="lead">The results from your address form are as follows...</p> <p>Record ID : <strong class="text-success">@Model.RecordId</strong></p> <p>Name : <strong class="text-success">@Model.Name</strong></p> <p>Address : <strong class="text-success">@Model.BuildingAddress</strong></p> <p>Town : <strong class="text-success">@Model.Town</strong></p> <p>County : <strong class="text-success">@Model.County</strong></p> <p>Post Code : <strong class="text-success">@Model.PostalCode</strong></p> <a href="~/address" class="btn btn-primary">Go back to the input form</a> </div> <script src="~/scripts/jquery-2.1.3.min.js"></script> <script src="~/scripts/bootstrap.min.js"></script> </body> </html> |
error.html:
Code Listing 32
<!DOCTYPE html> <html lang="en"> <head> <meta charset="utf-8"> <meta http-equiv="X-UA-Compatible" content="IE=edge"> <meta name="viewport" content="width=device-width, initial-scale=1"> <title>Nancy Demo | Data Binding Example</title> <link href="~/content/bootstrap.min.css" rel="stylesheet" type="text/css" /> </head> <body> <div class="container"> <div class="page-header"> <h1 style="display: inline-block">Nancy Demo <small>Data Binding Example</small> </h1> <h1 style="display: inline-block" class="pull-right"><small><a href="~/" title="Click to return to demo home page">home <span class="glyphicon glyphicon-home"></span></a></small> </h1> </div> <h3 class="text-danger">Unfortunately something went wrong trying to bind to the inbound data, and Nancy was unable to bind to your object.</h3> <a href="~/address" class="btn btn-primary">Go back to the input form</a> </div> </body> </html> |
Recompile your application, then request /address in your browser. Fill in the form and click Send Data. If everything worked, you should see something like the following:
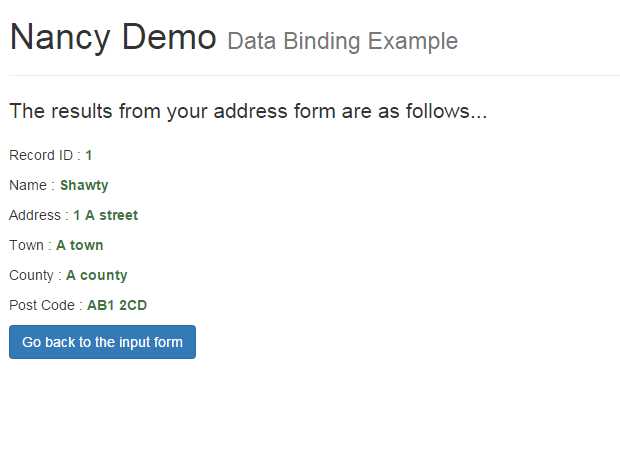
Figure 15: The result of posting an address entry to the form binder
In your input form, you could change all the name attributes on each of the input elements to something that's different to the property names in your address model EG:
<input id="RecordId" name="RecordIdDONOTUSE" type="hidden" value="1" /> <div class="form-group"> <label for="Name">Name</label> <input type="text" class="form-control" id="Name" name="NameDONOTUSE" placeholder="Enter Persons Name here" /> </div> |
Then, press F5 to reload your form, and try entering data again. You should observe that the object just contains default values (in this case, 0 for RecordId and an empty string for Name).

Figure 16: The result of sending data to our endpoint with missing data
As you can see, if any fields or properties are missing from your inbound data, Nancy doesn't throw an exception or cause any kind of show-stopping error, as some frameworks do.
There may, however, be times when you specifically need to force a property or field to be ignored. For example, you might want to make sure that a form has a field for a second password (so you can validate a password entry on the client), but you might not want that property bound to your object. Or, you might want to use the same input form for a user and an admin input, but have certain fields ignored when the form is used by a user, and not ignored when it's used by an admin.
Whatever the reason, it's easy to ask the binding system to ignore any properties you want it to, by providing either a list of lambdas or just simple property names when performing the binding.
Make sure that your form is changed back to the original version (so that all the fields are submitted to the post endpoint), then change your Nancy module so that it looks like the following:
using nancybook.Models; using Nancy; using Nancy.ModelBinding; namespace nancybook.modules { public class AddressRoutes : NancyModule { public AddressRoutes() : base("/address") { Get[@"/"] = _ => View["address/index"]; Post[@"/save"] = _ => { var myAddress = this.Bind<Address>("BuildingAddress"); if (myAddress != null) { return View["address/display", myAddress]; } return View["address/error"]; }; } } } |
I've highlighted the line that's changed in red; you should be able to see that I've added a parameter to it that matches the name of a property in my object.
If you build and run your application now, then submit the form, you'll find that even though the BuildingAddress property is being supplied, the binding system openly ignores it.
You can also specify the field names as follows:
var myAddress = this.Bind<Address>(f => f.BuildingAddress);
You can specify multiple property lists in both cases by separating each name entry with a comma.
Binding to lists and arrays
At this point you might be wondering, “What about adding checkboxes to my form?” The good news is that you don't need to do anything special, except for ensuring that your checkbox has a name, just like any other form parameter (just an ID won't do). When you post it, any bool property in your object that matches the checkbox name will be populated with true or false as needed.
Binding to arrays is just as simple. If you have a regular text field that contains a text representation of your list items separated by commas, the Nancy model-binder will split this input into an array automatically, should one be provided in the model you’re binding to. For example, if you had the following input field in your form:
<div class="form-group"> <label for="AliasList">Alias List</label> <input type="text" class="form-control" id="AliasList" name="AliasList" placeholder="Enter List of aliases here" /> </div> |
Then you updated your address model so it looked like the following:
namespace nancybook.Models { public class Address { public int RecordId { get; set; } public string Name { get; set; } public string BuildingAddress { get; set; } public string Town { get; set; } public string County { get; set; } public string PostalCode { get; set; } public string[] AliasList { get; set; } } } |
You would then find that if you entered something similar to “Peter,Shawty,Pete,Mr Shaw” in that field and submitted it, your model property would then include each entry in a separate array slot:

Figure 17: Entering a comma separated list in the binder will bind as an array
This list binding works with any simple value types such integers, decimals, and Booleans.
The automatic parsing of multiple items into an array works with multiple inputs, too. For example, say you had a list of check boxes, formatted as follows:
Code Listing 33
Option 1 <input type="checkbox" name="OptionsList" value="One" /><br /> Option 2 <input type="checkbox" name="OptionsList" value="Two" /><br /> Option 3 <input type="checkbox" name="OptionsList" value="Three" /><br /> Option 4 <input type="checkbox" name="OptionsList" value="Four" /><br /> Option 5 <input type="checkbox" name="OptionsList" value="Five" /><br /> |
If you render and submit the form containing them, the model binder will add an entry to the array for each item that's checked, just as it did for any items separated by a comma.
Lastly, if you add a multiple-item select list in your form using the following:
Code Listing 34
<select multiple="multiple" name="AliasList"> <option>Option 1</option> <option>Option 2</option> <option>Option 3</option> <option>Option 4</option> <option>Option 5</option> </select> |
That, too, will bind and populate the array with the selected options from your list.
It's worth noting that we've used a standard array[] so far in the binding examples, but anything that derives from an IEnumerable will bind in exactly the same manner. For example:
Code Listing 35
namespace nancybook.Models { public class Address { public int RecordId { get; set; } public string Name { get; set; } public string BuildingAddress { get; set; } public string Town { get; set; } public string County { get; set; } public string PostalCode { get; set; } public List<string> AliasList { get; set; } } } |
The outcome will be exactly the same as with the array syntax, except that now you can use all that lovely LINQ goodness to manipulate your data as you see fit.
The last trick that Nancy has when it comes to model binding is the ability to bind to entire lists of data. So far, we've only uses primitive lists, embedded in our objects, alongside other singular items of data. But what if we wanted to pass a list of addresses to our address module? It’s probably no surprise by now that Nancy has a “super-duper-happy-path" for that, too.
If you format your input items in your form using a hidden index, and array specified fields for each of your properties, you can then bind the entire inbound data model to an IEnumerable list. If you have a form that looks like the following:
Code Listing 36
<form method="POST" action="~/address/save"> <!-- Address item 0 --> <input id="RecordId" name="RecordId[0]" type="hidden" value="1"/> <div class="form-group"> <label for="Name">Name</label> <input type="text" class="form-control" id="Name" name="Name[0]" placeholder="Enter Persons Name here" /> </div> <div class="form-group"> <label for="BuildingAddress">Building Address</label> <input type="text" class="form-control" id="BuildingAddress" name="BuildingAddress[0]" placeholder="Enter Building Address here" /> </div> <div class="form-group"> <label for="Town">Town</label> <input type="text" class="form-control" id="Town" name="Town[0]" placeholder="Enter Town here" /> </div> <div class="form-group"> <label for="County">County</label> <input type="text" class="form-control" id="County" name="County[0]" placeholder="Enter County here" /> </div> <div class="form-group"> <label for="PostalCode">Postal Code</label> <input type="text" class="form-control" id="PostalCode" name="PostalCode[0]" placeholder="Enter Postal Code here" /> </div> <!-- Address item 1 --> <input id="RecordId1" name="RecordId[1]" type="hidden" value="2" /> <div class="form-group"> <label for="Name">Name</label> <input type="text" class="form-control" id="Name1" name="Name[1]" placeholder="Enter Persons Name here" /> </div> <div class="form-group"> <label for="BuildingAddress">Building Address</label> <input type="text" class="form-control" id="BuildingAddress1" name="BuildingAddress[1]" placeholder="Enter Building Address here" /> </div> <div class="form-group"> <label for="Town">Town</label> <input type="text" class="form-control" id="Town1" name="Town[1]" placeholder="Enter Town here" /> </div> <div class="form-group"> <label for="County">County</label> <input type="text" class="form-control" id="County1" name="County[1]" placeholder="Enter County here" /> </div> <div class="form-group"> <label for="PostalCode">Postal Code</label> <input type="text" class="form-control" id="PostalCode1" name="PostalCode[1]" placeholder="Enter Postal Code here" /> </div> <button type="submit" class="btn btn-primary">Send Data</button> </form> |
If you alter your Address module so that it binds your address object as a list, as follows (I've highlighted the changed line):
Code Listing 37
using System.Collections.Generic; using nancybook.Models; using Nancy; using Nancy.ModelBinding; namespace nancybook.modules { public class AddressRoutes : NancyModule { public AddressRoutes() : base("/address") { Get[@"/"] = _ => View["address/index"]; Post[@"/save"] = _ => { var myAddress = this.Bind<List<Address>>(); if (myAddress != null) { return View["address/display", myAddress]; } return View["address/error"]; }; } } } |
You'll find that when you examine the data in the Visual Studio debugger, you get a full list of separate object types:
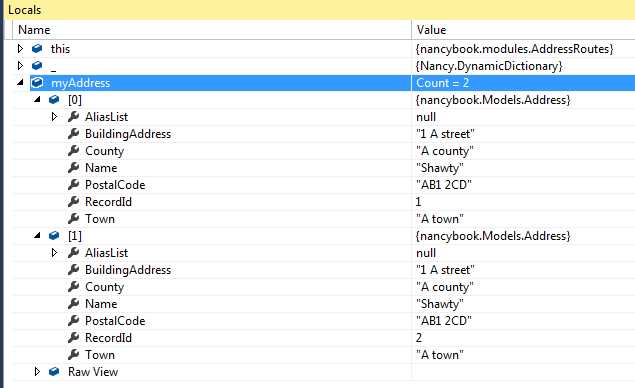
Figure 18: Visual Studio debugger showing list binding
As long as the form contents are laid out as shown, and each input element name has an array index appended to it, then the Nancy model binder will allow you to bind it.
A word of caution: you must make sure that your indexes are sequential. I've read that the method Phil Haack suggests for ASP.NET MVC, using a hidden index field, also works for Nancy. I've not actually tested this, however, and when I generate forms dynamically to take advantage of this feature, I always try to make sure I keep the indexes in sync.
Validation
The last thing we'll take a look at in this chapter is validation. Just like ASP.NET MVC and other .NET-based frameworks, Nancy has the ability to validate your objects when you bind to them, allowing you to easily reject any binds that contain incomplete or incorrect data.
There are two packages currently available on NuGet that provide validation support: Nancy.Validation.FluentValidation and Nancy.Validation.DataAnnotations.
For the purposes of this book, I'm only going to demonstrate the data annotations approach. If you’re used to using fluent validations, or already have that deployed elsewhere, you may want to use it. The concept is the same in that you need to create a separate class that derives from AbstractValidator. There's an example of how to do this in the NancyFX demos in the source code on GitHub.
Validating with data annotations
If you've used ASP.NET MVC, you may be familiar with the way models are validated using the framework. Data annotations for NancyFX work in exactly the same way.
You attach attributes to your data objects, and these attributes are used to generate rules, which the rest of the framework checks. Because the same data annotation assemblies used in the ASP.NET product are used in Nancy, any rules you may have already developed to work under ASP.NET MVC will also work without change under a NancyFX-based project.
To give you an example of how to use them, take your Address class from the previous demonstration and change it so that it looks like the following code:
using System.ComponentModel.DataAnnotations; namespace nancybook.Models { public class Address { [Required] public int RecordId { get; set; } [Required] [StringLength(20)] public string Name { get; set; } [RegularExpression(@"^[0-9]{1,3}\s.*")] public string BuildingAddress { get; set; } [Range(18, 150)] public int Age { get; set; } [DataType(DataType.EmailAddress)] public string Email { get; set; } } } |
You can see I've added a few of the available validations in here. Required ensures that the property has a value and will reject the validation if not; and StringLength ensures the string has no more that the specified number of characters (20 in this case). The RegularExpression attribute allows you to specify a custom pattern to match, too. I'm not going to delve into the subject of regular expressions here, but if you're interested, there is a book in the Succinctly series that covers this topic.
The last two, Range and DataType, allow you to specify a numerical or date range into which a value must fall, and the type of data expected as the format of the contents.
The latter on DataType may be a little confusing to some, but the DataAnnotations assembly has a number of pre-made patterns that can be used to check the format of the supplied string. In this demo, I've chosen to use the Email format, which will check that the data is formatted correctly for an email address. If you use IntelliSense in Visual Studio, you'll see there are many others:
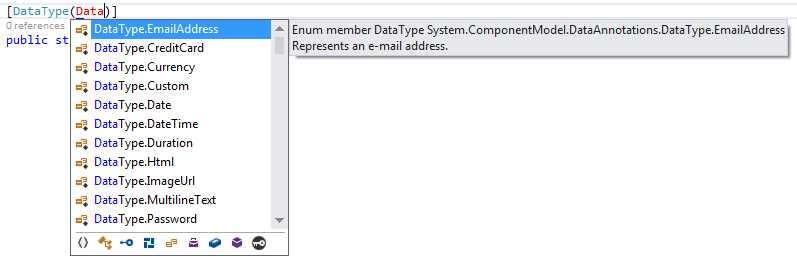
Figure 19: Visual Studio IntelliSense showing the different data types available
Once you've added the required attributes to your model, validating it is easy.
using nancybook.Models; using Nancy; using Nancy.ModelBinding; using Nancy.Validation; namespace nancybook.modules { public class AddressRoutes : NancyModule { public AddressRoutes() : base("/address") { Get[@"/"] = _ => View["address/index"]; Post[@"/save"] = _ => { var myAddress = this.Bind<Address>(); var result = this.Validate(myAddress); return result.IsValid ? View["address/display", myAddress] : View["address/error"]; }; } } } |
You can see that you bind the object just as you did before, but now, you immediately make a call to this.Validate.
The validation returns a result object that, among other things, has a property called IsValid. This property is a regular true or false Boolean value that you can test to see if your object passed validation.
If IsValid is set to false, then the Errors property will contain a list of errors and error messages telling you exactly what failed in the validation.

Figure 20: Visual Studio debugger showing validation errors
How you display those errors is entirely up to you; Nancy has no specific way that you must deal with them, leaving you free to do what is best for your application.
Summary
In this chapter, we took a closer look at Nancy's model binder. We saw firsthand how to get our view models from our HTML pages back into our Nancy module.
We also saw how Nancy smartly takes multiple inputs, or single inputs with a delimiter, and makes them easily accessible to us in the form of standard lists and arrays.
Finally, we looked at how Nancy provides the same experience as other .NET frameworks and allows you to easily provide validation for your view-bound data objects.
In the next chapter, we will move away from plain HTML and explore content negotiation, Nancy's “super” weapon for powering API-based URLs.
- 1800+ high-performance UI components.
- Includes popular controls such as Grid, Chart, Scheduler, and more.
- 24x5 unlimited support by developers.