
MSIX Succinctly®

CHAPTER 4
The Package Support Framework
In Chapter 1, we learned that even if the container enforced by MSIX is very lightweight, there are still some different behaviors between a traditional Win32 app and a packaged one. There are some requirements that we need to satisfy in order to make a successful packaging. For example, since MSIX packages don’t create a traditional shortcut in the Start menu, which references the executable of the application, the APIs to retrieve the current working directory will return C:\Windows\System32 or C:\Windows\SysWOW64 (based on the app’s architecture) instead of the folder where the application has been deployed. This behavior can create problems for applications that, at runtime, try to load files that are deployed together with the executable in the same folder, like a database or an image.
Another different behavior that we can experiment with is related to writing operations. MSIX packages are deployed inside the C:\Program Files\WindowsApps folder, which is system-protected. The application, which instead runs at the user level, doesn’t have permission to write in that folder. However, some applications might use the installation folder as a location to write some content, like a log file or a configuration file. In such a scenario, you will experience an exception, since the writing operation will fail.
The best approach to solving this kind of problem is changing the code and fixing the wrong behavior. However, this isn’t always possible. As an IT pro, you might need to deploy applications coming from third-party developers, so you don’t have access to the source code. Or maybe it’s a very old application that is still widely used, but no longer maintained.
The Package Support Framework is an open-source project, published by Microsoft on GitHub, that aims to solve these scenarios by allowing the IT pro to change the logic of the application without modifying the code. Let’s take a look at the architecture of the Package Support Framework.
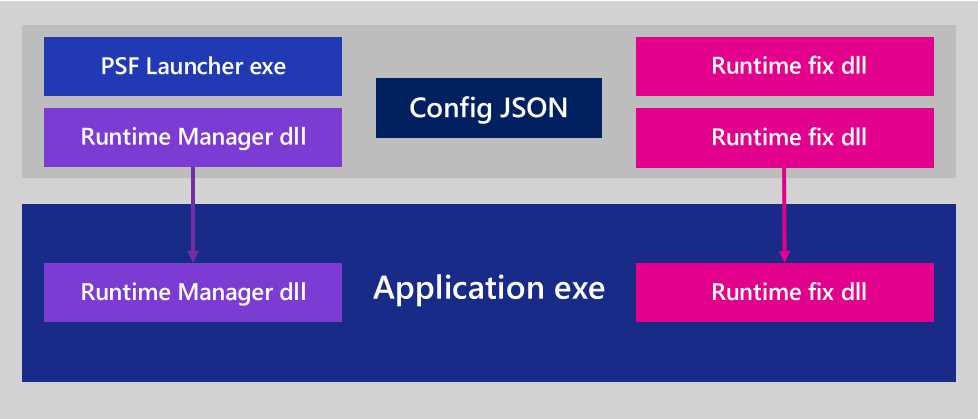
Figure 34: A packaged application which uses the Package Support Framework
The Package Support Framework is composed of four components:
- A launcher, which is an executable.
- A runtime manager, which is a DLL.
- A JSON configuration file.
- One or more runtime fixes, which are DLLs that contain the logic to change the behavior of the application.
When the Package Support Framework is applied to a packaged application, the launcher replaces the application’s executable as the main entry point. The purpose of the launcher is to execute the main application with the injected runtime manager. Thanks to this implementation, the runtime manager is able to load runtime fixes that are able to change one or more behaviors of the app on the fly. The whole configuration is controlled by a JSON file, which specifies parameters like the current working directory to use, the main executable to launch, and which runtime fixes to apply.
The runtime fixes can change the workflow of Windows APIs by intercepting an operation and replacing it with a different behavior. For example, a fixup can intercept the writing operation happening on the installation folder and redirect it to another location where the application has write permission. This task is accomplished without changing the code of the original application.
Adding the Package Support Framework
The first step to add the Package Support Framework to an application is to download it. The framework is available on NuGet. However, in our scenario, we don’t have the source code of the application, so we don’t have a project in Visual Studio that we can open to install the NuGet package.
The easiest way to get it is to download the NuGet standalone executable to a folder of your choice. Once you have downloaded it on your machine, open a command prompt in that folder where you have saved it, and run the following command.
Code Listing 9
nuget.exe install Microsoft.PackageSupportFramework |
Once the operation is completed, you will find in the same folder a new subfolder called Microsoft.PackageSupportFramework.x.y.z, where x.y.z is the version number of the most recent version. Inside the bin folder, you will find all the executables and DLLs that constitute the Package Support Framework, and which you will need to add to your packaged application.
However, at this point, you will probably already have a packaged application you have deployed, and you’ll have verified that it suffers from an issue that can be fixed with the Package Support Framework. Before moving on, you will have to unpack the application so that you can add new files to it and change the configuration. You can achieve this goal with the makeappx tool, which is included in the Windows 10 SDK. If you don’t already have it on your machine, you can install the standalone version.
Once you have installed the Windows 10 SDK, the tool will be available in the C:\Program Files (x86)\Windows Kits\10\bin\10.0.xyz.0\x86 folder, where xyz is the version of the Windows 10 SDK you have downloaded. For example, at the time of writing, the most recent available Windows 10 SDK is 10.0.18362.0, so you’ll find the tool in the C:\Program Files (x86)\Windows Kits\10\bin\10.0.18362.0\x86 folder.
Once you have identified the right folder, open a command prompt on it and launch the following command.
Code Listing 10
makeappx unpack /p SamplePackage.msix /d PackageFiles |
The /p parameter references the full path of the MSIX package, while the /d one points to the folder where you want to unpack the content of the MSIX package. After the operation is completed, the PackageFiles folder will contain all the files that comprise the application, plus the specific MSIX ones, like the app manifest and the virtual registry.
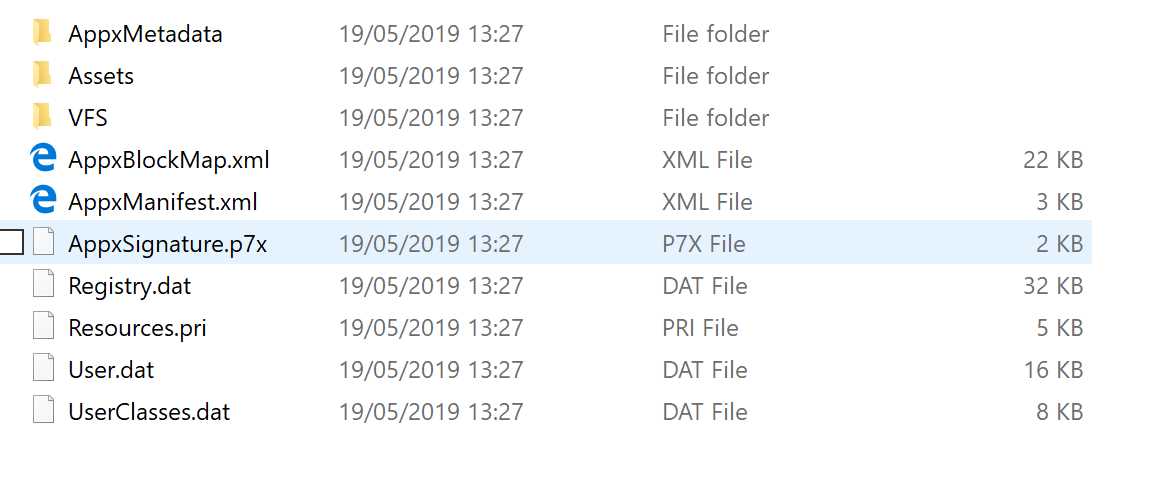
Figure 35: The content of a MSIX package once it has been unpackaged with the MSIX tool
The first step is to copy, inside this folder, the files that compose the Package Support Framework. You can find them in the Microsoft.PackageSupportFramework.x.y.z\bin folder, which you previously downloaded using NuGet. The minimum set of files to copy is:
- PsfLauncher.exe
- PsfRunDll.exe
- PsfRuntime.dll
The folder contains two variants of the files, one for each CPU architecture (x86 and x64). You need to choose the right version based on the CPU architecture for which the app has been compiled.
The folder also contains a set of fixups, which are ready to be used:
- FileRedirectionFixup.dll, to help you to solve the writing permission scenario we have previously described.
- TraceFixup.dll, to identify issues within the application. We’re going to see later how to use it.
- WaitForDebuggerFixup.dll, to allow you to hold the process during startup until a debugger is attached.
If any of these fixups can be helpful to solve your scenario, just copy them inside the folder that contains the unpackaged version of your application.
Configuring the fixups
Once you have copied the required files, you must configure the framework using a JSON file called config.json, which must be included inside the root of the package.
This is what a typical configuration file looks like.
Code Listing 11
{ "applications": [ { "id": "PSFSample", "executable": "PSFSampleApp/PSFSample.exe", "workingDirectory": "PSFSampleApp/" } ], "processes": [ { "executable": "PSFSample", "fixups": [ { "dll": "FileRedirectionFixup.dll", "config": { "redirectedPaths": { "packageRelative": [ { "base": "PSFSampleApp/", "patterns": [ ".*\\.log" ] } ] } } } ] } ] } |
The applications entry specifies the base configuration of the application by leveraging the following properties:
- id must match the application’s identifier declared in the manifest. To find it, open the AppxManifest.xml file inside the package’s folder with a text editor and look for the id attribute of the Application entry, as highlighted in the following sample.
Code Listing 12
<Applications> <Application Id="PSFSample" Executable="PSFSampleApp\PSFSample.exe" EntryPoint="Windows.FullTrustApplication">
</Application> </Applications> |
- executable is the main entry point of the application. Remember that when you use the Package Support Framework, the entry point becomes the launcher included in the tool, so we need to specify which is the real main process of the application.
- workingDirectory is the folder inside the package that contains the main executable. Thanks to this entry, the APIs to retrieve the current working directory will return the correct one instead of C:\Windows\System32 or C:\Windows\SysWOW64.
The processes section is used to configure the various fixups you have decided to include in the package:
- The executable property contains the name of the main executable of the application.
- fixups is a collection that contains one entry for each fixup.
Each fixup is defined by the dll property, containing the name of the DLL that implements it without any reference to the CPU architecture, and the config property, containing the fixup configuration. This last property doesn’t have a fixed structure: it’s up to the developer of the fixup to implement and document its own config. For example, on GitHub, you can find the documentation for the File Redirection Fixup, which is included in the previous sample. We’ll see more details about the File Redirection Fixup later in this chapter.
Configuring the manifest
Once you have added the config.json file to your package, you must also update the manifest. Remember that to leverage the Package Support Framework, we need to change the entry point of the application. We must use the built-in launcher, which will take care of launching the real application and injecting the runtime and the various fixups.
To achieve this goal, open the AppxManifest.xml file and look, once again, for the Application entry, which will be something like the following.
Code Listing 13
<Applications> <Application Id="PSFSample" Executable="PSFSample\PSFSample.exe" EntryPoint="Windows.FullTrustApplication">
</Application> </Applications> |
As you can see, the Executable attribute will reference the main executable of the application. You must replace this value with the PSFLauncher.exe executable, which is part of the Package Support Framework. Remember to reference the correct version based on the application’s architecture. For example, this is how the Application entry will look for a 32-bit application.
Code Listing 14
<Applications> <Application Id="PSFSample" Executable="PSFLauncher32.exe" EntryPoint="Windows.FullTrustApplication">
</Application> </Applications> |
Repackaging the application
The last step is to repackage the application in order to get back a MSIX package that we can deploy. We can again use the makeappx utility with the same parameters. We just need to change the action to perform from unpack to pack, as in the following example.
Code Listing 15
makeappx pack /p SamplePackage.msix /d PackageFiles |
Once we have an MSIX package, we need to sign it before deploying it. Remember that unsigned MSIX packages can’t be installed at all. For this task, we can use a tool included in the Windows 10 SDK, called signtool.exe. It’s located in the same folder of the makeappx tool, which is C:\Program Files (x86)\Windows Kits\10\bin\10.0.18362.0\x86.
Here is a sample command that you can use to sign the package.
Code Listing 16
signtool.exe sign /tr http://timestamp.digicert.com /a /v /fd SHA256 /f "MyCertificate.pfx" /p "Password" SamplePackage.msix |
The three relevant parameters that you must customize are:
- /f, containing the full path of the PFX certificate you want to use to sign the package.
- /p, containing the password of the certificate.
- The last parameter, which is the full path of the MSIX package you want to sign.
Now you’re ready to deploy the updated version of your application leveraging the Package Support Framework.
Identifying potential issues
The first challenge of using the Package Support Framework is identifying the wrong behavior of the app, and which fixups might be helpful to fix it. There are cases where it’s easy to identify the problem. For example, let’s say you have an application that triggers the following problem at startup.
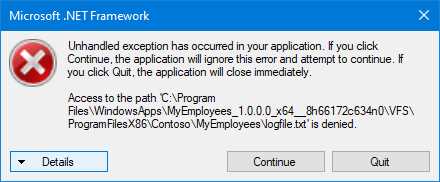
Figure 36: The error displayed when a packaged application tries to write inside the installation folder
In this case, it’s easy to understand that the application is trying to write a file inside the installation folder. The error is reporting that access has been denied to a text file called logfile.txt stored in the folder where the package is deployed.
Another common scenario is when the application crashes with an error like the following one.
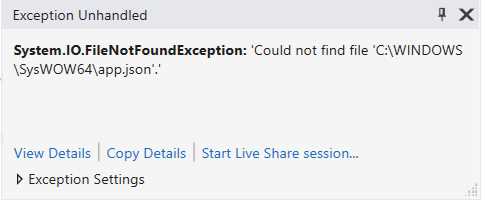
Figure 37: The error displayed when a packaged application tries to read from the current working directory
It’s easy to understand what’s happening. The application is trying to read a file called app.json from the C:\Windows\SysWOW64 folder, which is the current working directory for a packaged app. It means that the application is using the Windows APIs to read a file from the installation folder, but since the Current Working Directory is different, it can’t find it.
However, in some cases the behavior could be sneakier, and we might not have a clear error that helps us to understand what’s happening. The application might just crash without logging any meaningful error. A good way to troubleshoot potential issues is by using one of the fixups provided by the Package Support Framework called Trace Fixup. Thanks to it, all the operations performed by the application that don’t complete successfully (like reading a file from the hard disk or writing a registry key) will be logged and can be analyzed with different tools, based on the configuration.
The first step to using Trace Fixup is to make sure to include it inside the package. When you copy the Package Support Framework in the folder where you have unpackaged the application, make sure to copy also the TraceFixup32.dll or TraceFixup64.dll file, depending on the application’s architecture.
The second step is to configure the fixup in the config.json file. This is what a typical configuration looks like.
Code Listing 17
{ "dll": "TraceFixup.dll", "config": { "traceMethod": "outputDebugString", "traceLevels": { "default": "allFailures" }, "breakOn": { "filesystem": "unexpectedFailures" } } } |
The traceMethod property can be used to specify where you want to output the traces recorded by the fixup. In the previous sample, we set to output the logs to the system trace.
Then we can specify two different kind of behaviors:
- traceLevels is used to define which kind of failures must be logged.
- breakOn is used to define which kind of failures should trigger a breakpoint if you have an attached debugger.
For each behavior, you can specify which activities and which kinds of failures you want to log. In the previous snippet, you can see two different samples:
- default and allFailures means that we want to log all the failures, regardless of the type.
- filesystem and unexpectedFailures means that we want to log only the unexpected failures that happen on the file system.
You can find the list of all the supported values in the documentation on GitHub.
Once you have included the Trace Fixup, you can use a debugger or a diagnostic tool like Debug View, which is part of the Sysinternals suite. For example, let’s see what happens when you open Debug View and then launch an application with the Trace Fixup injected through the Package Support Framework.
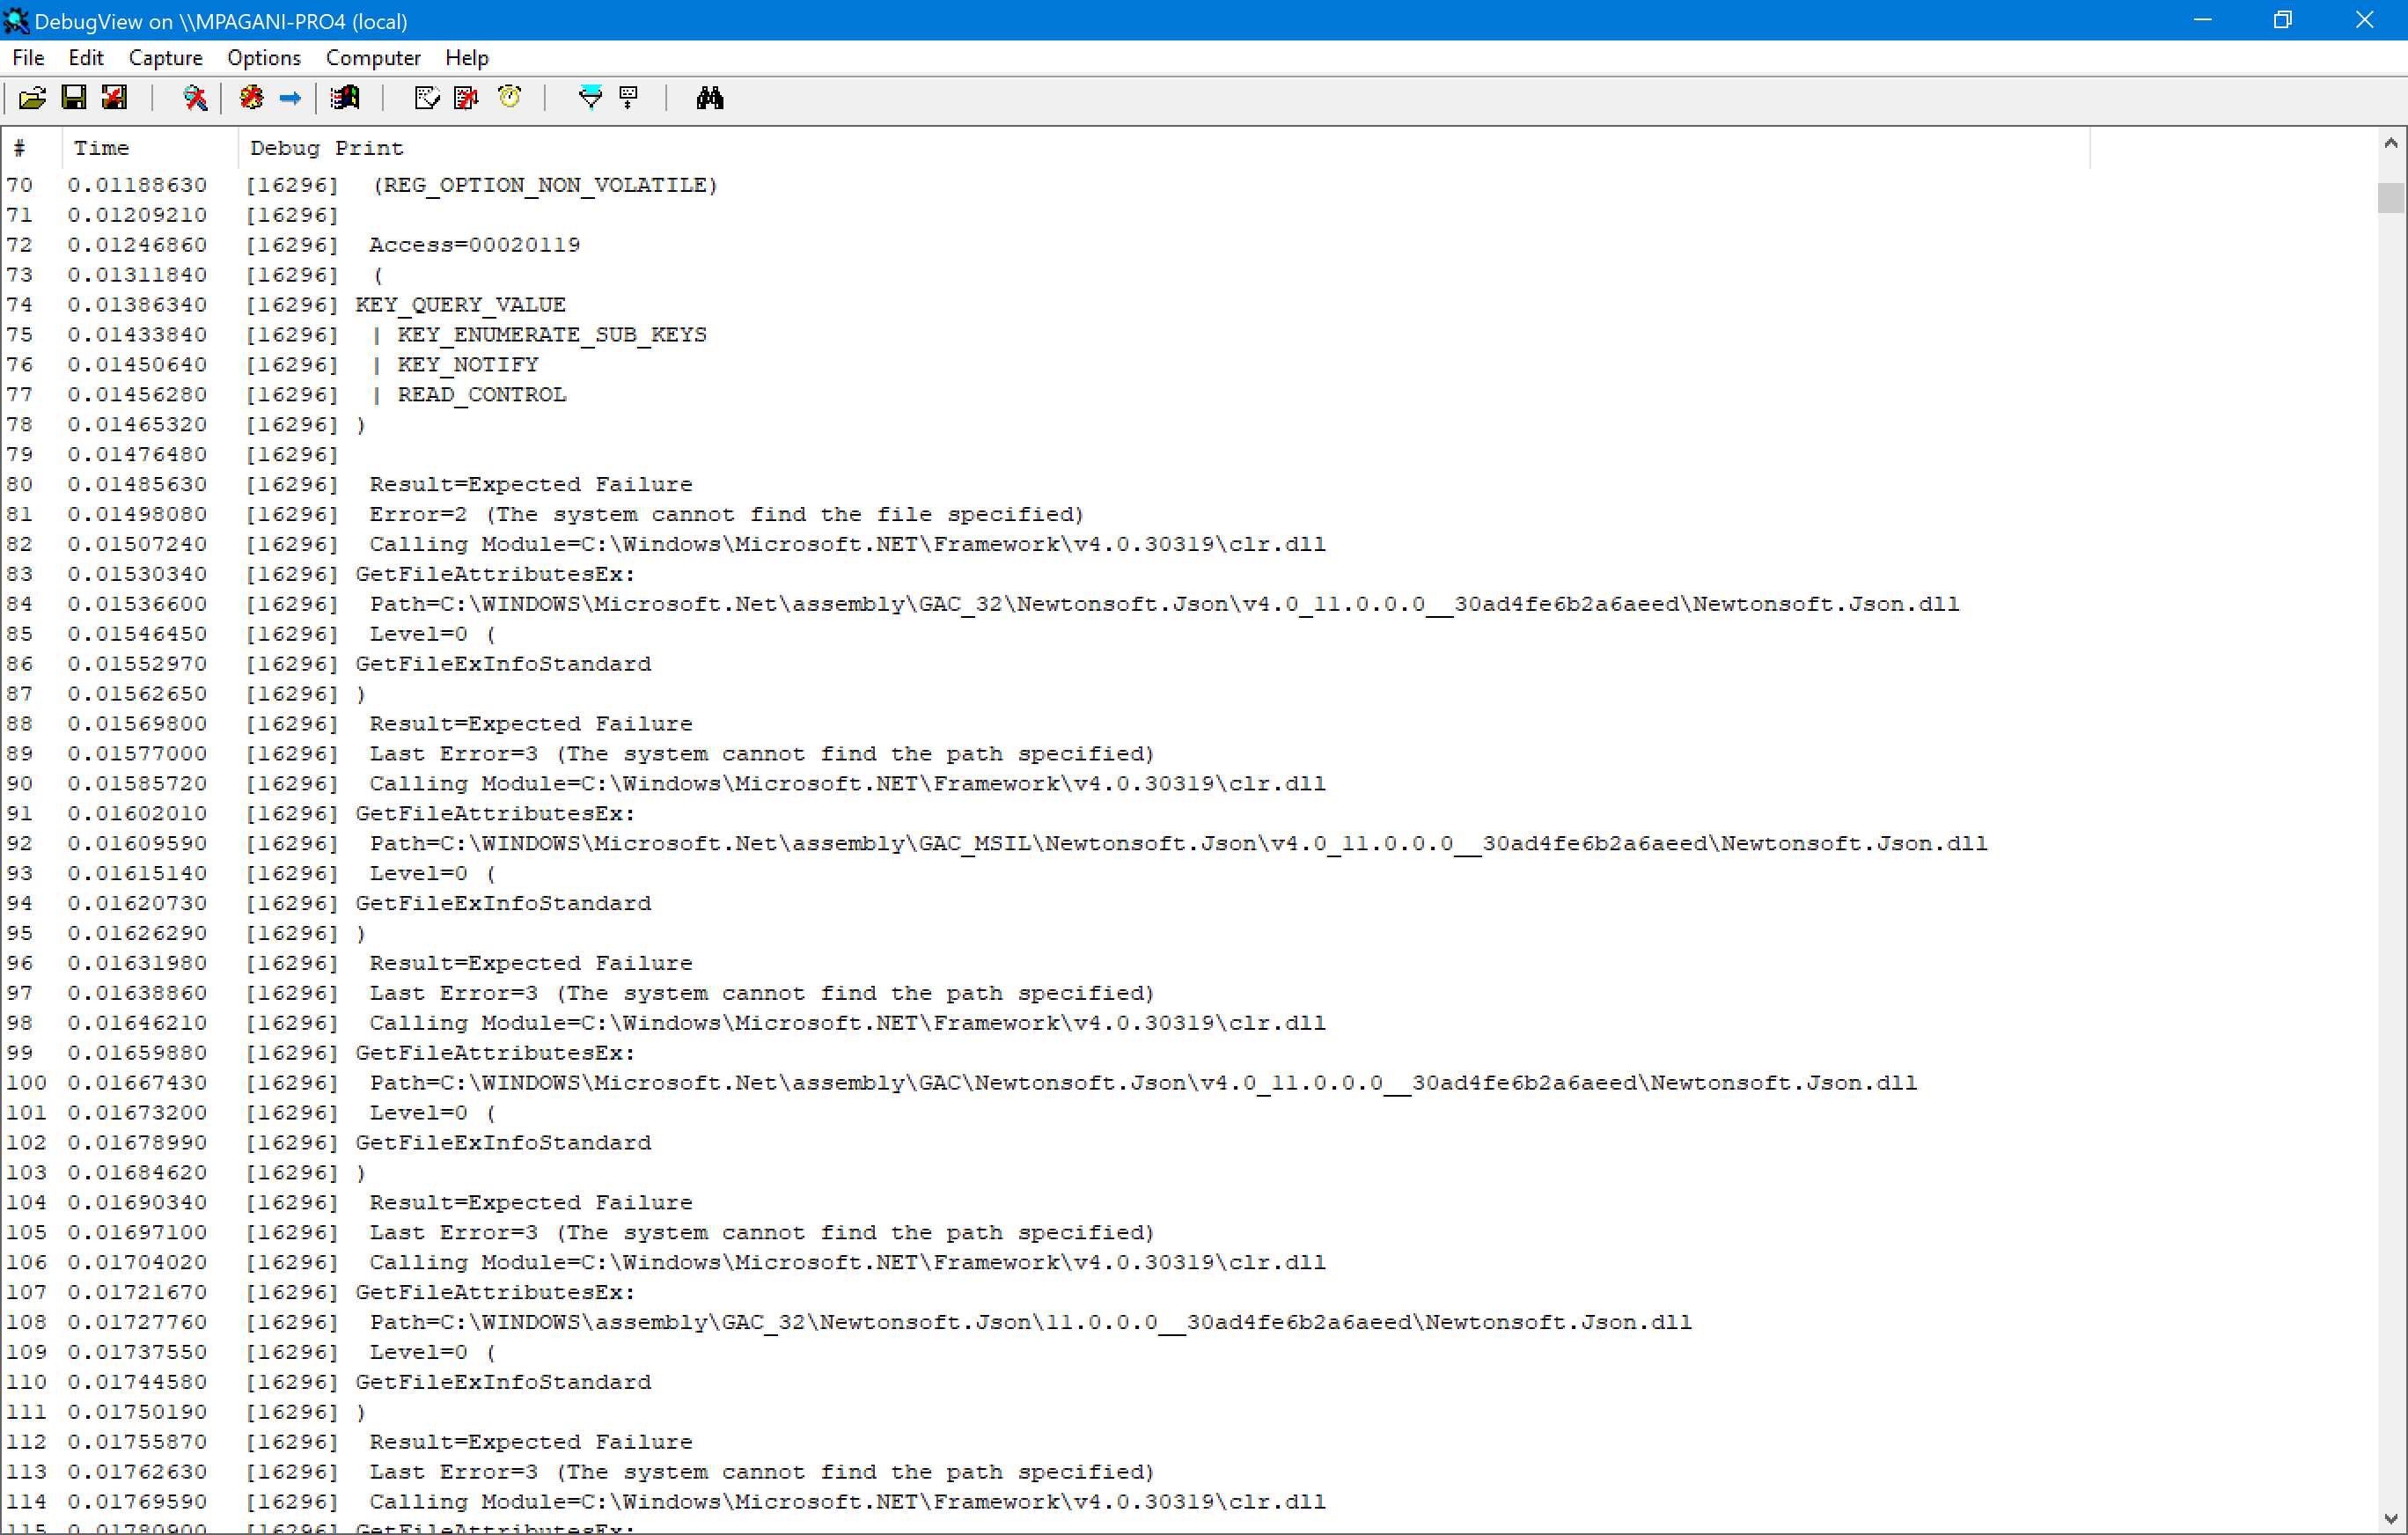
Figure 38: Debug View collects the trace output from an application that uses the Trace Fixup
As you can see from Figure 38, the Trace Fixup is sending to the system trace the output of all the operations performed by the application on the file system and on the registry, based on the configuration we have set. With some digging, we will be able to find out if the application is failing because it isn’t able to file a file or a registry key, meaning that the lightweight container provided by MSIX could interfere with the regular flow of the application.
Enabling file redirection
As we learned at the beginning of this section, one of the most common issues that affects applications’ MSIX packages is the inability to write in the installation folder. For this reason, the File Redirection Fixup is built into the Package Support Framework.
This fixup is implemented by the FileRedirectionFixup32.dll and FileRedirectionFixup64.dll files, so make sure to copy the right one (based on your application’s architecture) inside the folder where you have unpackaged the MSIX.
Here is a sample configuration of the fixup.
Code Listing 18
|
"dll": "FileRedirectionShim.dll", "config": { "redirectedPaths": { "packageRelative": [ { "base": "PSFDemo/", "patterns": [ ".*\\.json" ] } ] } } } |
We’re using the packageRelative option, which means we want to redirect all the writing operations performed in a folder relative to the package. In this case, we are redirecting all the operations executed inside the installation folder, which is called PSFDemo and is specified using the base property.
The last step is to use the patterns option to specify which kind of operations we want to redirect. In this scenario, we’re assuming that our application tries to write a file with the .json extension in the installation of folder, so we specify .*\\.json as the pattern.
Another option we can use is called redirectedPaths, which is helpful when the application tries to write some content in a system folder. This is a sample configuration of this scenario.
Code Listing 19
{ "dll": "FileRedirectionFixup.dll", "config": { "redirectedPaths": { "knownFolders": [ { "id": "ProgramFilesX86", "relativePaths": [ { "base": "Contoso\\MyEmployees", "patterns": [ ".*\\.txt" ] } ] } ] } } } |
In this case, the writing operation causing trouble for our application is performed inside the C:\Program Files (x86)\Contoso\MyEmployees folder, which is one of the folders redirected by Windows using the virtual file system. In this scenario, we use the knownFolders property to specify the identifier of the VFS folder where we want to enable the redirection, which is ProgramFilesX86. The rest of the configuration is the same as the previous one: we specify the base folder (Contoso\MyEmployees) and which file operations we want to redirect (the ones involving files with the .txt extension).
But where are these files being written? They are written inside the local storage of the application, which is located in %LOCALAPPDATA%\Packages\<Package_Family_Name>\LocalCache, where Package Family Name is the one assigned to the MSIX package.
This is, for example, the content of local storage of the application that is using the configuration file showcased in the previous snippet.

Figure 39: A file redirected to the local storage
As you can see, we have intercepted the creation of a .txt file, called logfile.txt. The file has been created inside the local storage of the application, in a folder that follows the same path of the original location of the file (C:\Program Files (x86)\Contoso\MyEmployees).
From now on, Windows will redirect all the operations, including the reading ones, to leverage this file. This means that, whenever the application tries to read the logfile.txt file, Windows will provide a reference to the one in the local storage, and not to the original one.
- 1800+ high-performance UI components.
- Includes popular controls such as Grid, Chart, Scheduler, and more.
- 24x5 unlimited support by developers.