
MSIX Succinctly®

CHAPTER 5
Packaging Your Applications with Visual Studio
In Chapter 2, you learned about the MSIX Packaging Tool, a great tool for helping IT pros repackage applications. However, if you’re a developer, you will probably feel more comfortable doing the packaging in an environment you probably already know very well and use every day for your development tasks: Visual Studio.
Visual Studio offers built-in MSIX packaging integration, which makes it easy to package an existing project built with WPF, Windows Forms, or Visual C++. In the most recent versions, Visual Studio has also gained the ability to package applications for which you don’t own the source code. You won’t have support for all the features (like debugging), but you will be able to leverage a better manifest editor and an integrated experience to generate an MSIX package.
To package an application with Visual Studio, you will need to install:
- Visual Studio 2019. The Community edition, which is free, is perfectly suitable for this task.
- The Windows 10 SDK. At the time of writing, the most recent version is 18362, which pairs with Windows 10 version 1903. It can be downloaded from here, but the simplest way to install it is to enable the Universal Windows Platform development workload during the setup process.

Figure 40: The workload to enable to leverage MSIX in Visual Studio
You will also need to make sure that the Developer Mode is turned on in Windows, as explained in Chapter 2.
Once you have met all the requirements, the first step is to open the Visual Studio solution that contains your desktop application’s project. Right-click on the solution inside Solution Explorer and choose Add > New project. Search for the template called Windows Application Packaging Project, as displayed in the following image.
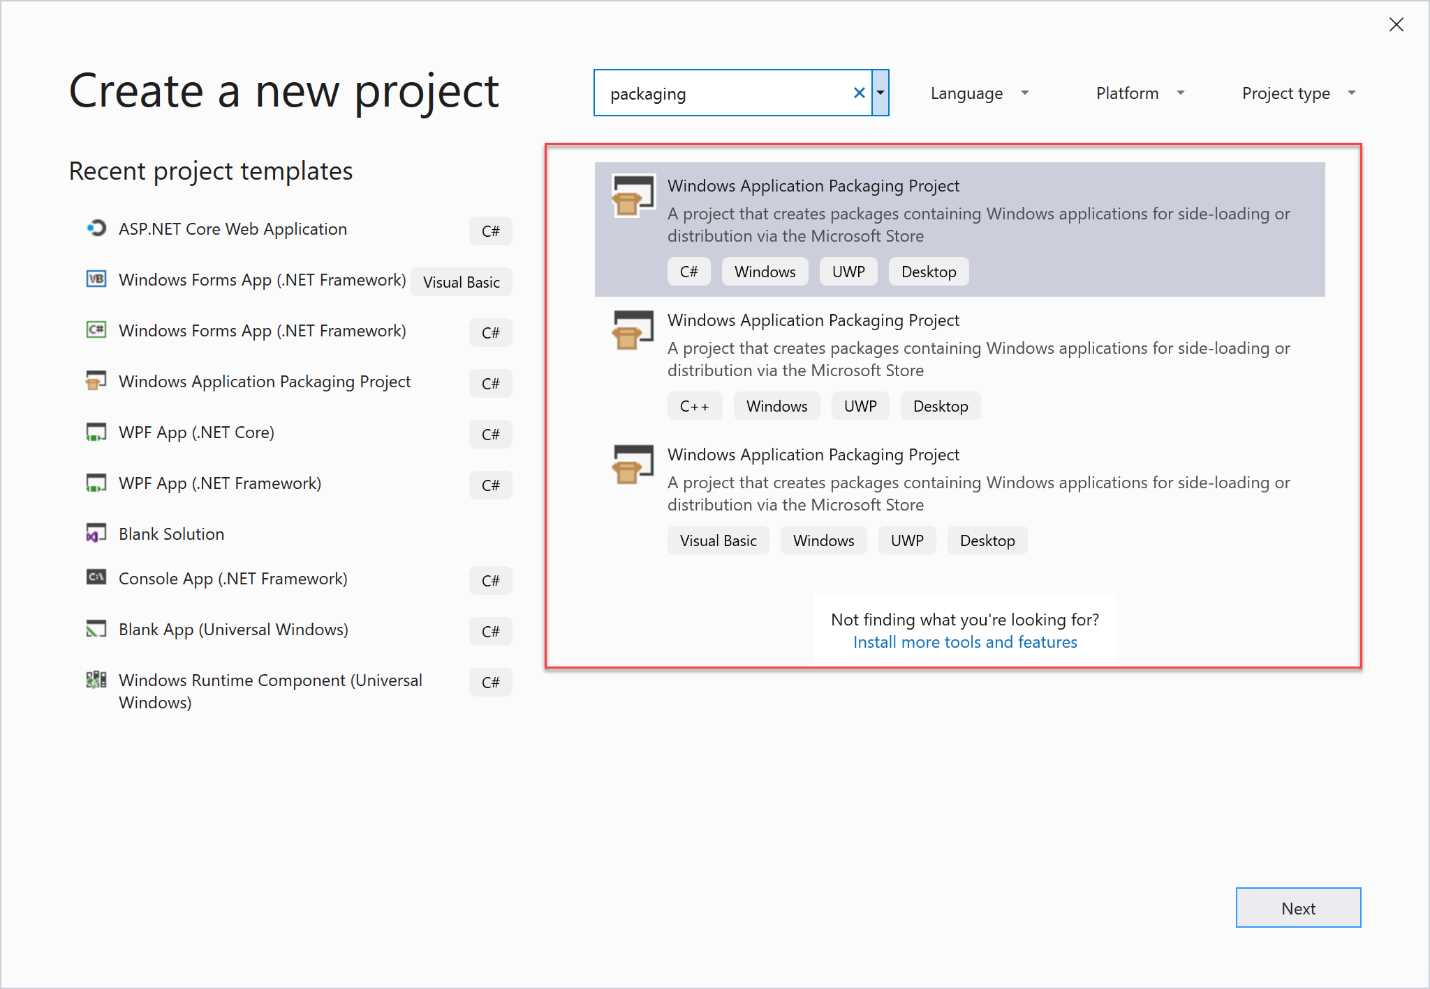
Figure 41: The Windows Application Packaging Project in Visual Studio 2017
You’ll first be asked which target version and the minimum version of Windows 10 you want to leverage.

Figure 42: Setting up the target and minimum version for the project
The target version defines the API surface of the Universal Windows Platform the application will have access to. If your application doesn’t leverage any feature from the Universal Windows Platform, so is a pure classic desktop application, this choice won’t have any effect.
The minimum version defines the minimum version of Windows 10 required to run this application. To generate a MSIX package, you need to set both as target and minimum version at least Windows 10 version 1809 (10.0; Build 17763). Setting a lower version will cause Visual Studio to generate a package using AppX, the previous packaging format.
The project will look like the one for the Universal Windows Platform application. You have a manifest file, called Package.appxmanifest, which you can edit with the visual editor by double-clicking on it. You also have a folder called Images, which contains the default icons used for the Start screen, the taskbar, and so on.
However, there’s a big difference compared to a standard development project. Instead of the References section, which is typically used to add third-party libraries to your project, you will find one called Applications. The Windows Application Packaging Project, in fact, being meant for packaging existing apps, can’t be used to include code; it must contain a reference to the application you want to package.
To select it, right-click the project and choose Add references. You will have the opportunity to choose which one of the projects included in the Visual Studio solution contains the main application. You can add multiple projects if the package contains multiple executables. In this case, you can choose the entry point of the package by right-clicking the correct application and choosing Set As Entry Point.
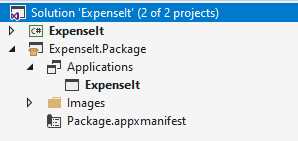
Figure 43: The structure of a Windows project that includes a Windows Application Packaging Project
Debugging
One of the advantages of the Windows Application Packaging Project is that it can be used to debug the packaged version of the application by leveraging the source code of the original desktop one. Right-click the Windows Application Packaging Project, choose Set as Startup Project, and then press F5. Visual Studio will launch the packaged version, but you’ll still be able to put breakpoints in the source code of the Win32 project, add watches, and perform all the common debugging tasks.
Be aware, however, that when you deploy a package directly from Visual Studio, Windows leverages a deployment model called loose registration. The application will be executed directly from the build folder and not from the C:\Program Files\WindowsApps one, as we learned in Chapter 1. Since the build folder isn’t system-protected, some of the requirements enforced by MSIX packaging that we saw in Chapter 1 (like the inability to write in the installation folder) won’t apply.
Before deploying an application packaged with Visual Studio in production, make sure to always test it with the real MSIX package generated using the built-in wizard, which we’re going to see in a few moments.
The manifest editor
Visual Studio offers a built-in manifest editor, which will help you to set the identity, the capabilities, etc., of the application using a visual interface.
To access to the manifest editor, you just need to double-click the Package.appxmanifest file included in the Windows Application Packaging project.
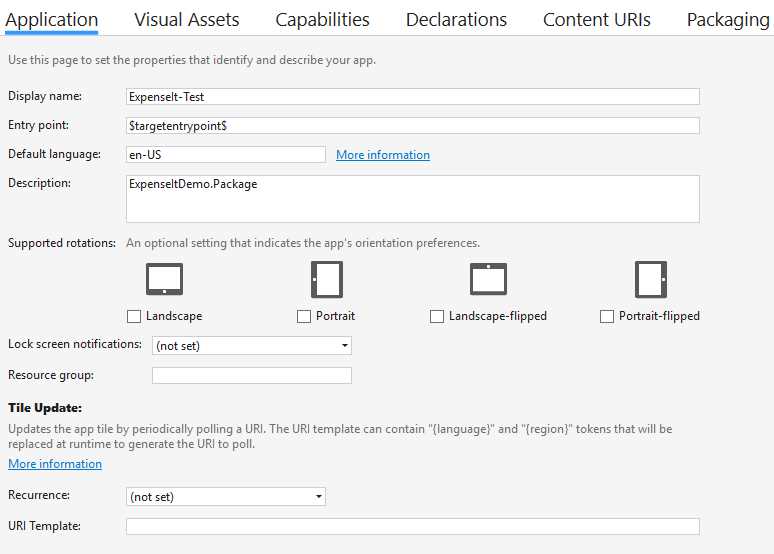
Figure 44: The Visual Studio manifest editor
If you’re packaging a classic Windows application, the relevant sections are:
- Visual Assets, to help you generate the right icons to use in Windows 10.
- Packaging, used to set up the identity by defining the package name, the publisher’s name, etc.
- Declarations, allowing you to add extension points to integrate your application with Windows 10.
Generating a package
To generate a package, right-click the Windows Application Packaging Project and choose Store > Create app packages.

Figure 45: The “Create App Packages” wizard in Visual Studio
Before starting the process, you must choose if whether you want to publish the application on the Microsoft Store, or if you’re planning sideloading distribution for manual or enterprise deployment. In the first case, you’ll be asked to log in with the Microsoft account linked to your developer account, so that Visual Studio can assign the right identity to the application. In the second case, you’ll start the packaging process right away. However, you have the option to check the Enable automatic updates option, which will add an additional step during the process. We’re going to see the distribution options in more detail in Chapter 7.
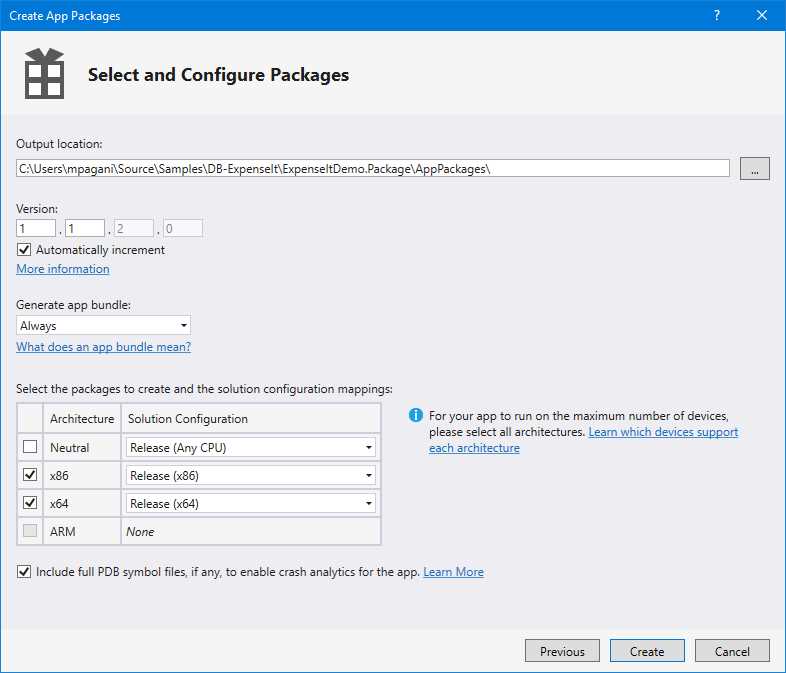
Figure 46: The window to configure the content of the package
In the next section, you will have the option to configure the package you’re going to create. At first, you will need to define the folder where you want to generate the MSIX package. By default, it will be a folder called AppPackages inside the Windows Application Packaging Project.
Next, you can define the version number and choose whether you want to generate an app bundle. The suggested approach is to use Always.
Note: An app bundle is a special package that includes multiple subpackages, one for each potential configuration of the user. With this approach, the tool will generate a main package with the basic app, plus a series of subpackages for the various CPU architectures, scale factors, languages, etc. Windows will install only the components that are the best match for the user’s configuration.
In the last section, you can define which packages you want to create, based on the different architectures you want to support. Since we are packaging a classic desktop application, we can support x86 and x64 architectures. Universal Windows Platform apps, instead, can be compiled for ARM. Using the Solution Configuration drop-down menu, we can also choose the configuration we want to use. If you’re building a package for distribution, the suggested one to use is Release.
Click Create. Visual Studio will start building the applications, and it will generate the package. At the end, you will be notified with a confirmation window like the following one.
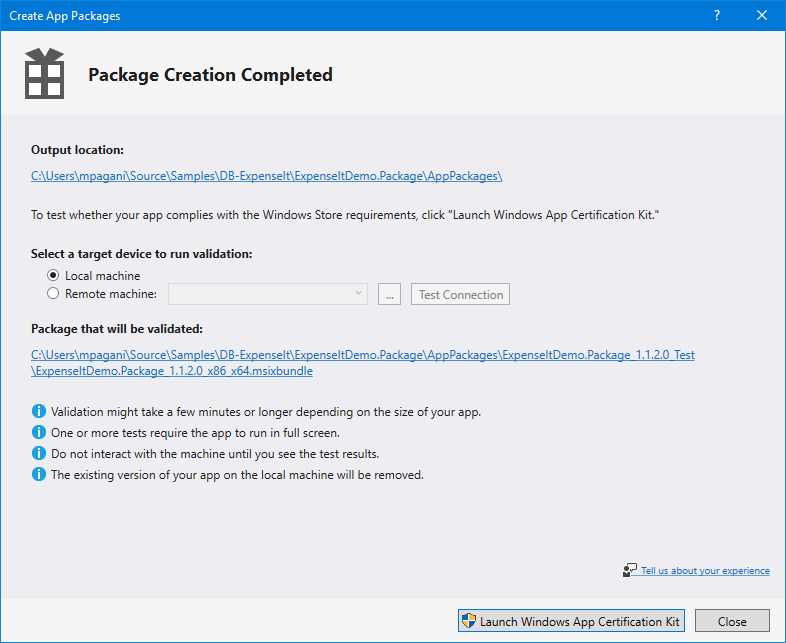
Figure 47: The creation of the package has been completed
By clicking the Output location, you will have access to the folder where the package has been created, which will look like the following image.
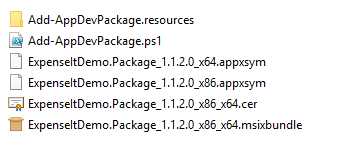
Figure 48: The output of the package creation process by Visual Studio
The main file is the one with the extension .msixbundle, which is the generated package. Since we have specified that we wanted to create an app bundle, Visual Studio has generated an .msixbundle file, which contains one .msix package for each supported architecture. Other important files are the test certificate used to sign the package and a PowerShell script, which we can use to automate the deployment of the package. The script will take care of installing the certificate and then deploying the package.
Packaging a standalone application
The Windows Application Packaging Project also supports packaging applications for which you don’t own the source code. Thanks to this approach, you’ll be able to retain the benefits of the Visual Studio environment, like the powerful manifest editor, or the ability to easily generate a MSIX package for the Store or for sideloading.
The first step to using the Windows Application Packaging Project with a standalone application is to copy, inside it, the binaries that comprise your application, like DLLs, assets, and configuration files.
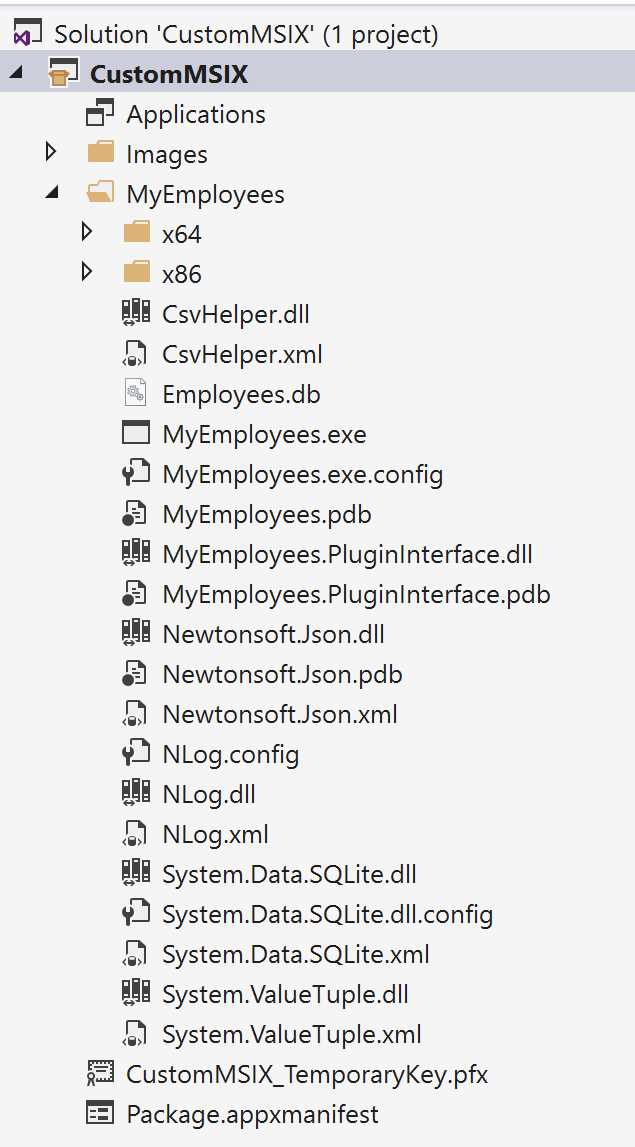
Figure 49: A Windows Application Packaging Project that contains the binaries of a standalone application
The next step is to configure the project to use, as a starting point, the main executable of the application you have just copied. However, in this case we can’t use the Add reference option, because we don’t have a Visual Studio project with the main application to reference. We already have the binaries included in the project itself. We must manually edit the project’s file by right-clicking it and choosing Edit Project. Visual Studio will open the XML version of the project’s file.
Now locate the first PropertyGroup element, containing information like the target SDK and the minimum supported Windows 10 version. You will need to add a new entry called EntryPointExe, which must include the relative path to the executable.
Code Listing 20
<PropertyGroup> <ProjectGuid>b2767d43-1ddb-4aa8-8dee-36d54055dcd2</ProjectGuid> <TargetPlatformVersion>10.0.17763.0</TargetPlatformVersion> <TargetPlatformMinVersion>10.0.17763.0</TargetPlatformMinVersion> <DefaultLanguage>en-US</DefaultLanguage> <PackageCertificateKeyFile>CustomMSIX_TemporaryKey.pfx</PackageCertificateKeyFile> <EntryPointExe>MyEmployees\MyEmployees.exe</EntryPointExe> </PropertyGroup> |
That’s it. Now you can just press F5 to deploy the packaged version of the application. Alternatively, you can right-click the project and choose Store > Create app package to start the wizard, which will generate a MSIX package for distribution.
Creating a registry hive
One of the challenges of using the Windows Application Packaging Project, compared to the MSIX Packaging Tool, is that it doesn’t support capturing and deploying a registry hive. The MSIX Packaging Tool is able to capture all the changes performed by the installer on the system, including the creation of keys in the system registry. These keys are then captured in one or more files with the .dat extension, and then deployed inside the virtual registry when the package is installed. This way, the application will be able to read these keys right away at the start.
The Windows Application Packaging Project lacks this capability, since it doesn’t perform any capturing process. What if your packaged application needs to deploy one or more registry keys anyway? A solution is to use a library included in the Windows 10 SDK called Offline Registry Library, which is implemented by the offreg.dll file.
This library exposes classes and methods to create registry hives. However, compared to the traditional APIs that we find in other development environments (like the Registry class in the .NET Framework), these hives aren’t stored in the system registry, but in an offline file. This file uses the same exact format leveraged by the .dat files created by the MSIX Packaging Tool. Thanks to this library, we can write a small application that creates the hive we need. Then we just need to include it inside the Windows Application Packaging Project to deploy it together with our package.
The Offline Registry Library is native, which means that you must leverage C or C++ to use it. If you’re a C# developer, you can leverage an open-source wrapper developed by Michael Bisbjerg, called OffregLib. The library is available on GitHub and on NuGet.
You can leverage this library to build an application that generates a registry hive with the required configuration. In this case, we’re going to use a console application.
Note: The library shouldn’t be installed in the main application you’re packaging. It should be leveraged by an application built with the only goal of creating the registry hive you need. The .dat file, in fact, must be copied inside the Windows Application Packaging Project so that it can be deployed at startup. It can’t be deployed at runtime.
Once you have created your project in Visual Studio, just right-click your project, choose Manage NuGet Packages, look for the library called OffregLib, and install it.
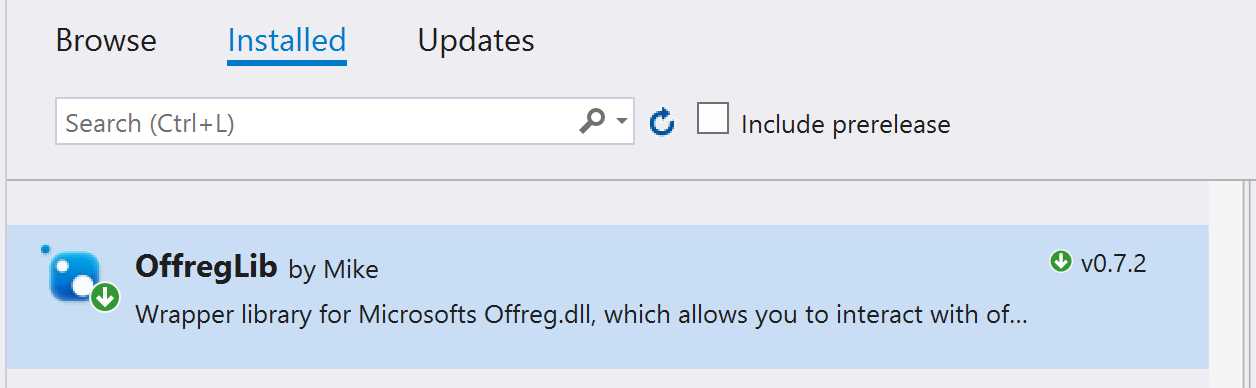
Figure 50: The OffregLib library in NuGet
Using this library is easy. The two relevant methods to use are:
- CreateSubKey(), which creates a key as child of the selected node.
- SetValue(), which creates a value inside the key.
For example, let’s say that you want to create a virtual registry file that creates the value FirstRun inside the HKLM/SOFTWARE/Contoso/ContosoExpenses hive. This is the code you need to use.
Code Listing 21
using (OffregHive hive = OffregHive.Create()) { using (var registryEntry = hive.Root.CreateSubKey("REGISTRY")) { using (var machineEntry = registryEntry.CreateSubKey("MACHINE")) { using (OffregKey key = machineEntry.CreateSubKey("SOFTWARE")) { using (var subKey = key.CreateSubKey("Contoso")) { using (var finalKey = subKey.CreateSubKey("ContosoExpenses")) { // Set a value to a string. finalKey.SetValue("FirstRun", "True"); } } } } } } |
You create the starting point of a hive using the static OffregHive.Create() method. From there, you can call the CreateSubKey() method to create a new item as child of the current one. Each child must be created by calling the CreateSubKey() method on the child created in the previous iteration. The library, in fact, doesn’t support a way to create a full path with a single operation.
Note: In order to work properly as a virtual registry for an MSIX package, the starting node should be called REGISTRY.
Once you have reached the desired path, you can finally call the SetValue() method to create the desired value, passing as parameters the key’s name and its value. As a last step, you can save the offline registry file by invoking the SaveHive() method on the starting OffregHive object. This is the full definition of the console application.
Code Listing 22
namespace RegistryHive.Writer { class Program { static void Main(string[] args) { using (OffregHive hive = OffregHive.Create()) { using (var registryEntry = hive.Root.CreateSubKey("REGISTRY")) { using (var machineEntry = registryEntry.CreateSubKey("MACHINE")) { using (OffregKey key = machineEntry.CreateSubKey("SOFTWARE")) { using (var subKey = key.CreateSubKey("Contoso")) { using (var finalKey = subKey.CreateSubKey("ContosoExpenses")) { // Set a value to a string finalKey.SetValue("FirstRun", "True"); } } } } } // Delete the file if it exists - Offreg requires files not to exist. if (File.Exists("Registry.dat")) File.Delete("Registry.dat"); // Save it to disk - version 5.1 is Windows XP. This is a form of compatibility option. // Read more here: http://msdn.microsoft.com/en-us/library/ee210773.aspx hive.SaveHive("Registry.dat", 5, 1); } } } } |
Now you can just launch your console application and, at the end of the process, you will find a file called Registry.dat in the build output folder of Visual Studio.
The final step is simply to copy this file inside the Windows Application Packaging Project of your solution so that it can be included in the generated MSIX package.
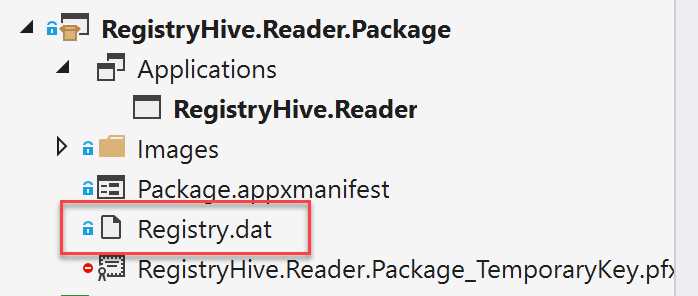
Figure 51: The Registry.dat file included in the Windows Application Packaging Project
Now your packaged application will be able to find the FirstRun key inside the registry hive HKLM/SOFTWARE/Contoso/ContosoExpenses, even if this key doesn’t exist in your system registry.
Integrating with Windows 10
Many Windows applications have the requirement to integrate with the operating system. They may allow the creation of files, which should be opened with a double-click in File Explorer; or maybe they must be configured to run at startup; or again, they may need to set up some specific rules for the Windows firewall.
All these scenarios are typically controlled using the system registry and delegated to the installer of the application. The installer takes care of creating the keys required to register a specific file type association, or to add a context menu in File Explorer, or to expose a COM object to other applications. The challenge is that, most of the time, you must rely on a third-party tool to configure this integration, since the process isn’t straightforward. You are required to create some special keys in the HKEY_LOCAL_MACHINE\SOFTWARE\Classes hive and to deal with concepts like ProgId and CLSID, which are typical of the COM world. Third-party installer authoring tools make this approach easier, since they typically provide a user interface that will create, under the hood, the required registry keys for you.
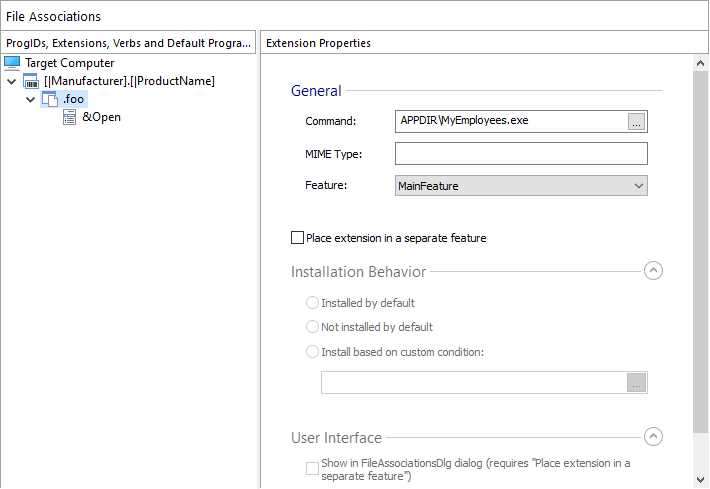
Figure 52: The dialog in Advanced Installer for creating a file-type association
MSIX packaging makes the integration even easier by moving the configuration of Windows 10 extensions from the registry to the manifest. Supporting a file type association or a startup task is nothing more than clicking a couple of options in the Visual Studio’s manifest editor or, if you prefer a manual approach, adding an XML entry to the manifest.
Let’s see some examples of the most common Windows integration options.
Registering a file-type association
File-type associations can be easily configured using the manifest editor included in Visual Studio. Just double-click the Package.appxmanifest file inside the Windows Application Packaging Project and move to the Declarations tab. A drop-down menu will list all the available integration options. Choose File Type Associations and click Add.
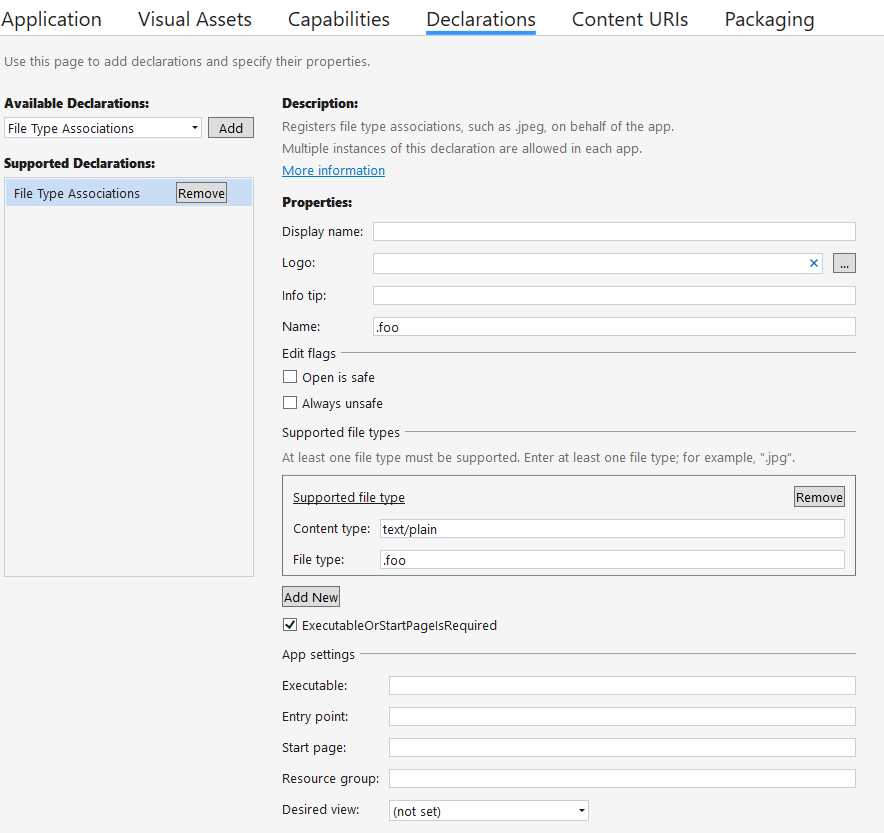
Figure 53: How to register a file-type association
The Name field is required and must match the extension you want to register. You can register as many extensions as you want by simply clicking Add New. By default, the template comes with a single association. For each of them, the required field to fill is File type, which must contain the extension you’re registering, as well. Content type is optional, but it’s helpful to let Windows understand which kind of content is stored inside the file.
By default, Windows will apply the main logo of the application to the files with the selected extensions. You can apply a custom logo, if you prefer, by choosing a different image in the Logo field.
If you right-click the Package.appxmanifest file and choose View code, you will be able to see how the options you have chosen have been translated into XML. Inside the Application entry you will find the following item.
Code Listing 23
<Extensions> <uap:Extension Category="windows.fileTypeAssociation"> <uap:FileTypeAssociation Name=".foo"> <uap:SupportedFileTypes> <uap:FileType ContentType="text/plain">.foo</uap:FileType> </uap:SupportedFileTypes> </uap:FileTypeAssociation> </uap:Extension> </Extensions> |
From a developer point of view, the activation works in the same way as for a traditional Win32 application. The application will be opened with, as first argument, the full path of the file selected by the user.
Enabling a context menu
File-type associations are often coupled with a context menu. When users right-click a file that is supported by your application, they will have access to a broader set of options. This feature can be configured using the same windows.fileTypeAssociation extension we saw in the previous section. However, the manifest editor doesn’t support it, so we need to manually add it in the XML by right-clicking the Package.appxmanifest file and choosing View code. This is what the extension looks like.
Code Listing 24
After the SupportedFileTypes entry, which contains the list of supported extensions, we add a new section called SupportedVerbs, which can contain one or more Verb items. Each Verb item is an option displayed in the context menu when you right-click a file with the target extension, such as .foo. Each entry has a unique Id and Parameters, which specify the set of arguments that will be passed to the application when you select this option. Thanks to these parameters, the application will be able to understand the context and perform the most appropriate action.
Register a global alias
Some applications need to register as a global alias so that you can invoke them from any File Explorer or command prompt instance. This extension isn’t supported by the visual editor in Visual Studio, so you will need add the following entry to the XML. The extension is called windows.appExecutionAlias.
Code Listing 25
<?xml version="1.0" encoding="utf-8"?> <Package xmlns="http://schemas.microsoft.com/appx/manifest/foundation/windows10" xmlns:uap3="http://schemas.microsoft.com/appx/manifest/uap/windows10/3" xmlns:desktop="http://schemas.microsoft.com/appx/manifest/desktop/windows10" IgnorableNamespaces="uap3 desktop"> <Applications> <Application> <Extensions> <uap3:Extension Category="windows.appExecutionAlias" Executable="MyEmployees.exe" EntryPoint="Windows.FullTrustApplication"> <uap3:AppExecutionAlias> <desktop:ExecutionAlias Alias="ME.exe" /> </uap3:AppExecutionAlias> </uap3:Extension> </Extensions> </Application> </Applications> </Package> |
In this example, we’re setting up an alias called ME.exe, which will launch the MyEmployees.exe executable included inside the package. After deploying this package, you would be able to just open a command prompt and, regardless of the folder in which you are located, type ME and press Enter to start the application.
Launch the application at startup
Another common requirement for applications is to start when the user logs in, so that they are immediately ready to handle tasks for the user. This goal can be achieved with the windows.startupTask extension, which isn’t supported by the visual editor. As such, you will need to edit the XML behind the Package.appxmanifest file and add the following snippet.
Code Listing 26
<Package xmlns:desktop="http://schemas.microsoft.com/appx/manifest/desktop/windows10" IgnorableNamespaces="desktop"> <Applications> <Application> <Extensions> <desktop:Extension Category="windows.startupTask" Executable="MyEmployees.exe" EntryPoint="Windows.FullTrustApplication"> <desktop:StartupTask TaskId="MyEmployees" Enabled="true" DisplayName="My Employees App" /> </desktop:Extension> </Extensions> </Application> </Applications> </Package> |
The extension itself just needs an Executable attribute, which specifies the executable included inside the package you want to launch at startup. Then you need to define a StartupTask entry with the following properties:
- TaskId, the unique identifier of the task.
- Enabled, which defines the default status of the task.
- DisplayName, the name displayed in Task Manager in the list of startup services.
Note that this feature follows the original Universal Windows Platform philosophy, which is “user first.” The goal is to make sure that all the operations that might jeopardize the user experience are made known to the user. As such, a startup task is initialized only the first time the application is launched. If the application is deployed but never started, the startup task won’t be enabled.
Transition your users
When you start packaging your application as MSIX, there might be an unintended negative effect. Since Windows isn’t able to determine the identity of a classic application, compared to one packaged with MSIX, users won’t be blocked from installing the MSIX package of an application they already have deployed on their machine with a traditional installer. This can lead to multiple issues from a user experience point of view. In the best case, users will be confused because they will have two identical versions of the same application running side by side; in the worst case, users can suffer data loss if both applications are reading and writing from the same data source.
Thanks to a set of special extensions, developers have the opportunity to facilitate this transition by making sure that all the existing shortcuts and file-type associations are redirected to the MSIX-packaged version instead of the classic one. Let’s see these extensions in detail.
Shortcuts transition
This special extension allows Windows to automatically redirect all the existing shortcuts (in the Start menu, on the desktop, in the list of programs installed on your machine, etc.) to open the MSIX-packaged version of the application instead of the classic one. Let’s take a look at a sample snippet.
Code Listing 27
<Package xmlns:rescap3="http://schemas.microsoft.com/appx/manifest/foundation/windows10/restrictedcapabilities/3" IgnorableNamespaces="rescap3"> <Applications> <Application> <Extensions> <rescap3:Extension Category="windows.desktopAppMigration"> <rescap3:DesktopAppMigration> <rescap3:DesktopApp ShortcutPath="%USERPROFILE%\Desktop\[my_app].lnk" /> <rescap3:DesktopApp ShortcutPath="%APPDATA%\Microsoft\Windows\Start Menu\Programs\[my_app].lnk" /> </rescap3:DesktopAppMigration> </rescap3:Extension> </Extensions> </Application> </Applications> </Package> |
The extension is called windows.DesktopAppMigration, and it includes a section called DesktopAppMigration. Inside it you can add as many DesktopApp entries as you need, one for each shortcut created by default by the traditional installer. The example in Code Listing 27 migrates two shortcuts: the one created on the desktop, and the one created in the Start menu. The full path of these shortcuts can be obtained by searching for the ones created by the traditional installer, right-clicking it, and choosing More > Open file location.
Once you have deployed the MSIX package with such a configuration, clicking the shortcuts in the Start menu, or the ones created on the desktop by the traditional installer, will open the MSIX-packaged version.
File type association transition
We have just seen how an application can be registered to open one or more file types based on their extensions. In such a scenario, you may already have the classic version of your Windows application registered for these file types. The goal of this special extension is to make sure that, once the MSIX package is deployed, double-clicking one of these files will open it instead of the classic version that was deployed with a traditional installer.
Here is the relevant snippet.
Code Listing 28
<Package xmlns:uap="http://schemas.microsoft.com/appx/manifest/uap/windows10" xmlns:uap3="http://schemas.microsoft.com/appx/manifest/uap/windows10/3" xmlns:rescap3="http://schemas.microsoft.com/appx/manifest/foundation/windows10/restrictedcapabilities/3" IgnorableNamespaces="uap3, rescap3"> <Applications> <Application> <Extensions> <uap:Extension Category="windows.fileTypeAssociation"> <uap3:FileTypeAssociation Name=".foo"> <rescap3:MigrationProgIds> <rescap3:MigrationProgId>Foo.Bar.1</rescap3:MigrationProgId> <rescap3:MigrationProgId>Foo.Bar.2</rescap3:MigrationProgId> </rescap3:MigrationProgIds> </uap3:FileTypeAssociation> </uap:Extension> </Extensions> </Application> </Applications> </Package> |
To support the file-type transition, you need to find the programmatic identifier (ProgID), which is used by the classic application to register the file-type association. This is the special registry key we mentioned at the beginning of the section. You can locate it by analyzing the original installer of your application or by exploring HKEY_LOCAL_MACHINE\SOFTWARE\Classes\ in the Registry Editor. In the following screenshot, for example, you can see all the ProgIDs registered by Microsoft Excel.
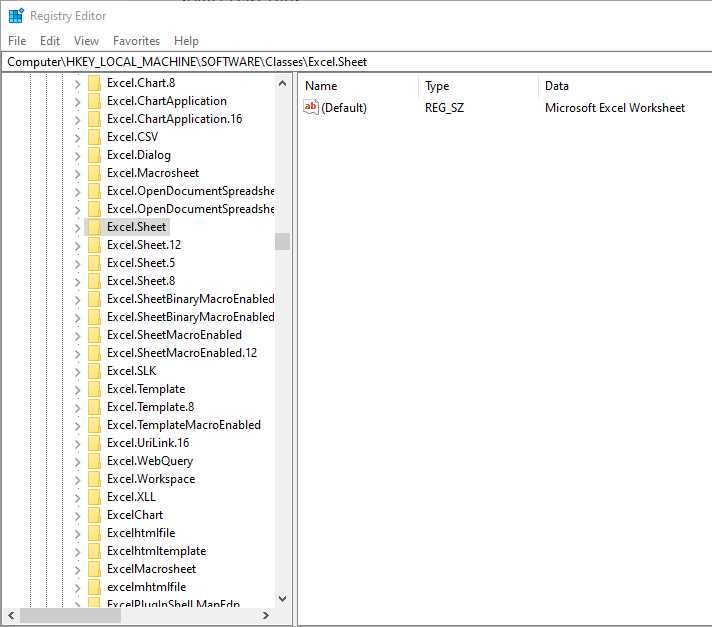
Figure 54: The ProgIDs registered by Microsoft Excel to handle different file types
Other extensions
The manifest of a MSIX-packaged application supports many more extensions, like:
- Registering a protocol to launch the application.
- Setting one or more firewall rules.
- Exposing COM objects to other applications.
- Handling image preview in File Explorer.
- Exposing file properties in the details pane.
You can find the documentation on how to enable all these extensions here.
- 1800+ high-performance UI components.
- Includes popular controls such as Grid, Chart, Scheduler, and more.
- 24x5 unlimited support by developers.