
MSIX Succinctly®

CHAPTER 6
Move Your Application Forward with MSIX
So far, we have learned how MSIX is a great way to improve the deployment of your existing Windows applications. However, if you’re a developer, MSIX is a lot more than just a new deployment technology. It opens up many exciting opportunities to move your application forward, to enhance it, and to access all the new features that have been added to Windows 10 in the past years, like support for biometric authentication, toast notifications, Timeline, and new UI controls.
Evolving the ecosystem
When the Universal Windows Platform was launched, its focus was to provide a new modern framework to help developers build new experiences and compelling applications that can leverage all the latest enhancements in modern development, like touch and inking support, first-class support for the cloud, and speech recognition.
These features were immediately very compelling for developers, but there were many requirements to satisfy, especially in the enterprise space. These requirements typically belong to the traditional Windows world, like the ability to run at admin level and deploy applications using SSCM, Intune, or a website. Additionally, these applications usually have a long history and a big development codebase, so rewriting them using a new technology wasn’t feasible in many scenarios.
With the latest enhancements in the Windows app-development story, this barrier between the modern and desktop worlds is becoming thinner and thinner. The Universal Windows Platform is still a great starting point if you want to build applications that target new experiences, but now it’s also a framework that you can leverage from your existing desktop applications. You can easily add a reference to the Universal Windows Platform in your desktop application and use features that, in the past, were reserved for modern apps, like Windows Hello, Timeline, or Live Tiles. And thanks to a new technology called XAML Islands, you can add controls that belong to the Universal Windows Platform inside your existing Windows Forms or WPF UI. This way, you’ll be able to leverage the new UI features (fluent design, enhanced accessibility, touch support, etc.) without rewriting your application from scratch.
MSIX is a great starting point for enhancing your Windows applications. Many APIs of the Universal Windows Platform can be consumed by a plain Win32 application, but some of them require the application to have an identity; otherwise, they won’t work, or they will return exceptions. The identity is a concept that typically belongs to Universal Windows Platform applications, but thanks to MSIX packaging, you can also enable it for classic desktop applications.
Some of the features that require an identity are:
- Notifications
- Live Tiles and badges
- Background tasks
- Share target
- Storage and file pickers
- App services
Adding features from the Universal Windows Platform
In the past, adding a reference to the Universal Windows Platform in a Win32 app wasn’t a straightforward task, since you needed to manually look for the Windows metadata files on the hard disk and add them. Now the process is really easy, thanks to a dedicated NuGet package, which you just need to install in your WPF or Windows Forms application.
The package is called Microsoft.Windows.SDK.Contracts, and it comes in multiple versions, based on the Windows 10 SDK version you want to target.

Figure 55: The various versions of the Microsoft.Windows.SDK.Contracts package
Once the package has been installed, you will be able to access the whole Universal Windows Platform surface in your application, which is offered through the Windows.* namespace.
In most cases, using APIs from the Universal Windows Platform in your classic desktop applications isn’t any different from leveraging them in a full UWP app. For most of the features, you can just reference the standard documentation. You can also read my previous books published by Syncfusion, UWP Succinctly and More UWP Succinctly, if you want to learn more about the features offered by the Universal Windows Platform.
However, as already mentioned, some of the features require the application to have an identity before being used. Let’s see an example.
Adding a toast notification
One of the features included in the Universal Windows Platform is the ability to send toast notifications. Windows offers a rich notification model that supports text, images, and actions.

Figure 56: An actionable toast notification
Toast notifications are defined using an XML schema, which describes all the relevant properties like the title, text, icon, and actions. The following sample shows how to send a toast notification within an application.
Code Listing 29
In order to use these APIs, you will need to reference the following namespaces in your class.
Code Listing 30
using Windows.Data.Xml.Dom; using Windows.UI.Notifications; |
Once you have defined the XML schema, you need to load it inside a XmlDocument object by using the LoadXml() method. Then you can wrap it inside a ToastNotification object and, in the end, show it to the user by calling the Show() method exposed by the ToastNotificationManager.CreateToastNotifier() object.
Tip: If you prefer to use classes and C# to build your notification, you can use a library on NuGet called Microsoft.Toolkit.UWP.Notifications.
As you can see, these APIs belong to the two Windows.* namespaces declared in Code Listing 30, which means they are part of the Universal Windows Platform. If you invoke this code from an unpackaged Windows Forms or WPF application, you will see the following exception.

Figure 57: The exception raised when you send a toast notification from a Windows application that isn’t packaged
This is a typical symptom of an API that requires an identity and, as such, it can’t be used from a Windows application without packaging it first. The solution is quite straightforward: you need to add a Windows Application Packaging Project to your solution and, by following the guidance described in Chapter 5, package your application with MSIX.
Once the application has been packaged and deployed, the previous code will no longer trigger an exception. The notification will be correctly displayed.
Adding a UWP UI control
Windows 10 version 1809 introduced XAML Islands, a feature for hosting controls from the Universal Windows Platform in Win32 applications. However, the technology was just added in preview. Windows 10 version 1903 is marked the first official release.
The XAML Islands architecture
XAML Islands relies on a new set of APIs included in Windows 10 called XAML Bridge Source WinRT APIs. The “magic” is powered by two new system APIs: WindowsXamlManager and DesktopWindowXamlSource.
The WindowsXamlManager takes care of initializing the UWP XAML Framework inside the current thread of a non-Win32 Desktop app so that you can start adding UWP controls to it.
The DesktopWindowXamlSource is the actual instance of your Islands content. It has a Content property, which you can instantiate and set with the control you want to render.
With an instance of the DesktopWindowXamlSource class, you can attach its HWND (Win32 Windows Handle) to any parent HWND you want from your native Win32 app. This virtually enables any framework that exposes HWND to host a XAML Island, including third-party technologies like Java and Delphi. However, when it comes to WPF and Windows Forms applications, you don’t have to manually do that, thanks to the Windows Community Toolkit, which already wraps these classes into ready-to-be-used controls.
The Windows Community Toolkit is an open-source project maintained by Microsoft and driven by the community, and includes many custom controls, helpers, and services to speed up the development of Windows applications. Starting from version 5.0, the toolkit includes four packages to enable XAML Island:
- One called WindowsXamlHost. It's a generic control that can host any UWP control, either custom or native. It comes in two variants: Microsoft.Toolkit.Wpf.UI.XamlHost for WPF and Microsoft.Toolkit.Forms.UI.XamlHost for Windows Forms.
- One called Controls. It includes wrappers for first-party controls like Map or InkCanvas. Thanks to these controls, you'll be able to leverage them as if they're native WPF or Windows Forms controls, including direct access to the exposed properties and binding support. Also in this case, it comes into two variants: Microsoft.Toolkit.Wpf.UI.Controls for WPF, and Microsoft.Toolkit.Forms.UI.Controls for Windows Forms.
All these packages are available on NuGet.

Figure 58: The XAML Islands architecture
Using one of the available wrappers
The purpose of the wrappers is to make it easier for WPF and Windows Forms developers to include some of the most commonly requested controls. These are the ones currently available in the Windows Community Toolkit:
- WebView: A modern WebView that you can use to embed HTML content in your application. It’s based on the Edge rendering engine, as opposed to the built-in .NET Framework WebBrowser control, which is still based on the Internet Explorer engine.
- MapControl: A map control with full support for touch, inking, offline capabilities, traffic, etc.
- MediaPlayerElement: An advanced control to play media items with support for captions, smooth streaming, modern codecs, etc.
- SwapChainPanel: A hosting surface to render DirectX content as XAML UI.
- InkCanvas: A canvas with full support for inking, with text and shape recognition.
Thanks to these wrappers, you can add one of these controls from the Universal Windows Platform without using any Windows Runtime concept or type. You will just leverage properties and events like you would do with a native .NET Framework control.
Let’s see an example by adding an InkCanvas control to a WPF application. The first step is to add the relevant NuGet package, which, in the case of a WPF application, is Microsoft.Toolkit.Wpf.UI.Controls.

Figure 59: The NuGet package to add XAML Islands wrapped controls to a WPF application
Once the package is installed, you will need to add a namespace to the XAML page where you want to add the control. Being a third-party control, it can’t be referenced like you would do with a native control, like TextBox or Grid. This is the namespace to add.
Code Listing 31
xmlns:toolkit="clr-namespace:Microsoft.Toolkit.Wpf.UI.Controls;assembly=Microsoft.Toolkit.Wpf.UI.Controls" |
Thanks to this namespace, you can reference all the wrapped controls included in the toolkit. For example, this is how you can add the InkCanvas control to your page.
Code Listing 32
<toolkit:InkCanvas x:Name="Signature" /> |
Once the control has been added, you can interact with it in your code like you would do with a native WPF control. For example, let’s say you want to change the interaction type so that the user can also interact with the canvas using the mouse or the touch screen. By default, in fact, the InkCanvas control works only with the pen. It’s enough to add the following snippet when the WPF window is initialized.
Code Listing 33
public partial class ExpenseDetail : Window { public ExpenseDetail() { InitializeComponent(); Signature.InkPresenter.InputDeviceTypes = CoreInputDeviceTypes.Mouse | CoreInputDeviceTypes.Pen; } } |
InkPresenter is a wrapped property exposed by the InkCanvas control, which accepts one or more values of the CoreInputDeviceTypes enumerator. They’re both types coming from the Universal Windows Platform, but, being wrapped for you, they can be used without any specific knowledge about this framework.
In the following figure, you can see the actual outcome.

Figure 60: A WPF window with an InkCanvas control
Hosting a generic control
The XAML Islands feature also offers the opportunity to host any control from the Universal Windows Platform by using the WindowsXamlHost control included in the Windows Community Toolkit. To add this control to your application, you will need to install another NuGet package, called Microsoft.Toolkit.Wpf.UI.XamlHost.
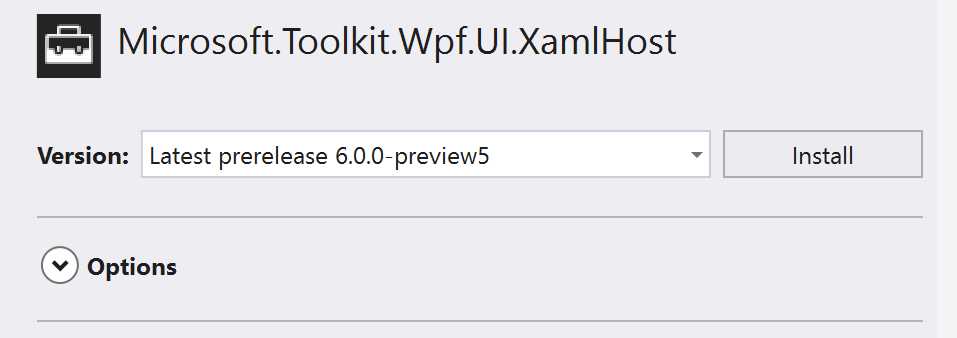
Figure 61: The NuGet package to add the generic UWP control host in a WPF application
Once the library has been added, you need to add to the WPF XAML the declaration of the namespace that contains the control.
Code Listing 34
xmlns:xamlhost="clr-namespace:Microsoft.Toolkit.Wpf.UI.XamlHost;assembly=Microsoft.Toolkit.Wpf.UI.XamlHost" |
Then you can add the WindowsXamlHost to your page, like in the following sample.
Code Listing 35
<xamlhost:WindowsXamlHost InitialTypeName="Windows.UI.Xaml.Controls.CalendarView" x:Name="CalendarUwp" ChildChanged="CalendarUwp_ChildChanged" /> |
The key property of the control is InitialTypeName, which must be set with the full signature of the control you want to host. In the previous sample, we’re hosting a control built-in with the Universal Windows Platform, the CalendarView. However, you aren’t limited to built-in controls. You can also reference a custom control or a control coming from a third-party vendor.
The second important part is the usage of the ChildChanged event. The main difference between this control and a wrapped control is that WindowsXamlHost can virtually host any control. As such, it can’t expose specific properties or events. Thanks to the ChildChanged event, you can intercept the rendering of the hosted control and set properties or subscribe to events that are specific to the control you want to display. Here is an example implementation of this event.
Code Listing 36
private void CalendarUwp_ChildChanged(object sender, System.EventArgs e) { WindowsXamlHost windowsXamlHost = (WindowsXamlHost)sender; Windows.UI.Xaml.Controls.CalendarView calendarView = (Windows.UI.Xaml.Controls.CalendarView)windowsXamlHost.Child; if (calendarView != null) { calendarView.SelectedDatesChanged += (obj, args) => { if (args.AddedDates.Count > 0) { //do something } }; calendarView.MaxDate = DateTimeOffset.Now; } } |
The WindowsXamlHost control offers a property called Child that contains a reference to the control being hosted. This control matches the one you have defined with the InitialTypeName property, so you can cast it using the same type. In the previous example, we’re casting the Child property to the Windows.UI.Xaml.Controls.CalendarView control, which was set as InitialTypeName in the XAML.
Once we have a reference to the hosted control, we can access its events and properties. In the previous snippet, we subscribe to the SelectedDatesChanged event (which is triggered when the user selects a date from the calendar), and we set the MaxDate property (to set a maximum selectable date).
This is the final result in the WPF application.

Figure 62: A UWP CalendarView control included inside a WPF window
As you can see in Figure 62, thanks to the events that we have subscribed to inside the ChildChanged event, we are able to interact with the control from our WPF application. The selected date is displayed in the window inside a WPF TextBlock.
XAML Islands and MSIX
You might be wondering what the relationship is between MSIX and XAML Islands. This technology is available starting from Windows 10 version 1903, so it requires your application to target this version or later as minimum. If you don’t satisfy this requirement, your application will crash with the following exception as soon as you try to load a window that contains one or more UWP controls.

Figure 63: The exception raised when you use XAML Islands without a manifest
The best and quickest solution is to package your application with MSIX. In the MSIX manifest, you can declare the minimum Windows 10 version the app supports, so you can make sure that your Windows application using XAML Islands is targeting 1903 as minimum version.
Alternatively, you can also add an application manifest, which is an XML that describes and identifies the shared and private side-by-side assemblies that an application should bind to at runtime. Starting from Windows 10 version 1903, the manifest includes a property called maxVersionTested, which you can use to leverage some Windows 10 features in an unpackaged application. You can learn more about this approach in this article.
The future of XAML Islands: WinUI 3.0
As already mentioned, every Windows 10 feature update brings new features for developers. This includes new UI controls, like the teaching tip introduced in Windows 10 version 1903. The limitation of this approach is that, in order to use these controls, your customer must be on the same or later version, which is not always possible in the enterprise space. For this reason, Microsoft has introduced WinUI, an open source library that includes most of the inbox UWP controls and that offers backward compatibility back to Windows 10 version 1607. Since it’s a NuGet package, you just need to install it in your Windows project to take advantage of the latest UI controls.
However, WinUI doesn’t help to solve this problem when it comes to XAML Islands, since it leverages some features of the XAML framework that are deeply integrated with Windows. Currently, your customers must use Windows 10 1903 or later to launch a classic Windows application that uses XAML Islands to host UWP controls. However, at Build 2019, Microsoft announced that the next release of WinUI, 3.0, will solve this problem by detaching the whole XAML Framework from the operating system and moving it directly inside the library. As a consequence, you will be able to support XAML Islands in your applications starting from Windows 10, version 1607, just by installing the WinUI 3.0 package from NuGet in your WPF or Windows Forms applications.
The first preview of WinUI 3.0 is scheduled for the end of 2019. You can find the complete roadmap on GitHub.
Extend your Windows application with Universal Windows Platform components
The Universal Windows Platform offers many powerful APIs to add new features to your existing Windows application. However, there’s more! UWP also comes with many components that allow you to perform tasks that, in the past, were reserved for full Universal Windows Platform applications.
Features like background tasks, App Services, and contracts can help your application to integrate even better with Windows 10 and add more value for your users.
In this chapter, we’re going to explore one of these components: background tasks.
Background tasks
The Universal Windows Platform has introduced a new way to perform operations in the background through the introduction of background tasks. This new approach was required due to the different lifecycle of Universal Windows Platform applications compared to the classic Win32 ones. Once an application is minimized in the taskbar, it gets suspended, which means that it can’t leverage CPU, network, or storage. As a consequence, it isn’t able to perform any operations in background. Background tasks have been created to overcome this limitation. They are small components, separate from the main application, that contain code that can be executed at any stage of the lifecycle. Whether the application is opened, closed, or suspended, Windows can run a background task if the conditions for its execution are satisfied.
Thanks to this approach, background tasks are much more friendly in terms of CPU, memory, and consumption compared to the traditional Win32 approaches, like using Windows Services or keeping an entire application in the background.
A background task is controlled by two factors:
- A trigger, the event that triggers the execution of the task.
- A condition, a way to optimize resources and to make sure the task is executed only if all the conditions to perform the operation are satisfied.
However, a traditional Windows application, even when it’s packaged as MSIX, doesn’t follow the same lifecycle as a full UWP application. It can run in the background indefinitely, and it can access all the computer’s resources. Which are the features that make background tasks interesting for classic Windows applications?
The first one is the flexibility of the various triggers available in the system. When you develop a Windows Service or a background process, you need to manually intercept the event that you want to handle. Some of them can be hard to pin down, and you may consume lots of resources to listen to them continuously. Triggers in background tasks, on the other hand, will allow you to focus only on the operation you want to execute. Windows will trigger the task for you when the event happens, even the most complex ones, like a time zone change or the connection with a Bluetooth device.
The second one is the better usage of system resources. With Windows 10, we have seen the advent of many new form factors that go beyond the classic desktop computer, such as 2-in-1s, detachable devices, and tablets. These devices may be optimized for portability and have less power compared to a full desktop PC, or they may be used for long period of times without a power source. Having applications that don’t waste CPU or battery life is critical for all these scenarios. Background tasks include a lot of optimizations to make sure their impact on the system resources is minimum. Additionally, Windows can track them and limit their execution in case the system’s conditions aren’t optimal, like when there is low battery power or too much memory in use.
A background task is defined using a Windows Runtime component, a class library built on top of the Windows Runtime. The main difference from a traditional library is that, through the generation of metadata, it can be consumed using any language supported by the Universal Windows Platform, regardless of the language used to build the component.
The following image shows you the general architecture of a background task.
 Figure 64: The architecture of a background task
The task is registered by the application. During the registration process, the application defines which trigger is connected to the execution of this task. Once it’s registered, the application hands off the execution to Windows. When the registered trigger occurs, Windows will start a new process called BackgroundTaskHost.exe, which will create a new instance of the Windows Runtime Component. Then it will look for a method called Run(), implemented by the component, and it will execute it. As we’re going to see in the rest of the section, as a developer you will be required to implement inside this method the logic you want to execute when the task is invoked.
Windows 10 also supports another background task model, called in-process. In this scenario, the task isn’t implemented with a separate background task, but directly inside the main application. However, this implementation relies on the lifecycle of a full Universal Windows Platform application and can’t be leveraged in a packaged Win32 application scenario.
Let’s see how to implement a background task for the following scenario: we want to display a notification to the user every time the status of the internet connection changes.
Create a background task
The first step is to add a Windows Runtime component to your WPF or Windows Forms solution. You can find this template when you create a new project.

Figure 65: The template to create a Windows Runtime Component in Visual Studio
By default, the new project will contain just one empty class. Feel free to rename it with a more meaningful name. The next step is to inherit your class from the IBackgroundTask interface, which will require you to implement a method called Run().
Code Listing 37
public sealed class OfflineTask : IBackgroundTask { public void Run(IBackgroundTaskInstance taskInstance) { var deferral = taskInstance.GetDeferral(); //background task implementation. deferral.Complete(); } } |
Inside this method, we’re going to add the code that we want to execute when the task is triggered. Inside a task, it’s important to leverage the deferral, which is a special object that keeps the task alive during the execution of asynchronous operations. Typically, when the task is executed, you get a reference to the deferral by calling the GetDeferral() method, and then you release it once the task is ended by calling the Complete() one. Otherwise, as soon as you start an asynchronous operation, which is executed on a different thread, Windows will think that the task has completed its work and will terminate it.
The benefit of using a background task is that you don’t have to focus on the event you want to handle, but rather on the code you want to execute. Let’s see the implementation of our task.
Code Listing 38
public sealed class OfflineTask : IBackgroundTask { public void Run(IBackgroundTaskInstance taskInstance) { var deferral = taskInstance.GetDeferral(); var profile = NetworkInformation.GetInternetConnectionProfile(); string title; string description; if (profile != null) { title = "You're online!"; description = "Make sure to sync all the expenses for your trip!"; } else { title = "You're offline!"; description = "Your expenses won't be synced until you're back online."; } string xml = $@"<toast> <visual> <binding template='ToastGeneric'> <text>{title}</text> <text>{description}</text> </binding> </visual> </toast>"; XmlDocument doc = new XmlDocument(); doc.LoadXml(xml); ToastNotification toast = new ToastNotification(doc); ToastNotificationManager.CreateToastNotifier().Show(toast); deferral.Complete(); } } |
As you can see, the task doesn’t contain any reference to the event that is going to trigger it. It just includes the code that we want to execute when the trigger happens. In our scenario, we use the NetworkInformation class and the GetInternetConnectionProfile() method to discover the status of the internet connection (available or not available). Then we create a new ToastNotification object using an XML schema to display the network status to the user.
Registering the background task in code
Once we have defined the background task, we need to register it inside the application so that we can specify which trigger and which conditions we want to handle. Where to add this code is up to the requirements of your application. In most of the cases, a background task is automatically registered when the application is launched, so it’s a good practice to place it when the application starts or when the first window is loaded. However, there are scenarios where you might want to keep the background task off by default and register it only as a user’s choice, for example, with a button in the Settings page.
Regardless of your choice, here is the code snippet to register a background task.
Code Listing 39
public void RegisterBackgroundTask() { string triggerName = "NetworkTrigger"; bool taskRegistered = false; // Check if the task is already registered. foreach (var cur in BackgroundTaskRegistration.AllTasks) { if (cur.Value.Name == triggerName) { taskRegistered = true; break; } } if (!taskRegistered) { BackgroundTaskBuilder builder = new BackgroundTaskBuilder(); builder.Name = triggerName; builder.SetTrigger(new SystemTrigger(SystemTriggerType.NetworkStateChange, false)); builder.TaskEntryPoint = "ContosoExpenses.Task.OfflineTask"; builder.Register(); } } |
These APIs are part of the Universal Windows Platform, and they require the declaration of the following namespace.
Code Listing 40
using Windows.ApplicationModel.Background; |
The first step is to assign a unique name to the trigger, in this case NetworkTrigger. Then, by iterating through the BackgroundTaskRegistration.AllTasks collection, we check if the task has already been registered during a previous execution of the application. If that’s the case, we can skip the rest of the code, since we don’t have to register it again.
If it isn’t registered, instead, we kick-off the registration process by using the BackgroundTaskBuilder class. We need to define the following information:
- The unique name, by using the Name property.
- The TaskEntryPoint, which is the full signature of the class that implements the Run() method. It’s the class we have previously implemented in the Windows Runtime component.
- The trigger that will execute the task. We add it by calling the SetTrigger() method and passing one of the available triggers. In this case, we’re using one of the system triggers, specifically the NetworkStateChange one. By passing false as second parameter, we’re telling Windows that we want to execute the task every time the selected event is triggered. By passing true, we would register a one-shot background task.
- One or more conditions that need to be satisfied in order to run the background task. This isn’t a requirement, but it can be helpful to save resources. In this sample, we’re using the system condition UserPresent to make sure that the task runs only if the user is actively using the computer. If the user is away from the screen, we don’t need to alert them with a notification.
As a last step, we call the Register() method to complete the registration.
Registering the background task in the manifest
Out-of-process background tasks must be declared in the manifest of the application; otherwise, they can’t be registered.
You must open the manifest by double-clicking the Package.appxmanifest file included in the Windows Application Packaging Project of your solution and move to the Declarations tab. From the drop-down list, choose Background Tasks and click Add.

Figure 66: The background task declared in the manifest of the packaged application
First you need to choose from the list which type of background task you’re registering. In our case, we’re using the NetworkStateChange trigger, which belongs to the System event category. In the Entry point field, you need to add the full namespace of the class in the Windows Runtime component that implements the Run() method. It’s the same signature you specified in the TaskEntryPoint property when you registered the task in code.
Packaging everything together
If you try to package the whole solution, you may face some challenges. The first one is that the background task is implemented using a Windows Runtime component, which belongs to a different ecosystem than the different .NET Framework. As such, Visual Studio won’t allow you to directly reference the background task from your WPF or Windows Forms application. A potential solution would be to reference the Windows Runtime component directly from the Windows Application Packaging Project. However, this isn’t a supported scenario. The project is meant to package applications and, as such, it won’t allow referencing a project that doesn’t output an executable, like a library.
So, are we stuck? Luckily, there’s a workaround, which is using an empty UWP project as container for our background task. Universal Windows Platform apps can reference a background task without issues since they belong to the same ecosystem. However, the application will be empty. It will be used to make sure that the MSIX package contains all the required assemblies and files, but it will never be launched and made visible to the user.
As a first step, right-click your Visual Studio solution and add a new project of type Blank App (Universal Windows).

Figure 67: A project to create a blank Universal Windows Platform application
Once the project has been created, right-click it and choose Add reference. From the Project -> Solutions section, choose the Windows Runtime component that includes your background task.
In the end, right-click the Windows Application Packaging Project, choose Add reference and add the UWP project you have just created. Then expand the Applications section and make sure the project that contains your WPF or Windows Forms app is in bold, which means that it will be the entry point of the package.

Figure 68: A Windows Application Packaging Project that contains two applications: a WPF one and a UWP one
Testing the application
That’s it. Now you must set the Windows Application Packaging Project as startup and launch it. You just have to trigger the event that will cause the execution of the background task. In some scenarios, like ours, it’s easy. You just need to disable and enable your internet connection, and you should see a notification popping out.

Figure 69: A toast notification sent by a background task
In some other cases, it might be more complicated, like for a time-based trigger, so Visual Studio provides a convenient way to force the execution of the task. Once the debugger is attached, look in the toolbar for a drop-down menu called Lifecycle Events. By expanding it, you will see a set of default events, plus a list with all the background tasks registered by your application. Just click the one you want to test to force the execution.

Figure 70: The option in Visual Studio to force the execution of a background task
As a side effect of the new configuration of your solution, you might see two applications being deployed in your Start menu: your Win32 packaged application, and the blank UWP application. This happens only when you debug in Visual Studio since, by default, it deploys all the projects included in the package that output an executable. When you generate an MSIX package for the Microsoft Store or for sideloading, you won’t face this problem, since your package has only a single entry point. However, if you want to remove this behavior from Visual Studio, as well, you just need to navigate to Build > Configuration Manager and uncheck the Deploy option for the blank UWP project.

Figure 71: The option to uncheck to avoid the deployment of the blank UWP project
Use a Win32 process in a Universal Windows Platform application
So far, we have seen scenarios where you can integrate features from the Universal Windows Platform inside a classic .NET application. What about the other way around? What if I have a Universal Windows Platform application and I want to leverage features from the Win32 ecosystem?
There are two compelling scenarios where this approach can be useful:
- You want to leverage a library or a process that is targeting the .NET Framework, but it doesn’t provide support to the Universal Windows Platform, or you aren’t ready to migrate it.
- You want to leverage a feature that isn’t supported by the Universal Windows Platform.
Thanks to the Windows Application Packaging Project and a set of extensions included in the Universal Windows Platform, you can achieve this goal. But first, let’s introduce App app services.
App services
Previously in this chapter, we learned about background tasks. App services are built on top of the same concept, but they can be leveraged from multiple applications. Once an application deploys an app service, all the other applications installed on the computer can interact with it. Applications can establish a communication channel with the app service and, using a key-value pairs collection, exchange data.
App services are a great way to offload operations that must be shared across a suite of applications. For example, an app service could implement the logic to extract information from a bar code. Then, other applications belonging to the same suite can just send the bar code image to the app service and get back the decoded text. You can think of app services as a way to build a set of REST services, but which run offline and are managed by Windows.

Figure 72: A sample usage of an app service
From a technical point of view, app services and background tasks share the same implementation. They both implement the IBackgroundTask interface and the code to execute when the task is invoked is defined inside the Run() method. The main difference is the trigger that causes the execution. For background tasks, we have seen that triggers are events that happen inside the system: a network connection change, a Bluetooth device connected, etc. For app services, the trigger is the incoming request from another application.
A client application can connect to an app service by using the AppServiceConnection class, included in the Windows.ApplicationModel.AppService namespace of the Universal Windows Platform. The following sample shows you a connection.
Code Listing 41
public async Task Connect() { //we create a connection with the App app Service service defined by the UWP app. var connection = new AppServiceConnection(); connection.AppServiceName = "DatabaseService"; connection.PackageFamilyName = "Contoso.MyEmployees_8rkfj2ay7vd1w"; connection.RequestReceived += Connection_RequestReceived; connection.ServiceClosed += Connection_ServiceClosed; //we open the connection. AppServiceConnectionStatus status = await connection.OpenAsync(); if (status == AppServiceConnectionStatus.Success) { ValueSet initialStatus = new ValueSet(); initialStatus.Add("Status", "Ready"); await connection.SendMessageAsync(initialStatus); } } |
The two relevant pieces of information to establish a connection are:
- The AppServiceName, defined by the application that exposes the app service.
- The PackageFamilyName of the application that exposes the app service.
Once you have established a connection using the OpenAsync() method, you can start to exchange data between the client application and the app service using a ValueSet, which is a key-value pairs collection. Messages can be exchanged via the SendMessageAsync() method.
After the connection is established, the app service will receive a reference to the channel, and it will be able to use it as well as receive and send messages to the client application. Like for background tasks, you can implement an app service using the out-of-process model (a dedicated Windows Runtime component) or the in-process model (directly in the UWP app). The following sample shows the in-process implementation, which is done in the App class of the Universal Windows Platform application.
Code Listing 42
protected override void OnBackgroundActivated(BackgroundActivatedEventArgs args) { base.OnBackgroundActivated(args); if (args.TaskInstance.TriggerDetails is AppServiceTriggerDetails) { AppServiceTriggerDetails details = args.TaskInstance.TriggerDetails as AppServiceTriggerDetails; Connection = details.AppServiceConnection; Connection.RequestReceived += Connection_RequestReceived; } } private async void Connection_RequestReceived(AppServiceConnection sender, AppServiceRequestReceivedEventArgs args) { if (args.Request.Message.ContainsKey("Status")) { string currentStatus = args.Request.Message["Status"].ToString(); ValueSet set = new ValueSet(); set.Add("StatusUpdated", "Status has been updated"); await args.Request.SendResponseAsync(set); } } |
In the in-process implementation, the Run() method of the Windows Runtime component is replaced by the OnBackgroundActivated() method. The Universal Windows Platform lifecycle, in fact, allows the application to be activated by an event without having to actually launch the whole application. In this scenario, the method will be triggered when another application calls the app service. Windows will execute it in background, and then it will terminate the process.
The arguments of the event handler come with a property called TaskInstance.TriggerDetails, which contains all the information about the channel. The most important one is AppServiceConnection, which is the actual connection established with the calling application. Once we have the connection, we can use it like we dhave doneid in the calling application. We can start listening for incoming requests by subscribing to the RequestReceived event or we can send a message using the SendMessageAsync() method.
In the previous snippet, you can see what happens when the app service has received a message. The RequestReceived event handler is triggered and, inside it, thanks to the Request property, you can access the Message collection, which is the ValueSet object sent by the calling application. Then you can craft a response and send it back to the calling application by calling the SendResponseAsync().
Exactly like a background task, an app service must be declared in the manifest of the application through the Declarations section.
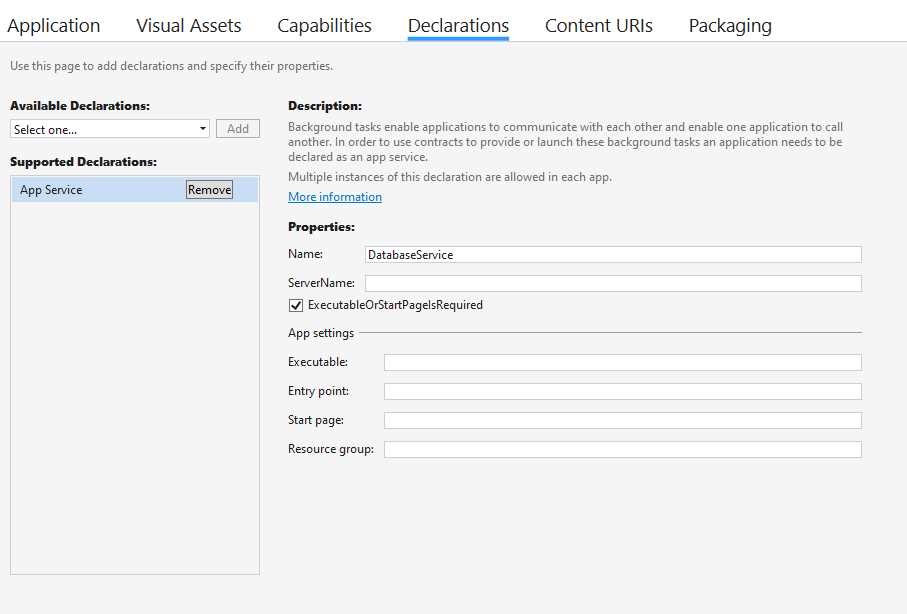
Figure 73: An manifest declaration to expose an app service
The relevant information to set is the Name, which is the one that the other application will need to use (in combination with the Package Family Name of the app) to connect to it. If your app service is declared out-of-process, you will also have to set the Entry point with the full signature of the class that implements it. If, instead, like in the previous sample, the app service is handled in-process, there’s no need to specify an entry point.
Why are app services important in the context of using Win32 processes from a Universal Windows Platform application? Because they are the way the two processes can communicate. The Universal Windows Platform application will expose an app service, and the Win32 process included in the same package will connect to it. By using ValueSet objects, the two processes will be able to exchange data. This way, the Win32 process can perform one or more operations and then return the result to the Universal Windows Platform application, making it possible to perform tasks that are supported only by the .NET Framework.
The only limitation is that this scenario is supported only by in-process app services. We can’t build a communication channel using a separated Windows Runtime component, like we did in the previous section when we implemented a background task.

Figure 74: An app service used as a communication channel between a UWP application and a Win32 process included in the same package
A real example
To demonstrate the usage of this feature, let’s build a Universal Windows Platform application that displays some data to the user. The challenge is that this data is coming from a Microsoft Access database, which isn’t supported by the Universal Windows Platform. We don’t have any APIs that we can use to query an Access database. The .NET Framework, on the other hand, supports this functionality, so we can delegate this operation to a Win32 process. In Figure 75, you can see the look of the final application.

Figure 75: The Employees application built with UWP, but powered by a Win32 process
The main application is built with the Universal Windows Platform, and it leverages a modern UI. However, when the user clicks the Get employees button, the operation will be performed by the Win32 process.
This is how our solution looks.

Figure 76: The solution that includes a UWP application and a Win32 process
We have a UWP application (ExpenseItDemo), a Win32 process (ExpenseItDemo.Export), and a Windows Application Packaging Project (ExpenseItDemo.Package). The last one is required because it helps us to combine both applications in a single MSIX package. As you can see, they are both added as applications inside the project, but the UWP one is set as the entry point.
The first step to building our solution is to declare the app service in the manifest. However, there’s an important thing to highlight. Once you create a package with the Windows Application Packaging Project, its manifest becomes the main one that defines the identity. As such, even if at first glance you would be tempted to declare the app service in the application’s manifest of the Universal Windows Platform application, you must do it in the Packaging Project’s one; otherwise, it won’t be recognized. You must replicate the configuration you see in Figure 76 in the Package.appxmanifest file included in the ExpenseItDemo.Package project.
The Win32 process
In this scenario, the Win32 process is completely transparent to the user. It doesn’t provide any UI, but it just takes care of retrieving the data from the Access database and returning it back to the UWP application. The process is a simple console application, built on top of the .NET Framework.
Tip: If you right-click the Console project and change the Output Type from Console Application to Windows Application, you will get an executable that runs in background without opening a console window. It’s the best choice for this scenario, because the users won’t see any application running other than the main UWP one unless they open Task Manager.
Let’s see the full implementation and explain it step by step.
Code Listing 43
class Program { static AppServiceConnection connection = null; static AutoResetEvent appServiceExit; static void Main(string[] args) { //we use an AutoResetEvent to keep the process alive until the communication channel established by the app service is open. appServiceExit = new AutoResetEvent(false); Thread appServiceThread = new Thread(new ThreadStart(ThreadProc)); appServiceThread.Start(); appServiceExit.WaitOne(); } static async void ThreadProc() { //we create a connection with the app service defined by the UWP app. connection = new AppServiceConnection(); connection.AppServiceName = "DatabaseService"; connection.PackageFamilyName = Windows.ApplicationModel.Package.Current.Id.FamilyName; connection.RequestReceived += Connection_RequestReceived; connection.ServiceClosed += Connection_ServiceClosed; //we open the connection. AppServiceConnectionStatus status = await connection.OpenAsync(); if (status != AppServiceConnectionStatus.Success) { //if the connection fails, we terminate the Win32 process. appServiceExit.Set(); } else { //if the connection is successful, we communicate to the UWP app that the channel has been established. ValueSet initialStatus = new ValueSet(); initialStatus.Add("Status", "Ready"); await connection.SendMessageAsync(initialStatus); } } private static void Connection_ServiceClosed(AppServiceConnection sender, AppServiceClosedEventArgs args) { //when the connection with the app service is closed, we terminate the Win32 process. appServiceExit.Set(); } private static async void Connection_RequestReceived(AppServiceConnection sender, AppServiceRequestReceivedEventArgs args) { if (args.Request.Message["GetEmployees"].ToString() == "true") { DatabaseService service = new DatabaseService(); List<Employee> employees = service.GetEmployees(); string serializedValue = JsonConvert.SerializeObject(employees); ValueSet set = new ValueSet(); set.Add("Employees", serializedValue); await args.Request.SendResponseAsync(set); } } } |
The Main() method takes care of initializing a thread using an AutoResetEvent object. This way, the process will be kept alive until the communication channel established by the app service is open.
The thread executes a method called ThreadProc(), which initializes the connection to the app service and starts listening for incoming messages from the main Universal Windows Platform application. The connection is established using the code we learned to use in the previous section. We use an AppServiceConnection object and set the AppServiceName property with the app service’s name we previously declared in the manifest. Then we set the PackageFamilyName property with the PFN of the UWP application. Since the process is running inside the same package of the UWP application, they share the same identity. As such, we can retrieve it using the Windows.ApplicationModel.Package.Current.Id.FamilyName property.
In the end, we call the OpenAsync() method to establish the connection. If the operation fails, we call the Set() method on the AutoResetEvent object, so that the process can be terminated. Otherwise, using a ValueSet object and the SendMessageAsync() method, we send a message to the UWP app to tell it that we’re ready to send and receive messages through the channel.
We have also subscribed to two events offered by the AppServiceConnection object. The first one is ServiceClosed, and it’s triggered when the channel has been closed. As we did before in the case of an unsuccessful connection, we use this event to terminate the process by calling the Set() method on the AutoResetEvent object.
The RequestReceived event is where the real work happens. This event is triggered when the UWP application sends a request to the Win32 process. In our scenario, this will happen when the user presses the button to see the list of employees. When this event happens, the UWP application will send a message with the key GetEmployees. As such, inside this event handler, we retrieve from the database the list of employees. The details of the DatabaseService class implementation are out of the scope in this context, since we’re just building a sample to showcase how to connect a UWP app to a Win32 process. In your scenario, you could use any .NET Framework API you may need to achieve your goal. The key information to know is that the GetEmployees() method is using classes like OleDbConnection and OleDbCommand to query the Access database and return a collection of Employee objects. These classes aren’t supported by the Universal Windows Platform or .NET Standard, so they can’t be leveraged directly from the main application.
In the end, we send the collection of employees back to the UWP application by using a ValueSet. However, being a key-value pairs collection, it supports only data that can be serialized. As such, we can’t send it back to the collection as it is, we need to serialize it. In this case, as a JSON using the popular library Json.NET. We do it by calling the SerializeObject() method exposed by the JsonConvert class.
The Universal Windows Platform application
Inside the Universal Windows Platform application, we need to follow the same guidelines we have seen about implementing in-process app services. When the Win32 process opens a connection to our app service, the OnBackgroundActivated event exposed by the App class is triggered. Inside this code, we need to implement the execution of the app service. However, in the context of our scenario, the only thing that we need to do is store a reference to the connection, so that we can reuse it later in the other pages of the application, where the real communication will happen.
First, let’s declare a couple of variables in the App class.
Code Listing 44
public static AppServiceConnection Connection = null; private BackgroundTaskDeferral appServiceDeferral = null; |
The first property will be used to store the connection. It’s declared as static so that we can easily reuse it from other pages of the application. The second property is BackgroundTaskDeferral, which is needed to keep the connection alive. Using it is very important; otherwise the app service will drop the connection immediately after having initialized the channel.
Now we have everything we need to implement the OnBackgroundActivated event handler.
Code Listing 45
protected override void OnBackgroundActivated(BackgroundActivatedEventArgs args) { //this method is invoked when the Win32 process requests to open the communication channel with the app service. base.OnBackgroundActivated(args); if (args.TaskInstance.TriggerDetails is AppServiceTriggerDetails) { appServiceDeferral = args.TaskInstance.GetDeferral(); AppServiceTriggerDetails details = args.TaskInstance.TriggerDetails as AppServiceTriggerDetails; Connection = details.AppServiceConnection; } } |
When the Win32 process makes a request to open a connection with the app service, we accept it and, by using the AppServiceTriggerDetails property of the activation arguments, we store it inside the Connection property we previously defined.
Now we can leverage this property in the main page of our application. When the user clicks the button to get the data, the Universal Windows Platform application will send a message through this connection to the Win32 process. Here is the implementation of the event handler raised by the button in the main page.
Code Listing 46
private async void OnGetEmployees(object sender, RoutedEventArgs e) { //if the connection with the app service has been established, we send the info about the flight to the Win32 process. if (App.Connection != null) { ValueSet set = new ValueSet(); set.Add("GetEmployees", "true"); AppServiceResponse response = await App.Connection.SendMessageAsync(set); //if the Win32 process has received the data and has successfully generated the boarding pass, we show a notification to the user. if (response.Status == AppServiceResponseStatus.Success) { string message = response.Message["Employees"].ToString(); List<Employee> employees = JsonConvert.DeserializeObject<List<Employee>>(message); EmployeesView.ItemsSource = employees; } } } |
If you understand how an app service works, the code should be easy to understand. We create a ValueSet with a message with the GetEmployees key. When the Win32 process receives such a message, it will query the Access database and send back the data using the JSON format. If the response is successful (we use the Status property of the AppServiceResponse object to determine it), we extract the message from the response and look for the data inside the item identified by the Employees key. Then we again use Json.NET to deserialize the data and to get back a collection of Employee objects. In the end, we set the collection as ItemsSource of a DataGrid control, which is part of the Windows Community Toolkit.
Launching the Win32 process
By default, when you start a Universal Windows Platform application, Windows will execute only the main entry point. If you have included a Win32 process inside the package, it won’t be launched automatically. As such, all the code we have written so far won’t work, because the Win32 process won’t be running. In order to launch it, we need to make a couple of changes to our application.
The first change must be done in the manifest. We need to declare the full path of the process we want to launch. However, this option can’t be configured using the visual editor, so you will have to right-click the Package.appxmanifest file and choose View code. Remember that, in our context, the main entry point is the Windows Application Packaging Project. As such, exactly like we did to declare the app service, we need to make this change in the Package.appxmanifest file included in the Packaging Project, and not in the UWP app.
You should already have a windows.AppService entry in the Extensions section for the app service. You will need to add a windows.FullTrustProcess extension right below it, as shown in the following snippet.
Code Listing 47
<Extensions> <uap:Extension Category="windows.appService"> <uap:AppService Name="DatabaseService" /> </uap:Extension> <desktop:Extension Category="windows.fullTrustProcess" Executable="ExpenseItDemo.Export\ExpenseItDemo.Export.exe" /> </Extensions> |
The only required attribute is Executable, with the full path of the Win32 process inside the package. In order to use this extension, you will have to declare the desktop namespace in the Package definition.
Code Listing 48
<?xml version="1.0" encoding="utf-8"?> <Package xmlns="http://schemas.microsoft.com/appx/manifest/foundation/windows10" xmlns:desktop="http://schemas.microsoft.com/appx/manifest/desktop/windows10" IgnorableNamespaces="desktop"> . . . </Package> |
The second step is to launch the process using a special API included in the Universal Windows Platform. However, this API isn’t implemented on all the supported Windows 10 devices, but only on traditional computers. Before using it, you need to add the specific desktop extension for the Universal Windows Platform to your project. Right-click the Universal Windows Platform application and choose Add reference. Select Universal Windows > Extensions and look for a library called Windows Desktop Extension for the UWP. You may have multiple versions of it if you have multiple versions of the Windows 10 SDK installed on your machine. Select the most recent one and click OK.

Figure 77: The UWP extension to support specific desktop features
Once you have added a reference to the library, you may add the required code to launch the Win32 process we declared in the manifest. It’s up to you to choose where to add it, based on your requirements. A common scenario is to launch the process together with the main UWP application. In the following snippet, we launch it when the main page of the application is displayed.
Code Listing 49
protected async override void OnNavigatedTo(NavigationEventArgs e) { if (ApiInformation.IsTypePresent("Windows.ApplicationModel.FullTrustProcessLauncher")) { //we launch the Win32 process that generates the boarding pass on the desktop. await FullTrustProcessLauncher.LaunchFullTrustProcessForCurrentAppAsync(); } } |
First we use the IsTypePresent() method exposed by the ApiInformation class. This technique is called Adaptive Coding. We use the Windows.ApplicationModel.FullTrustProcessLauncher class only if it’s available on the current Windows 10 device. This way, if the application is launched on a device that doesn’t support running Win32 processes (like Surface Hub or Xbox), the application won’t crash, it simply won’t execute the rest of the code.
To effectively launch the Win32 process, we must call the LaunchFullTrustProcessForCurrentAppAsync() method exposed by the FullTrustProcessLauncher class. We don’t have to specify the process we want to launch, since the method will automatically leverage the one declared in the manifest.
That’s it! Now the full architecture has been implemented. We have built a full UWP application that relies on a Win32 process to execute an operation that, otherwise, we wouldn’t be able to achieve.
- 1800+ high-performance UI components.
- Includes popular controls such as Grid, Chart, Scheduler, and more.
- 24x5 unlimited support by developers.