
MSIX Succinctly®

CHAPTER 7
Distribute Your MSIX Packages
One of the advantages of MSIX is its flexibility. It doesn’t just open the doors to new distribution platforms like the Microsoft Store or the Microsoft Store for Business, it retains the ability to be deployed with a wide range of options that are commonly used in enterprises, like System Center Configuration Manager, Microsoft Intune, or simply a website or a file share.
In this chapter, we’re going to explore two different distribution approaches—the Microsoft Store and the web—using a Windows 10 feature called App Installer. We’re also going to see how you can use PowerShell to manage MSIX packages.
Distributing an application on the Microsoft Store
The Microsoft Store is a great distribution platform for applications that target consumers. The Microsoft Store, in fact, is built into Windows 10, and it provides users easy access to a wide catalog of applications. With the advent of the Desktop Bridge in the Windows 10 Anniversary Update, the Microsoft Store also opened the doors to classic desktop applications packaged as AppX or MSIX. Spotify, Slack, and iTunes are just some examples of Win32 applications that can be easily downloaded from the Store.
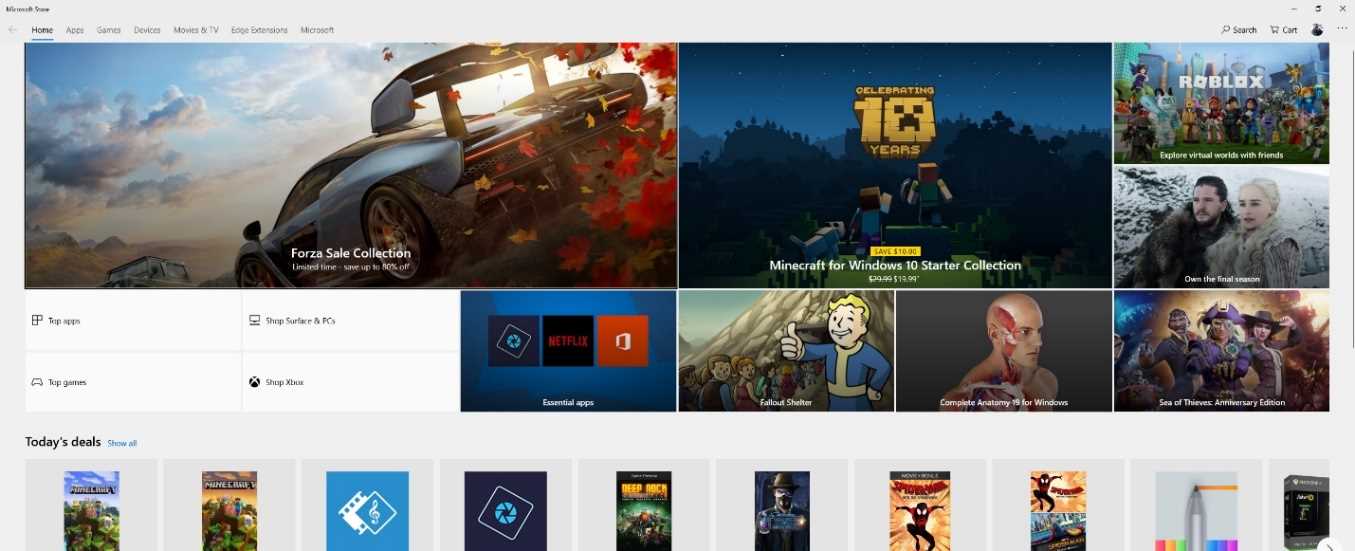
Figure 78: The Microsoft Store
The Store helps to solve many of the challenges that developers must face when they want to distribute applications:
- You don’t have to handle the monetization. The purchase flow will be handled directly by Microsoft and, every month, you will receive your earnings, with the Store fee deducted.
- You don’t have to handle licensing. You can enable features like trials or in-app purchases, and Windows will make sure that users won’t be able to circumnavigate them and use the application without paying for the license.
- You don’t have to handle updates. By default, automatic updates are turned on in the Microsoft Store, so users will always use the latest version of your application.
Additionally, the Microsoft Store includes many features that can be helpful for improving the development experience:
- You can create flights, subsets of users (identified by the Microsoft account) that will receive different versions of the application. With this feature, you can create multiple test rings (alpha, beta, production, etc.) and deliver preliminary versions of your application to your testers. Once an update has been validated, you can just move it from one ring to another to expand your audience.
- You can create private applications that only a specific set of users (identified by the Microsoft account) will be able to see and download.
- You can enable gradual rollout, so that only a random subset of users will get the update first. This way, in case of unexpected issues, you can quickly stop the distribution and fix the problem before resuming.
The submission process is managed through the Microsoft Partner Center dashboard, which is a web portal that allows developers to submit, validate, and update their applications.
Registering a developer account
To publish applications, you need to register yourself as an app developer, which is a single account that lets you submit apps and add-ins for the entire Microsoft ecosystem—not just Windows apps, but also Office add-ins on the Office Store or on the Azure Marketplace. The account costs $19 for individual developers and $99 for companies. It’s a lifetime subscription, which you need to pay only once. However, if you have a Visual Studio subscription, among the available benefits, you will find a token to register for free.
You can start the procedure to create a developer account here. You will be asked for information about you or your company, based on which kind of account you want to open. The procedure is the same, and you’ll be able to pay using a PayPal account or a credit card. The only difference is that:
- If it’s a personal account, it will be immediately activated after the payment has been successfully completed.
- If it’s a company account, it takes a bit longer to get the account activated. A Microsoft partner will contact you and request additional information to prove that the company really exists, and that you are legally allowed to operate on behalf of it.
Creating a package for the Microsoft Store
Thanks to Visual Studio, it’s easy to create a package for the Microsoft Store. Whether it’s a full Universal Windows Platform application or a classic application packaged using the Windows Application Packaging Project, by right-clicking the project, you will see the option Store > Create app packages. The first question you will be asked is if you want to create a package for the Microsoft Store or for sideloading. If you choose the first option, you will be asked to log in with the Microsoft account connected to your developer account. Visual Studio will show you a list of app names you have already registered, and it will give you the option to create a new one. This name must be unique, and it will be used to establish the identity of your package.
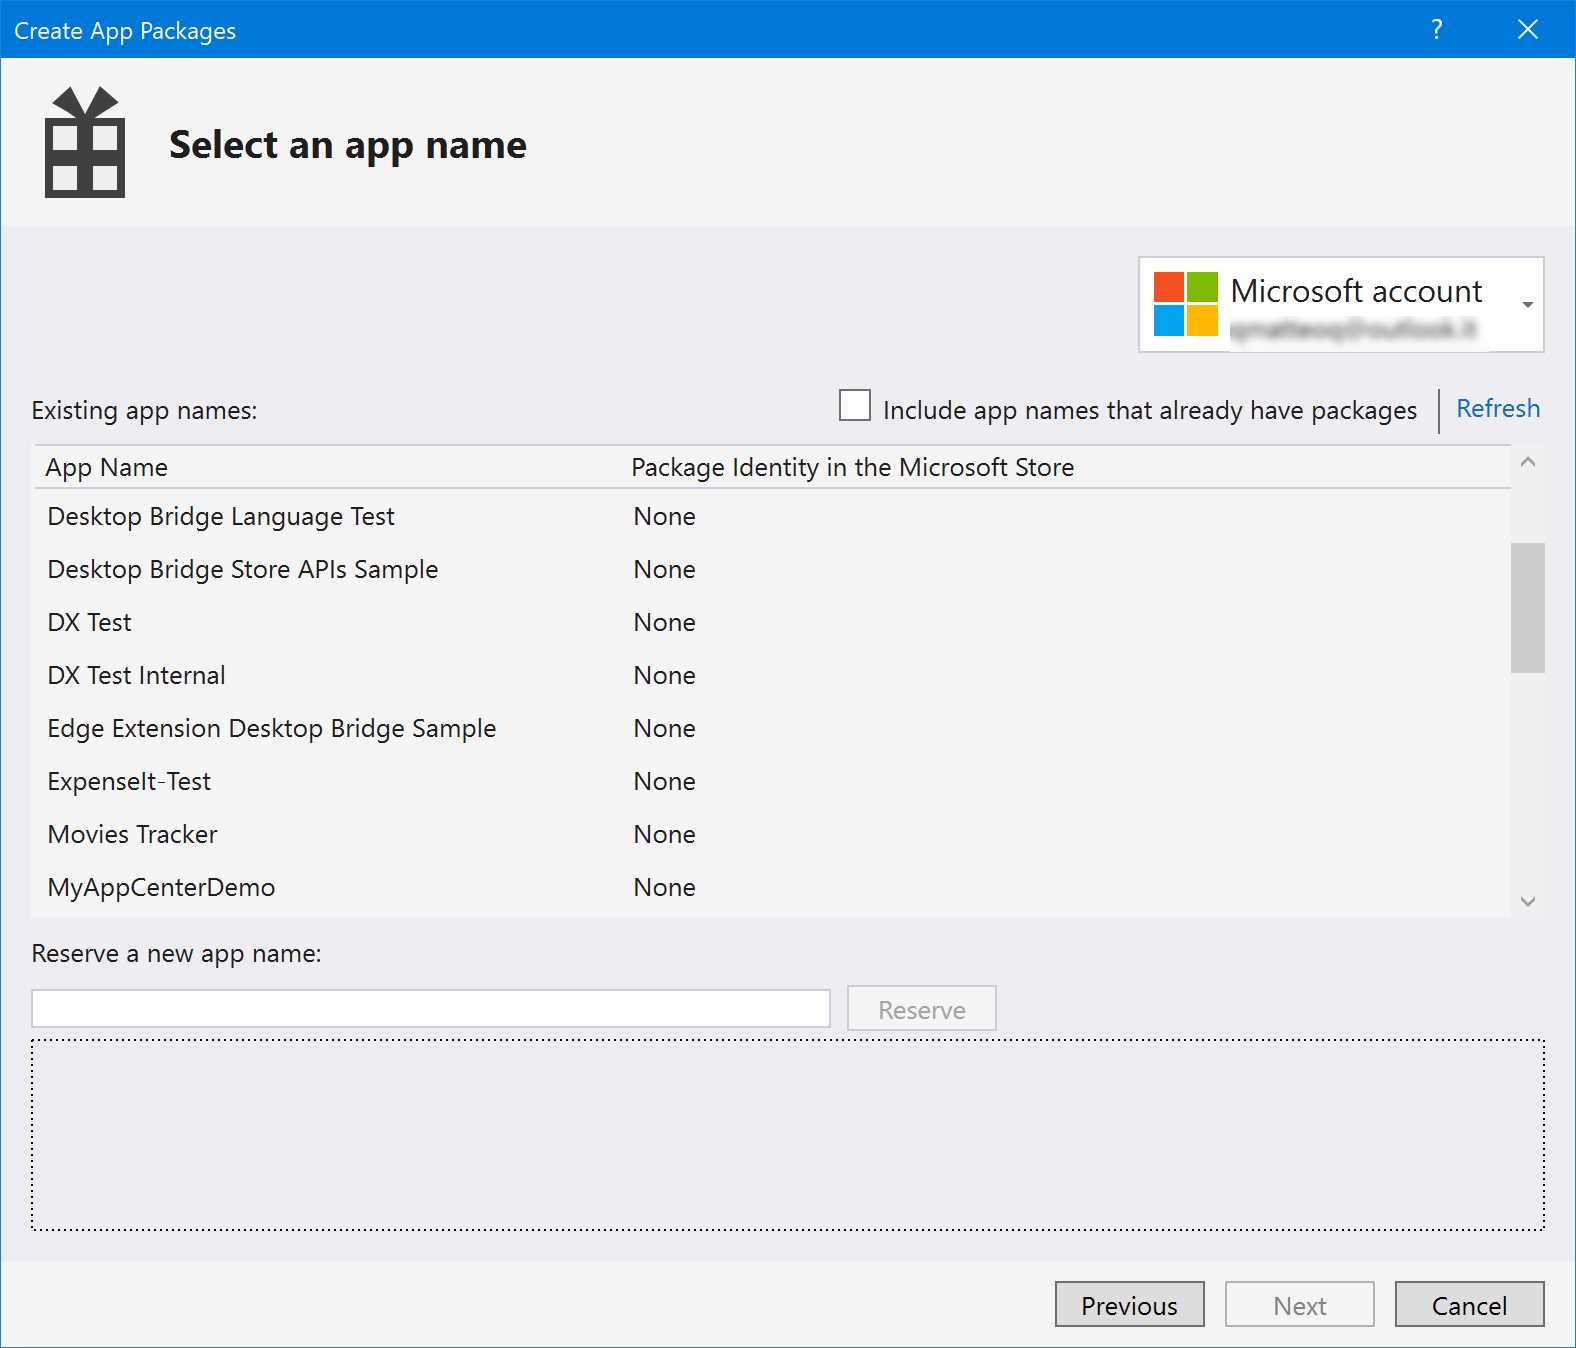
Figure 79: You must associate the application to an app name before generating a package for the Store
The rest of the wizard is the same as the one we saw in Chapter 2 when we talked about the Windows Application Packaging Project. You will be asked to set the version number and define which packages you want to create: target CPU architecture, configuration mode, etc.
At the end of the process, you will obtain a file with the extension .msixupload (or .appxupload, if you’re targeting a Windows 10 version earlier than 1809). Once you have it, you can go to the Microsoft Partner Center website and log in with your developer account. In the applications list, you will find the name you have reserved through the Visual Studio wizard. Just click Start your submission to start the submission process.
You will be guided through a series of steps:
- Pricing and availability: In this section, you can choose the price at which you want to sell your app, and how to distribute it. You can choose to make it available only in a restricted number of countries, to distribute it to everyone, or to opt-in for private distribution. You can define a specific schedule for when to make the application available.
- Properties: In this section, you can choose the category of your application.
- Age ratings: In this section, you will have to complete a survey, which will be used to assign an age rating to your application. This is required to be compliant with the various laws and certifications around the world regarding age restrictions for software products.
- App packages: In this section, you will need to upload the .msixupload package that Visual Studio has generated for you.
- Store listings: In this section, you can provide the metadata of your application, which will be used to populate the Store page, such as a description, screenshots, a video trailer, and keywords.
- Submission options: In this section, you can provide notes for the tester in case the application has any special requirements, like credentials to log in, or dependency from a hardware device.
At the end of the process, you will be able to submit the application on the Microsoft Store. The submission will trigger a certification process that will validate your application to make sure it’s compliant with the Store technical requirements and policies. The certification time may vary; in some cases, only automated tests are performed, which means that the application will be validated after a few hours. In some other cases, the application may be picked up for manual testing, which can take up to five business days.
Restricted capabilities
When you submit a classic Windows application packaged as MSIX, there’s a caveat. If you recall what we learned in Chapter 1, these applications leverage a restricted capability called runFullTrust, which allows them to run outside the sandbox leveraged by full Universal Windows Platform applications. Being a restricted capability, it isn’t granted by default to Store applications. As such, when you upload a .msixupload package containing a manifest that declares this capability, you will see a new step in the submission process. You will be asked to specify the reason why you’re requesting this capability. Usually, it’s enough to specify that your application is a Win32 app and, as such, it can’t work properly without this capability.
The Microsoft Store for Business/ Education
The Microsoft Store for Business/Education is a private version of the Microsoft Store that can be leveraged by companies and schools. From a technical point of view, it uses the same infrastructure of the Microsoft Store. However, the environment is controlled by the administrator of the company or school, and it allows them to create a private and curated catalog of applications.
Being dedicated to companies and school, unlike for the public Store which requires a Microsoft Account, the access to the Store for Business/Education is granted using an Azure Active Directory account. Users will be able to log in using their work or school accounts.
After logging in to the Store with such an account, you will see a new tab with the name of your organization. When you click on it, you will see a curated list of applications selected by your company.
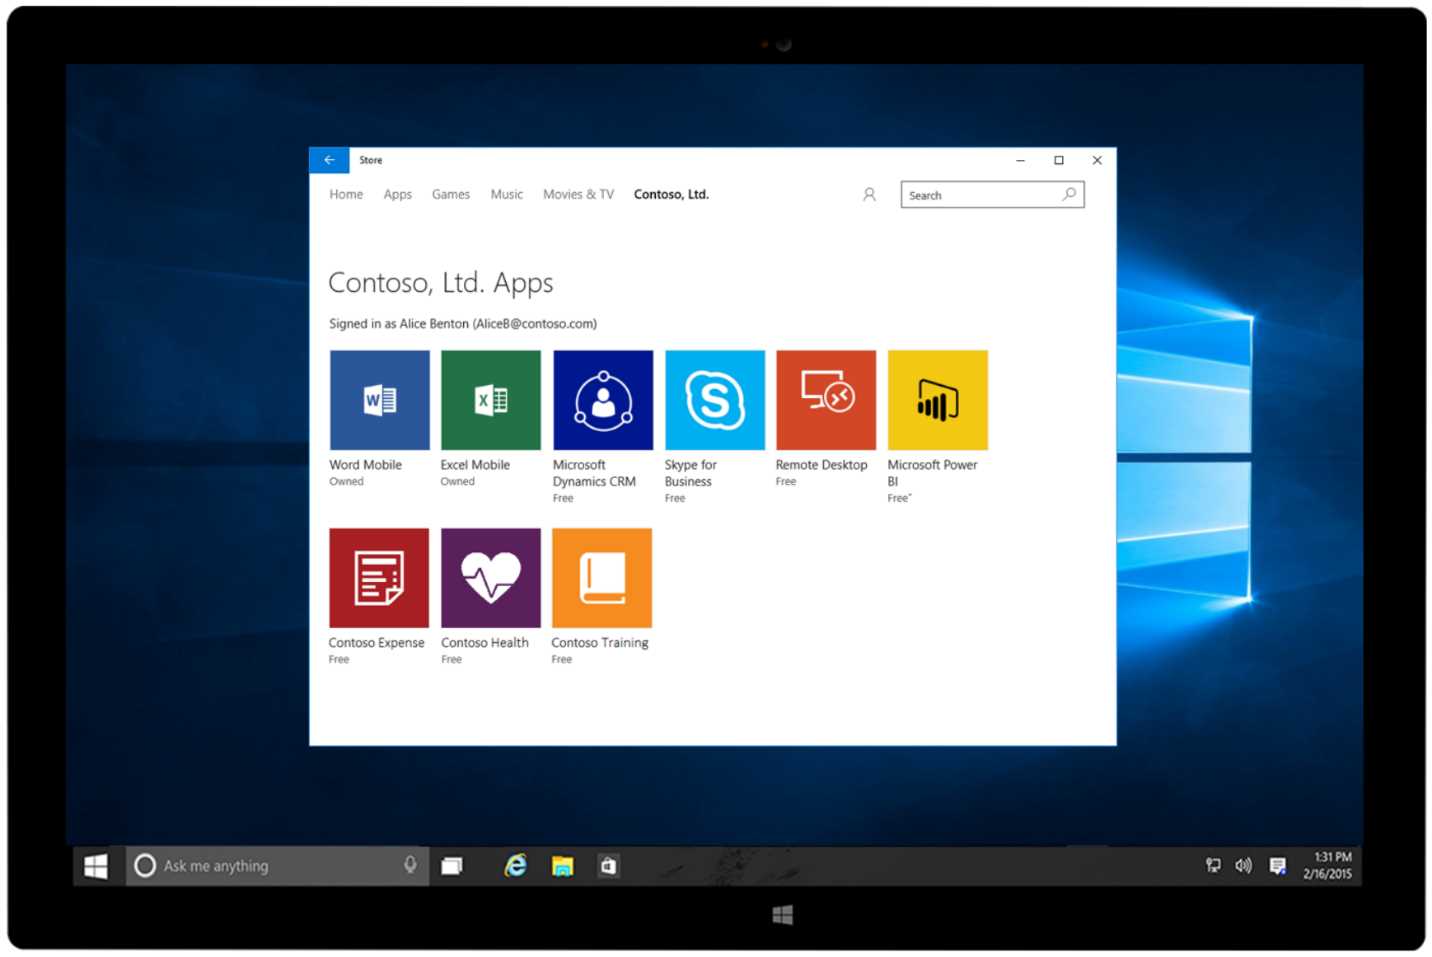
Figure 80: The Microsoft Store for Business
The administrator of the organization can use the web portal to acquire applications and add them to the internal catalog.
The acquisition models
The Store for Business supports the acquisition of free apps and paid apps. For both categories, there are two different acquisition models:
- Online licensing: Unlike the Microsoft Store, where the purchase is individual, the Store for Business supports bulk purchases of licenses. The administrator can purchase an arbitrary number of licenses and then assign them to a group of users within the organization. With the online model, licenses are tracked directly by the Microsoft Store, so you don’t have to worry about their management. You just need to choose the group of users that will receive them. This licensing model is very flexible. If an employee or a student leaves the organization, the license isn’t lost, and can be easily transferred to another person. This licensing model works only in combination with Azure Active Directory.
- Offline licensing: This approach can be useful for companies that are using tools like SSCM to deploy applications. They don’t support Azure Active Directory and, as such, they can’t access the Microsoft Store. In this scenario, the web interface of the Store for Business will simply allow the administrator to download the MSIX package, which then will need to be manually deployed on the users’ machines. With this approach, you can’t leverage the automatic license tracking; it will be up to you to make sure you have purchased the right number of licenses for your users.
Publishing an application on the Microsoft Store for Business
As a developer, you have two approaches to make an application available on the Store for Business. If you have developed a general-purpose application, which can be appealing for many enterprise customers, you can publish it on the public Store and turn on the organizational licensing distribution options. With this approach, your application will be searchable not only on the public Store, but also on the Store for Business dashboard. Administrators will be able to find your app and acquire it, so that it can be added to the internal catalog.
To achieve this goal, you need to make sure that, during the submission process on the Partner Center, you enable two options in the first step, which is App pricing and availability:
- Make my app available to organizations with Store-managed (online) licensing and distribution: This option will enable your application to be available through the Store for Business using the online licensing model. This option is turned on by default.
- Allow organization-managed (offline) licensing and distribution for organizations: This option will enable your application to support the offline licensing model, which allows distribution outside the Store. This option is turned off by default.

Figure 81: The options during the submission process to enable distribution through the Microsoft Stores for Business and Education
Note: You can publish an application on the public Store and opt out from publishing on the Store for Business and Education, but not the other way around. If you want to publish an application on the Store for Business, you must also publish it on the public Store, unless it’s a private line-of-business app.
Another scenario is line-of-business applications that have been developed or customized for a specific customer. In this case, deploying this application on the public Store wouldn’t make sense, because it can’t be used by a generic customer. To satisfy this requirement, the Store for Business and Education enables administrators to invite a developer to publish applications only in their private catalog. This goal can be achieved from the Permissions section of the web dashboard, which offers a tab called Line-of-business publishers. When you click the Invite button, you will have to specify the email address associated with the Partner Center account of the developer that you would like to invite.
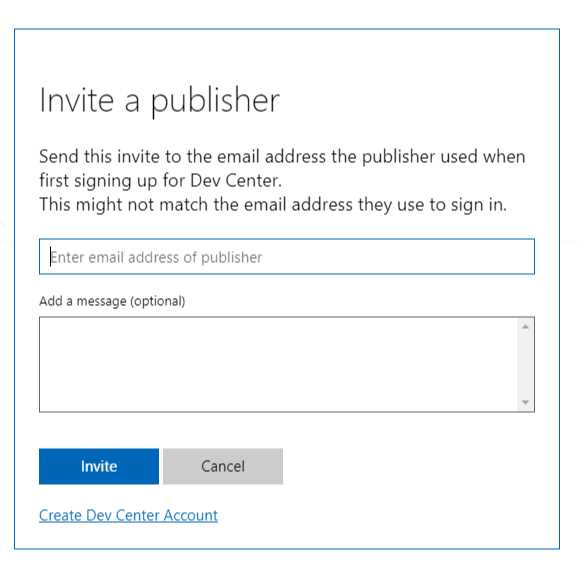
Figure 82: An administrator can invite a developer to publish applications only in a private catalog
The developer will receive an email, and upon accepting the invitation, will see a new option in the Pricing and availability section of the submission process.
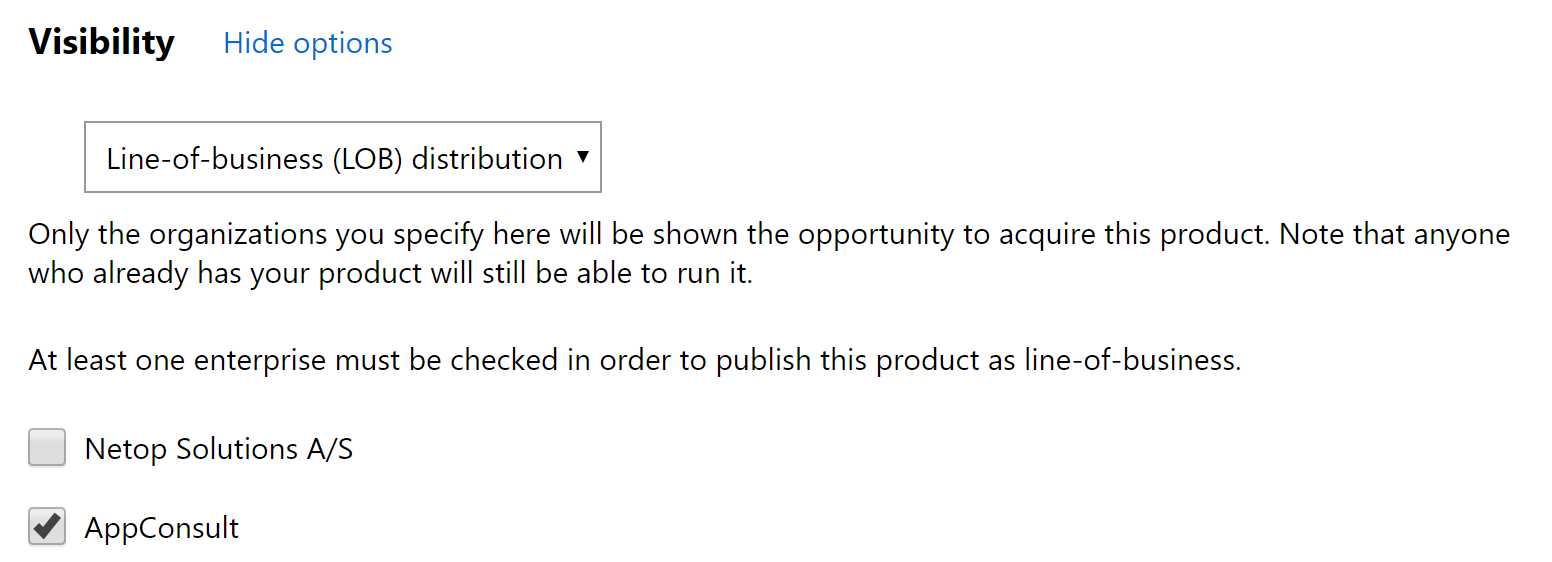
Figure 83: A developer has the option to submit an application only on the private store of an organization
In the Visibility section, there will be a new drop-down menu where the developer will be able to choose Line-of-business (LOB) distribution. The page will list all the organizations that have sent an invitation. The developer just needs to check the ones for which they’re publishing the application, and then continue the submission as usual. At the end of the process, the application will be available only in the private catalog of the company, and not searchable by other users and companies.
This publishing approach gives you more flexibility over the certification process. Since the application won’t be published on the public Store, all the restricted capabilities will be automatically allowed, and there won’t be a real certification process, except for the basic technical checks. It will be up to the administrator of the organization to validate the application and to make sure it’s compliant with the organization’s requirements.
Controlling access to the Microsoft Store
As an enterprise, you can control the access to the Store for your users using group policies. You can find them by opening the Group Policy Editor, which can be launched by clicking the Start button and typing gpedit. The policies are available under Computer Configuration > Administrative Templates > Windows Components > Store. If you aren’t using the Microsoft Store or the Microsoft Store for Business, you can disable it completely using the Turn off Store application policy.
If, instead, you want to leverage the Microsoft Store for Business, but you don’t want to give your users access to the public Microsoft Store, you can turn on the Only display the private store within the Microsoft Store policy. In this case, users will be able to open the Store application, but they will see only the private catalog defined by the enterprise. They won’t have access to the public catalog.
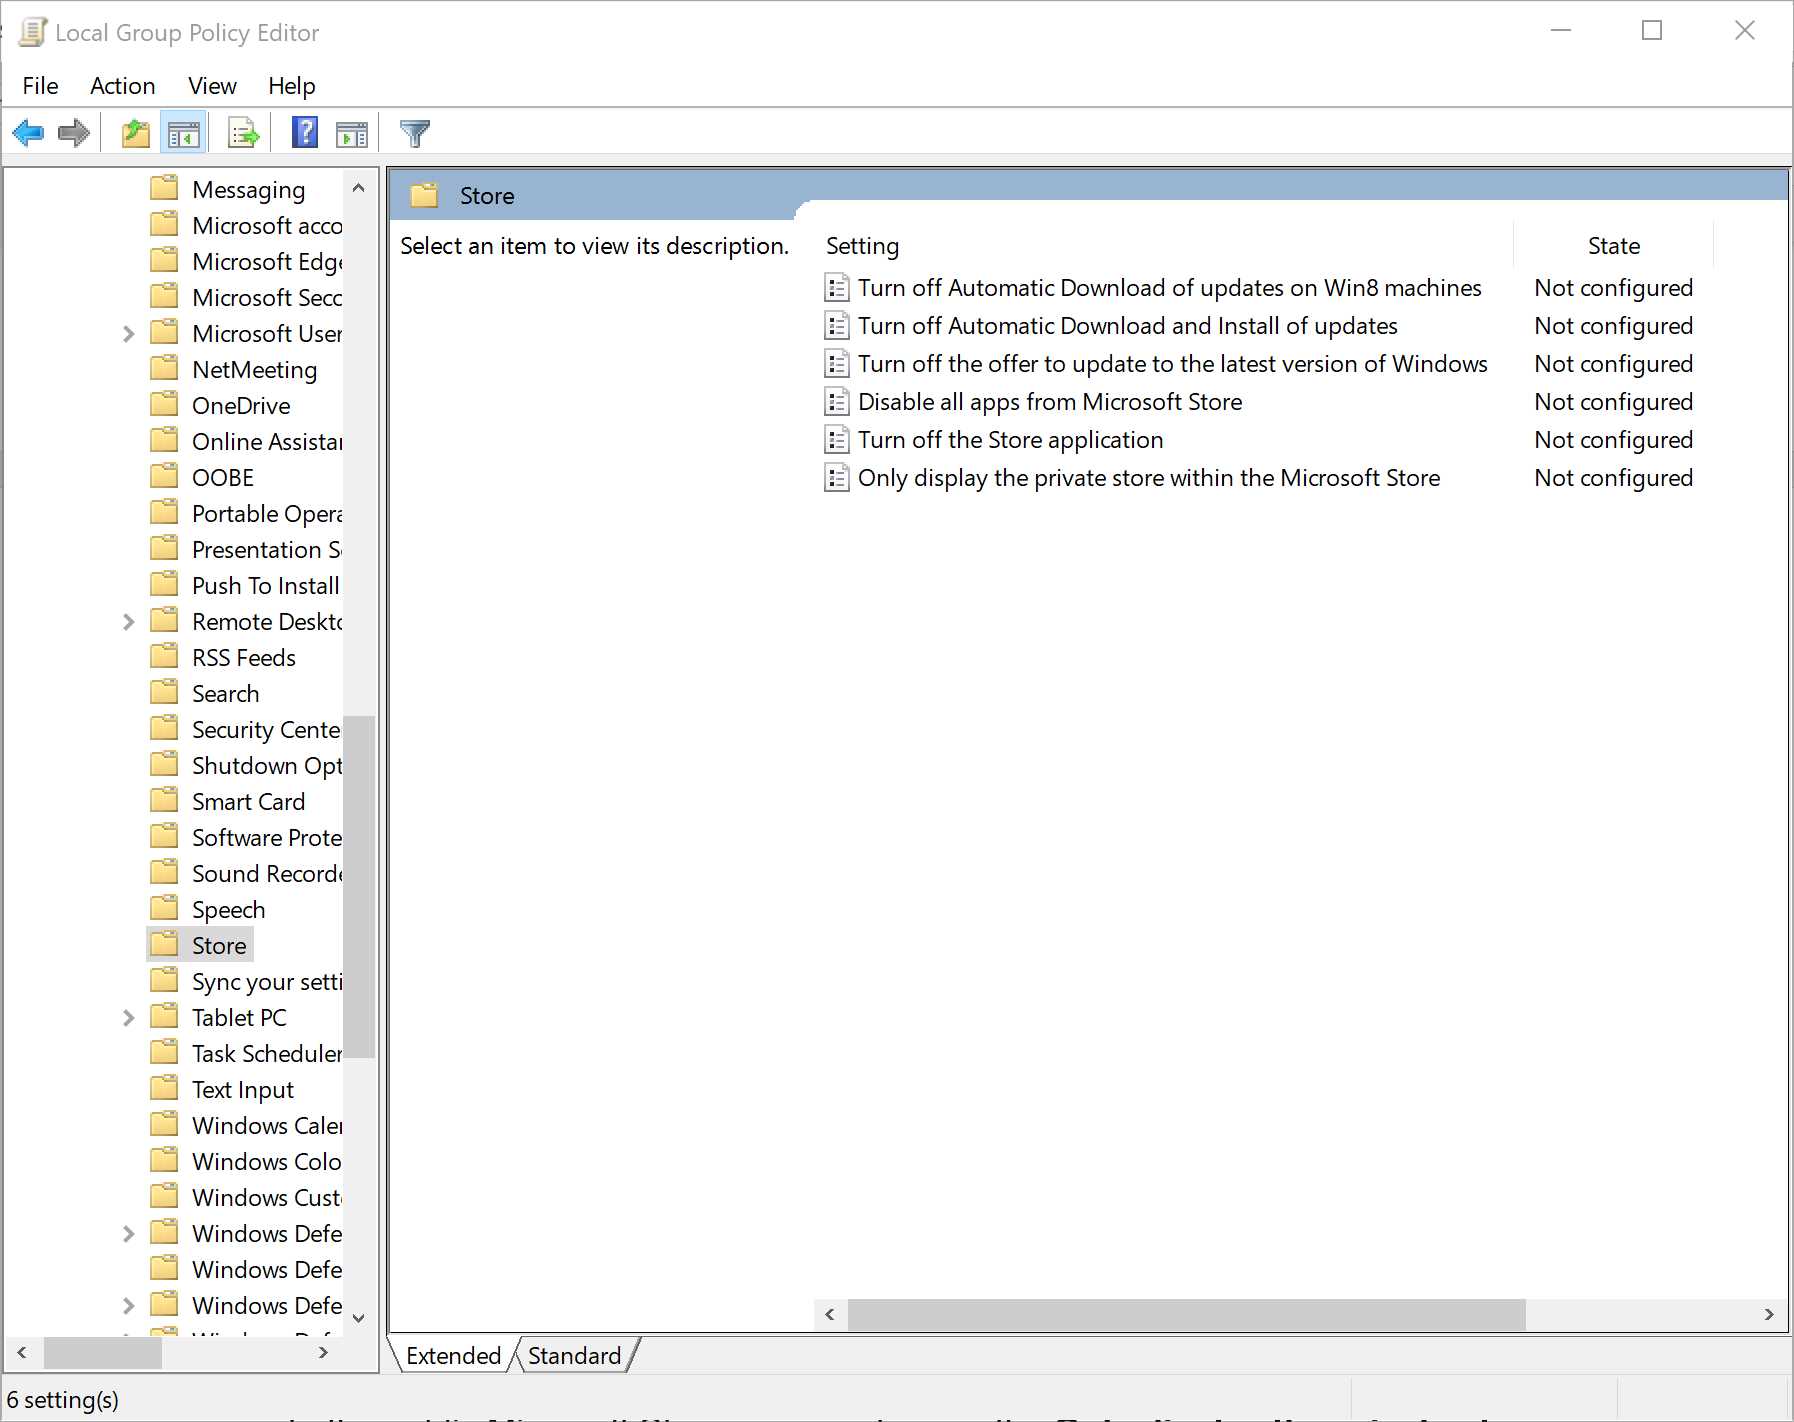
Figure 84: The policies to control access to the Microsoft Store
App Installer
The Store is a great distribution channel, but it may not always be the best fit for your scenario. You may need to deploy the application in an enterprise that hasn’t adopted the Store for Business, or you may want to start an internal testing of a new app. In any case, you may be interested in retaining some of the advantages of Store distribution, like automatic updates.
Thanks to a Windows 10 feature called App Installer, you’ll be able to retain some of the Store features by deploying the application on a website or a file share. Let’s see how it works!
App Installer is the name of the technology in Windows 10 that makes it easy to deploy MSIX packages. In the past, PowerShell was the only option for deploying a package without using the Store. Thanks to App Installer, now you can just double-click an MSIX package and proceed with the deployment with the click of a button.
App Installer comes with support for the ms-appinstaller protocol, which you can use on a website or a file share to trigger the deployment of an MSIX package. When the user clicks on such a link in a browser, instead of having to manually download and install the MSIX package, Windows will immediately trigger the familiar user interface. In order to enable this feature, the ms-appinstaller protocol must point to a file with the .appinstaller extension. It’s an XML file that describes the package and contains information like the URL where it has been deployed.
Here is a sample file.
Code Listing 50
The AppInstaller entry includes a property called Uri, which contains the full URL where the file itself has been deployed. The package is described with the MainBundle entry, which includes the name, version number, publisher, and the full URL where the package has been uploaded. All this information (except for the URL) must match the information included in the manifest of the application. In this case, we’re using the MainBundle entry because we’re deploying a bundle that has the .msixbundle extension. If, instead, our application is made by a single package with the .msix extension, we can use the MainPackage entry, as shown in this example.
Code Listing 51
<?xml version="1.0" encoding="utf-8"?> <AppInstaller Uri="https://db-msixtest.azurewebsites.net/ContosoExpenses.Package.appinstaller" Version="1.0.5.0" xmlns="http://schemas.microsoft.com/appx/appinstaller/2017/2"> <MainPackage Name="ContosoExpenses" Version="1.0.5.0" Publisher="CN=AppConsult" Uri="https://db-msixtest.azurewebsites.net/ContosoExpenses.Package_1.0.5.0_x86.msix" /> </AppInstaller> |
Once you have created such a file, you can link to it using the ms-appinstaller protocol and reference it from a webpage.
Supporting additional packages
The App Installer file allows you to declare not just the main package, but also additional packages that must be installed together with the main application. This way, the user will be able to install everything needed to run the application with just one click. App Installer supports three categories of additional packages: optional packages, modification packages, and dependencies.
Optional packages are declared inside the OptionalPackages section, which can contain Bundle items (in the case of .msixbundle files) or Package items (in the case of .msix files). The following sample shows the declaration of an App Installer file that includes a main package and an optional package.
Code Listing 52
Modification packages work in the same way. The only difference is that Package or Bundle items must be declared inside the ModificationPackages section, as in the following sample.
Code Listing 53
<?xml version="1.0" encoding="utf-8"?> <AppInstaller Uri="https://db-msixtest.azurewebsites.net/ContosoExpenses.Package.appinstaller" Version="1.0.5.0" xmlns="http://schemas.microsoft.com/appx/appinstaller/2017/2"> <MainPackage Name="ContosoExpenses" Version="1.0.5.0" Publisher="CN=AppConsult" Uri="https://db-msixtest.azurewebsites.net/ContosoExpenses.Package_1.0.5.0_x86.msix" /> <ModificationPackages> <Package Name="ContosoExpenses.Customization" Publisher="CN=AppConsult" Version="1.0.0.0" Uri="https://db-msixtest.azurewebsites.net/ContosoExpenses-Customization.msix" /> </ModificationPackages> </AppInstaller> |
In the end, the App Installer file also supports dependencies, like the Visual C++ Runtime libraries. They are declared using the Dependencies section, and they work in a similar way as modification packages. You need to add one (or more) Package entry and describe all its features, including the path where you have deployed it, as in the following sample.
Code Listing 54
<?xml version="1.0" encoding="utf-8"?> <AppInstaller Uri="https://db-msixtest.azurewebsites.net/ContosoExpenses.Package.appinstaller" Version="1.0.5.0" xmlns="http://schemas.microsoft.com/appx/appinstaller/2017/2"> <MainPackage Name="ContosoExpenses" Version="1.0.5.0" Publisher="CN=AppConsult" Uri="https://db-msixtest.azurewebsites.net/ContosoExpenses.Package_1.0.5.0_x86.msix" />
<Dependencies> <Package Name="Microsoft.VCLibs.140.00" Publisher="CN=Microsoft Corporation, O=Microsoft Corporation, L=Redmond, S=Washington, C=US" Version="14.0.24605.0" ProcessorArchitecture="x86" Uri="https://db-msixtest.azurewebsitesfwkx86.appx" /> </Dependencies> </AppInstaller> |
Typically, once the dependency is declared inside the app manifest, the Visual C++ runtime libraries are automatically downloaded from the Microsoft Store. However, since when you use App Installer you might be in a scenario where the Store is blocked, you need to also specify where you have deployed the package by using the Uri attribute.
Supporting automatic updates
Thanks to App Installer, you can also enable automatic updates. As a developer, all you need to do is copy in the same location (website or file share) an updated MSIX package and an updated App Installer that references the update. All the users who have downloaded the application from that location using the ms-appinstaller protocol will automatically get the update, based on the criteria you have chosen. They won’t have to go back to the webpage to manually trigger the update.
The auto update feature is controlled by a setting in the App Installer file, as demonstrated in the following snippet.
Code Listing 55
<?xml version="1.0" encoding="utf-8"?> <AppInstaller Uri="https://db-msixtest.azurewebsites.net/ContosoExpenses.Package.appinstaller" Version="1.0.5.0" xmlns="http://schemas.microsoft.com/appx/appinstaller/2017/2"> <MainBundle Name="ContosoExpenses" Version="1.0.5.0" Publisher="CN=AppConsult" Uri="https://db-msixtest.azurewebsites.net/ContosoExpenses.Package_1.0.5.0_Test/ContosoExpenses.Package_1.0.5.0_x86.msixbundle" /> <UpdateSettings> <OnLaunch HoursBetweenUpdateChecks="0" /> </UpdateSettings> </AppInstaller> |
Compared to the previous snippet, we have added a new section called UpdateSettings that contains the OnLaunch entry. Thanks to this option, the application will check for updates every time it’s launched. With the HoursBetweenUpdateChecks attribute, you can specify the frequency between each check. 0 means that updates will be checked every time. If you set, for example, 3, it means that if you open the app multiple times over a period of time, Windows won’t check for new updates before three hours have passed. If a new update is found, Windows will automatically download it. However, to avoid data loss or work disruption, it will apply it only once the application has been closed. The next time the user reopens the application, the new version will be used.
Adding an interactive prompt
Starting from Windows 10 version 1903, the OnLaunch feature also supports an interactive UI that will warn the user there’s a pending update before launching the app. This option can be enabled by adding the ShowPrompt attribute, as in the following sample.
Code Listing 56
<UpdateSettings> <OnLaunch HoursBetweenUpdateChecks="0" ShowPrompt="True" /> </UpdateSettings> |
When this feature is turned on, users will see the following UI when they open the application and there’s a new version on the server:
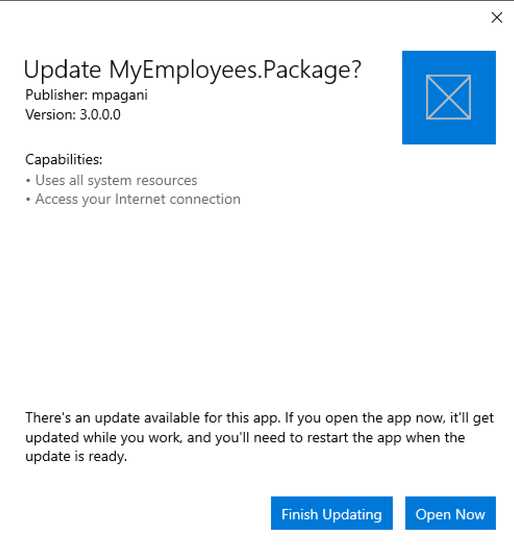
Figure 85: The message displayed to the user when there’s a new app update
Users will have the option to continue with the current version and apply the update later, once they close the app, or to apply it immediately before starting to use it.
Handling critical updates
When the ShowPrompt attribute is set to True, you can also leverage another feature, which is the ability to declare an update as critical. This goal can be achieved with the UpdateBlocksActivation attribute, as in the following snippet.
Code Listing 57
|
<OnLaunch HoursBetweenUpdateChecks="0" ShowPrompt="True" UpdateBlocksActivation="True" /> </UpdateSettings> |
When this feature is turned on, users will see the following UI if an update is available on the server.
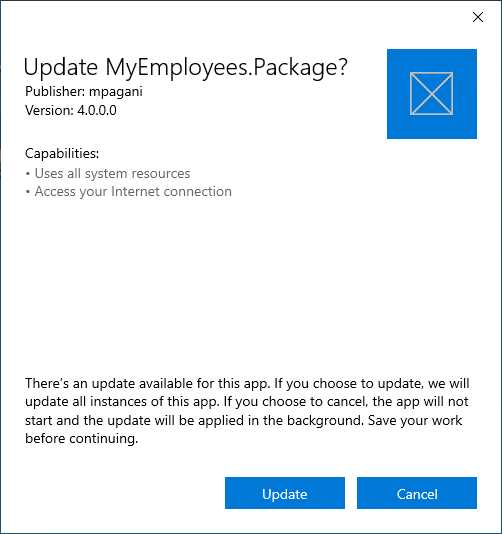
Figure 86: The message displayed to the user when there’s a critical update for the application
As you can see from the messaging, the user doesn’t have the option to postpone the update process anymore. The update will be applied regardless. Users can only choose if they want to automatically open the application or not after the update has been applied. This feature is helpful when you deliver an update that contains a critical security fix, or when you change something in the back end and the current version of the application won’t work anymore.
Supporting downgrades
By default, MSIX packages can be only updated with a package with the same identity and a higher version number. Windows will block you if the new package has a lower version number. However, in some scenarios, you may need to roll back to a previous version, for example, if the new version introduced a critical bug that will take some time to be resolved and waiting for an updated package isn’t an option.
In this case, you can enable the ForceUpdateFromAnyVersion option in the UpdateSettings section.
Code Listing 58
|
<OnLaunch HoursBetweenUpdateChecks="0" ShowPrompt="True" UpdateBlocksActivation="True" /> </UpdateSettings> |
However, even with this feature turned on, you won’t be able to automatically perform a downgrade. If you publish an MSIX package with a lower version number on the website or file share, the package won’t be automatically downloaded and installed. It will be up to users to return to the webpage from which they downloaded the application the first time and click again on the button linked to the ms-appinstaller protocol. The difference is that, this time, Windows won’t block the installation, but it will just warn users that they’re trying to install an update over a newer version.

Figure 87: The message displayed to users who attempt to downgrade an existing application
Installing updates in background
All the options we have seen so far are enabled by the OnLaunch configuration, since it supports displaying a UI to the user before triggering an update. However, in some scenarios you might just want to keep the application always up to date, regardless if the user has launched it or not. In this case, you can use the AutomaticBackgroundTask option, as in the following snippet.
Code Listing 59
<UpdateSettings> <AutomaticBackground /> </UpdateSettings> |
With this configuration, Windows will check for updates in the background every eight hours, regardless of when the user has last launched the application.
Generate an App Installer file
An App Installer file is nothing more than an XML file, so you can manually create it following the guidelines included in the official documentation. You will be able to reference not only main MSIX packages, but also dependencies and modification packages. This way, the user will automatically install everything required by the application to run as expected.
Visual Studio can help you by generating an App Installer file for you during the package creation wizard, which you can trigger by right-clicking the UWP or Windows Application Packaging Project and choosing Store > Create app packages. As the first question, you’re asked if you want to create a package for the Store or for sideloading. In the second scenario, you can select the check box called Enable automatic updates.
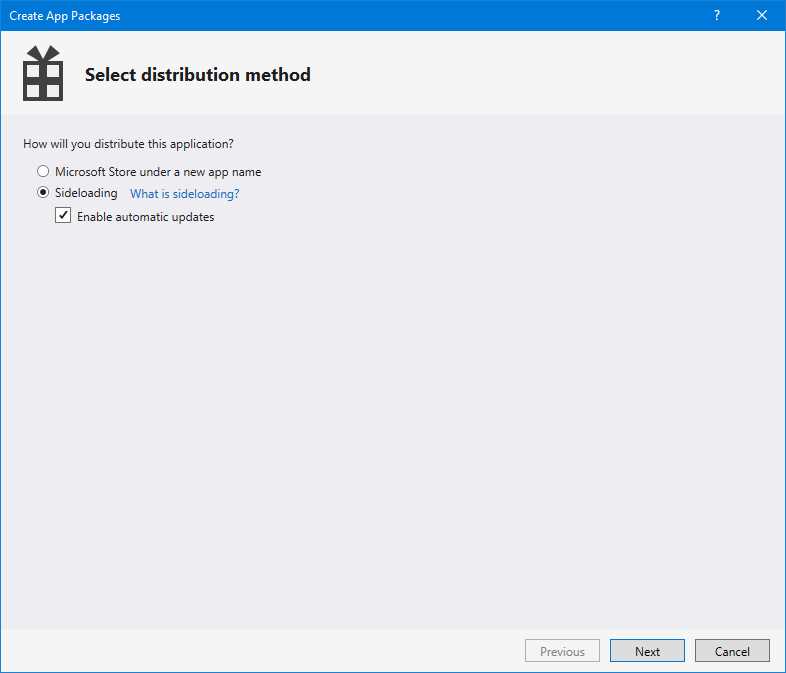
Figure 88: The option in Visual Studio to create a package for sideloading with automatic updates
Once you enable this option, you will have the opportunity to specify the URL where the package will be deployed (it can be a web URL or a file share path) update frequency.
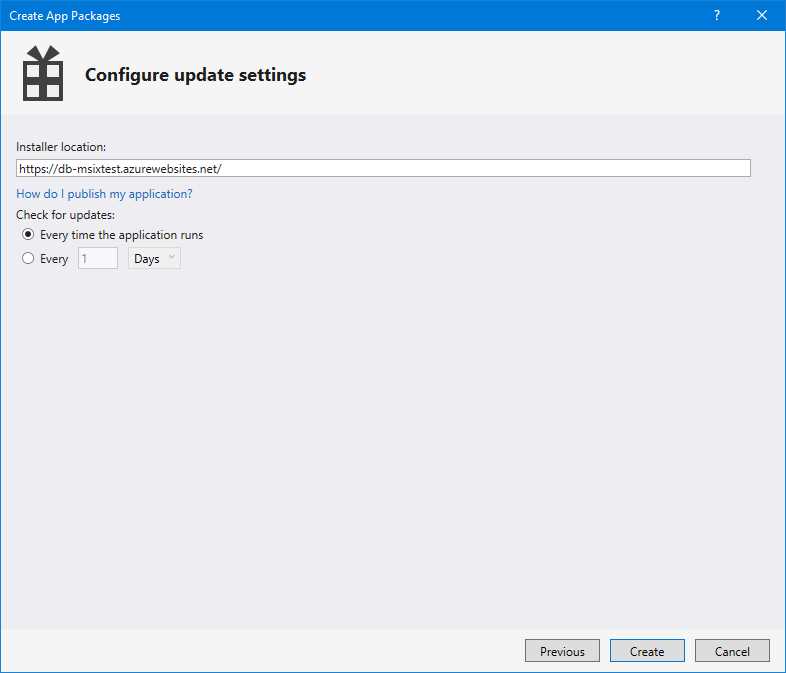
Figure 89: The option to configure automatic updates during the package creation wizard
At the end of the process, Visual Studio will generate, in addition to the folder with the package, a file with an .appinstaller extension and a default HTML page with a link to install it using the ms-appinstaller protocol.

Figure 90: Visual Studio when you create an MSIX package for sideloading with the automatic check for update feature enabled
Your task will be to copy the contents of this folder to your website or file share path. Your users will just have to open the URL to see the webpage and trigger the installation of the application. The generated HTML page contains some useful information, like the app version, the publisher, and the logo based on the application’s assets.

Figure 91: The page generated by Visual Studio to install the MSIX package using the ms-appinstaller protocol
The wizard has a downside, however. You can specify only a few options, like the update frequency and the installer location. What if you want to enable one of the new features we have just explored, like the ability to show a prompt or to mark an update as critical? You would need to manually edit the generated App Installer file after the package creation has been completed. However, this approach has many downsides, especially if you’re planning to include an automation system (like a CI/CD pipeline, as we’re going to see in Chapter 8) in order to automatically deploy the generated package.
Starting from Visual Studio 2019 version 16.2, you have the opportunity to add an App Installer template to your project, which you can customize. The relevant information (like the installer URL and the package identity) will be replaced at runtime during the package creation. To add a template, right-click your Windows Application Packaging Project (or directly in the UWP one, if it’s a full UWP application) and choose Add > New item. You will find a template called App Installer.
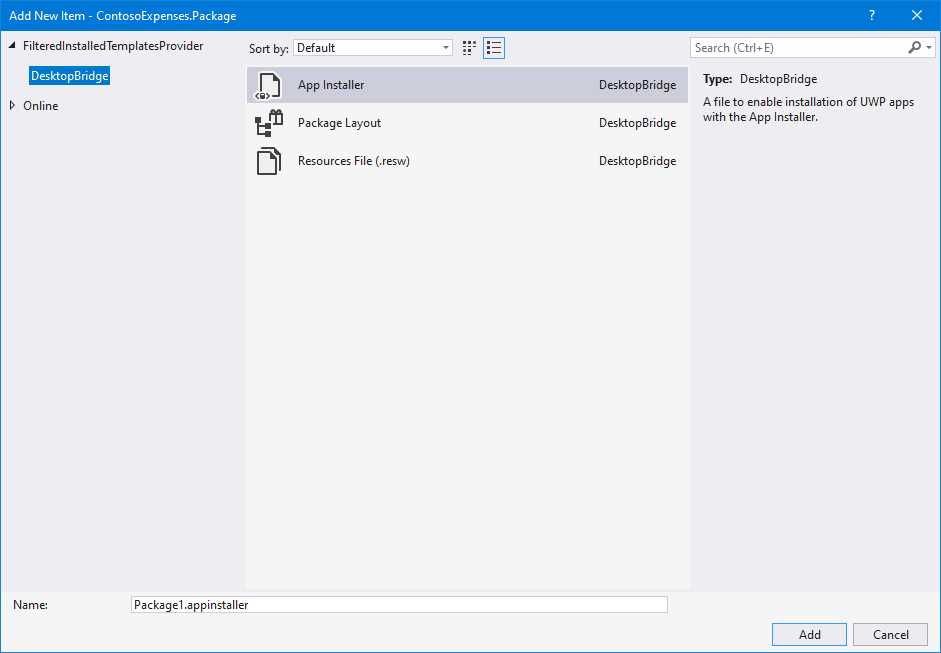
Figure 92: The template to generate an App Installer file
The file will look like the following.
Code Listing 60
<?xml version="1.0" encoding="utf-8"?> <AppInstaller Uri="{AppInstallerUri}" Version="{Version}" xmlns="http://schemas.microsoft.com/appx/appinstaller/2018"> <MainBundle Name="{Name}" Version="{Version}" Publisher="{Publisher}" Uri="{MainPackageUri}"/> <UpdateSettings> <OnLaunch HoursBetweenUpdateChecks="0" /> </UpdateSettings> </AppInstaller> |
As you can see, all the custom information is included with a placeholder, like {AppInstallerUri) or {Version}. These values will be replaced during the package generation, with the ones that are set in your manifest and that you have specified during the wizard. This way, you can customize the configuration (for example, by adding the ShowPrompt attribute to the OnLaunch item) and let Visual Studio automatically generate the correct App Installer file when you create a new MSIX package.
You will notice that the template is correctly recognized because, when you try to generate a new package, you will see the following notification in the wizard.
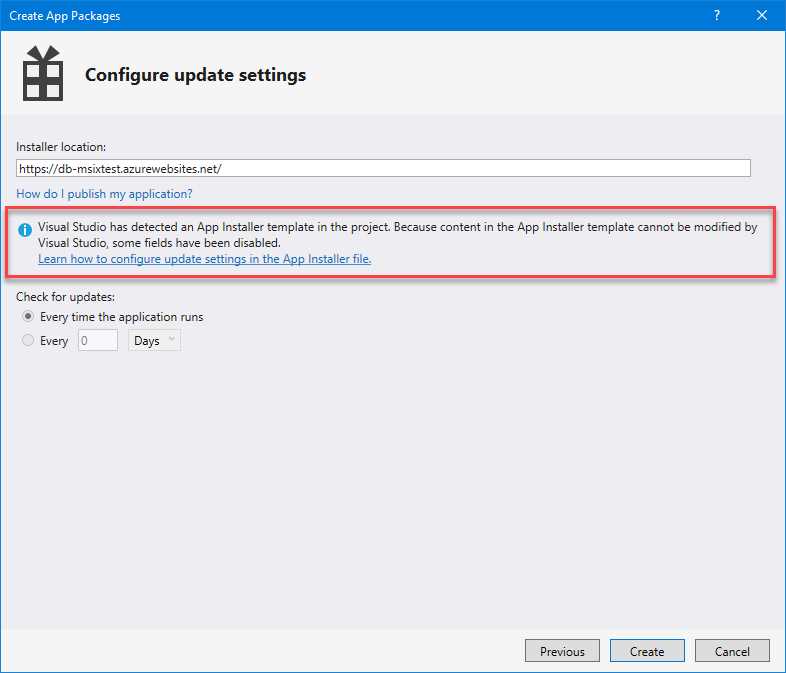
Figure 93: Visual Studio informs the user that an App Installer template is included inside the project
Another option is to leverage an open-source project created by Microsoft, called MSIX Toolkit, which includes many helpers to facilitate the work of IT pros and developers who are adopting MSIX. Among the tools, you will find one called AppInstaller File Builder, which provides a convenient user interface to generate an App Installer file.
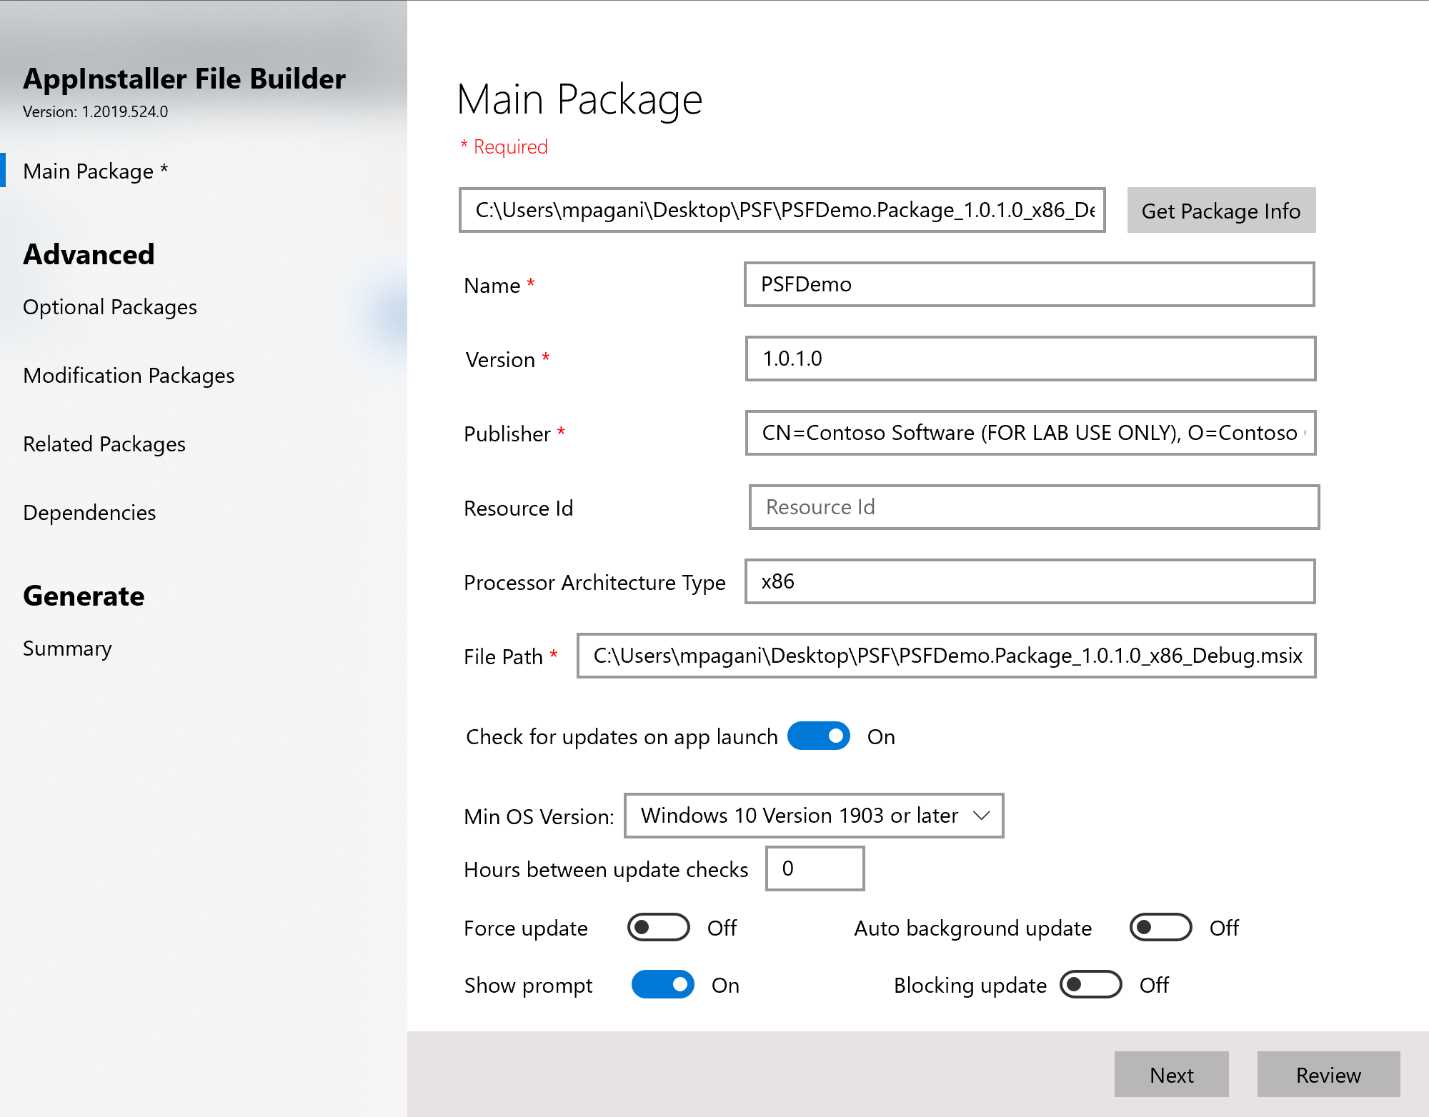
Figure 94: The AppInstaller File Builder tool
In the Main Package section, you can manually fill in all the information about the main application, or just click Get Package Info and choose the MSIX package you want to deploy from your hard disk. The tool will automatically retrieve all the relevant information from the manifest and fill the various fields.
In the second area, you can turn on the automatic check for updates feature. Based on the Min OS Version value you select from the drop-down list, you will see different options, since not all the features are supported by all the Windows 10 versions.
The Advanced section of the tool can be used to configure the various additional packages that are supported to be deployed together with the main one: optional packages, modification packages, related packages, and dependencies. All the various sections work in the same way: you can manually fill the various fields, or you can select the MSIX package and the tool will extract all the relevant information from the manifest.
Once you have completed the configuration, you can click Review to reach the final stage, where the tool will summarize all the options you have selected. Just click Generate to choose a folder on your computer where the App Installer file will be generated.
Publishing the package on a website
In some cases, you might experience some issues when you publish an MSIX package with the related App Installer file on a website. The reason is that not all the web servers are configured to recognize file extensions like .msix or .appinstaller. If that’s the case, you will have to configure the server to support the following MIME types.
Code Listing 61
<?xml version="1.0" encoding="utf-8"?> <configuration> <system.webServer> <!--This is to allow the web server to serve resources with the appropriate file extension.--> <staticContent> <mimeMap fileExtension=".appx" mimeType="application/appx" /> <mimeMap fileExtension=".msix" mimeType="application/msix" /> <mimeMap fileExtension=".appxbundle" mimeType="application/appxbundle" /> <mimeMap fileExtension=".msixbundle" mimeType="application/msixbundle" /> <mimeMap fileExtension=".appinstaller" mimeType="application/appinstaller" /> </staticContent> </system.webServer> </configuration> |
The previous snippet shows how to configure an ASP.NET web server to support the required MIME types.
Adding a custom update experience
In some scenarios, you may want to add a custom update experience. For example, you may want to display a notification to users if an update becomes available while they are using the application, so that they are aware that they must restart it to get it.
The Universal Windows Platform comes with a set of APIs that you can use to query the server, based on the App Installer configuration, and check if any update is available. Since the APIs are part of the UWP ecosystem, you first need to enhance your application by following the guidance we saw in Chapter 6.
The API is part of the Windows.ApplicationModel namespace, and it’s simple to use.
Code Listing 62
private async Task CheckForUpdates() { var result = await Package.Current.CheckUpdateAvailabilityAsync(); if (result.Availability == PackageUpdateAvailability.Available) { MessageBox.Show("There's a new update! Restart your app to install it"); } } |
You can retrieve a reference to the current package using the Package.Current singleton, and then call the asynchronous method CheckUpdateAvailabilityAsync(). You will get back, inside the Availability property, a value from the PackageUpdateAvailability enumerator, which you can use to detect if an update is available. It’s up to you to implement the logic that works best for your application. For example, you can display a message or send a toast notification. In the previous code snippet, we use the standard MessageBox from the .NET Framework to display a pop-up to the user to notify him that there’s an update available.
Choosing the right certificate
When it comes to distributing MSIX packages, there’s one important decision that you must make: the certificate you’re going to use to sign the package. As mentioned in Chapter 1, MSIX enforces a strong security model. All the packages must be signed with a digital certificate, which must be trusted by the machine.
As such, it’s very important to choose the right certificate to ensure a smooth deployment experience.
Publishing on the Microsoft Store
The simplest approach is to publish your application on the Microsoft Store or the Store for Business/Education. You won’t have to sign your package; the Microsoft Partner Center will do it for you during the certification process. The package will be signed with a Microsoft certificate, which is trusted by all Windows 10 devices.
Sideloading
When you sideload your application, you need to handle the package signing yourself. There are a few different options:
- Use a certificate provided by an internal certification authority (CA). This is the most common scenario when it comes to internal line-of-business applications. Many major enterprises have an internal CA, which can generate certificates that are automatically trusted by every machine in the company. When a package is signed with this certificate, all the company assets will be able to install the application without having to manually trust the certificate.
- Use a certificate provided by a public certification authority. This scenario is typical when you want to distribute an application to a public audience (either consumers or enterprises) without using the Microsoft Store. Since the certificate is coming from a public CA, the chain will be already trusted by Windows, and every user will be able to install it without having to manually trust the certificate. These certificates are purchased from an organization, and during the process, the CA will validate your identity.
- Use a self-signed certificate. This option is good when you’re in testing phase or it’s a very limited distribution, but it isn’t considered a best practice when it comes to enterprise or public distribution. A self-signing certificate validates the integrity of the package, but not the identity. Since there isn’t any identity verification process (like when you purchase a certificate from a public CA), you can easily create a self-signing certificate using a name for which you don’t have any rights. Additionally, before using it, the self-signing certificate must be manually added to the Trusted People certificate store in Windows, which requires administrator rights.
Creating a self-signed certificate
To create a certificate, you can use a set of PowerShell commands. The first step is to open a PowerShell prompt with administrative rights, which are required to add new items to the Windows certificate store. The easiest way to do it is to right-click the Start menu in Windows 10 and choose Windows PowerShell (Admin).
First, you will have to type the following command.
Code Listing 63
New-SelfSignedCertificate -Type Custom -Subject "CN=MyCompany" -KeyUsage DigitalSignature -FriendlyName MyApplication -CertStoreLocation "Cert:\LocalMachine\My" |
The two parameters that you must customize are highlighted in bold:
- Subject must match the publisher name declared in the manifest of the application.
- FriendlyName is a free value that you must use as a unique identifier for your certificate.
This command will create the certificate inside your local certificate store. As output, you will see a recap of the operation including the thumbprint of the certificate, as highlighted in Figure 95. Take note of it, because we’re going to need it in the next step.
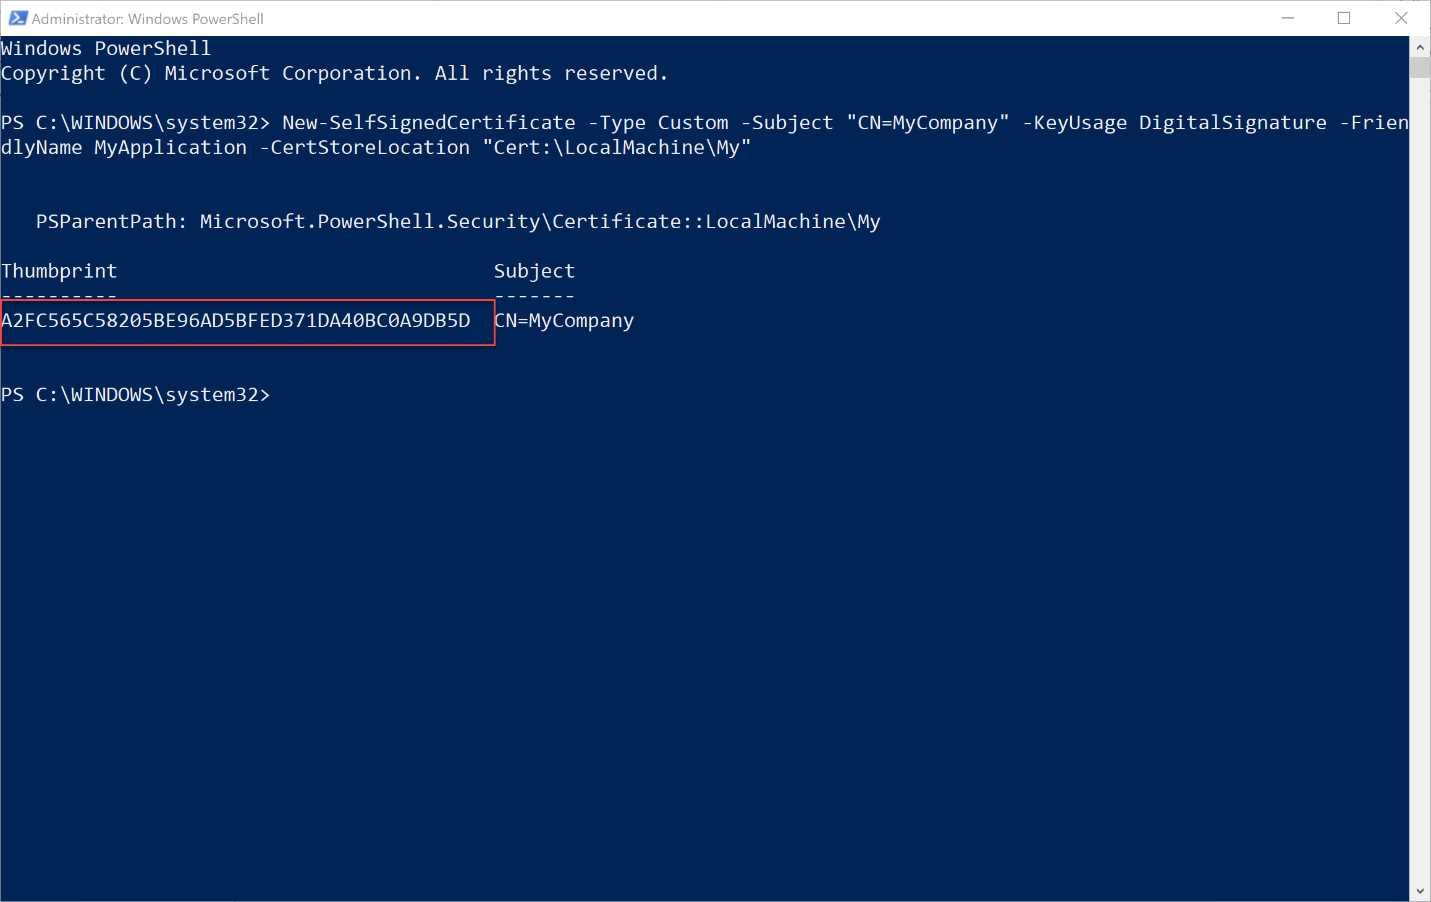
Figure 95: The output of the PowerShell command to create a certificate
Now that we have a certificate, we need to export it as a file so that we can choose it during the setup of the packaging process in the MSIX Packaging Tool.
Here is the PowerShell command to execute.
Code Listing 64
$pwd = ConvertTo-SecureString -String <Your Password> -Force -AsPlainText Export-PfxCertificate -cert "Cert:\LocalMachine\My\<Certificate Thumbprint>" -FilePath <FilePath>.pfx -Password $pwd |
The first line of the command will define a variable called $pwd, which signifies where to store the password of the certificatee, that must be passed as the value of the -String parameter.
The second line will perform the export operation, and requires customizing two parameters:
- In the cert parameter, you must replace the <Certificate Thumbprint> placeholder with the value you noted in the previous step, right after creating the certificate.
- In the FilePath parameter, you must specify the full path where you want to save the PFX file.
At the end of the process, you’ll obtain a password-protected PFX file, which can be used in combination with the MSIX Packaging Tool to sign the package.
Signing the package
A package can be signed by using the signtool utility included in the Windows 10 SDK. You can get to it by opening a command prompt and pointing it to the folder C:\Program Files (x86)\Windows Kits\10\bin\10.0.xyz.0\x86, where xyz is the most recent version of the Windows 10 SDK you have installed. We learned to use this utility in Chapter 3, but let’s review how to use it.
This is the command to execute.
Code Listing 65
signtool sign /tr http://timestamp.digicert.com /td sha256 /fd sha256 /f "c:\path\to\mycert.pfx" /p pfxpassword "c:\path\to\package.msix" |
The relevant parameters to customize are /f, which must include the path of the PFX file with the certificate, and /p, which must include the certificate’s password. The last parameter is the full path of the MSIX package you want to sign. Remember that the Publisher declared in the manifest of the package must match the subject of the certificate; otherwise, the signing operation will fail.
If you’re using Visual Studio, you also have the ability to sign the package with a UI included in the manifest editor. Double-click the Package.appxmanifest of your UWP or Windows Application Packaging Project and move to the Packaging section. Near the Publisher field, you will find the Choose Certificate option.
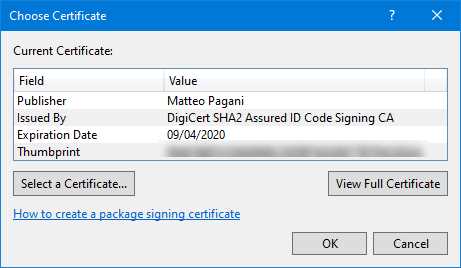
Figure 96: The Visual Studio option to choose a certificate
When you click Choose Certificate, you will have the opportunity to select one of the certificates you have in your personal storage.
Supporting Windows 10 in S Mode
Among the various Windows versions, Microsoft offers a special edition called S Mode, which is tailored for education and business scenarios. Windows 10 in S Mode offers enhanced security and performance, since you can install only applications coming from the Microsoft Store. This severely reduces the surface attacks from malicious developers, since all the Store applications are vetted from a certification process. Additionally, many of the vectors commonly used to perform malicious operations (like leveraging PowerShell or the Command Prompt) are blocked by default.
When it comes to Win32 applications packaged with MSIX, however, there are a couple of additional requirements to keep in mind.
The first one is that you aren’t allowed to launch any executable that lives outside the package or that is blocked by default in S Mode, like cmd.exe, powershell.exe, or reg.exe. You can find the full list of blocked executables in the official documentation. If the executable is included inside the package, you can safely launch it using Process.Start() or any other equivalent to invoke another process.
The second requirement is that the application can’t load code from a location outside the folder where the package is deployed. An application is allowed to generate code at runtime, but only if it’s kept in memory. If, for example, it’s generated and stored in a temporary folder, the operation will be blocked.
When it comes time to test if your packaged application is fully compliant with Windows 10 in S Mode, you can hit a blocker. Even if you own a device running Windows 10 in S Mode, you won’t be able to sideload an application, since you can install only packages coming from the Store. Microsoft has made available a set of policies for Device Guard, a technology included in Windows 10 to lock down the operating system, which can be used to simulate S Mode.
When you enable these policies, the two extra requirements we just mentioned will be enforced. The first step is to download the policies, which are available in the documentation. Inside the compressed file, you will find three different files with the .p7b extension, which correspond to three different policies:
- SiPolicy_Audit.p7b: When this policy is enabled, the application will continue to behave like it’s on a regular Windows 10 machine, but all the code integrity violations will be logged in Event Viewer.
- SiPolicy_Enforced.p7b: When this policy is enabled, Windows will behave like the real S Mode. You will be able to get applications only from the Store, and all the code integrity violations will be enforced.
- SiPolicy_DevModeEx_Enforced.p7b: When this policy is enabled, Windows will behave like the real S Mode, but you will be able to sideload applications that are signed with a special certificate, which is included inside the file you have downloaded.
Once you have selected the policy you want to enable, you must copy the .p7b file in the C:\Windows\System32\CodeIntegrity\ folder and rename it SiPolicy.p7b. Then reboot your machine. At restart, the policies will be applied.
Tip: It’s best to use a virtual machine to simulate Windows 10 in S Mode, since all the applications and services you have installed on a regular production machine may stop working, causing random issues.
All the errors will be logged in Event Viewer. To view them, navigate to Application and Services Logs > Microsoft > Windows > CodeIntegrity and look for the Operational section.
The following snippets show some examples of real errors you might see when you launch an application on Windows 10 in S Mode.
Code Listing 66
Code Integrity determined that a process (\Device\HarddiskVolume2\Program Files\WindowsApps\2bd04f34-968e-47a1-b7bc-3f667a2f1498_1.0.1.0_x86__8x64rcfmpem5g\LaunchCmd\LaunchCmd.exe) attempted to load \Device\HarddiskVolume2\Windows\SysWOW64\cmd.exe that did not meet the Enterprise signing level requirements or violated code integrity policy (Policy ID:{a244370e-44c9-4c06-b551-f6016e563076}). |
This error is logged when the first extra requirement isn’t satisfied. The application is trying to launch one of the executables that is blocked on Windows 10 in S Mode (cmd.exe), and a code integrity violation is logged in Event Viewer.
Code Listing 67
Code Integrity determined that a process (\Device\HarddiskVolume2\Program Files\WindowsApps\Contoso.MyEmployees_4.0.0.0_x64__b4ranh25ygct6\app\MyEmployees.exe) attempted to load \Device\HarddiskVolume2\Users\qmatteoq\AppData\Local\Temp\29684c81-1b32-4447-8ab6-fed88bd6202d.tmp.node that did not meet the Enterprise signing level requirements or violated code integrity policy (Policy ID:{a244370e-44c9-4c06-b551-f6016e563076}). |
This is an example of the second requirement enforced by Windows 10 in S Mode. The application has generated a temporary file, which contains some code that it’s trying to load. However, since this file is stored in a temporary folder (AppData\Local\Temp) and not in the package folder, the operation is blocked.
Updating the package for Windows 10 in S Mode testing
The policy file called SiPolicy_DevModeEx_Enforced.p7b is one of the most effective when it comes to testing your application in S Mode. Thanks to this policy, you can get helpful logging in Event Viewer; at the same time, you can see if your application is indeed failing as a consequence of one of the additional requirements.
However, sideloading an application on a machine configured with such a policy can be challenging. As we have learned, the subject of the certificate you use to sign a package must match with the publisher name declared in the app manifest. Since, in order to do the sideloading, you need to sign the package with the special certificate provided by Microsoft, you also need to temporarily change the publisher in the manifest to match its subject, which is CN=Appx Test Root Agency Ex.
As such, you would need to:
- Unpack the package with the makeappx tool included in the Windows 10 SDK.
- Edit the AppxManifest.xml file to change the Publisher attribute of the Identity tag.
- Use the makeappx tool to recreate the package.
- Use the signtool utility in the Windows 10 SDK to sign the package with the testing certificate provided by Microsoft.
To make your life easier, you can use a PowerShell script that is part of the MSIX Toolkit, called ModifyPackagePublisher. Once you have downloaded the latest release from GitHub, you need to extract it in a folder of your choice. Then, inside this folder, you will have to copy:
- Two tools from the Windows 10 SDK: signtool.exe and PackageEditor.exe. You can get them from the C:\Program Files (x86)\Windows Kits\10\bin\10.0.18362.0\x86 folder.
- The certificates that are supported by the special policies to simulate Windows 10 in S Mode. The files are called AppxTestRootAgency.cer and AppxTestRootAgency.pfx, and they are included in the AppxTestRootAgency folder inside the compressed policies file you have downloaded from the official documentation.
In the end, you can run the following command.
Code Listing 68
.\modify-package-publisher.ps1 -directory "C:\path\folderWithThePackage" -certPath ".\AppxTestRootAgency.cer" -pfxPath ".\AppxTestRootAgency.pfx" |
The three relevant parameters are:
- -directory, which must point to the folder that includes the MSIX package you want to test. The tool supports multiple packages, so you’re free to include in the folder all the packages you want to test.
- -certPath, which must point to the AppxTestRootAgency.cer file included in the policies.
- -pfxPath, which must point to the AppxTestRootAgency.pfx file included in the policies.
If the certificate has a password, you can use the -password parameter to set it.
At the end of the process, you will have an MSIX package that you can install on your Windows 10 machine with the SiPolicy_DevModeEx_Enforced.p7b policy applied.
Using PowerShell to handle MSIX packages
MSIX packages are very flexible and can be deployed in multiple ways: through the Microsoft Store, using a website or a file share, and using Intune or SSCM. One of the most powerful options is to use PowerShell to control the lifecycle of MSIX packages. Let’s see the most common commands.
Deploy a package
Deploying a package is as easy as passing to the Add-AppPackage command the full path of the MSIX file you want to deploy, using the Path parameter.
Code Listing 69
Deploy a package to all the users on a machine
MSIX packages are deployed per user. However, in some scenarios you may want to deploy an application to the current and future users that who will log in on the same machine. This goal can be performed using the Add-AppProvisionedPackage command.
Note: This command must be executed from a PowerShell prompt with administrative rights.
There are two different options to use this command. The first scenario is deploying the package to all the users of the current Windows 10 machine.
Code Listing 70
The second scenario is when you want to apply the package to a Windows 10 image so that you can provision machines with the application already installed for all the users. In this case, you need to replace the Online parameter with the Offline one and specify the path that contains the image.
Code Listing 71
Add-AppxProvisionedPackage -Path "C:\Windows10Image" -PackagePath "SamplePackage.msix" |
Get all the information about a package
In order to get all the information about a deployed package, you can use the Get-AppPackage command. If you issue it without passing any parameter, you will get a list of all the packages installed on your machine, ordered from the oldest to the most recent one.
If, instead, you’re looking for information about a specific package, you can pass as parameter a search query, which also supports wildcards. For example, if the application is called MyEmployees, you can find it using the following command.
Code Listing 72
Get-AppPackage *MyEmployees* |
Regardless of the method you choose, the output will be similar to the following one.
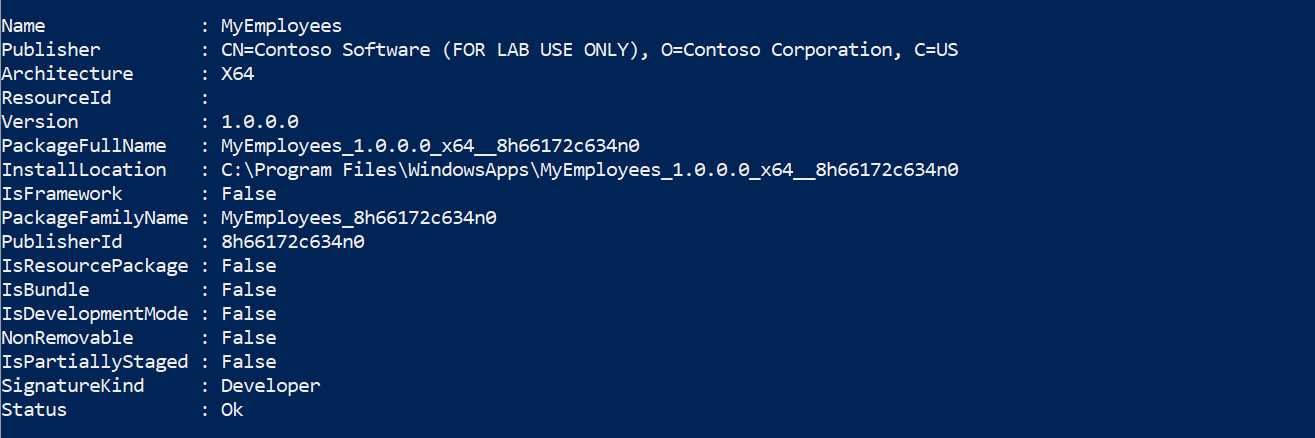
Figure 97: The information displayed by the Get-AppPackage command about a deployed application
As you can see, the output lists all the main information about the package, like the name, the publisher, the PackageFamilyName, the version number, etc.
If you are in a multi-user scenario and you execute the Get-AppPackage command in a PowerShell prompt with administrative rights, you will also see the information about which users have already installed the package in the PackageUserInformation field.

Figure 98: A package that has been deployed to multiple users on the same machine
Modification packages won’t appear as regular packages, so you won’t find them using the Get-AppPackage command. However, if an application includes one or more modification packages, they will be displayed in the Dependencies section, as shown in the following image.

Figure 99: An application deployed together with a modification package
Remove a package
To remove a package, you can use the Remove-AppPackage command, which requires the Package parameter with the Package Full Name of the application you want to remove. You can obtain this information using the Get-AppPackage command we have just learned to use. For example, to remove the MyEmployees application, you can use the following command.
Code Listing 73
Remove-AppPackage -Package MyEmployees_1.0.0.0_x64__8h66172c634n0 |
Remove a package for all the users
If a package has been deployed to all the current and future users on the machine, you can use the Remove-AppProvisionedPackage command to remove all the installed instances. You must specify the Package parameter, followed by the Package Full Name of the application you want to remove. If you want to remove the application from the current machine, you must also add the AllUsers parameter.
Code Listing 74
Remove-AppPackage -Package MyEmployees_1.0.0.0_x64__8h66172c634n0 -AllUsers |
If you want to remove the package from a Windows 10 image you have built, you can use the Path parameter to specify the path that contains it.
Code Listing 75
Remove-AppPackage -Package MyEmployees_1.0.0.0_x64__8h66172c634n0 -Path C:\Windows10Image |
Note: This command must be executed from a PowerShell prompt with administrative rights.
Execute a process inside the container
When you’re troubleshooting a packaged application, some operations might be complicated by the container, which virtualizes the file system and the registry. Let’s say, for example, that you want to check if whether the application has correctly created a key in the registry. If you open the Registry Editor, you won’t be able to see it, because the key is created inside the virtual registry. Another example is the deployment of a dependency or of a modification package. If you want to check if whether a file is really there, you can’t use a normal command prompt or File Explorer, because the system folders are handled with the Virtual File System.
To overcome this limitation, PowerShell offers a command that you can use to invoke a process inside the same container of an application. This means the process will have access to the virtual registry and the virtual file system, exactly like the main application. Thanks to this approach, you can launch a command prompt or the Registry Editor inside the container and explore the full file system or the registry.
The command is called Invoke-CommandInDesktopPackage, and it requires three parameters:
- AppId, the application identifier declared in the manifest of the application.
- PackageFamilyName, the Package Family Name of the application.
- Command, the process you want to launch inside the container.
Note: To use this command, the Developer Mode must be enabled in your Windows 10 PC. To enable it, you must open your Settings, go to Update & Security > For developers, and choose Developer mode.
For example, this is the command you must launch if you want to run the Registry Editor inside the same container of the MyEmployees application.
Code Listing 76
Invoke-CommandInDesktopPackage -AppId MyEmployees -PackageFamilyName MyEmployees_8h66172c634n0 -Command regedit |
The Registry Editor will be opened with a merged view of the system registry with the virtual registry. The screenshot in Figure 100 shows a set of keys that belong to the MyEmployees application and are deployed by the MSIX package. As such, they wouldn’t be visible if you just launch the Registry Editor outside the container.
The following example shows how to run a command prompt inside the application’s container.
Code Listing 77
Invoke-CommandInDesktopPackage -AppId MyEmployees -PackageFamilyName MyEmployees_8h66172c634n0 -Command cmd |
Thanks to this command prompt, you’ll be able to navigate the virtual file system as if they’re actual files and folders on your hard drive. In Figure 16, you can see the list of files inside the C:\Program Files (x86)\Contoso\MyEmployees folder. This folder doesn’t really exist in the system, but it’s included in the VFS\ProgramFilesX86 folder of the package.
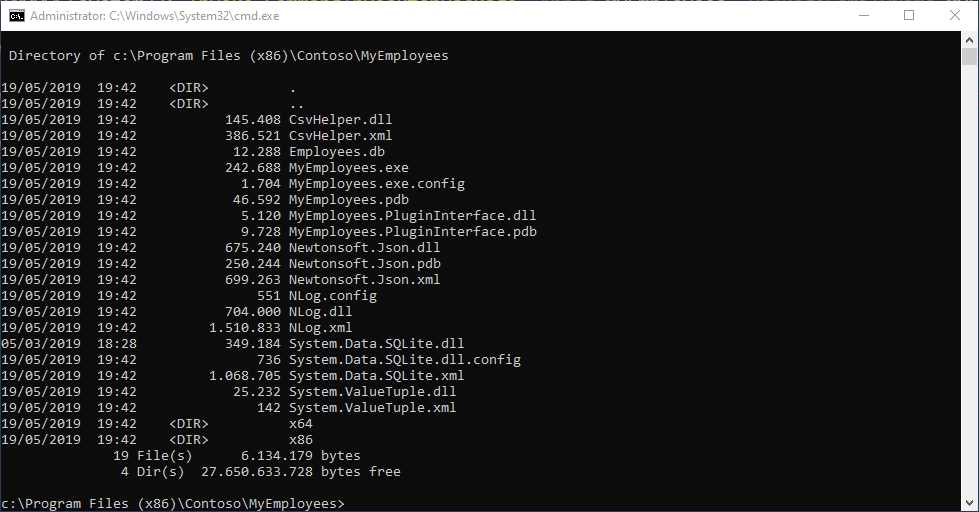
Figure 100: A command prompt opened inside the container shows files that belong to the virtual file system as if they’re part of the physical hard drive
An easier way for troubleshooting
The Invoke-CommandInDesktopPackage command is very useful, but its use isn’t very straightforward. You need to retrieve the application identifier and the Package Family Name of the application before using it, which might be challenging.
Caphyon, the company behind the popular installer authoring tool Advanced Installer, has released a free tool called Hover, which makes it easier to launch other applications inside a container.
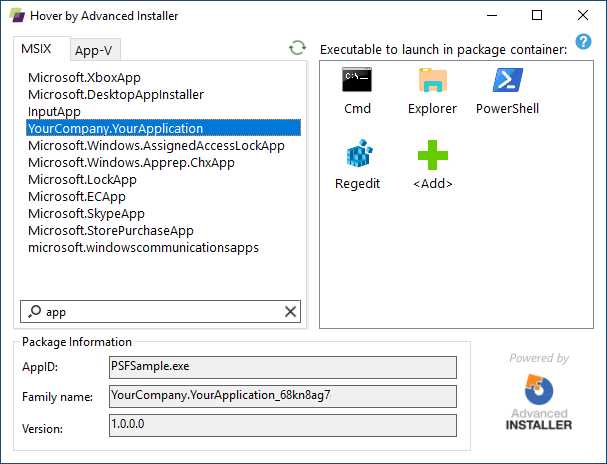
Figure 101: Hover, a tool that makes it easier to launch applications inside an existing container
The user interface is simple to decode. Under the MSIX tab, you will find a list of all the MSIX-packaged applications installed on your machine. On the right, you can choose the executable you want to launch. The tool already includes the most popular ones, like command prompt, File Explorer, and Regedit, but you can also add your own executable.
You just have to double-click the executable in the right panel to launch it inside the container, so that it will be able to leverage the registry keys and files that are included in the virtualized ecosystem.
- 1800+ high-performance UI components.
- Includes popular controls such as Grid, Chart, Scheduler, and more.
- 24x5 unlimited support by developers.