
MSIX Succinctly®

CHAPTER 8
DevOps for Windows Desktop Applications with MSIX
Adopting a DevOps culture is becoming more and more critical to delivering successful software projects. Thanks to DevOps, you can address feedback from your customers quickly, you can identify problems as soon as they happen, and you can react to changes in a more efficient way.
As Donovan Brown, one of Microsoft’s DevOps leads, says, DevOps is all about “the union of people, process, and products to enable continuous delivery of value to your end users.” It doesn’t matter which tools and approaches you decide to adopt; the starting point should always be identifying the value that you can bring to your users.
For a Windows desktop application, the added value of adopting DevOps is making sure that your users are always up to date, which is still a challenge in the desktop world. From this point of view, a web application is easier to deploy. Your users will always have access to it from a browser and from a single entry point, which is the URL of the web application. As such, they will always use the most recent version of your product, since you just need to deploy it on a single server.
Note: In the real world, web applications can have a complex architecture, made by microservices, multiple servers, containers, etc. However, this doesn’t change the fact that, in the end, your customers will always access it using a unique entry point.
Windows applications, instead, can run on hundreds, thousands, millions of different computers all around the world, so deploying updates isn’t as straightforward as with a web application. MSIX helps us solve this challenge. As we saw in Chapter 7, deployment solutions like the Microsoft Store and the App Installer make it easier for users to always stay up to date. We just need to make the process agile, so that releasing updates can become an easy and automatic procedure.
Welcome Azure DevOps
Azure DevOps is the platform built by Microsoft to provide all the services you need to create a DevOps experience for your project. The platform is made up of five different services:
- Azure Boards: Used for project management, it allows you to track the status of the project, define work items, track bugs, etc.
- Azure Pipeline: Used for building a continuous integration and continuous delivery experience in your project. It’s the platform we’re going to talk about more in this section.
- Azure Repos: This provides a space to host the source code of your project, using the Git platform.
- Azure Test Plans: Used to run advanced automatic tests on your projects.
- Azure Artifacts: Makes it easier for development teams to build and share packages and libraries.
One of the biggest advantages of Azure DevOps is its flexibility. You can choose only the services you need, and you can easily integrate them with existing third-party services in the DevOps space. For example, you can use Azure Pipeline to build your projects, but host your code on GitHub. Or, you can host your code on Azure Repos, but use Jenkins to enable CI/CD.
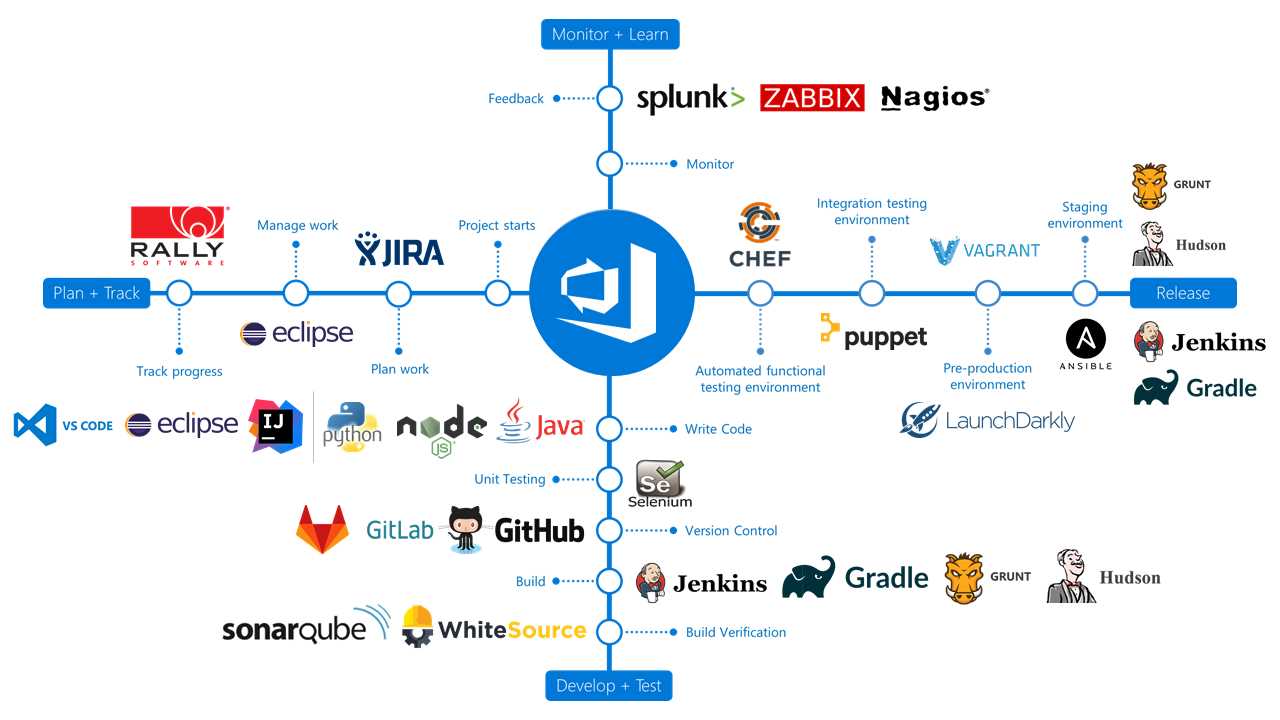
Figure 102: Azure DevOps supports integration with many third-party services
If you don’t already have an Azure DevOps account, you can create one on the official website. There are multiple plans, including a free one, which include as main features:
- Up to five users (if a user has a Visual Studio subscription, the user doesn’t count against the total).
- Unlimited repositories.
- One hosted job with 1,800 minutes of CI/CD per month.
If you’re working on an open-source project, you can get an unlimited number of users and unlimited CI/CD minutes for free, with up to 10 parallel jobs.
Azure DevOps is a great fit for deploying Windows desktop applications, since:
- You can build your projects with a Windows-based hosted agent, which already comes with Visual Studio, the Windows 10 SDK, and the .NET Framework.
- You have tasks that will help you sign your package with the right certificate, in case of sideloading.
- You have tasks that can deploy a MSIX package directly on the Microsoft Store or to a website.
Let’s see it in more detail.
Using Azure Pipeline
Azure Pipeline is a service you can use to build a CI/CD experience in your projects. What does that mean, exactly?
- Continuous Integration is the process of triggering a new build of a software project every time new code is committed to the repository. As part of this project, you might also trigger the execution of unit tests, to make sure that the code you have added doesn’t break any existing feature of the application. Every successful build will generate a new artifact, which can be deployed to your users. In the case of a Windows desktop application, this artifact will be an MSIX package. This task is implemented using build pipelines.
- Continuous Deployment is the process of automatically deploying to your users the artifacts that are produced by a build pipeline. The deployment can happen in multiple stages (a dev environment, a testing environment, a production environment, etc.), and there may be gates between one stage and another. For example, you may require approval from the administrator of the project before triggering a deployment to the production environment. In the case of a Windows desktop application, we’re going to enable CD to deploy the application on the Store or on a website. This task is implemented using release pipelines.
The biggest advantage of implementing a CI/CD pipeline is that you only need to configure it once. After it’s up and running, new versions of the application will be automatically created and deployed without any manual intervention from your side.
A pipeline is nothing more than a series of tasks that are executed one after the other. These tasks can perform various operations, like compiling the source code, running unit tests, and installing a dependency. Azure Pipeline supports a wide range of tasks, either built into the platform, or distributed by third-party developers using the Marketplace.
Tasks are executed on an agent, which is a sort of virtual machine that contains the build environment. Azure DevOps offers a wide range of hosted agents, which are prebuilt machines with all the tools required to perform a specific set of tasks. These agents offer different operating systems (Windows, Linux, MacOS) and different build environments (Visual Studio 2017, Visual Studio 2019, etc.). If you need to leverage special tools that can’t be easily installed on a hosted agent, you have the opportunity to create your own custom agent and upload it on Azure DevOps.
Hosting the project
Before building a pipeline, you will have to host your code on a repository. Azure DevOps offers its own platform, Azure Repos, but you’re free to use any platform of your choice, like GitHub or GitLab. If you’re packaging a Win32 application, make sure the repository also includes the Windows Application Packaging Project, which is required to create a MSIX package.
Creating a build pipeline
Pipelines in Azure DevOps are defined using YAML, which is a markup language. This solution enables the infrastructure as code philosophy, which allows you to manage and provision resources using a code file rather than physical hardware configuration or interactive configuration tools. This way, the pipeline becomes part of your source code and can evolve with it.
Build pipelines can be created under the Pipelines > Builds section of your project on Azure DevOps. As a first step, you will be asked which platform is hosting the source code of your project. You can choose from among many options, like Azure Repos, GitHub, and BitBucket. In the second step, Azure Pipeline will propose a set of templates for different project types. Each of them will create a basic YAML file with some tasks already configured. In our scenario, the template to choose is Universal Windows Platform, which will compile our UWP or Windows Application Packaging Project and create an MSIX.
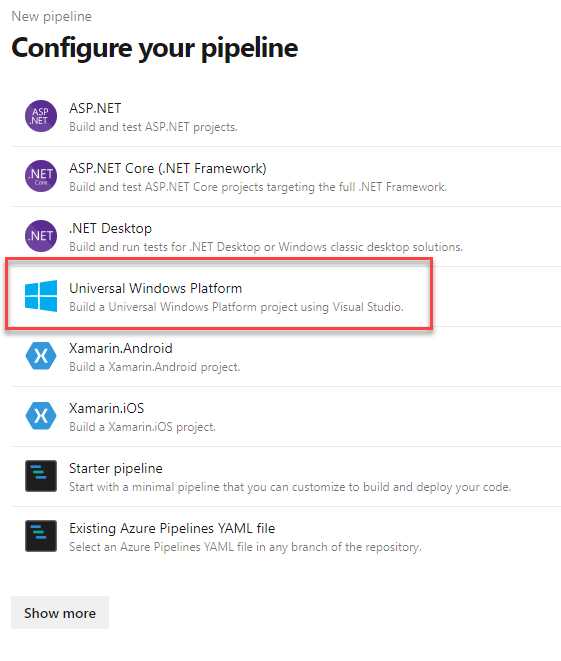
Figure 103: The template to choose to build an MSIX package in Azure Pipeline
The template will create the following YAML file.
Code Listing 78
# Universal Windows Platform # Build a Universal Windows Platform project using Visual Studio. # Add steps that test and distribute an app, save build artifacts, and more: # https://aka.ms/yaml trigger: - master pool: vmImage: 'windows-latest' variables: solution: '**/*.sln' buildPlatform: 'x86|x64|ARM' buildConfiguration: 'Release' appxPackageDir: '$(build.artifactStagingDirectory)\AppxPackages\\' steps: - task: NuGetToolInstaller@0 - task: NuGetCommand@2 inputs: restoreSolution: '$(solution)' - task: VSBuild@1 inputs: platform: 'x86' solution: '$(solution)' configuration: '$(buildConfiguration)' msbuildArgs: '/p:AppxBundlePlatforms="$(buildPlatform)" /p:AppxPackageDir="$(appxPackageDir)" /p:AppxBundle=Always /p:UapAppxPackageBuildMode=StoreUpload' |
Let’s analyze the meaning of the various elements.
The configuration
The first three items, trigger, pool, and variables, are used to configure the build environment.
The trigger section is used to enable continuous integration and specifies the criteria used to trigger a new build. By default, it contains the name of the branch we’re building (master), which means that every commit to this branch will trigger a new build.
The pool section contains the configuration of the agent that will execute the build. With windows-latest we specify that we want to use the latest Windows image.
The variables section defines a set of parameters that are leveraged during the build process. Specifically:
- solution defines which solution we want to build. By default, the pipeline will build all the solutions included in the project.
- buildPlatform defines which architecture we want to support inside the package.
- buildConfiguration is the Visual Studio configuration used for the build.
- appxPackageDir is the folder where the package will be created if the build is successful.
The steps
The steps section contains the tasks that will be performed one after the other. Each task has a unique identifier and a set of properties to customize it. The first two tasks, NuGetToolInstaller and NuGetCommand, will download the most recent version of NuGet and restore all the dependencies in the project. The last task, called VSBuild, will build the project and create an MSIX package.
Customizing the build
Before saving the YAML file, we need to make a few changes to fit our MSIX packaging scenario.
The first one is to make sure we’re building for the right CPU architecture. By default, the buildPlatform entry under variables will include x86, x64, and ARM, since these are the architectures supported by Universal Windows Platform applications. However, if you’re building a Win32 application packaged with the Windows Application Packaging Project, ARM won’t be supported, so make sure to remove it and leave only x86 or x64 (or both, based on your application’s configuration).
The second one is to disable the package signing. By default, MSIX packages are signed with a self-signing certificate generated by Visual Studio during the build process. However, signing the package during the build process isn't a good practice because we would need to upload the certificate to the repository. This means every developer working on the project will have access to the certificate, increasing the risk of identity theft. As such, the recommended approach is to sign the package in the release pipeline and store the certificate in a safe way. We're going to see how to do this later in the chapter. For the moment, just disable the signing during the compilation by adding the /p:AppxPackageSigningEnabled=false parameter to the msBuildArgs property of the VSBuild task.
The last change is to upload the artifacts. You can think of the hosted agent as a sort of virtual machine. Every time a new build is triggered, a new instance is created, which takes care of executing all the tasks, one after the other, and then it's disposed of at the end. The consequence is that, if we don't store the output of the build somewhere, it will be lost as soon as the hosted agent is disposed of. Azure DevOps offers its own cloud storage for storing the artifacts. Artifacts are available to the developer for manual download and are important for building a release pipeline. In a CD pipeline, in fact, the deployment is typically kicked off when a new artifact is available as a consequence of a CI pipeline that has been successfully completed. To achieve this goal, you will need to add the following task as the last step.
Code Listing 79
- task: PublishBuildArtifacts@1 inputs: PathtoPublish: '$(Build.ArtifactStagingDirectory)\AppxPackages' ArtifactName: 'drop' |
This is how the final YAML file should look.
Code Listing 80
# Universal Windows Platform # Build a Universal Windows Platform project using Visual Studio. # Add steps that test and distribute an app, save build artifacts, and more: # https://aka.ms/yaml trigger: - master pool: vmImage: 'windows-latest' variables: solution: '**/*.sln' buildPlatform: 'x86|x64' buildConfiguration: 'Release' appxPackageDir: '$(build.artifactStagingDirectory)\AppxPackages\\' steps: - task: NuGetToolInstaller@0 - task: NuGetCommand@2 inputs: restoreSolution: '$(solution)' - task: VSBuild@1 inputs: platform: 'x86' solution: '$(solution)' configuration: '$(buildConfiguration)' msbuildArgs: '/p:AppxBundlePlatforms="$(buildPlatform)" /p:AppxPackageDir="$(appxPackageDir)" /p:AppxBundle=Always /p:UapAppxPackageBuildMode=StoreUpload /p:AppxPackageSigningEnabled=false' - task: PublishBuildArtifacts@1 inputs: PathtoPublish: '$(Build.ArtifactStagingDirectory)\AppxPackages' ArtifactName: 'drop' |
Once you have finished editing the YAML file, you can click Save and run. The YAML file will be saved in the root of your repository, and the build will be triggered. You will be able to follow the build step by step, thanks to real-time logging. If the build is successful, you’ll be able to access the artifacts using the Artifacts button that will appear at the top of the build details page. From there, you will be able to explore and download the files that have been created.
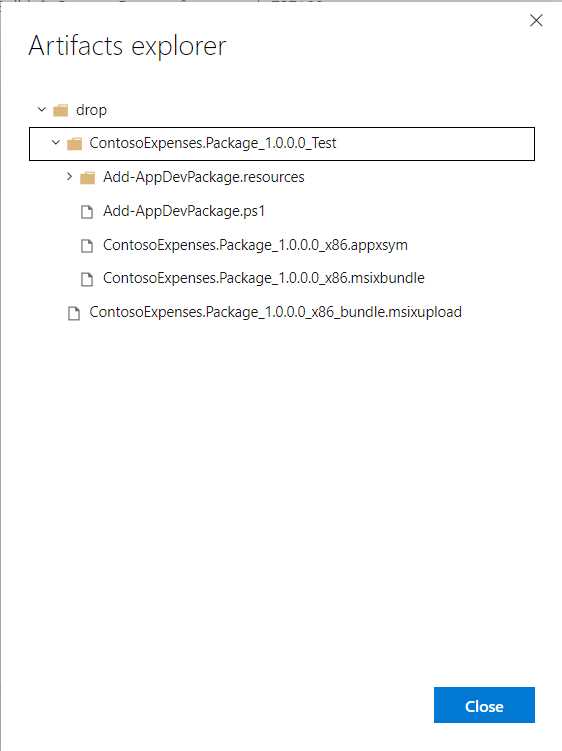
Figure 104: The build output of the pipeline
Setting the package version
If you check the artifact, you will notice that the MSIX package has been generated using the version number that is declared in the manifest of your project. By default, however, the version number will not change for future builds, as the build environment is not persisted between them. It's our duty to manually update the manifest every time we push some code to the repository. However, this approach can lead to many problems. If we forget to update the number, and we generate an update with the same version number as the prevision one, we will break the update chain.
The solution is to leverage the build number generated by Azure DevOps to also update the package version also, so that it will be automatically increased at every execution. However, there’s a catch. By default, Azure DevOps uses the following expression to generate a build number.
Code Listing 81
$(date:yyyyMMdd)$(rev:.r) |
The dollar sign is used by Azure DevOps to reference variables, which can be configured on the portal. However, some of them are already built into Azure DevOps, like the one used for the date in the expression above. You can find the full list here. The expression in Code Listing 81 will generate a build number like the following.
Code Listing 82
20190504.1 |
This build number, however, isn’t compatible with the version number required by MSIX packages, which must follow the convention x.y.z.0. We can change the build number by editing the YAML file and modifying the build configuration. To achieve this goal, go back to Pipelines > Builds in your Azure DevOps project, locate the build pipeline you previously created, and click Edit. You will get access to the advanced YAML editor.
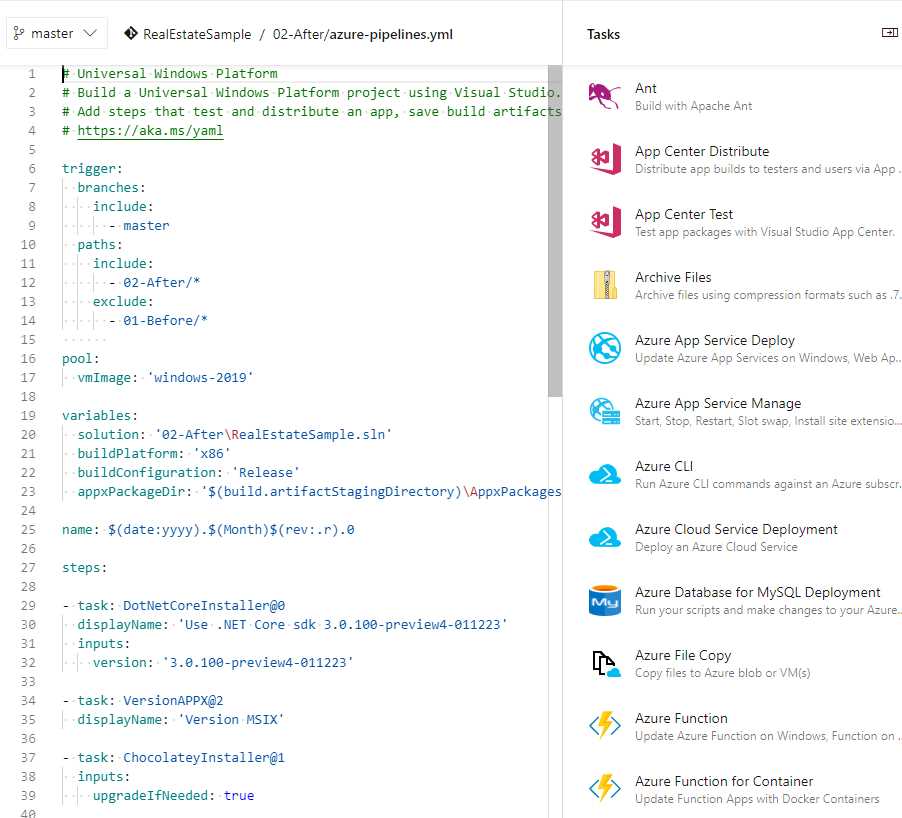
Figure 105: The advanced YAML editor
Compared to the editor you used the first time to create the YAML file, this version includes a more friendly user interface. From the panel on the right, in fact, you’ll be able to choose from among many tasks and configure them using a visual UI. The option you have selected will be automatically translated into YAML markup.
To define the new build number, you have to add a new entry before the steps section using the following snippet.
Code Listing 83
name: $(date:yyyy).$(Month)$(rev:.r).0 |
With the name entry, we’re defining a new versioning for the build number. This time, we’re generating a version that is compatible with the MSIX requirements.
The last step is to apply this build number to the manifest of our MSIX package. We can use a task created by a third-party developer. Save the YAML file you have updated, and then go back to the Azure DevOps dashboard. Locate the marketplace icon at the top and choose Browse marketplace.
![]()
Figure 106: The icon to access to the Azure DevOps marketplace
Search for an extension called Manifest Versioning Build Task by Richard Fennell, click it, and then click Get it free. You will initialize the process to add the extension to your Azure DevOps account. Once the extension has been installed, you can go back to the pipeline, click Edit, and add the following step before the VSBuild step.
Code Listing 84
- task: VersionAPPX@2 displayName: 'Version MSIX' |
This task doesn’t require any special parameter. It will simply edit the manifest of your project and apply the build number as the version.
Note: Since the YAML file is stored in the repository of your project, you can edit it on your local machine using an editor like Visual Studio or Visual Studio Code. The latter also offers an extension that adds IntelliSense support for the various tasks offered by Azure Pipeline.
Supporting App Installer
If you want to support App Installer, the easiest way is to let it be generated by Visual Studio. It’s enough to generate a package just once in your local environment using the Store > Create app package wizard. Just make sure to choose Sideloading and keep the automatic updates feature turned on. Otherwise, you can manually edit the .csproj file of the Windows Application Packaging Project and include the highlighted changes in the main PropertyGroup.
Code Listing 85
|
<ProjectGuid>c807bb90-d408-451a-b267-4972342402a2</ProjectGuid> <TargetPlatformVersion>10.0.17763.0</TargetPlatformVersion> <TargetPlatformMinVersion>10.0.17763.0</TargetPlatformMinVersion> <DefaultLanguage>en-US</DefaultLanguage> <EntryPointProjectUniqueName>..\ContosoExpenses\ContosoExpenses.csproj</EntryPointProjectUniqueName> <PackageCertificateThumbprint>99461B8F2CD60990EC93FBF5652E877B7D4CE02A</PackageCertificateThumbprint> <AppInstallerUri>https://db-msixtest.azurewebsites.net/</AppInstallerUri> <AppInstallerUpdateFrequency>1</AppInstallerUpdateFrequency> <GenerateAppInstallerFile>True</GenerateAppInstallerFile> <AppxAutoIncrementPackageRevision>True</AppxAutoIncrementPackageRevision> <AppxBundlePlatforms>x86</AppxBundlePlatforms> </PropertyGroup> |
These properties match the information that you can set during the visual wizard:
- AppInstallerUri is the URL of the website of the network share where the package will be deployed.
- AppInstallerUpdateFrequency defines how many hours should pass between each update check.
- AppInstallerCheckForUpdateFrequency defines when you want to check for updates (at application’s launch or in the background).
GenerateAppInstaller is a generic property that must be set to true in order to generate the .appinstaller file as part of the build process. You can go back to Chapter 7 if you want to know more about the parameters supported by App Installer.
You can also leverage an App Installer template as described in Chapter 7. It will be picked up by the build process and used to customize the App Installer file that will be generated.
Create a release pipeline
Now that you have a build pipeline that produces an MSIX package, you can define a release pipeline that will deploy it to your users.
Release pipelines are created in the Pipelines > Release section of Azure DevOps. Building a release pipeline is a bit different than the steps we saw in the previous section, as you can see from the starting template in Figure 107.
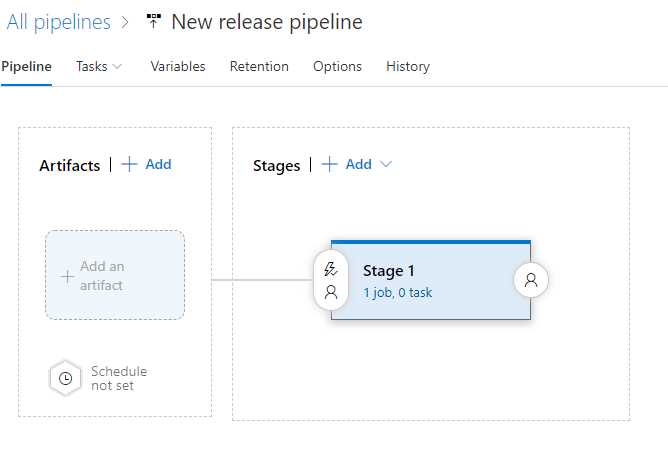
Figure 107: The template to create a release pipeline
In the first section, called Artifacts, you will have to specify which build output will be used for deployment. The default choice is to use the build artifacts, so you will have to select from the list the build pipeline you previously created.
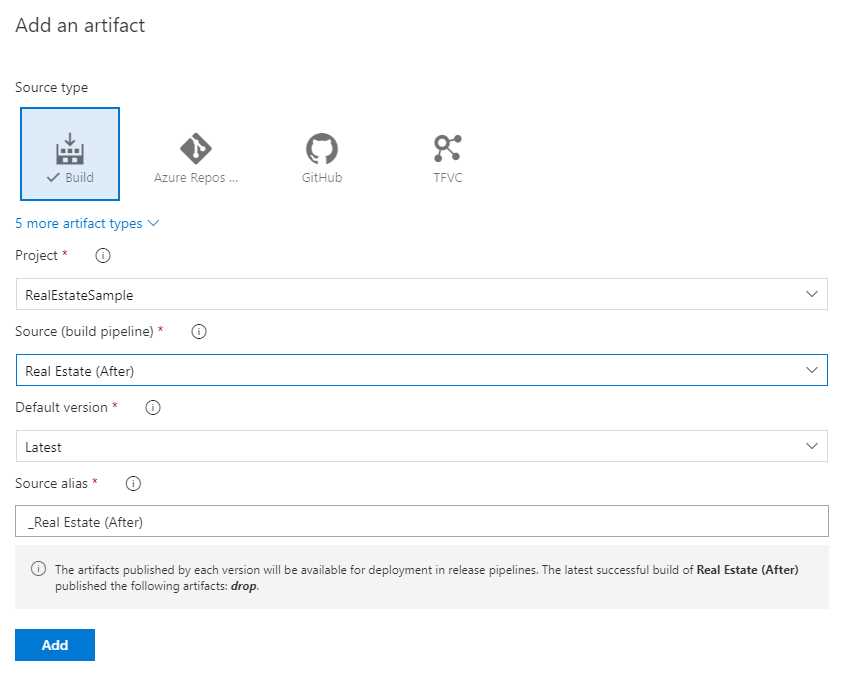
Figure 108: The option to choose the build artifact generated by a build pipeline
Once you have added it, you will notice a lightning symbol near the artifact’s name. Click it and enable the Continuous deployment trigger. It will turn the pipeline into a CD pipeline, which will trigger a new deployment every time a new build pipeline is successfully completed.
In the second part of the template, you can create one or more stages, which are the various phases of the deployment. Each stage is typically mapped with a different environment: development, testing, production, etc. Each stage can run one or more tasks, which will take care of performing the actual deployment.
In order to configure a stage, you just need to click the link below the stage name. You will get access to the visual task editor.
Signing the package
As previously mentioned, it isn’t a good practice to sign the package in the build pipeline. The best place to perform this task is the release pipeline, since it allows us to store the certificate in a safe way, so that we don’t have to share it with other developers.
To achieve this goal, we need to leverage another extension from a third-party developer. Go back to the Marketplace, look for an extension called Code Signing by Stefan Kert, and install it to your Azure DevOps account.
After that, go back to the release pipeline you’re building, and press the + sign near the agent job to add a new task. Look for the task called Code Signing and add it.
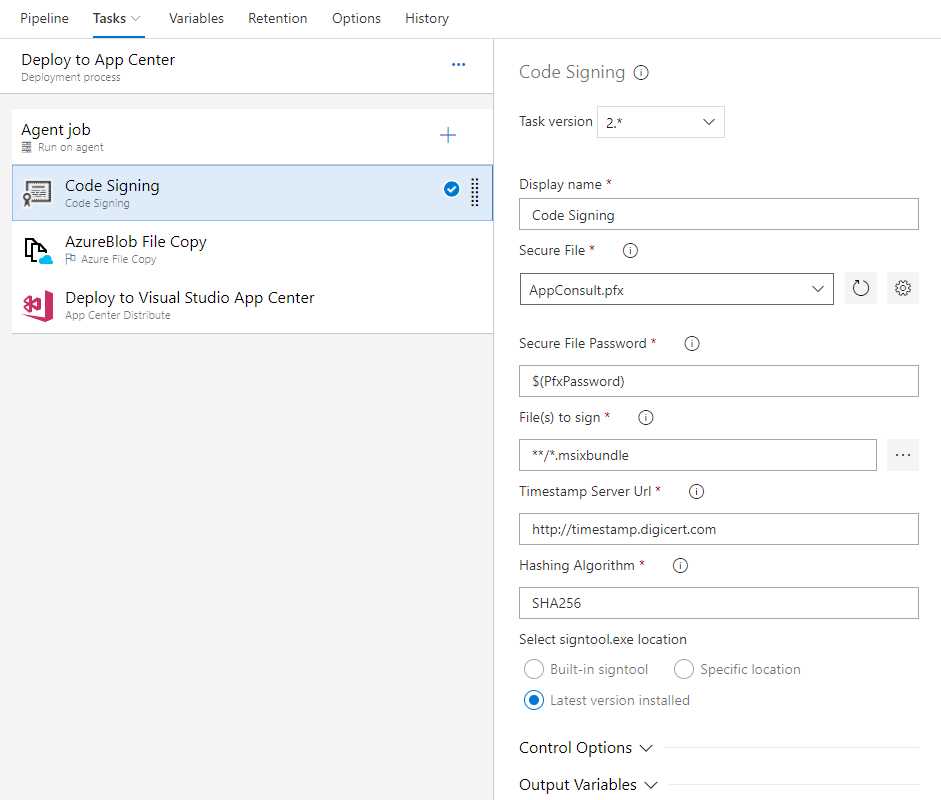
Figure 109: The code signing task
This task will launch, under the hood, the signtool utility to sign your package, using the information provided in the configuration:
- Provide the certificate. Just click the Settings icon near the Secure File field and upload a PFX certificate from your machine. The file will be stored using the Secure File feature provided by Azure DevOps. Thanks to this feature, the file will be safely stored in the cloud without giving anyone the opportunity to download it. The only options are to leverage it in a pipeline or delete it.
- Define the password of the certificate. It isn’t a good idea to provide the password in clear, so for the moment we just define a variable called PfxPassword, which we’re going to define later.
- Specify the file to sign. Since our artifact will contain only an .msixbundle file, we can just use a wild card to specify this extension.
Once you have saved the task, you can move to the Variables section of the pipeline to define the password. Just click Add and set as the name PfxPassword and, as the value, the real password. Then click the lock icon displayed near the field to hide its value.
Deploying the application
The next step is to add a task to deploy the MSIX package, together with the App Installer file and the HTML page, in a location your users will be able to reach. Azure DevOps provide multiple tasks that can be used to achieve this goal:
- You can use AzureBlob File Copy if you want to host your package on an Azure Blob Storage.
- You can use Azure App Service Deploy if you want to host your package on an Azure web application.
- You can use FTP Upload if you want to host your package on a website hosted by any web provider.
Going into the details in this book would be off topic, since there isn’t a unique solution, but it all depends on the requirements of your project. Additionally, all the tasks are easy to configure. For example, if you want to deploy your package using Azure Blob Storage, you will just have to link your Azure DevOps account with your Azure account and choose which one of your storage accounts will be the destination. Or if you want to deploy over FTP, you will have to provide the FTP URL, port, username, and password.
Another option is to deploy the MSIX package directly on the Microsoft Store, thanks to an extension created by Microsoft. Once you have installed this extension on your Azure DevOps account, you’ll be able to add to your release pipeline one of the two available tasks:
- Windows Store – Publish to publish the application as public.
- Windows Store – Flight to publish the application in a private flight ring.
The first step is to configure the service endpoint, which will allow Azure Pipeline to authenticate to the Store using your Dev Center account. Then you must provide the Application ID, the new metadata (if you want to update them as part of the process), and a reference to the MSIX package created by the build. The selection of the package is made easy by the artifact explorer, which you can invoke by clicking the three dots near the Package file field.
However, there’s a catch. After you have selected the MSIX package, the output will look like the following.
Code Listing 86
$(System.DefaultWorkingDirectory)/My build pipeline/drop/ContosoExpenses.Package_2019.5.23.0_Test/ ContosoExpenses.Package_2019.5.23.0_x86.msixupload |
As you can see, the path contains the version number of the package, which will change at every build. As such, the release pipeline will complete successfully for the current build, but it will fail for the next ones. The solution is to use one of the global variables, Build.BuildNumber, which will be automatically replaced with the correct build number at every iteration.
Code Listing 87
$(System.DefaultWorkingDirectory)/My build pipeline/drop/ContosoExpenses.Package_$(Build.BuildNumber)_Test/ ContosoExpenses.Package_$(Build.BuildNumber)_x86.msixupload |
Thanks to this task, the updated MSIX package will be automatically submitted to certification at the end of the CI/CD process.
- 1800+ high-performance UI components.
- Includes popular controls such as Grid, Chart, Scheduler, and more.
- 24x5 unlimited support by developers.