
More UWP Succinctly®

CHAPTER 4
Publishing an application on the Windows Store
In this final chapter, we’re going to learn how to publish an application on the Windows Store, how to handle its lifecycle (releasing updates, handle purchases and add-on, etc.) and how we can make our application available to a wider audience, by supporting multiple languages and cultures.
Localization
A very effective strategy to make our application more popular is to properly support various languages: Windows devices are used all over the world and by users which speak and read multiple languages, so we can’t take for granted that all of them will understand English. The Universal Windows Platform offers built-in support for localization: instead of hard-coding the strings that are displayed in the user interface in XAML or in code, we’re going to save them in separated files, one for every supported language. Every file (which, under the hood, is an XML file) contains a list of resources, with a key (the unique identifier) and the value (the real text localized in the specific language). Every time we’re going to display a text to the user, we’re going to add a reference to the key that matches the text that we want to display.
The first step to manage localization is to add a file for each language we want to support: this scenario is implemented using a naming convention based on the folder’s name. All the resource files need to be included into a folder in the project, usually called Strings. Inside this folder, you must create a subfolder with the culture code for each language you want to support. You can find a list of supported codes in the MSDN documentation: https://docs.microsoft.com/en-us/windows/uwp/publish/supported-languages. It’s important to highlight that you’re not forced to use the full culture code (like en-US or it-IT): you can also use the short version (like en or it), in case you want to support all the variants of the same culture with one unique resource file.
Inside each folder, you’ll need to create a resource file: you’ll find a specific template in Visual Studio, called Resources File (.resw). The default name to assign to the file is Resources.resw.
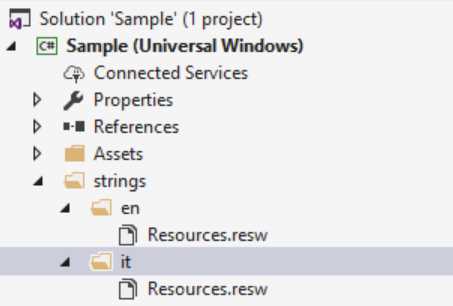
- A project that supports two languages: English and Italian
By double clicking on the Resources.resw file, Visual Studio will open the visual editor, which will display a list of rows and three columns:
- Name, which is the resource identifier.
- Value, which is the localized text.
- Comment, which is an optional comment that makes easier to understand the purpose of the resource.

- The visual interface
Resources are strictly connected to the XAML controls that will display the value: consequently, the Name must follow a specific convention. The first part of the key is the unique resource identifier: it’s up to you to choose what’s best for your scenario. For example, it could be a label like Title. The second part of the key, separated by the first part with a dot, it’s the name of the control’s property we want to handle with this resource. For example, if we want to display the value of the resource in the Text property of a TextBlock control, we should define it as Title.Text.
We can connect the resource to a control by using a special XAML property called x:Uid, which is supported by every XAML control: we need to set it with the unique identifier of the resource, which is the first part of the key (before the dot). So, for example, if we want to connect the resource Title.Text to display its value in a TextBlock control, we need to define an x:Uid attribute in the following way:
<TextBlock x:Uid="Title" /> |
Another common requirement is to use a resource in code: for example, if we need to display a popup message using the MessageDialog class, we need to access to the resource in another way, since a dialog can’t be defined in XAML. To achieve this goal, we must use the ResourceLoader class, which offers a method called GetString(): as parameter, we need to pass the full name that identifies the resource. The application will automatically retrieve the resource based on the current language.
private async void OnShowMessageClicked(object sender, RoutedEventArgs e) { ResourceLoader loader = new ResourceLoader(); string resource = loader.GetString("Title/Text"); MessageDialog dialog = new MessageDialog(resource); await dialog.ShowAsync(); } |
As you can see, there’s an important difference to highlight: when you call a resource from code, you need to use the forward slash (/) instead of the dot as separator between the first and the second part of the key. In the sample, to retrieve the value of the resource with the name Title.Text, we pass as the parameter the value Title/Text.
Localizing images
Another common requirement is to support different images based on the user’s language, in case they contain some embedded texts. In this case, we can use a naming convention like the one we’ve seen when it comes to manage the different visual scaling factors supported by Windows 10. We can add, in fact, a .lang- suffix to the image name, followed by the culture code, to make it visible only when the device is used with the specified language. For example, if we have an image called logo.png and we want to have two versions, one for English and one for Italian, we can add two files to the project, one with name logo.lang-en.png and one with name logo.lang-it.png.
This naming convention is completely transparent to the developer, exactly like the one used to handle the various scale factors: in XAML or in code we’ll just need to reference the image using the base name (logo.png) and the operating system will automatically pick the proper one, based on the language, like in the following sample:
<Image Source="/Assets/logo.png" /> |
Manage the default language
The default application language is set in the manifest file, by a field called Default language in the Application section: it’s the default language that is used when we don’t provide a specific resource file for the current language. By default, it’s en-US and it’s a good approach to keep the setting this way: since English is one of the most widespread languages in the world, it’s likely that our users will know it, even if we don’t support their native language.
However, there are some scenarios where it makes sense to use another default language: for example, local applications that are distributed only in a specific country (like a newsreader app connected to a local magazine). In this case, it’s enough to change the Default language value with another culture code.
Translating the application’s name
We can also translate the application’s name, in case we want our app to have a localized name, based on the user’s language. To achieve this goal, it’s enough to add a new string in each resource file: this time, we can give to the resource the Name we prefer, without following any convention.
Then it’s enough to open the manifest file and, in the Application section, changing the Display name field by setting the resource name using the ms-resource prefix:. For example, if we’ve created a resource with the key ApplicationName, we should use as value for the field ms-resource:ApplicationName.
The Multilingual App toolkit
Microsoft has released a Visual Studio extension called Multilingual App Toolkit, which makes easier to solve some challenges that we may face during localization. Here are some of the features it offers:
- When you add a new item in the Resources.resw file of the main language, it’s able to automatically create the same item (even if with an empty value) in all the files for the other languages. By default, in fact, Visual Studio doesn’t perform this operation for you, but you need to take care each time of manually adding all the new entries you create.
- It includes a built-in translator feature, which leverages the services offered by Bing translator, which can automatically translate the various resources from one language to another. Of course, it’s not meant to completely replace human translations, but it’s a great starting point to have a working draft in another language and to understand if the look & feel of the application remains consistent across all the languages. It may happen, for example, that a word translated in another language becomes too short or too long and, consequently, it may interfere with the visual layout.
- It includes a field to keep track of the status of every resource (not translated, translated, reviewed, etc.), so that it’s easier for you to understand which is the status of the overall translation.
You can learn more and download the Multilingual App Toolkit from the official website: https://developer.microsoft.com/en-us/windows/develop/multilingual-app-toolkit
Adding monetization to your application
One of the biggest advantages of using a centralized distribution system like a Store is that, other than helping you in giving more visibility and marketing opportunities, it helps to monetize it, by providing built-in options to sell an application, other than releasing it just for free. As we’re going to see later when we’ll talk in detail about the submission process, you have the chance to monetize your app without changing your code: you can just set a price and the user, before downloading it from the Store, must purchase it using one of the payment systems associated to his Microsoft Account (PayPal, a credit card, mobile operator billing, etc.).
However, the Store offers many options to improve the chances that the user will buy your application, like:
- Support for trial mode: if the user has the chance to try the app before buying it, he will be more inclined to complete the purchase.
- Support for add-ons: you can release your application for free or at a low price with a minimum set of contents and then include premium features that can be purchased separately within the app itself.
In both cases, leveraging the options that are offered during the submission process isn’t enough anymore. You need, in fact, to include some changes in your code: for example, to hide a feature if the app is running as trial or to trigger the purchase of an add-on.
There’s an important concept to highlight at this point: the Windows 10 Anniversary Update has introduced a completely new set of APIs to integrate monetization features in your application, which are part of a new namespace called Windows.Services.Store. Since this book is being released after the release of the Anniversary Update, we’re going to talk only about these new APIs. However, you must keep in mind that, to leverage them, your application needs to have, both as Target Version and Min Version in the project’s properties, the Anniversary Update SDK 14393. This means that your application will be able to run only on a device with Windows 10 Anniversary Update and above.
If you can’t respect this requirement because your application needs to run also on previous versions of Windows 10 (like the November Update) you will have to leverage the old Store APIs, which are included in the Windows.ApplicationModel.Store namespace. However, we won’t discuss them in this chapter: you can refer to the official documentation (available at https://msdn.microsoft.com/en-us/windows/uwp/monetize/in-app-purchases-and-trials-using-the-windows-applicationmodel-store-namespace) or to one of my previous books published by Syncfusion, called More Windows 8.1 Succinctly, which you can download for free from https://www.syncfusion.com/resources/techportal/details/ebooks/morewindows8.1
The APIs included in the Windows.ApplicationModel.Store namespace, in fact, are exactly the same that were already available in Windows 8.1, so the content of Chapter 1 of the previously linked book (which is about publishing an app on the Store) still applies to the Universal Windows Platform.
Using the new Store APIs
The starting point of the new Store APIs is the StoreContext class, which belongs to the Windows.Services.Store namespace. To get a reference to the object, you need to call the GetDefault() method. From there, you’ll be able to perform all the operations supported by the Store.
The following code is a basic sample of how to initialize the class:
private void OnCheckTrial(object sender, RoutedEventArgs e) { StoreContext context = StoreContext.GetDefault(); //perform operations with the Store APIs } |
The StoreContext class will be the basis of all the operations we’re going to see from now on to interact with the services offered by the Store.
Supporting the trial mode
As already mentioned, offering a trial is a way to allow users to try our application before deciding to buy it. The most interesting feature of the trial mode is that it allows you to avoid publishing two different apps (one free with limited features and one paid with all the features), like it often happens on other Stores: the feature will be implemented directly in a single project and you’ll be able to detect, in code, if the app is running as trial or not. If the user purchases your app, he won’t have to download it again from scratch; the Windows Store will just download a certificate that will unlock all the features.
There are two ways to manage a trial:
- Manually: the Store APIs offer a method that returns a Boolean that simply tells us if the application is running in trial mode or not. Thanks to this information, we can implement the trialthe way we prefer: we could block some features, display a popup message every time the app is launched, display some advertising, etc.
- Time trial: when you submit your application on the Store, you’ll be able to set an expiration date for the trial: the app will be automatically blocked once the trial period is ended. This feature is handled directly by Windows: if the user tries to open the app once it’s expired, it won’t be launched. Instead, a popup will appear, informing the user that the trial has expired and allowing him to go directly to the Store and buy the app. However, we still can control this feature in code: for example, we can decide to disable anyway a feature during the trial, even it’s time based. Or we can handle the fact that the status of the trial has changed while the app is running (because ’'s expired or the user has purchased it).
Handling the trial is quite simple: once you have a StoreContext object, you just need to call the GetAppLicenseAsync() method. You’ll get as result an object of type StoreAppLicense, which includes a property called IsTrial: it’s a simple bool, that you can use to understand if the app is running as trial or not.
The following sample simulates an application where the save feature (associated to a Button control placed in the XAML page) is enabled only if the app has been purchased:
private async void OnCheckTrial(object sender, RoutedEventArgs e) { StoreContext context = StoreContext.GetDefault(); StoreAppLicense license = await context.GetAppLicenseAsync(); if (license.IsTrial) { SaveButton.Visibility = Visibility.Collapsed; } else { SaveButton.Visibility = Visibility.Visible; } } |
In case the trial is time-based, you have also the option to check which is the expiration date in case, for example, you want to show a message in the app to tell the user how much time he has left to try the app before it expires:
private async void OnCheckTrial(object sender, RoutedEventArgs e) { StoreContext context = StoreContext.GetDefault(); StoreAppLicense license = await context.GetAppLicenseAsync(); if (license.IsTrial) { ExpirationDate.Text = $"The app is running as trial and it will expire on {license.ExpirationDate}"; } } |
What happens if the status of the trial changes while the app is running (either because it is expired or because the user has purchased it)?
You have two options:
- Do nothing and let the user to continue using the app as it is until he closes it. Then, when he will reopen it, Windows will take care of handling it in the proper way (by showing the expired popup if the trial is ended or by normally launching it if he has purchased it).
- Do something, like displaying a message and closing the app or enabling immediately all the features. In this case, you can leverage an event provided by the StoreContext object called OffliceLicenseChanged, as highlighted in the following example:
private async void Context_OfflineLicensesChanged(StoreContext sender, object args) { StoreAppLicense license = await context.GetAppLicenseAsync(); if (license.IsActive && !license.IsTrial) { //the user has purchased the app } else { //the trial has expired } } |
Thanks to the IsActive property of the StoreAppLicense object, we can find out if the license is still valid or not.
Purchasing the application
The simplest way to purchase an application is directly from the Store. When they visit the dedicated page, they have the option to download the trial (if available) or to purchase it. However, you can trigger the purchase process also from the application. This way, the user will never have to leave your application to purchase it. The following code shows how to achieve this task:
private async void OnStartPurchaseProcess(object sender, RoutedEventArgs e) { StoreContext context = StoreContext.GetDefault(); StoreProductResult result = await context.GetStoreProductForCurrentAppAsync(); if (result.ExtendedError == null) { StorePurchaseResult purchase = await result.Product.RequestPurchaseAsync(); if (purchase.ExtendedError == null) { switch (purchase.Status) { case StorePurchaseStatus.Succeeded: //handle the OfflineLicenseChanged event break; case StorePurchaseStatus.AlreadyPurchased: break; case StorePurchaseStatus.NotPurchased: break; case StorePurchaseStatus.NetworkError: break; case StorePurchaseStatus.ServerError: break; default: break; } } } |
As usual, the starting point is the StoreContext object, which offers a method called GetStoreProductForCurrentAppAsync() to retrieve the product associated to the app itself (we’ll see later, in fact, that also add-ons are considered products). If there are no errors (we leverage the ExtendedError property to understand if something went wrong), we can get access to the Product property which, among other things, offers a method to start the purchase process called RequestPurchaseAsync().
From now on, the Store will take care of everything automatically: it will prompt the user with a popup with the total price, it will allow him to select the payment method he prefers and, once the operation is done, we get back a StorePurchaseResult object with the outcome, which will be stored in the Status property.
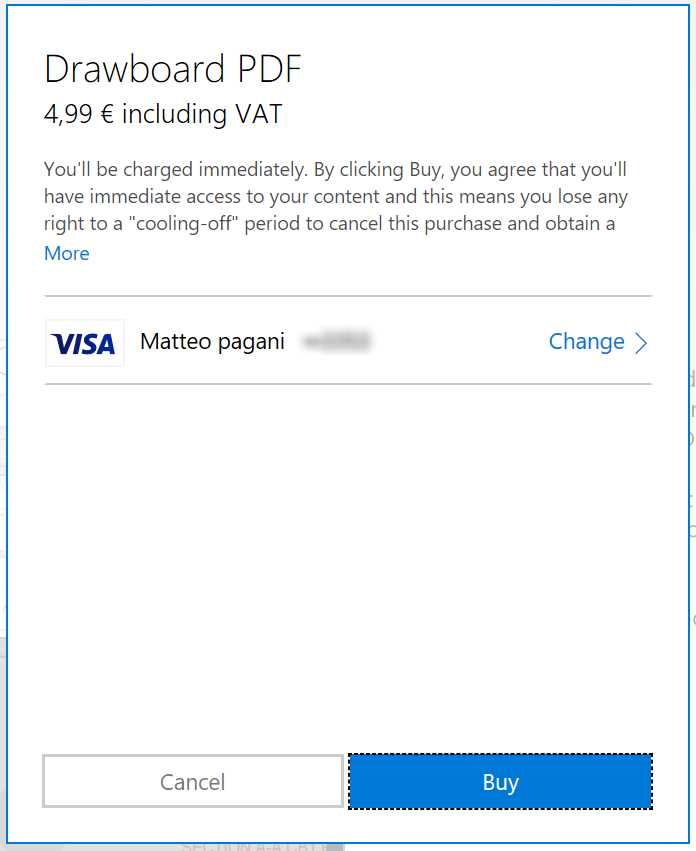
- The purchase process handled by the Windows Store
Based on its value (it’s an enumeration of type StorePurchaseStatus, which covers the different scenarios), we can act in the way that works best for our application.
The only status I would like to highlight is Succeded. It means that the purchase has completed successfully, so the application isn’t running as trial anymore. As such, we can now decide which logic we want to apply as described in the previous paragraph:
- We can leave things as they are and simply the user, when he will close and open again the application, he will start using the full version and he will find all the previously locked features now available.
- We can leverage the OfflineLicenseChanged event of the StoreContext class to detect, in real time, that the status of the license has changed, so that we can immediately unlock all the features, without requiring the user to close and re start the app.
Add-ons purchases
Add-ons, also known as in-app products (or IAPs for short) are digital products that can be purchased directly within the app. It’s another effective way to monetize your application: instead of offering a time-based or a feature based trial, you can decide to publish a free application with a basic set of features, that can be later expanded by buying additional contents from the app itself. There are many examples of applications that leverage this scenario:.Games, for example, can offer a basic set of levels and then offer the opportunity to purchase an additional set when the user has completed all of them; or a photo editing application can include a built-in set of photo filters and then offers the opportunity to buy new ones.
The Windows Store offers three types of add-ons:
- Durables: these add-ons, once purchased, are persisted and they can be typically bought just once. However, a durable add-on can be configured to expire at a specific date and time: in this case, it can be purchased again, but only after it has expired.
- Consumables managed by the developer: consumables are products that can be purchased multiple times. Once the user has bought it, he will be able to continue using the product until he has completely consumed it. After that, he will be able to purchase it again. This approach is widely used by games, for example to buy digital money to purchase additional content inside the application. These kinds of consumables must manually be managed by the developer: this means that, in the Store, you will have just to define that it’s a consumable product, then it will be up to the developer to decide when its usage has been fulfilled in code. For example, if the consumable product allows the user to buy 1000 digital coins, it will be up to the developer to keep the count every time the user will spend some of them and, once he has 0 coins left, report the product as fulfilled so that the user will be able to buy it again.
- Consumables managed by the Store: these kinds of consumables work in the same way of the previous ones, except that it will be up to the Store to automatically the keep the count of the number of items left. If we reuse the same sample as before, we can define a product which contains 1000 digital coins and specify the amount directly in the Dev Center: then the Store will automatically take care of keeping the count and to report to the developer when there are no coins left.
Add-ons aren’t defined in code, but in the Dev Center, in a similar way you define the submission of the application: you set a name, a price, a description, the visibility, etc. Then, thanks to the StoreContext class, you will be able to get a list of all the available add-ons, to identify which of them have already been purchase, to report a consumable as fulfilled, etc. In the next paragraphs, we’re going to see the most common scenarios.
Retrieving the list of available add-ons
Getting the list of the add-ons that you have defined in the Store is an easy operation, thanks to the GetAssociatedStoreProductsAsync() method offered by the SyncContext class. The app requires, as parameter, a collection of strings with a set of special string values that acts as a filter: you can choose to retrieve all the available products or only the ones that belong to one of the categories we’ve seen in the previous paragraph.
The three special values are:
- Durable
- Consumable
- UnmanagedConsumable
The following sample code retrieves all the products, regardless if they are durables or consumables (managed either by the developer or the Store):
private async void GetProducts(object sender, RoutedEventArgs e) { StoreContext context = StoreContext.GetDefault(); string[] productKinds = { "Durable", "Consumable", "UnmanagedConsumable" }; StoreProductQueryResult result = await context.GetAssociatedStoreProductsAsync(productKinds); ObservableCollection<AddOn> addOns = new ObservableCollection<AddOn>(); if (result.ExtendedError == null) { foreach (var item in result.Products) { AddOn addOn = new AddOn { StoreId = item.Value.StoreId, Title = item.Value.Title, Price = item.Value.Price.FormattedPrice }; addOns.Add(addOn); } Products.ItemsSource = addOns; } } |
When you call the GetAssociatedStoreProductAsync() method of the SyncContext class passing, as parameter, the filter, you get back a StoreProductQueryResult object, which contains a property called Products. It’s a special kind of collection (a Dictionary), which contains all the add-ons you have defined in the Store, identified by its unique key (called also StoreId).
In the previous sample, since we didn’t need to display to the user all the information we have about an add-on, but just its id, name and price, I have created a simpler class called AddOn, which gets populated with the info retrieved from the Products collection:
public class AddOn { public string StoreId { get; set; } public string Title { get; set; } public string Price { get; set; } } |
In the end, the collection of AddOn items is defined as ItemsSource of a ListView control: the user will see, in the main page, the list of available products with each price.
Purchasing an add-on
There are two ways to start the process of purchasing an add-on. If we expand the previous scenario, we can do it by calling the RequestPurchaseAsync() method of the StoreContext class, passing as parameter the identifier of the product. Since, in the previous scenario, we have stored this information in the StoreId property of the AddOn class, we can leverage it in the ItemClick event of the ListView control, that is triggered when the user taps or clicks on one of the products in the list:
private async void Products_ItemClick(object sender, ItemClickEventArgs e) { AddOn addOn = e.ClickedItem as AddOn; StoreContext context = StoreContext.GetDefault(); StorePurchaseResult result = await context.RequestPurchaseAsync(addOn.StoreId); string message = string.Empty; if (result.Status == StorePurchaseStatus.Succeeded) { message = "Thanks for your purchase!"; } else { message = "The purchase process has been canceled"; } MessageDialog dialog = new MessageDialog(message); await dialog.ShowAsync(); } |
The code is like the one we’ve seen to trigger the purchase of the app itself: when it’s invoked, a Store popup will be display directly in the application to handle the purchase process.
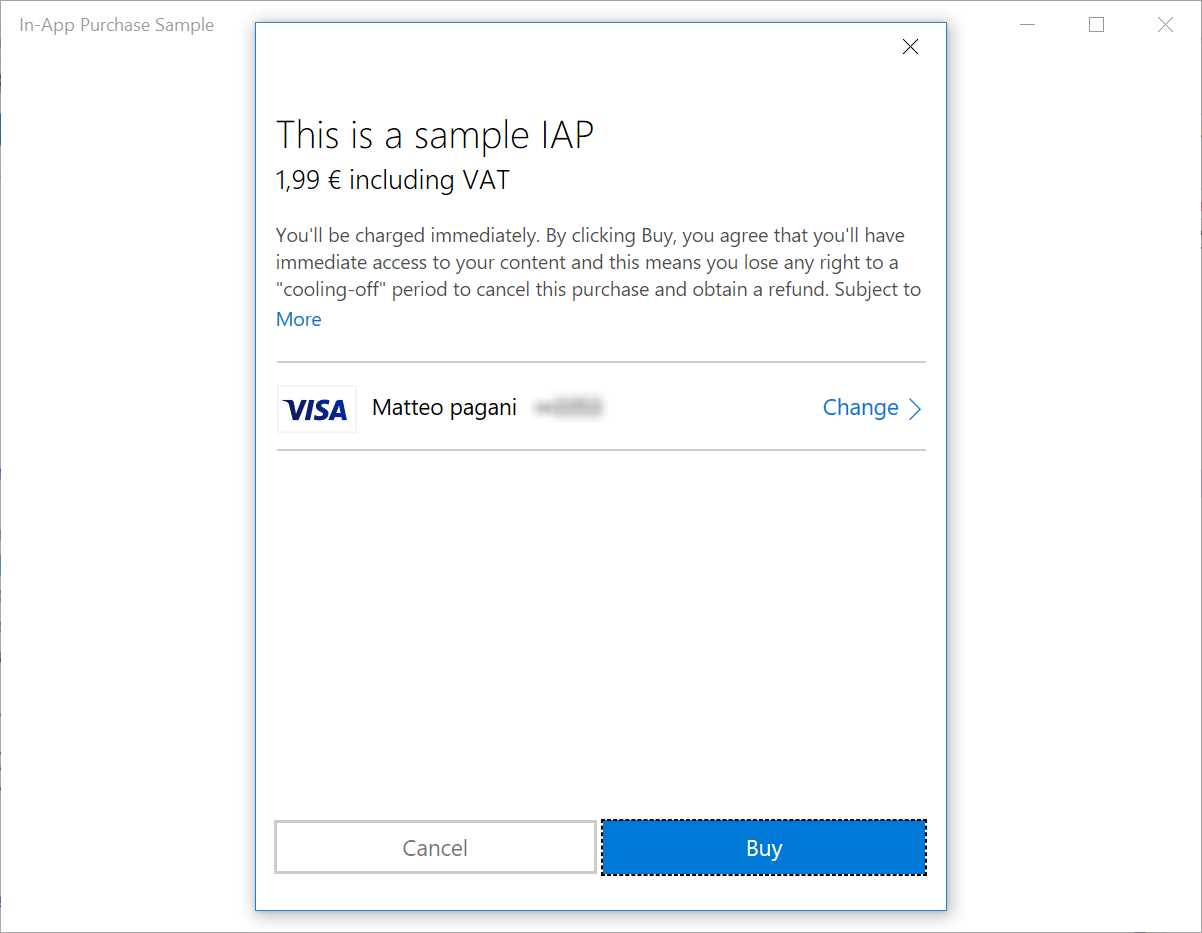
- The add-on purchase process within an application
When the operation is completed, we get back a StorePurchaseResult object, which Status property will help us to understand if the purchase has been completed successfully or not and, based on our scenario, act accordingly (for example, by unlocking a new feature).
If we don’t know the StoreId but we have direct access to the StoreProduct object, we can achieve the same goal by calling the RequestPurchaseAsync() method exposed by the object itself. The following sample shows how we can force the app to trigger the purchase of the first available add-on:
private async void GetProducts(object sender, RoutedEventArgs e) { StoreContext context = StoreContext.GetDefault(); string[] productKinds = { "Durable", "Consumable", "UnmanagedConsumable" }; StoreProductQueryResult result = await context.GetAssociatedStoreProductsAsync(productKinds); if (result.ExtendedError == null) { StorePurchaseResult purchaseResult = await result.Products.FirstOrDefault().Value.RequestPurchaseAsync(); string message = string.Empty; if (purchaseResult.Status == StorePurchaseStatus.Succeeded) { message = "Thanks for your purchase!"; } else { message = "The purchase process has been canceled"; } MessageDialog dialog = new MessageDialog(message); await dialog.ShowAsync(); } } |
Handling a consumable product
If, once we have purchased a product, we would try to repeat the previous process using the same code, this time the returned Status won’t be Succeeded but AlreadyPurchased. The reason is that, so far, we were simulating a durable add-on: once it has been purchased, it will always belong to the user until it expires.
However, we have mentioned that consumable products work in a different way: at some point, need to tell the Store it has been consumed and, consequently, the user can buy it again.
To perform this task we can use the ReportConsumableFulfillmentAsync() method of the StoreContext class, which requires three parameters:
- The unique identifier of the add-on.
- How many items of the add-on have been purchased.
- A GUID, which acts as a unique identifier of the transaction. The purpose of this id is to be paired with the StoreId, so that the Store can be aware of the status of a purchase operation independently if the app has been able to handle the response or not (for example, because of a network error). This way, if you would try to call again the ReportConsumableFullfilmentAsync() method with the same StoreId and the same GUID, you will get back a result with Status equal to Successful (like if it’s the first purchase), so that your application can properly unlock the purchased features. However, since the GUID of the operation is the same, the user won’t be charged again for the price of the product since the Store would be able to understand that the product has already been successfully purchased. It was just the app that didn’t have the chance to handle the outcome in the proper way.
Once we have reported the add-on as fulfilled, the user will be able to buy it again: if we call on it the RequestPurchaseAsync() method we won’t get any more AlreadyPurchased as a status, but the Store will initiate a new purchase process.
Here is a sample code that simulates that once the user has selected one add-on in the list, it’s reported as fulfilled.
private async void Products_ItemClick(object sender, ItemClickEventArgs e) { AddOn addOn = e.ClickedItem as AddOn; StoreContext context = StoreContext.GetDefault(); string storeId = addOn.StoreId; uint quantity = 1; Guid trackingId = Guid.NewGuid(); StoreConsumableResult result = await context.ReportConsumableFulfillmentAsync(storeId, quantity, trackingId); string message = string.Empty; if (result.ExtendedError == null) { if (result.Status == StoreConsumableStatus.Succeeded) { message = "The product has been successfully used. You can buy it again if you want"; } else if (result.Status == StoreConsumableStatus.InsufficentQuantity) { message = "Sorry, but you don't have enough quantity, buy the product again first"; } } } |
The code is pretty straightforward: I only highlight that there’s a special status that can be returned by the ReportConsumableFulfillmentAsync() method, which is InsufficientQuantity: it means that the user is trying to consume a product which has been already completely consumed, so he needs to buy it again first.
Which is the different between a consumable product handled by the developer and a consumable product handled by the Store?
The code is always the same but:
- In the first case, we always need to pass as quantity (the second parameter of the ReportConsumableFullfilmentAsync() method) the value 1. In the second case, instead, we can pass the real number of items that have been consumed.
- In the second case, we can use a method called GetConsumableBalanceRemainingAsync(), passing as parameter theunique identifier of the product , to get access to how many items are left before the user has to purchase the product again. The following sample code shows how to retrieve this information thanks to the BalanceRemaining property, which is included in the result of the method.
private async void Products_ItemClick(object sender, ItemClickEventArgs e) { AddOn addOn = e.ClickedItem as AddOn; StoreContext context = StoreContext.GetDefault(); string storeId = addOn.StoreId; StoreConsumableResult result = await context.GetConsumableBalanceRemainingAsync(storeId); if (result.ExtendedError == null) { string message = $"The remaining balance of the product is {result.BalanceRemaining}"; MessageDialog dialog = new MessageDialog(message); await dialog.ShowAsync(); } } |
Checking the product status
When the app starts, it’s important to check the status of all the available add-ons, so that we can understand if we need to enable or not the additional features. To get this information, we need to use the same method we have leveraged in the beginning of this section to get the license of the app: the GetAppLicenceAsync() one offered by the StoreContext object.
In case the app supports add-ons and the user has purchased one or more of them, we will find them in the AddOnLicenses collection. For each of them, we can leverage the IsActive property to understand if the add-on is still active or not.
The following code simply takes care of using this collection to retrieve all the purchased add-on and, for each of them, display the status to the user with a dialog:
private async void Products_ItemClick(object sender, ItemClickEventArgs e) { AddOn addOn = e.ClickedItem as AddOn; StoreContext context = StoreContext.GetDefault(); string storeId = addOn.StoreId; StoreConsumableResult result = await context.GetConsumableBalanceRemainingAsync(storeId); if (result.ExtendedError == null) { string message = $"The remaining balance of the product is {result.BalanceRemaining}"; MessageDialog dialog = new MessageDialog(message); await dialog.ShowAsync(); } } |
Testing the monetization features
Unlike the previous version of the monetization APIs, the new ones don’t include a local simulator to test the implementation without publishing your app. However, there’s a simple workaround to test changes in your code without publishing an update every time. Here are the steps to follow:
- Create a first version of the app, even a basic one, and associate it with a name you have reserved on the Store. To perform this operation, right click on the project, choose Store -> Associate app with the Store and reserve a new name or choose one that you have already reserved in the past on the Dev Center. This procedure will make sure that all the information about the identity of the app (like the name, the app identity, the publisher, etc.) will be overwritten with the real ones assigned by the Dev Center, instead of the test values generated by Visual Studio.
- Publish the application on the Store, by following the steps we’re going to see later in the chapter. The app doesn’t have to be public; if you’re still in testing phase it can also be hidden.
- Once the app has been approved and certified, make sure to download it at least once from the Store: this way, Windows will download and associate a valid license for it.
- Now, since the version on the Store will have the same identity of the version you have locally and you have a valid license for it, you will be able to test the Store APIs directly from Visual Studio: the GetDefault() method of the StoreContext class will return a real object, that will allow you to enumerate the real add-ons, to start the purchase process, to fulfill a consumable add-on, etc. You’ll also be able to apply changes to your code compared to the version you have published on the Store and the APIs will continue to work and report real values, without forcing you to publish an update every time you want to test a code change.
Publishing an application on the Store
In this section, we’re going to see an overview of the procedure to submit an application on the Store. However, we won’t see every single detail of each step, since the Dev Center is independent from the Windows 10 SDK: consequently, new features and changes in the submission process are released independently by the Windows 10 lifecycle. Also, the images you will find in this section are purely indicative and they refer to the time period when the book has been written; they won’t be necessarily the same when the book will be published.
Registering a developer account
To publish applications, you need to register yourself as an app developer, which is a single account that lets you submit apps and add-ins for the entire Microsoft ecosystem, so not just Windows Store apps, but also Office add-ins on the Office Store or on the Azure Marketplace. The account’s price is $19 for individual developers and $99 for companies: it’s a lifetime subscription, which you need to pay only once. However, there is an exception: if you own a MSDN subscription, among the available benefits, you will find a token to register for free.
You can start the procedure to create a developer account at https://developer.microsoft.com/en-us/store/register: you will be asked all the information about you or your company, based on which kind of account you want to open. The procedure is the same and you’ll be able to pay using a PayPal account or a credit card, the only difference is that:
- If it’s a personal account, it will be immediately activated after that the payment has been successfully completed.
- If it’s a company account, it takes a bit longer to get the account activated: a Microsoft partner, in fact, will contact you and request a series of information to prove that the company really exists and that you are legally allowed to operate on behalf of it.
Once the account is ready, there are two important sections to complete if you want to publish paid apps, which are Payout and Tax:
- The first section is required to setup how you want to be paid by Microsoft in case you decide to monetize your application (either by directly selling it or through add-ons, or by including advertising). We can set up a bank account or a PayPal one.
- The second section is required to properly manage the taxes payout and it’s important especially if you live outside United States. By filling the proper form, in fact, you’ll be able to avoid that your incomes are taxed both by the United States and by your own country. In case of doubt, I suggest you to contact a business consultant to complete this section, since Microsoft is not allowed to provide legal advices.
The main dashboard
Once you are logged in to the Dev Center, you have access to the main dashboard, which is a way to have a quick glance on the status of your apps, as you can see from the following image:
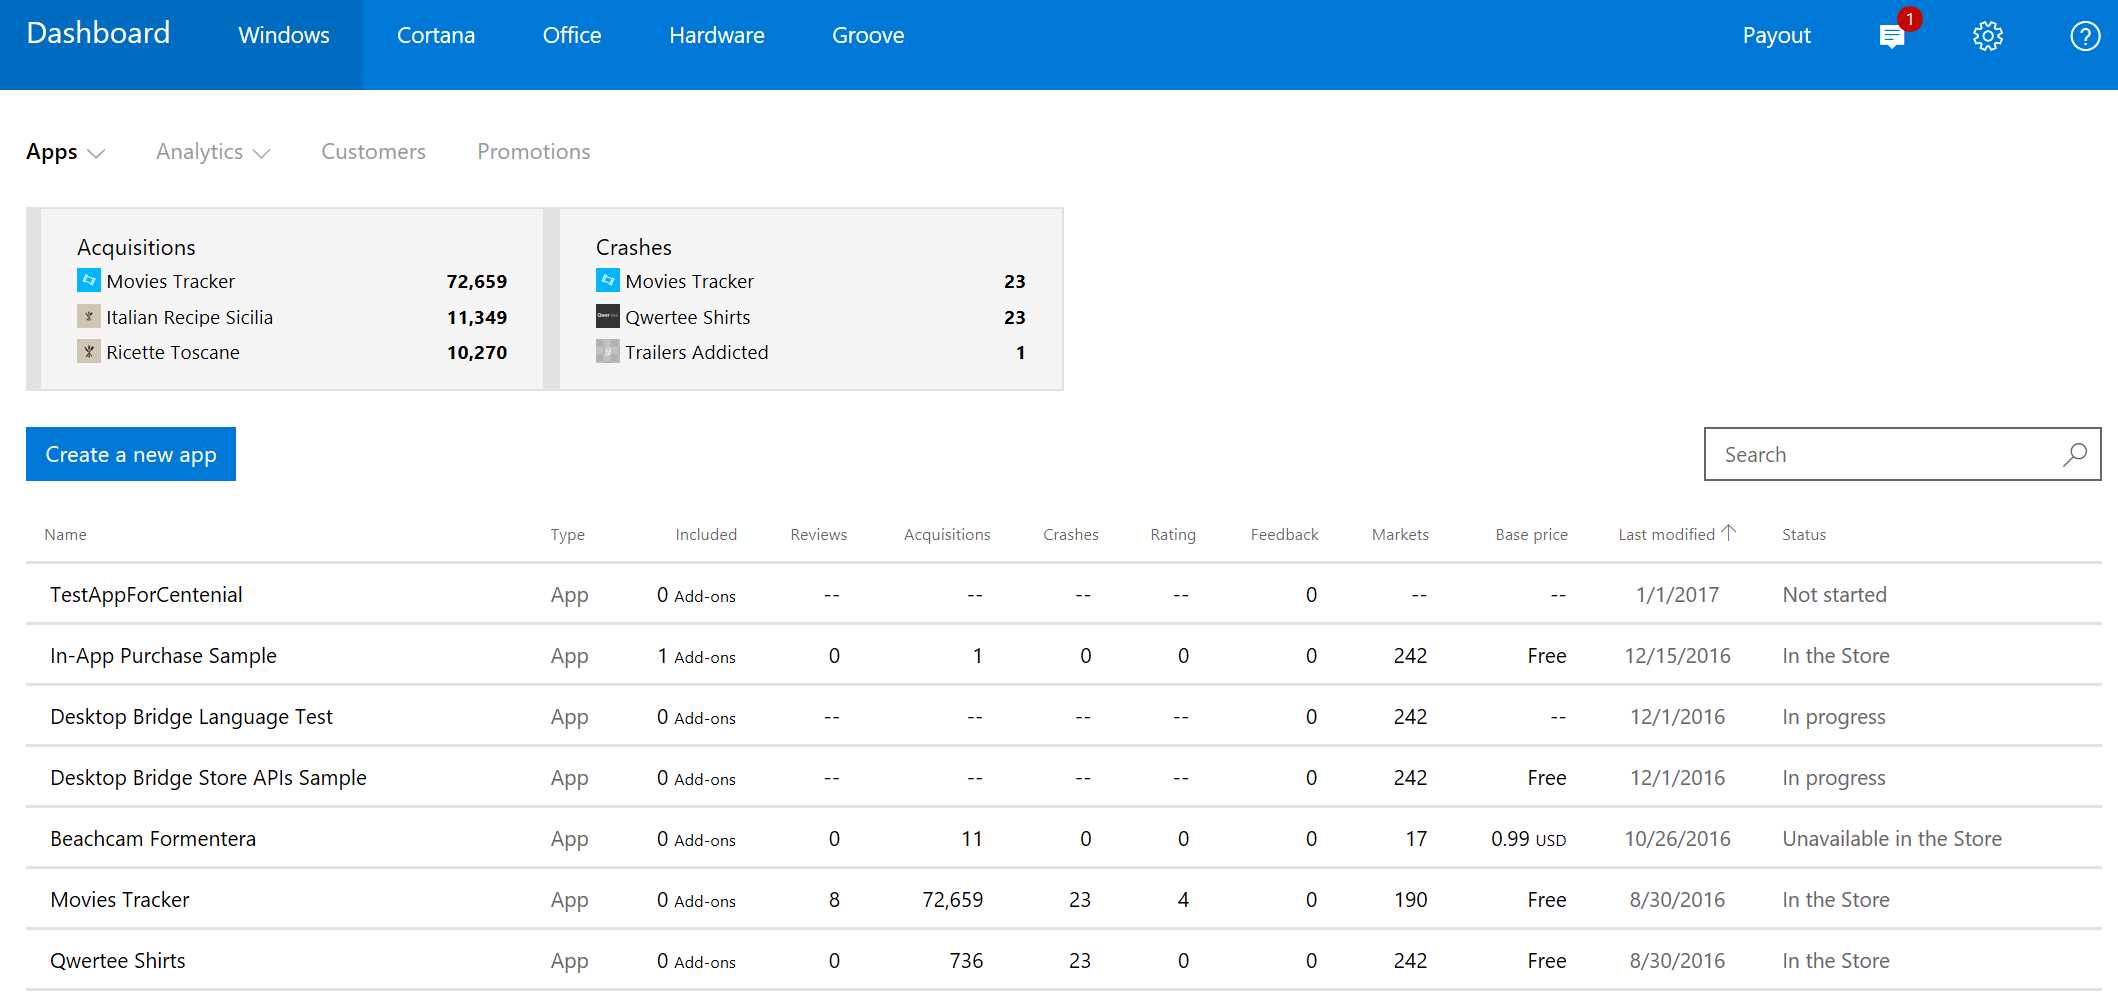
- The Dev Center dashboard
You can quickly see which are your most popular apps in terms of downloads, which ones are experiencing some problems and which is their status (live on the store, pending certification, submission in progress, etc.).
You have also the option to start a new submission, by pressing the Create a new app button. However, this step is required only if you’re starting from scratch: if you have already reserved a name for your app and associated it in Visual Studio (using the Store -> Associate App with the Store option we’ve seen when we have talked about testing the monetization features), you will find it in the list, with status Not started, so if you want to start the submission you just should click on it.
No matter which is the process you have decided to reserve a name for your app (which must be unique among the Store, two apps with the same name can’t exist); when you click on it in the list you get access to its detail page which, instead, can be used to start the real submission process and to perform all the operations that are connected to the app (like creating an add-on, seeing statistics about downloads, purchases and crashes, retrieving information about the identity or the credentials required to access to push notifications, etc.).
The following image shows an example of what you’re going to see when you don’t have any version published on the Store yet:
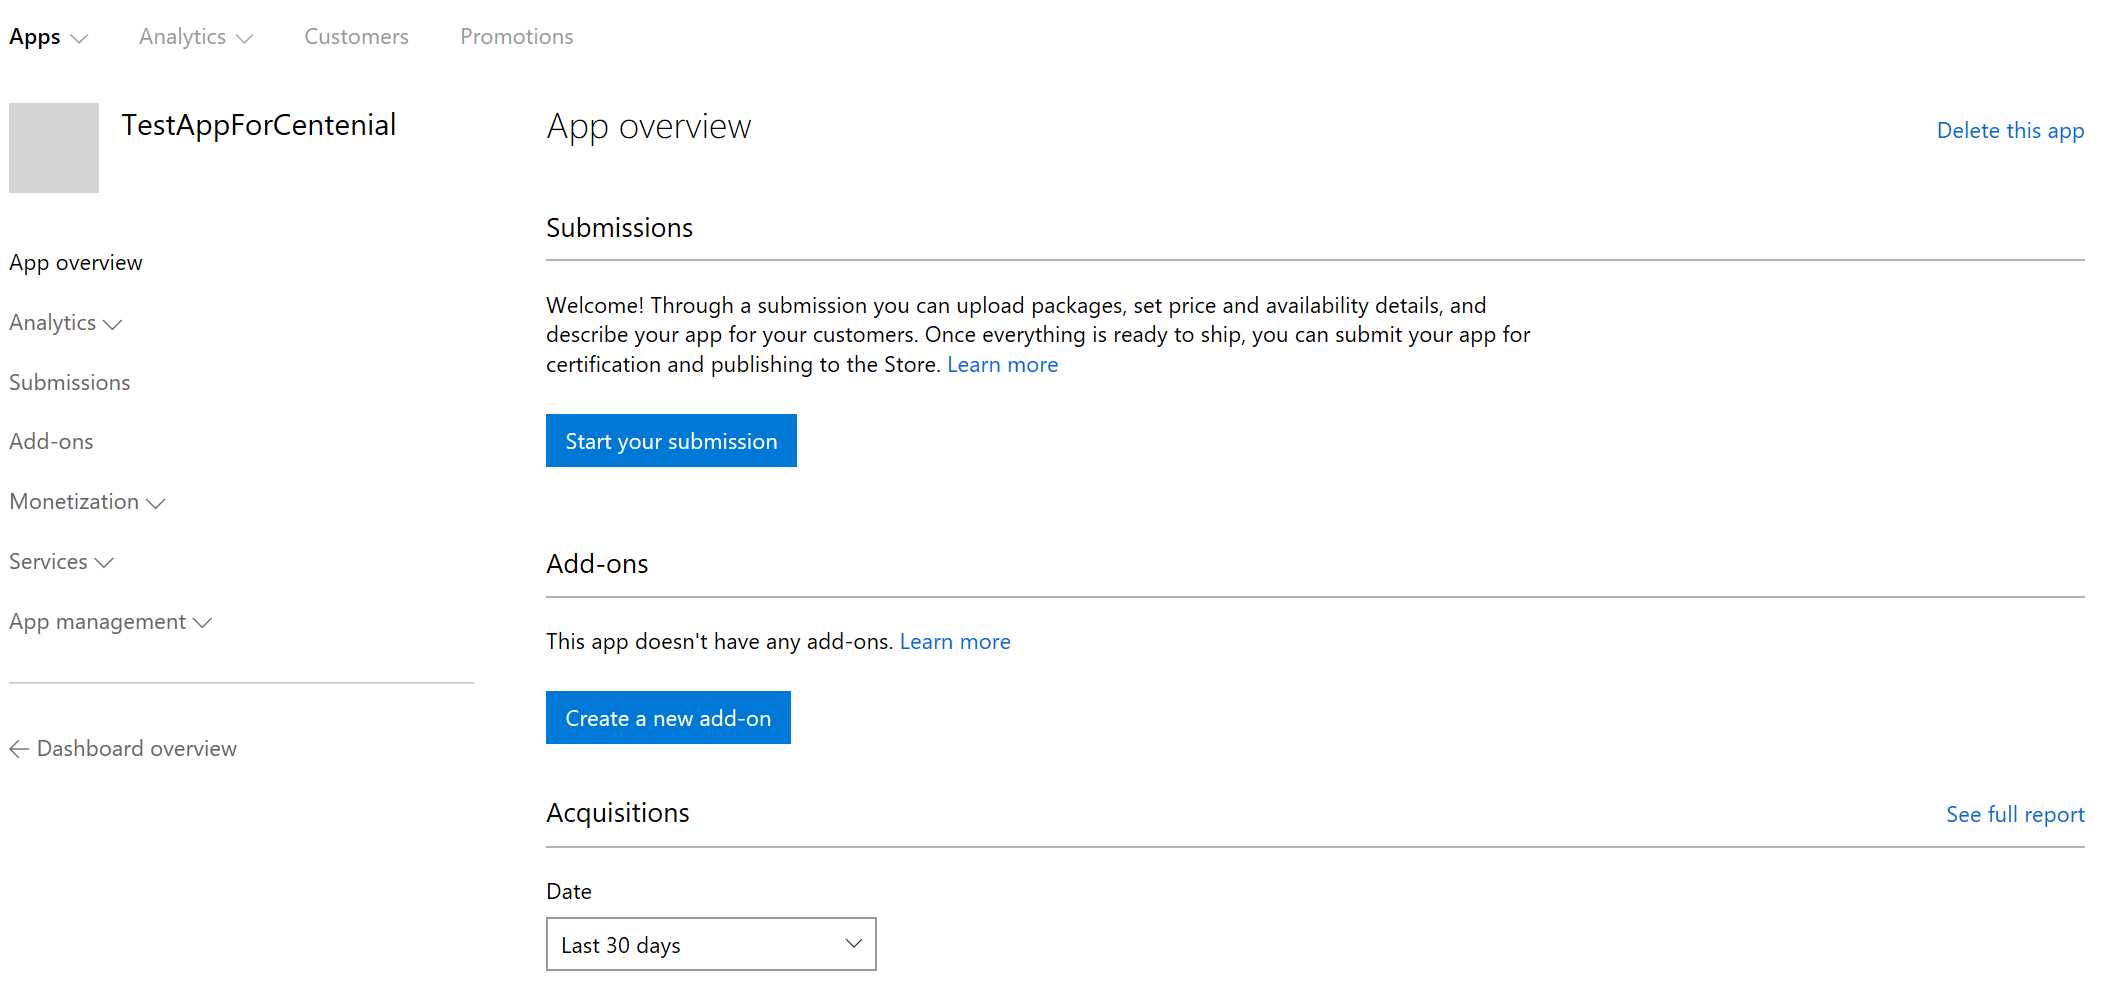
- The detail page of an application on the Dev Center
As you can see, in the Submissions, section, you’ll find a button called Start your submission, which is the one you need to start the publishing process.
The submission process
The submission process is made by six steps, In the following sections we’re going to see an overview of all of them.
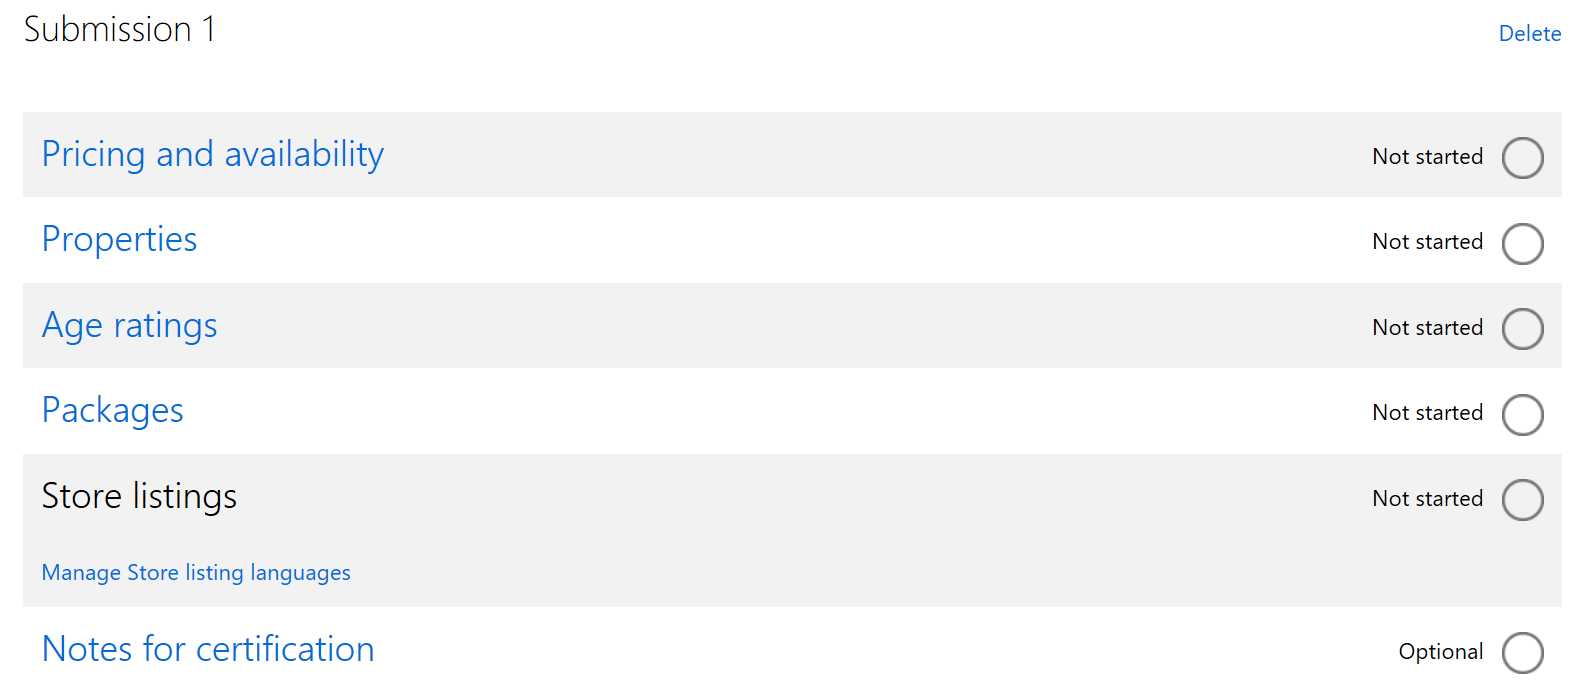
- The required steps to follow to submit an application on the Store
Pricing and availability
In this section, you can define how you want to market your application: if you want to release it for free or to sell it for a price, if you want to enable a trial, if you want to sell it in every country supported by the Windows Store or only in a selection of them (for example, the application to read a Spanish newspaper will likely be sold only in Spanish speaking countries).
The most important options you can configure are:
- The base price
- Trial mode: like we’ve seen previously in this chapter, you can decide to use the Trial never expires option (in this case, it will be up to you to leverage the Store APIs to disable some features until the user buys the full version) or one of the timed options (from 1 to 30 days). In the second case, Windows will be able to automatically handle the trial experience and preventing the user to launch again the app once it’s expired.
- Sales: thanks to this option, you can decide to offer a promotion to your customers and sell the app at a reduced price for a limited period. The Store will take care of automatically changing the price for you, you just toned to choose the new price, the starting date and the ending date of the sale. For example, you can decide to launch the app at a reduced price for the first week, or to run a special sale during a special occasion (like the Christmas holidays).
- Distribution and visibility: the Store offers multiple options to distribute an application. Since this book is focused on Windows 10, we’re going to see in detail only the ones that are supported by Universal Windows Platform apps, I won’t describe the ones that are supported only by previous versions of Windows. The default option is Make this app available on the Store, which means that the app will be public and every user will be able to search, download and buy it (always respecting, of course, the markets where you have opted-in to sell it). However, you have also other two options which can be useful for testing / limited distribution scenarios:
- Hide this app in the Store: also in this case, the app will be available for users to be downloaded and purchased, but only if they know the direct link (which you can find in the App management -> App identity section of the Dev Center). This is an example of a direct link: https://www.microsoft.com/store/apps/9wzdncrfhvqm. Users won’t be able to search for the app, neither by its name or by one of its keywords.
- Hide this app and prevent acquisition: this is the best approach in case you want to do some internal testing or distribute an early version of the app to bloggers and reviewers before it goes live. When this option is selected, a regular user won’t be able to find this app, even if he knows the direct link. The only option for him to download it is to receive a promotional code, which can be generated and shared only by the developer.
- Publish date: if the app passes the certification process, you have three options:
- Automatically publish the app.
- Manually publish the app: it will remain in “stand-by” (not visible, not searchable and not downloadable by users) until you will manually press the Publish button.
- No sooner that a specific date and time. Of course, this option needs to keep in consideration the certification timings (which, in some cases, may require up to 2-3 days).
The last two options are typically used when you are planning some marketing activities related to the app launch (like social marketing campaigns, go-live of a website, etc.) and you want to sync them with the date when the app will be visible on the Store.
Properties
This section can be used to describe the features of your application: which category it belongs to; if we want that the content of the app to be automatically included in the OneDrive backups; if the application has some special hardware requirements (like it works only with a touch screen, or it requires a Near-Field-Communication or a Bluetooth sensor, or maybe it’s a game so it requires a minimum amount of memory, CPU power and video memory).
Age ratings
This section will ask you many questions around the content of your application, like if it contains violence, gambling, crude language or images, etc. These questions are requested by the International Age Rating Coalition (IARC), which is the legal entity that issues an electronic document that certifies the age rating of your app.
This rating is required by the law and typically affects games since it’s the category of applications which is more likely to include content which is not suitable for children. The age rating that is assigned to your app can affect which users will be able to download it: for example, if the Microsoft Account of the customer is connected to a user who is 14 years old, he won’t be able to download an app / game which, instead, has an age rating of 18+.
Packages
In this section, you must upload the package of your application. To create it, you need to go back to Visual Studio, right click on your project and choose Store -> Create App Packages. At the first question, choose the option Yes, which means that you want to create a package for the Store (if you answer No, you will get a package that is valid only for side loading, which means manually installing the application on another device).
The second step is to choose the name you want to associate with your app: if you have already done it before, you can just continue and keep the same name you have already reserved.
Then it comes the most important app: the package generation.
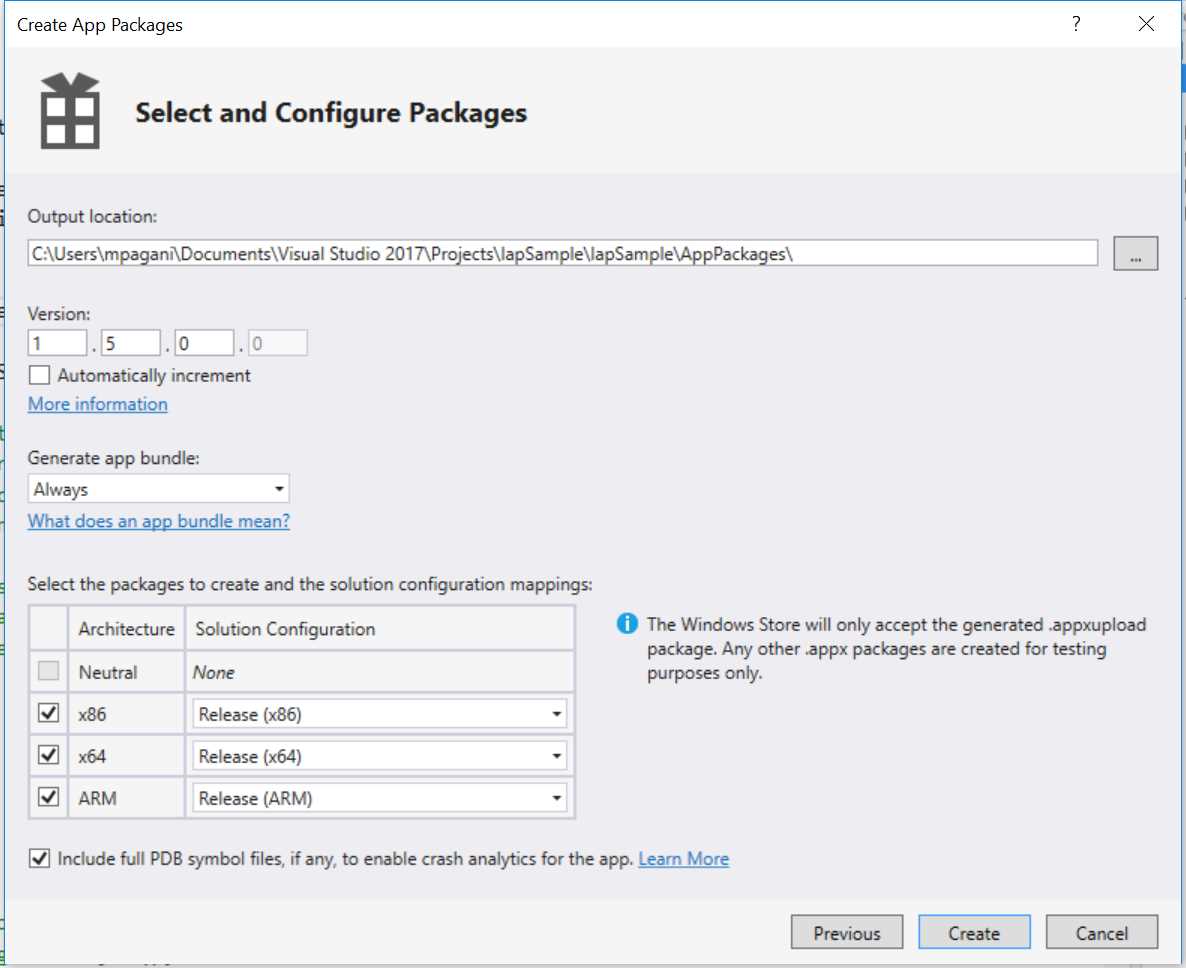
- The package creation process for the Store
Other than the output location and the version number (which you can choose to manually define or to automatically increment it at every build, the only requirement is that the version of the package you’re going to create must be higher than the one it’s currently available on the Store, in case you’re releasing an update), the most important part is the app bundle generation.
By default, the option Generate app bundle is set to Always. What is a bundle? It’s a special version of the package, which has a bigger size than a traditional one, but it’s split in multiple different pieces: a core one, with the basic executable and DLLs which are in common for every device, and multiple ones which, instead, contain only specific resources (like the images for a certain scale factor or the localization files for a certain language).
You can easily see when an application is distributed as a bundle because, in case you change the configuration of the device where the app is running (like the Windows language or the scaling factor of the device), the Store will trigger the download of the additional resources which are missing.
The bundle approach has become even more useful with Windows 10, mainly for two reasons:
- The same app can run on a wide range of devices. Releasing the package as a bundle will avoid that a user that is downloading the app on a phone with a low resolution will also get also the 4K images we have included to support the Xbox One or a big screen.
- Due to the .NET Native compilation we have talked about in the first book of this series, a Universal Windows Platform app can be no longer cross compiled for multiple architectures, using the old Any CPU configuration, but you must have a specific package for each architecture supported by Windows 10. Thanks to the bundle, you’re going to get a single package which contains all the three versions (x86, x64 and ARM), but the user will automatically download only the one which is specific for the device where he’s installing the app.
In most of the cases, using a bundle is the best choice, since it has many advantages and it reduces the size of the package that the user has download. However, there may be some catches in some peculiar scenarios. For example, if you want to provide an option within your app to let the user choose the language he prefers (even a different one that the language currently configured on the device), the bundle approach won’t work well, since the resources files for the languages different than the device’s one will be missing.
When you make this choice, it’s important to remember that there’s no way to go back once a bundle is published on the Store: you can’t change your mind later and revert to a standard package publishing.
Whatever is your choice, make sure to choose the Release mode for every architecture: this compilation mode will trigger also .NET Native, which is a requirement for the package to be accepted on the Store. Once you have clicked on the Create button, Visual Studio will start generating the bundle (or the three different packages). The compilationoperation, this time, will take a while, based on the complexity of the application, since.NET Native compilationrequires more time to be completed compared to the standard Debug one.
When the operation is completed, you will find in the folder chosen during the wizard a file with the .appxupload extension. The default folder is called AppPackages and it’s stored inside the project’s folder. The generated file name will have the following naming:
Name of the app_version number_architecture_bundle.appxupload
Here is the example of the generated file for a package generated as a bundle, which supports all the existing architectures:
IapSample_1.2.0.0_x86_x64_arm_bundle.appxupload
The output window of the certification process will contain also a button labeled Launch Windows App Certification Kit: this action will process the application through a tool called WACK, which will perform the same preliminary technical tests that are performed by the Dev Center. This tool is very helpful to have a rough idea of the outcome of the certification process: if you get a failure, it means that also the Dev Center is going to fail the preliminary certification and, as such, your app will be rejected. The tool will provide you a report file and, in case of errors, all the details you need to know to solve them.
Once you have the package, you can simply drag and drop it in the page: the Dev Center will start the upload process, followed by the analysis of the package to understand if everything is correct (there are no restricted capabilities in the manifest, all the existing assets are valid, etc.).
By default, the package will be available to every Windows 10 device. If you want to limit the distribution (for example, because your application is optimized only for desktop or for mobile), you can use the second part of the page to manually choose which platforms you want to support.

- The option to limit the availability of a Windows 10 app only to a specific set of devices
Store listing
The store listing page is the most important one from a marketing point of view. We can use it, in fact, to define all the information that will be displayed on the Store and which should attract the user to download our application. Some of this information are:
- The description.
- The release notes, in case it’s an update.
- Up to 9 screenshots for each supported device family.
- Some promotional artworks, which will be used by the Store team in case they decide to highlight your application in the front page.
- A set of keywords, to increase the chances for user to find your application even if they don’t know its exact title.
- A contact mail for support, a privacy policy if needed, etc.
To get the best results, it’s highly suggested to provide a different set of information for each supported language by your application. The Dev Center will automatically understand (based on the structure of your project) which languages are supported and it will propose you to fill the previous fields for each of them.
Notes for certification
This is the only optional section and it’s required in case the application is picked up for manual certification. There are some scenarios where an application can’t be tested out of the box, but it requires a set of pre-requirements. For example, if your application is connected to a backend service which requires a registration before using it, you should provide a set of credentials for the tester, so that he can immediately try the app.
Submitting the application
Once you have completed successfully all the steps, the Submit to Store button will be enabled and you will have the chance to effectively submit the app for the certification. Now you must wait the outcome of the certification. There are two kinds of certification processes:
- Automatic certification: this process is achieved with a set of automatic tests, which checks that your app satisfies all the technical requirements (it doesn’t crash at startup, it doesn’t try to use not allowed APIs, it gets suspended and resumed in the assigned amount of time, etc.). It usually takes a few hours to be completed.
- Manual certification: this process is done by a manual tester, which checks that the user interface of the app is clear and consistent, that there are no unhandled exceptions, that it doesn’t contain content prohibited by the Store (like excessive profanity or violence, racism, etc.). It may take up to 5 business days to be completed.
Most of the apps are processed only through the automatic certification, which means that usually an app completes the certification process within a few hours. Then, it takes between 24 and 48 hours for the Store servers to synchronize and for your app to be fully visible on the Store. However, at any time, the Store team has the chance to pick your application for a deeper round of tests and, if they find any problem, they will get back to you, asking to fix them otherwise they will unpublish the app.
Some apps, instead, can be randomly picked up for manual certification: in this case, the certification process will take longer to be completed. The chances to be picked for manual certification are connected also to the “reputation” of the developer: if, in the past, a developer has often published apps or updates with problems, it’s more likely that a new app or update released from him will be processed manually.
Once the application has been submitted, in the Dashboard you’ll be able to keep track of the status and in which of the different stages of the certification the app is. However, you will receive a mail once the certification is completed, either with a success or with a failure.
Updating the application
Once you have submitted at least one version of the app, the Start your submission button will disappear and the Submissions section in the dashboard will display the status of the last submission.

- The application’s page on the Dev Center once a submission is live on the Store
If you want to release an update, you can simply press the Update button on the right: you must follow the same steps described before, with the difference that, this time, every section will already be filled with the information you have specified during the previous submission.
It’s important to understand that the update procedure isn’t meant only when you want to release a new version of the application: in fact, you aren’t forced to upload a new package in the Packages section. The update procedure can be used also to change just the price of the application, to start a new sale, to create a new add-on or to simply edit the description on the Store. In these cases, the certification process will be almost instant, since there isn’t a new package to test, neither automatically or manually.
Add-ons
Previously in this chapter we have seen how to handle add-ons using the Store APIs. However, as mentioned in the paragraph, add-ons are defined in the Dev Center: you can create them from the Add-ons section, thanks to a button called Create new add-on.

- The section in the Dev Center to create new add-ons
The procedure to create new add-ons is like the one to publish a new app: once you have assigned a unique id to the add-on and its type (Durable, Consumable handled by the user or consumable handled by the Store), you will need to define its pricing and availability and the information for the Store (like description, keywords, etc.).
It’s important not to confuse the Product Id (which is a unique value that you assign to make easier for you to identify the add-on on the Dev Center) with the StoreId (which is, instead, the automatically generated identifier leveraged by the Store APIs). You can see an example in the following image:

- The details of an add-on product
The value highlighted in the red box is the identifier assigned by the developer, while the one highlighted in green is the one assigned by the Store and that will be used by the Store APIs we’ve previously learned to use in this chapter.
Flighting
Once you have a public submission on the Store, you can decide to create one or more flighting rings to release earlier versions of your app to a subset of users, to get feedback and identify potential issues before releasing them publicly.
You can create multiple rings and each of them will contain a list of users, identified by their Microsoft Account, which needs to match the one they used to register their Windows 10 devices. When you publish a new version of your application, you can decide to make it available only to a specific ring.
What happens when the user downloads an application that has one or more flighting rings enabled?
- If he isn’t part of any ring, he will just get the public version.
- If he’s part of a ring, he will get the testing version that you have released inside that ring.
The purpose of having multiple rings is to handle different testing scenarios: for example, you can have an alpha ring (where you publish nightly builds with more new features but potentially more issues) and a beta ring (where you publish versions with less new features, but more stable). At any point in time, you have the chance to move one version from a ring to the other: for example, once you have decided that the beta version is stable enough, instead of starting a new publishing process, you can simply move the package from the beta ring to the public one, so that every user will get it.
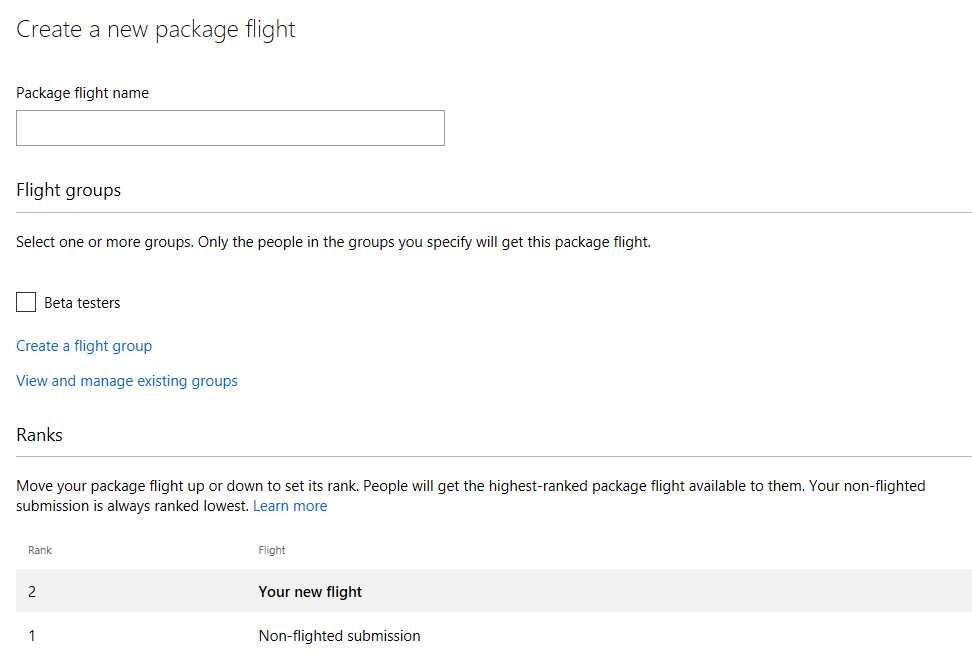
- The option to create a new package flight
As you can see from the previous image, flights have the concept of Rank. The rank number decides which is the version the user will get: people will download, in fact, the highest ranked package available for them. For example, if one of your users is included in both rings (the beta one with rank 2 and the alpha one with rank 3), he will get the package included in the alpha ring, since it’s the one with the highest rank.
Gradual rollout
Another feature provided by the Store is gradual rollout: instead of making a version of the application immediately available to every user, you can decide to gradually rollout it so that, if any unexpected problem should arise, you can cancel it and avoid that other users will be impacted by the issue. When you define a gradual rollout, you need to specify a percentage value between 1 and 100: the lower is the value, the lower will be the number of users that, every day, will receive the new version.
Once you are confident that the rollout is proceeding well, you can press the Finalize package rollout button to complete the distribution to all the existing users.
It’s important to keep in mind that you can’t submit a new update until a rollout has been completely finalized or halted.
Handling different roles
Having a Microsoft Account as a single-entry point to access to all the Store services works well when you’re an independent developer, but it can become hard to manage when you’re working with a team or when you have outsourced the development of your application (for example, you’re developing an application that will be published by a third-party customer and not using your account).
To handle this scenario, the Dev Center has introduced the concept of roles: the owner of the developer account can add other users to the same account, with the option to assign to each of them a different role, which will define which features he will be able to access.
For example, a user with the Developer role will be able to create new packages for the Store, to submit new updates and add-ons, but he won’t be able to see any statistics about how the app is performing in terms of downloads and purchases. Or a Business Coordinator can access to the financial info, change the price of the app, but he can’t submit new updates. Or, again, a Marketer can handle all the marketing activities (like replying to user’s reviews or see reports about download and usage), but he doesn’t have access to financial reports neither he can upload new versions of the app.
This feature is controlled by the Manage users option under the Account settings and requires the owner of the account to setup an Azure Active Directory tenant, since it’s the technology that, under the hood, the Dev Center leverage to provide the multi-role feature. However, this requirement doesn’t mean that this feature requires an extra payment: even if your company doesn’t have an existing Azure Active Directory infrastructure, Azure offers a free tier for this service, which is a perfect fit for the Dev Center multi-role scenario (since the number of users and object that you can create for free is much higher than the one you usually need to handle for such a scenario).
If you want to learn more about the different opportunities and how you can create a free Azure Active Directory account, you can refer to an official blog post published by the Windows team: https://blogs.windows.com/buildingapps/2015/12/22/using-multi-user-and-roles-in-dev-center
The Windows Store for Business
So far, we have talked only about consumer scenarios: the Windows Store, in fact, is an environment dedicated mainly to consumer customers, which are the users that every day buy and use a Windows 10 device like a PC, a Xbox One, etc.
However, as developers, we may often have the requirement to work not only on consumer apps, but also on enterprise apps. Additionally, there are some apps that don’t have a fixed target: they can either be used independently from a consumer or a business user.
To simplify the distribution of apps in an enterprise environment, without having to setup a Mobile Device Management infrastructure with tools like Intune or Airwatch, Microsoft offers the Windows Store for Business: it’s based on the same infrastructure of the Windows Store, but it’s dedicated to companies.
The entry point, in fact, is the same Store app you find on your Windows 10 device: the difference is that, starting from the November Update, users can login on the Store not only with their private Microsoft Account, but also with their company account (which must be connected to an Azure Active Directory subscription).
If your company has properly enabled and configured the Windows Store for Business, other than the traditional consumer sections (like Apps, Games, Music and Movies & TV), you will find a specific section of the Store where you’ll be able to see and download all the applications that your company has decided to make available to you as a worker. These applications can be:
- Consumer applications that are available also on the public store, but that your employee has decided that they can be useful for your everyday work.
- Internal applications, that aren’t available on the public store because they would be useless for a person that doesn’t work for your company.
One of the biggest advantages of the Windows Store for Business is that it supports bulk purchases of public apps: your employee can buy 100 licenses of a public paid app and assign them to each user of the company. Additionally, licenses can be easily transferred from one user to another, in case for example that a person leaves the company and he’s replaced by a new one.
You will find a reference to the Windows Store for Business in the Pricing and availability section of the submission process: when you publish a new app on the Store you can decide, in fact, to opt in or opt out for bulk licenses purchases.
You can learn more how to setup a Windows Store for Business in your company at the URL https://www.microsoft.com/business-store
The Microsoft Store Services SDK
We conclude this chapter with a brief overview of an SDK that has been recently released by Microsoft called Store Services SDK, which allows to perform further operations connected to the Store within your app. You can follow the official instructions to learn how to download and install the SDK in Visual Studio: https://msdn.microsoft.com/en-us/windows/uwp/monetize/microsoft-store-services-sdk#install-the-sdk
Here are the supported features.
Experiments with A/B testing
A/B testing is a practice that can be helpful to experiment if a new feature in your app can be useful or not. When you leverage this feature, you have the chance to define a set of variables and values in your project remotely in the Dev Center, which are retrieved by the application in real-time. These variables will assume different values for different users, despite they have downloaded the same app. For example, in a game you may decide to sell an add-on which allows the user to buy an extra number of life: the price of the add-on will be the same, but some users will get 5 extra life, while some others 10. When the experiment is ended, you’ll be able to see statistics about the outcome and leverage it to decide how to implement the feature in your app. For example, if the conversion rate of the add-on (which means the number of people who has purchased it) is five times higher for the users that have received 10 extra-life instead of 5, it means that the B option is more effective. If, instead, you get a similar number of purchases regardless of the number of extra-life, probably we will have to think about a more interesting and attractive add-on.
You can learn more about the implementation details in the documentation: https://msdn.microsoft.com/en-us/windows/uwp/monetize/run-app-experiments-with-a-b-testing
Collect feedbacks
Starting from the Anniversary Update, Windows 10 has a new built-in app called Feedback Hub: its purpose is to collect feedbacks, error reports and suggestions from users about their everyday experience with Windows 10. The data collected by this tool is analyzed daily by the Windows team and used to define priorities when it comes to fix bugs or to add new features in the future releases of Windows.
However, the Feedback Hub can be used also to collect feedback about your application: you can launch the app within your application and then, directly in the Dev Center, you’ll be able to read the feedbacks, reply to them or mark them with a special tag (like “Under revision”, “Implemented”, “Not supported”, etc.), so that your customers can always stay up to date about the status of their suggestions.
Once you have installed the Store SDK, using this feature is very simple: you just need to retrieve a reference to the StoreServicesFeedbackLauncher object with the GetDefault() method and invoke the LaunchAsync() operation, like in the following sample:
private async void OnSendFeedback(object sender, RoutedEventArgs e) { var launcher = Microsoft.Services.Store.Engagement.StoreServicesFeedbackLauncher.GetDefault(); await launcher.LaunchAsync(); } |
The StoreServicesFeedbackLauncher class offers also a method called IsSupported(), which can be useful if you decide to implement this feature in an application which, however, will be supported also on a version of Windows 10 prior to the Anniversary Update, which doesn’t have the Feedback Hub application. This way, for example, you can choose to hide the button to send the feedback if the feature isn’t supported on the device where the app is running.
Send Dev Center push notifications
Dev Center push notifications are like regular push notifications, but they don’t require to setup a traditional Windows Nofitication Service infrastructure with a backend because they are simply sent to all your customers directly by the Dev Center. For example, you can send a notification to all your customers to invite them to try a new feature or to rate your app.
You can also send targeted notifications, based on a set of criteria supported by the Dev Center: for example, you can decide to notify a promotion only to your most active users (based on how many times they have opened the application) or to notify a discount on an add-on only to your less active users (to encourage them to start using the application again).
You can learn more about how to implement them in the official documentation: https://msdn.microsoft.com/en-us/windows/uwp/monetize/configure-your-app-to-receive-dev-center-notifications
Log custom events
The option to log custom events is often offered by many analytics tools, like HockeyApp or Google Analytics. Thanks to a very simple API, you have the chance to track on the Dev Center every time the user has done a specific operation in your application (like opening the setting page or using a feature of your app). This way, based on the reports you will get, it will be easier for you to understand how many people are using this feature and act accordingly. For example, if the usage numbers are high, you can decide to invest more time in expanding it; vice versa, if the numbers are low, you may decide to rethink the way you have implemented the feature, because probably the current version isn’t very useful.
The code to track an event is every simple, as you can see from the following code:
private async void OnSendFeedback(object sender, RoutedEventArgs e) { Microsoft.Services.Store.Engagement.StoreServicesCustomEventLogger logger = Microsoft.Services.Store.Engagement.StoreServicesCustomEventLogger.GetDefault(); logger.Log("SettingsPageOpened"); } |
Display advertising
The SDK includes also two controls to display advertising in your application, which is another monetization option: instead of selling your app or add-ons, you can decide to release your app for free and to earn money from the advertisings displayed within the app.
However, you need to be careful: if the advertising is too intrusive, it can lead to a bad user experience. A commonly used practice is to release a trial version of the app with advertising and then selling a paid version without it or offering an add-on to remove it.
The Store SDK contains two controls to display advertising:
- AdControl, which is the one to display standard banners within your app, in different sizes and formats.
- InterstitialAd, which is a control that can display videos at a certain time during the usage of the application (for example, before launching a new level of a game).
You can find all the information on how to configure the controls and add them to your application in the official documentation: https://msdn.microsoft.com/en-us/windows/uwp/monetize/display-ads-in-your-app
- 70+ advanced UWP components for Windows Store apps.
- UI controls for LOB apps: Charts, DataGrid, Diagram, and more.
- Comprehensive features for building touch-friendly, Windows 10-style applications.