
MonoGame Role-Playing Game Development Succinctly®

CHAPTER 6
Levels and Maps
In this chapter, we are going to look at how we can represent the area the player is currently in. This could be the interior of a shop, a town the player is wandering around in, or the deep, dark depths of a cold, damp dungeon.
We are going to do this with levels. Our level will have a number of maps that will help make up its detail. For the purposes of this book, we are keeping its bounds to the area of the screen. The level will have a number of maps passed to it. These will be textures that will represent the level floor layout and objects that are in the areas, as well as mobile objects (mobs), their patrol areas, and exits from the level to other areas of the game world.
We are also going to use our animated sprite sheet code that we covered in Chapter 2 when rendering the level.
Levels
For simplicity we have gone with a top-down view using hand-drawn maps, all rendered using a simple tile map system.
Our world is going to be made up of levels. The game world for the purpose of our book is going to be made up of the following areas:
Areas
Town
The town is where our intrepid adventurer is going to start. Within the town there will be the inn, a place where the player can buy some supplies and hear some rumors. The player will also be able to exit north through the town gates and enter the surrounding area.
Inn
The inn is full of ale, gossip, and rumors, one of which tells of a dungeon to the northeast that has become a home to a small party of goblins that have been raiding local farms. Our player can also buy some equipment here for their journey; a sword may be useful for those goblins.
Surrounding area
The village is not too far from the sea. Once leaving the village, the player will be able to roam the surrounding area freely, head to the dungeon that the rumors described, or even head back into town. Perhaps they will have a chance encounter while out in the wilds…
Dungeon
This is where the goblins are holed up, in the cellar of a keep that was once owned by a great wizard. After a frightful magical explosion a few hundred years ago, the only thing left of the keep is its cellar, located in the crater where the keep once stood.
Tile maps
Each level has a tile map to help describe where everything is in it. We pass a terrain map texture (this will be the ground tiles for the level), an overlay map (this will be for sprites that sit on top of the floor tiles), an object map (this will be used to map where items and other important objects are in the level), and finally, a map for mobs or NPCs (this will show where monsters and other NPCs may be in the level). Each pixel in the map is given a color to represent a sprite to be rendered at that location.
Sprite size
The first thing we need to do is decide how big the level tile maps are going to be. I have chosen to use 32×32 sprite sizes for areas of detail, so the town, the inn, and the dungeon. The surrounding area will be rendered using 16×16-pixel sprites, as we want this to seem like a more expansive area.
Map size
We are going to be rendering our sprites with 32×32 pixels, so we need to create our maps to fill the screen at that sprite size. The default screen size for our game is 800×480 pixels, so dividing both of those values by 32 tells us our maps for the 32×32 sprite size need to be 25×15 pixels.
Pretty much all our levels are going to be at this resolution, with the exception of the surrounding area level, which will use smaller sprites and create a larger playing area. For the area maps we are going with a 16×16 sprite, so all we need to do is double the map sizes we currently have, giving us tile map sizes of 50×30.
I am not going to cover all the maps. I will leave some of that up to you, but I will give examples of how we can create these level maps. Let’s take a look at the town maps we have created, and then we will look at the way our level base classes are made so we can use them to build any level we like by deriving from them and adding the specific code we want for that level.
Town maps
Terrain map
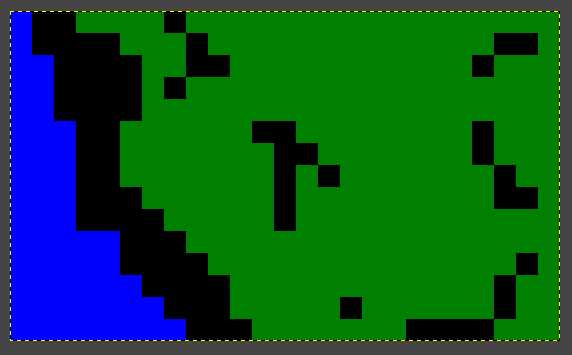
Figure 7: Town terrain map
This PNG texture created in GIMP 2.10.20 is 25×15 pixels in size. Each pixel is going to tell us what needs to be rendered at each sprite location on the screen. This is a very simple map. There are three colors indicating what needs to be drawn for our floor tiles: Black (0,0,0,255), Blue (0,0,255,255), and Green (0,128,0,255). In our TownLevel code, we can now just set the tile at that location based on this map.
Code Listing 51: TownLevel.cs
// Solid terrain if (terrainData[w + (h * width)] == Color.Black) data.TileType = "Green"; else if (terrainData[w + (h * width)] == Color.Blue) { data.TileType = "Water"; data.IsSolid = true; } else if (terrainData[w + (h * width)] == Color.Green) data.TileType = "Grass"; |
As you can see, we have a TileData object to help manage each tile. We can set its type, which indicates what sprite we want to use in our sprite sheet, and if it is "solid," which indicates whether or not avatars can move through it. Each of our tiles use the same sprite class we created in Chapter 2; this means we can have animated tiles in our level.
This tile terrain would then render the level like this:
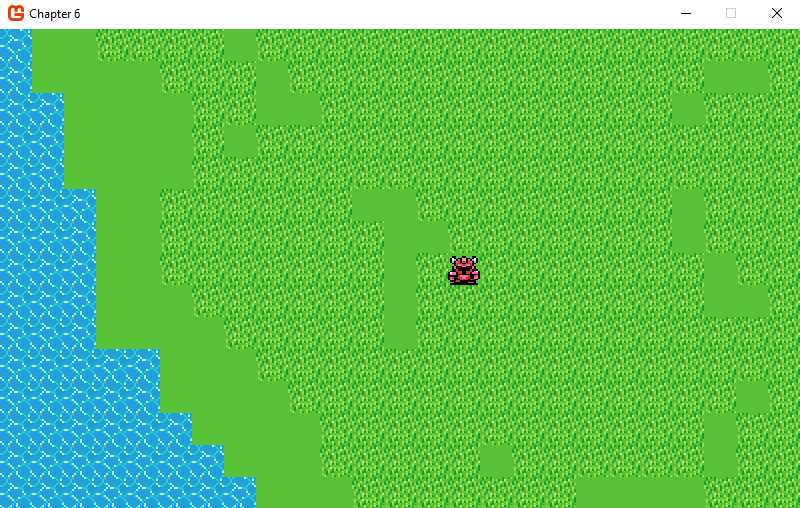
Figure 8: Rendered town terrain
If we pass in the other maps for the town, overlay, and object maps (object maps are used for the walls, paths, and buildings), we get the full level rendered.
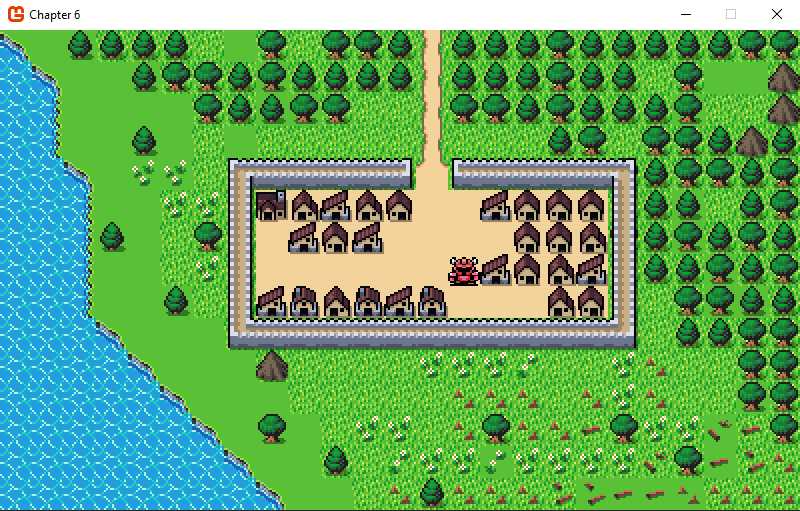
Figure 9: Rendered town with overlay and object map
Before we get to the code, let’s have a look at these other two maps.
Overlay map
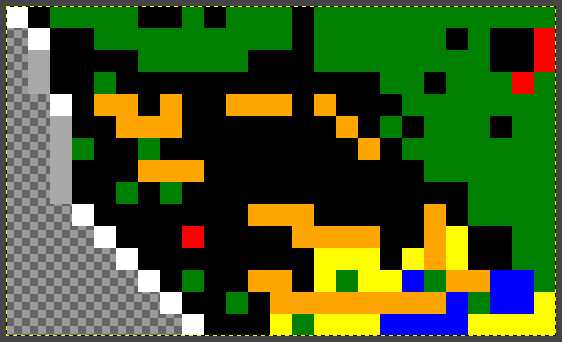
Figure 10: Town overlay map
As you can see, we are using a number of color keys here. Green is now being used for trees, red for mountains, orange for flowers, blue for logs, and yellow for tree stumps. To the left we are using a combination of white and gray to key the cliff sprites to use.
Object map
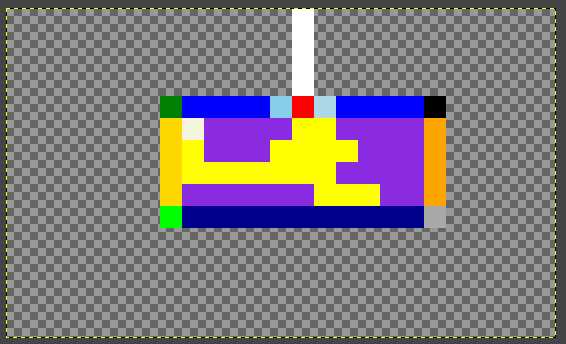
Figure 11: Town object map
Here, we have white for the vertical path, a number of colors to key the walls and their corners, and purple to generate a random house. The ivory in the top left corner of the town is where we want the inn, and the red square is the exit from the town.
LevelBase
All our levels use a common base class. This class will help set up the basic elements of a level and how it is drawn, but our derived classes for each level will have the mapping between the sprite sheet and the tile maps in them.
We have a number of properties in here.
Code Listing 52: LevelBase.cs properties
/// <summary> /// This is a reference to our player in the level /// </summary> public virtual Sprite PlayerReference { get; set; } /// <summary> /// This is a list of all our base tiles in the level /// </summary> public virtual List<MapTile> Tiles { get; protected set; } /// <summary> /// This is a list of all our overlay tiles in the level /// </summary> public virtual List<MapTile> OverlayTiles { get; protected set; } /// <summary> /// This is the size of each sprite tile in the level /// </summary> protected virtual Point tileSize { get; set; } /// <summary> /// A reference to the content manager so we can load assets /// </summary> protected virtual ContentManager contentManager { get; set; } /// <summary> /// The sprite sheet all tiles are rendered from /// </summary> protected virtual Texture2D spriteSheet { get; set; } /// <summary> /// The tile map used for floor tiles /// </summary> protected virtual Texture2D map { get; set; } /// <summary> /// The tile map used for overlay objects /// </summary> protected virtual Texture2D overlay { get; set; } /// <summary> /// The tile map used for overlay objects /// </summary> protected virtual Texture2D objects { get; set; } /// <summary> /// The tile map used for NPC avatars /// </summary> protected virtual Texture2D mobs { get; set; } |
You can see our tiles are made up of a class called MapTile. This is used to render the required sprite at a level location and retain the TileData required for that tile.
Code Listing 53: MapTile class
public class MapTile { public float Layer { get; protected set; } public Vector2 Location { get; set; } public List<Sprite> Items { get; protected set; } public Sprite TileBase { get; set; } public TileData Data { get; set; }
public MapTile(Texture2D spriteSheet, Point tileSize, Point cellSize, Dictionary<string, SpriteSheetAnimationClip> animation = null, string initialAnimation = null) {
TileBase = new Sprite(spriteSheet, tileSize, cellSize); if (animation != null) TileBase.animationPlayer = new SpriteSheetAnimationPlayer(animation); if (initialAnimation != null) TileBase.StartAnimation(initialAnimation); } public virtual void Update(GameTime gameTime) { if (TileBase != null) TileBase.Update(gameTime); } public virtual void Draw(GameTime gameTime, SpriteBatch spriteBatch) { if (TileBase != null) { TileBase.Position = Location; TileBase.Draw(gameTime, spriteBatch); } } } |
The class ensures the sprite is updated and drawn in the right location, and the Data property is an instance of TileData, which holds the required data for the tile in question.
Code Listing 54: TileData class
public class TileData { public bool IsSolid { get; set; } public string TileType { get; set; } public string ExitTo { get; set; } public Vector2 EnterIn { get; set; } } |
This class, as small as it is, is very important. It holds all the required data for a tile in our level: whether it is solid, the type of the tile (this is used to know what sprite is used), if and where the tile exits to another level, when the player enters that level, and at what coordinates.
Let’s see how these classes are all used to generate the level.
Code Listing 55: GenerateMap method
protected virtual void GenerateMap(Texture2D spriteSheet, Point tileSize, Point cellSize, Dictionary<Point, TileData> map, Dictionary<Point, List<TileData>> overlayMap, Dictionary<string, SpriteSheetAnimationClip> animation) { if (map != null) { Tiles = new List<MapTile>(); OverlayTiles = new List<MapTile>(); foreach (Point p in map.Keys) { MapTile tile = new MapTile(spriteSheet, tileSize, cellSize, animation, map[p].TileType); tile.Data = map[p]; tile.Location = new Vector2(p.X, p.Y); Tiles.Add(tile); if (overlayMap != null && overlayMap.ContainsKey(p)) { foreach (TileData td in overlayMap[p]) { tile = new MapTile(spriteSheet, tileSize, cellSize, animation, td.TileType); tile.Data = td; tile.Location = new Vector2(p.X, p.Y); OverlayTiles.Add(tile); } } } } } |
The derived class will have built and populated the Dictionary<Point,TileData> map variable, and our underlying functionality in the abstract class can now put this into our Tiles and OverlayTiles lists.
Let’s now have a look at a derived level class that does the mapping of the sprite sheet to the tile maps and generates this Dictionary<Point, TileData> map parameter.
Dungeon level
All we need to do now is create a constructor and the overrides for the abstract methods GetAnimationClips and GenerateTileData in our derived class.
Deriving from LevelBase, our contractor is pretty simple.
Code Listing 56: Dungeon class constructor
public Dungeon(ContentManager contentMgr, string tileSheetAsset, string mapAsset, string overlayMapAsset, string objectMapAsset, string mobMapAsset, Point tileSize, Point cellSize) : base(contentMgr, tileSheetAsset, mapAsset, overlayMapAsset, objectMapAsset, mobMapAsset, tileSize, cellSize) { } |
We now need to map our sprite sheet, just as we did in Chapter 2.
Code Listing 57: Dungeon animation clips
protected override Dictionary<string, SpriteSheetAnimationClip> GetAnimationClips(Texture2D spriteSheet) { SpriteAnimationClipGenerator sacg = new SpriteAnimationClipGenerator(new Vector2(spriteSheet.Width, spriteSheet.Height), new Vector2(4, 9)); return new Dictionary<string, SpriteSheetAnimationClip>() { {"Blank", sacg.Generate("Blank", new Vector2(3, 0), new Vector2(3, 0), new TimeSpan(0, 0, 0, 0, 500), true) }, {"Floor", sacg.Generate("Floor", new Vector2(1, 1), new Vector2(1, 1), new TimeSpan(0, 0, 0, 0, 500), true) }, {"TLWall", sacg.Generate("TLWall", new Vector2(0, 0), new Vector2(0, 0), new TimeSpan(0, 0, 0, 0, 500), true) }, {"LWall", sacg.Generate("LWall", new Vector2(0, 1), new Vector2(0, 1), new TimeSpan(0, 0, 0, 0, 500), true) }, {"BackWall", sacg.Generate("BackWall", new Vector2(1, 0), new Vector2(1, 0), new TimeSpan(0, 0, 0, 0, 500), true) }, {"TRWall", sacg.Generate("TRWall", new Vector2(2, 0), new Vector2(2, 0), new TimeSpan(0, 0, 0, 0, 500), true) }, {"RWall", sacg.Generate("RWall", new Vector2(2, 1), new Vector2(2, 1), new TimeSpan(0, 0, 0, 0, 500), true) }, {"BLWall", sacg.Generate("BLWall", new Vector2(0, 2), new Vector2(0, 2), new TimeSpan(0, 0, 0, 0, 500), true) }, {"BWall", sacg.Generate("BWall", new Vector2(1, 2), new Vector2(1, 2), new TimeSpan(0, 0, 0, 0, 500), true) }, {"BRWall", sacg.Generate("BRWall", new Vector2(2, 2), new Vector2(2, 2), new TimeSpan(0, 0, 0, 0, 500), true) }, {"LBackWall", sacg.Generate("LBackWall", new Vector2(0, 5), new Vector2(0, 5), new TimeSpan(0, 0, 0, 0, 500), true) }, {"RBackWall", sacg.Generate("RBackWall", new Vector2(1, 5), new Vector2(1, 5), new TimeSpan(0, 0, 0, 0, 500), true) }, {"LFrontWall", sacg.Generate("LFrontWall", new Vector2(1, 6), new Vector2(1, 6), new TimeSpan(0, 0, 0, 0, 500), true) }, {"RFrontWall", sacg.Generate("RFrontWall", new Vector2(0, 6), new Vector2(0, 6), new TimeSpan(0, 0, 0, 0, 500), true) }, {"BrickOverlay", sacg.Generate("BrickOverlay", new Vector2(2, 5), new Vector2(2, 5), new TimeSpan(0, 0, 0, 0, 500), true) }, {"BrickOverlay2", sacg.Generate("BrickOverlay2", new Vector2(3, 5), new Vector2(3, 5), new TimeSpan(0, 0, 0, 0, 500), true) }, {"BrickOverlay3", sacg.Generate("BrickOverlay3", new Vector2(2, 6), new Vector2(2, 6), new TimeSpan(0, 0, 0, 0, 500), true) }, {"BrickOverlay4", sacg.Generate("BrickOverlay4", new Vector2(3, 6), new Vector2(3, 6), new TimeSpan(0, 0, 0, 0, 500), true) }, {"BrickOverlay5", sacg.Generate("BrickOverlay5", new Vector2(3, 7), new Vector2(3, 7), new TimeSpan(0, 0, 0, 0, 500), true) }, {"BrickOverlay6", sacg.Generate("BrickOverlay6", new Vector2(3, 8), new Vector2(3, 8), new TimeSpan(0, 0, 0, 0, 500), true) }, {"Hole", sacg.Generate("Hole", new Vector2(1, 7), new Vector2(1, 7), new TimeSpan(0, 0, 0, 0, 500), true) }, }; } |
Again, we have a SpriteAnimationClipGenerator and we map the cells we want from the sprite sheet.
Now, in GenerateTileData we can read the tile maps, and based on the given colors in those maps create our map and overlay map dictionaries.
Code Listing 58: Dungeon GenerateTileData
protected override void GenerateTileData(Texture2D spriteSheet, Point tileSize, Point cellSize, Texture2D floorMap, Texture2D overlays, Texture2D objects, int width, int height, Dictionary<string, SpriteSheetAnimationClip> animation) { int seed = 1971; Random rnd = new Random(seed); Dictionary<Point, TileData> innFloorPlan = new Dictionary<Point, TileData>(); Dictionary<Point, List<TileData>> overlay = new Dictionary<Point, List<TileData>>(); Color[] floorMapData = new Color[floorMap.Width * floorMap.Height]; floorMap.GetData(floorMapData); Color[] overlayData = new Color[overlays.Width * overlays.Height]; overlays.GetData(overlayData); Color[] objectData = new Color[objects.Width * objects.Height]; objects.GetData(objectData); for (int w = 0; w < width; w++) { for (int h = 0; h < height; h++) { TileData data = new TileData(); Point p = new Point(w * tileSize.X, h * tileSize.Y); if (floorMapData[w + (h * width)] == Color.Transparent) { data.TileType = "Blank"; data.IsSolid = true; } else if (floorMapData[w + (h * width)] == Color.White) { int r = rnd.Next(0, 100); if (r <= 25) { if (!overlay.ContainsKey(p)) overlay.Add(p, new List<TileData>()); data = new TileData(); r = rnd.Next(0, 100); if (r <= 16) data.TileType = "BrickOverlay"; else if (r <= 32) data.TileType = "BrickOverlay2"; else if (r <= 48) data.TileType = "BrickOverlay3"; else if (r <= 64) data.TileType = "BrickOverlay4"; else if (r <= 80) data.TileType = "BrickOverlay5"; else data.TileType = "BrickOverlay6"; overlay[p].Add(data); } data = new TileData(); data.TileType = "Floor"; } else if (floorMapData[w + (h * width)] == Color.Black) { data.TileType = "Hole"; data.ExitTo = "AreaMap"; data.EnterIn = new Vector2(31, 15); } else if (floorMapData[w + (h * width)] == Color.Gray) { data.TileType = "BackWall"; data.IsSolid = true; } else if (floorMapData[w + (h * width)] == Color.DarkGray) { data.TileType = "BWall"; data.IsSolid = true; } else if (floorMapData[w + (h * width)] == Color.DimGray) { data.TileType = "LBackWall"; data.IsSolid = true; } else if (floorMapData[w + (h * width)] == Color.DarkSlateGray) { data.TileType = "RBackWall"; data.IsSolid = true; } else if (floorMapData[w + (h * width)] == Color.Red) { data.TileType = "TLWall"; data.IsSolid = true; } else if (floorMapData[w + (h * width)] == Color.RosyBrown) { data.TileType = "LWall"; data.IsSolid = true; } else if (floorMapData[w + (h * width)] == Color.Brown) { data.TileType = "BLWall"; data.IsSolid = true; } else if (floorMapData[w + (h * width)] == Color.Green) { data.TileType = "TRWall"; data.IsSolid = true; } else if (floorMapData[w + (h * width)] == Color.Lime) { data.TileType = "RWall"; data.IsSolid = true; } else if (floorMapData[w + (h * width)] == Color.LightGreen) { data.TileType = "BRWall"; data.IsSolid = true; } else if (floorMapData[w + (h * width)] == Color.GreenYellow) { data.TileType = "LFrontWall"; data.IsSolid = true; } else if (floorMapData[w + (h * width)] == Color.DarkGreen) { data.TileType = "RFrontWall"; data.IsSolid = true; } else { } if (!string.IsNullOrEmpty(data.TileType) && !innFloorPlan.ContainsKey(p)) innFloorPlan.Add(p, data);
} } GenerateMap(spriteSheet, tileSize, cellSize, innFloorPlan, overlay, animation); } |
As you can see, each color in the tile maps map to a given sprite for that location in the level. We know all walls are solid, so those have the IsSolid flags set. The entrance and exit to the Level in Black (0,0,0,255) leads back to the AreaMap at a given location.
Let’s have a look at the floor plan tile map for the dungeon.
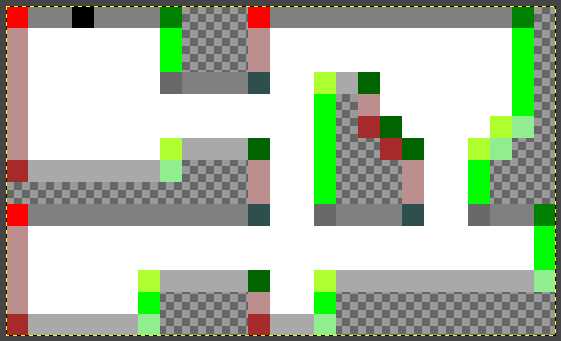
Figure 12: Dungeon terrain map
Looking at the tile map, we can see all red (255,0,0,255) pixels are used to render TLWall sprites. These are sprites on the sprite sheet that are "top left wall" corners. Looking at the animation map, that is the top left corner of the sprite sheet. The exit in black (0,0,0,255) uses the "Hole" sprite, and is located at (1,7) in the sheet, and we can see that's the open doorway.
![]()
Figure 13: Dungeon sprite sheet
Let’s see how that is rendered.
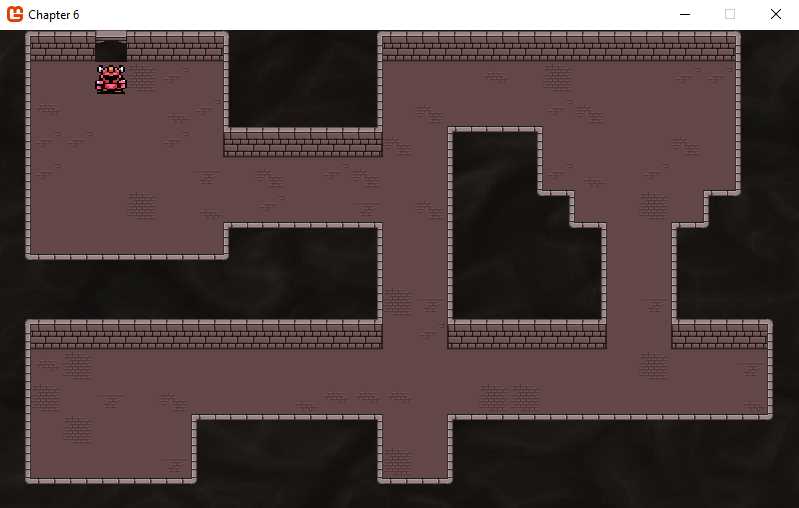
Figure 14: Rendered dungeon terrain
You can now see how to build levels and maps by simply creating a terrain, overlay, and object map for each, and then overriding the LevelBase class to create the level in-game. Take a look at the AreaLevel.cs and InnLevel.cs files; they are built just like DungeonLevel.cs.
What’s next
We now have a framework for rendering our world, where our character is able to move from one area to the next. In the next chapter, we are going to look at how we can give our character skills and use them in the world.
- 1800+ high-performance UI components.
- Includes popular controls such as Grid, Chart, Scheduler, and more.
- 24x5 unlimited support by developers.