
MongoDB 3 Succinctly®

CHAPTER 3
The Mongo Shell
Some of the first things a developer might try to find out is how to run queries and administer the database.
MongoDB comes with a set of utilities, all of them installed in the bin folder. One of the utilities is mongo.exe, also known as the “mongo shell,” which is an interactive JavaScript interface to the database. The mongo shell is used to query or manipulate data, as well as to perform administrative operations.
To start the mongo shell, we have to simply type mongo in the command prompt. Obviously, in order for the shell to work, the database has to be up and running.
Code Listing 13: Starting the Mongo Shell
C:\mongodb\bin>mongo MongoDB shell version v3.4.1 connecting to: mongodb://127.0.0.1:27017 MongoDB server version: 3.4.1 |
Once in the shell, we are automatically connected to the database instance on the local machine (localhost), and by definition the default port 27017 is used.
Tip: By including the c:\mongodb\bin directory in the system variable path, referencing mongodb utilities is much easier across the system.
If the database is not located on the local machine (which will almost always be the case in any production system), we can specify the remote server name (--host), port, and the username and password, as shown in the example that follows:
Code Listing 14: Connecting to the MongoDB remote server
C:\mongodb\bin>mongo --host <remoteServerName> --port 27017 –-u <username> --p <password> |
By default, MongoDB has no default user or password. These can be created with the db.createUser command.
Searching for help
One of the first things that can be done in the mongo shell is to check for help, which is available by simply typing help in the shell. Help will bring the list of available commands on the various objects such as database, collection, users, etc.

Figure 10: Showing help.
When you type db.help(), all of the operations available on the database object will be shown. The same logic would apply for other objects as well.

Figure 11: Showing help at the database level.
Databases
The MongoDB shell doesn’t explicitly provide commands for creating databases. When you insert at least one document into a collection, MongoDB will create a database if one doesn’t exist.
First, let’s see how to get the list of databases in MongoDB by running the show dbs command:

Figure 12: Getting the list of databases.
In the freshly installed MongoDB, there will be only one database, called local. Every mongod instance has its own local database, which stores data used in the replication process, and other instance-specific data.
You might also see an admin database being shown, depending on whether the security has been applied. The admin database will hold the information about users and passwords. In my case, there is no security applied.
Database creation
Just to play a bit with the shell, we will create a database called mydb by trying to insert a document. This action will make MongoDB create a database. To navigate to our new database, use the use mydb command. Even though the database doesn’t exist yet, the shell will allow us to switch to it.
So, as an exercise, let’s insert a fictitious user entry into the mydb database in the users collection:
Code Listing 15: Inserting a new document
db.users.insert({firstname: 'john', lastname: 'doe'}) |
As we can see in Figure 13, the result shows WriteResult({“nInserted” : 1 }), which tells us that one row has been written. All good so far.
Note: Inserting documents will be further explained in one of the following chapters.
As the last step, let’s check to see if the database is now being created by running show dbs once again:

Figure 13: Creation of the database by inserting data into collection.
Congratulations, you successfully created your first MongoDB database!
Dropping databases
Sometimes there is a need to delete a database that has already been created. The MongoDB db.dropDatabase() command is used for this purpose.
In order to delete a database, we have to call the use database command. Once the shell switches to the selected database, we can call the db.dropDatabase() command, which will effectively delete the database.

Figure 14: Deleting a database.
As in the previous case when we inserted an entry in the collection, the shell returns the result of the command, telling us that the command succeeded.
Collections
When we created the database, we inserted the first document in the users collection. To show that the users collection is there, we can use the command show collections, which is very similar to the one used to show the database list.

Figure 15: Showing the list of collections.
We can see that the users collection is available.
An alternative to this would be to run the db.getCollectionNames() command, which then returns a BSON document.

Figure 16: Alternative way of showing collections.
To create a collection, we can simply run the following command (the semicolon terminator is optional for single commands):
Code Listing 16: Creating Collections signature
db.createCollection(name, options); |
Name is a mandatory parameter, while options is not. There are various options that can be set, such as capped, autoIndexId, and size; we will be looking into those in the next chapter.
In order to create the collection called person, we need to run the following command:
Code Listing 17: Create Collection called person
db.createCollection(“person”); |
And to drop a collection, we would simply call drop, which will empty the collection and completely delete it from the database.
Code Listing 18: Dropping a person collection
db.person.drop(); |
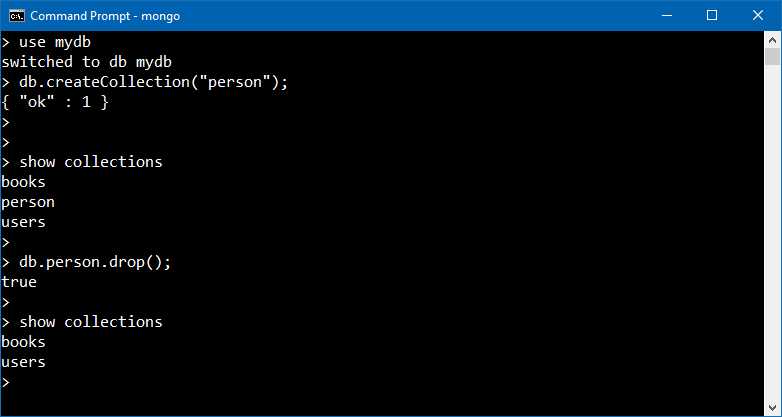
Figure 17: Creating and dropping a collection.
Tip: As a reminder: if you need to know which operations are available when working with collections, you can always refer to the help by using the db.<collectionName>.help() command, which will return a list of available commands.
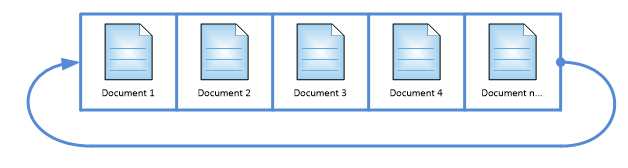
Capped collections
Capped collections are a special kind of collection: fixed-size, circular collections.
- Fixed-size refers to the fact that there is a predefined (configurable) limit on the maximum number of items this table will support.
- Circular refers to the fact that once the maximum amount is reached, the oldest of the items gets deleted to make room to the new one.
One of the interesting properties of capped collections is that the collection itself preserves the order in which the items get inserted. This is a very important aspect, especially if this kind of table gets used for a logging-type of problem where the order of entries should be preserved. On the other hand, it has some limitations: we cannot remove a document from a capped collection, and updates on the documents won’t work if an update or a replacement operation changes the document size.
Graphically, we can represent a capped collection as seen in Figure 18.
Capped collections can be used for several purposes, such as:
- Logging (for example, the latest activity performed on the website).
- Caching (preserving the latest items).
- Acting as a queue: Capped collection might be also used to act as a queue where the first-in-first-out logic applies.
Creating a capped collection
Capped collections are created in the same way as normal collections, but specifying the options parameter:
Code Listing 19: Creating capped collections
db.createCollection(“LogCollection”, { capped:true, size:10000, max:1000}) ; |
There are 14 optional parameters. Three of the most common are:
- Capped: True sets the type of the collection as capped (the default is false).
- Size: Sets the maximum size in bytes for this particular collection.
- Max: Specifies the maximum number of documents allowed for the given collection.

Figure 19: Creation of a capped collection.
Conclusion
In this chapter, we have seen what the MongoDB shell is and how to perform basic operations, such as the creation of a database or collections, with some more detail on collections themselves.
In the following chapters, we will see how to use the MongoDB shell further.
- 1800+ high-performance UI components.
- Includes popular controls such as Grid, Chart, Scheduler, and more.
- 24x5 unlimited support by developers.