
ML.NET Succinctly®

CHAPTER 5
Image Classification
Quick intro
So far, we have explored how to generate ML.NET models using Model Builder to create predictions using data structured as tables with defined input columns. In this chapter, we will step away from tabular data and work with images, an entirely different way of organizing data (as a collection of pixels).
We will focus on creating an image classification scenario. Contrary to previous chapters, we will write the code manually instead of initially using Model Builder. Once we have written the code, we will use Model Builder to generate code and compare that to the code we wrote.
I’ll leave a vital piece of the solution missing until the end, as this will help you understand how an image classification model has different requirements than what we’ve seen in previous chapters.
Imaging dataset
We’ll use the following image dataset from the book’s GitHub repository. The dataset consists of images from another GitHub repository and pictures from Pixabay. Within the dataset (which you need to unzip after downloading), you’ll find the images that shall be used for training within the sample-images folder. The images to test the model are located within the test-images folder.
The training images have been placed into subfolders (found within the sample-images folder), each representing an image classification category. These subfolders can be seen in the following figure.
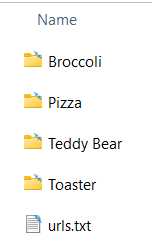
Figure 4-a: Image Classification Category (For Training)
I’ve also included a urls.txt file within the sample-images folder. This file indicates the sources from where each image was obtained (this GitHub repository and Pixabay).
When working with image classification in ML.NET, the images used to train the model must be placed within a specific subfolder structure, where each folder indicates the image category associated with a particular image type.
In other words, the Pizza subfolder contains pizza images, the Broccoli subfolder contains pictures of broccoli, and so on—these subfolders represent image labels.
ImgClass project
As previously mentioned, this time, we will write the code manually for the image classification scenario and then compare it to the structure that Model Builder will produce. We’ll use Model Builder later after manually writing all the ImgClass project's code.
Note: For consistency and ease of following along, the names of the classes, variables, and methods used throughout the code presented in this chapter will be the same as the ones used in previous chapters. It is not a must to follow this convention, but I think it helps with overall understanding.
To do that, let’s create a new Visual Studio project: a console application. Click the File menu, click New, and then click Project.
Select the Console App project option and then click Next. You’ll then be shown the screen where you can specify the project's name. I’ve renamed the project’s default name to ImgClass (which I suggest you use) and set the project’s Location.
Once done, to continue to the following screen, click Next, and as for the Framework option, any of the options available is fine—I’ll be using .NET 6.0 (Long Term Support). Once done, click Create.
You should have the new Visual Studio console application project ready by now. Next, we can add a new C# class file to the project. We can do this by going into Solution Explorer and selecting the project name, ImgClass. Then, right-click, click Add, and then click Class.
Let’s call the class ImageClassification.cs and then click Add.
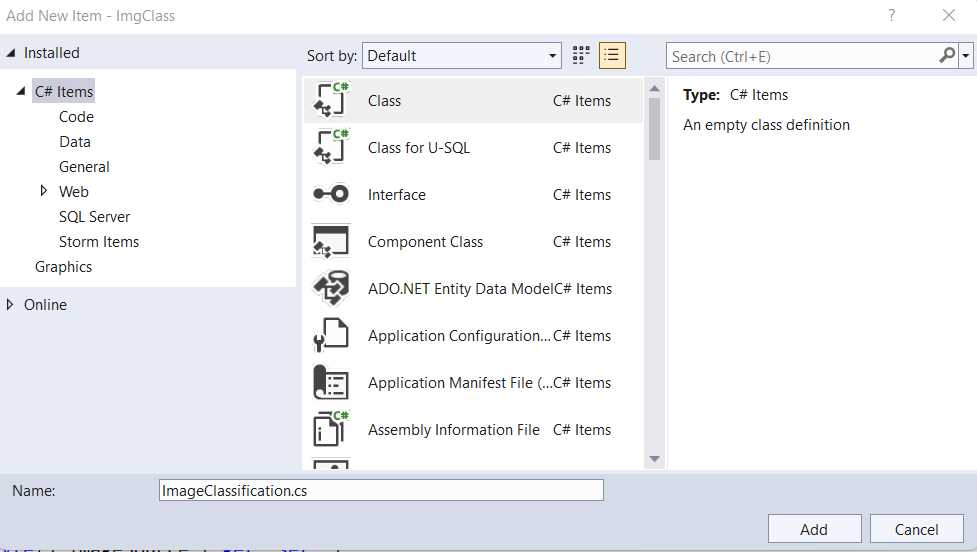
Figure 4-b: Add New Item (ImageClassification.cs for the ImgClass Visual Studio Project)
With the class added to the project, we are ready to start writing the code.
ImageClassification.cs
By default, the newly created ImageClassification.cs file will contain the following code.
Code Listing 4-a: ImageClassification.cs (Newly Created)
using System; using System.Collections.Generic; using System.Linq; using System.Text; using System.Threading.Tasks; namespace ImgClass { internal class ImageClassification { } } |
Let’s remove all the using statements, as we don’t need them—resulting in the following code.
Code Listing 4-b: ImageClassification.cs (Newly Created without the using statements)
namespace ImgClass { internal class ImageClassification { } } |
ImageClassification.cs steps
Before we start making any other changes and adding code, let’s understand what steps we need to take to ensure we write all the code we need. There are two main parts to the code we are about to write. One part has to do with the consumption of the model, and the other with training the model. We’ll start by writing with the consumption part of the model’s logic and later focus on the training part.
Overall, the consumption and training parts have more minor aspects of logic to consider, which can be divided as follows.
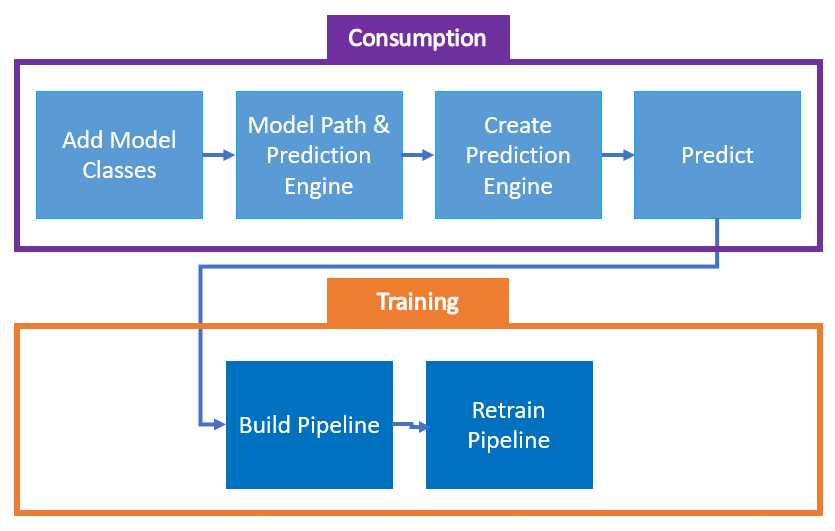
Figure 4-c: Logical Parts of ImageClassification.cs Code
From the preceding figure, we can see that within the model’s consumption logic, we’ll begin by adding the input and output classes required by the model. Following that, we’ll add the model’s path and the prediction engine. Then, we’ll create the prediction engine and write the prediction logic.
Once we have the consumption part of the logic sorted, we’ll focus on the training aspect, in which we’ll build the training pipeline, and then we’ll focus on how to retrain it.
Now that we know the steps needed, let’s get started.
Add Model classes
First, we need to change the class from internal to public, and then we need to declare the ModelInput and ModelOutput classes. We’ll also need to add the reference to Microsoft.ML.Data. The changes are highlighted in bold in the following code listing.
Code Listing 4-c: ImageClassification.cs (Including the ModelInput and ModelOutput Classes)
using Microsoft.ML.Data; namespace ImgClass { public class ImageClassification { public class ModelInput { [LoadColumn(0)] [ColumnName(@"Label")] public string Label { get; set; } [LoadColumn(1)] [ColumnName(@"ImageSource")] public byte[] ImageSource { get; set; } } public class ModelOutput { [ColumnName(@"Label")] public uint Label { get; set; } [ColumnName(@"ImageSource")] public byte[] ImageSource { get; set; } [ColumnName(@"PredictedLabel")] public string PredictedLabel { get; set; } [ColumnName(@"Score")] public float[] Score { get; set; } } } } |
Within the ModelInput class, we declared the Label and ImageSource properties. The Label property represents the category to which the training image belongs, in other words, the subfolder where the image resides. The ImageSource property indicates the file path to the training image.
Within the ModelOutput class, we declare the same input properties, Label, ImageSource, and two extra properties: PredictedLabel, and Score.
The PredictedLabel property will indicate what category a nontraining image will be given once processed by the machine learning algorithm that the model will utilize. The machine learning algorithm will use the Score property that the model will utilize to indicate how confident the machine learning algorithm is of the category (PredictedLabel) assigned to the image.
Model path and prediction engine
Next, we need to specify the path to the model’s metadata (we’ll create the metadata file later when running Model Builder), and we also need to declare the instance of the prediction engine. We also need to reference Microsoft.ML.
Those changes are highlighted in bold in the following code listing.
Code Listing 4-d: ImageClassification.cs (Including the Model Metadata File Path and Prediction Engine)
using Microsoft.ML; using Microsoft.ML.Data; namespace ImgClass { public class ImageClassification { public class ModelInput { [LoadColumn(0)] [ColumnName(@"Label")] public string Label { get; set; } [LoadColumn(1)] [ColumnName(@"ImageSource")] public byte[] ImageSource { get; set; } } public class ModelOutput { [ColumnName(@"Label")] public uint Label { get; set; } [ColumnName(@"ImageSource")] public byte[] ImageSource { get; set; } [ColumnName(@"PredictedLabel")] public string PredictedLabel { get; set; } [ColumnName(@"Score")] public float[] Score { get; set; } } private static string MLNetModelPath = Path.GetFullPath("ImgClass.zip"); public static readonly Lazy<PredictionEngine<ModelInput, ModelOutput>> PredictEngine = new Lazy <PredictionEngine<ModelInput, ModelOutput>> (() => CreatePredictEngine(), true); } } |
As you can see, the process is quite familiar. The file path to the future model’s metadata file is called MLNetModelPath. We could have chosen to give it another name, but I’ll stick to the same variable name used in previous models.
The MLNetModelPath variable points to the ImgClass.zip file, which is the model’s metadata file (which has yet to be created—we’ll do that later when creating the model using Model Builder).
Then we declare PredictEngine as an instance of Lazy<PredictionEngine<ModelInput, ModelOutput>>.
The constructor receives a lambda function that creates the engine as the first parameter: () => CreatePredictEngine(), and the second one (true) indicates whether the instance can be used by multiple threads and is thread-safe. Here, we also follow the same naming convention and pattern we have witnessed in previous chapters.
So far, everything looks familiar. But there’s something slightly different. Have you noticed it yet? If you haven’t, don’t worry.
The difference (compared to what we have seen in previous chapters) is that, in this case, ImageClassification is not a partial class. And that’s precisely my intention, to put both the model’s training and consumption logic into one file.
So far, all the code we’ve written for ImageClassification is related to the consumption aspect of the model’s logic. To finalize the consumption aspect, we still need to do two things: create the prediction engine and execute the prediction.
Create prediction engine
Now that we have declared the PredictEngine variable, let’s create the prediction engine—which we can do with the CreatePredictEngine method. The changes are highlighted in bold in the following code listing.
Code Listing 4-e: ImageClassification.cs (Including the CreatePredictEngine Method)
using Microsoft.ML; using Microsoft.ML.Data; namespace ImgClass { public class ImageClassification { public class ModelInput { [LoadColumn(0)] [ColumnName(@"Label")] public string Label { get; set; } [LoadColumn(1)] [ColumnName(@"ImageSource")] public byte[] ImageSource { get; set; } } public class ModelOutput { [ColumnName(@"Label")] public uint Label { get; set; } [ColumnName(@"ImageSource")] public byte[] ImageSource { get; set; } [ColumnName(@"PredictedLabel")] public string PredictedLabel { get; set; } [ColumnName(@"Score")] public float[] Score { get; set; } } private static string MLNetModelPath = Path.GetFullPath("ImgClass.zip"); public static readonly Lazy<PredictionEngine<ModelInput, ModelOutput>> PredictEngine = new Lazy <PredictionEngine<ModelInput, ModelOutput>> (() => CreatePredictEngine(), true); private static PredictionEngine<ModelInput, ModelOutput> CreatePredictEngine() { var mlContext = new MLContext(); ITransformer mlModel = mlContext.Model.Load(MLNetModelPath, out var _); return mlContext.Model. CreatePredictionEngine<ModelInput, ModelOutput>(mlModel); } } } |
As you might recall from the previous chapters, the CreatePredictEngine method creates an instance of MLContext that gets assigned to mlContext.
The Load method loads the model, as its name implies. To this method, MLNetModelPath is passed as a parameter, and the modelInputSchema is represented as the out var _ parameter. Finally, the Load method returns the model loaded (mlModel).
The prediction engine, previously declared, is finally created when CreatePredictionEngine is invoked, passing mlModel as a parameter.
Predict
With the prediction engine created, we next need to create the method responsible for predicting the model’s results. So, let’s do that following the same naming conventions we’ve been using so far. I’ve highlighted the changes in bold in the following code listing.
Code Listing 4-f: ImageClassification.cs (Including the Predict Method)
using Microsoft.ML; using Microsoft.ML.Data; namespace ImgClass { public class ImageClassification { public class ModelInput { [LoadColumn(0)] [ColumnName(@"Label")] public string Label { get; set; } [LoadColumn(1)] [ColumnName(@"ImageSource")] public byte[] ImageSource { get; set; } } public class ModelOutput { [ColumnName(@"Label")] public uint Label { get; set; } [ColumnName(@"ImageSource")] public byte[] ImageSource { get; set; } [ColumnName(@"PredictedLabel")] public string PredictedLabel { get; set; } [ColumnName(@"Score")] public float[] Score { get; set; } } private static string MLNetModelPath = Path.GetFullPath("ImgClass.zip"); public static readonly Lazy<PredictionEngine<ModelInput, ModelOutput>> PredictEngine = new Lazy <PredictionEngine<ModelInput, ModelOutput>> (() => CreatePredictEngine(), true); private static PredictionEngine<ModelInput, ModelOutput> CreatePredictEngine() { var mlContext = new MLContext(); ITransformer mlModel = mlContext.Model.Load(MLNetModelPath, out var _); return mlContext.Model. CreatePredictionEngine<ModelInput, ModelOutput>(mlModel); } public static ModelOutput Predict(ModelInput input) { var predEngine = PredictEngine.Value; return predEngine.Predict(input); } } } |
As you can see, the Predict method takes an instance of the ModelInput class as a parameter and then executes the Predict method from PredictEngine.Value.
So, with this done, we have completed the consumption part of the image classification code. Next, let’s add training logic to the code.
Build the pipeline
To train the model, we need to add the logic to build the image classification pipeline, which we can do in three steps:
· Convert categorical (string) values into numerical ones—this is required before executing the training algorithm. In image classification, the input values are numeric (pixels), but in this example, the labels, such as broccoli, are strings that must be converted to integers.
· Specify the training algorithm.
· Convert the key types back to their original (categorical) values.
So, let’s add the code for the BuildPipeline method with these steps to the existing code we’ve written so far. The changes are highlighted in bold in the following code listing, and I’ve assigned a specific color to each step.
Code Listing 4-g: ImageClassification.cs (Including the BuildPipeline Method)
using Microsoft.ML; using Microsoft.ML.Data; namespace ImgClass { public class ImageClassification { public class ModelInput { [LoadColumn(0)] [ColumnName(@"Label")] public string Label { get; set; } [LoadColumn(1)] [ColumnName(@"ImageSource")] public byte[] ImageSource { get; set; } } public class ModelOutput { [ColumnName(@"Label")] public uint Label { get; set; } [ColumnName(@"ImageSource")] public byte[] ImageSource { get; set; } [ColumnName(@"PredictedLabel")] public string PredictedLabel { get; set; } [ColumnName(@"Score")] public float[] Score { get; set; } } private static string MLNetModelPath = Path.GetFullPath("ImgClass.zip"); public static readonly Lazy<PredictionEngine<ModelInput, ModelOutput>> PredictEngine = new Lazy <PredictionEngine<ModelInput, ModelOutput>> (() => CreatePredictEngine(), true); private static PredictionEngine<ModelInput, ModelOutput> CreatePredictEngine() { var mlContext = new MLContext(); ITransformer mlModel = mlContext.Model.Load(MLNetModelPath, out var _); return mlContext.Model. CreatePredictionEngine<ModelInput, ModelOutput>(mlModel); } public static ModelOutput Predict(ModelInput input) { var predEngine = PredictEngine.Value; return predEngine.Predict(input); } public static IEstimator<ITransformer> BuildPipeline( MLContext mlContext) { var pipeline = mlContext.Transforms.Conversion. MapValueToKey( outputColumnName: @"Label", inputColumnName: @"Label") .Append(mlContext.MulticlassClassification. Trainers.ImageClassification( labelColumnName: @"Label", scoreColumnName: @"Score", featureColumnName: @"ImageSource") ) .Append(mlContext.Transforms.Conversion. MapKeyToValue( outputColumnName: @"PredictedLabel", inputColumnName: @"PredictedLabel") ); return pipeline; } } } |
Highlighted in yellow you’ll see the first step in building the pipeline, which is responsible for converting categorical (string) values into numerical ones, in this case, for the Label column. This is done by invoking the MapValueToKey method. This step is important because the image classification algorithm doesn’t work with string values.
Then, the next step (which is added to the pipeline using the Append method) is to specify the training algorithm, which in this case is done by invoking the ImageClassification method from mlContext.MulticlassClassification.Trainers.
For the training algorithm, we pass the Label column, the column containing the confidence percentage of the result obtained (Score), and the column specifying the features of the image (which is the image itself, ImageSource).
The final step is to take the resultant prediction value (PredictedLabel) and convert that from a number to a string label, indicating the image's classification or category determined by the algorithm.
Retrain pipeline
The last part of the puzzle is to create the method responsible for retraining the model. Following the naming conventions used in previous chapters, we’ll name this method RetrainPipeline. In bold, I’ve highlighted the changes to the existing code in the following code listing.
Code Listing 4-h: ImageClassification.cs (Including the RetrainPipeline Method)
using Microsoft.ML; using Microsoft.ML.Data; namespace ImgClass { public class ImageClassification { public class ModelInput { [LoadColumn(0)] [ColumnName(@"Label")] public string Label { get; set; } [LoadColumn(1)] [ColumnName(@"ImageSource")] public byte[] ImageSource { get; set; } } public class ModelOutput { [ColumnName(@"Label")] public uint Label { get; set; } [ColumnName(@"ImageSource")] public byte[] ImageSource { get; set; } [ColumnName(@"PredictedLabel")] public string PredictedLabel { get; set; } [ColumnName(@"Score")] public float[] Score { get; set; } } private static string MLNetModelPath = Path.GetFullPath("ImgClass.zip"); public static readonly Lazy<PredictionEngine<ModelInput, ModelOutput>> PredictEngine = new Lazy <PredictionEngine<ModelInput, ModelOutput>> (() => CreatePredictEngine(), true); private static PredictionEngine<ModelInput, ModelOutput> CreatePredictEngine() { var mlContext = new MLContext(); ITransformer mlModel = mlContext.Model.Load(MLNetModelPath, out var _); return mlContext.Model. CreatePredictionEngine<ModelInput, ModelOutput>(mlModel); } public static ModelOutput Predict(ModelInput input) { var predEngine = PredictEngine.Value; return predEngine.Predict(input); } public static IEstimator<ITransformer> BuildPipeline( MLContext mlContext) { var pipeline = mlContext.Transforms.Conversion. MapValueToKey( outputColumnName: @"Label", inputColumnName: @"Label") .Append(mlContext.MulticlassClassification. Trainers.ImageClassification( labelColumnName: @"Label", scoreColumnName: @"Score", featureColumnName: @"ImageSource") ) .Append(mlContext.Transforms.Conversion. MapKeyToValue( outputColumnName: @"PredictedLabel", inputColumnName: @"PredictedLabel") ); return pipeline; } public static ITransformer RetrainPipeline( { var pipeline = BuildPipeline(mlContext); var model = pipeline.Fit(trainData); return model; } } } |
The RetrainPipeline method receives an instance of MLContext and the training data (trainData), which is used as the input and output of transforms. This method returns an object responsible for transforming data within an ML.NET model pipeline. With the objects in the pipeline created, trainData is passed to train the model by invoking the pipeline.Fit method, and finally, the model is returned.
Generating the model
With the code ready, let’s use Model Builder to create the model’s metadata and generate the model’s code to compare it to what we have done.
Going back to Solution Explorer, select the ImgClass project by clicking on it and then right-clicking. Click Add and then click Machine Learning Model.
When prompted, change the default name suggestion to ImgClass.mbconfig and then click Add. When the Select a scenario window opens, scroll down and click the Local button under Image classification.
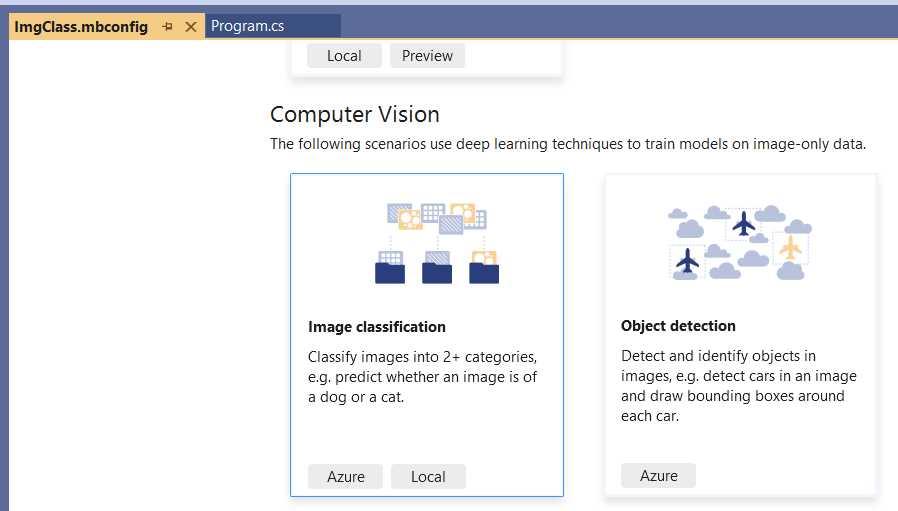
Figure 4-d: Model Builder (Image Classification)
Once done, you’ll be shown the Select training environment option. Choose Local (CPU) and click Next step.

Figure 4-e: Model Builder (Select training environment)
The next step is to provide the dataset: the training images.
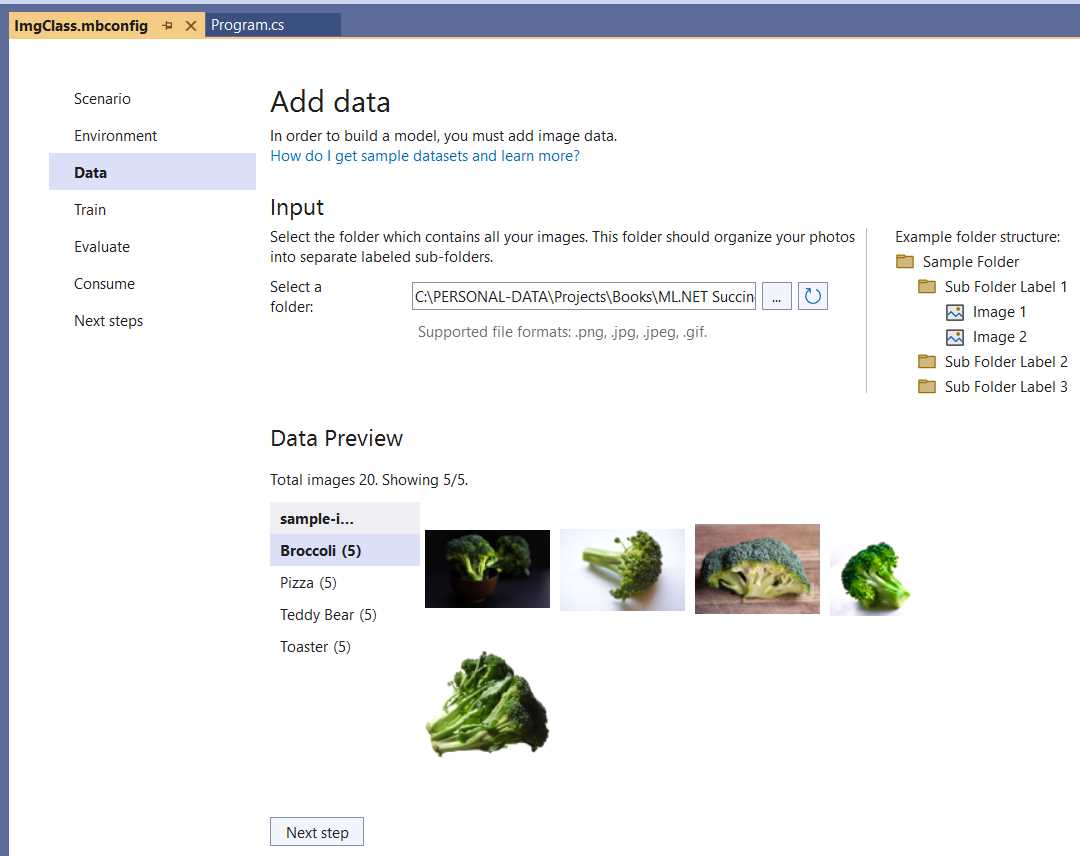
Figure 4-f: Model Builder (Add data)
At this stage, all we need to do is to choose the folder where the training images are located. Then, the images and their different categories will be shown within the Data Preview section. Once done, click Next step to train the model.
Within the Train screen, click Start training to initiate the training process. Once the training has been finalized, click Next step to continue.
Evaluating the model
At this point, the Model Builder has generated the model in the background, and we can test things out by evaluating the model with a test image. Choose one from the dataset provided and the list of sample images and click Browse an image.
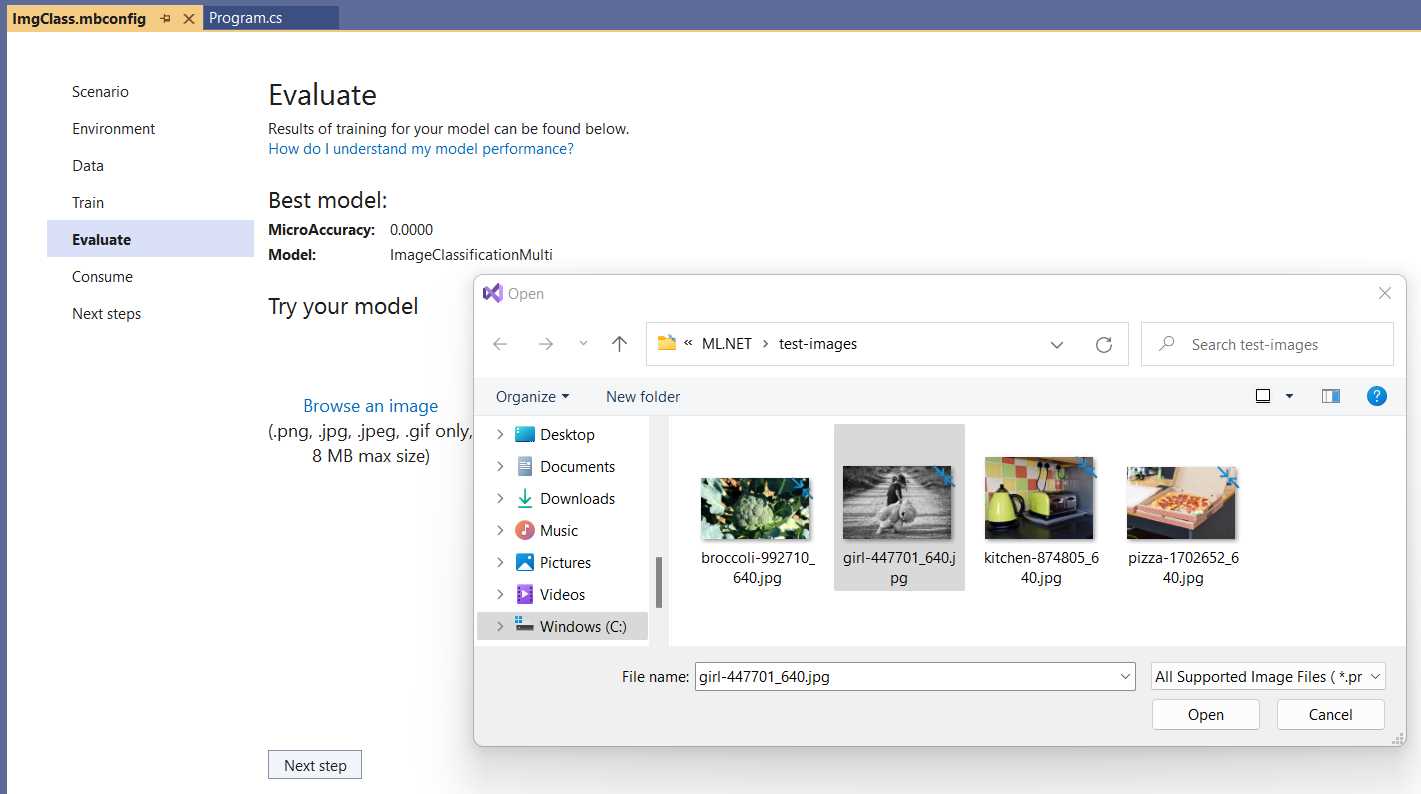
Figure 4-g: Model Builder (Evaluate—Choosing a Test Image)
I will choose the black-and-white photo with the little girl holding a teddy bear and then click Open. A few seconds after the image has loaded, Model Builder correctly predicts that the image corresponds to the Teddy Bear category.
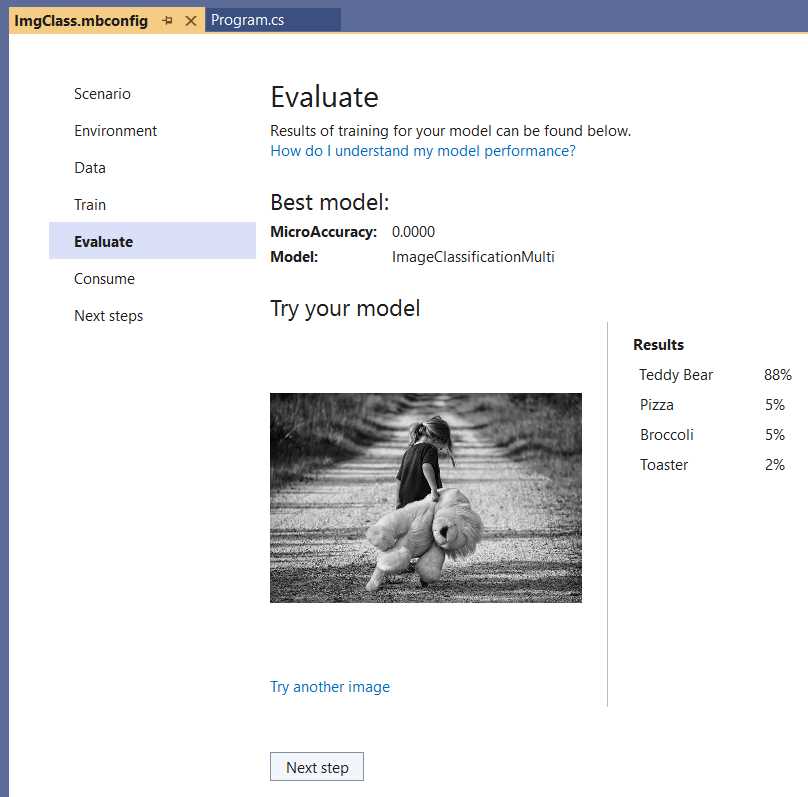
Figure 4-h: Model Builder (Evaluate—Results—Teddy Bear)
The preceding figure shows that the Teddy Bear category has been given a score of 88% compared to the other types. There are two things to which I’d like you to pay close attention. First, we’ve only trained each image category with five sample images. Second, the sample Teddy Bear training images only have a teddy bear and nothing else. However, the test image contains a road, a little girl, and a teddy bear.
So, here’s the best part: the test image was correctly predicted to be within the Teddy Bear category despite being only trained with five images per category—this blows me away. If you test the model with other test images that differ from the training images, you’ll notice that those predictions will be spot-on.
To do that, click Try another image. I will select the image with the light green toaster next to the kettle.
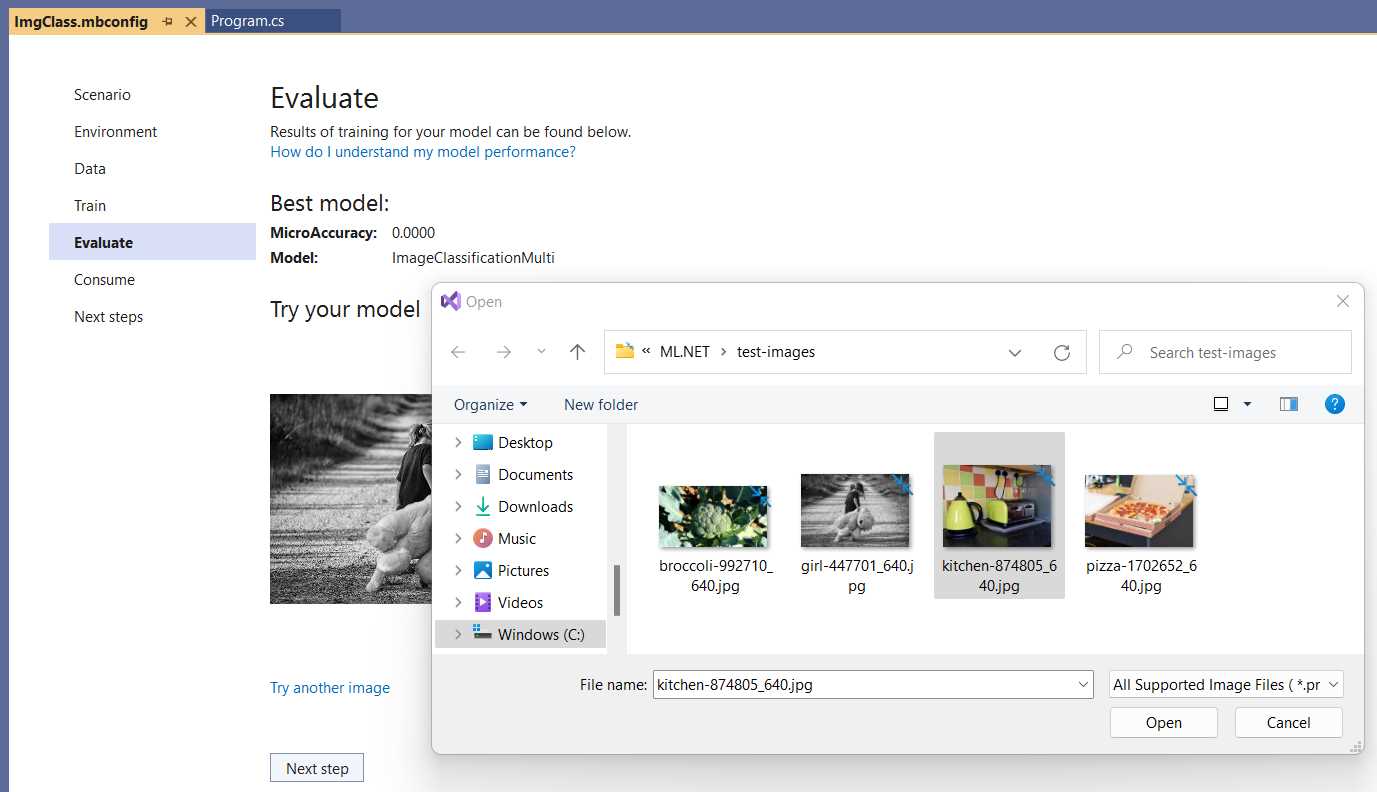
Figure 4-i: Model Builder (Evaluate—Choosing Another Test Image)
Then, click Open to see what result we get.
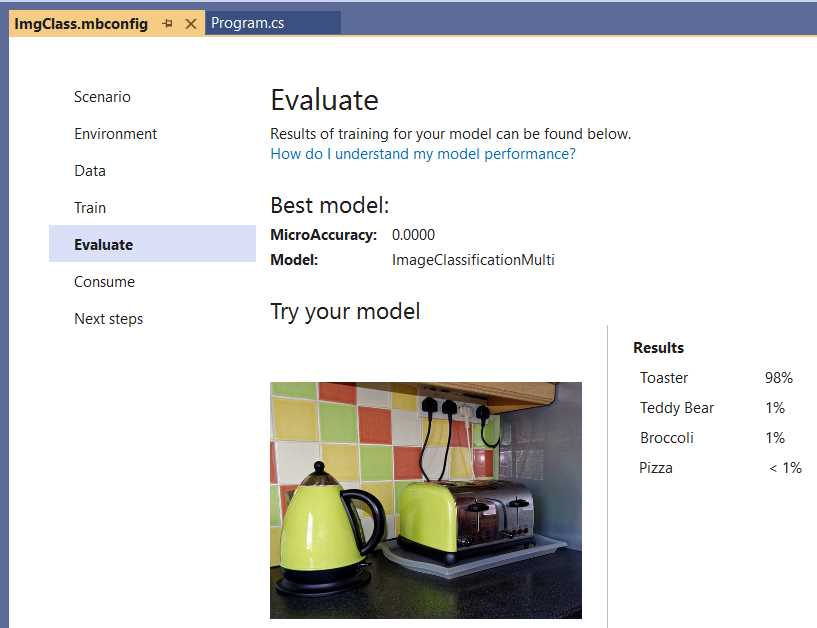
Figure 4-j: Model Builder (Evaluate—Results—Toaster)
After a few seconds, we can see that the image has been correctly labeled as Toaster. Since we only used five images per category, I find the results quite impressive, mainly because the test images are not similar to the training images.
Consuming the model and app execution
The last part is to consume the model, and as you know, to do that all we need to do is click on Next step and then copy the code snippet.

Figure 4-k: Model Builder (Consume)
Let’s copy the code snippet, paste it into the Main method of Program.cs, and adjust it. Following is the modified Program.cs code after doing that.
Code Listing 4-i: Modified Program.cs
namespace ImgClass { internal class Program { private static void Main(string[] args) { //Load sample data. var imageBytes = File.ReadAllBytes( @"C:\test-images\bowl-of-broccoli-2584307_640.jpg"); ImgClass.ModelInput sampleData = new ImgClass.ModelInput() { ImageSource = imageBytes, }; //Load model and predict output. var result = ImgClass.Predict(sampleData); } } } |
In principle, we should be ready to click the run button within Visual Studio and see the results. Let’s give it a try.
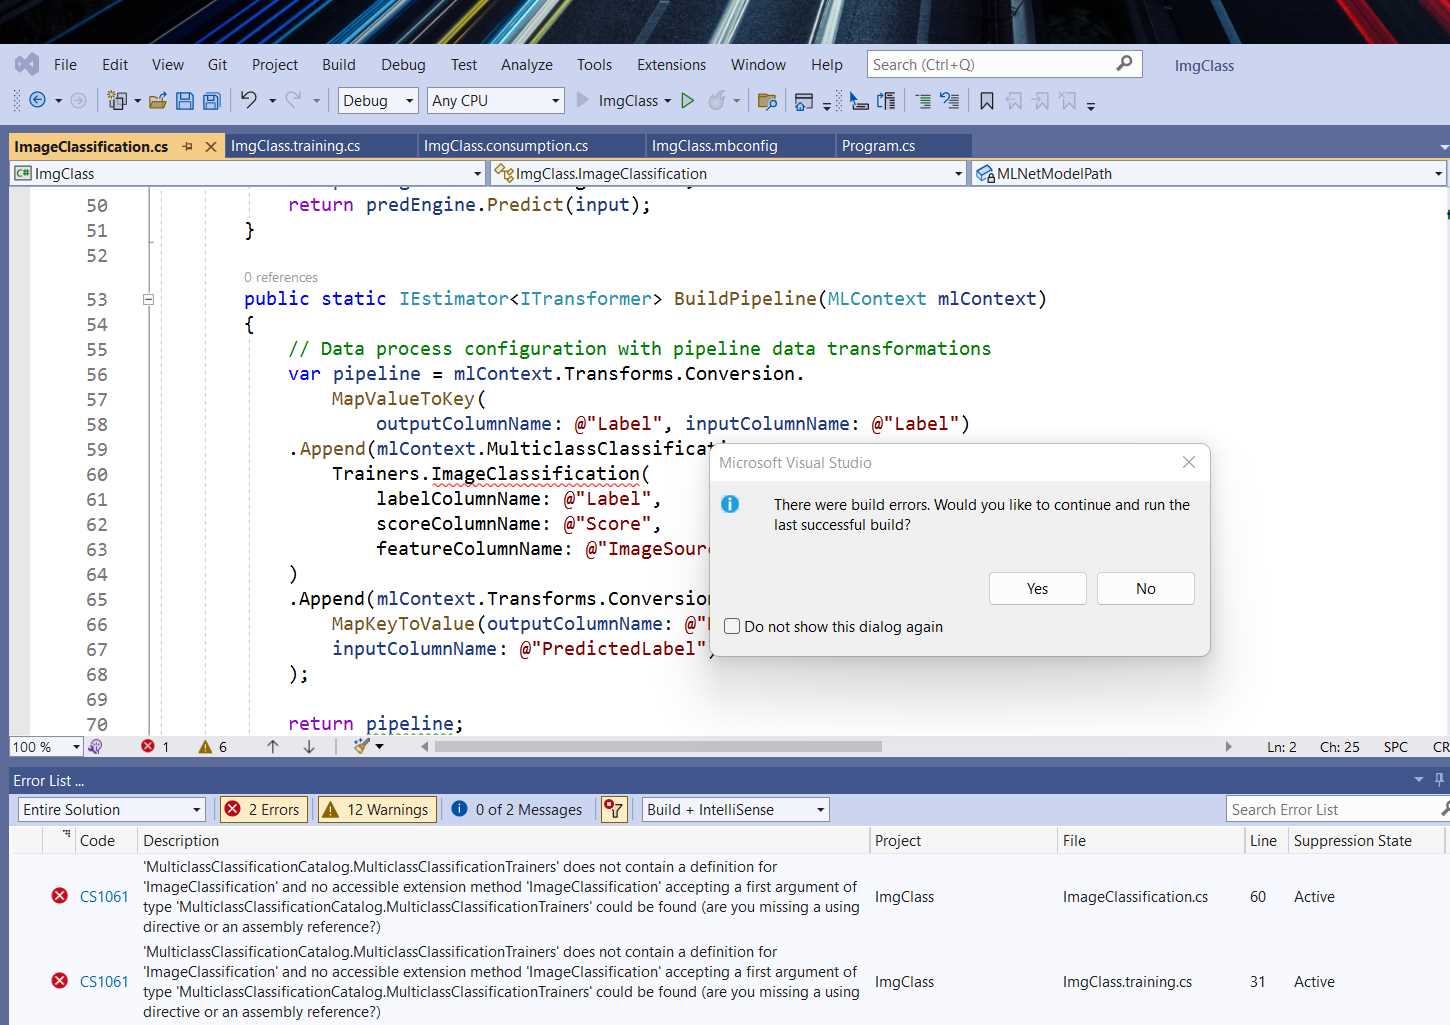
Figure 4-l: Visual Studio—Running the Application (with Errors)
From the preceding figure, we can see that the ImageClassification method has been highlighted, and a couple of errors are associated with it.

Figure 4-m: Visual Studio Errors
We can see that both errors are the same, indicating that the ImageClassification method cannot be found within mlContext.MulticlassClassification.Trainers. But why is this? The reason is that we are missing the LG.Microsoft.ML.Vision NuGet package, which contains several APIs required for performing image classification using computer vision.
Installing LG.Microsoft.ML.Vision
So, let’s add this package. Within Solution Explorer, select ImgClass, right-click, and then click Manage NuGet Packages.
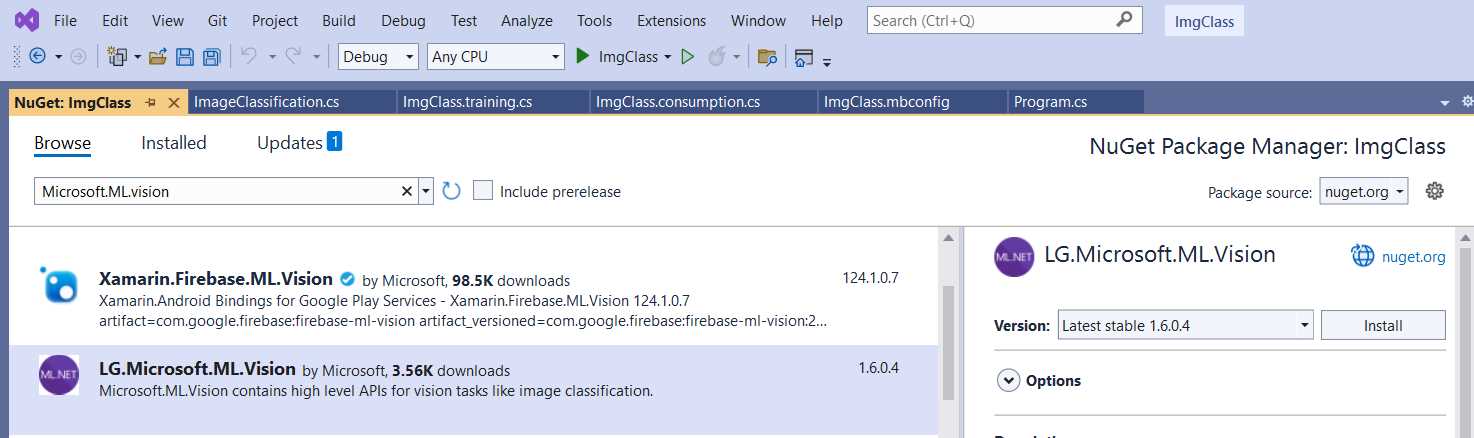
Figure 4-n: NuGet Package Manager (Visual Studio)
To install the LG.Microsoft.ML.Vision package, click Install.
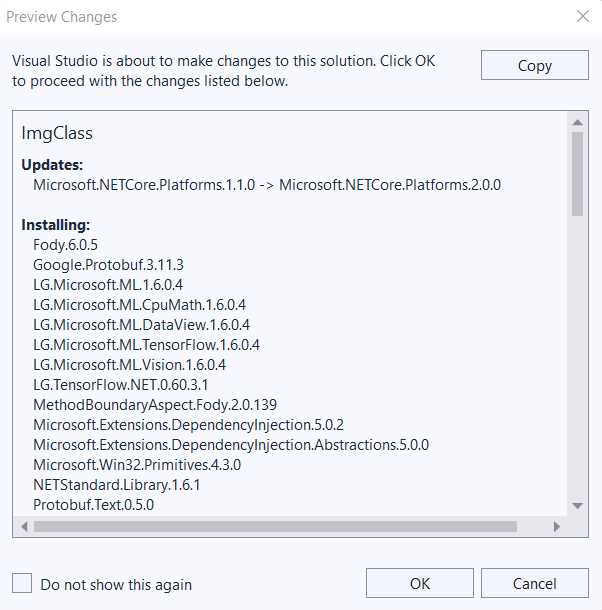
Figure 4-o: Installing the NuGet Package—Preview Changed (Visual Studio)
When prompted, click on OK to install the package. As you can see, this package installs a series of other related packages. Before installing these packages, you’ll be prompted to accept the license.
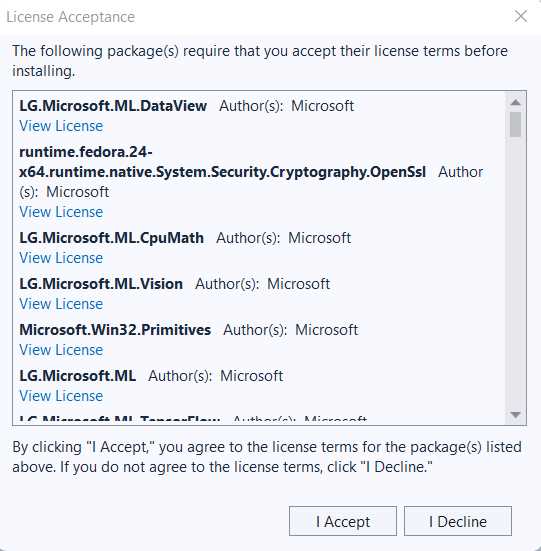
Figure 4-p: License Acceptance (Visual Studio)
At this stage, click on I Accept to continue. Once these packages have been installed, you’ll notice that the errors are gone. You can verify this by going to Solution Explorer, right-clicking ImgClass, and clicking Build.
Once the build process has succeeded, you can rerun the application by clicking the Run button within Visual Studio to see what happens.
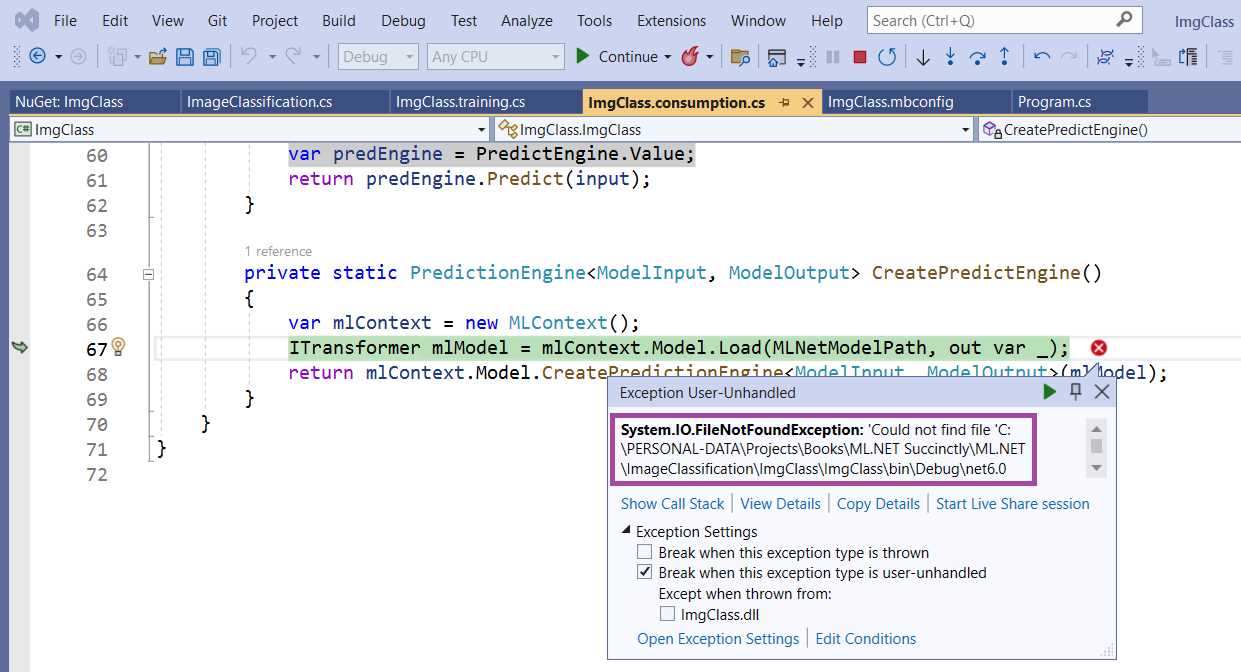
Figure 4-q: Error Executing the Application—Visual Studio
When executing the application, I’ve run into an error indicating that the ImgClass.zip file (the model’s metadata) is not in the app's folder.
Fixing the “missing” ImgClass.zip
If you run into this error, the solution is simple. First, stop the execution of the application by pressing Shift+F5. Then, go to Solution Explorer and click on ImgClass.mbconfig to expand it. Following that, right-click ImgClass.zip and click Properties.
With the Properties pane open, change the value of the Copy to Output Directory property from Do not copy to Copy if newer.
Then, click the run button in Visual Studio to execute the application again. In my case, I’ve run into the following issue.
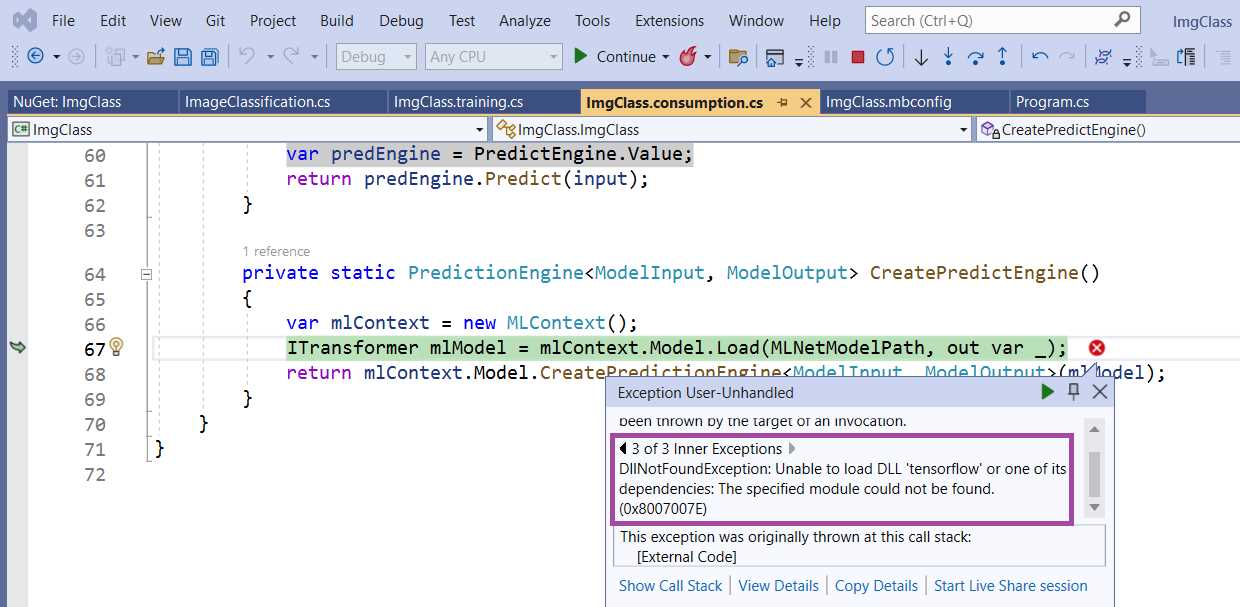
Figure 4-r: Another Error Executing the Application—Visual Studio
Fixing the missing TensorFlow DLL
The preceding error indicates that there’s a missing tensorflow DLL. TensorFlow is an open-source and freely available machine learning platform from Google. Internally, ML.NET uses TensorFlow to perform image classification.
To install TensorFlow for ML.NET, open the NuGet Package Manager by selecting the ImgClass project within Solution Explorer. Right-click, then click Manage NuGet Packages, and then click Install.

Figure 4-s: The SciSharp.TensorFlow.Redist NuGet Package—Visual Studio
When prompted, click OK on the Preview Changes window, and later accept any license terms to continue with the installation, if prompted.
Rerunning the app
Once the TensorFlow NuGet package has been installed, we can rebuild the project and rerun the application. Do this by clicking the run button within Visual Studio. After running the app, in my case, I see the following output within the Microsoft Visual Studio Debugger console.
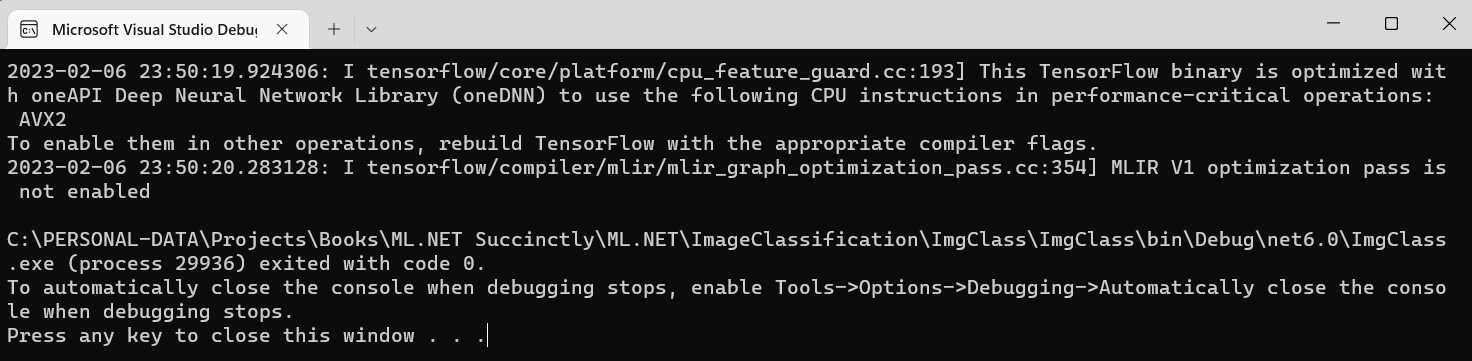
Figure 4-t: The App Running—Microsoft Visual Studio Debugger
From the output, you can see that TensorFlow has been invoked, and the application has been successfully executed. However, we don’t know the result of the model’s prediction. To find that out, let’s go back to Program.cs and add an extra line of code to display the prediction result (PredictedLabel). The changes are highlighted in bold in the following code listing.
Code Listing 4-j: Modified Program.cs (With the Results Displayed)
namespace ImgClass { internal class Program { private static void Main(string[] args) { //Load sample data. var imageBytes = File.ReadAllBytes( @"C:\test-images\bowl-of-broccoli-2584307_640.jpg"); ImgClass.ModelInput sampleData = new ImgClass.ModelInput() { ImageSource = imageBytes, }; //Load model and predict output. var result = ImgClass.Predict(sampleData); } } } |
If we rerun the application, we’ll see the following result.
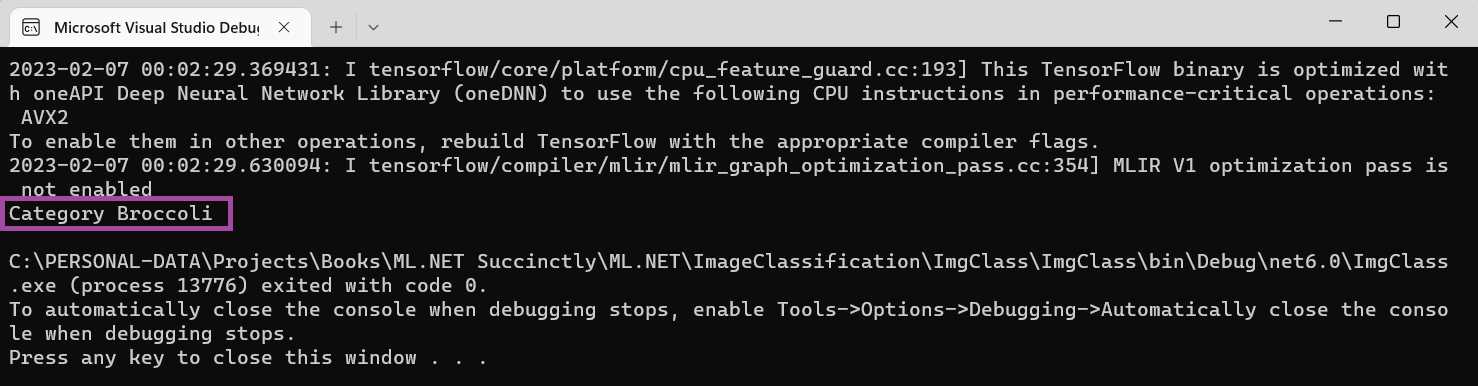
Figure 4-u: The App Running (PredictedLabel Shown)—Microsoft Visual Studio Debugger
Great—that worked! Nevertheless, notice that within Program.cs, we are using the code that Model Builder generated, not the ImageClassification.cs code we wrote. The reason is that the code that exists in the Main method of Program.cs invokes ImgClass and not ImageClassification.
So, to finally test the code we wrote, let’s change any occurrences of ImgClass found within the Main method to ImageClassification.
Code Listing 4-k: Modified Program.cs (Changed All ImgClass Occurrences to ImageClassification)
namespace ImgClass { internal class Program { private static void Main(string[] args) { //Load sample data. var imageBytes = File.ReadAllBytes( @"C:\test-images\bowl-of-broccoli-2584307_640.jpg"); ImageClassification.ModelInput sampleData = new ImageClassification.ModelInput() { ImageSource = imageBytes, }; //Load model and predict output. var result = ImageClassification.Predict(sampleData); } } } |
If we rerun the program, we should see the same result.

Figure 4-v: The App Running (PredictedLabel Shown)—Microsoft Visual Studio Debugger
Indeed, the result is the same. At this stage, you might realize that using the same naming conventions within the ImageClassification.cs file was probably worth it because all we had to do was swap ImgClass with ImageClassification.
Summary and final thoughts
We’ve reached the end of this chapter and the book. As you noticed, this chapter was structured differently than the previous ones. The structural change of this final chapter was done on purpose. I wanted to take you on the road less traveled by hitting a few bumps along the way but still ending up with the same outcome.
I think the goal was achieved. By focusing on the code logic first and then using Model Builder to complete what we started, we stepped out of the ML.NET comfort zone. Interestingly, we ran into a few missing pieces and learned how to correct them by following the process differently.
This lesson didn’t require diving too deep into ML.NET classes but provided valuable insights into using this library. Hopefully, you agree with me. Nevertheless, although we did get a good idea of the features, ease of use, and power behind ML.NET, we just scratched the surface of what is possible.
In the future, if any of the machine learning scenarios using ML.NET that we touched upon piqued your interest, additional goodies are awaiting you. There are other scenarios that Model Builder covers out of the box that we could not cover, as doing that would probably require a couple of other Succinctly books.
Furthermore, as we saw in this final chapter, ML.NET integrates and uses capabilities and features from other machine learning frameworks, such as TensorFlow. If using external machine learning frameworks in combination with ML.NET excites you, there’s a wealth of learning opportunities waiting.
To conclude, machine learning is not easy. However, thanks to the great work of the engineering team behind ML.NET at Microsoft, it is now accessible to any .NET developer. I think ML.NET is a significant step forward in empowering any .NET developer to embrace the world of machine learning, which every day becomes more prevalent and essential.
Until next time, never stop learning, take care, and thank you for reading.
- 1800+ high-performance UI components.
- Includes popular controls such as Grid, Chart, Scheduler, and more.
- 24x5 unlimited support by developers.