
ML.NET Succinctly®

CHAPTER 3
Core ML.NET and Binary Classification
Quick intro
Let’s dive a bit deeper into ML.NET. For that, we need to look at ML context, which is the starting point for all the operations executed with ML.NET, such as loading data, creating and evaluating models, and getting detailed information about what is happening with the pipeline, such as errors or other events.
ML context can also seed the environment for splitting data and helping others run your code to achieve similar results. In the broader context of things, you can think of ML context as the starting point of ML.NET.
So, within our project’s Program.cs file, let’s implement ML context as follows—highlighted in bold.
Code Listing 2-a: Program.cs - TestML
using Microsoft.ML; internal class Program { private static void Main(string[] args) { var context = new MLContext(); Console.WriteLine("Hello, World!"); } } |
By invoking new MLContext(), we have implemented ML context within our application and have a starting point to work with ML.NET.
ML context provides a set of properties and methods, commonly referred to as the ML.NET API, that allow us to execute various (types of) operations.
Types of operations
ML context provides various operations that the ML.NET API can perform, which can be divided into four categories. They are data operations, model operations, data transformations, and algorithms that can be used for training (trainers), as illustrated in the following figure.
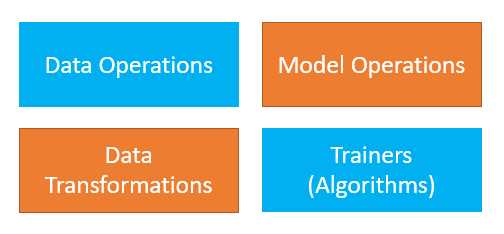
Figure 2-a: Types of ML.NET Operations
The data operations category includes methods that allow ML.NET to load data from different sources.
The model operations category includes methods that can be executed on the model itself, either on an existing model or a completely new one.
The data transformations category includes methods used to process the data to get it into specific formats that machine learning algorithms might require.
The trainers category is a set of algorithms built into ML.NET that can be used for different machine-learning scenarios.
So, let’s continue and explore the methods available to load and use data from different sources.
Data operations
The ML.NET API is part of ML context, and we can use various methods to load data into our ML.NET-powered app—these methods are known as data operations.
The data loading methods are available as part of the Data property of ML context (context)—these are:
· LoadFromBinary: Loads data from a binary file.
· LoadFromTextFile: Loads data from text files, including CSVs.
· LoadFromEnumerable: Loads data like arrays or lists.
· CreateDatabaseLoader: Connects to a SQL Server instance to retrieve data.
· Filter: As its name suggests, it is used for filtering data.
· TestTrainSplit: As its name suggests, it divides source data into a set for training a model and a set for testing and evaluating the trained model.
· Shuffle: As its name suggests, it is used to randomize the order in which data is processed during training, which is necessary to prevent training from stalling.
Model operations
Next, we have operations we can execute for the model itself to start making predictions, and we can save a model once we are happy with it. Some of the methods to do this are available as part of the Model property of ML context (context):
· Load: As its name suggests, it is used for loading an existing model.
· Save: As its name suggests, it is used for saving a model.
· CreatePredictionEngine: This method will let you make a prediction given a specific model input.
Data transformations
Some changes may have to be done to your data during processing—that’s where data transformations come into play. Some of the methods and properties to do this are available as part of the Transforms property of ML context (context):
· Categorical: Applicable when working with data that can be categorized.
· Conversion: Applicable when converting from one data type to another.
· Text: When working with text columns, it is possible to transform those string values into their equivalent numerical values.
· ReplaceMissingValues: Replaces missing values within other data.
· DropColumns: Removes specific columns that might not be required.
· Concatenate: Concatenates multiple columns into one column.
Trainers
ML.NET comes with a set of built-in algorithms that are used for training your model based on input data for different scenarios—these algorithms are often referred to as trainers. ML.NET provides algorithms for scenarios such as clustering, regression, anomaly detection, ranking, multiclass or binary classification, etc.
Adding a Model
Having gone over the different types of operations that ML.NET can perform, and having created the console app, let’s add a machine learning model to our application. To do that, within Solution Explorer, click on TestML to select the app, right-click, choose Add, and click on the Machine Learning Model option.
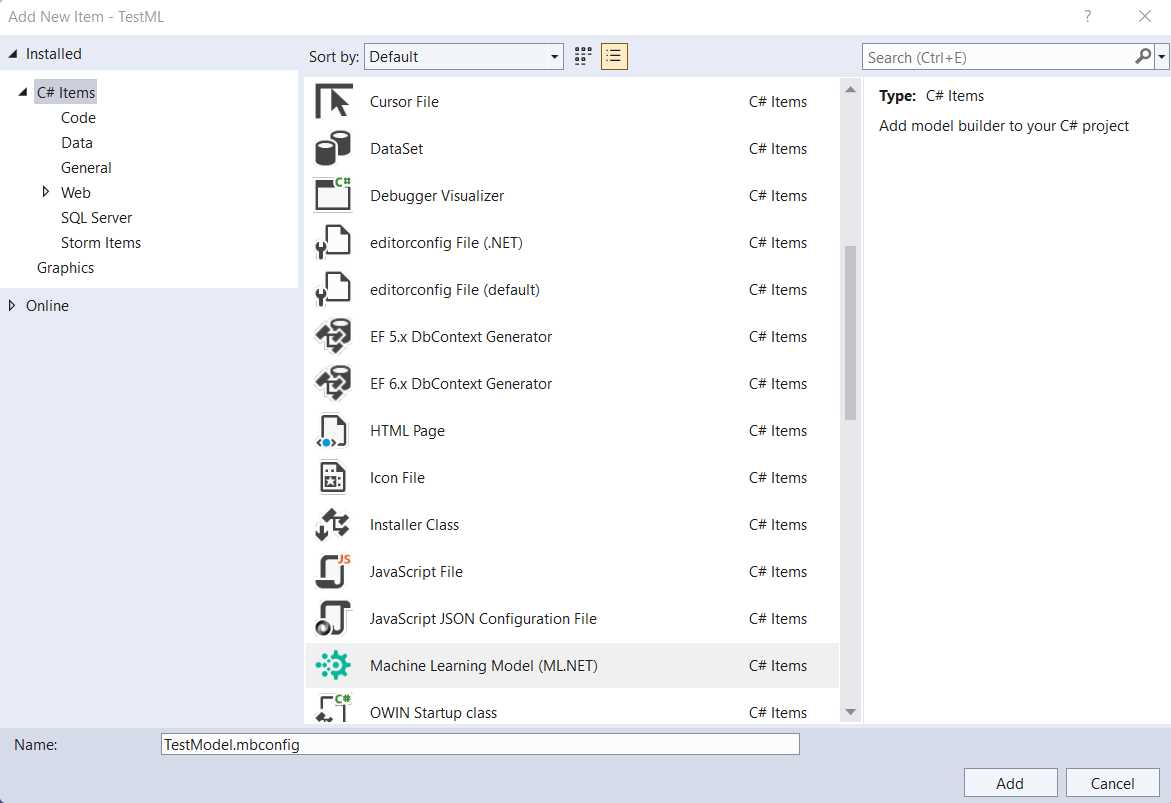
Figure 2-b: Adding a Machine Learning Model (ML.NET)
I’ll give it the name, TestModel, and then click Add. Once that has been done, you’ll notice that the TestModel.mbconfig file is added to the project, and a new UI is displayed—this UI is the Model Builder.

Figure 2-c: The Model Builder UI (Not Up to Date)
Notice that the Model Builder UI (previous screen) seems to be missing some details (those white areas above each scenario’s title and description should not be empty).
Note: If the previous issue doesn’t happen to you, that’s great! It means your Model Builder is up to date. In that case, feel free to skip the rest of this section and head over to the Scenarios and tasks section.
The preceding situation indicates that the Model Builder installed is not up to date (it’s not the latest version). In that case, please download the most up-to-date version of the Model Builder from this URL.
Note: If you run into this situation, please make sure you download and install the latest version of Model Builder. Ensure you don’t have Visual Studio running when installing the latest version of Model Builder.
Once you have downloaded the most recent version of Model Builder, execute the downloaded installer, and you should see the following screen.
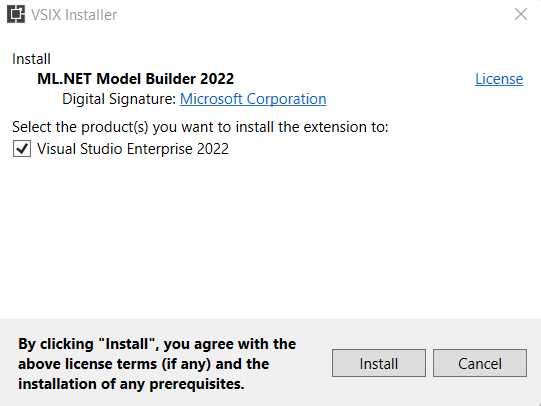
Figure 2-d: Model Builder Installer (Initial Screen)
To proceed with the installation, click Install. Once the installation has been finalized, you’ll see the following screen.

Figure 2-e: Model Builder Installer (Final Screen)
To quit the installer, click Close. With that done, rerun Visual Studio and open your project. Go to Solution Explorer and click on the TestModel.mbconfig file to open it.
Tip: Within Visual Studio, you can also update Model Builder by going to the Extensions menu, then clicking Manage Extensions.
Once done, the Model Builder UI should look as follows.
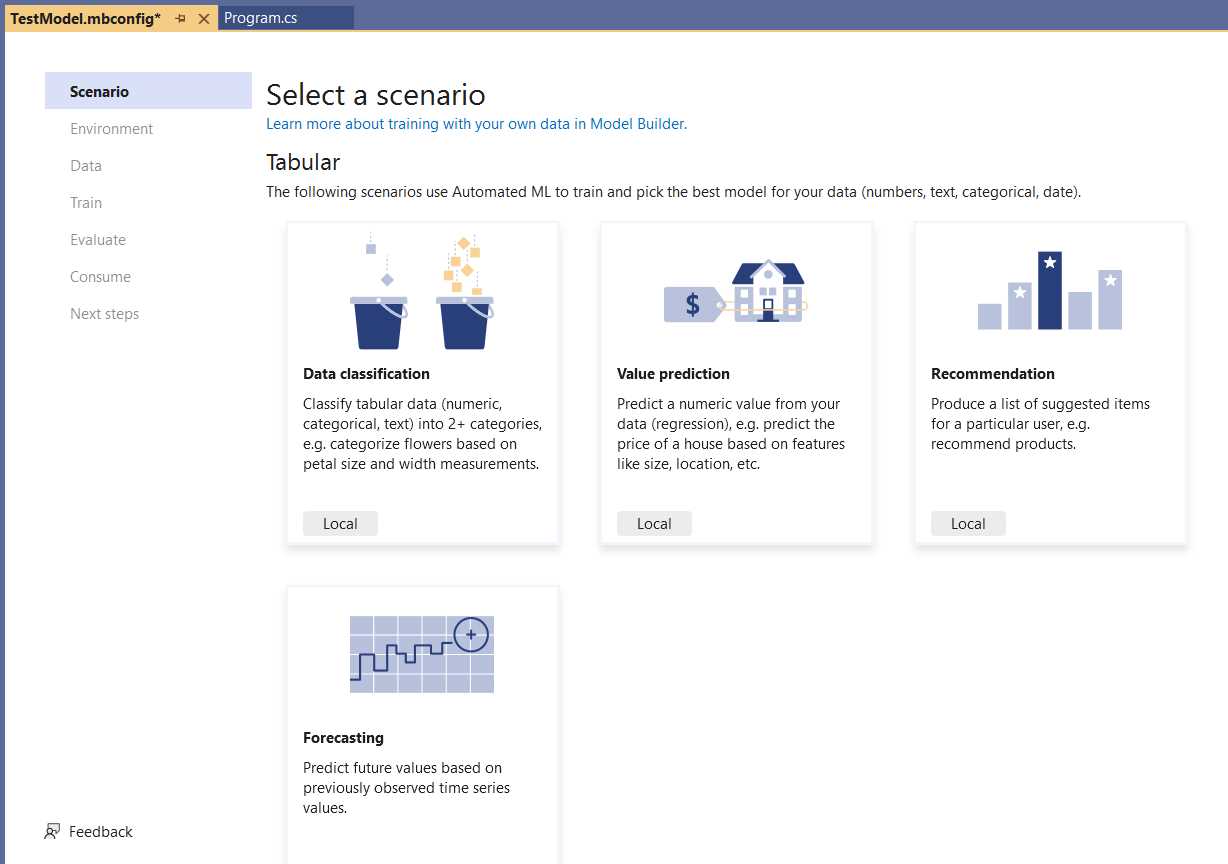
Figure 2-f: The Model Builder UI (Up to Date)
Great! As you can see, the Model Builder UI is now up to date, and the icons are displayed for each scenario.
Scenarios and tasks
Before we build the model and select the scenario we want to create, we need to understand how these different scenarios listed within the Model Builder UI correspond to machine learning tasks.
A scenario is how Model Builder describes the type of prediction that you want to make with your data, which correlates to a machine learning task. The task is the type of prediction based on the question being asked.
Think of the scenario as a wrapper around a task; the task specifies the prediction type and uses various trainers (algorithms) to train the model. The following diagram illustrates this.
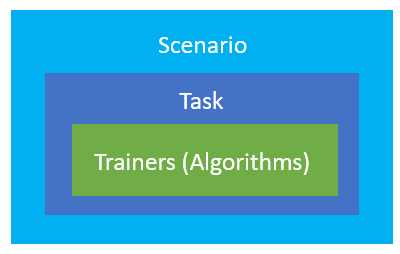
Figure 2-g: The Scenario-Task-Trainer(s) Hierarchy in ML.NET
For the model we will build shortly, we’ll use this dataset to predict whether a text is a spam message (or not) using binary classification. The idea is to build the model using Model Builder and then expand in greater detail on what happens behind the scenes.
Given that binary classification doesn’t appear as an option within the Model Builder UI, we need to understand how the scenarios listed in the Model Builder UI relate to different machine learning tasks, such as binary classification.
To do that, let’s have a look at the following diagram.
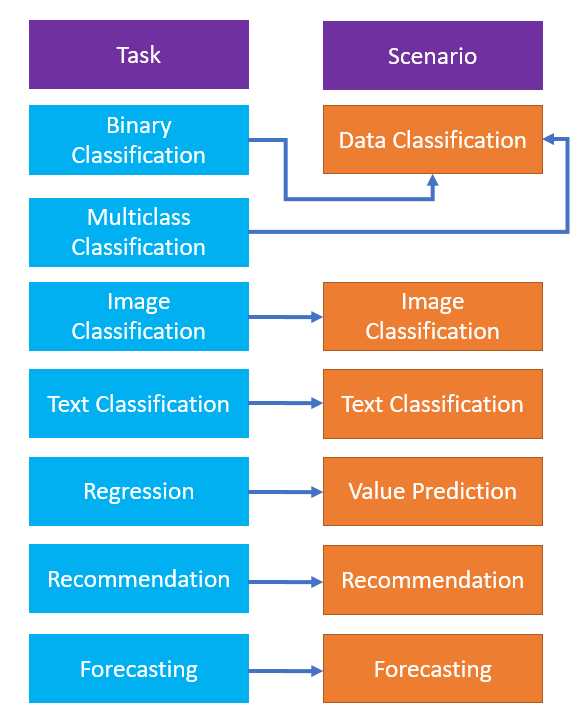
Figure 2-h: The Relationships between Machine Learning Tasks and Model Builder Scenarios
So, from the preceding figure, we can see that the binary classification task corresponds to the data classification scenario (as seen in the Model Builder UI).
Binary classification is used to understand if something is positive or negative, if an email is a spam message or not, or in general, whether a particular item has a specific trait or property (or not).
Training with Model Builder
Model Builder abstracts almost all the technical complexity of creating a model by hand (writing the code manually) and works similarly to a UI wizard.
To begin, let’s choose the scenario to use. Because we will do binary classification to detect spam messages, we must select Data classification.

Figure 2-i: Model Builder—Select a Scenario (Data Classification)
To select the data classification scenario, click the Local button under the scenario’s description. Once done, you’ll be presented with the Select training environment screen, as follows.
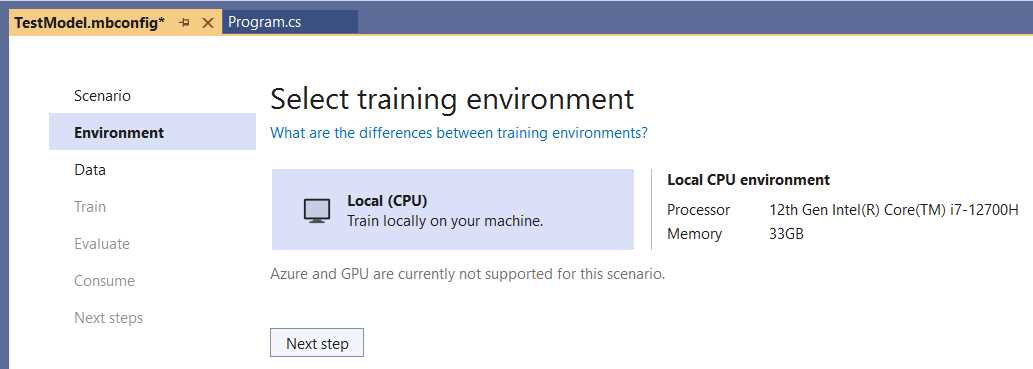
Figure 2-j: Model Builder—Select Training Environment
By default, Model Builder shows the details of the environment available where the data training and model creation will be done. Given that we previously clicked on Local, the local environment details (in this case, from my computer) are displayed. In your case, you’ll see the details of your machine.
To continue, click on the Next step button, which will present you with the option to Add data to the model we are creating.
Before we continue, let’s pause for a moment so that you can download the training data. The CSV file being used, spam_assassin_tiny.csv, is a subset (the first 100 rows) of this dataset.
Once you have downloaded it, you can import it by clicking Browse, as seen in the following screenshot.
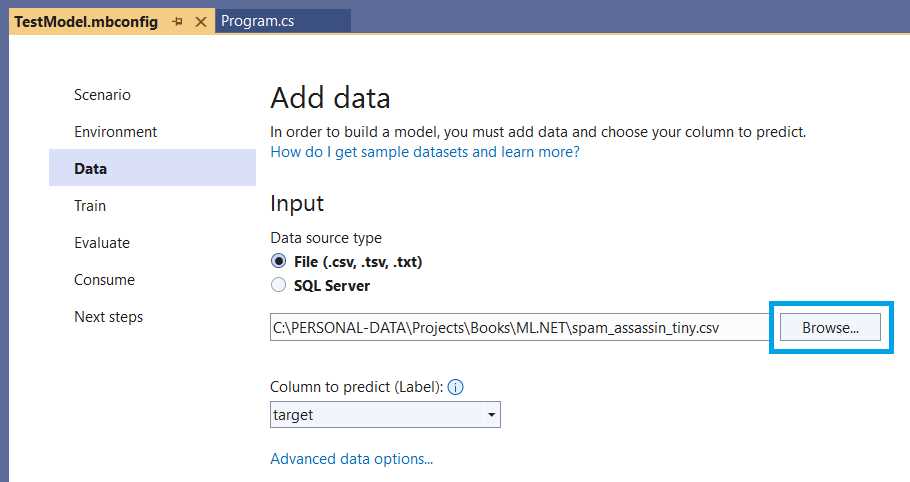
Figure 2-k: Model Builder–Add Data (Importing the Data)
With that done, the next step is to ensure that the Column to predict (Label) is set to target (which is the column that indicates whether the text is spam or not).
The column target of the spam_assassin_tiny.csv file has a value of 0 if the text is not spam and a value of 1 if the text is spam—which you’ll notice if you open the file with any text editor.
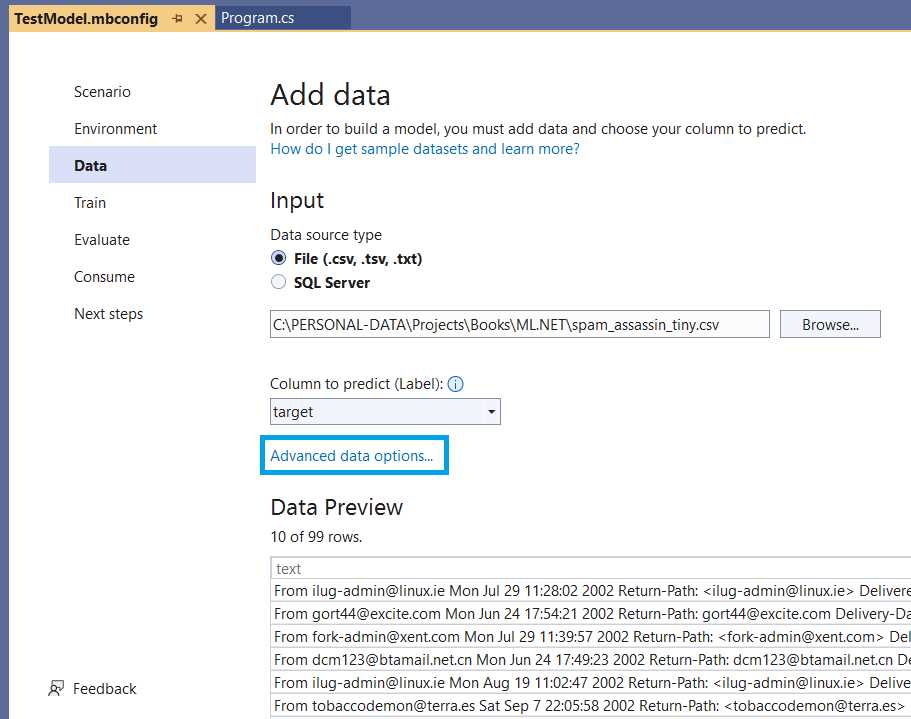
Figure 2-l: Model Builder—Add Data (Data Imported)
By setting the target as the Column to predict (Label), we are saying that ML.NET will use this column to predict the value based on what is read from the text column of the dataset (as seen in the previous figure’s Data Preview section).
To fully understand this, let’s look at the advanced options by clicking Advanced data options.
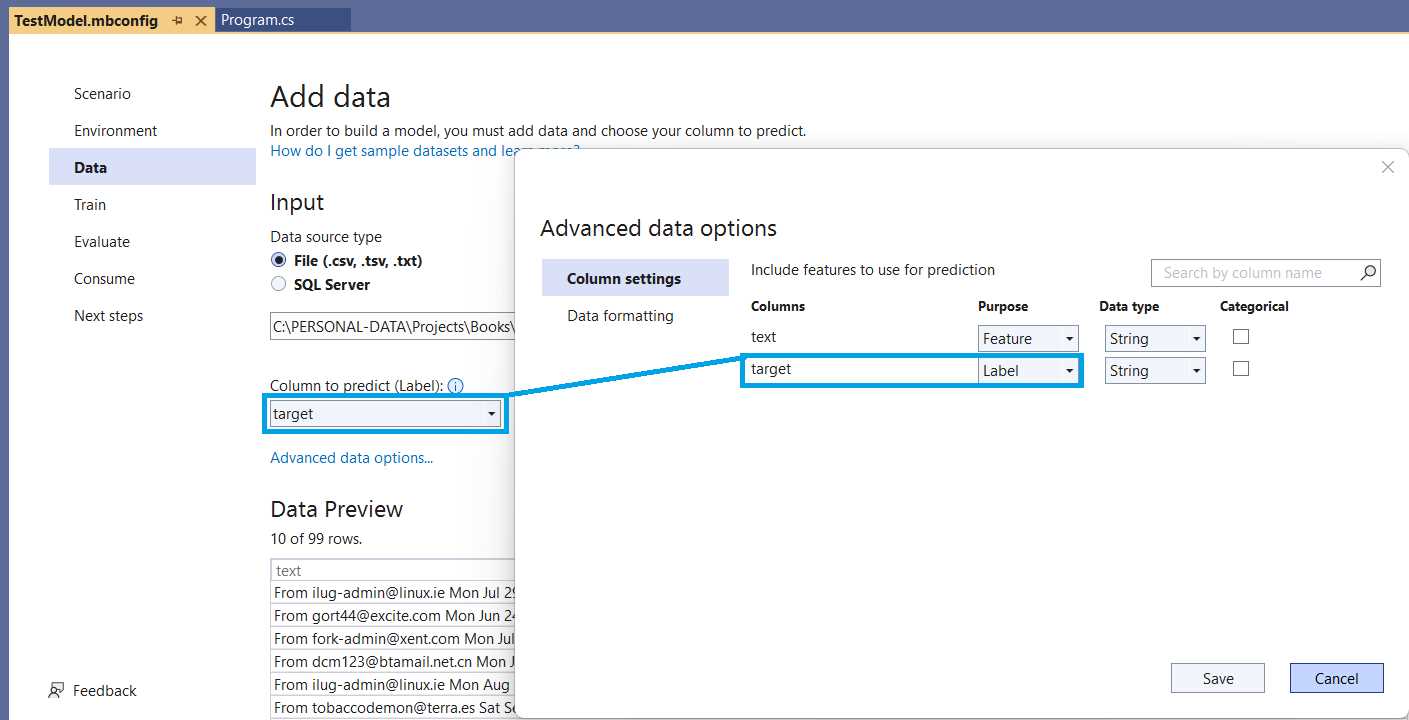
Figure 2-m: Model Builder—Advanced Data Options
Model Builder has identified that the dataset contains two columns, text and target, as seen within Advanced data options, Column settings. The text column trains the model—it contains the actual email messages. In contrast, the target column contains the value (1 or 0) that is the value to predict.
We can click Cancel to continue, as no changes have been made within the Advanced data options window.
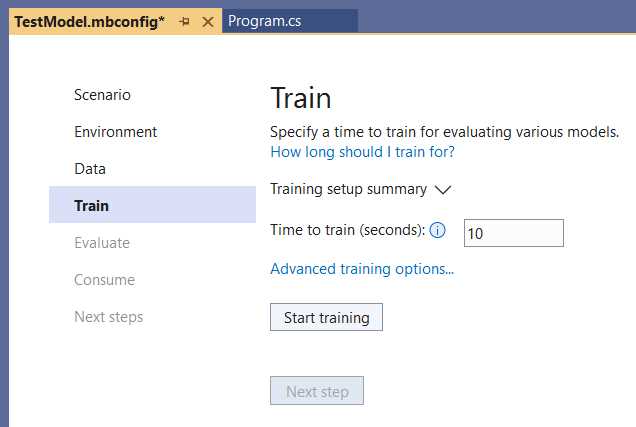
Figure 2-n: Model Builder—Train (Training Not Started)
Next, we can train the model with the dataset provided, and to do that, we need to click on Start training.
The time required to train the model is, in most cases, directly proportional to the size of the dataset. So, the larger the dataset, the more computing resources and time are required. Typically, time is available; however, computing resources are mostly limited to the specs of the environment used.
Instead of using the complete dataset, which includes 5,329 rows, I created a tiny subset with only the first 100 rows (99, given that the first row is a header).
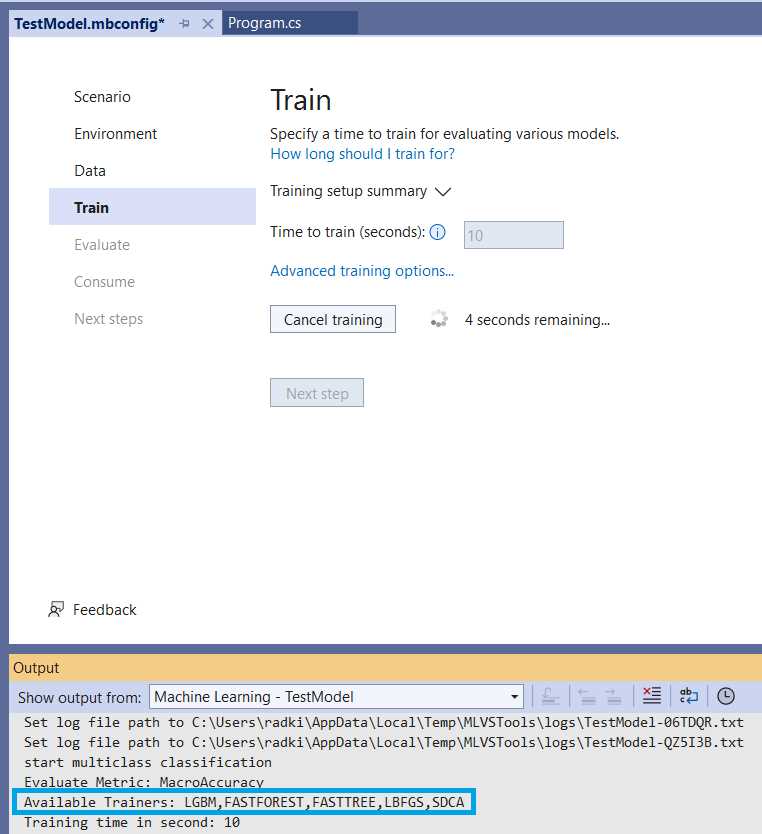
Figure 2-o: Model Builder—Train (Training Started)
While the training takes place, unless otherwise specified, the different trainers (algorithms) available for the machine learning task will be used—highlighted in the previous screen.
In this case, we are running a binary classification task, which employs the available trainers highlighted in the previous figure by default. If we would like to tweak the training properties and trainers to use, we can either wait for the training to finalize or cancel the training in execution.
Let’s wait for the training to finish to look at the Advanced training options available.

Figure 2-p: Model Builder—Train
After clicking Advanced training options and Trainers, you’ll see the following screen.
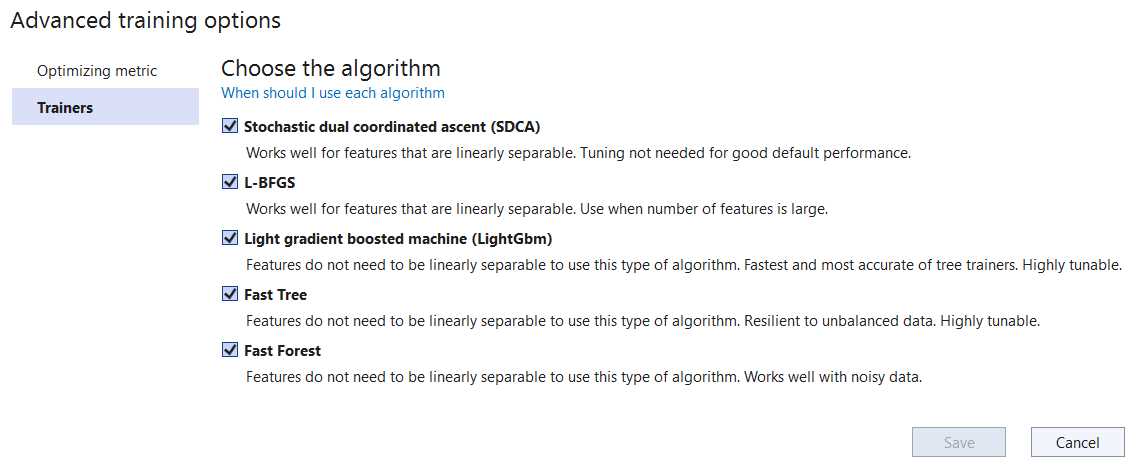
Figure 2-q: Model Builder—Advanced Training Options (Trainers)
Here we can see a list of the trainers that are available and used. By default, all the trainers are selected. It is also possible to use fewer trainers, which can be done by unchecking one or more.
ML.NET has good documentation that dives deeper into what these algorithms do and how to choose one by clicking on the When should I use each algorithm option.
We’ll use all the trainers for our use case, so let’s leave this as is and close the window by clicking Cancel.
At this stage, I wanted to show you that it is possible to change (enable or disable) some of the predefined algorithms for training a model in case the evaluation results are not optimal.
Evaluating with Model Builder
Now that we have trained the model, we can evaluate it. To do that, let’s first click on the Evaluate option.
From the spam_assassin_tiny.csv file, copy one of the rows (without the target column value) and paste it into the text field above the Predict button. In my case, I copied row number six.
After clicking Predict, you’ll see how the model predicts based on the text input. The prediction is correct given that in this case the text input is not spam, but a legitimate message. Thus, the result is 0 (not spam) with a value of 67% certainty. The percentage is not a true mathematical probability, sometimes called a pseudo-probability.
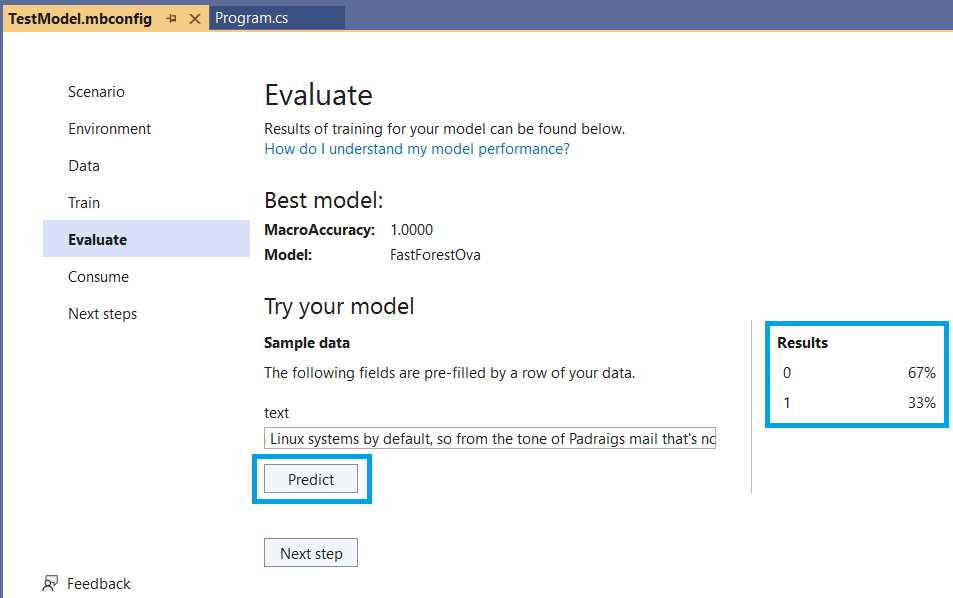
Figure 2-r: Model Builder—Evaluate
Feel free to try with other text input from the complete dataset. Remember that the evaluation process is an opportunity to tweak and improve the model if the results are not as expected.
Because we have trained this model with a tiny dataset, not using the entire dataset, the percentages (confidence) of the results will not be as high (when correct) or low (when incorrect) as they would be if the model had been trained using the complete dataset. So, evaluate as many times as needed and feel free to retrain the model with a slightly larger dataset to improve the accuracy of the results.
The main reason I chose to explain all these Model Builder steps with a small dataset, not the large one, was to save you time while following along, as larger datasets require significantly more training time and resources from the system.
In your spare time, try training the model with the large dataset. Just make sure you have enough coffee available.
Consuming the model
With the model evaluation complete, the next step is to consume (use) the model created by Model Builder within our application.
As seen in the previous screenshot, Model Builder makes it very easy. There are two options: 1) either copy the Code snippet highlighted, or 2) use one of the available project templates, which can be added to your Visual Studio solution by clicking Add to solution.
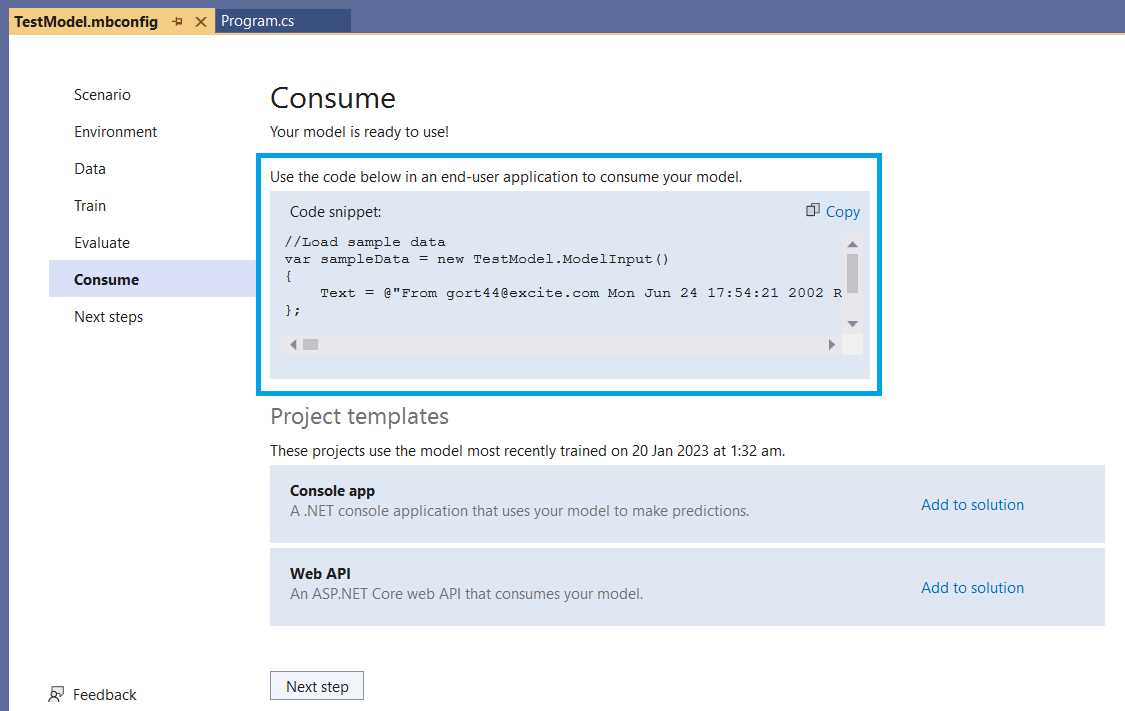
Figure 2-s: Model Builder—Consume
In my case, I’ll go with option 1, which is to copy the code snippet and paste it into the Main method of Program.cs, as follows (code highlighted in bold).
Note: The line highlighted with a blue background is a new line I added (not part of the code snippet) to see the prediction result when running the program.
Note: The ellipsis markers (...) indicate extra text that I have explicitly removed to make the code more readable. The code snippet you’ll copy from Model Builder will have the full text. Please refer to the GitHub repo to get the complete code of Program.cs.
Note: The “using TestML;” statement is not part of the code snippet copied. It’s usually added (automatically) by Model Builder after the model is created, given that some additional C# files and a zip file are added to the project when the training finishes (we’ll explore these files later). If the “using TestML;” statement has not been added, please add it manually.
Code Listing 2-b: Program.cs–TestML (After copying the code snippet from Model Builder)
using Microsoft.ML; using TestML; internal class Program { private static void Main(string[] args) { var context = new MLContext(); Console.WriteLine("Hello, World!"); //Load sample data. var sampleData = new TestModel.ModelInput() { Text = @"From [email protected]...Mortgage Lenders & Brokers Are Ready to compete for your business. Whether a new home loan is what you seek or to refinance your current home loan at a lower interest rate, we can help!...This service is fast and free. Free information request form: PLEASE VISIT http://builtit4unow.com/pos...***", }; //Load model and predict output. var result = TestModel.Predict(sampleData); Console.WriteLine($"Predicted: {result.PredictedLabel}"); } } |
Note: It is plausible that the snippet you copied from Model Builder might have a different Text value than mine, which means your prediction result might differ.
From the preceding code, some things stand out if you look closely at it. The first is that the content of the Text property of the sampleData object is spam to the naked eye. The second is that the sampleData object is passed as a parameter to the Predict method of the TestModel class.
As its name implies, the Predict method executes a prediction for the input data provided (sampleData) for the model created.
Finally, the result of the prediction is displayed by invoking result.PredictedLabel. To see this in action, let’s run the application. To do that, click on the run button in Visual Studio.

Figure 2-t: The Run Button Highlighted—Visual Studio
Once the application executes, you should see the following screen with the correct prediction value of 1 (indicating that the message is indeed spam).

Figure 2-u: The Execution of the Application—Microsoft Visual Studio Debugger
Great! Model Builder has completely abstracted all the complexity of what ML.NET does behind the scenes to give us this prediction, providing us with a quick and easy implementation. The process is impressive, given that we’ve gone from nothing to having a spam-detection machine-learning model in just a few lines of code. Now, let’s have a look behind the scenes.
Generated model (TestModel.consumption.cs)
We’ve gone through the various steps provided by Model Builder, and behind the scenes a model was created. Let’s look at the code that was generated during that process.
Tip: Considering that the generated code we will explore might seem a bit complex, I suggest you review the high-level definitions of some of the concepts and objects we will encounter to get acquainted with the terminology.
Within Solution Explorer, click on the arrow icon next to the TestModel.mbconfig file to expand its content.
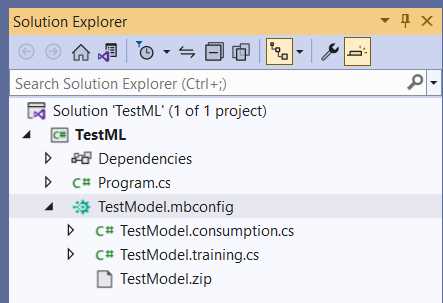
Figure 2-v: TestModel.mbconfig Expanded—Solution Explorer
Notice the three files that Model Builder created. First, let’s open TestModel.consumption.cs and explore the code behind it.
Note: In most cases, when you open TestModel.consumption.cs, you might see one or two lines of comments generated by Model Builder when the file was created. For the listing below, I have explicitly removed those lines.
Code Listing 2-c: TestModel.consumption.cs
using Microsoft.ML; using Microsoft.ML.Data; namespace TestML { public partial class TestModel { /// <summary> /// model input class for TestModel. /// </summary> #region model input class public class ModelInput { [LoadColumn(0)] [ColumnName(@"text")] public string Text { get; set; } [LoadColumn(1)] [ColumnName(@"target")] public string Target { get; set; } } #endregion /// <summary> /// model output class for TestModel. /// </summary> #region model output class public class ModelOutput { [ColumnName(@"text")] public float[] Text { get; set; } [ColumnName(@"target")] public uint Target { get; set; } [ColumnName(@"Features")] public float[] Features { get; set; } [ColumnName(@"PredictedLabel")] public string PredictedLabel { get; set; } [ColumnName(@"Score")] public float[] Score { get; set; } } #endregion private static string MLNetModelPath = Path.GetFullPath("TestModel.zip"); public static readonly Lazy<PredictionEngine<ModelInput, ModelOutput>> PredictEngine = new Lazy<PredictionEngine<ModelInput, ModelOutput>>(() => CreatePredictEngine(), true); /// <summary> /// Use this method to predict <see cref="ModelInput"/>. /// </summary> /// <param name="input">model input.</param> /// <returns><seealso cref=" ModelOutput"/></returns> public static ModelOutput Predict(ModelInput input) { var predEngine = PredictEngine.Value; return predEngine.Predict(input); } private static PredictionEngine<ModelInput, ModelOutput> CreatePredictEngine() { var mlContext = new MLContext(); ITransformer mlModel = mlContext.Model.Load(MLNetModelPath, out var _); return mlContext.Model. CreatePredictionEngine<ModelInput, ModelOutput>(mlModel); } } } |
Let’s review the code to understand it better. The ML.NET Model Builder automatically created this code.
First, we find the references to the two libraries that the code uses: Microsoft.ML and Microsoft.ML.Data.
The first (Microsoft.ML) includes ML.NET core methods, such as the trainers (algorithms), and the second (Microsoft.ML.Data) contains ML.NET methods that interact with the dataset used by the model.
Following that, within the TestML namespace, we find the TestModel class, declared as a partial class because it is partially declared (split) in both the TestModel.consumption.cs file and the TestModel.training.cs file.
Within the TestModel class, we find the ModelInput class, which defines as properties the two columns found within the dataset used: Text and Target.
Notice that both properties have decorators that map them to their respective columns within the dataset (ColumnName) and their position within that dataset (LoadColumn).
The ModelInput class, as its name implies, is used as the model’s input. On the other hand, the ModelOutput class is used as the model’s output.
Contrary to the ModelInput class, the properties of the ModelOutput class do not include the LoadColumn decorator, just ColumnName.
As part of the ModelOutput class, besides the Text and Target properties (which are also part of the ModelInput class), we find the Features, PredictedLabel, and Score properties.
Note: The Target property of the ModelOutput class is an unsigned integer (uint), contrary to the Target property of the ModelInput class, which is a string—this is because the Target property for a binary classification has to be an integer. Because the input dataset is in a CSV file, the value of Target as an input (even though it is a number) is a string. CSV files only store string values (including those that represent numbers).
These properties indicate the Features, the predicted value (PredictedLabel) column, and the confidence obtained for those results (Score).
Next, we find the declaration of the MLNetModelPath variable, which points to the model's metadata path (file name)—in our case TestModel.zip. This file includes the model’s schema, training information, and transformer chain metadata.
Following that, we find the PredictEngine variable declared, which is nothing else than the variable that will hold the reference to the prediction engine (PredictionEngine) to make predictions on the trained model.
The prediction engine (PredictEngine) will contain a value of the following type:
Lazy<PredictionEngine<ModelInput, ModelOutput>>
The creation of the prediction engine (PredictionEngine) is deferred until it is first used, accomplished by using Lazy initialization.
Notice that the ModelInput and ModelOutput classes are the type parameters of the prediction engine (PredictionEngine).
The prediction engine (PredictionEngine) is instantiated by creating a new object of type Lazy<PredictionEngine<ModelInput, ModelOutput>> as in:
public static readonly Lazy<PredictionEngine<ModelInput, ModelOutput>>
PredictEngine = new Lazy<PredictionEngine<ModelInput,
ModelOutput>>(() => CreatePredictEngine(), true);
The constructor receives as a first parameter a lambda function that creates the engine, () => CreatePredictEngine(), and the second parameter (true) indicates whether the instance can be used by multiple threads (thread-safe).
Next, we have the Predict method, which is used for making predictions based on the model, as follows.
public static ModelOutput Predict(ModelInput input)
{
var predEngine = PredictEngine.Value;
return predEngine.Predict(input);
}
The Predict method receives as a parameter a ModelInput instance (input), which, as its name implies, is the input data for the model.
The predicted value (PredictEngine.Value) is assigned to the predEngine variable. The result of invoking the predEngine.Predict method (which receives as a parameter the input data) is returned by the Predict method.
Then, we find the CreatePredictEngine method, which, as its name implies, creates the prediction engine instance.
private static PredictionEngine<ModelInput, ModelOutput> CreatePredictEngine()
{
var mlContext = new MLContext();
ITransformer mlModel = mlContext.Model.Load(MLNetModelPath, out var _);
return mlContext.Model.
CreatePredictionEngine<ModelInput, ModelOutput>(mlModel);
}
The first thing the method does is create an instance of MLContext, which is assigned to the mlContext variable.
Then, the model is loaded—this is done by invoking the Load method from mlContext.Model, to which the model’s metadata path is passed as a parameter (MLNetModelPath). The out var _ parameter represents the modelInputSchema. The Load method returns the model loaded as an object (mlModel).
The prediction engine (PredictEngine) is finally created when the CreatePredictionEngine method from mlContext.Model is called, to which the object model (mlModel) is passed as a parameter.
So, overall, TestModel.consumption.cs contains the generated code responsible for creating the prediction engine and invoking it—thus, allowing the consumption of the model.
Generated model (TestModel.training.cs)
Next, let’s go back to Solution Explorer, open TestModel.training.cs, and explore the code behind it, which was also automatically generated by Model Builder.
Tip: Gentle reminder. Given that the generated code we will explore could seem a bit complex, I suggest you review the high-level definition of some of the concepts and objects we will encounter to get acquainted with the terminology.
Note: In most cases, when you open TestModel.training.cs, you might see one or two lines of comments generated by Model Builder when the file was created. For the listing below, I have explicitly removed those lines.
Code Listing 2-d: TestModel.training.cs
using Microsoft.ML.Trainers.FastTree; using Microsoft.ML; namespace TestML { public partial class TestModel { /// <summary> /// Retrains model using the pipeline generated as part of the /// training process. For more information on how to load data, /// see aka.ms/loaddata. /// </summary> /// <param name="mlContext"></param> /// <param name="trainData"></param> /// <returns></returns> public static ITransformer RetrainPipeline(MLContext mlContext, IDataView trainData) { var pipeline = BuildPipeline(mlContext); var model = pipeline.Fit(trainData); return model; } /// <summary> /// build the pipeline that is used from model builder. Use this /// function to retrain model. /// </summary> /// <param name="mlContext"></param> /// <returns></returns> public static IEstimator<ITransformer> BuildPipeline( MLContext mlContext) { // Data process configuration with pipeline data // transformations. var pipeline = mlContext.Transforms.Text.FeaturizeText (inputColumnName:@"text",outputColumnName:@"text") .Append(mlContext.Transforms. Concatenate(@"Features", new []{@"text"}) ) .Append(mlContext.Transforms. Conversion.MapValueToKey( outputColumnName:@"target",inputColumnName:@"target") ) .Append(mlContext.MulticlassClassification. Trainers.OneVersusAll(binaryEstimator:mlContext. BinaryClassification.Trainers.FastTree(new FastTreeBinaryTrainer.Options() { NumberOfLeaves=4, MinimumExampleCountPerLeaf=20, NumberOfTrees=4, MaximumBinCountPerFeature=254, FeatureFraction=1, LearningRate=0.1, LabelColumnName=@"target", FeatureColumnName=@"Features" } ), labelColumnName: @"target" ) ) .Append(mlContext.Transforms.Conversion. MapKeyToValue( outputColumnName:@"PredictedLabel", inputColumnName:@"PredictedLabel" ) ); return pipeline; } } } |
The code begins with the using statements, where the ML.NET core (Microsoft.ML) and Microsoft.ML.Trainers.FastTree libraries are imported. The Microsoft.ML.Trainers.FastTree library contains the algorithm implementation used by the model.
Next, we find the TestModel class, also used within TestModel.consumption.cs, given that it is a partial class. The first method we come across is RetrainPipeline. As the comment indicates, this method is responsible for retraining the model once the pipeline has been built. Let’s inspect its code.
public static ITransformer RetrainPipeline(MLContext mlContext, IDataView trainData)
{
var pipeline = BuildPipeline(mlContext);
var model = pipeline.Fit(trainData);
return model;
}
So, as we can see, this method receives two parameters, an instance of MLContext and the training data (trainData) of type IDataView (used as the input and output of transforms).
The RetrainPipeline method returns an object that implements the ITransformer interface (responsible for transforming data within an ML.NET model pipeline).
The RetrainPipeline method works by building the model’s pipeline, in which the different transforms and algorithm(s) that will be used are specified.
With the objects in the pipeline created, the data (trainData) is passed to train the model by invoking the pipeline.Fit method. Finally, the model is returned.
So, the most complex part of the code is what happens within the BuildPipeline method. Let’s dissect it into smaller chunks to make sense of what is happening.
The BuildPipeline method receives as a parameter an MLContext instance and returns an object that implements the IEstimator<ITransformer> interface. The pipeline is built through a series of transformations that get subsequently added using mlContext.Transforms. The code begins with the call to:
Text.FeaturizeText(inputColumnName:@"text",outputColumnName:@"text")
The method transforms the input column strings (text) into numerical feature vectors (integers) that keep normalized counts of words and character n-grams.
Then, a series of Append methods are chained to FeaturizeText. For every Append method, a transform operation or trainer is passed as a parameter, creating the ML.NET pipeline. The first Append looks as follows:
.Append(mlContext.Transforms.Concatenate(@"Features", new []{@"text"})
What this does is invoke the Concatenate method from mlContext.Transforms to concatenate the various input columns into a new output column, in this case, Features.
The next Append looks as follows:
.Append(mlContext.Transforms.Conversion.MapValueToKey(
outputColumnName:@"target",inputColumnName:@"target")
The MapValueToKey method from mlContext.Transforms.Conversion maps the input column (inputColumnName) to the output columns (outputColumnName) to convert categorical values into keys.
Moving on, the next Append looks as follows. Note this is where the magic happens.
.Append(mlContext.MulticlassClassification.
Trainers.OneVersusAll(binaryEstimator:mlContext.
BinaryClassification.Trainers.FastTree(new
FastTreeBinaryTrainer.Options()
{
MinimumExampleCountPerLeaf=20,
MaximumBinCountPerFeature=254,
LearningRate=0.1,
LabelColumnName=@"target",
FeatureColumnName=@"Features"
}
),
labelColumnName: @"target"
)
)
The OneVersusAll method of mlContext.MulticlassClassification.Trainers receives a binary estimator (binaryEstimator) algorithm instance as a parameter. The one-versus-all technique is a general machine language algorithm that adapts a binary classification algorithm to handle a multiclass classification problem. See “Transformation to binary.”
The binary estimator instance represents the machine learning binary classification task employed by ML.NET that contains the trainers, utilities, and options used by the FastTree algorithms used for making predictions on the model.
Those options are then passed to the FastTree algorithms (highlighted in blue), predicting a target using a decision tree for binary classification.
Note: I’ve included a link to the official documentation for each option property, so you can look at what each one does and the allowed values for each.
The final part (labelColumnName: @"target") indicates that all predictions done by FastTree will be set on the column with the target label.
In short, TestModel.training.cs describes how the machine learning pipeline for the model works and behaves by specifying the various types of transformers and algorithms used and their sequence.
Summary
Throughout this chapter, we have employed Model Builder to generate a model for our data. Model Builder does a fantastic job of abstracting all the complexity behind writing the logic required to train, test, and consume a model.
As you have seen, the ML.NET classes are challenging to grasp, especially if you don’t have a machine learning background. If we didn’t have Model Builder to do the heavy lifting, we would have to experiment with many different values (for the option properties) and try different combinations or sequences to get the pipeline right. All in all, it would be a daunting and time-consuming activity that would make ML.NET no different from any other machine learning framework—thus, requiring a deeper understanding of machine learning.
By going over the code this way, I have tried to explain the underlying complexity of the Model Builder-generated code in relatively simple terms, so you can get a feeling of what happens behind the scenes, keeping a balance between simplicity and complexity.
For what remains of this book, I’ll go over other ML.NET scenarios and employ Model Builder to generate code for us. We’ll dive into the generated code for those new scenarios and compare how those look to the data classification scenario (binary classification) we just explored to understand differences and commonalities.
- 1800+ high-performance UI components.
- Includes popular controls such as Grid, Chart, Scheduler, and more.
- 24x5 unlimited support by developers.