
Migrating from Xamarin.Forms to .NET MAUI Succinctly®

CHAPTER 2
Preparing a Xamarin.Forms Example
In this chapter, you will create a Xamarin.Forms example that will be used to discuss the steps for migration to .NET MAUI in a structured, practical way. It’s not necessary to create a complex solution, but it is important to include all the parts that require some more analysis and understanding at migration time. The next chapters will explain how to migrate all the parts included in the example created here.
Tip: You’ll first implement all the features and the necessary code. After every implementation is completed, you’ll be able to see the sample application running.
Considerations on the Xamarin.Forms example
The Xamarin.Forms solution that you’ll be creating in this chapter needs to include the following parts, which will be discussed thoroughly in the next chapter:
- XAML and C# code from the base library. Simple code with simple views that undergo important changes in .NET MAUI.
- Third-party libraries that provide features not included by Xamarin.Forms out of the box, such as a PDF viewer and a Lottie animation viewer. This allows us to discuss how to upgrade libraries in .NET MAUI and what to do if there is no full counterpart.
- Icons and fonts so that you can understand how to simplify the management of assets and resources later in .NET MAUI.
- A custom renderer so it will be possible to understand how to move to handlers in .NET MAUI.
- Some broadcast messages based on the MessagingCenter class that will be upgraded to the WeakReferenceMessenger class when migrating to .NET MAUI.
- Some code that works in Xamarin.Forms but doesn’t work in .NET MAUI, even if it is formally legal. This will allow me to teach you what to do in the event of known issues.
- An analytics and diagnostics setup in the App Center and the sample app so you can understand how to keep your analytics history in .NET MAUI.
Without a doubt, this is the longest chapter, but it’s crucial to set up a proper environment to walk through migration in a structured way. The next chapter discusses the migration assessment based on all the features implemented in the sample project.
Note: As mentioned in the introduction, the assumption is that you have existing knowledge and experience with Xamarin.Forms, so many steps will be described quickly.
Creating a Xamarin.Forms solution
Open Visual Studio 2022 and create a new Xamarin.Forms solution via the Mobile App (Xamarin.Forms) template, as shown in Figure 1.
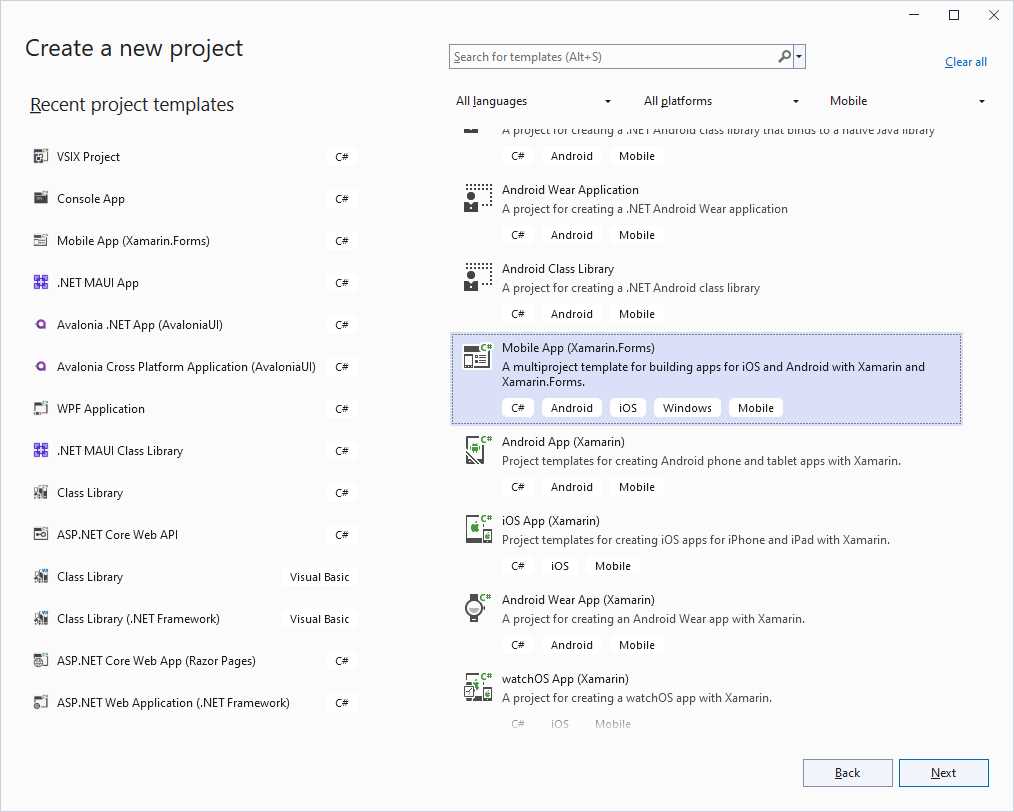
Figure 1: Creating a Xamarin.Forms project
Select Next and then enter MigrationSource as the project name. In the New Mobile App dialog, make sure that at least Android and iOS are selected as platform targets (see Figure 2). You can select Windows (UWP), but it will not be used here.
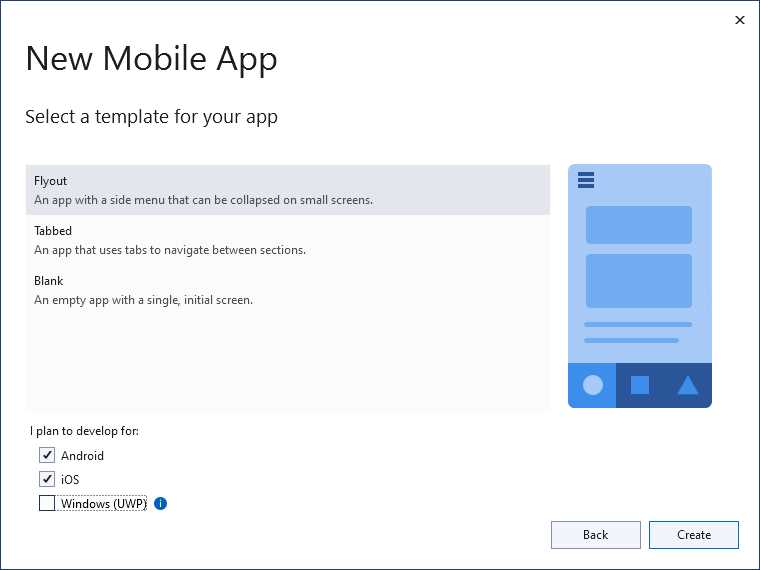
Figure 2: Selecting platform targets
After a few seconds, the new project will be ready in Visual Studio. At this point in the shared project, do the following:
- Remove the Model and Services folders.
- Remove all the files in the ViewModels folder and leave it empty.
- Remove all the files in the Views folder and leave it empty.
- In the AppShell.xaml file, remove the following nodes: FlyoutItem, MenuItem, and TabBar.
- In the App.xaml.cs file, remove the following line: DependencyService.Register<MockDataStore>();
- In the AppShell.xaml.cs file, remove both the invocations to the Routing.RegisterRoute method and the OnMenuItemClicked event handler.
All these changes are necessary for a clean solution populated with items based on the previously described requirements.
Tip: After you make these edits, rebuild the project to check that everything is functioning properly.
Installing NuGet packages
Chapter 6 will explain what to do when there’s no library counterpart in .NET MAUI and when there isn’t 100% feature parity yet between technologies. The following libraries will be used for the Xamarin.Forms version to prepare you for this topic:
- Com.Airbnb.Xamarin.Forms.Lottie, a library that allows for displaying Lottie animations in Xamarin.Forms. For this library, make sure you install version 3.1.3. This is not the latest stable version, but it is the one that has no known issues.
- Syncfusion.Xamarin.SfPdfViewer, a library from Syncfusion® used to display PDF documents within your apps. Using this library requires a license, but a trial version is available that works for demonstration purposes.
In addition, the Microsoft.AppCenter.Analytics and Microsoft.AppCenter.Crashes libraries will be used to explain how to work with analytics and migrate their history. You’ll need to install the NuGet packages for all of these libraries in all the projects in the solution. When done, the NuGet user interface must appear as it does in Figure 3.

Figure 3: Installing the required NuGet packages
Make sure you also update to the latest version of the Xamarin.Forms and Xamarin.Essentials NuGet packages added by Visual Studio.
Implementing code and features
At this point, it’s possible to start implementing the code and app features that will serve as the base for discussing each migration step.
Implementing code from the base library
As you can imagine, it’s not possible to use every single Xamarin.Forms view and find the MAUI counterpart. However, it is possible to focus on some key examples, showing some views that will need to be updated and others where the code stays the same. In this example, you’ll add the following items:
- A layout that contains formatted text with gesture recognizers.
- A layout containing a button that aims to show the battery status by taking advantage of the Xamarin.Essentials API.
- The related C# code required for both layouts to work.
Add a new page called MainPage.xaml to the Views folder of the shared project. You can use the Content Page item template shown in Figure 4.

Figure 4: Creating a new page
Tip: This is the template you’ll use whenever you’re asked to add a new page, so keep Figure 4 as a reference.
When the new page is ready, add the code shown in Code Listing 1.
Code Listing 1
<?xml version="1.0" encoding="utf-8" ?> <ContentPage xmlns="http://xamarin.com/schemas/2014/forms" xmlns:x="http://schemas.microsoft.com/winfx/2009/xaml" xmlns:renderers="clr-namespace:MigrationSource.Renderers" x:Class="MigrationSource.Views.MainPage"> <ContentPage.Content> <StackLayout VerticalOptions="Center" HorizontalOptions="Center"> <Label Margin="10,0,0,0"> <Label.FormattedText> U8<FormattedString> <Span x:Name="LinkText" FontSize="18" Text="This is formatted text "/> <Span x:Name="LinkSpan" Text="and it supports gestures" FontSize="18" TextDecorations="Underline"> <Span.GestureRecognizers> <TapGestureRecognizer x:Name="LinkGesture" Tapped="LinkGesture_Tapped" /> </Span.GestureRecognizers> </Span> </FormattedString> </Label.FormattedText> </Label> <StackLayout Orientation="Horizontal"> <Button x:Name="BatteryStatusButton" Text="Check battery status" Clicked="BatteryStatusButton_Clicked"/> <Label x:Name="BatteryStatusLabel" Margin="10,0,0,0" /> </StackLayout> </StackLayout> </ContentPage.Content> </ContentPage> |
The code is quite simple: the FormattedText property of the first Label contains a FormattedString object, whose content is made of Span objects, each representing a piece of text with different formatting. The second Span is formatted as a hyperlink and provides support for the tap gesture. The second StackLayout contains a Button whose Clicked event handler will show the battery status in the label. Code Listing 2 shows the full code-behind for the page.
Code Listing 2
using System; using Xamarin.Essentials; using Xamarin.Forms; using Xamarin.Forms.Xaml; namespace MigrationSource.Views { [XamlCompilation(XamlCompilationOptions.Compile)] public partial class MainPage : ContentPage { public MainPage() { InitializeComponent(); } private async void LinkGesture_Tapped(object sender, EventArgs e) { await DisplayAlert("Info", "You tapped the link!", "OK"); } private void BatteryStatusButton_Clicked(object sender, EventArgs e) { BatteryStatusLabel.Text = $"Charge level: {Battery.ChargeLevel}"; } } } |
Tip: On Android, you’ll need to set the appropriate permission to check the battery status explicitly. To do so, open the manifest in the project properties and flag the BATTERY_STATS permission.
The code is extremely simple, but note how it uses the Xamarin.Essentials API to interact with the battery. The approach is even simpler in .NET MAUI. Despite its simplicity, the code implemented so far is enough to demonstrate key concepts in the migration to .NET MAUI.
Using third-party libraries and components
One of the most significant topics involved in the migration from Xamarin.Forms to .NET MAUI is the usage of third-party libraries and components. Previously, you installed NuGet packages that allow for displaying Lottie animations and PDF documents in your app. In this section, you’ll write the code that displays that content.
Displaying Lottie animations
Note: Lottie is a popular format for animations created with Adobe After Effects, based on the JSON notation. Lottie animations are widely used in mobile apps, which is why I’ve chosen them for this example.
Add a new page called LottiePage.xaml to the Views folder of the shared project. When ready, add the following XML namespace directive:
xmlns:lottie="clr-namespace:Lottie.Forms;assembly=Lottie.Forms"
Then, add the following code as the page content:
<Grid HorizontalOptions="FillAndExpand"
VerticalOptions="FillAndExpand">
<lottie:AnimationView
HorizontalOptions="FillAndExpand"
VerticalOptions="FillAndExpand"
x:Name="animationView"
Animation="lottielogo.json" IsPlaying="True"
Loop="True"/>
</Grid>
Here are some relevant notes on the previous code:
- The AnimationView control displays Lottie animations.
- The Animation property contains the file name for the animation that will be displayed. It also supports binding data to properties containing JSON strings.
- The IsPlaying property, of type bool, determines whether the animation is automatically played.
- The Loop property states whether the animation repeats (true, false).
In this example, the control points to an animation file called lottielogo.json, which is included in the companion code and downloaded from the LottieFiles website. You’re free to use a different animation file, so long as it follows these rules:
- For Android, the animation file must be copied into the Assets folder of the Android project, and its build action property must be set as AndroidAsset.
- For iOS, the animation file must be copied into the Resources folder of the iOS project, and its build action property must be set as BundleResource.
The way the animation is reproduced can also be controlled in C# code, but that’s not relevant at this point. The key point here is that no .NET MAUI counterpart for this library exists, and you’ll need to use a different one with fewer features.
Displaying PDF documents
There are plenty of third-party components for displaying PDF documents in both Xamarin.Forms and .NET MAUI, but I’ll be using the PDF viewer from Syncfusion® for one simple reason. At this writing, there isn’t 100% feature parity, which will force you to make important considerations at migration time. For now, add a new content page called PdfPage.xaml to the Views folder of the shared project, and add the following XML namespace reference:
xmlns:syncfusion="clr-namespace:Syncfusion.SfPdfViewer.XForms;assembly=Syncfusion.SfPdfViewer.XForms"
Then, as the content of the page, add the following code:
<Grid>
<syncfusion:SfPdfViewer x:Name="PdfViewer" IsToolbarVisible="True" />
</Grid>
The SfPdfViewer control provides a full-featured viewer with all the necessary tools that one would need to read, highlight, and comment on a PDF document. Setting the IsToolbarVisible property to true will display a toolbar with all the relevant tools. The source document can be local or remote. For this example, the application will display a PDF of a Succinctly® ebook from Syncfusion®. To accomplish this, you must add the following C# code to the code-behind file:
private async Task SetPdfDocumentStreamAsync(string URL)
{
HttpClient httpClient = new HttpClient();
HttpResponseMessage response = await httpClient.GetAsync(URL);
var doc = await response.Content.ReadAsStreamAsync();
PdfViewer.LoadDocument(doc);
}
protected override async void OnAppearing()
{
base.OnAppearing();
await SetPdfDocumentStreamAsync("https://www.syncfusion.com/
downloads/support/directtrac/general/pd/
PDF_Succinctly1928776572");
}
The SetPdfDocumentStreamAsync method gets a reference to the remote document by invoking the GetAsync method from the HttpClient class. The content of the response is read in the form of a stream (ReadAsStreamAsync), which is passed to the instance of the SfPdfViewer (LoadDocument). The method is invoked when the page is rendered on screen because OnAppearing supports asynchronous methods, while the page constructor does not. This is enough to demonstrate some potential issues you might face when migrating to .NET MAUI using third-party components.
Implementing broadcast messages
Note: This section requires that you have at least a basic knowledge of the Model-View-ViewModel (MVVM) pattern or the commanding pattern in XAML-based technologies. In addition, it’s best to know what broadcast messages are in Xamarin.Forms.
Broadcast messages allow objects to notify subscribers that something has happened. A typical scenario is with MVVM architectures, where ViewModels send messages to notify subscribers that something happened in the business logic layer, and subscribers (typically pages or windows) receive the message and take appropriate actions. In the current sample project, the implementation of broadcast messages will be defined as follows:
- A new page contains a button, whose action is bound to a Command object defined inside a ViewModel.
- When the command is invoked, a broadcast message is sent to simulate that something happened in the business logic (completing an activity, for example).
- The new page subscribes to the message, and when received, it displays an alert.
Add a new page called BroadcastMessagePage.xaml to the Views folder of the shared project. The code for the page’s content looks like the following:
<StackLayout VerticalOptions="Center"
HorizontalOptions="Center">
<Button x:Name="Button1"
Text="Click here!" WidthRequest="150"
HeightRequest="40" Command="{Binding ActionCommand}"/>
</StackLayout>
The Command property of the Button is data-bound to an object called ActionCommand, which is going to be defined inside a class file called BroadcastMessageViewModel.cs that you want to add into the ViewModels folder of the shared project. Code Listing 3 shows the code for the new ViewModel.
Code Listing 3
using Xamarin.Forms; namespace MigrationSource.ViewModels { public class BroadcastMessageViewModel { public Command ActionCommand { get { return new Command(() => { // Do other tasks here… MessagingCenter.Send(this, "ButtonTapped"); }); } } } } |
The ViewModel defines a property called ActionCommand, of type Command. Inside the property, you could perform other tasks or invoking methods. When the task is completed, a broadcast message is sent via the Send method of the MessagingCenter static class. This method takes two arguments: the instance of the message publisher (typically the current object instance) and the message name as a string. The final step of this section is to make the new page subscribe to the message. This is accomplished by writing the code shown in Code Listing 4 inside the BroadcastMessagePage.xaml.cs code-behind file.
Code Listing 4
using MigrationSource.ViewModels; using Xamarin.Forms; using Xamarin.Forms.Xaml; namespace MigrationSource.Views { [XamlCompilation(XamlCompilationOptions.Compile)] public partial class BroadcastMessagePage : ContentPage { private BroadcastMessageViewModel ViewModel { get; set; } public BroadcastMessagePage() { InitializeComponent(); ViewModel = new BroadcastMessageViewModel(); BindingContext = ViewModel; MessagingCenter.Subscribe<BroadcastMessageViewModel>(this, "ButtonTapped", ShowAlert); } private async void ShowAlert(BroadcastMessageViewModel model) { await DisplayAlert("Info", "You clicked the button!", "OK"); } protected override void OnDisappearing() { MessagingCenter.Unsubscribe<BroadcastMessageViewModel>(this, "ButtonTapped"); base.OnDisappearing(); } } } |
Here’s a list of relevant notes on Code Listing 4:
- An instance of the ViewModel is assigned to the data context (BindingContext) of the page. This allows data-binding to work.
- The page subscribes to a message called ButtonTapped when sent from BroadcastMessageViewModel objects. Subscription is done by invoking the MessagingCenter.Subscribe method, whose signature requires three arguments: the instance of the object that is subscribing, the message name, and an action that will be executed when the message is intercepted.
- Subscribers must also unsubscribe from listening to messages. If you close the page without unsubscribing, and then open the page again, the page subscribes to the message again, which can lead to memory leaks. Unsubscribing happens by invoking the MessagingCenter.Unsubscribe method.
- Like in previous examples, this is also very simple in terms of code structure, but it’s enough to provide a base for understanding how to migrate broadcast messages from Xamarin.Forms to .NET MAUI.
Implementing custom renderers
In Xamarin.Forms, custom renderers make it possible to customize the look and behavior of native controls by accessing platform APIs in C# code. For the current example, you’ll create a custom renderer that will autoselect the content of Entry views every time they are focused on. You need the following pieces:
- A class that inherits from Entry in the shared project and that will leverage the custom renderer. This allows you to apply the custom renderer only to the derived view rather than to all the instances of the base view.
- A custom renderer definition for each platform project.
- The class that inherits from Entry where desired.
In the shared project, add a new folder called Renderers and a new class file called AutoSelectEntry.cs to that folder. The code for this new class looks like the following:
using Xamarin.Forms;
namespace MigrationSource.Renderers
{
public class AutoSelectEntry : Entry
{
}
}
In the Android project, create a new folder called Renderers, and add a new class file called AutoSelectEntryRenderer.cs to that folder. The code for the new class is shown in Code Listing 5.
Code Listing 5
using Android.Content; using MigrationSource.Droid.Renderers; using MigrationSource.Renderers; using Xamarin.Forms; using Xamarin.Forms.Platform.Android; [assembly: ExportRenderer(typeof(AutoSelectEntry), typeof(AutoSelectEntryRenderer))] namespace MigrationSource.Droid.Renderers { public class AutoSelectEntryRenderer : EntryRenderer { public AutoSelectEntryRenderer(Context context) : base(context) { } protected override void OnElementChanged( ElementChangedEventArgs<Entry> e) { base.OnElementChanged(e); if (e.OldElement == null) { var nativeEditText = (global::Android.Widget.EditText)Control; nativeEditText.SetSelectAllOnFocus(true); } } } } |
When the OnElementChanged event is raised, the SetSelectAllOnFocus method is invoked over the native view instance to select its content automatically. Repeat the steps of adding the folder and the class file to the iOS project. In this case, the code for the custom renderer is shown in Code Listing 6.
Code Listing 6
using MigrationSource.iOS.Renderers; using MigrationSource.Renderers; using System; using Xamarin.Forms; using Xamarin.Forms.Platform.iOS; [assembly: ExportRenderer(typeof(AutoSelectEntry), typeof(AutoSelectEntryRenderer))] namespace MigrationSource.iOS.Renderers { public class AutoSelectEntryRenderer : EntryRenderer { protected override void OnElementChanged( ElementChangedEventArgs<Entry> e) { base.OnElementChanged(e); var nativeTextField = Control; nativeTextField.EditingDidBegin += (object sender, EventArgs eIos) => { nativeTextField.PerformSelector(new ObjCRuntime .Selector("selectAll"), null, 0.0f); }; } } } |
Similarly, when the OnElementChanged event is raised, the PerformSelector method is invoked over the instance of the native view. The method argument is an object of type ObjCRuntime whose Selector method applies the selectAll type in order to autoselect the content of an entry. The last step is providing an example using the custom renderer. Go back to the shared project, and in the MainPage.xaml file, add the following XML namespace directive:
xmlns:renderers="clr-namespace:MigrationSource.Renderers"
Now add the following XAML code as the last visual element before the closing tag of the root StackLayout:
<StackLayout>
<renderers:AutoSelectEntry x:Name="Entry1"
Text="Pre-populated Entry for auto-select"/>
</StackLayout>
Specifying some text for the Text property is important to demonstrate the autoselection feature of the derived entry view quickly. This is enough to demonstrate how to migrate a custom renderer from Xamarin.Forms to a .NET MAUI handler later in Chapter 7.
Implementing analytics with Visual Studio App Center
The purpose of this section is to discuss another part of the process that many developers will need to face when migrating from Xamarin.Forms to .NET MAUI—migrating analytic and diagnostic data already available in the Visual Studio App Center.
Note: The App Center was retired on March 31, 2025, though support continues for the analytics and diagnostics features into 2026. Microsoft suggests using other services offered by Azure. In the meantime, you can migrate analytics at no cost while you find an alternative, but do not rely on the App Center for long-term implementations. More details will be provided in Chapter 10.
To enable the collection of analytics and diagnostic data, sign in to the Visual Studio App Center. The home page is shown in Figure 5.

Figure 5: Logging into the Visual Studio App Center
Once logged in, the first thing you need to do is link your app. By app, I mean each individual platform version, so you’ll need to repeat the steps for Android, iOS, macOS, and UWP. In this section, only the Android version will be given as an example. The policies for developing Android apps are not as strict as the iOS policies, which require you to have a Mac computer to build the code. This means that all developers can freely work with Android.
Select Add new app, then specify an identifier for your name (the same project name, for example) and the release type. As you can see in Figure 6, I’ve chosen the Alpha release type, but you can choose a different one.
Tip: Each release type has a different app secret. This allows for the separating of analytic data between releases. Keep in mind that, according to the release type, you’ll need to provide the appropriate code secret in the source code.

Figure 6: Adding a new app
For OS, select Android. For Platform, select Xamarin. When ready, click Add new app. At this point, you will be provided with instructions for setting up analytics in your code (see Figure 7).
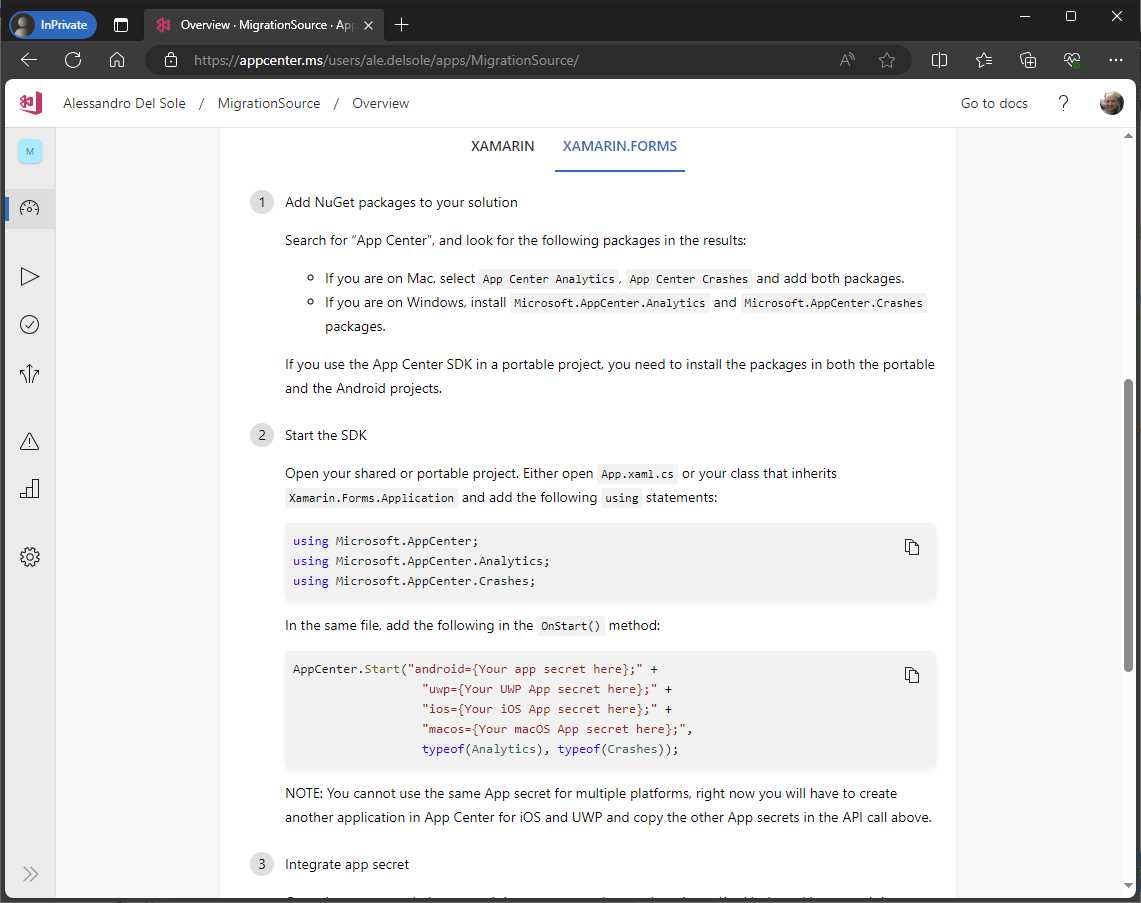
Figure 7: The setup code for analytics and diagnostics
Select the Xamarin.Forms tab and copy the setup code into the OnStart method of the App.xaml.cs file:
protected override void OnStart()
{
AppCenter.Start("android=Your Android App secret here;" +
"uwp={Your UWP App secret here};" +
"ios={Your iOS App secret here};" +
"macos={Your macOS App secret here};",
typeof(Analytics), typeof(Crashes));
}
The latest versions of Visual Studio will automatically add the necessary using directives when pasting the code. For Android, replace “Your Android App secret here;” with the app secret that you see on the page in the App Center.
Suppose you want to track a few actions and send crash data. Open the MainPage.xaml.cs file and extend the existing event handlers as follows:
private async void LinkGesture_Tapped(object sender,
EventArgs e)
{
await DisplayAlert("Info", "You tapped the link!", "OK");
Analytics.TrackEvent("Link tapped");
}
private void BatteryStatusButton_Clicked(object sender,
EventArgs e)
{
try
{
BatteryStatusLabel.Text =
$"Charge level: {Battery.ChargeLevel}";
Analytics.TrackEvent("Battery status checked.");
}
catch (Exception ex)
{
Crashes.TrackError(ex);
}
}
In both event handlers, an invocation to the Analytics.TrackEvent method has been added to send data to the App Center. In the BatteryStatusButton_Clicked event handler, we also added a try..catch block, which sends error data if an exception occurs by using the Crashes.TrackError method. Before running the app and sending analytic events, there’s one last step to complete in the sample project: working with assets and resources.
Adding assets and resources
It’s very common to include images, icons, custom fonts, and other raw assets in mobile app packages. This section recaps how to include images and fonts in Xamarin.Forms projects.
Including images and icons
In Xamarin.Forms, images and icons must be supplied in different resolutions for each platform project. Like in the previous sections, the assumption here is that you already know how images work, so I’ve provided only a recap. In Figure 8, you can see how the default icons appear in Solution Explorer.
![]()
Figure 8: Images and icons in Xamarin.Forms
For Android, the same image or icon must be produced in different resolutions, and each is copied into the corresponding mipmap subfolder without renaming the file. For iOS, images and icons reside in the Resources folder, and you must supply three different resolutions. Files with higher resolution have an @2x and @3x suffix in their name. More about image resolution in Xamarin.Forms can be found in the official documentation.
Creating new images and icons in different resolutions would not be relevant in this chapter, and it would be time consuming, so you can use the autogenerated icons as a reference (icon_about.png, icon_feed.png, and so on). Considerations on converting icons to the appropriate format will be provided in Chapter 9.
Including custom fonts
By default, Xamarin.Forms projects use the current system fonts to display text. You can add custom font files to your projects very easily. For example, you can use Google’s popular Noto Sans Regular font, which you can download from the Google Fonts Noto page. The font file is called NotoSans-Regular.ttf. On Android, this file must be copied into the Assets folder of the platform project, and its build action property must be set as AndroidAsset. On iOS, the font file must be copied into the Resources folder of the platform project, and its build action property must be set as BundleResource.
Once you have added the file, you’ll need to register the font in the App.xaml file. The following code shows how to register the font and must be added to the ResourceDictionary node of the App.xaml file:
<OnPlatform x:Key="RegularFont" x:TypeArguments="x:String">
<OnPlatform.iOS>NotoSans-Regular</OnPlatform.iOS>
<OnPlatform.Android>NotoSans-Regular.ttf#NotoSans-Regular</OnPlatform.Android>
</OnPlatform>
Notice how you need to differentiate between iOS and Android via the OnPlatform tag. On iOS, you register the font by specifying the file name without the extension. On Android, however, you separate the full file name from the font name with a #. The x:Key property declares an identifier that you’ll use to assign the font. In the user interface definition, you’ll assign the FontFamily property of views with the font. The following line assigns the new font to the formatted Label in the MainPage.xaml file:
<Label Margin="10,0,0,0" FontFamily="{StaticResource RegularFont}">
Registering fonts must be done for every font file you add to the app that you want to use in your user interface.
At this point, you have everything you need in your Xamarin.Forms project, and you’re ready to see how it works.
Running the sample app
Rebuild the solution and run the application on your favorite device and platform. Figures in this chapter are based on Android, but the behavior will be the same on iOS. When the application starts up, it sets up a connection to the App Center behind the scenes. The first page should look like the one in Figure 9.
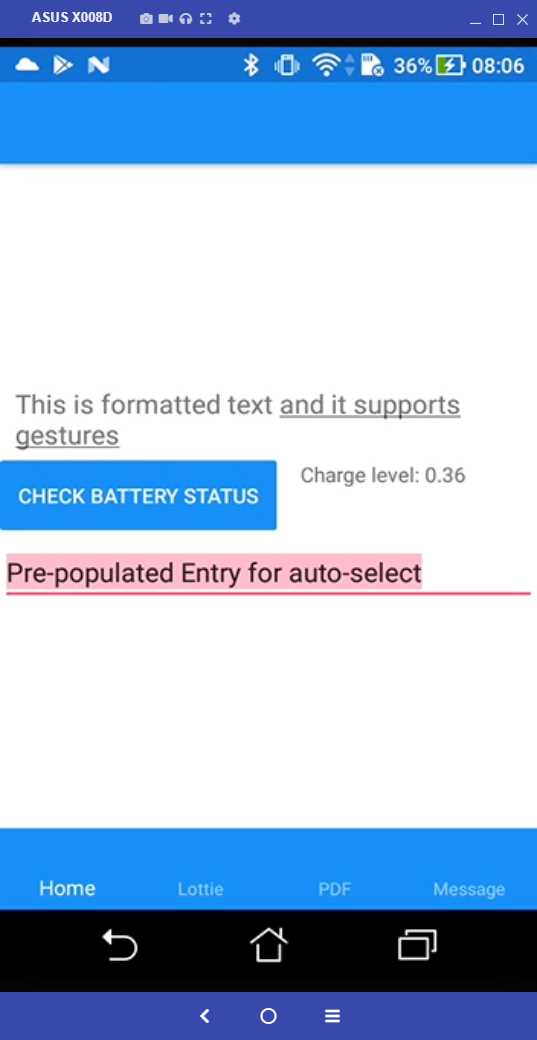
Figure 9: The first page of the app
Click the button and the hyperlink multiple times to send analytic events to the App Center. If you go to the Lottie page, you’ll see the animation playing (see Figure 10).
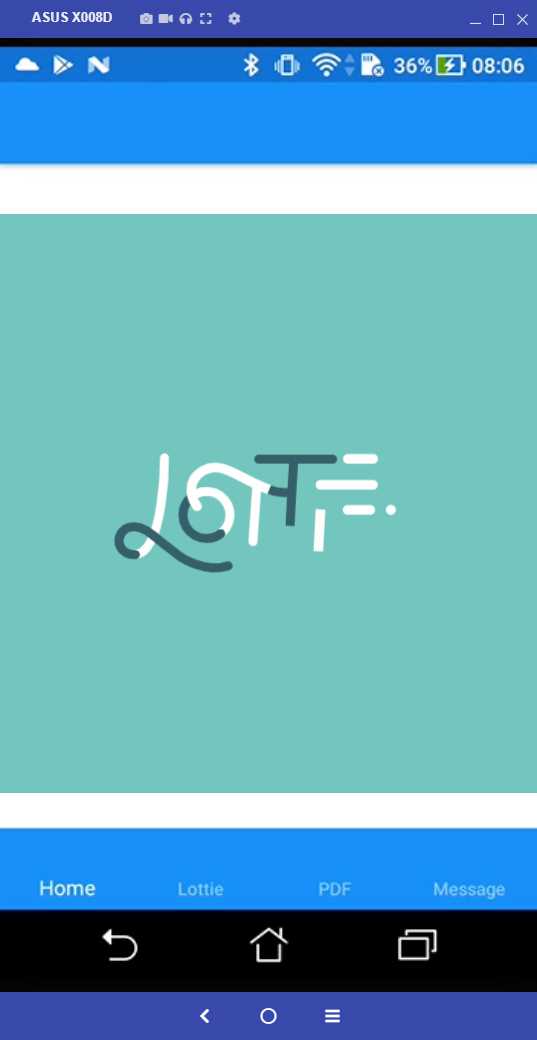
Figure 10: Displaying a Lottie animation
The third tab of the sample app allows you to display a PDF document. If you don’t have a Syncfusion® license, a warning message appears saying that you’re using a trial version. Figure 11 shows how the document appears in the viewer, and the toolbar includes all the necessary tools to work with PDF documents in the app.
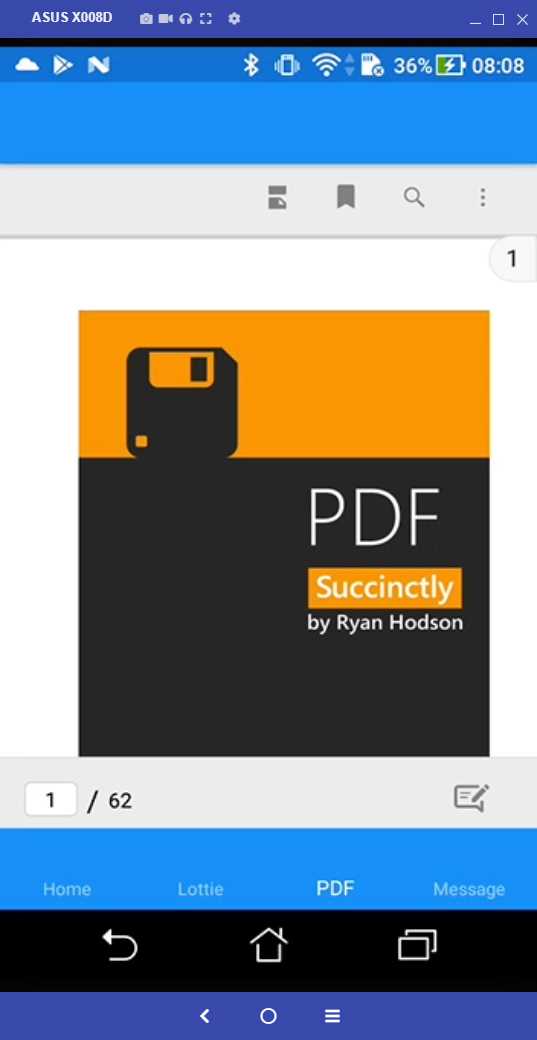
Figure 11: Displaying an in-app PDF document
The last tab of the sample app is related to broadcast messages. Simply click the button to see the message that’s shown based on the publisher/subscriber pattern (see Figure 12).
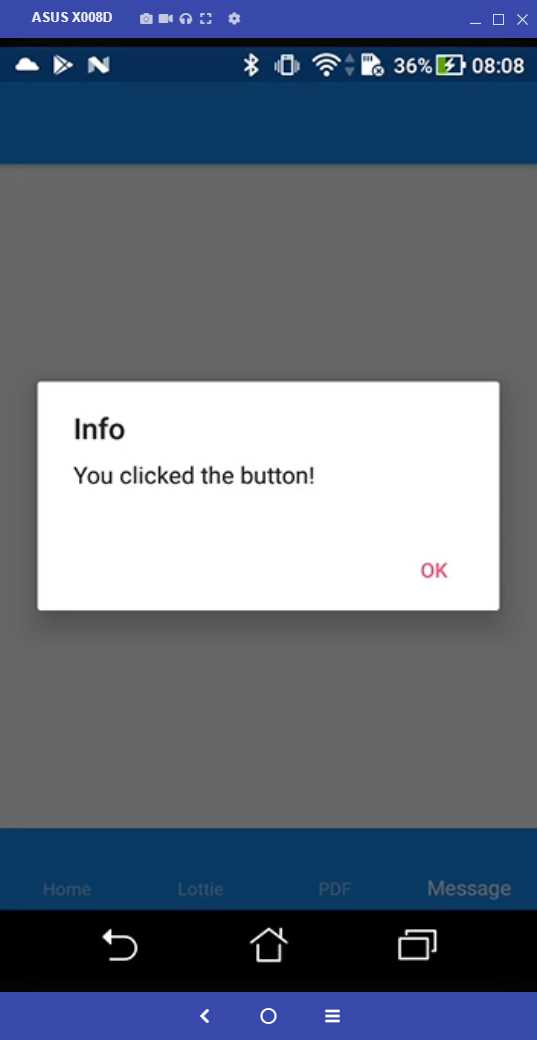
Figure 12: Broadcast messages in action
This part’s migration will be particularly interesting. Now, if you go back into the App Center and open the Analytics tab on the app’s main page, you’ll see some usage metrics, as shown in Figure 13.
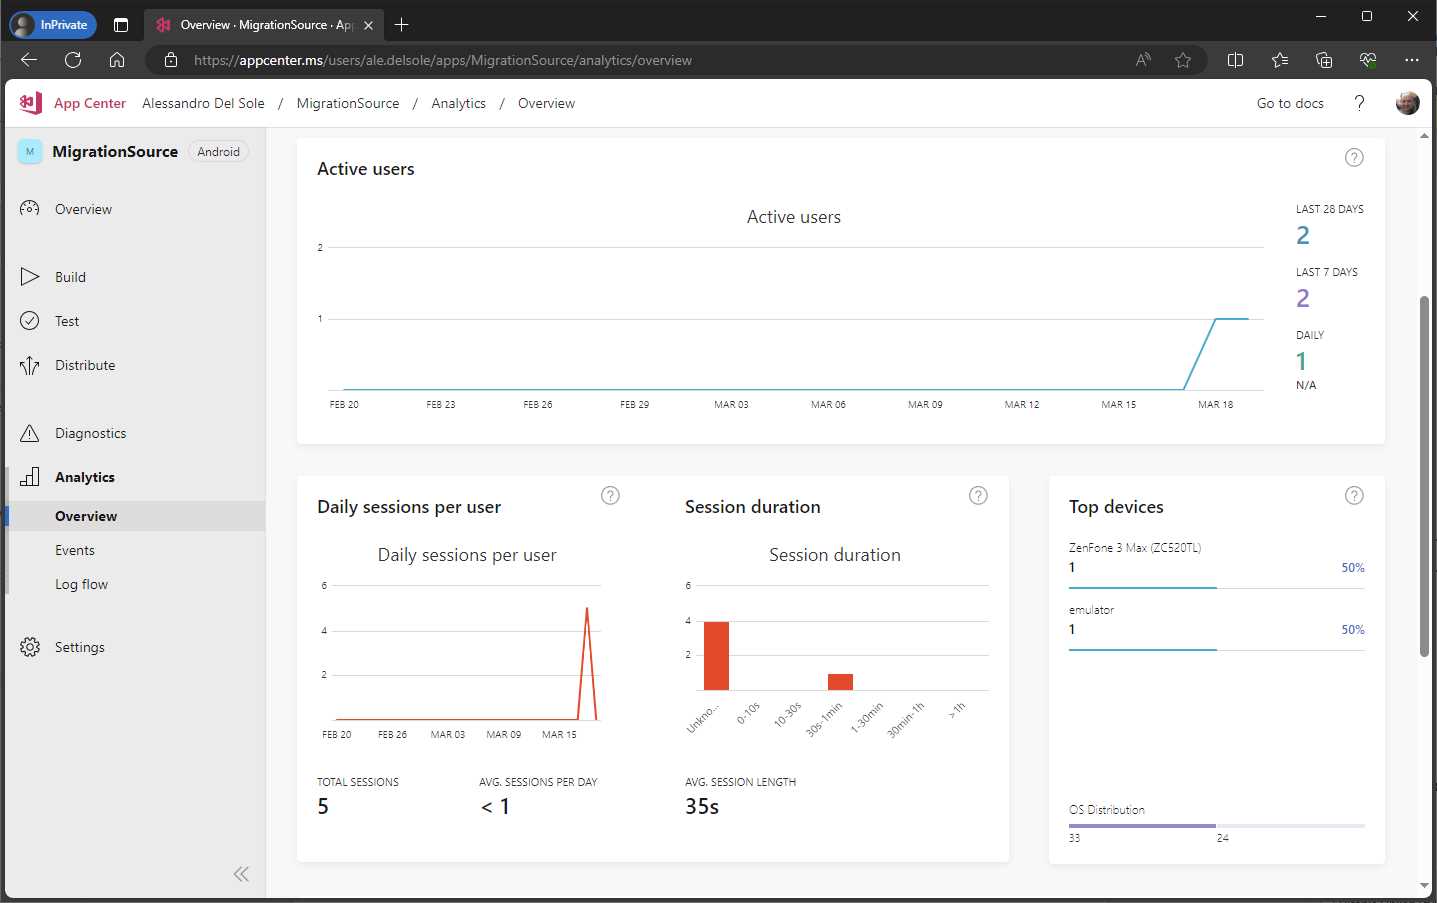
Figure 13: App usage metrics
If you go to the Events tab, you will see the list of events sent by the app (see Figure 14).
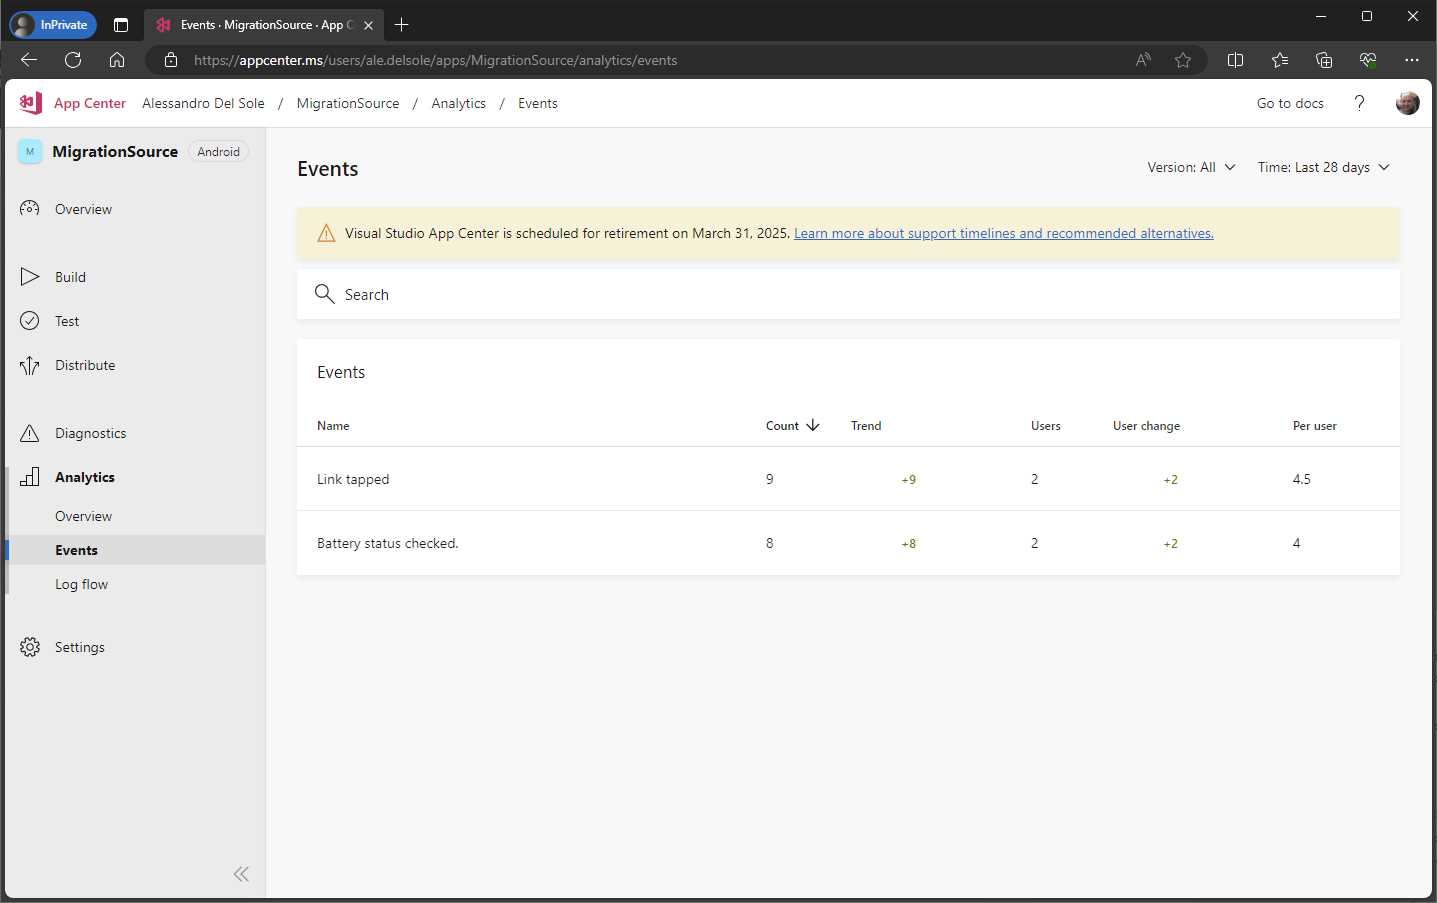
Figure 14: Analytic events in the App Center
Obviously, there are limited metrics and events with a sample project like this, but the analytics history can be very rich with production apps. It’s important not to miss out on analytics, as you’ll see later in the book.
Chapter summary
In this chapter, you’ve created a Xamarin.Forms solution that includes all the critical topics that you will likely face when migrating to .NET MAUI. This includes migrating XAML and C# code, upgrading third-party libraries and components, migrating custom renderers, and adding icons, fonts, broadcast messages, and analytics. Starting with the next chapter, you’ll implement the same features in a .NET MAUI solution, with a thorough premigration analysis.
- An ever-growing .NET MAUI control suite with rich feature sets.
- DataGrid, Charts, ListView, Scheduler, and more.
- Active community and dedicated support.
- Phone, tablet, and desktop support.