
Migrating from Xamarin.Forms to .NET MAUI Succinctly®

CHAPTER 5
Migrating XAML and C# Code
This chapter marks the real start of the migration of your Xamarin.Forms project created in Chapter 2. You’ll focus on migrating the XAML and C# code, learning the critical points that you’ll need to face in terms of technical complexity and time. It’s impossible to show you how to migrate every single view, but the good news is that the majority of your code can be ported without any real issues. The only exception is specific views, such as layouts, which will be discussed in this chapter.
Migrating XAML code
The first thing you’ll notice when migrating from Xamarin.Forms to .NET MAUI is the XML namespace declarations for the base library. In .NET MAUI, they are the following:
xmlns="http://schemas.microsoft.com/dotnet/2021/maui"
xmlns:x="http://schemas.microsoft.com/winfx/2009/xaml"
The benefit of creating a new solution from scratch is that you won’t need to update these declarations manually for every XAML file. The goal of this section is to migrate the content of Code Listing 1 to .NET MAUI. The first important consideration is layouts. In Xamarin.Forms, you use the StackLayout to align visual elements close to each other, either vertically (default) or horizontally. In .NET MAUI, you’ll use two specific layouts: the VerticalStackLayout and the HorizontalStackLayout. Despite the StackLayout still surviving in .NET MAUI, it’s considered deprecated, and it’s kept only for backward compatibility, so you shouldn’t use it.
The new layouts are instead designed from zero, and they’re more optimized. Another important consideration is spacing. In Xamarin.Forms, layouts have a default spacing of 6. In .NET MAUI, the default spacing is 0. So, it’s not enough to replace the StackLayout with the proper specialized layout. It’s also necessary to review the spacing between views. With this in mind, you should rewrite the code for the MainPage.xaml file as shown in Code Listing 7 in .NET MAUI.
Code Listing 7
<?xml version="1.0" encoding="utf-8" ?> <ContentPage xmlns="http://schemas.microsoft.com/dotnet/2021/maui" xmlns:x="http://schemas.microsoft.com/winfx/2009/xaml" x:Class="MigrationTarget.MainPage">
<VerticalStackLayout Spacing="6" VerticalOptions="Center" HorizontalOptions="Center"> <Label Margin="10,0,0,0"> <Label.FormattedText> <FormattedString> <Span x:Name="LinkText" FontSize="18" Text="This is formatted text "/> <Span x:Name="LinkSpan" Text="and it supports gestures" FontSize="18" TextDecorations="Underline"> <Span.GestureRecognizers> <TapGestureRecognizer x:Name="LinkGesture" Tapped="LinkGesture_Tapped" /> </Span.GestureRecognizers> </Span> </FormattedString> </Label.FormattedText> </Label> <HorizontalStackLayout Spacing="6" Margin="10,0,0,0"> <Button x:Name="BatteryStatusButton" Text="Check battery status" Clicked="BatteryStatusButton_Clicked"/> <Label x:Name="BatteryStatusLabel" Margin="10,0,0,0" /> </HorizontalStackLayout> </VerticalStackLayout> </ContentPage> |
As you can see, compared to the Xamarin.Forms version, layouts have been replaced, and the desired spacing has been explicitly added. You’ll also want to adjust spacing for other layouts, including the Grid and the FlexLayout. With real-world applications, replacing and adjusting layouts can take a lot of time and can be technically complex. This is something that really takes a lot of time, and it’s important that you understand how to set up spacing based on your design requirements. That way, you can at least save time on repetitive spacing adjustments.
As you can see, the rest of the code has simply been copied and pasted. In general, you’ll be able to reuse XAML code that leverages views from the base library without the need for changes. There are situations where you might need to replace a property name or some values, but they’re limited. This is why no additional example is required.
Migrating C# code
The next step is migrating C# code related to the base library, and your code can be ported without any issues most of the time. When your changes break the code, you’ll find information in the .NET documentation, and the code editor in Visual Studio will propose appropriate alternatives. The goal of this section is to migrate the content of Code Listing 2. Consider Code Listing 8, which contains the C# code for the MainPage.xaml.cs file.
Code Listing 8
namespace MigrationTarget { public partial class MainPage : ContentPage { public MainPage() { InitializeComponent(); } private async void LinkGesture_Tapped(object sender, EventArgs e) { await DisplayAlert("Info", "You tapped the link!", "OK"); } private void BatteryStatusButton_Clicked(object sender, EventArgs e) { BatteryStatusLabel.Text = $"Charge level: {Battery.ChargeLevel}"; } } } |
As you can see, the code for the methods and event handlers is exactly the same, and there’s no difference in how you access members. .NET MAUI has been designed with migration from Xamarin.Forms in mind, which is why this part of the migration goes smoothly.
Tip: Don’t forget to add the BATTERY_STATS permission in the Android manifest, just like you did for the Xamarin.Forms project.
There are a couple of additional things to consider:
- There is no explicit using directive pointing to the .NET MAUI namespaces (see Table 2) because they’re implicitly added by the background compiler. This is a default setting in the project properties.
- In Xamarin.Forms, the XAML compilation is enabled explicitly with an attribute. This is not necessary in .NET MAUI since that’s the default setting.
- In Xamarin.Forms, you need the Xamarin.Essentials NuGet package to access many device features (including battery management), whereas everything is in the base library in .NET MAUI. This avoids the need for external packages and simplifies project maintenance.
You can run the project to see if everything was migrated as expected.
Migrating other C# code
It’s worth mentioning that you can migrate the following objects and parts of code at no risk:
- Value converters: In .NET MAUI, value converters have the same architecture, and converter classes still implement the IValueConverter interface.
- Behaviors: In .NET MAUI, behaviors have the same architecture and still inherit from Behavior<T>. Attached behaviors are also supported.
- Data binding: The data-binding engine has been redesigned behind the scenes, but how you implement and consume data-binding in .NET MAUI is the same as Xamarin.Forms. This includes command implementation, as you’ll discover later in Chapter 8.
There are differences between the implementation of application lifecycle events that deserve a dedicated paragraph.
Migrating the application lifecycle management
In .NET MAUI, the object that handles the application lifecycle is called Window. When the application starts up, an instance of this class is created. Such an instance also allows you to subscribe to events that represent moments of the lifecycle, summarized in Table 3.
Table 3: Events in the application lifecycle
Event | Description |
|---|---|
Created | Raised after the native window or mobile app page has been created. The cross-platform window will have a handler for the native one, but it might not be visible yet. |
Activated | Raised when the window or page has been activated and focused on. |
Deactivated | Raised when the window or page has lost focus, though it might still be visible. |
Stopped | Raised when the window or page is no longer visible. |
Resumed | Raised when an app resumes after being stopped. This event can only be raised if the Stopped event was previously raised. |
Destroying | Raised when the native window or page is being destroyed and deallocated. |
There are two ways to handle the app lifecycle events: overriding the CreateWindow method in the App class and subclassing the Window class.
Overriding the CreateWindow method
The MAUI runtime invokes the CreateWindow method to generate an instance of the Window class when the application starts up. You can override this method to subscribe to the app lifecycle events. Code Listing 9 shows an example.
Code Listing 9
public partial class App : Application { public App() { InitializeComponent(); MainPage = new AppShell(); } protected override Window CreateWindow(IActivationState activationState) { Window window = base.CreateWindow(activationState); window.Created += (sender, eventArgs) => { // take actions here... }; window.Activated += (sender, eventArgs) => { // take actions here... }; return window; } } |
What you need to do is subscribe to one or more of the app events. For example, the preceding code starts listening to the Created and Activated events (see Table 3). You will need to add your own logic to every event handler you subscribe to based on the type of event. For instance, if you were subscribing to the Destroying event, you could write code in the event handler that stores the state of the app and its data.
Subclassing the Window class
An alternative to handling events directly in the App class is creating a class that derives from Window and overrides the methods that represent events. As it normally happens with naming conventions in .NET, event names are preceded by the On prefix. You’ll have OnCreated, OnActivated, OnStopped, and so on. Code Listing 10 shows an example of subclassing the Window class.
Code Listing 10
public class MyWindow: Window { public MyWindow(): base() { } public MyWindow(Page page): base(page) { } protected override void OnCreated() { base.OnCreated(); } protected override void OnActivated() { base.OnActivated(); } } |
As with the technique discussed in the previous section, the example only shows how to override two events, but you’ll be able to handle one or more events depending on your requirements. Add your own logic inside each event handler. At this point, the App class needs to create an instance of the Window object via the new MyWindow class. This can be accomplished by overriding the CreateWindow method as follows:
protected override Window
CreateWindow(IActivationState activationState)
{
MyWindow window = (MyWindow)base.CreateWindow(activationState);
return window;
}
The two techniques—handling events in the App and subclassing the Window class—are equally good, so the choice is completely up to you. I personally prefer to handle events in the App class because of how I organize my code.
Running the code
In the Visual Studio toolbar, select the target platform and device for debugging. The following figures are still based on the same Android device used in Chapter 2. When ready, press F5. When the application starts up, you’ll notice a different color tone, but the rest of the features are the same, as shown in Figure 16. You’ll have the option to fix color tones later. You can click the hyperlink and the button to see how they work like the ones in Xamarin.Forms.
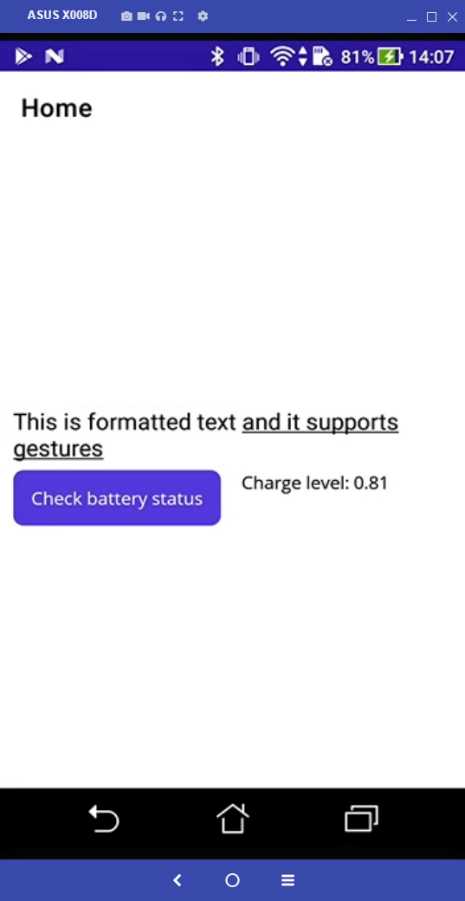
Figure 16: Running the .NET MAUI sample app
Tip: In .NET MAUI, the page title is always displayed if specified in the shell. If you don’t want to display the title, remove the Title property for each ShellContent item in the AppShell.xaml file.
Your first code migration was successful but also quite easy. In the next chapters, migration will be much more challenging.
Closing considerations
Though it’s not possible to walk you through the migration of every single view and every possible scenario, when you migrate your XAML and C# code, you can always keep in mind the following considerations:
- Layouts might need reworking. You might need to replace layout views, and you’ll need to adjust the spacing.
- Known issues exist. Check the .NET MAUI GitHub repository if your code isn’t working, even if it’s apparently legal.
- In general, copying and pasting your code will work for both XAML and C#.
- If your changes break the code, the code editor and the .NET MAUI documentation will be great guides to make corrections.
In summary, you do not need to know how to migrate every single view. Instead, you need the tools to be able to migrate any view and any piece of code with success.
Chapter summary
In this chapter, you’ve learned the general steps you’ll take when migrating XAML and C# code from Xamarin.Forms to .NET MAUI. You’ve seen how layouts need reworking, you’ve been advised of potential known issues, and you’ve seen how .NET MAUI avoids the need for an external library to interact with device features. In the next chapter, you’ll face the most critical part of the migration: upgrading components and libraries.
- An ever-growing .NET MAUI control suite with rich feature sets.
- DataGrid, Charts, ListView, Scheduler, and more.
- Active community and dedicated support.
- Phone, tablet, and desktop support.