
Migrating from Xamarin.Forms to .NET MAUI Succinctly®

CHAPTER 7
Migrating Custom Renderers
In Xamarin.Forms, custom renderers allow you to customize the appearance and behavior of platform-specific views from C# code, accessing the native APIs. You write platform-specific code in each platform project and make changes to the native view according to the target operating system’s features. In .NET MAUI, you have one project, so the way you access and customize native views is completely different and based on the concept of handlers. In this chapter, you’ll get a quick refresher on handlers, and you’ll learn how to migrate a custom renderer to the new structure.
Understanding handlers
Handlers are classes that .NET MAUI uses to access and render native views, which bind MAUI’s views and layouts to their native counterparts. For example, the Label view maps to a LabelHandler class that MAUI uses to render the native UILabel, TextView, and TextBlock views on iOS, Android, and Windows, respectively. Handlers let you access the full set of features of native views, overriding and customizing the behavior, look, and features of views themselves. Compared to Xamarin.Forms, handlers in MAUI provide a simpler way to access views’ native features. Before starting with handlers in practice, it’s important to understand how they work behind the scenes.
Architecture of handlers
Controls in .NET MAUI have an interface representation that provides abstract access to the control. For instance, a Button is backed by an IButton interface. Such interfaces are also referred to as virtual views, and they are mapped to native controls via handlers. Figure 22, taken from the official Microsoft documentation, shows how handlers map native controls to cross-platform controls with the support of virtual views.
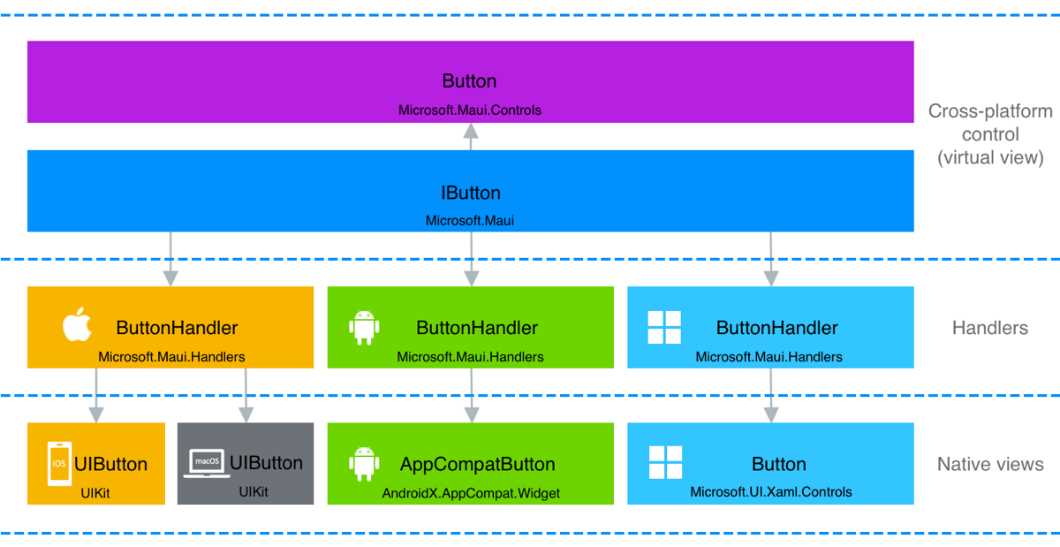
Figure 22: Handler architecture (Source: Microsoft)
In practice, you access handlers via their interface (IButton, in the case of the Button). This creates a reference to the native view through a managed object. Handlers expose the full set of native features and API of a view, so you have total control over the user interface. In the next few paragraphs, you’ll learn how to access native features via handlers.
Tip: The documentation also shows the full list of controls based on handlers.
Customizing views via handlers
Handlers can be defined in different places across your project. They’re commonly defined in the MauiProgram.cs file if you want them to be available to the whole project or in the code-behind file of a page if you want to limit their visibility to an individual page. For this example, you’ll implement the handler in the MainPage.xaml.cs file for consistency with the sample Xamarin.Forms app created in Chapter 2. In the sample app, we declared and used the custom control in the MainPage object.
Considering the sample Xamarin.Forms project, remember that a custom renderer was defined to implement autoselection over a control called AutoSelectEntry, which derives from Entry. Since you’re migrating the app from Xamarin.Forms to .NET MAUI, you’ll want to achieve the same result. As you now know, you can’t use custom renders in MAUI, so you’ll need to create a handler and use the native view features. Code Listing 11 shows how to accomplish this by leveraging the EntryHandler class. This must be added to the MainPage.xaml.cs file.
Code Listing 11
void ModifyEntry() { Microsoft.Maui.Handlers.EntryHandler. Mapper.AppendToMapping("AutoSelectOnFocus", (handler, view) => { #if ANDROID handler.PlatformView.SetSelectAllOnFocus(true); #elif iOS handler.PlatformView.PerformSelector(new ObjCRuntime .Selector("selectAll"), null, 0.0f); #elif WINDOWS handler.PlatformView.SelectAll(); #endif }); } |
Here’s a list of key notes on the preceding code:
- The Microsoft.Maui.Handlers namespace exposes the handler objects that you can use.
- In this case, the EntryHandler is used.
- IPropertyMapper allows you to add or change a feature’s behavior by making it possible to access the virtual view for the current handler.
- The AppendToMapping method extends control mapping by adding a virtual property to the view via its first argument. The second argument is an Action that allows you to invoke the API from the native view. The first argument is important because it represents a key that you can use to modify the mapping you added.
- The handler and view variables have a reference to the handler of the native view and the cross-platform control, respectively.
Note: You can invoke the PrependToMapping method instead of AppendToMapping when you want to modify the mapping for the handler before mappings to the cross-platform control are applied. Similarly, you can invoke ModifyMapping to modify an existing mapping.
The PlatformView property of the handler class represents the native view and allows for invoking its native APIs. By using preprocessor directives, you can invoke the proper native code depending on the platform your app is running on. On Android, autoselection is performed by invoking the SetSelectAllOnFocus method; on iOS, autoselection can be done by invoking the PerformSelector method and passing the area to be selected; on Windows, the invocation of SelectAll will autoselect the text.
Obviously, much more complex customizations are possible via handlers, but you should now have an idea of how much simpler it is to work with handlers in MAUI compared to custom renderers in Xamarin.Forms. The preceding example will affect your page’s default Entry view and all its instances. You can restrict the handler’s behavior to custom objects. For example, you can create a custom entry like this:
public class AutoSelectEntry: Entry
{
}
And then you can apply the autoselection to this type only, by adding an if block, as follows:
void ModifyEntry()
{
Microsoft.Maui.Handlers.EntryHandler.
Mapper.AppendToMapping("AutoSelectOnFocus", (handler, view) =>
{
if (view is AutoSelectEntry)
{
#if ANDROID
handler.PlatformView.SetSelectAllOnFocus(true);
#elif iOS
handler.PlatformView.PerformSelector(new ObjCRuntime
.Selector("selectAll"), null, 0.0f);
#elif WINDOWS
handler.PlatformView.SelectAll();
#endif
}
});
}
This will still work because the AutoSelectEntry view relies on the EntryHandler and its PlatformView implementation.
Understanding handler events
Handlers have a lifecycle represented by the following events:
- HandlerChanging, which is fired when a new handler is being created for a MAUI control and when an existing handler is being removed from a MAUI control.
- HandlerChanged, which is fired when a MAUI control has been created. This ensures that a handler for the specified control is actually available.
The handler methods of these events can be the place to subscribe to the native views’ events. The following code demonstrates how to subscribe to the FocusChange event of the native Android text box:
private void Entry_HandlerChanged(object sender, EventArgs e)
{
#if ANDROID
((sender as Entry).Handler.PlatformView as
Android.Views.View).FocusChange += OnFocusChange;
#endif
}
Notice how the code only works with the platform specified via the preprocessor directives. The instance of the native view is retrieved via a double conversion: the first conversion is from the native View instance into a PlatformView object (which was explained previously), and the second conversion is converting the PlatformView into the actual view, an Entry in this case. In the same code block, an event handler for the FocusChange event is specified. I’ve provided an example of an event handler here:
private void OnFocusChange(object sender, EventArgs e)
{
var nativeView = sender as
AndroidX.AppCompat.Widget.AppCompatEditText;
if (nativeView.IsFocused)
nativeView.SetBackgroundColor(Colors.LightGray.ToPlatform());
else
nativeView.SetBackgroundColor(Colors.Transparent.ToPlatform());
}
This is just an example, and the logic inside the event handler is completely up to you. The relevant point here, though, is that the sender object represents an instance of the native view. In the case of an Entry, it’s the AppCompatEditText. The subscription to the FocusChange event will be done when the HandlerChanged event is fired. This means you can subscribe to native view events when such an event is raised. On the other side, you’ll need to unsubscribe from the same events when the handler is being removed, and this can be done when the HandlerChanging event is fired. Here’s an example:
private void Entry_HandlerChanging(object sender,
HandlerChangingEventArgs e)
{
if (e.OldHandler != null)
{
#if ANDROID
(e.OldHandler.PlatformView as Android.Views.View).
FocusChange -= OnFocusChange;
#endif
}
}
Notice how the HandlerChangingEventArgs class exposes a property called OldHandler, which is not null when the handler is being removed. In this particular case, you can unsubscribe from the selected events. The way you connect the HandlerChanging and HandlerChanged event handlers to the view is always the same, so in your XAML code, you can assign the events with their handlers as follows:
<Entry HandlerChanging="Entry_HandlerChanging"
HandlerChanged="Entry_HandlerChanged" />
It’s quite common to interact with native view events, because they give you a lot of control over the view lifecycle, and .NET MAUI provides a convenient way to simplify event handling on all the supported platforms.
Consuming the handler
For consistency with the Xamarin.Forms project that you’re migrating, suppose you want to consume the AutoSelectEntry view (and its handler) defined previously. Open the MainPage.xaml file and add the following XML namespace declaration, which allows for consuming objects exposed by the namespace:
xmlns:local="clr-namespace:MigrationTarget"
Now, before the closing tag of the root VerticalStackLayout, add the following code:
<local:AutoSelectEntry
Text="Welcome to .NET Multi-platform App UI"
FontSize="18" HandlerChanging="Entry_HandlerChanging"
HandlerChanged="Entry_HandlerChanged"
HorizontalOptions="Center" />
You’ll declare the view in the exact same way as in Xamarin.Forms but point to events specific to the concept of a handler. If you run the sample project now, you’ll see how autoselection is applied when the control is focused on (see Figure 23).
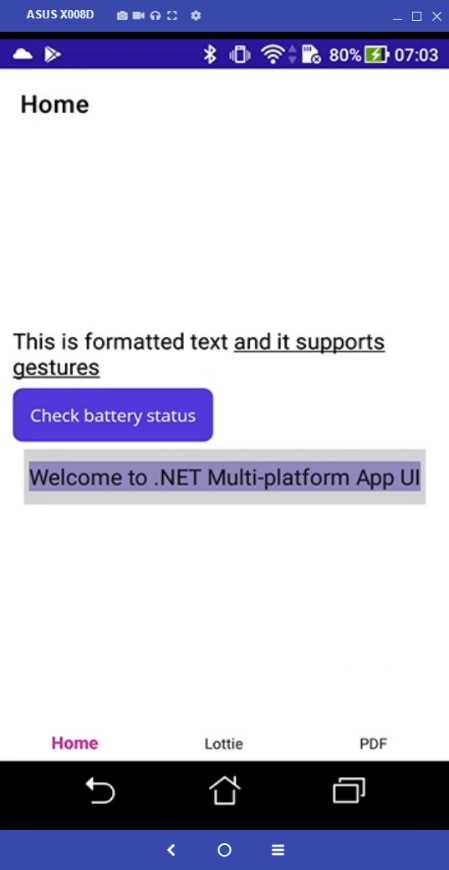
Figure 23: Entry customization with handlers
As you can see, migrating custom renderers to handlers can be tricky, especially if you have many of them. The time and effort must be carefully evaluated, and you might also want to check if enhanced cross-platform options might offer the features you need instead of customizing views in code. This is another scenario where there isn’t a single answer, but at least you now have an idea of the complexity you might face at migration time.
Hints about partial classes
Handlers are incredibly powerful and therefore not easy to summarize in a few paragraphs. In this chapter, you’ve discovered how to take advantage of handlers to customize the mapping of native views, but there’s more. For example, you can write more advanced, cleaner code using partial classes, with event handlers on one side and behavioral changes on the other.
Introducing platform-specifics
Like Xamarin.Forms, .NET MAUI provides the so-called platform-specifics, which allow for consuming features that are available only on specific platforms. Platform-specifics represent a limited number of features, but they allow you to work without having to use handlers.
Note: Platform-specifics do not represent features that are available cross-platform. They instead provide quick access to features that are available only on specific platforms. As an additional clarification, a platform-specific might be available on iOS, while the same platform specific might not exist for Android and Windows.
For instance, suppose you’re working on an iOS app and you want the separator of a ListView to be full width (which is not the default). With platform-specifics, you just need to add the code shown in Code Listing 12.
Code Listing 12
<?xml version="1.0" encoding="utf-8" ?> <ContentPage xmlns="http://schemas.microsoft.com/dotnet/2021/maui" xmlns:x="http://schemas.microsoft.com/winfx/2009/xaml" x:Class="NativeAccess.PlatformSpecificsiOSPage" xmlns:iOS="clr-namespace:Microsoft.Maui.Controls.PlatformConfiguration.iOSSpecific;assembly=Microsoft.Maui.Controls" Title="PlatformSpecificsiOSPage"> <VerticalStackLayout> <ListView iOS:ListView.SeparatorStyle="FullWidth" x:Name="ListView1"> <!-- Bind your data and add a data template here... --> </ListView> </VerticalStackLayout> </ContentPage> |
In the case of iOS, you need to import the Microsoft.Maui.Controls.PlatformConfiguration.iOSSpecific namespace. Then you can use the attached properties provided by this namespace on the view of your interest. In the example shown in Code Listing 12, the attached property, ListView.SeparatorStyle, allows you to customize the separator width. Platform-specifics can also be used in C# code. In that case, you’d need two using directives to import the Microsoft.Maui.Controls.PlatformConfiguration and Microsoft.Maui.Controls.PlatformConfiguration.iOSSpecific. Then you can invoke the On method on the view of your interest, passing the target platform and supplying the platform-specific implementation you need. Here’s an example that represents the same scenario seen in Code Listing 12, but in C# code:
this.ListView1.On<iOS>().SetSeparatorStyle(SeparatorStyle.FullWidth);
Platform-specifics work the same way on Android and Windows. In the case of Android, the namespace you import is Microsoft.Maui.Controls.PlatformConfiguration.AndroidSpecific (for both XAML and C#), whereas the Windows namespace is Microsoft.Maui.Controls.PlatformConfiguration.WindowsSpecific. Code Listing 13 shows an example of Android platform-specifics that allow you to enable fast scrolling on a ListView.
Code Listing 13
<?xml version=”1.0” encoding=”utf-8” ?> <ContentPage xmlns="http://schemas.microsoft.com/dotnet/2021/maui" xmlns:x="http://schemas.microsoft.com/winfx/2009/xaml" x:Class="NativeAccess.PlatformSpecificsAndroidPage" xmlns:android="clr-namespace:Microsoft.Maui.Controls.PlatformConfiguration.AndroidSpecific;assembly=Microsoft.Maui.Controls" Title="PlatformSpecificsAndroidPage"> <VerticalStackLayout> <ListView android:ListView.IsFastScrollEnabled="true"/> </VerticalStackLayout> </ContentPage> |
There are specific documentation pages for a list of built-in platform-specifics for iOS, Android, and Windows.
Tip: A platform-specific for one platform will simply be ignored on other platforms.
Chapter summary
In this chapter, you’ve faced one of the most complex migration topics: going from custom renderers to handlers. You’ve seen how handlers provide a managed mapping of native views and how you can interact with native APIs from the shared code by taking advantage of preprocessor directives. You’ve also seen how the way you consume handlers in XAML is very similar to Xamarin.Forms. Finally, you’ve read about platform-specifics, another .NET MAUI similarity with Xamarin.Forms that can be ported quite easily. Another important piece is coming in the next chapter: implementing broadcast messages.
- An ever-growing .NET MAUI control suite with rich feature sets.
- DataGrid, Charts, ListView, Scheduler, and more.
- Active community and dedicated support.
- Phone, tablet, and desktop support.