
Localization for .NET Succinctly®

CHAPTER 7
Text
Text. Is that really something that we have to discuss? Isn’t it all about saving texts in different languages? Unfortunately, no.
String comparisons
Let’s start with a simple exercise. What will the resulting variable contain – true or false?
class Program { static void Main(string[] args) { var result = "i".Equals("I", StringComparison.CurrentCultureIgnoreCase); Console.WriteLine("Result is: " + result); } } |
It will return false if you live in Turkey. You could have done the comparison like this:
class Program { static void Main(string[] args) { var result = "i".Equals("I", StringComparison.OrdinalIgnoreCase); Console.WriteLine("Result is: " + result); } } |
This will return true for all countries.
Know your target audience or what you want to get out of string comparisons. Letters that might seem obvious to you might work differently for someone else.
Different types of letters and alphabets
U.S. citizens have been spared from Latin characters, but most of the European countries have not. And to make it more complex, many European countries uses different sets of Latin characters.
In Sweden we use “åäö” while in France they use “àâæçéèêëîïôœùûüÿ”. And that’s just two of the countries in Europe. Then we have the rest of the world, with several different alphabets.
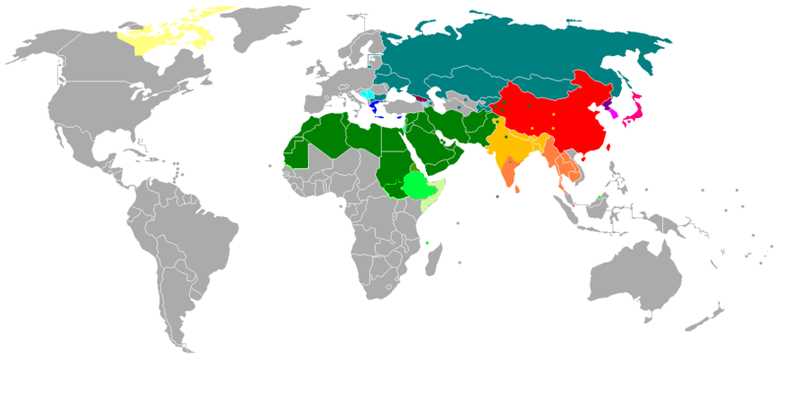
(Image from Wikipedia.)
Alphabets: Armenian , Cyrillic , Georgian , Greek , Latin , Latin (and Arabic) , Latin and Cyrillic
Abjads: Arabic , Hebrew
Abugidas: North Indic , South Indic , Ge'ez , Tāna , Canadian Syllabic and Latin
Logographic+syllabic: Pure logographic , Mixed logographic and syllabaries , Featural-alphabetic syllabary + limited logographic , Featural-alphabetic syllabary
Encodings
In the beginning there was ASCII (American Standard Code for International Interchange), which was a 7-bit text encoding. It couldn’t represent accent characters such as ‘ä’. Here is a Swedish sentence:
–Hej alla barn, jag heter Rulle! Jag är full – full Rulle! Hej då!
To solve the problem with accents, another method of encoding called Extended ASCII (or 8bit ASCII) was introduced. It was later replaced with iso-8559-1 (ISO Latin 1), which worked for most western European countries. These encodings are still simple, since only one byte is used per character.
Those encodings are not enough, since many countries have extended character sets.
你好世界
That text says “hello world” in Chinese (I hope; these Chinese characters were generated using Google Translate).
If you want to know the 99.5 percent most frequently used Chinese characters, you have to learn 3,500 different ones. As you might have figured out, all of those characters won’t fit into a single byte.
Unicode
A new standard has emerged to solve this problem, a version of Unicode called UTF8. UTF8 was designed to be compatible with ASCII. That is, the most frequently used ASCII characters are encoded in the same way in UTF8. The great thing with that is that many text parsers (like an HTML parser) don’t have to know about the encoding, as those bytes look the same as in ASCII (i.e. <html> looks the same in both ASCII and UTF8).
UTF8 has also become the default encoding in many programming languages (and in HTML).
Unicode comes in different flavors. The name of each version reflects how many bytes it requires. UTF8 requires one byte (8 bits = 1 byte). UTF16 gets a minimum of two bytes per character, and UTF32 requires three bytes. Which one to use depends on the alphabet that you want to support.
.NET
In .NET we have the System.Text namespace where all different encodings are located. In that namespace there is a class that contains a couple of static properties to make our life easier.
.NET itself uses UTF16 as internal encoding for the String class. Do note that System.IO.StreamWriter and other classes use UTF8 per default.
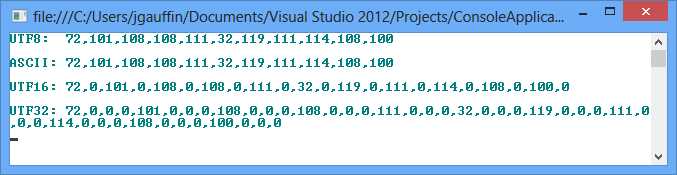
Let’s prove what I said about the encodings by printing the bytes that they generate:
class Program { static void Main(string[] args) { var text = "Hello world"; var utf8 = Encoding.UTF8.GetBytes(text); var ascii = Encoding.ASCII.GetBytes(text); var utf16 = Encoding.Unicode.GetBytes(text); var utf32 = Encoding.UTF32.GetBytes(text); Console.WriteLine("UTF8: " + string.Join(",", utf8)); Console.WriteLine(); Console.WriteLine("ASCII: " + string.Join(",", ascii)); Console.WriteLine(); Console.WriteLine("UTF16: " + string.Join(",", utf16)); Console.WriteLine(); Console.WriteLine("UTF32: " + string.Join(",", utf32)); } |
As you can see in Figure 41, UTF8 and ASCII are identical while UTF16/32 takes up more space:
Resource files
Resource files are special files that contain different types of resources like images and text. These files can be used for localization when you create multiple copies of them. Each copy of the file represents a specific culture.
To add a resource file, right-click on the project in the Solution Explorer, click Add, and then click New item. Next, find Resource file in the list and give it a name like shown below

The file itself contains something called a string table. It’s a mapping between identifiers and the strings that they represent. The identifier itself must remain the same for all different resource rules. An example follows:
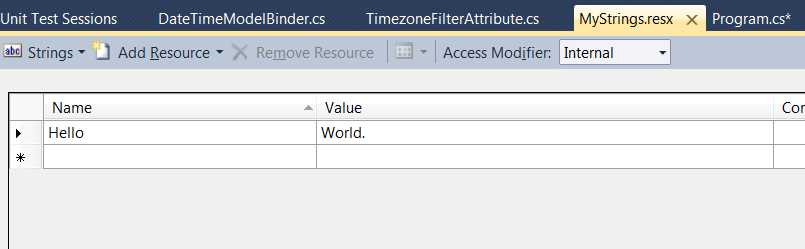
You can finally use the string:
class Program { static void Main(string[] args) { Console.WriteLine(MyStrings.Hello); Console.ReadLine(); } } |
Visual Studio automatically generates the MyStrings class and names it as the resource file. The class contains all resources in the resource file and acts as an accessor. VB.NET has a custom class named My that is used to access resources. More information about this class is available in MSDN.
The resources themselves are accessed from a special class called a ResourceManager. You can access that file using MyStrings.RecourceManager. I’ll come back to that later.
That above code example was for one language only. To add support for multiple languages, you just copy the language file and give it a new name with a language code suffix. The file without a prefix is used as the default language file, as illustrated in Figure 44.
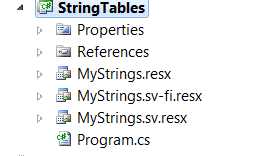
Notice that I created one file with the “sv” suffix and one with the “sv-FI” suffix. That means that anyone speaking Swedish in Finland will get their own language while users from all other Swedish-speaking countries get a neutral dialect (the “sv” file). Everyone else can use the file without a language suffix.
How do you specify the language to use? You do it using the CultureInfo class, as described previously.
class Program { static void Main(string[] args) { Thread.CurrentThread.CurrentUICulture = new CultureInfo("sv-FI"); Console.WriteLine(MyStrings.Hello); Thread.CurrentThread.CurrentUICulture = new CultureInfo("sv"); Console.WriteLine(MyStrings.Hello); Thread.CurrentThread.CurrentUICulture = new CultureInfo("en-US"); Console.WriteLine(MyStrings.Hello); Console.ReadLine(); } } |
The output is:
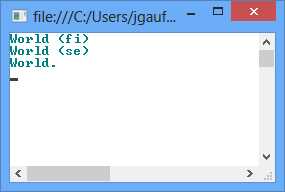
The string outputted is the one that I’ve written in the respective resource file.
ASP.NET (WebForms)
In ASP.NET we also use string tables. They are divided into two different sections: local resources and global resources.
Global resources
Global resources can be shared between pages. You can use the static accessors just as with regular string tables (i.e. MyResourceFile.MyTextName).
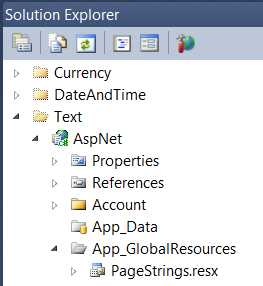
However, the global resources are placed in a special file inside the ASP.NET projects. To add the folder, right-click on the project in the Solution Explorer, click Add ASP.NET Folder, and then click Add, as shown in the following figure:

That adds the global resources folder to which you can add global resource files, as shown in Figure 47.
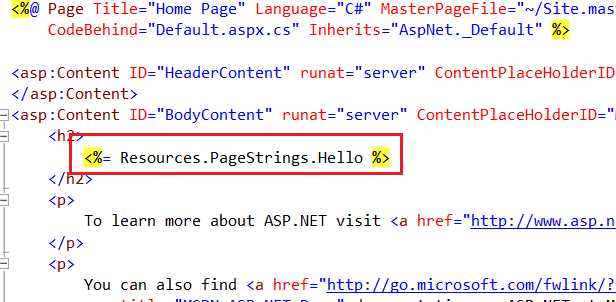
The following example illustrates a resource string usage:
Local resources
Local resources are resources that are specific for each page. They cannot be shared between several pages. The cool thing with local resources is that you can use them in a convention over configuration manner.
First, create a simple page (I used the default WebForms template in VS2012):
<%@ Page Title="" Language="C#" MasterPageFile="~/Site.Master" AutoEventWireup="true" CodeBehind="DemoForm.aspx.cs" Inherits="WebApplication2.DemoForm1" %> <asp:Content ID="Content1" ContentPlaceHolderID="HeadContent" runat="server"> </asp:Content> <asp:Content ID="Content2" ContentPlaceHolderID="FeaturedContent" runat="server"> </asp:Content> <asp:Content ID="Content3" ContentPlaceHolderID="MainContent" runat="server">
<!-- Note the meta:resourcekey --> <asp:Button ID="SomeButton" runat="server" Text="Not localized" meta:resourcekey="SomeButton" /> </asp:Content> |
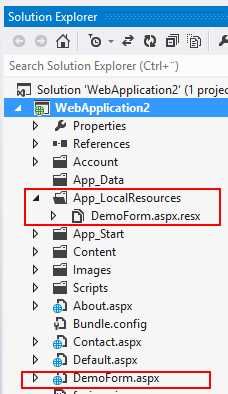
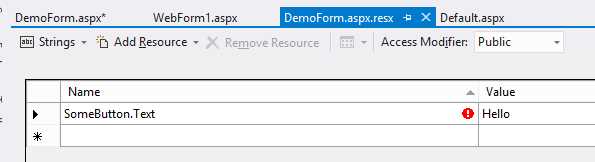
The meta resource key is the string that tells us what to find. ASP.NET will look for that key in a resource file, which got the exact name as the ASPX file, as shown in Figure 49.
In that file you should add every property of every control that you want localized. I’ve just added the Text property of the button in the following example:
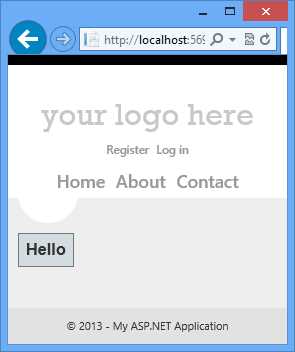
The result is shown in Figure 51:
Read more in MSDN or in MSDN Magazine. The MSDN Magazine article targets .NET 2.0, but is still valid.
Auto selecting culture
You can get ASP.NET to automatically select a culture for you by using the ones provided by your web browser.
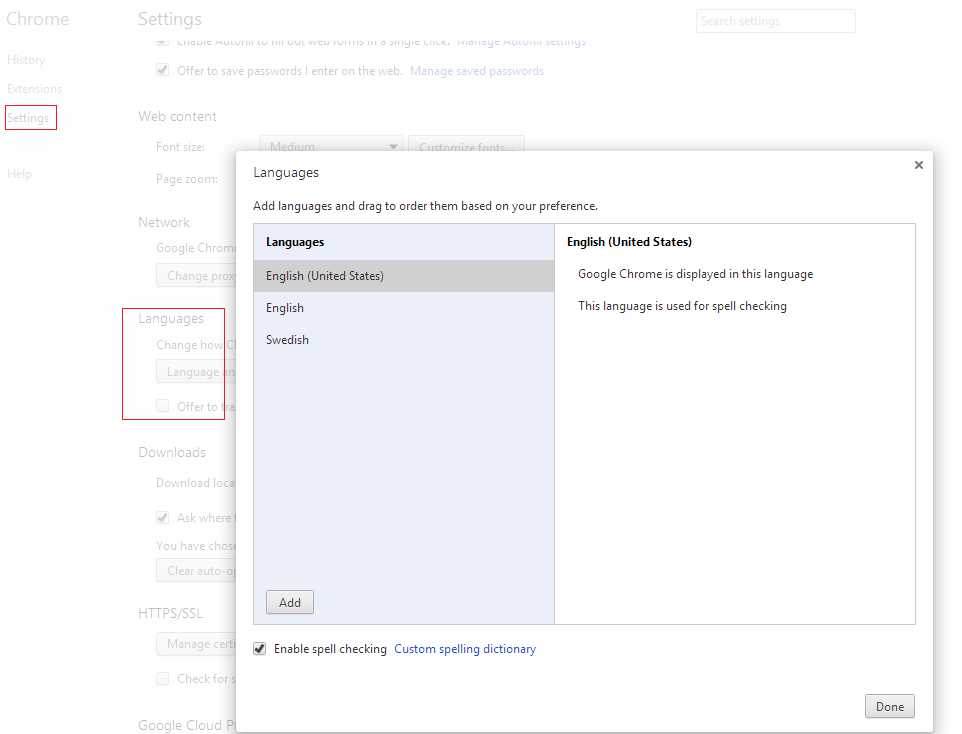
In Google Chrome I’ve configured my languages as follows:
These settings are included in the web request like this:
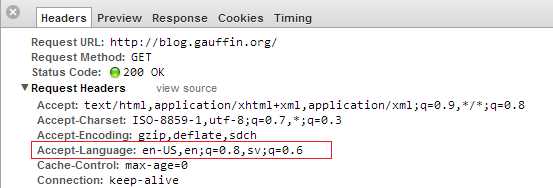
To get ASP.NET to use those values, we have to open up web.config and find globalization under system.Web.
<configuration> <system.web> <globalization culture="auto" uiCulture="auto" /> <compilation debug="true" targetFramework="4.5" /> <httpRuntime targetFramework="4.5" /> </system.web> </configuration> |
ASP.NET MVC & WebApi
ASP.NET and WebApi use similar techniques for localization, so I will document their approaches in the same section.
There are three different sections that can be translated in MVC/WebApi. Each section uses its own solution for the localization.
Views
The recommended approach for views is to use string tables as for regular ASP.NET projects. Create a file under global resources and access it using the generated static class as shown in the following figure.
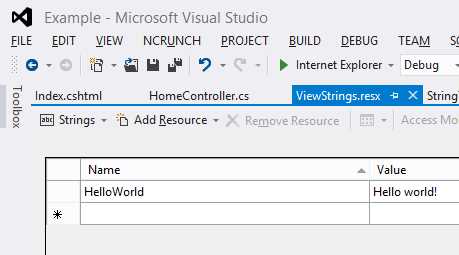
Next, create a new view in which you use that resource file:
@using Resources @{ ViewBag.Title = "Index"; } <h2>Index</h2> <p>@ViewStrings.HelloWorld</p> |
Running the application would display the following text:

View models
View models in ASP.NET MVC can also be localized. The strings are still stored in resource files. But as there is no way to globally specify a resource file (or even per view model), you have to repeat the specification for each model.
Start by creating a new resource file and specifying the strings.
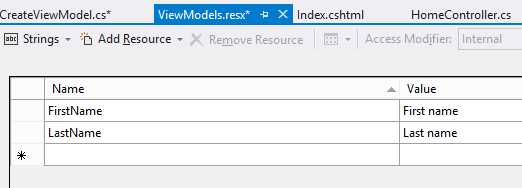
Next, create a new view model:
namespace MvcModels.Models.Users { public class CreateViewModel { public string FirstName { get; set; } public string LastName { get; set; } } } |
To create a connection between the view model and the string table, we use an attribute called [Display]. In it we specify which resource file to use and what the field is called:
namespace MvcModels.Models.Users { public class CreateViewModel { [Display(ResourceType = typeof(Resources.ViewModels), Name = "FirstName")] public string FirstName { get; set; } [Display(ResourceType = typeof(Resources.ViewModels), Name = "LastName")] public string LastName { get; set; } } } |
There is however one problem. Resource files are by default compiled as internal classes. That doesn’t work well with the attributes, since they exist in the System.ComponentModel.DataAnnotations assembly. Hence we need to reconfigure the resource file to generate a public class.
Right-click on the resource file in the Solution Explorer and select Properties. Change the settings so that the Custom Tool is set to PublicResXFileCodeGenerator and the Custom Tool Namespace is set to Resources. Finally, change the Build Action to Embedded Resource. The project should now be able to run.
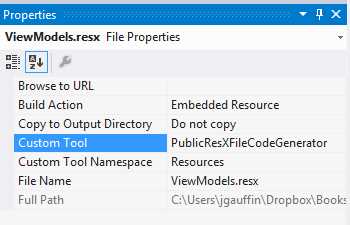
- Resource file changes
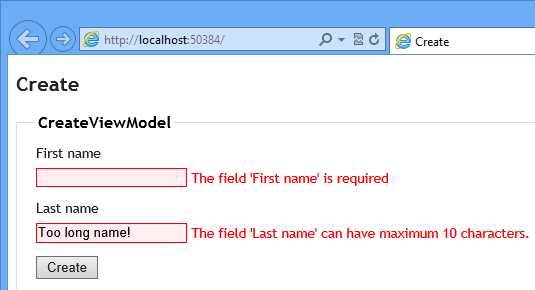
Validation messages
Validation messages work in a similar fashion. We use string tables and attributes to specify that the validation messages should use resource files to get the localized strings.
If we build on the previous example we get the following view model:
namespace MvcValidation.Models.Users { public class CreateViewModel { [Display(ResourceType = typeof(Resources.ViewModels), Name = "FirstName")] [Required(ErrorMessageResourceType = typeof(Resources.ViewModels), ErrorMessageResourceName = "Required")] public string FirstName { get; set; } [Display(ResourceType = typeof(Resources.ViewModels), Name = "LastName")] [Required(ErrorMessageResourceType = typeof(Resources.ViewModels), ErrorMessageResourceName = "Required")] [StringLength(20, ErrorMessageResourceType = typeof(Resources.ViewModels), ErrorMessageResourceName = "StringLength")] public string LastName { get; set; } } } |
The string table looks like this:
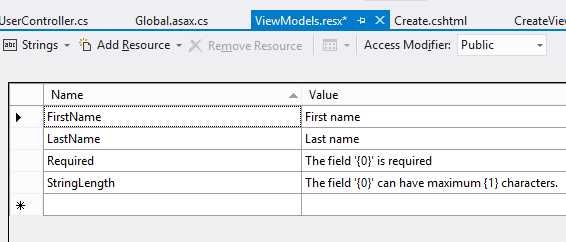
If you look closely, you will see that we are now using formatters (the “{0}” strings). The number of arguments depends on the number of arguments used in the validation attribute constructor. The first argument will always be the property name, while the other arguments depend on the constructor.
The end result is:
Alternatives to string tables
If you would like to use an alternative to string tables you either need to stop using Data Annotations (since there really is no way to extend its localization handling) or start using a third-party library (which needs to use some sort of hack). There is no other way.
As for the first option, I recommend that you look at the Fluent Validation library, which can be found on CodePlex at: http://fluentvalidation.codeplex.com/.
For the latter, I’ve created a library called Griffin.MvcContrib that can use any data source for the strings. With it you do not have to specify the resource files but can revert to just using validation attributes. Do note that I use some hacks in it to allow you to keep using the validation attributes as Microsoft intended.
Your models look clean:
namespace GriffinMvcContrib.Models.User { public class CreateViewModel { [Required] public string FirstName { get; set; } [Required] [StringLength(10)] public string LastName { get; set; } } } |
You can read about the library in gihub if you are interested in learning more.
Switching languages
Sometimes you do not want to use the culture specified by the browser (as shown in the “Auto selecting culture” example).
You can create a nifty little HTTP module, which allows you to switch languages by using the query string. Simply add a new value called “lang” like shown in the following figure:
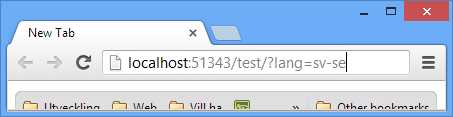
That string will be picked up by the module and stored in a cookie. The actual handling is therefore transparent to your application.
The HTTP module is automatically loaded into ASP.NET and will automatically set the correct cultures for you.
The module:
using System; using System.Globalization; using System.Threading; using System.Web; using Microsoft.Web.Infrastructure.DynamicModuleHelper; [assembly: PreApplicationStartMethod(typeof(ExampleApp.LanguageSwitcherModule), "Setup")] namespace ExampleApp { public class LanguageSwitcherModule : IHttpModule { private const string CookieName = "LangCookie"; public static void Setup() { DynamicModuleUtility.RegisterModule(typeof(LanguageSwitcherModule)); } public void Init(HttpApplication context) { context.BeginRequest += OnRequest; } public void Dispose() { } private void OnRequest(object sender, EventArgs e) { var app = (HttpApplication) sender; // language switched if (app.Request.QueryString["lang"] != null) { var lang = app.Request.QueryString["lang"]; AssignLanguage(lang); SetCookie(app.Response, lang); } // same language as before. else if (app.Request.Cookies[CookieName] != null) { AssignLanguage(app.Request.Cookies[CookieName].Value); } } private static void AssignLanguage(string lang) { Thread.CurrentThread.CurrentCulture = Thread.CurrentThread.CurrentUICulture = new CultureInfo(lang); } private static void SetCookie(HttpResponse response, string language) { response.Cookies.Add(new HttpCookie(CookieName, language) { Expires = DateTime.Now.AddYears(1), }); } } } |
Web sites
When working with web sites you typically use the lang attribute on the HTML element to specify the language that the HTML document is in. You can also use that element in javascripts to specify which language to load.
<html lang="x-klingon"> <head> <title>tlhIngan maH!</title> </head> <body> <h1>nuqneH</h1> <p>nuqDaq 'oH puchpa''e'</p> </body> </html> |
An x is actually a valid tag, and means that the language is experimental. So what the lang tag says is that we are use an experimental language with the dialect “Klingon.”
Otherwise you use any of the tags defined in the HTML5 specification (HTML4 uses the same type of code).
JavaScript plugins
JavaScript plugins can be localized by using a global extension to your plugin.
You typically begin by creating a plugin (myplugin.js):
var MyPlugin = (function() { function checkName(name) { if (name === 'Jonas') { return 'Kungen'; } else { return name; } } function MyPlugin() { }
MyPlugin.prototype.print = function(name) { name = checkName(name); return MyPlugin.Texts.Welcome.replace('{name}', name); }
return MyPlugin; })(); // Initialize default language. if (!MyPlugin.Texts) { MyPlugin.Texts = {}; MyPlugin.Texts.Welcome = 'Hello, {name} is in the house.'; } |
Then you add one or more languages in separate files (myplugin.sv-se.js)
MyPlugin.Texts.Welcome = 'Hej, {name} har äntligen kommit.'; |
Finally, you can select the correct language file by using the same technique as before:
<html lang="sv-se"> <head> <title>Javascript example</title> <script src="plugin.js"></script> <!-- use your server side language to get the correct language code --> <script src="plugin.sv-se.js"></script> </head> <body> <script type="text/javascript"> var plugin = new MyPlugin(); document.writeln(plugin.print('Jonas')); </script> </body> </html> |
This approach makes it easy to localize scripts. Simply copy the default language or any other to a separate file. The one making the localization can just replace the new texts. It also allows your users (if you are a plugin developer) to localize your plugin without effort.
- 1800+ high-performance UI components.
- Includes popular controls such as Grid, Chart, Scheduler, and more.
- 24x5 unlimited support by developers.