
LINQPad Succinctly®

CHAPTER 4
LINQPad Basics
Queries: the basic concept in LINQPad
LINQPad uses the term query for every piece of code that is written in the editor. So from this point forward in LINQPad Succinctly, the term query will be used for pointing to every code sample displayed in it.
As discussed in the “Save Hello World code” section of the previous chapter, a query can be saved for future use. When a query is saved, LINQPad will display its filename beneath a tree view node called My Queries. This tree view is located at the bottom-left side of the user interface.
Changing the location where queries are saved
LINQPad stores queries in a folder named LINQPad Queries, which by default is located in the Documents folder that belongs to the current user. This behavior can be changed by clicking the Set Folder hyperlink located above the My Queries tree view node. This action will bring up the Preferences dialog box with the Folders tab selected.
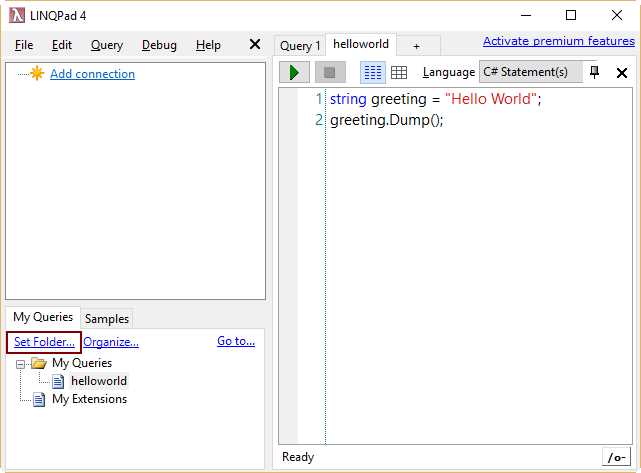
Figure 16: The Set Folder hyperlink
All queries discussed in this book will be stored in a folder named C:\LINQPad_Succinctly\Queries. To select this folder, first create it on disk, and then click the Custom Location button located under the My Queries framework in the Preferences dialog box. Next, click the Browse hyperlink to the right of the same option button, and the Browse For Folder dialog box will appear.

Figure 17: The Browse For Folder dialog box
Select C:\LINQPad_Succinctly\Queries, and then click OK. After that, the folder name will appear in the combo box list located under the Custom Location option button.

Figure 18: The Preferences dialog after the C:\LINQPad_Succinctly\Queries folder
Click OK to accept all changes made.
Searching for a specific query
In a working environment with a few queries, locating a specific one may be a simple task. But when those queries increase in number, this can be a hard work. LINQPad solves this issue by allowing you to search queries using a term. To do this, click on the Go to hyperlink located on the My Queries tree view node.

Figure 19: The Go to hyperlink.
The Navigate To Query dialog box will appear on the screen. At this point, the user can type a term into the Search Terms combo box, and LINQPad will display all queries with names that contain the term typed. Typing the term hel will cause LINQPad to display the helloword.linq query in the Result list.

Figure 20: The Navigate to Query dialog
Select the helloworld query from the list, and then click OK to open this query in the editor.
Programming languages available in LINQPad
In the “LINQPad user interface” section of previous chapter, 14 graphic elements were identified. One of these elements was the Language Selector combo box. As explained in this section, this graphic element allows the user to choose the programming language that will be used to write queries.
LINQPad has the following programming languages available:
- C# Expression: An expression written in C#, with no semicolon at the end of line.
- C# Statements: Several statements written in C#. Each code line must end with a semicolon.
- C# Program: A C# Main () method, which can be followed by another methods or another class definitions. Each code line must end with a semicolon.
- VB Expression: Same as C# Expression, but coded in VB.Net.
- VB Statements: Same as C# Statements, but coded in VB.Net.
- VB Program: Same as C# Program, but coded in VB.Net.
- SQL: One or more statements coded in SQL language.
- ESQL: Entity SQL Language Queries.
- F# Expression: An expression written in F#.
- F# Program: A program block written in F#.
Query file internal structure
When a query is saved, LINQPad associates the .linq file extension to its filename. Internally, a header in XML format is added before the code written in the query. The following sample displays this structure.
Code Listing 3
<Query Kind="Expression" /> // Here it is, the simplest "hello, world" ever! (Just hit F5) "Hello, world!" |
As noted in the previous sample, the root node for the XML header saved with the query is precisely named Query. The attribute Kind for this node tells LINQPad which type of programming language should be used when compiling the query. This matches with the option chosen from the Language Selector combo box.
If a query uses a SQL connection (which will be explained in the following section), the internal structure for the query file will look like the following sample.
Code Listing 4
<Query Kind="Expression"> |
<Connection> |
<ID>4dbf890a-9be0-431c-a6d4-4bb20c1ba604</ID> |
<Persist>true</Persist> |
<Server>.\SQLEXPRESS</Server> |
<SqlSecurity>true</SqlSecurity> |
<UserName>sa</UserName> |
<Password>AQAAANCMnd8BFdERjHoAwE/Cl+sBAA5T916HCR6MaMom1sOSIA=</Password> |
<Database>uspostalcodes</Database> |
<ShowServer>true</ShowServer> |
</Connection> |
</Query> |
Places.Where(row => row.County_id == 1926) |
Now the Query node of the XML header contains a node named Connection. This node stores all parameters needed to connect to the database server employed by the query.
With both of these samples, the XML header added to the query tells LINQPad which programming language and SQL connection the query uses.
Managing SQL connections
We can manage connections to SQL servers using the LINQPad user interface. This can be done in the Connection’s tree view area, located at the left side of the interface, by clicking on the Add connection hyperlink.

Figure 21: The Add connection hyperlink in Connection’s tree view area
Creating a SQL connection
When you click the Add connection hyperlink, the Choose Data Context dialog box will be displayed. In this dialog, you can choose the LINQPad driver that will be used to make the connection. In this case, the LINQ to SQL driver (which is the default) will be used.
To complete driver selection, click Next. (Clicking Cancel will abort the process.)

Figure 22: The Choose Data Context dialog
The LINQPad Connection dialog box is shown (titled “LINQ to SQL Connection” in LINQPad 5) in order to set connection’s parameters. The example for this book will create a Microsoft SQL Server connection. Select the SQL Server option from the Provider frame, located at the top of the dialog box.
It is assumed that a Microsoft SQL Server Express instance is installed in the local computer, and that this instance it was named SQLEXPRESS during the SQL’s installation process. It’s also assumed that this instance was configured for a SQL Authentication security mode.
Regarding how databases will be managed, LINQPad gives three options:
- Display all databases stored in the server, using a TreeView.
- Attach a database file stored in the local hard drive to the server.
- Specify a specific database from the server, or create a new one.
For purposes of this book, the first option will be selected.
Finally, the user should configure a set of options for the connection’s Data Context.
- Pluralize EntitySet and Table properties. All entities and table properties are shown in plural.
- Capitalize property names. All name for properties appear with the first letter in uppercase.
- Include Stored Procedures and Functions. When checked, all functions and stored procedures belonging to any database that appears in the tree view are displayed.
The connection used in this book requires all default options being left with no changes.

Figure 23: LINQPad Connection dialog box
You can test the connection before accepting the parameters by clicking the Test button, located at the bottom of the dialog box. Once the test is passed, click OK to create the connection and display it in the user interface.

Figure 24: The new connection appears in the Connection’s tree view area.
By default, LINQPad names a connection using the server name followed by a period and the name of the authenticated user, when SQL Authentication is chosen. In this case, the name displayed in the tree view is .\SQLEXPRESS.sa. because I connected as the SQL Server sys admin. If Windows Authentication is selected in the LINQPad Connection dialog box, the name given to the connection will contain the server name only.
Note: When a specific database is selected in the LINQPad Connection dialog box, the connection’s name will contain the name of the database that was chosen, at the end.
The Connection context menu
The Connection context menu will pop up when the user right-clicks on the connection’s name.

Figure 25: The Connection context menu
The commands available from this menu are:
- Refresh: Queries the server and reloads all entities and their properties.
- Delete Connection: Removes the selected connection from the tree view.
- Rename Connection: Allows you to customize the name for the connection.
- Flag as Production: Sets a flag to indicate that the connection used is in a production environment. When clicked, the word “Production” will appear at the right of the connection’s name. Then, the command will appear in the context menu as “Unflag as Production.”
- Create Similar Connection: Shows the LINQPad Connection dialog with all the parameters for the selected connection, in order to create an exact new one or a connection with almost the same parameters values.
- Properties: Shows the LINQPad Connection dialog box, in order to change connection’s parameters.
Browsing LINQPad samples
The LINQPad user interface provides a special tab named Samples. This tab is located beside the My Queries tree view area.
To work with a specific sample, click on the name of the desired one. LINQPad will automatically bring up the code for that sample into the editor.

Figure 26: The Samples tab
Referring to the previous figure, if you click the Hello LINQPad! sample, the following code will be displayed in the editor.
Code Listing 5
// Here it is, the simplest "hello, world" ever! (Just hit F5) "Hello, world!" |
The previous code shows a simpler “Hello World” example than the one discussed in the “The ever-present Hello World” section in Chapter 3.
As the code suggests, the user should hit F5 in order to execute the code. This is the equivalent of clicking on the Execute Query button.

Figure 27: Output for the “Hello LINQPad!” sample
A LINQ-to-objects sample
To demonstrate LINQ-to-objects support, the “A simple query expression” sample will be used. The code for this sample is the following.
Code Listing 6
// Now for a simple LINQ-to-objects query expression (notice no semicolon): from word in "The quick brown fox jumps over the lazy dog".Split() orderby word.Length select word // Feel free to edit this... (No-one’s watching!) You'll be prompted to save any // changes to a separate file. // // Tip: You can execute part of a query by highlighting it, and then pressing F5. |
The code is essentially a one-line LINQ-to-objects query expression that returns a list of words from a string. The String Split method creates that list. Then, the orderby clause sorts the list based on every word’s length. In this case, the list is sorted beginning with the smallest word and ending with the largest one. Finally, the select statement iterates the list sequentially.
When the expression is executed, it produces the following output.
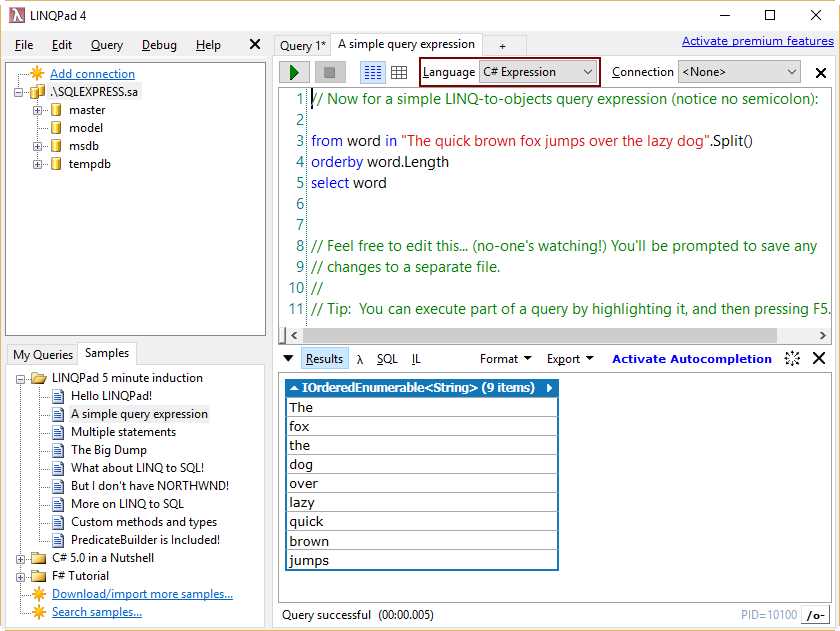
Figure 28: Output for the “A simple query expression” sample
The Language Selector combo box displayed in the previous figure shows C# Expression, which is the type of language used for a one-line statement. In this case, no semicolon should be used at the end of the code line.
A multiple statements sample
LINQPad also can execute multiple statements at a time. The “Multiple statements” sample will be used to demonstrate this feature. The code for this sample is the following.
Code Listing 7
// Setting the query language to "C# Statement(s)" permits multiple statements: var words = from word in "The quick brown fox jumps over the lazy dog".Split() orderby word.ToUpper() select word;
var duplicates = from word in words group word.ToUpper() by word.ToUpper() into g where g.Count() > 1 select new { g.Key, Count = g.Count() };
// The Dump extension method writes out queries: words.Dump(); duplicates.Dump(); // Notice that we do need semicolons now! |
The first statement of this sample does almost the same job as the sample discussed in the previous section. But in this case, the list is sorted alphabetically, using the uppercase format for each word in it. After that, the list is stored in the words collection.
The next statement is intended to get a list of duplicate words along with how many of these words exists into the words collection. The from statement iterates the words list, and uses the group clause to gather those words in uppercase format that are exactly the same. The criteria used to create groups is the uppercase format of each one of them. Every group is stored into g variable as an IGrouping interface, which is a collection of data records of string type (word.ToUpper ()).
A special Key property is added. This property holds the grouped value (in this case, the uppercase format of each word) that is associated with all records in the collection. The where clause makes g available for the select clause only when the Count method of the collection returns a value greater than 1. When this happens, a new <string, int> collection item is added to the duplicates collection, using the grouped value (g.Key) as a key for the item and storing the value returned by the g.Count method (which is actually the number of duplicates).
The Dump extension method (which will be explained in the following section) generates the output for each one of the objects.
As stated previously, semicolons need to be used in a multiple statements query. Also, C# Statement(s) must be selected from the Language combo box.
The execution of the query will display the following output.

Figure 29: A multiple statements query
The Dump method
The Dump extension method is probably one of the most powerful features of LINQPad. The purpose of this method is to display the value(s) of almost any type of object, generating an output to be usually displayed on screen.
How Dump works
The Dump extension method is not a shortcut for .NET’s Console.WriteLine method. Instead, it is a recursive method that generates a display for the values of objects, in HTML format. It supports collections, DataTables, Images, and other types. It can also format collections of complex objects into tables.
The Dump method knows how objects dumped are built, and what values are stored into them, by using the .NET Reflection mechanism. It then turns these objects into HTML and displays the result in a grid. This mechanism makes results more readable and provides the user with a great way to debug complex objects.
To demonstrate Dump, the user should select C# Statement(s) from the Language combo box, and then type the following code in the editor.
Code Listing
new FileInfo(@"C:\Windows\explorer.exe ").Dump(); |
When the previous code is executed, the output displayed will be the following.

Figure 30: Dump method’s output
Figure 30 shows an example of the Dump method’s output. Note that the column header for the grid has a blue background. Also, a white down arrow is displayed at the left. This means that the output result can be expanded, getting more details on it.

Figure 31: Dump method’s output expanded
The Dump method allows you to pass a string parameter in order to display a description before the result. The following example demonstrates this feature.
Code Listing 8
new FileInfo(@"C:\Windows\explorer.exe ").Dump("Windows Explorer info"); |
When the previous code is executed, the following output will be displayed.

Figure 32: Dump method’s output with a description
Some issues with the Dump method
The Dump method works great on small collections and most objects. The user might notice long running times with big collections or some specific object types. Complex objects with many levels of hierarchy, or with a large number of properties, can be difficult to read into the result panel.
Chapter summary
This chapter was dedicated to showing basic concepts about LINQPad. One of these concepts is the term “query.” LINQPad uses this term for every piece of code written in the editor, and it allows us to save this code in code. All queries saved are displayed beneath a tree view node called My Queries.
LINQPad stores queries in a folder named LINQPad Queries, located into the user’s Documents folder. This behavior can be changed by clicking the Set Folder hyperlink, and browsing for a new folder in the Preferences dialog box. All queries discussed in this book will be saved in a folder named C:\LINQPad_Succinctly\Queries.
When the user works with a few queries, locating a specific one is simple. But when those queries increase in number, this can be hard work. To solve this issue, LINQPad allows you to search queries by using a term. This can be done by clicking on the Go to hyperlink located on the My Queries tree view node. Then, the user can type the term in the Navigate to Query dialog, and LINQPad will show all queries that match that term.
LINQPad can compile code in ten programming language variations. These variations are C# Expression, C# Statements, C# Program, VB Expression, VB Statement, VB Statements, VB Program, SQL, ESQL, F# Expression, and F# Program.
All query filenames are associated with the .linq file extension. Internally, a header in XML format is added at the beginning of the file. This header tells LINQPad which kind of programming language and SQL connection are used by the query.
LINQPad allows you to manage connections to SQL servers in the Connection’s tree view area by clicking on the Add Connection hyperlink. Then, the Choose Data Context dialog box displays, which allows the user to choose which LINQPad driver will be used. For purposes of this book, we’ll use the LINQ to SQL driver (which is the default).
After the LINQPad driver is chosen, the LINQPad Connection dialog box is shown to set the connection’s parameters. A Microsoft SQL Server connection will be created, assuming that a SQLEXPRESS instance configured with SQL Authentication security mode is installed in the local computer. Also, the default Data Context options will be used for the connection.
LINQPad names a connection using the server name followed by a period and the name of the authenticated user, when SQL Authentication is chosen. The name displayed for the connection created will be .\SQLEXPRESS.sa. When Windows Authentication is selected, the name for the connection will contain the server name only.
When the connection is displayed in the user interface, a context menu is available when the user right-clicks on the connection’s name. This menu contains a set of commands for managing that connection.
A few LINQPad queries samples were discussed in this chapter, too. The discussion starts with the traditional “Hello World” sample, and continues with a LINQ-to-objects and a multiple statements examples.
The last section of this chapter explains the Dump extension method, which is one of the most powerful features of LINQPad. This method renders almost any type of object and turns it into HTML by using reflection, and then displays the result in a grid.
The Dump method works great on small collections and most objects, but when big collections are processed, the user might notice long running times.
- 1800+ high-performance UI components.
- Includes popular controls such as Grid, Chart, Scheduler, and more.
- 24x5 unlimited support by developers.