
LINQPad Succinctly®

CHAPTER 6
LINQPad as a Code Scratchpad
One of the best uses of LINQPad is as a test and prototyping tool. As mentioned in the “Languages available in LINQPad” section of Chapter 4, LINQPad allows you to run code in the C#, F#, and VB languages. So no matter which of those languages you employ for development, LINQPad will be useful.
This book relies entirely on the C# programming language, so all code testing or prototyping will be written in C#.
How C# code can be executed in LINQPad
C# code can be written in LINQPad in three different ways:
- As an expression: A single-line C# expression with no semicolon is executed.
- As statements: Several C# lines of code are executed. Each line must end with a semicolon.
- As a program: LINQPad automatically adds a Main method to the query in order to execute statements or another methods or classes within the method. The methods or classes to execute can be defined after the closing brace of the Main method is created.
Testing a C# expression
Sometimes when a program is being coded, there’s a need to test small pieces of code to ensure they will provide the expected result. One of these pieces of code is an expression.
The following example assumes that you need to test an expression that converts the actual DateTime value to a string, according to the XML Schema format.
Code Listing 31
XmlConvert.ToString(DateTime.Now,XmlDateTimeSerializationMode.Unspecified) |
The static ToString method of the XmlConvert class is used to make the DateTime value conversion. This value is passed to the method as the first parameter. The second parameter passed to the method is the XmlDateTimeSerializationMode.Unspecified enumeration value. This value tells the ToString method that the time zone for the actual date and time should be ignored. The result is displayed in the following snippet.
Code Listing 32
2016-06-12T18:55:08.0376168 |
Executing C# statements
In the output generated in the sample explained in previous section, note that the seconds part of the converted DateTime value is returned with fractional parts of the seconds value. If the desired result is expected without those fractions, an additional statement should be executed to remove them from the string. Thus, a C# Statements query should be written to solve this topic.
Code Listing 33
var xmlschemaDatetime = XmlConvert.ToString(DateTime.Now,XmlDateTimeSerializationMode.Unspecified); xmlschemaDatetime = xmlschemaDatetime.Substring(0,xmlschemaDatetime.IndexOf(".")); xmlschemaDatetime.Dump(); |
The previous code sample corresponds to a C# Statements query. Unlike with a C# Expression query, writing C# Statements queries requires you to declare variables in order to assign the results coming from methods or calculations. The Dump method must be included to display the final results that come up from the queries.
The query displayed in the previous example uses the Substring and the IndexOf methods of the string class in order to remove the fractions from the seconds part of the converted DateTime value.
The expected result must contain no decimal fractions, so the Substring method needs to take only those characters before the decimal point. The IndexOf method is used to calculate the position of the decimal point. Because strings are zero-based indexed, if the decimal point appears in the 19th position, it really is the 20th character (20 – 1 = 19) of the string. Thus, if this is the case, the Substring method must take 19 characters, and that is exactly the number returned by the IndexOf method.
The result is displayed the following snippet.
Code Listing 34
2016-06-12T18:55:08 |
Running a C# program
The third way C# code can be executed in a LINQPad query is similar to how we run a C# Program. When this kind of query is selected from the Language Selector combo box, LINQPad automatically creates a Main method, which will serve as an entry point for the query.
A C# Program query may work for testing or prototyping pieces of code that might be part of a bigger project. Once these pieces of code pass all tests, they can be part of a Visual Studio solution. This practice can save you time, because you don’t need to build another project for testing purposes. Even so, parts of the solution to be delivered could exist before the solution itself is created in Visual Studio.
The following code is a C# Program query version of the C# Statements query explained in the previous section.
Code Listing 35
void Main() { var convertedDateTime = toXmlSchemaDateTime(DateTime.Now); convertedDateTime.Dump(); } // Define other methods and classes here public string toXmlSchemaDateTime(DateTime currentDateTime) { var xmlschemaDatetime = XmlConvert.ToString(DateTime.Now,XmlDateTimeSerializationMode.Unspecified); xmlschemaDatetime = xmlschemaDatetime.Substring(0,xmlschemaDatetime.IndexOf("."));
return (xmlschemaDatetime); } |
As noted in the previous example, the conversion process is now delegated to a program-defined method named toXmlSchemaDateTime. The method definition is written under the Main method’s definition, as suggested by LINQPad by way of the comment added to the code. This approach allows you to convert any DateTime value to its XmlSchema equivalent, not only the current system’s DateTime.
Now, the Main method creates a variable and calls the toXmlSchemaDateTime method with the value of the current system’s DateTime. The Dump method displays the result.
An example for a test workbench usage
As mentioned in the previous section, the ability to test parts of code before being part of a solution makes LINQPad robust and powerful. In this section, it’s going to be assumed that a class for managing DateTime values needs to be tested before the developer puts the code into a Visual Studio solution. A query for this purpose should look like the following sample.
Code Listing 36
void Main() { var dateTimeManager = new DateTimeManager(); dateTimeManager.toXmlSchemaDateTime(DateTime.Now).Dump("toXmlSchemaDateTime method"); dateTimeManager.backNDays(DateTime.Now,3).Dump("backNDays method"); dateTimeManager.forwardNDays(DateTime.Now,15).Dump("forwardNDays method"); } // Define other methods and classes here public class DateTimeManager { public string toXmlSchemaDateTime(DateTime currentDateTime) { var xmlschemaDatetime = XmlConvert.ToString(DateTime.Now,XmlDateTimeSerializationMode.Unspecified); xmlschemaDatetime = xmlschemaDatetime.Substring(0,xmlschemaDatetime.IndexOf("."));
return (xmlschemaDatetime); }
public DateTime backNDays(DateTime currentDateTime, int daysToGoBack) { return (currentDateTime.Subtract(TimeSpan.FromDays(daysToGoBack))); }
public DateTime forwardNDays(DateTime currentDateTime, int daysToGoBack) { return (currentDateTime.Add(TimeSpan.FromDays(daysToGoBack))); } } |
The previous code shows a class named DateTimeManager. The class has three methods:
- toXmlSchemaDateTime: Converts a DateTime value to a string complying with the format defined by the XmlSchema.
- backNDays: Returns a DateTime value, which is a given number of days before the DateTime value passed to the method.
- forwardNDays: Returns a DateTime value, which is a given number of days after the DateTime value passed to the method.
The previous code shows how all methods for the class can be tested at the same time. This is done by creating an instance of the class and calling each of the methods, along with Dump. A string is passed to each Dump call in order to identify the result for each one of the methods tested.
The output for the query is displayed in the following sample.
Code Listing 37
toXmlSchemaDateTime method 2016-08-03T19:05:05 backNDays method 7/31/2016 7:05:05 PM forwardNDays method 8/18/2016 7:05:05 PM |
If the results are as expected, the class code can be added to the solution.
Measuring query performance
When LINQPad is used for testing purposes, another important issue is measuring code performance. A common way to measure performance is by adding time-managing statements, and performing subtract operations.
LINQPad gives the user a very simple solution for this issue: every time a query execution is completed, the amount of time spent to get the results is displayed in the status bar.

Figure 44: Time consumed by query’s execution
As noted in Figure 44, the precision for performance measuring falls into milliseconds.
Referencing custom and default assemblies
LINQPad also allows the use of custom assemblies in queries. You can reference these assemblies in a query by selecting the Query Properties command from the Query menu.

Figure 45: The Query Properties command
Another way to reference the assemblies is by pressing the F4 key, as the previous figure suggests. Whichever method you use, the Query Properties dialog box will be displayed so that you can add the needed references.

Figure 46: Query Properties dialog box
The dialog box provides a group of buttons that should be used to add an assembly reference to the query. The purpose for each of these buttons will be explained in the following sections.
Picking up an assembly from the system
The Add Custom Assembly References dialog box is employed to choose an assembly from those available in the system. To bring up this dialog, click the Add button located in the Query Properties dialog box. The Add Custom Assembly References dialog box displays all assemblies found in the system. You can select one or more of these by clicking on the name of the desired assemblies and pressing the Ctrl or Shift keys as you would in the Windows File Explorer.

Figure 47: Add Custom Assembly References dialog box
As noted in Figure 47, the dialog box also provides a search bar, which allows you to filter the assemblies listing by their full or partial names.
There are two check boxes to the right of the search bar. The first one tells LINQPad if the assemblies installed in the Global Assembly Cache (GAC) will be included in the list (checked) or not (unchecked). The other one restricts the assemblies listing only to their latest versions (checked), or tells LINQPad to include all installed versions for each one of them (unchecked).
Note: The Global Assembly Cache (GAC) is the location of the computer that will store all assemblies designated to be shared by several applications. The GAC is typically located at C:\Windows\Microsoft.NET\assembly.
The Browse button, located at the bottom of the dialog box, lets allows you to search an assembly within the computer’s file system.
The Refresh button, also located at the bottom of the dialog box, lets you refresh the assemblies listing to include recently installed assemblies.
Choosing an assembly directly from the computer’s file system
You can choose an assembly from the computer’s file system without displaying the Add Custom Assembly References dialog box. You can do this by clicking the Browse button in the Query Properties dialog box. Now, the use can locate the desired assembly and click Open to pick it up. For the purposes of this book, a class library project named customassembly was created in the C:\LINQPad_Succinctly folder.
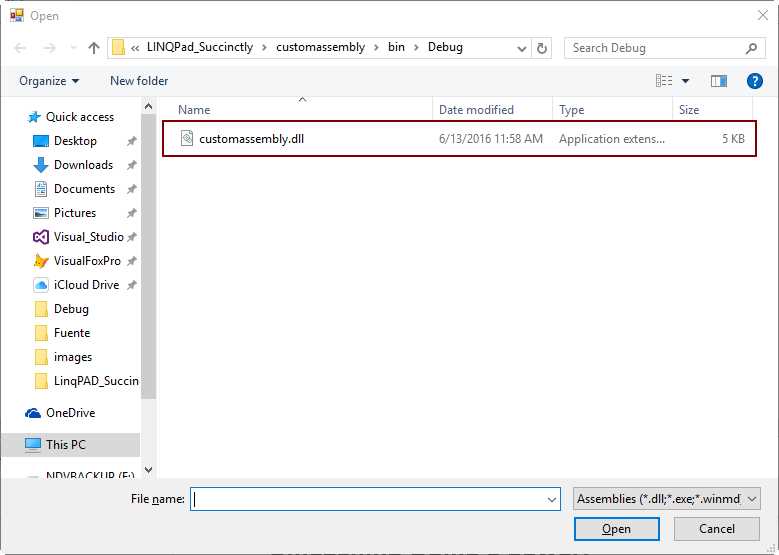
Figure 48: Picking up the custom assembly library
Once the assembly is opened, its name appears in the Query Properties dialog box. You can accept the selection by clicking OK, or you can tell LINQPad that the assembly should be used by the current query and all those created after this one. To do this, click Set as default for new queries.

Figure 49: The Query Properties dialog box after selecting the assembly
Importing namespaces into queries
When a developer writes a C# program and needs to employ a class or method located in another namespace, this program usually starts with the following statements.
Code Listing 38
using System.Drawing; using System.Net; using System.Windows.Forms; |
The action performed by the using statements is called importing namespaces and allows the developer to employ all classes exposed in the namespaces declared by each one. Of course, the assemblies that contain these namespaces must be referenced in the project in order to make each using statement work properly.
In all previous samples where an assembly reference was added, when a class or method contained in that assembly was needed, it had to be written in a fully qualified form. That is, the name of the namespace that contains the class or method is written before the name of the method itself, followed by a period.
Code Listing 39
var image = Util.Image(new System.Net.WebClient().DownloadData("https://www.linux.com/sites/all/themes/custom/lcom/logo.png")); //The WebClient method is used in the form of System.Net.WebClient(), where System.Net is the namespace which contains the method image.Dump(); |
In the previous sample, the WebClient method is coded using its fully qualified name. In this case, the namespace that contains the method is System.Net. The namespace declaration cannot be omitted when the method is invoked. If this happens, LINQPad will trigger an error message upon the query’s execution because it won’t know where exactly the WebClient method is located. This will occur even when the reference to the assembly containing the namespace is added. This issue can be solved by importing the namespace into the query. However, the using statement cannot be employed in LINQPad queries. Instead, the Query Properties dialog box and the Additional Namespace imports tab should be used.

Figure 50: The Additional Namespace Imports tab
Figure 50 shows the Additional Namespace Imports tab within the Query Properties dialog box. A multiline text box is available in order to write the name for each namespace to be imported on a separate line. A hyperlink named Pick from assemblies is also available. When this hyperlink is clicked, a list with all referenced assemblies in the query appears on the right.

Figure 51: The Query Properties dialog box after Pick from assemblies is clicked
As displayed in Figure 51, the Namespaces list, which appears under the Assemblies list, shows all available namespaces within the assembly selected. This is a multi-select list, so several namespaces can be chosen at the same time. This multi selection can be done by using the Ctrl + click or the Shift + click combinations, as in the Windows File Explorer.
Clicking OK will import the selected namespaces into the query. If you want this selection to be available for all new queries, click Set as default for new queries before importing the namespaces.
Now, the code for the query should look like the following sample.
Code Listing 40
var image = Util.Image(new WebClient().DownloadData("https://www.linux.com/sites/all/themes/custom/lcom/logo.png")); image.Dump(); |
As noted in the previous sample, the namespace declaration was omitted. There won’t be an error message when the query is executed because the namespace for the WebClient method was previously imported into the query.
Unleashing Dump’s power
As explained in Chapter 4, the Dump extension method is capable of rendering almost any type of object to generate output that will be displayed on the screen. This section will explore some powerful ways to use the Dump method.
Testing the appearance of a Windows form control
Sometimes, when a developer is building a custom controls assembly, it is necessary to see how those controls will look before releasing the project. The developer might write another project for testing purposes, which consumes time and effort.
With LINQPad, this time and effort can be downsized significantly, because LINQPad allows us to write a series of statements along with the Dump method, in order to prototype a control. In this case, the Dump method will render the control and displays it in the Results panel. The developer can run the statements over and over, until the desired results are presented. Then, the code can be added to the project.
The following sample prototypes a CustomButton class, and displays that custom button in the Results panel.
Code Listing 41
void Main() { var custombutton = new CustomButton(); custombutton.Dump(); } // Define other methods and classes here public class CustomButton : System.Windows.Forms.Button { public CustomButton() { Text = "Custom Button Class"; Font = new System.Drawing.Font("Segoe UI",12); } } |
This is a C# Program query, which defines a CustomButton class under its Main method. An instance for this custom class is created in the Main method, and the variable that stores the instance uses the Dump method to display the button.
Note: The previous example needs the System.Windows.Forms and System.Drawing assemblies to be referenced, as explained in the "Referencing custom and default assemblies" section of this chapter.
The output produced by the previous query is displayed in Figure 52.

Figure 52: The custom button displayed in the Results panel
As exposed in Figure 52, the Dump method renders the button, which is displayed in the Results panel.
The CustomButton class with a different approach
The following code prototypes the CustomButton class with a few changes.
Code Listing 42
void Main() { var custombutton = new CustomButton(); custombutton.Dump(); } // Define other methods and classes here public class CustomButton : System.Windows.Forms.Button { public CustomButton() { FlatStyle = System.Windows.Forms.FlatStyle.Flat; BackColor = System.Drawing.Color.FromArgb(244,152,31); ForeColor = System.Drawing.Color.Black; Font = new System.Drawing.Font("Segoe UI",12); Text = "Custom Button Class Flat Version"; } } |
In this case, the class will create a flat button with an orange background and a black colored text.
Downloading an image from a web location
The Dump method can render almost any kind of objects; images are not the exception. The following code demonstrates how to render an image that is downloaded from a web location.
Code Listing 43
var image = Util.Image(new System.Net.WebClient().DownloadData("https://www.linux.com/sites/all/themes/custom/lcom/logo.png")); image.Dump(); |
The output displayed by this code is shown in Figure 53.
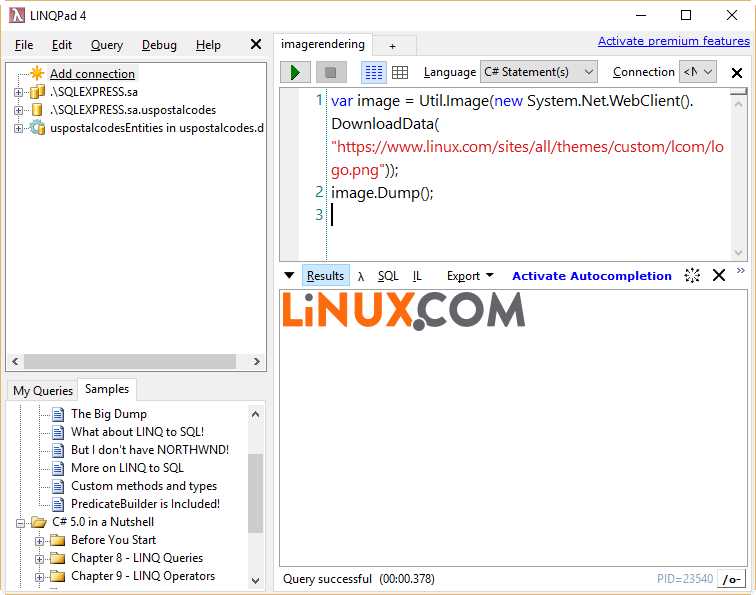
Figure 53: An image rendered by the Dump method
Note: The previous example needs the System.Net assembly to be referenced, as explained in the "Referencing custom and default assemblies" section of this chapter.
The Util class
LINQPad exposes a class called Util. This class has many useful methods and properties that can be used to interact with the queries. This section will demonstrate some of the methods and properties available in the Util class.
ClearResults method
The ClearResults method wipes out the Results panel.
Code Listing 44
var image = Util.Image(new WebClient().DownloadData("https://www.linux.com/sites/all/themes/custom/lcom/logo.png")); image.Dump(); Thread.Sleep(2000); //Stops query execution for two seconds Util.ClearResults(); |
This code sample renders an image downloaded from a web location. Then, the query execution is stopped for two seconds. After that, the ClearResults method clears the image from the Results panel.
Cmd method
The Cmd method executes a system command and displays the result. The following sample shows the contents of the C:\LINQPad_Succinctly\Queries folder.
Code Listing 45
Util.Cmd(“dir C:\\LINQPad_Succinctly\\Queries”); |
The output displayed should look like the following snippet.
Code Listing 46
Volume in drive C has no label. Volume Serial Number is AA4F-79E0 Directory of C:\LINQPad_Succinctly\Queries 06/26/2016 08:45 AM <DIR> . 06/26/2016 08:45 AM <DIR> .. 05/31/2016 12:28 PM 416 A simple query expression.linq 06/16/2016 10:19 AM 654 buttonprototype.linq 06/16/2016 11:25 AM 826 buttonprototypechanged.linq 06/24/2016 10:39 PM 1,025 catchingwpfelementevent.linq 06/21/2016 12:18 PM 1,046 cmdlineoptions.txt 06/17/2016 10:17 AM 239 CmdMethod.linq 06/22/2016 01:50 PM 43,681 cmdsymbolsample.html 06/22/2016 01:49 PM 950 cmdsymbolsample.linq 06/11/2016 02:36 PM 646 countiesortedentityframework.linq 06/10/2016 06:33 PM 989 CountiesPredicateKeywords.linq 06/10/2016 09:40 AM 909 CountiesPredicateSample.linq 06/10/2016 11:37 AM 979 CountiesPredicateSample_2.linq 06/22/2016 12:15 PM 473 custombutton.txt 13 File(s) 135,723 bytes 2 Dir(s) 65,482,702,848 bytes free |
GetMyQueries method
The GetMyQueries method returns all the queries located in the default queries folder and displayed under the My Queries tree view node. The method returns an IEnumerable<Query> object. Each element in the enumeration is a reference to a Query object, which has the following properties.
- OpenLink: Contains a hyperlink with the name of the query. When this hyperlink is clicked, the query is opened in a separate tab.
- Location: Contains the query file’s relative path, starting from the default queries folder. The default queries folder is considered the root folder (\).
- Name: The name of the query in plain text.
- Text: The query’s code.
- Language: The kind of programming language, according to those explained in the “How C# code can be executed in LINQPad” section of this chapter.
- FileReferences: An IEnumerable<string> object containing the full filename for all references added to the query, as explained in the “Referencing custom and default assemblies” section of this chapter.
- GacReferences: An IEnumerable<string> object containing the full filename for all references from the Global Assemblies Cache (GAC) added to the query, as explained in the “Referencing custom and default assemblies” section of this chapter.
- NamespaceImports: An IEnumerable<string> object containing the name of all namespaces imported into the query, as explained in the “Importing namespaces into queries” section of this chapter.
- LastModified: The date and time when the query was last updated.
The following code displays all queries available.
Code Listing 47
Util.GetMyQueries().Dump("My Queries listing"); |
WriteCsv method
The WriteCsv method stores the contents of an object into a CSV file. The following sample creates a CSV file from a Where query made to the Counties table.
Code Listing 48
var csvFile = Util.CurrentQueryPath.Replace(".linq",".csv"); Util.WriteCsv(Counties.Where(row => row.State_id == 29),csvFile); |
The first line of the previous code uses the CurrentQueryPath property of the Util class (which returns the filename of the query currently running, including its absolute path) along with the Replace method, in order to build the filename for saving the CSV contents. This filename is stored in the csvFile variable. The WriteCsv method receives the result of querying the Counties table that is applying the Where method, and then writes this result to the file specified into the csvFile variable. Now, if you look into the queries default folder, you will find a CSV file named like the query (except for the .csv extension).
Note: Since there’s no Dump call in the previous sample, the Results panel displays nothing. Also, in order to retrieve the filename for the query with the CurrentQueryPath property, this must be saved before being executed.
Run method
The Run method executes a LINQPad query from within another query, .NET program, or Windows Service. In case of a .NET program or Windows Service, the LINQPad.exe file should be referenced within them.
The Run method executes the query just as the command line tool lprun.exe (which will be explained in the following chapter) would do it.
The following sample uses the Run method to execute the getmyqueries.linq query located in the default queries folder.
Code Listing 49
const string queriesPath = @"C:\LINQPad_Succinctly\Queries\"; var dummyFormat = new LINQPad.QueryResultFormat(); Util.Run(queriesPath+"getmyqueries.linq",dummyFormat).Dump(); |
Note: Unlike the formatted output shown when a query is executed from LINQPad interface, the output generated by the Run method is in plain text format.
ProgressBar class
The ProgressBar class allows you to track the progress for a query’s execution, displaying a progress bar in the Results panel.
Code Listing 50
var counties = new List<Counties>(); var totalRows = Counties.Count(); var rowIndex = 0; var pb = new Util.ProgressBar("Querying Counties table"); pb.Dump(); foreach (var row in Counties) { pb.Percent = (rowIndex * 100) / totalRows; counties.Add(row); rowIndex++; Thread.Sleep(2); //A small delay to watch the progress } pb.Percent = 100; counties.Dump(); |
This code stores the rows from the Counties table into a List<Counties> variable named counties, using a foreach loop. The ProgressBar class is used to display the progress of the operation within the loop. As displayed in the code, a message can be assigned to the progress bar when the class is instantiated.
Note that the Dump method for the instance of the ProgressBar class is called before entering the loop. This makes the progress bar visible prior to iterate the table.
The Thread.Sleep method adds a delay of two milliseconds after adding each row to the list, in order to make the user watch the progress of the operation.
The work performed by the ProgressBar class is shown in the following figure.
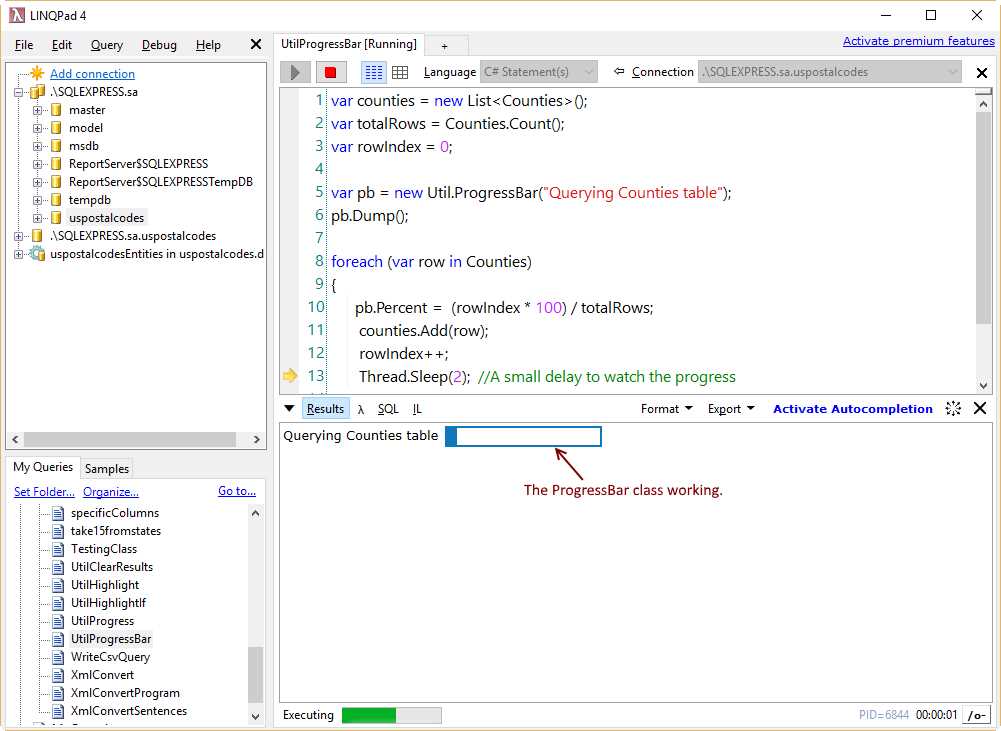
Figure 54: The progress bar displaying the advance
Progress property
The Progress property allows you to update the progress bar integrated in the status bar of LINQPad. In this case, the progress bar is not displayed in the Results panel, and the user cannot assign a message to it.
Code Listing 51
var counties = new List<Counties>(); var totalRows = Counties.Where(row => row.State_id == 29).Count(); var rowIndex = 0; foreach (var row in Counties.Where(row => row.State_id == 29)) { Util.Progress = (rowIndex * 100) / totalRows; counties.Add(row); rowIndex++; Thread.Sleep(30); //A small delay to watch the progress } Util.Progress = 100; counties.Dump(); |
The previous code is similar to the code used to explain the ProgressBar class, except for the use of the Progress property. The following figure shows how the Progress property works.

Figure 55: Updating the integrated progress bar
Chapter summary
LINQPad has the ability to be used as a test and prototyping tool, and can run code in the C#, F#, and VB languages.
C# code can be executed in LINQPad as a single line expression, as several C# sentences, and as a C# program with a Main method.
LINQPad gives the user the ability to measure a query’s performance by displaying the time consumed by query’s execution in the status bar.
Every time LINQPad executes a query, the results are displayed in a window known as the Results panel. This window offers some useful features by way of six graphic elements: the Options Menu drop-down button, Results View Mode options, Format Menu, Export Menu, Unlock Results button, and Close button.
LINQPad also allows the use of custom assemblies in queries. These assemblies can be referenced in a query by selecting the Query Properties command from the Query menu, or by pressing the F4 key. The user can pick up an assembly from those installed in the system, browse for a custom assembly file into the local filesystem, or add references for both. The users of the LINQPad Premium edition can also reference NuGet packages. In the Free edition, only those packages used in LINQPad examples can be referenced.
When custom or system assemblies are referenced in queries, the use should declare the classes or methods belonging to those assemblies by an explicitly qualified name. That is, to use the Button control located in the System.Windows.Forms namespace, the user should write System.Windows.Forms.Button in order to create an instance for the class. To simplify the way the code is written, LINQPad allows you to import namespaces into queries using the Additional Namespace Imports tab located in the Query Properties dialog box.
The Dump method is used to display the output produced by a query. This method also has tremendous capabilities that can help the user to render a Windows Form control and download and render an image from a web location. In LINQPad5, the Dump method has additional parameters to conditionally display the output in the screen.
As a final point, LINQPad exposes a static class called Util. This class has many useful methods and properties that can be used to interact with the queries in order to run system commands, obtain all available queries in a list, highlight the results for a query, export results to a CSV file, or display progress bars.
- 1800+ high-performance UI components.
- Includes popular controls such as Grid, Chart, Scheduler, and more.
- 24x5 unlimited support by developers.