
LINQPad Succinctly®

CHAPTER 3
Beginning with LINQPad
Running LINQPad
To start LINQPad, double-click on the LINQPad icon on the Windows desktop. This action brings up the LINQPad user interface.
![]()
Figure 9: LINQPad icon on the Windows desktop
LINQPad user interface
The LINQPad user interface corresponds to the client application in which users will do most of their work.
User interface graphic elements
The following graphic elements of the interface, which we will be using for the purposes of this book, are shown in Figure 10.
- LINQPad main menu: Holds all LINQPad commands available to work with the program.
- Connection’s tree view area: Shows all connections created by the user with the connection manager.
- Queries and Samples tree view area: Shows all queries and extensions created by the user. It also shows all available samples within LINQPad, which are displayed in separate tabs.
- Query code tab window area: Where the user will write the query code.
- Query code tab caption: Shows the name of the query that is being edited.
- Add New Tab button: Adds a new tab for query editing.
- Execute Query button: Executes the query that is currently selected.
- Stop Execution button: Stops query execution.
- Results View Type button: Allows the user to switch between Rich Text and Data Grid, for viewing query results.
- Language Selector combo box: Allows the user to select the programming language in which queries will be written.
- Connection Selector combo box: Allows the user to select a previously created custom connection.
- Close Tab button: Closes the tab currently selected.
- Premium Features activation link: In the free version of LINQPad, this link allows the user to open the product’s webpage to acquire a license, for activating paid license’s features.
- Status Bar: Shows several messages sent by the program, including query’s time performance.
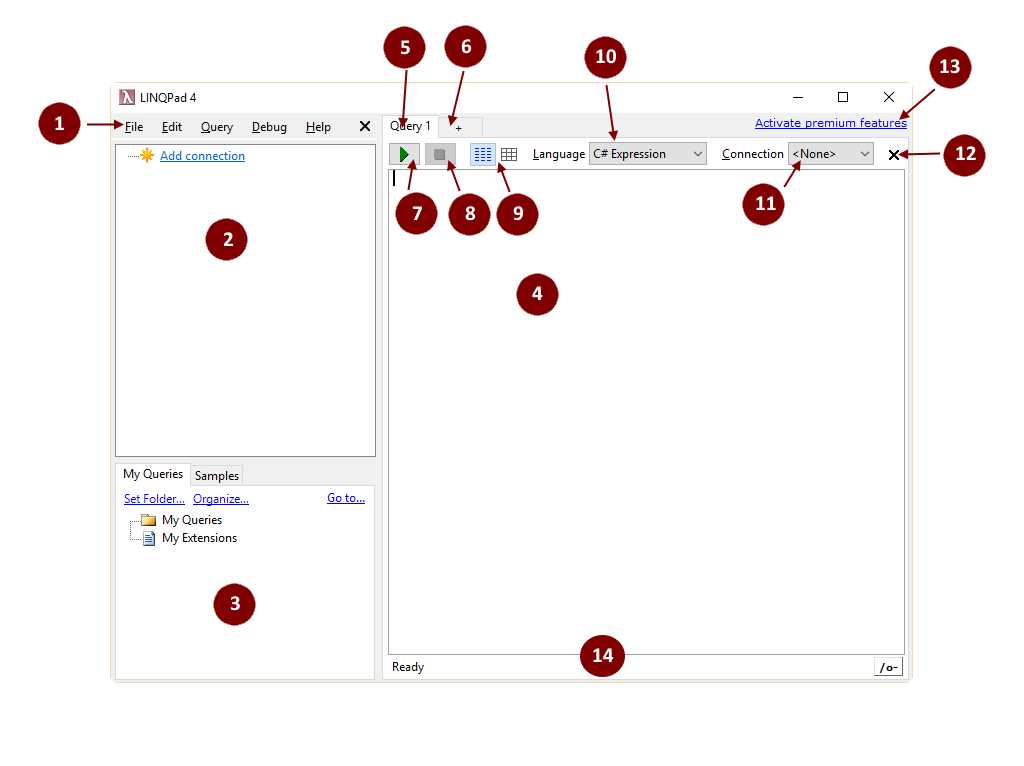
Figure 10: LINQPad user interface
Customizing the editor window
You can customize the editor window’s font and other elements, such as the window background color or displayed code line numbers. This can be done by using the Preferences command located in the Edit menu.
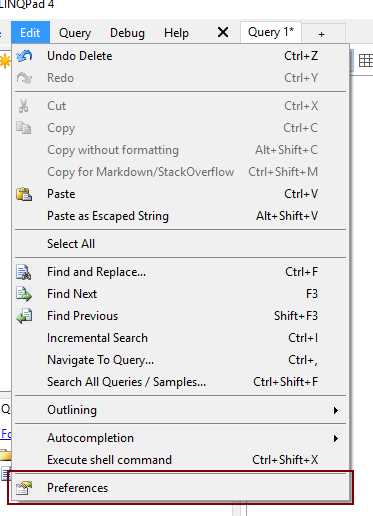
Figure 11: Preferences command in Edit menu
For the purposes of this book, I customized my editor window by setting the font to Segoe UI and making code line numbers visible.
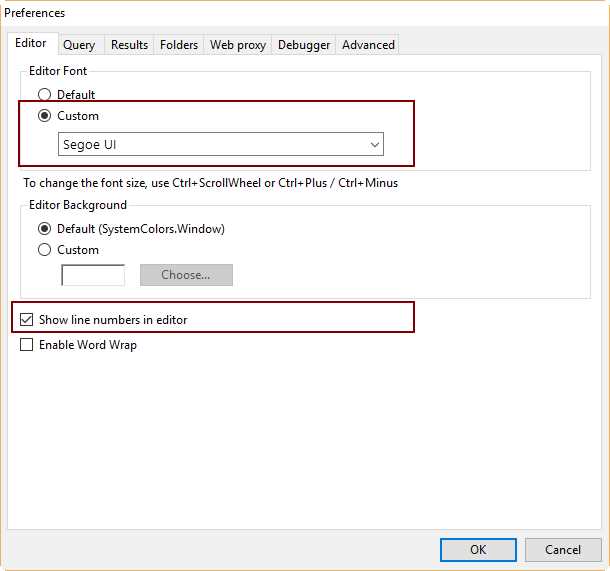
Figure 12: Editor Window Preferences
It can be noted in Figure 12 that font size customization is not available. That’s because LINQPad allows the user to increase or decrease font size in two different ways: by using the Ctrl+Plus (increase) or Ctrl+Minus (decrease) key combinations, or by using the mouse scroll wheel while pressing the Ctrl key at the same time.
The ever-present Hello World
Our first meeting with LINQPad will take place by creating and running the traditional Hello World code. To do this, first set the Language drop-down control to C# Statement(s), then type the following code into the Query window.
Code Listing 2
string greeting = "Hello World";
greeting.Dump();
Now, to run to previous code, click on the Execute Query (green arrow) button. The output for this code is shown in the following figure.
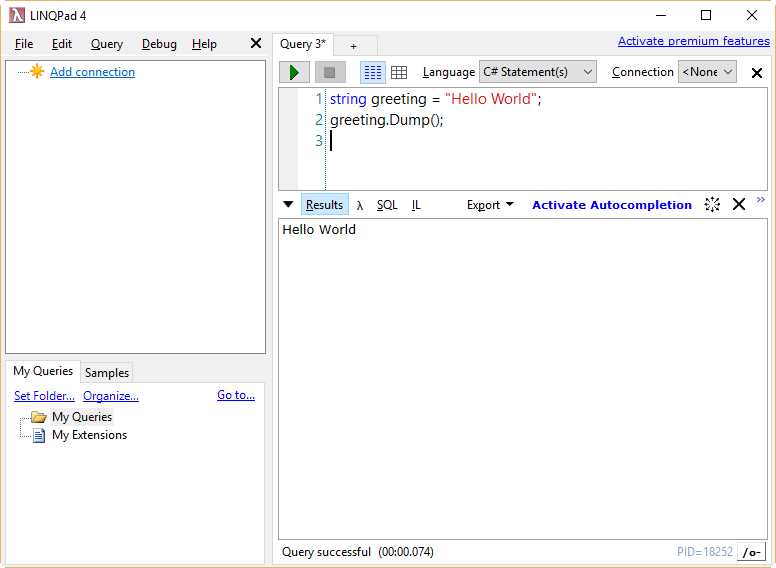
Figure 13: Hello World sample output
Saving the Hello World code
With LINQPad, all the queries you write can be easily accessed using the My Queries tree view located at the bottom-left side of the user interface.
In order to make the Hello World code available from tree view, you need to save it first. This can be done by pressing Ctrl+S. In the Save Query As dialog box, type the file name for saving the query. For the purposes of this book, the name will be helloworld. The file will be saved with a .linq extension.
The file name given to the query will appear beneath the My Queries node of the tree view after it is saved in the disk. Now you can quickly access the helloworld code when needed.

Figure 14: The “Save Query As” dialog box

Figure 15: The helloworld query beneath the My Queries node.
Chapter summary
This chapter explained how to begin using LINQPad. To start LINQPad, double-click on the icon placed on the Windows desktop. This will launch the LINQPad user interface, which is the client application that will do most of the work.
We identified 14 graphic elements in LINQPad user interface for purposes of this book. These elements are: LINQPad main menu, Connection’s tree view area, Queries and Samples tree view area, Query code tab window area, Query code tab caption, Add New Tab button, Execute Query button, Stop Execution button, Results View Type button, Language Selector combo box, Connection Selector combo box, Close Tab button, Premium Features activation link, and Status Bar.
You can customize the editor window by using the Preferences command from the Edit menu. Then, the settings for the window can be changed in the Editor tab of the Preferences dialog. For purposes of this book, the Segoe UI font will be used, and code line numbers will be displayed.
Font size customization is not available, because LINQPad allows the user to increase or decrease this size using Ctrl+Plus (increase) or Ctrl+Minus (decrease) keys combinations, or the mouse scroll wheel while pressing the Ctrl key at the same time.
A “Hello World” example was used to start with LINQPad work. The output produced by this code was displayed in the Results window.
The code of the “Hello World” example was saved into a file named helloword.linq in order to make it available for future use. After that, the filename appeared beneath the My Queries node located at the bottom-left of the user interface.
- 1800+ high-performance UI components.
- Includes popular controls such as Grid, Chart, Scheduler, and more.
- 24x5 unlimited support by developers.