
LightSwitch Mobile Business Apps Succinctly®

CHAPTER 5
Tuning the engine
This chapter, ‘Tuning the engine’, explains more advanced programming principles like the JavaScript API, the server side API, and JQuery UI widgets.
Crossing navigation boundaries.
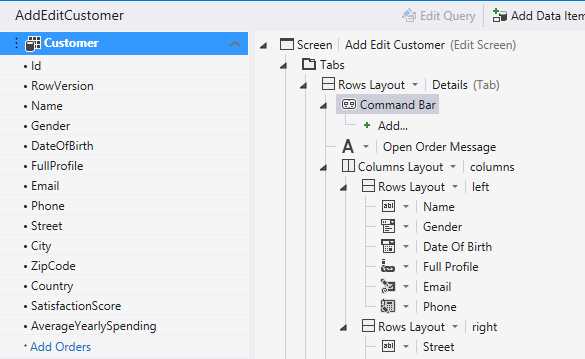
With the Browse Customer screen smiling us in the face, time to give the Add Edit Customer screen a good polish.
First point on the agenda is to transform it from the small popup it is now, into a screen that takes up the full available height and width. Open the screen and select the root node in the visual tree, then from Properties Window uncheck the Show As Dialog checkbox.
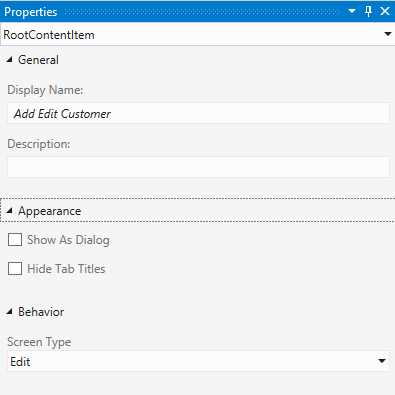
Properties Window with the screen’s root element selected
Besides appearance properties, you’ll also find a Behavioral property called Screen Type, which is used to indicate wheter the screen is an Edit or a Browse screen.
LightSwitch uses a design pattern called ‘unit of work’, which means that changes are accumulated into a single transaction, then sent to the server to be validated and processed as a whole. Each time you navigate from an Edit to another screen, the current unit of work will be passed to that screen implicitly and any changes made in that screen will be committed or discarded together with the current changes.
However, when you navigate from one Browse screen to the next, a new unit of work will be started. This implies that if there are any pending changes, LightSwitch will display a popup to ask the end user to commit or discard the current changes prior to nagivating, or to cancel navigation and Stay on Page all together.
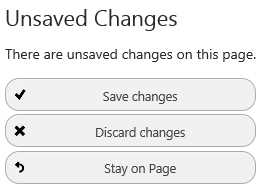
Unsaved changes dialog
You as a developer can also explicitly close a unit of work. From any JavaScript function, this would be done by calling one of three methods on the global myApp object:
myapp.applyChanges();
myapp.commitChanges();
myapp.cancelChanges();
The first function, applyChanges(), will finish try to validate the pending changes and when they are valid, launch a request to process the unit of work asynchronously on the server.
CommitChanges() does the same thing but after a positive response from the server it will close the current screen and navigate back to the previous screen. CancelChanges() also navigates back asynchroneously discarding the open unit of work.
Every action that you can do from the Screen Designer can also be invoked from JavaScript, and more, usually by invoking functions on the global myapp object. Just as an example, the following snippet demonstrates how you would navigate to the Add Edit Customer screen from code:
myapp.showAddEditCustomer(null);
This showAddEditCustomer method was generated on the global myapp object, when you created the screen from the IDE. As an argument it expects a Customer entity. To open the screen to edit a new Customer entity, you might think about writing code like this:
myapp.showAddEditCustomer( new msls.application.Customer());
However, if you would actually try to run this code from a button on the Browse Customer screen, you’ll run into some interesting behaviour: as soon as you click the button that executes this code, LightSwitch prompts that you have pending changes that need to be saved or discarded before navigating to the Add Edit Customer screen.
What actually happened is that the constructor of the Customer entity is called within the boundaries of the unit of work belonging to the Browse Customer screen. Because you’re moving from one screen to another, the unit of work needs to be completed or discarded, hence the prompt to save or cancel.
Luckely, the showAddEditCustomer method accepts a second argument that allows you to add one callback function that will be executed before the screen is shown, and one that is executed after the screen has been closed:
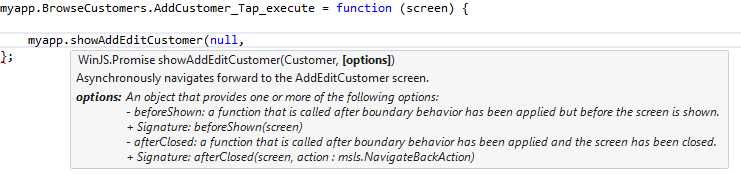
Passing callback functions when navigating to a screen
Reading the intellisence on the Javascript immediately reveals the missing piece of the puzzle: the beforeShown callback function is executed within the boundaries of the Add Edit Customer screen. Thus, to open the screen to edit a new Customer entity you would need to write:
myapp.showAddEditCustomer(null,
{
beforeShown: function (detailScreen) {
detailScreen.Customer = new msls.application.Customer();
}
});
The beforeShown callback function is mostly used to perform some scanario specific initialization code, the afterClosed callback function is usefull to perform any action after the detail screen has finished it’s unit of work and has been closed, perhaps even depending on how the user left the screen (was the unit of work committed or cancelled), for example:
myapp.showAddEditCustomer(null,
{
beforeShown: function (detailScreen) {
detailScreen.Customer = new msls.application.Customer();
detailScreen.Customer.SatisfactionScore = 0.85;
},
afterClosed: function (detailScreen, navigationResult) {
if (navigationResult == msls.NavigateBackAction.cancel)
msls.showMessageBox("User cancelled out of changes.");
else
screen.showPopup("NewUserPopup");
}
});
Initializing values
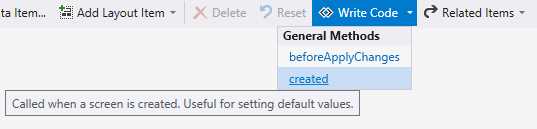
Initializing values is usually done in three distinct spots: in the created event that fires when an entity is created, using the beforeShown callback function when navigating to a screen from code, or in the created event that fires when a screen is created, in this order.
To initialize values on a particular entity you need to open that entity in the Entity Designer, select the perspective of the HTMLClient at the bottom, then at the top click the Write Code button and select the created event to have a function stub generated.

The Write Code button for entities
Suppose that on average, a Customer starts out as a ‘Happy Customer’, resulting in a hypothetical SatisfactionScore of 80% (see note 5). You could model this in the appliction in this created() function stub that was generated from the Entity Designer:
myapp.Customer.created = function (entity) {
entity.SatisfactionScore = 0.8;
};
However, per screen you could still initialize this value to something different if it would makes sence.
From the Write Code button in the Screen Designer, each screen has a similar option to generate a function stub that gets executed when the screen is first created.
The write code button for screens
This function can be used to do general initialisation of any property of, or value or entity on the screen. You could use this function stub to test if the customer that’s being edited is a new or existing entity, then setting the screen’s title from the default ‘Add Edit Customer’ to something more appropriate:
myapp.AddEditCustomer.created = function (screen) {
if (screen.Customer.Id) {
screen.details.displayName = screen.Customer.Name;
}
else {
screen.details.displayName = "Add a new customer.";
}
};
At this point, a business rule could dictate that any new customers created via this screen start with a basic Satisfaction Score of 90%.
myapp.AddEditCustomer.created = function (screen) {
if (screen.Customer.Id) {
screen.details.displayName = screen.Customer.Name;
}
else {
screen.details.displayName = "Add a new customer.";
screen.Customer.SatisfactionScore = 0.9;
}
};
Remember that this code snippet runs after the beforeShown callback (if the screen was opened from code and you specified such a method).
Asynchronous programming
The initialization code that we wrote for the Add Edit Customer screen was pretty straight forward: set the DisplayName of the screen and initialize the Satisfaction Score of the Customer entity. We didn’t touch any properties or fields that could potentially take a while to complete. When you do, to prevent the interface from freezing up while lengthy code is executing, LightSwitch would force you to write asynchronous JavaScript code using WinJS ‘promise’ objects. As an exercise, we’re going to try to show a message on the Add Edit Customer screen that displays whether or not the customer has any open orders.
This of course implies we’re going to extend the application by introducing a new entity called Order, with a one-to-many relationship between Order and Customer.

The Order entity
I also added a couple of hundred of these Order entities using the same SQL Post Deployment Script that got added earlier in the ‘Adding fuel’ chapter.
You can download the full script from https://gist.github.com/janvanderhaegen/6682208 to get the sample data yourself.
SET IDENTITY_INSERT [dbo].[Orders] ON;
MERGE INTO [dbo].[Orders] AS Target
USING (VALUES
(1, '20121103', 1, 238, 2),
-- more random orders ...
(298, '20120903', 1, 105, 2),
(299, '20110220', 1, 1689, 3)
)
AS Source(Id, CreationDate, Completed, OrderTotal, Order_Customer)
ON Target.Id = Source.Id
-- update matched rows
WHEN MATCHED THEN
UPDATE SET CreationDate = Source.CreationDate, Completed = Source.Completed, OrderTotal = Source.OrderTotal,
Order_Customer = Source.Order_Customer
-- insert new rows
WHEN NOT MATCHED BY TARGET THEN
INSERT (Id, CreationDate, Completed, OrderTotal, Order_Customer)
VALUES (Id, CreationDate, Completed, OrderTotal, Order_Customer)
-- delete rows that are in the target but not the source
WHEN NOT MATCHED BY SOURCE THEN
DELETE;
SET IDENTITY_INSERT [dbo].[Orders] OFF;
GO
If all went well, you can now open the Add Edit Customer screen in the Screen Designer again, and spot the new link on the Customer entity on the View Model (left hand side) to add the Customer’s Orders to the Screen View Model.
You can add the Customer’s Orders to the screen with the Add Orders link
Once you click it, LightSwitch will add a new VisualCollection to the Screen View Model named Orders.

The Order VisualCollection and the Customer Entity
Hit the Edit Query link to open the Orders in the Query Designer and adjust it to only retrieve the orders that are havent’t been completed yet.
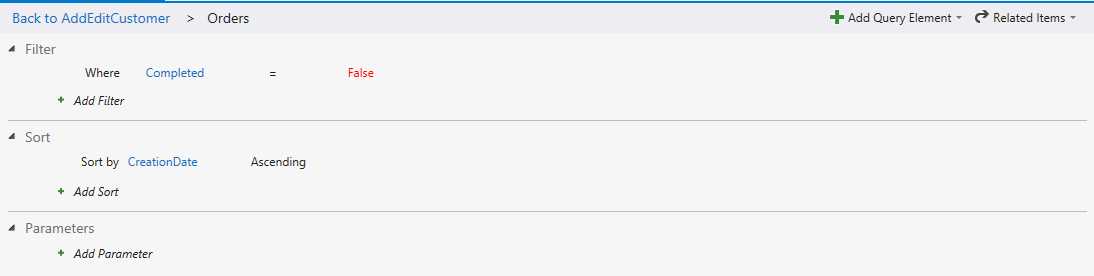
Retrieving open orders only via the Query Designer
Rename the Orders collection to OpenOrders.
Now that the application has the notion of Orders, you added some sample data and added a collection of Open Orders to the screen, you’ve got everything in place to display a message if the Customer currently has any pending Orders.
To be able to show this message, we’ll need to store it somewhere on the View Model. Add a new String property to the View Model by clicking the Add Data Item button at the top of the Screen Designer, and creating the OpenOrderMessage property in the Add Data Item wizard.

Add Data Item Wizard allows you to add a local property
From the View Model on the left hand side, drag this new string property somewhere on the View.
The OpenOrderMessage property on the View Model and in the View
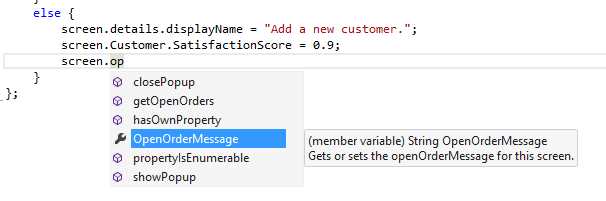
Lastly, we need to store a message in that OpenOrderMessage property. You can do that from the screen’s created function, which currently looked like:
myapp.AddEditCustomer.created = function (screen) {
if (screen.Customer.Id) {
screen.details.displayName = screen.Customer.Name;
}
else {
screen.details.displayName = "Add a new customer.";
screen.Customer.SatisfactionScore = 0.9;
}
};
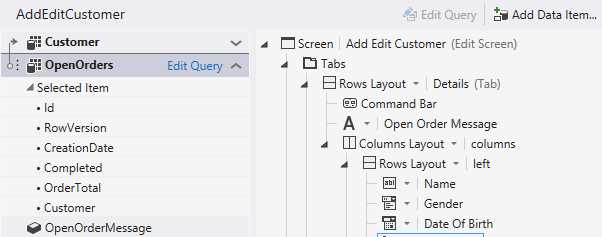
The screen’s View Model has a Customer, OpenOrders and OpenOrderMessage property. However, the JavaScript intellisence only reveals the Customer Entity and OpenOrderMessage String to use as a property from within JavaScript.
A JavaScript property was generated for OpenOrderMessage but not for OpenOrders
Instead of a OpenOrders property, a function was generated named getOpenOrders, which returns a WinJS promise object.
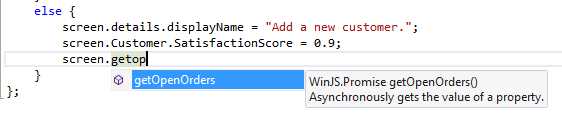
The getOpenOrders function
The idea behind this differentiation is that LightSwitch knows the difference between a ‘simple’ property that is quick to acces and can thus be done synchroneously, and a more ‘complex’ property like this collectoin that might not be up to date or loaded at all.
Making sure the collection is up to date, might cause a potentially lengthy service call. Hence, LightSwitch forces you to retrieve a Promise object instead of working with the collection directly.
The Promise object is nothing more than a ‘reference to the fetching of the data’. Intellisence reveals that it can be chained with a number functions, out of which the then() function is the one you’ll use the most.
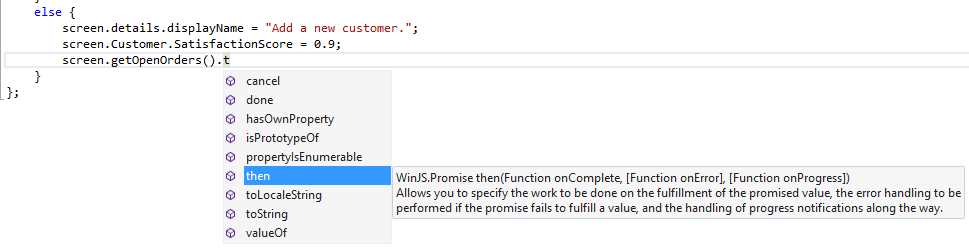
Available callback functions on the promise object
This then() function allows you to chain a callback function a callback function that gets executed when the collection has finished loading, or immidiately if the collection was already loaded and up to date.
screen.getOpenOrders().then(
function (orders) { /* Callback code goes here */}
);
Either way, once the callback function is executed, LightSwitch made sure that the collection is up to date and will pass it as an argument to your callback function. The full initialization for the Add Edit screen thus becomes:
myapp.AddEditCustomer.created = function (screen) {
if (screen.Customer.Id) {
screen.details.displayName = screen.Customer.Name;
screen.getOpenOrders().then(
function (orders) {
if (orders.count == 0)
screen.OpenOrderMessage = "No open orders";
else
screen.OpenOrderMessage = "Orders pending";
}
);
}
else {
screen.details.displayName = "Add a new customer.";
screen.Customer.SatisfactionScore = 0.9;
screen.OpenOrderMessage = "";
}
};
Or, because a million pixels say more than a thousand words, at runtime…
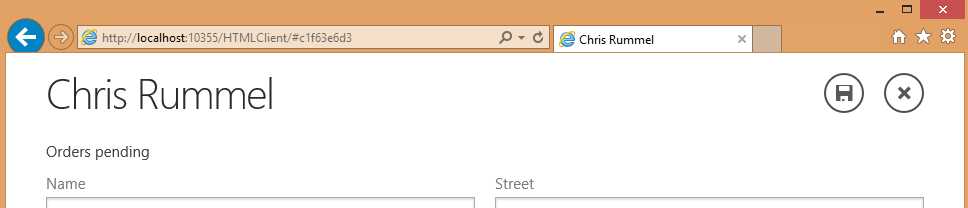
The propertly initialized detail screen
Just a side note: it is incorrect to believe that this is a multi-treaded application. Even if these techniques are explicitlly referred to as asynchroneous, JavaScript does offer multi-threading support (as per the specs: http://www.ecma-international.org/publications/files/ECMA-ST/Ecma-262.pdf). Instead of truly running multiple code paths at the same time (like real multi-threaded applications would), the Promise objects simply encapsulate logic that alters the ‘one’ single-threaded sequential code path.
If you have a custom JavaScript function that might potentially take a while to complete, then LightSwitch has a simple API call that allows you to wrap any function in a Promise yourself, like Michael Washington demonstrates in the following self-describing code snippet taken from “Using Promises in Visual Studio LightSwitch” (http://lightswitchhelpwebsite.com/Blog/tabid/61/EntryId/170/Using-Promises-In-Visual-Studio-LightSwitch.aspx):
myapp.PromiseOrders.created = function (entity) {
// Set the default date for the Order
entity.OrderDate = new Date();
// Using a Promise object you can call the CallGetUserName function
msls.promiseOperation(CallGetUserName).then(function (PromiseResult) {
// Set the result of the CallGetUserName function to the
// UserName of the entity
entity.UserName = PromiseResult;
});
};
// This function will be wrapped in a Promise object
function CallGetUserName(operation) {
$.ajax({
type: 'post',
data: {},
url: '../web/GetUserName.ashx',
success: operation.code(function (AjaxResult) {
operation.complete(AjaxResult);
})
});
}
Server side programming
I don’t know if you noticed we’re fetching all (top 45 actually due to default paging) of a customer’s open orders to the client. Unless you have other plans with the Open Orders collection (display the orders for example) this was a an absolute waiste of bandwith since you really only needed to know if there was one or more. Suppose you want to show an overview of the evolution of the completed orders per country over the last couple of years. Your mobile device simply does not have the capacity to process a couple of millions of rows, not to mention the bandwith costs, so we need a way to program in a more efficient manner.
For these specific data queries or to model more specific business operations, LightSwitch generates an extensive model in the server project. This way, you can accomplish your advanced scenarios in an efficient manner by adding your own WCF web services, SignalR hubs, ASP.Net Web API, ....
As an illustration, let’s use the latter to summarize the order history of any given customer per year.
If you are unfamiliar with ASP.Net Web API I would suggest http://www.asp.net/web-api/overview/getting-started-with-aspnet-web-api/tutorial-your-first-web-api. Again, if you are running out of coffee breaks today, here’s the really short summary. ASP.Net Web API is a server-side framework that for any web request, the server matches the URI and HTTP verb (POST, GET, …) with a routing table to determine which controller should be instantiated and which method on that controller should be called to handle the request.
The required references and setup to add ASP.Net Web API are handled automatically by adding a controller, so start by right click on the server project and selecting Add New Folder from the context menu. Name the folder ‘Controllers’, then add a controller by right clicking on the folder and from the Add New Item dialog, selecting Web Api Controller.
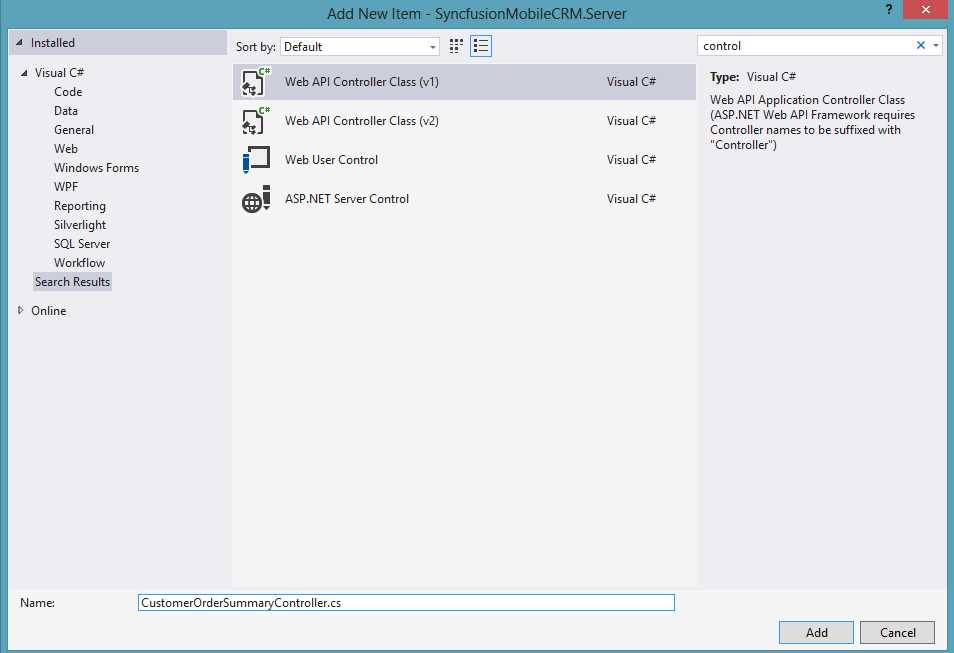
Adding a Web API Controller
The empty controller that got added will look like:
using System.Linq;
using System.Web.Http;
namespace LightSwitchApplication.Controllers
{
public class CustomerOrderSummaryController : ApiController
{
// GET api/<controller>
public IEnumerable<string> Get()
{
return new string[] { "value1", "value2" };
}
// GET api/<controller>/5
public string Get(int id)
{
return "value";
}
Before implementing the code, you can configure the routing for this controller so that you can give it a quick smoke test. Right click the server project and select Add New Item from the context menu.
Add a new global application class from the Add New Item dialog, and replace the contents with the following code:
using System;
using System.Web.Http;
using System.Web.Routing;
namespace LightSwitchApplication
{
public class Global : System.Web.HttpApplication
{
protected void Application_Start(object sender, EventArgs e)
{
RouteTable.Routes.MapHttpRoute(
name: "ReportsApi",
routeTemplate: "reports/{controller}/{id}"
);
}
}
}
The code will add a new route called the ReportsAPI, which will handle all HTTP GET requests to the URL
http://{HostURL}/reports/{NameOfTheController}/{Id}
by initializing the correct controller, and executing a method called Get() which accepts a single argument called id.
Since you can perform an HTTP GET from your browser, you can test your setup by setting a breakpoint in the Get method of the CustomerOrderSummaryController, and pressing F5 to build and start debugging. Navigate your browser from the HTML client’s default url ‘http://localhost:10355/HTMLClient/’ to ‘http://localhost:10355/reports/CustomerOrderSummary/5’, you should hit your breakpoint and notice the value of the id argument is 5. (The port number, 10355, is likely to be different on your system)
Next step is to implement the controller to interact with application’s server-side LightSwitch model. This is done by adding a reference to the Microsoft.LightSwitch namespace, in which LightSwitch generated a class called the ServerApplicationContext, to the using statements at the top of the class.
Instances of the ServerApplicationContext class implement IDisposable, so should be wrapped in a using statement for proper disposal of resources like the connection to the database.
using System.Linq;
using System.Web.Http;
using Microsoft.LightSwitch;
namespace LightSwitchApplication.Controllers
{
public class CustomerOrderSummaryController : ApiController
{
public object Get(int id)
{
using (ServerApplicationContext context = ServerApplicationContext.CreateContext()) {
}
}
}
}
This context exposes methods that allow access to the currently authenticated user and it’s permissions, and access to the entities created in the Entity Designer. You can interact with the entities directly and even make use of some extension methods that aren’t available on the client, like the GroupBy method.
Remember that this GroupBy method is always available on the server, but the success of this method depends on the type of data source. You can model your LightSwitch entities around an existing Sharepoint list or OData web service, in which case the grouping will fail since the underlying protocol by which LightSwitch interacts with the data source does not support grouping. Also, if the data source is a new or existing SQL or SQLAzure database, the grouping will actually be deferred to be done by the SQL server itself.
The full code to fetch and summarize the order history based on the given id of the customer, becomes:
using System.Linq;
using System.Web.Http;
using Microsoft.LightSwitch;
namespace LightSwitchApplication.Controllers
{
public class CustomerOrderSummaryController : ApiController
{
public object Get(int id)
{
using (ServerApplicationContext context = ServerApplicationContext.CreateContext()) {
var query = context.DataWorkspace.ApplicationData.Orders
.Where(o => o.Customer.Id == id)
.GroupBy(o => o.CreationDate.Year)
.Select(g => new
{
Label = g.Key,
Value = g.Sum(o => o.OrderTotal)
})
.OrderBy(g => g.Label);
return query.Execute().Select(
g => new {
Label = string.Format("'{0}" , (g.Label - 2000)),
Value = g.Value
}
).ToArray();
}
}
}
}
From the Get operation, you are returning an array of implicitly typed CRL objects from the code. In fact, ASP.Net Web API will automatically marshall the data to JSON format (JavaScript Object Notation), which is programming language agnostic.
You could call this from any programming language. In fact, to test the result, feel free to press Ctrl+F5 to build and start the application (without debugging), then navigate to a hardcoded URL like ‘http://localhost:{YourPortNumber}/reports/CustomerOrderSummary/5’ to see the result. Depending on your browser this JSON response might be shown directly or downloaded as a file.
![]()
Internet Explorer offers to download the summarized order history
JQuery UI Widgets: EssentialJS
Now that you have a performant way to accumulate data on the server, we need a performant way to visualize the results. Although you can write a custom control yourself using the Render method, it is interesting to note that in no way LightSwitch prevents the use of third party libraries, so I thought this would be a good opportunity to put Syncfusions’s new EssentialJS to the test.
EssentialJS is a new JavaScript framework designer for use in line of business (LOB) applications in particular. At the time of writing it is available in beta at http://www.syncfusion.com/products/javascript, which is great news because in this particular case, beta is a synonym for free, and the beta version never expires.
Adding third party components to your LightSwitch HTML application is always a three step process. The first step is to add the required code (.js files) and styling (.css files) to the appropriate folders in the HTMLClient project, then you need to make sure they are loaded by referencing them from the web page, then you can use them where required.
After downloading the EssentialJS suite, copy the stylesheets named bootstrap.css, default.css and default-responsive.css from the installtion directory to the Content subfolder of the HTMLClient project, and ej.widgets.all.min.js and properties.js to the Scripts subfolder. When adding a third party script to your application, always search for a minified version, which you can recognize by the .min in the file-name, to reduce the download size.
Next up, you’ll need to load the resources into the HTML page called default.htm.

Default.htm, the single HTML page in this SPA
This HTML page is an empty shell, consisting out links to the required stylesheets, an HTML DIV element showing a loading animation, links to the required JavaScript files, and finally a single JavaScript block:
<script type="text/javascript">
$(document).ready(function () {
msls._run()
.then(null, function failure(error) {
alert(error);
});
});
</script>
This block will cause the Microsoft LightSwitch (‘msls’) Javascript libraries to load and your application to start, replacing the HTML DIV element with the loading animation with the elements that form your app.
In this web page, find the links to the stylesheets and add links to the EssentialJS stylesheets that you just added to the project at the bottom:
<!-- Syncfusion stylesheets-->
<link href="Content/bootstrap.css" rel="stylesheet">
<link href="Content/default.css" rel="stylesheet" />
<link href="Content/default-responsive.css" rel="stylesheet" />
Next, find the links to the JavaScript files and add links to the EssentialJS JavaScript files:
<!-- Syncfusion widgets-->
<script src="Scripts/ej.widgets.all.min.js" type="text/javascript"></script>
<script src="Scripts/properties.js" type="text/javascript"></script>
When adding third party JavaScript, it’s a good practise to add the references to the end but just above the generatedAssets import:
<script type="text/javascript" src="Scripts/Generated/generatedAssets.js"></script>
Finally, to avoid conflicting duplication you have to comment out the first script reference (which, according to Senior Developer on the LightSwitch team Prem Ramanathan, is only required when using LightSwitch to create SharePoint apps, which requires AJAX to be preloaded):
<!--<script type="text/javascript" src="//ajax.aspnetcdn.com/ajax/4.0/1/MicrosoftAjax.js"></script>-->
Now that the required EssentialJS files have been added to the project and loaded into the HTML page, you can use them as “Custom Controls” in the application.
First, open the Add Edit Customer screen in the Screen Designer and create a new tab called OrderSummary. On this tab, drag the Customer’s Id property from the View Model onto the View, and use a Custom Control to render it. From Properties Window, set the Label Position to ‘None’.
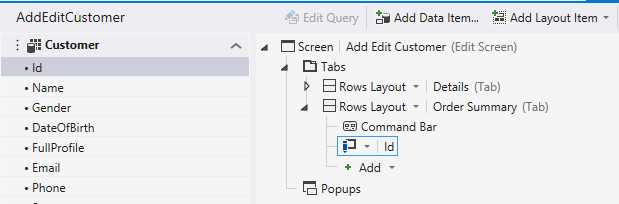
Adding a new Tab to the screen
From Properties Window, click the Edit Render Code link to generate a function stub like you did earlier. Again you’ll start by writing some code that inserts a DIV element into the HTML page, then databind to the value (the customer id) with a callback function.
myapp.AddEditCustomer.Customer_Id_render = function (element, contentItem) {
$(element).append('<div id="container" style="width:700px" />');
contentItem.dataBind(
"value",
function (customerId) {
}
);
};
In that callback function, you’ll use a JQuery selector to wrap a JQuery object around the DIV element you just inserted by passing a hashtag and the id:
$("#container")
Almost any JavaScript library will be wrapped in a ‘JQuery UI Widget’. This means that the producer of the JavaScript library registered the ‘HTML controls’ with JQuery’s plugin system by using a specialized JQuery function. The advantage is that in this way the producer can add add functionality to the JQuery Object directly. For example, this is how to turn the DIV with the ‘container’ id into an EssentialJS chart:
$("#container").ejChart()
Obviously you’ll need to pass a some additional parameters to this initialization method, the most important one will be to set the data source. You’ll instruct this EssentialJS chart to fetch its data directly from the ASP.Net Web API controller that you created in the previous chapter: ‘Server side programminmg’.
$("#container").ejChart(
{
series: [{
dataSource: {
data: new ej.DataManager({
url: "../reports/CustomerOrderSummary/" + customerId,
}),
The full code includes some additional formatting and colouring:
myapp.AddEditCustomer.Customer_Id_render = function (element, contentItem) {
$(element).append('<div id="container" style="width:700px" />');
contentItem.dataBind(
"value",
function (customerId) {
$("#container").ejChart(
{
chartAreaBorder: {
width: 1
},
primaryXAxis:
{
rangePadding: 'Additional',
title: { },
},
primaryYAxis:
{
title: { text: "Total (in USD)" },
},
series: [{
name: ' ', type: 'column',
animation: true,
dataSource: {
data: new ej.DataManager({
url: "../reports/CustomerOrderSummary/" + customerId,
}),
xName: "Label",
yNames: ["Value"],
query: ej.Query()
},
style: { interior: "#7ED600" }
}],
load: "loadTheme",
size: { height: 470 },
legend: { visible: false },
}
);
}
);
};
Save your progress and refresh your browser to see the result in action: the Add Edit Screen for any customer now has two tabs. Click the header to open the Order Summary tab, which will display a nice little graphic of the data served by the ASP.Net Web API.
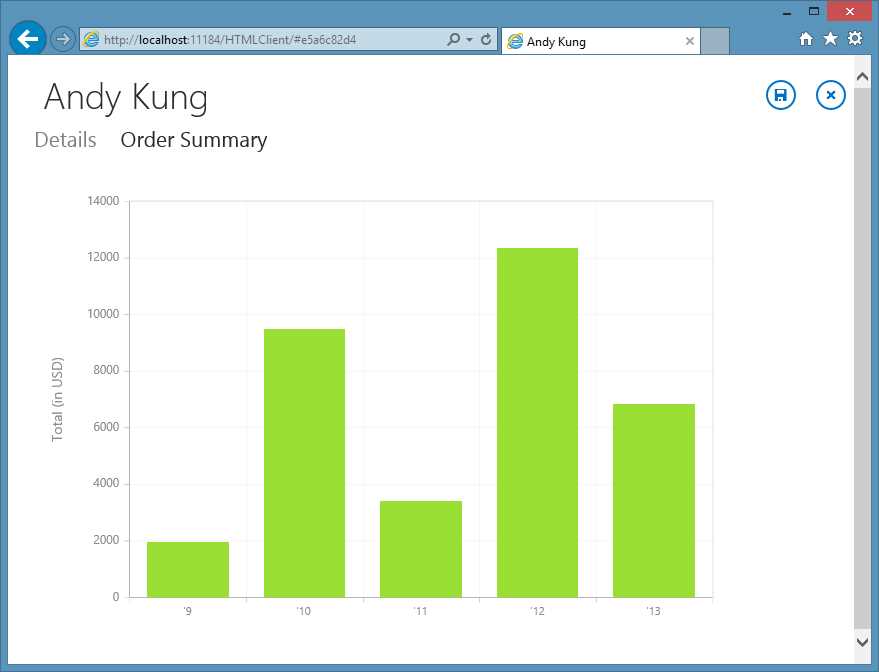
EssentialJS in action in the LightSwitch application
I wish you could see the animation on this beauty in action.
JQuery UI Widgets: custom Bing Maps control
It would be a shame to end this chapter without demonstrating how you can take advantage of some device specific capabilities, like geolocation. Geolocation the name for using a JavaScript built-in function to request information about the current position, altitude or velocity. It’s a JavaScript API so this means it is compatible with every mobile device. The JavaScript engine will actually ask the OS, which will first ask permission from the user.
To test this we’re going to add some functionality that helps a user navigate from his/her current location to the address listed for the customer.
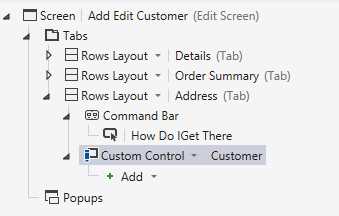
Start by adding a new Tab to the Add Edit Customer screen called Address Tab, then add a new command to the Command bar.
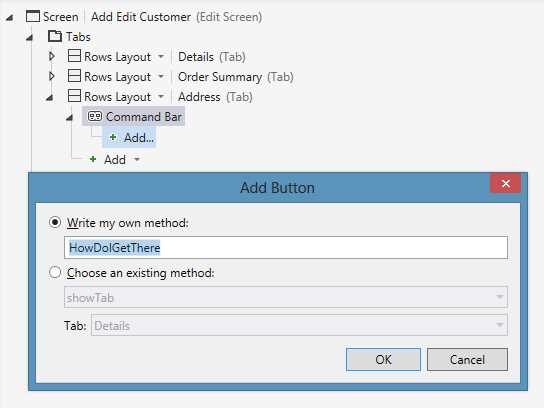
Generating custom methods from Add Button wizard
Generate a custom method called ‘HowDoIGetThere’. This will both generate the Button in the Tab’s Command Bar in the View, as a corresponding command in the ViewModel.
Select the newly added command from Properties Window, change the Icon to ‘Question’. Then, right click on the command and select the Edit Execute code option.
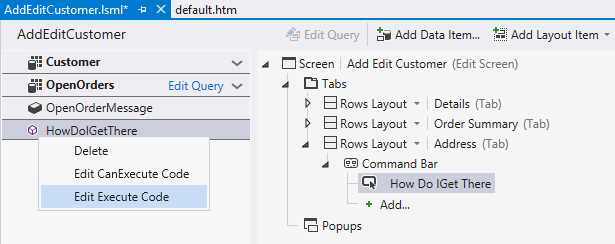
Context menu for custom commands
Replace the generated method stub with the following code:
myapp.AddEditCustomer.HowDoIGetThere_execute = function (screen) {
if (navigator.geolocation) {
navigator.geolocation.getCurrentPosition(function (position) {
msls.showMessageBox("Current location is " + position.coords.latitude + "," + position.coords.longitude);
});
}
else { msls.showMessageBox("Geolocation is not supported by this browser."); }
};
The code will check if geolocation is supported, then ask for the current location (this will require permission from the end user) and display it in a message box.
Ok, but instead of displaying the current coordinates in a message we’re going to show a map with detailed instructions on how to get to the customer using another JQuery UI Widget: https://gist.github.com/janvanderhaegen/6310722.
The widget itself is based on a post by LightSwitch program manager Heinrich Wendel: http://blogs.msdn.com/b/lightswitch/archive/2013/01/14/visualizing-list-data-using-a-map-control-heinrich-Wendel.aspx.
After downloading it, make sure you add it to the project and reference it in the default.htm page. Open the Add Edit Customer screen again and from the left hand side of the Screen Designer, drag the Customer onto the View.
Select ‘Custom Control’ as the control to use and set the Label Position to ‘None’ again.
Preparing a spot to draw a Bing Maps control
The rendering code adds two HTML div elements, one to display the Bing map and one to host the directions, then instructs the widget to draw a Bing map and highlight the current Customer’s address.
myapp.AddEditCustomer.Customer_render = function (element, contentItem) {
var mapDiv = $("<div id='addressMap' class='msls-hauto msls-vauto' ></div>");
$(mapDiv).appendTo($(element));
var directionsDiv = $("<div id='directions' class='msls-hauto msls-vauto' ></div>");
directionsDiv.appendTo($(element));
mapDiv.lightswitchBingMapsControl({
street: contentItem.value.Street,
city: contentItem.value.City,
zipcode: contentItem.value.ZipCode,
state: contentItem.value.Country,
mapTypeId: Microsoft.Maps.MapTypeId.road,
height: "470"
});
};
Change the code behind the execute function of the HowDoIGetThere function to use JQuery to find the DIV element containing the map, and draw the route between the current location and the Customer’s address:
myapp.AddEditCustomer.HowDoIGetThere_execute = function (screen) {
$("#addressMap").lightswitchBingMapsControl("getLocationOfUser", $("#directions"));
};
Save and refresh the browser to see that the Add Edit Customer screen indeed has a map showing the location of the current customer, as well as the ‘How do I get there’ button. The button triggers a request to get the current location, then uses it to display correct instructions on how to get from the current location to the customer.
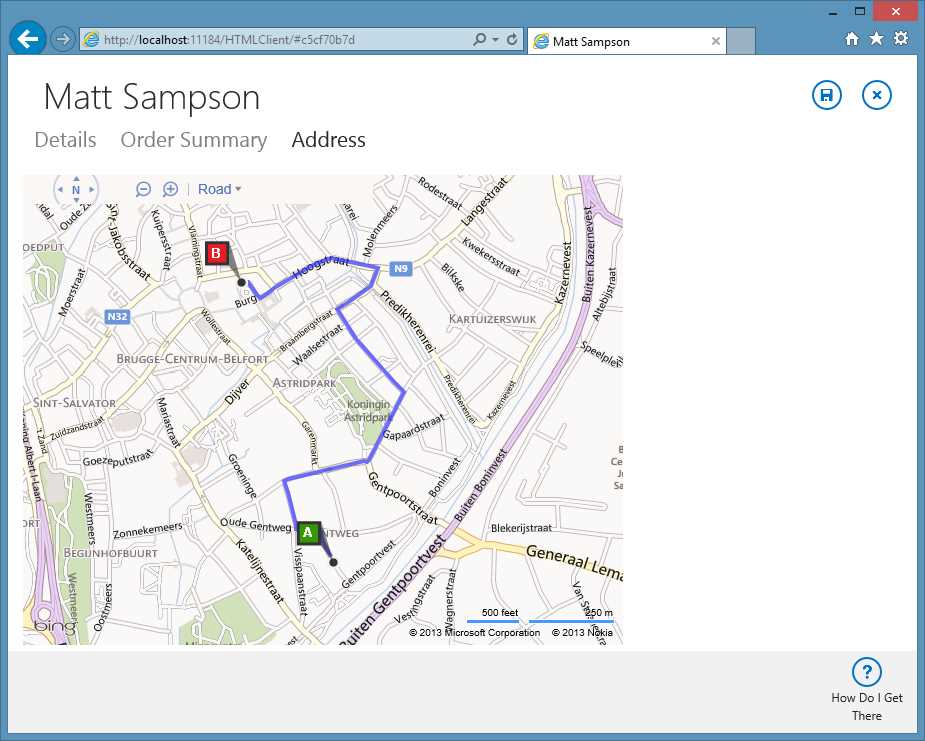
Bing Maps control showing navigation instructions to the customer’s address
- 1800+ high-performance UI components.
- Includes popular controls such as Grid, Chart, Scheduler, and more.
- 24x5 unlimited support by developers.