
LightSwitch Succinctly®

CHAPTER 5
The Screen Editor
Creating a Search Data Screen for our query
In the Add New Screen wizard, select the Search Data Screen template. Name the screen MyUrgentTasks, and select MyUrgentTasks as the Screen Data.

Figure 44: Creating a Search Data Screen
The Model and ViewModel part of the Screen Editor
In the left-hand side of the Screen Editor, LightSwitch added the two query parameters, but it added each parameter twice. The left side is considered the ViewModel and Model layer of the screen in the LightSwitch MVVM implementation. The first time you recognize these parameters, they actually represent the query parameters and are thus part of the Model, and the second time they are listed represents the screen properties as part of the ViewModel.

Figure 45: Left-hand side of the Screen Designer shows the ViewModel and Model layer
As shown in Figure 45, an arrow is displayed between the corresponding query parameters and the local screen properties to reveal that they are data-bound. This can also be observed in the Properties window by selecting one of the query parameters.

Figure 46: Binding properties
Turning a Screen Property into a required Screen Parameter
Select the TaskAssignedPerson screen property and in the Properties window, make sure both the Is Parameter and Is Required check boxes are selected.

Figure 47: Turning a screen property into a required screen parameter
Also verify that both check boxes are cleared for the TaskMinimumPercentageComplete and TaskMaximumPercentageComplete local screen properties.
Validation on Screen Properties
The Screen Properties window allows you to set up some validation logic too. Change the number of Percent Decimal Places to 0, and set the Minimum Value and Maximum Value to 0 and 100 respectively for the two percentage complete properties.

Figure 48: Screen properties can have validation too
You’ll notice that there are some similarities between how these local screen properties work and how the Entity Designer works. With the TaskMaximumPercentageComplete local screen property still selected, click on the Custom Validation link in the Properties window.
We’ll use this to write some simple code that checks if the entered minimum value is less than the entered maximum value.
public partial class MyUrgentTasks
{
partial void TaskMaximumPercentageComplete_Validate(ScreenValidationResultsBuilder results)
{
if (this.TaskMinimumPercentageComplete > this.TaskMaximumPercentageComplete) {
results.AddPropertyError("Minimum cannot exceed the maximum");
}
}
}
Initializing Screen Properties
By the way, while we’re writing code, it might be a good idea to initialize our local screen properties. To do so, locate the Write Code button at the top of the Screen Designer, and click on the drop-down arrow. Click on the link MyUrgentTasks_Created—this will take you to the code extensibility point that runs on the client once the screen is created.

Figure 49: Finding the level-one extensibility point to initialize the screen properties
The code to initialize the two local screen properties isn’t very surprising:
partial void MyUrgentTasks_Created()
{
this.TaskMinimumPercentageComplete = 0;
this.TaskMaximumPercentageComplete = 1;
}
Where did the screen go?
If you press F5 to debug your application, you’ll notice that the navigation menu doesn’t include our new screen.
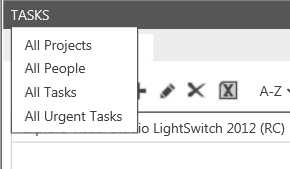
Figure 50: The new screen doesn’t seem to be included in the navigation menu
The reason for this is that our new screen has one local screen property, TaskAssignedPerson, for which we selected both the Is Required and the Is Parameter extended properties. This means the code that opens this screen must pass an integer parameter (TaskAssignedPerson), and the navigation menu has no idea how to resolve a value for it.
We’ll have to add our new screen manually, which will only be the fifth time we’ve had to code in this tutorial—not bad for how much functionality we have already built in this application.
Adding a new command to a screen
One suitable place to open this screen with urgent tasks from a particular person is the All People screen. Open the All People screen in the Screen Editor and locate the Screen Command Bar element near the top of the Screen Visual Tree, the center part of the Screen Editor.

Figure 51: Adding a new button to the screen
Choose the New Button… option. In the pop-up that appears, select the New Method option and name it ShowUrgentTasks.

Figure 52: Creating a new command on the screen
A new command will be added, and like almost any element of your LightSwitch application, you can use the designer to set several extended properties. One property we’ll definitely want to set is the image that is used. Personally, I’ve really become a fan of Syncfusion’s free custom icon tool, Metro Studio (http://www.syncfusion.com/downloads/metrostudio). I use the icons almost exclusively for LightSwitch commands because of the great fit they are with the LightSwitch Cosmopolitan theme (see Chapter 6).

Figure 53: Adding an image to the command
After this is done, right-click on your button in the Visual Tree editor, and select the Edit Execute Code option from the context menu.

Figure 54: Editing the code behind the command
Opening a screen from code
LightSwitch generates several classes that you can use to code against if you choose to do so. For example, LightSwitch generates a method called Show<ScreenName> on the Application class for each screen. In our case, this makes the code that opens the screen as simple as:
public partial class AllPeople
{
partial void ShowUrgentTasks_Execute()
{
Application.ShowMyUrgentTasks(this.People.SelectedItem.Id);
}
}
This time, press F5 to pick the fruit of our labor. The All People screen now has an extra command as shown in the following figure.

Figure 55: The Show Urgent Tasks command is now visible in the application
When the Show Urgent Tasks command is clicked, our new search screen called My Urgent Tasks opens.

Figure 56: My Urgent Tasks screen
The run-time Screen Editor
Although our new screen is useful, you’ll probably want to make some graphical modifications to it, like hide the Task Assigned Person label and text box. One of the most jaw-dropping features of Visual Studio LightSwitch is that you do not have to write custom XAML to make modifications to the UI if you do not want to or are not familiar with Silverlight XAML. Even better, you do not even have to stop running your application and recompile it if you want to change the layout or controls on your screens.
If you launch a LightSwitch application from the Visual Studio IDE (i.e. with the debugger attached), the application will have a command called Design Screen, which enables you to do these modifications and persist them back to your Visual Studio solution at run time! Quite honestly, it could be a personal lack of experience, but I do not know of any other technology that allows you to do this, and I’m loving it. Designing the graphical parts of your application while it’s running without having to build to test each modification, and to be able to design with actual test data instead of “Neque porro quisquam est qui dolorem ipsum quia dolor sit amet, consectetur, adipisci velit”—This feature is an absolute time saver!

Figure 57: The Design Screen command
Click the Design Screen command in the application’s command bar. This will open a run-time variant of the Screen Editor.

Figure 58: Using the Screen Designer at run time
Hiding the TaskAssignedPerson controls
In the Visual Tree editor on the left, select the Task Assigned Person element, and make sure the Is Visible check box is cleared.

Figure 59: Designing the screen at run time
Once you click the Save button in the top right of your screen, the screen will be updated and your changes will be persisted back to the Visual Studio solution.

Figure 60: After editing the search data screen at run time
Creating new item templates
This run-time version of the Screen Designer can do more than set properties on existing visual elements. It can add new elements to your screen or replace existing elements with a completely different one. For example, in the run-time Screen Designer of the All People screen, select the Person visual element.
The control that is currently used is the Summary Viewer, which results in the following representation.

Figure 61: The current All People screen
By clicking on the down arrow, you can select an entirely different layout for this list’s item data template.
Change the control used to represent a Person to Picture and Text by selecting it from the drop-down menu.

Figure 62: Changing the item template at run time
In this Picture and Text editor, use the Avatar property as the Picture and the Full Name computed property as the Title.
Modifying an entire group of controls at once
The run-time Screen Editor can also change properties for an entire group as well. Select the Details Column—it is the second Rows Layout visual element in the Visual Tree.
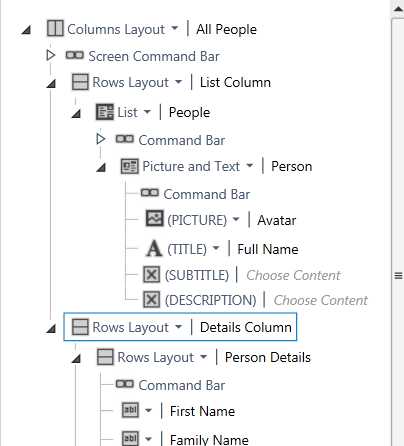
Figure 63: Designing an entire part of the screen at once
In the Properties Window, select the Use Read-only Controls check box as shown in the following figure, and then click Save.

Figure 64: Setting the read-only status of an entire collection of controls at run time
The changes are persisted back to the Visual Studio solution, and the screen is refreshed and now looks somewhat more graphically appealing.

Figure 65: All People screen after designing it at run time
Just as you can write custom code to respond to a lot of predefined events in the application, you can also take full control of the UI and write custom Silverlight XAML for any element in the Visual Tree Designer.
However, because this requires rebuilding to compile the XAML, it cannot be done from the run-time version of the Screen Designer.
- 1800+ high-performance UI components.
- Includes popular controls such as Grid, Chart, Scheduler, and more.
- 24x5 unlimited support by developers.