
Kubernetes Succinctly®

CHAPTER 5
Upgrades and Scaling
In the previous chapter, we covered how we can develop stateful microservices with persistent volumes. Our application is living happily on production systems, and our users want it to support many other features. However, since the users are too dependent on the application, they don’t want any downtime during upgrades. With a set of new features, it is now time for our next deployment. Deploying multiple times to a nonproduction system is not an issue. The challenge comes when your application is already in production, and you have multiple changes to be deployed. You need to take care of many aspects at this point, like application downtime, storage backup and restore, and testing the deployment. However, this isn’t new to the software world, and we already have multiple tried-and-tested strategies in place to overcome these issues.
Fortunately, Kubernetes supports many of the best practices out of the box, which you can leverage to accomplish this task.
Application upgrades
Application upgrades are an essential aspect of modern software applications, and it has become critical that this happens with zero downtime and issues. As enterprises are learning the importance of DevOps automation, many strategies/frameworks are getting built, which helps in performing application upgrades. Let’s discuss some of these strategies concerning Kubernetes.
Rolling updates
Rolling updates ensures that your application pods are updated incrementally to eliminate downtime. However, this method doesn’t consider scenarios where you have breaking changes in the update. It just updates the pod instances one by one, and all requests coming to your application can go to either of the old or new instances. There are a few strategies to implement selective routing of incoming traffic to different versions of an application. We will discuss one such strategy later in this chapter.
The following diagram illustrates the rolling update scenario.

Figure 44: Rolling update
In our API application (remind-me-service), we have added support for deleting reminders so that reminders that have already been processed can be removed from the database. We have published a new image version of our service to Docker Hub, and now it’s time to upgrade our stateful set to use the updated image. To update the application image in the cluster, we will use the kubectl set image command.
Code Listing 56: Update container image
kubectl set image statefulsets/remindmeapi-statefulset backend=kubernetessuccinctly/remind-me-web:2.0.0 |
Note: In the previous command, backend is the name of the container. Check the servicespec.yaml that we previously applied to build our API for more details.
You can verify the upgrade status of your pods by using the following command.
Code Listing 57: Get pods
kubectl get pods |
We can also use the rollout status command to check the status of our deployment.
Code Listing 58: Check rollout status
kubectl rollout status statefulsets/remindmeapi-statefulset |
In the event of an issue in the deployment, kubectl provides an easy way to roll back to the last successful deployment.
Code Listing 59: Rollback deployment
kubectl rollout undo statefulsets/remindmeapi-statefulset |
If we have multiple updates to be deployed at the same time, we can also create a new deployment specification and apply that to our cluster. While creating the new specification, we need to specify the deployment strategy (in the .spec.strategy attribute) appropriately. There are two types of strategies available:
- Rolling update strategy: Ensures pods are updated in a rolling update manner.
- Recreate strategy: Ensures all pods are destroyed before new ones are created.
Note: In the rolling update strategy, you can also specify maxUnavailable (the maximum number of pods that can be unavailable during the update process in absolute or percentage terms) and maxSurge (the maximum number of pods that can be created over the desired number in absolute or percentage terms) to control the update process. The recreate strategy is more suited for the nonproduction environment.
This is the updated specification that we will use to deploy the new version of the Remind Me service.
To apply this configuration to your cluster, execute the following command in your shell.
Code Listing 60: Updating application in cluster
kubectl create -f https://raw.githubusercontent.com/Kubernetes-Succinctly/remind-me-v3/master/kube-manifests/servicespec.yaml --record |
The flag record appended to the end of the command saves the kubectl command that you used to apply the update. You will be able to see the recorded commands as the reason for change when you check the rollout history of a deployment. The following is the output of the command that you executed previously.

Figure 45: Output cluster service upgrade
You can also run the kubectl get pods command to see the rolling update in action.

Figure 46: Output kubectl get pods
As you can see in the output, only one of the three pods is in the ContainerCreating state for your service, while the other two are in the Running state.
The spec template has optional fields that can be used to define the rolling strategy and tweak based on the requirements.
Tip: The default value of .Spec.Strategy is rollingupdates, and therefore, it is an optional attribute.
Now, we can check the status of deployment using the following command.
Code Listing 61: Deployment status
kubectl rollout status deployments/remindmeweb-deployment |
To verify whether our service is updated successfully, execute the command kubectl proxy and then navigate to the following URL in the browser:
http://localhost:8001/api/v1/namespaces/default/pods/remindmeapi-statefulset-0/proxy/index.html
This URL will take you to the Open API specification of the API (v2), which looks like the following. Notice the delete API we have introduced in this version, as compared to the previous version deployed in chapter 4.
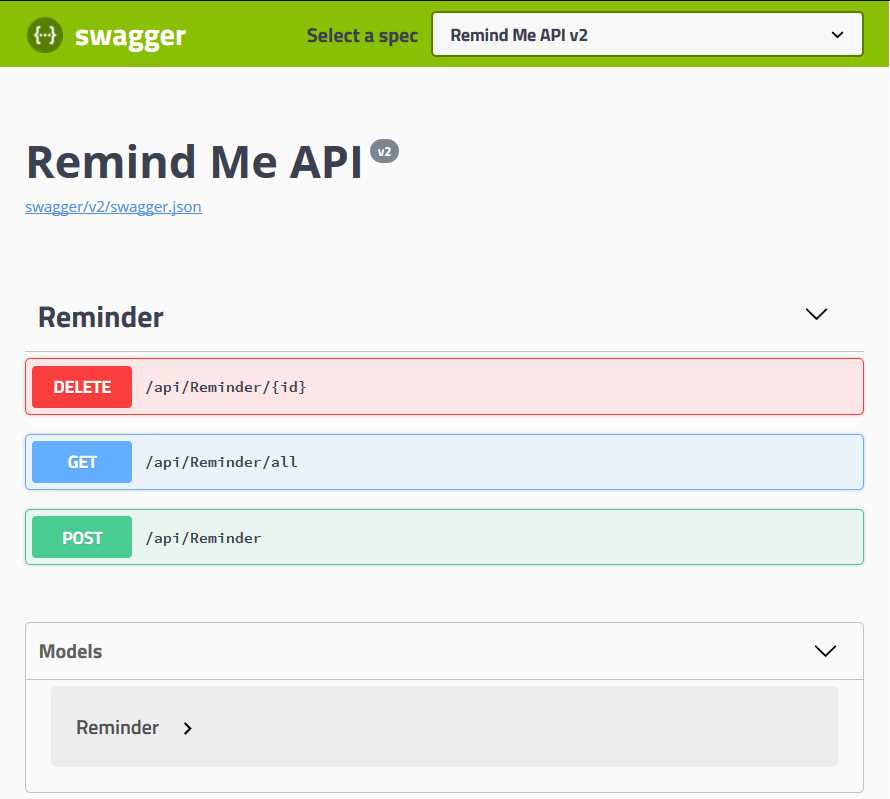
Figure 47: Remind Me API v2 Open API Definition
Congratulations, your cluster is now updated with the latest version of the application. We will use the new version of our API to later build a job that processes the reminders and deletes the processed reminders from the database.
To view the history of all the rollouts you performed on a certain resource, you can execute the following command.
Code Listing 62: Deployment history
kubectl rollout history statefulsets/remindmeapi-statefulset |
The length of history that you want to keep can be controlled by setting the revision history limit.
Blue-green deployments
We have seen how we can specify the recreate strategy to avoid partial update scenarios. However, it may impact application availability for a longer duration, resulting in application downtime. There is a popular strategy that can be used for zero-downtime upgrades, known as blue-green deployments. In the case of blue-green deployments, a new version (green) is created for your application, and the older version (blue) continues to run on the cluster. Once you are done testing the new (green) version of the application, you can switch your endpoints to the new version. This strategy ensures minimum downtime for your application. However, in the case of storage-level breaking changes, you need to take care of migration and data updates for the new deployment as well. This method is costly to begin with, since it involves two sets of deployments, but it ensures that your application availability is maintained in the case of breaking changes.
Tip: You can follow the same steps and infrastructure to set up your green deployment, or you can change it entirely, since it is a separate deployment. This helps in upgrading and degrading infrastructure with minimum downtime.
The following diagram illustrates the blue-green deployment scenario.
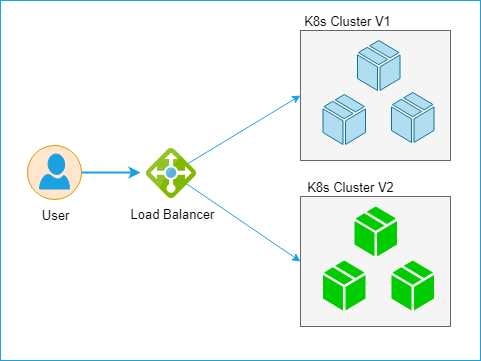
Figure 48: Blue-green deployment
The K8s Cluster V2, which is a green deployment, is thoroughly tested before being attached to the load balancer. Once the green deployment is attached, the blue one is removed from the load balancer, and the updated version of the application is made available to the end users.
This can be set up in a simple manner using Kubernetes services. If we consider the previous scenario, to update our stateful set with the new image, we can leverage the blue-green setup as well. We will create a new stateful set with different selectors, name, and version, and deploy it to the cluster green stateful set. To test it, we can expose a new service and test it separately. Once we are satisfied, we just have to point the existing service to the new selectors, and the existing (blue) stateful set will be replaced with the new (green) setup.
Scaling
Scaling (or scalability) is an essential aspect of modern applications. It refers to how your infrastructure adapts to an increasing or decreasing load by increasing or decreasing the number of instances running your applications, or upgrading the infrastructure to more capable VMs. To save cost, autoscaling, which is the process of scaling an application automatically based on metrics such as user load, has become a de facto feature of most applications.
Scaling can be categorized in two types:
- Horizontal scaling: Add a higher number of resources to your existing infrastructure.
- Vertical scaling: Increase the configuration of your existing infrastructure.
Vertical scaling usually requires manual intervention and is not preferred, due to higher costs and possibility of underutilization. Horizontal scaling, on the other hand, is widely used to make sure your application can handle the spikes in load and can return to a normal state once the load decreases.
In Kubernetes, we have multiple ways to define autoscaling rules for the cluster:
- Using the kubectl autoscale command.
- Horizontal pod autoscaling.
kubectl autoscale follows the imperative command style, while horizontal pod autoscaling follows the declarative style, in which you can control the scaling operation via a YAML configuration.
kubectl autoscale
To configure autoscaling for your cluster using the kubectl autoscale command, execute the following command in your shell.
Code Listing 63: kubectl autoscale
kubectl autoscale deployment remindmeweb-deployment --min=2 --max=4 -–cpu-percent=60 |
The command instructs the cluster to have a minimum of two pod instances and to increase the pod instance count when CPU load goes beyond 60 percent, but not to go beyond four instances. You can specify the replication set, replication controller, or deployment in the autoscale command.
As you can see, autoscaling is very easy and straightforward to configure. However, in enterprise scenarios, you might want to scale your applications using other metrics apart from CPU utilization. You can achieve this with the Horizontal Pod Autoscaler YAMLs.
Horizontal Pod Autoscaler (HPA)
The Horizontal Pod Autoscaler can also scale the deployment, replication controller, or replica set objects, but cannot be used for objects that cannot be scaled, like daemon sets. By default, it has support for scaling by CPU percentage (v1), but it can be configured to scale on other metrics, like request rate or memory utilization (v2-beta). It can also be configured to scale based on custom metrics.
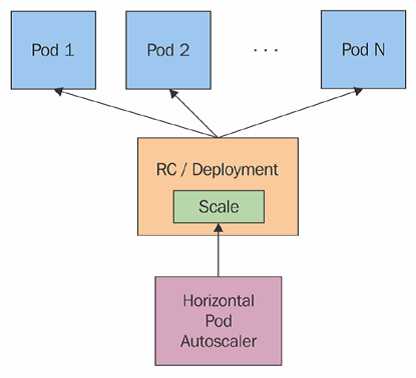
Figure 49: Horizontal Pod Autoscaler. Source: Kubernetes.io
As depicted in Figure 49, the Horizontal Pod Autoscaler doesn’t scale the instances by itself. Instead, it controls the instance count, provided there exists a resource like deployment or replication controller. It fetches the metric at a fixed duration (the default is 30 seconds, but can be changed with the flag --horizontal-pod-autoscaler-sync-period) from resource metrics API or custom metrics API, and takes appropriate action.
The standard APIs used by the Horizontal Pod Autoscaler are metrics.k8s.io, custom.metrics.k8s.io, and external.metrics.k8s.io. The metrics.k8s.io API is usually provided by metrics-server, which needs to be launched separately.
For leveraging the full feature set of the Horizontal Pod Autoscaler (v2), the following conditions must be met:
- The API aggregation layer is enabled. This is an additional layer that needs to be enabled explicitly, as it is not part of core Kubernetes APIs. Please refer to the documentation for more details on how to enable the aggregation layer.
- Metrics-server is enabled as a cluster add-on. Please refer to the documentation for more details.
- The --horizontal-pod-autoscaler-use-rest-clients is true or unset. Setting this to false switches to Heapster-based autoscaling, which is deprecated (Heapster enables collecting performance metrics for a cluster).
- custom.metrics.k8s.io and external.metrics.k8s.io are provided by the adaptor API server and must be enabled by the respective providers.
HPA commands
HPA is directly supported by kubectl. The following are the set of commands supported by HPA. Create a config file hpaspec.yaml with type of HorizontalPodAutoscaler and apply it to your cluster using the following commands.
Code Listing 64: Horizontal Pod Autoscaler
apiVersion: autoscaling/v1 kind: HorizontalPodAutoscaler metadata: name: remindmeautoscaler namespace: default spec: scaleTargetRef: apiVersion: apps/v1 kind: Deployment name: remindmeweb-deployment minReplicas: 2 maxReplicas: 6 targetCPUUtilizationPercentage: 60 --- |
Now, you can apply the YAML using the following command.
Code Listing 65: HPA Autoscale

Figure 50: Output create HPA
You can also list the autoscalers active in your cluster using the following command.
Code Listing 66: Get HPA
kubectl get hpa |

Figure 51: Output get HPA
Alternatively, if you want to delete the already created autoscalers, then the following command can be used.
Code Listing 67: Delete HPA

Figure 52: Output delete HPA
This will delete the scheduled autoscale with a defined name from the Kubernetes cluster.
Note: You can also prevent frequent pod creation and deletion caused by the thrashing by setting the --horizontal-pod-autoscaler-downscale-delay flag. Its default value is five minutes. This flag sets the metric cool-down time to prevent frequent fluctuations.
The HPA works great for scaling your cluster on different metrics, but it has a few shortcomings. Let’s discuss one of those, as well.
Limitation
One of the limitations of HPA is that it doesn’t support rolling updates with the replication controller. This is because a new replication controller is created during the rolling update, and HPA remains bound to the old replication controller. This can be overcome by using a deployment resource instead of a replication controller, which will ensure that both autoscaling and rolling updates are supported.
Summary
In this chapter, we learned how we could update our applications deployed in a Kubernetes cluster. We covered how we can use existing, established techniques like rolling updates and blue-green deployment to update our applications. We also covered different strategies for scheduling autoscaling in a Kubernetes cluster using kubectl and HPA.
In the next chapter, we’ll discuss the last functional piece of our application—jobs.
- Shared infrastructure for efficient resource management
- Self-service analytics for easy data exploration
- Enhanced security with row-level security and SSO
- Customizable dashboards to meet your specific needs