
Kubernetes Succinctly®

CHAPTER 2
Installation
Now that we have a good understanding of primary Kubernetes concepts, let’s get our hands in the game by provisioning our first Kubernetes cluster. In this chapter, we will cover the installation of a Kubernetes cluster on an Ubuntu 17.10 server using kubeadm. Although the steps to install on other operating systems (OS) remain more or less the same, it is essential that you refer to the steps of your specific OS for any prerequisites.
In this chapter, we will also cover installing a Kubernetes cluster on a local Windows machine and a local Mac machine, which will help you build and debug your applications before publishing them on a live cluster.
Setting up a cluster using kubeadm
kubeadm helps in creating a minimum viable Kubernetes cluster. It focuses on the initial setup and bootstrapping of the cluster on already provisioned machines. kubeadm init and kubeadm join are the two main commands:
- kubeadm init: This initializes a Kubernetes master with the desired configuration. It has many flags, which you can specify to configure your cluster. Some of these configurations are dependent upon your pod network add-on.
- kubeadm join: This initializes and joins one or more Kubernetes nodes to an existing Kubernetes cluster. It takes credentials for your cluster and joins the nodes to it.
As explained in Chapter 1, Kubernetes consists of many components as part of its setup. However, there are two main components that are the building blocks of your cluster:
- Kubernetes master
- Kubernetes node(s)
The Kubernetes master is the core of a Kubernetes cluster, and manages all the components in the cluster.
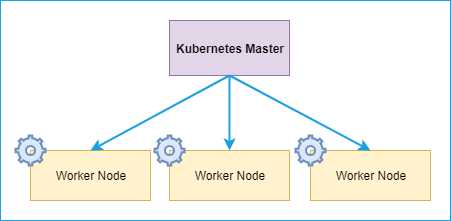
Figure 8: Kubernetes installation component
Prerequisite
The following are the prerequisites for setting up a Kubernetes cluster:
- 2 GB+ RAM per machine.
- 2 CPUs or more.
- Network connectivity among all machines in the cluster (public or private).
- A unique hostname, MAC address, and product_uuid for every node.
- Required ports open on your machines.
Tip: You can get the MAC address of the network interfaces using the command ifconfig -a. To check the product_uuid, use the following command: sudo cat /sys/class/dmi/id/product_uuid.
The following is a summary of ports that need to be open for the cluster components to communicate with each other and with the external traffic.
Table 1: Port list (Source: Kubernetes)
PortRange | Purpose | Node |
|---|---|---|
6443 | Kubernetes API server | Master |
2379-2380 | etcd server client API | Master |
10250 | Kubelet API | Master |
10251 | kube-scheduler | Master |
10252 | kube-controller-manager | Master |
10250 | Kubelet API | Worker |
30000-32767 | NodePort Services | Worker |
You will need to work through the documentation of your OS network configuration and firewall settings to enable the ports listed in the table.
Tip: You can check whether the required port is in use or not by using the following command: netstat -a |grep LISTEN.
For clouds such as Microsoft Azure, Amazon AWS, and Google GCP, you can expose the required ports via their management portals.
Setting up the Kubernetes master
Once all the prerequisites are satisfied, you can start working on the Kubernetes master installation. Start with the update of existing system packages.
Code Listing 6: Prepping machine
#Updates the list of packages. sudo apt-get update #Upgrades to latest packages. sudo apt-get upgrade -y |
The next step will be to install the apt-transport-https package, which is required for accessing the https URL of some of the repositories used in the installation.
Code Listing 7: Installing apt-transport-https package
sudo apt-get install apt-transport-https -y |

Figure 9: Output apt-transport-https package
Next, we need to install the docker package on which all our containers will run. Run the following four commands in the order in which they are listed.
Code Listing 8: Installing Docker
# Add Docker official GPG key. Trailing ‘-‘ means use stdin. curl -fsSL https://download.docker.com/linux/ubuntu/gpg | sudo apt-key add - # Set up the stable repository. sudo add-apt-repository \ "deb [arch=amd64] https://download.docker.com/linux/ubuntu \ $(lsb_release -cs) \ stable" # Update the apt package index. sudo apt-get update # Install the latest version of docker ce. sudo apt-get install docker-ce |
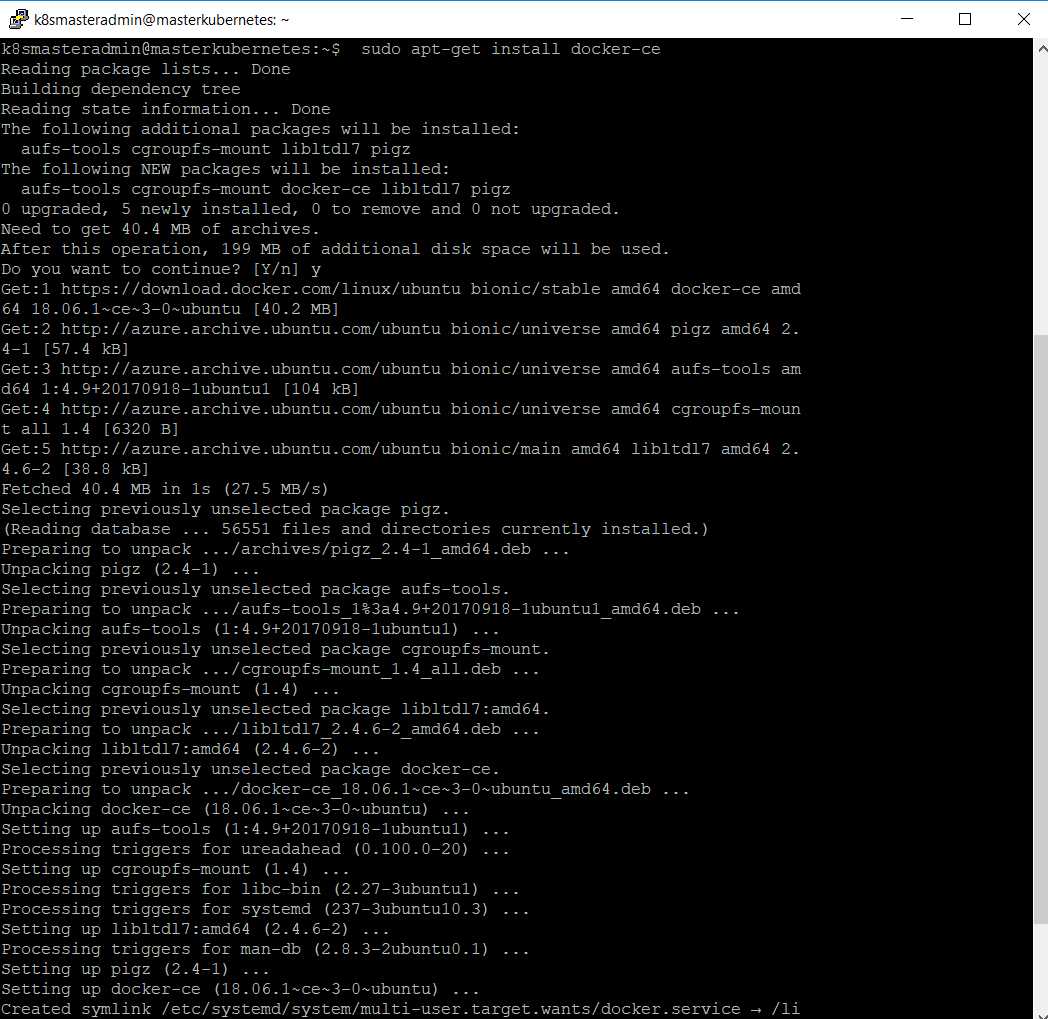
Figure 10: Output Docker installation
Once Docker is installed, it’s time to start and enable the Docker daemon.
Code Listing 9: Enabling Docker
# Start the Docker service. sudo systemctl start docker # Enable the Docker service. sudo systemctl enable docker |
If you didn’t encounter any errors, then your system is ready for installing Kubernetes. Let's start with adding a public key for the Google Kubernetes packages that are required for accessing Google packages from the web. We will also create a file in /etc/sources and add a link for downloading the Kubernetes package.
Code Listing 10: Adding Google Cloud key and link
Now, run apt-get update to download the newly added package.
Code Listing 11: Update machine
sudo apt-get update |
Now we can install the kubeadm, kubelet, kubect, and kubernetes-cni packages.
Code Listing 12: Installing Kubernetes components
sudo apt-get install -y kubelet kubeadm kubectl kubernetes-cni |
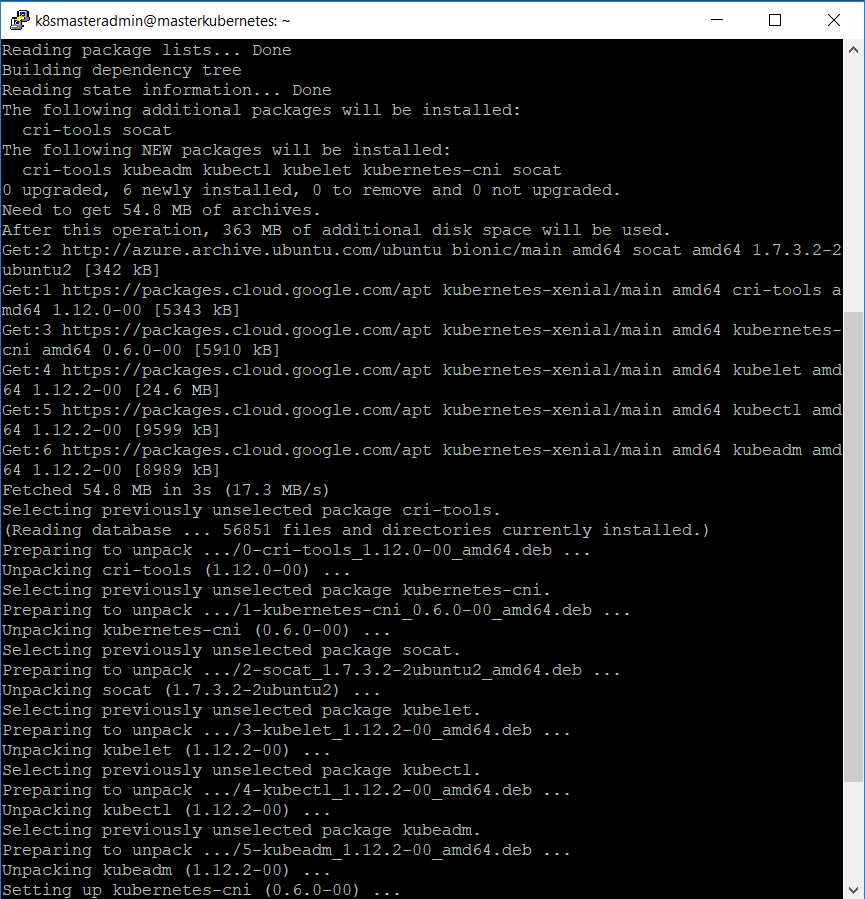
Figure 11: Output Kubernetes component installation
If there are no errors, then we are good to proceed with cluster initialization. For initializing our cluster, we will need the public IP of our master node. Use the following command to initialize the Kubernetes cluster.
Code Listing 13: Initializing cluster using kubeadm
sudo kubeadm init --pod-network-cidr= 192.168.0.0/16 --apiserver-advertise-address=13.76.45.201 <---ipaddress of master---> |
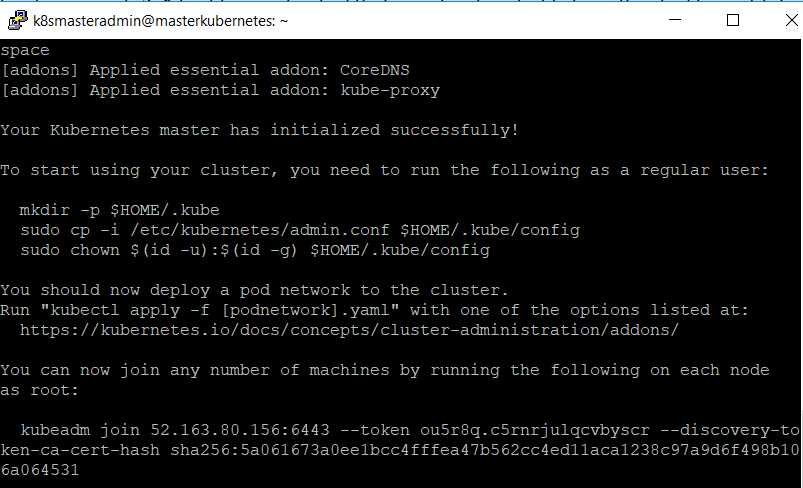
Figure 12: Output cluster initialization
Congratulations, your Kubernetes cluster is now ready for use. Your token and certificate hash are displayed as output of the previous command, and they can be used to join nodes to your cluster.
Note: If you get a message that your Docker version is not compatible with your Kubernetes version, you can downgrade your Docker version using this command: sudo apt-get install docker-ce=<VERSION>. You can check for the available Docker versions using this command: apt-cache madison docker-ce.
You can copy the command displayed in your console (kubeadm join) to use in our node(s) to join the cluster.
Note: The --pod-network-cidr= 192.168.0.0/16 flag is only required if you are using the Calico pod network add-on. We will be using the Calico network add-on for our cluster, but you can use any other network add-on. See the section “Adding pod network add-on” in this chapter for details.
Before adding nodes to your cluster, execute the commands in the following code listing, which will set relevant permissions in your Kubernetes cluster config files.
Code Listing 14: Setting permission
# Create .kube directory in the Home path. mkdir -p $HOME/.kube # Copy default configuration to new directory. sudo cp -i /etc/kubernetes/admin.conf $HOME/.kube/config # Set the relevant permissions. sudo chown $(id -u):$(id -g) $HOME/.kube/config |
Note: You can execute kubectl get nodes to get the number of nodes running in your cluster. At this stage, you should get one node running as master. Your node will be in the “Not Ready” state because we have not applied a pod network add-on to the cluster.
We will use the kubeadm join command in our node(s) machine. However, before we do that, we need to apply the pod network add-on.
Adding pod network add-on
The pod network add-on is required for pods to communicate with each other. There are many default network add-ons available, all of which you can read about on the Kubernetes.io site. We will use the Calico add-on to set up networking, which requires a Calico configuration. The configuration itself is divided into two parts. First, we will install role-based authorization for our network.
Code Listing 15: Applying pod network rbac
$ kubectl apply -f https://docs.projectcalico.org/v3.3/getting-started/kubernetes/installation/hosted/rbac-kdd.yaml |
After you get an output that looks like the following listing, you are good to proceed. The operation should not take more than a few seconds to complete.

Figure 13: Output Role-Based Access Control (RBAC) network
The following command will install the network add-on to our cluster.
Code Listing 16: Applying pod network add-on
$ kubectl apply –f https://docs.projectcalico.org/v3.3/getting-started/kubernetes/installation/hosted/kubernetes-datastore/calico-networking/1.7/calico.yaml |
It will deploy the appropriate configuration and daemon set, along with network configuration. You should see output similar to the following listing.

Figure 14: Output network add-on
After successful execution, the kubectl get nodes command should give you the current status for your master node. You can check for more details about other components of Kubernetes master by using kubectl get pods –all-namespaces command. All the pods should be in running state before you start adding nodes.
Adding worker nodes
Now that we’ve set up the master node, it’s time to add worker nodes. Worker nodes are the workhorses of a Kubernetes cluster that host the workloads running on the cluster. Prepare each worker node by following the same steps you followed for the Kubernetes master, up to the installation of the kubeadm, kublet, kubectl, and kubernetes-cni packages.
After successful installation, use the kubeadm join command that you copied from the output of the Kubernetes master initialization in the previous steps.
Code Listing 17: Joining worker nodes
kubeadm join 13.76.45.201:6443 --token hkjku5.vqo1puk7qekto77g --discovery-token-ca-cert-hash sha256:ba95f86079b6bd81e93b8f1569177104da282a42a987538a4aae91c60e5a00d8 |
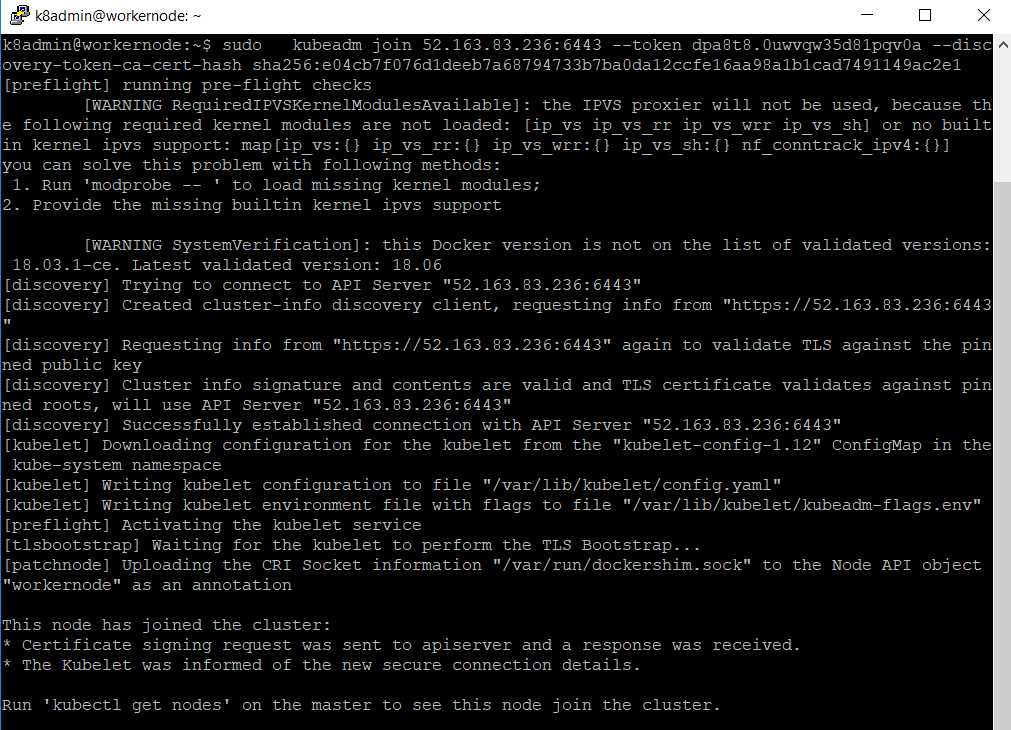
Figure 15: Output joining nodes
You can repeat the same steps for all worker nodes that you want to join in the cluster.
Note: If you lose the cluster join token that you previously generated, this command will print it again for you: kubeadm token create --print-join-command.
To verify that a node has successfully joined the cluster, execute the command get nodes on the master node of your cluster.
Code Listing 18: Get nodes
kubectl get nodes |

Figure 16: Output get nodes
You can also view the status of your cluster by using the cluster-info command.
Code Listing 19: Get cluster-info
kubectl cluster-info |

Figure 17: Output cluster-info
Your Kubernetes cluster is now up, running, and ready to host applications. If you faced any issues during cluster installation, you can refer to this Kubernetes page for details on common issues and troubleshooting them.
Setting up a cluster on a developer machine
We need everything running locally on our machines to debug and test our applications before promoting them to the production environment. Kubernetes has extensive support for running a small version of a massive, enterprise-grade cluster on a developer machine. Up until recently, the most popular solution for running Kubernetes locally was Minikube. Minikube sets up a single node cluster on a local machine inside a VM and supports almost all the standard Kubernetes commands. This is helpful for running and testing applications on development systems. It is also a good starting point for learning Kubernetes.
With the latest Docker for Windows/Mac release, Docker has inbuilt support for Kubernetes, making setting up the local Kubernetes environment on the developer machine easy. Docker Swarm, which is a clustering and scheduling tool for Docker containers, was the only option in the previous version of Docker for Windows/Mac as an orchestrator. However, Docker now provides the option of choosing between Docker Swarm and Kubernetes.
Prerequisite
Docker for Windows and Docker for Mac are community editions for each OS. You need to have an account on the Docker store to download Docker for Windows or Mac.
Let’s install Docker for Windows from the Docker store. For Docker for Mac, the package and installation steps are available on the Docker website.
The following are the basic system configurations required to install Docker for Windows:
- Windows 10 64 bit: Pro, Enterprise, or Education (1607 Anniversary Update, Build 14393 or later).
- Virtualization enabled in BIOS. Typically, virtualization is enabled by default (this is different from having Hyper-V enabled).
- CPU SLAT-capable feature.
- At least 4GB of RAM.
- Microsoft Hyper-V.
For Docker for Mac setup, the following conditions must be satisfied:
- Mac hardware must be a 2010 or newer model, with Intel’s hardware support for memory management unit (MMU) virtualization, including Extended Page Tables (EPT) and Unrestricted Mode.
- macOS El Capitan 10.11 and newer macOS releases are supported.
- At least 4GB of RAM.
- VirtualBox prior to version 4.3.30 must NOT be installed (it is incompatible with Docker for Mac).
Tip: You can check to see if your Mac machine has this support by running the following command in a terminal: sysctl kern.hv_support.
The following components are installed as part of Docker for Windows or Mac setup:
- Docker Engine: Default docker daemon that runs in the background.
- Docker CLI client: Command-line client to interact with Docker daemon.
- Docker Compose: Used to run multicontainer Docker applications and enables support for YAML-based deployment.
- Docker machine: Helps in installing the Docker engine on virtual hosts.
- Kitematic: Automates the Docker installation and setup process and provides a graphical user interface (GUI) for running and managing Docker containers.
Note: If your system does not meet the requirements to run Docker for Windows/Mac, you can install Docker Toolbox, which uses Oracle Virtual Box instead of Hyper-V.
If all the previous prerequisites are satisfied by your machine, you can go ahead and install the appropriate Docker setup.
Kubernetes installation
Once Docker for Windows or Mac is installed successfully on your local machine, go to Settings and click Enable Kubernetes. This will download the required images and set up the Kubernetes cluster for you. Awesome, right? How simple was this compared to the kubeadm setup that we just did for Linux cluster?
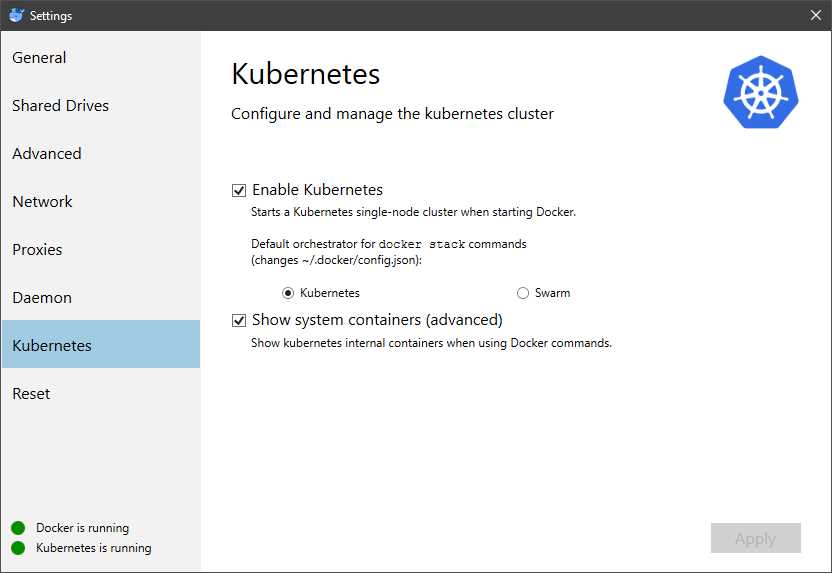
Figure 18: Docker for Kubernetes
You can also click Show system containers, which will make all the system containers visible. The Kubernetes server runs locally within your Docker instance, is not configurable, and is a single-node cluster.
Note: Make sure the kubectl path (C:\Program Files\Docker\Docker\Resources\bin\kubectl.exe) is set in your cli PATH variable. For Mac, the path is /usr/local/bin/kubectl.
Once everything is green, and the “Kubernetes is running” message is shown, you can open the Docker CLI and start using kubectl commands.
Summary
In this chapter, we set up our Kubernetes cluster on Ubuntu VM using kubeadm. We also set up and installed Docker for Windows and Mac OS. Let’s move on to the next chapter to deploy our first application to our newly created cluster.
- Shared infrastructure for efficient resource management
- Self-service analytics for easy data exploration
- Enhanced security with row-level security and SSO
- Customizable dashboards to meet your specific needs