
Kubernetes Succinctly®

CHAPTER 1
Hello Kubernetes
Organizations all over the world compete on technology, regardless of the sector to which they belong. Every organization wants to make the best use of their infrastructure investments in public or local clouds. However, deploying applications densely on servers to optimally utilize the available infrastructure comes at the cost of management. The unit of deployment in a datacenter started with bare metal, moved on to virtual machine, and is now a container. A fine-grained unit of deployment abstracts the application from the underlying infrastructure, which provides a considerable advantage to application developers: they can treat the underlying infrastructure as immutable. If a server dies, crashes, or becomes unresponsive, no one sheds a tear, and the server simply gets replaced.
Managing multiple applications spread across containers hosted on various virtual machines is a complex task. There are several tools that we can use to manage the containers and the applications hosted by them. Some of the most common tools that are well known and trusted by organizations are Docker Swarm, Kubernetes, and Mesosphere DC/OS. Out of all the tools, Kubernetes is evolving as the de facto container management tool used by organizations and cloud vendors all over the world. However, all the tools fulfill the basic need of automatically placing a user application on infrastructure that can best host the application and manage its lifecycle. The orchestration capabilities of these tools free the Operations (or Ops) team from managing application concerns such as replication, availability, and fault tolerance. Since the orchestrator intimately knows the infrastructure, it ensures optimal utilization and highly efficient use of resources.
Before we proceed, let’s visualize the architecture of a datacenter capable of running containerized applications, and see where the orchestrator tools fit into the overall architecture.
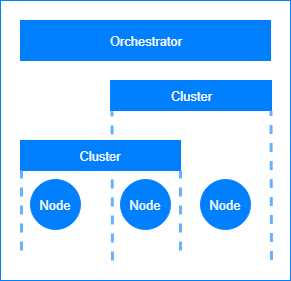
Figure 1: Datacenter architecture for containerized applications.
In distributed systems such as Kubernetes, the workloads are spread across all the available compute units, which are many virtual machines working together. The orchestrator tools themselves can run on a variety of platforms, and therefore, they can support the containerized applications running on any platform.
A node is a physical or virtual machine that can host an application and run some of the orchestrator services. A cluster is a virtual collection of network-connected nodes. Some of the most common clusters deployed in modern data centers are the failover clusters and the load-balancing clusters; however, they can also be purposed to host different application environments, such as development, testing, and production.
Kubernetes
Kubernetes is a container orchestration application developed by Google. It provides a unified API that can be used to manage the deployment and upgrades of containerized applications, batch jobs, and databases. Kubernetes provides a layer of abstraction and isolation to applications from the underlying hardware by deploying them in containers. Kubernetes uses a declarative approach to deploying applications. As a user, you write the application requirements (such as networking, ports, memory, and replication) in a manifest, and hand it over to Kubernetes. Kubernetes then reads this manifest and decides where to place the nodes that run your application in the cluster.
Note: Kubernetes is pronounced as “koo-ber-net-eez,” and is sometimes referred to as K8s (8 because it replaces 8 characters between the K and the S). Kubernetes is the Greek name for a helmsman or captain of a ship, and like a captain, Kubernetes manages containerized applications. The official website of the Kubernetes project is here. The majority of Kubernetes code is written in the Go programming language.
Because of its excellent orchestration and routing capabilities, Kubernetes is an enterprise-grade platform for building microservices applications. Since Kubernetes decides the placement of microservices, it has inbuilt features to support service discovery. Using the service discovery feature of Kubernetes, microservices can talk without knowing each other’s physical location. Behind the scenes, Kubernetes is always working to keep the cluster in the desired state, maintaining required replica count and monitoring service health by taking actions like replacing nodes with new ones and providing a holistic view of the cluster to the administrator. Kubernetes also supports some of the most well-known microservice deployment workflows out of the box, such as rolling updates, blue-green deployment, and canary deployments.
A brief history
Google has a massive infrastructure and application footprint. In the years 2003–2004, Google internally introduced a large-scale cluster management system named Borg. Borg can run hundreds of thousands of jobs from several thousand applications in clusters composed of tens of thousands of machines.
After Borg, Google released project Omega in 2013. Omega, which is a flexible and scalable scheduler for large compute clusters, was the next version of the Borg cluster management system. In 2015, Google launched Kubernetes, which is an open-source version of Borg. In the same year, several industry leaders, such as Microsoft, IBM, and Docker, joined the Kubernetes community. A year later, Google donated Kubernetes to the Cloud Native Computing Foundation (CNCF), which maintains high-quality projects such as Kubernetes and Prometheus, and aims to build a sustainable community and ecosystem around microservices projects that use containers.
Since 2016, Kubernetes has gone mainstream. Deployment of several large-scale applications on Kubernetes clusters, such as Pokemon Go! and GitHub, added to the popularity of the platform. We are now seeing almost all major cloud vendors provide native support for Kubernetes on the cloud, and several projects cropping up in the Kubernetes ecosystem.
Kubernetes architecture
Before we jump into the exciting topic of building and deploying applications with Kubernetes, let’s go through a short Kubernetes 101 lesson. In this section, we will look at the components that make up a Kubernetes cluster. The following diagram illustrates how the individual components in the Kubernetes architecture work together.
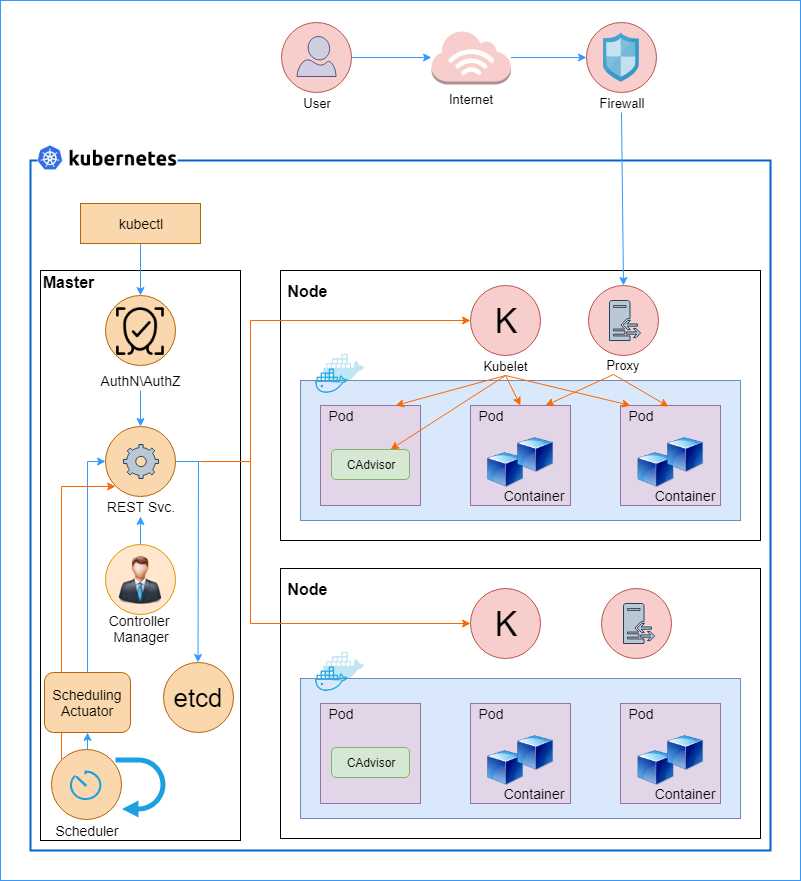
Figure 2: Kubernetes architecture. Sources: kubernetes.io and x-team.com blog.
Let us dissect the architecture and understand the roles of the various components in Kubernetes. The overall architecture of Kubernetes is composed of three parts: the cluster, the master, and the node. The cluster forms the infrastructure component of Kubernetes and it is responsible for hosting the Kubernetes platform. Most of the cloud vendors offer managed Kubernetes clusters that are ready to host your applications with just a few clicks; however, you can set up a cluster on-premise as well, which is a much more complex activity.
The master component of Kubernetes is responsible for allocating workloads to nodes and managing the cluster state so that the cluster always remains in the desired state. For a Kubernetes cluster, the desired state means infrastructure and application requirements, such as which applications the user wants to run on a cluster, which containers the application should use, and which network and disk resources the user wants to make available to the application. The nodes, on the other hand, run the actual workloads on containers. Next, we will discuss the various components that make up the Kubernetes system, further divided into different categories.
Cluster
Clusters are collections of computing hosts, storage, and network resources that Kubernetes can use to deploy and manage your applications. In general, very large-scale applications sweep across clusters, and Kubernetes can manage such applications by federating across clusters. Federated clusters are outside the scope of this book, but you can read more about them on the Kubernetes website.
Master
The Kubernetes master makes up the control plane of Kubernetes. It is made up of several components, such as the API server, a scheduler, a controller manager, and a cluster-configuration storage, which is generally implemented using etcd—a consistent and highly available key value store that stores Kubernetes cluster data. The following is a high-level architecture diagram of the Kubernetes master and its components.
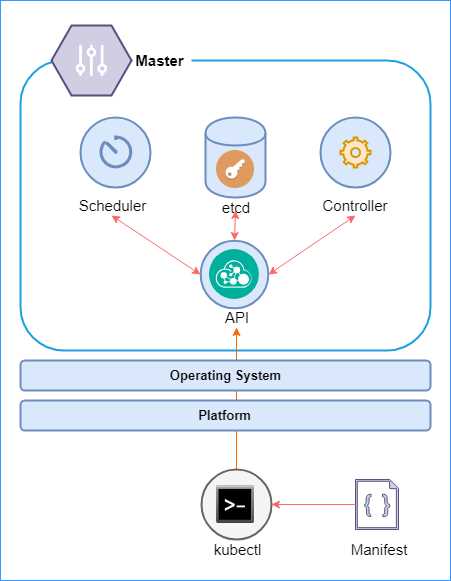
Figure 3: Kubernetes master
We will discuss these components in a little more detail in the following sections. However, at a high level, the master schedules the pods and handles cluster events, such as a health check. The master can be deployed on multiple nodes to make the cluster highly available. The control plane does not host workloads, and it is solely responsible for maintaining the cluster. The master is supported by the underlying operating system (Linux), and it can be hosted on a variety of platforms on the cloud or premises.
All interactions with the master take place through the Kubernetes REST API, which makes it easy to build custom tooling for managing Kubernetes clusters. Users can use the kubectl tool, a REST CLI (Command Line Interface) client, to send a manifest with the desired changes to the API server. The desired state rules then kick off, which leads to the scheduler modifying the pods to bring the state of the cluster to the state definition provided in the manifest.
REST API
Any interaction of tools or developers with Kubernetes takes place through the Kubernetes API, the kube-apiserver. Interact with this API using the command line interface (CLI) called kubectl, which is a simple client built for simplifying interaction with the Kubernetes API. The API stores the state data in the cluster state store: the etcd cluster. The API is stateless, so it can be scaled out on demand.
Etcd
Etcd is a reliable, distributed persistent data store that is used by the API server for storing the cluster state and configuration. The etcd cluster store is a distributed, always consistent, and watchable data store. Its unusual name is derived from the Linux etc directory, plus the word “distributed.” The cluster store is the single source of truth for the cluster and, therefore, you should plan to make the storage redundant and always accessible for highly available clusters. In a small cluster, an instance of etcd can run on the master node. However, for nontrivial deployments in which reliability and availability are essential, it is recommended to maintain an odd-numbered count of etcd cluster nodes, such as 3 or 5.
Controller manager
The controller manager, kube-controller-manager, is the management engine of Kubernetes. It is a daemon that is made up of multiple managers that control replication, pods, services, endpoints, and so on. The managers watch their respective resources through the Kubernetes API and try to direct the cluster to the desired state in case of any inconsistency.
The cloud variant of the controller manager, cloud-controller-manager, manages the nodes in the cloud. The cloud controller manager uses vendor-specific APIs to manage the nodes while implementing a standard interface. Therefore, your applications won’t be impacted by different implementations of the controller manager.
Scheduler
The Kubernetes scheduler, kube-scheduler, is responsible for scheduling (deploying) pods into nodes, which is a physical or virtual machine, based on the desired configuration that you specify in the application deployment manifest. A pod can host multiple containers and is the smallest unit of deployment in Kubernetes. The scheduler considers constraints such as resource requirements, affinity requirements, service requirements, and data localization for scheduling the pods.
Scheduling workflow
To understand how the components of the masters work together, let’s look at the workflow that is followed for provisioning a new pod and assigning it an application workload. The following sequence diagram illustrates the actions that are invoked to create a pod for an application.
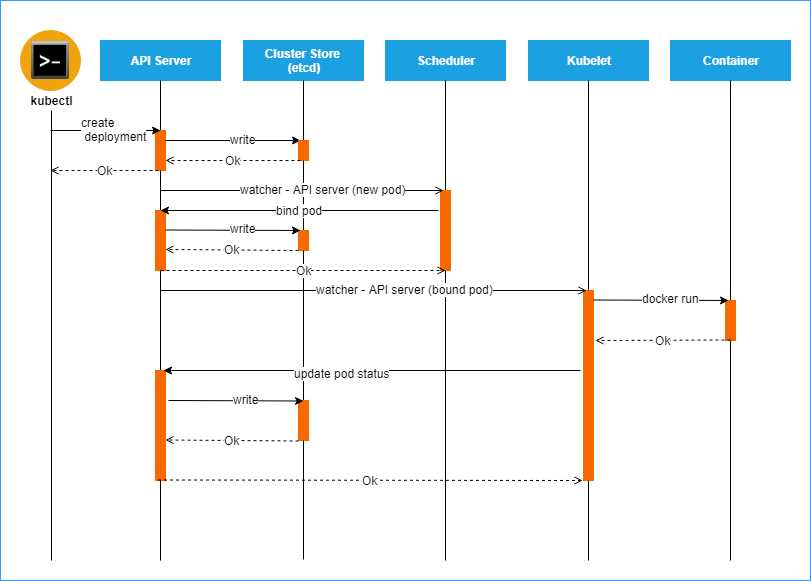
Figure 4: Pod creation sequence. Source: Heptio
The kubectl tool sends the application manifest to the API server. The API server extracts the desired cluster information from the manifest and persists it in the cluster store. The cluster store acknowledges the request, and a success response is sent back to the caller.
At this stage, the Kubernetes watchers come into effect. All Kubernetes object resource types are required to maintain an incremental change feed called the watch. A client can send an HTTP request to the watch endpoint of the API to get an incremental feed of the cluster changes.
You can see the feed for yourself by starting the kubectl proxy with the following command.
Code Listing 1: kubectl proxy
kubectl proxy |
Next, use another terminal to send a request to the watch feed for observing changes to the pod objects.
Code Listing 2: Observe pod changes
curl -X GET -i http://127.0.0.1:8001/api/v1/pods?watch=true |
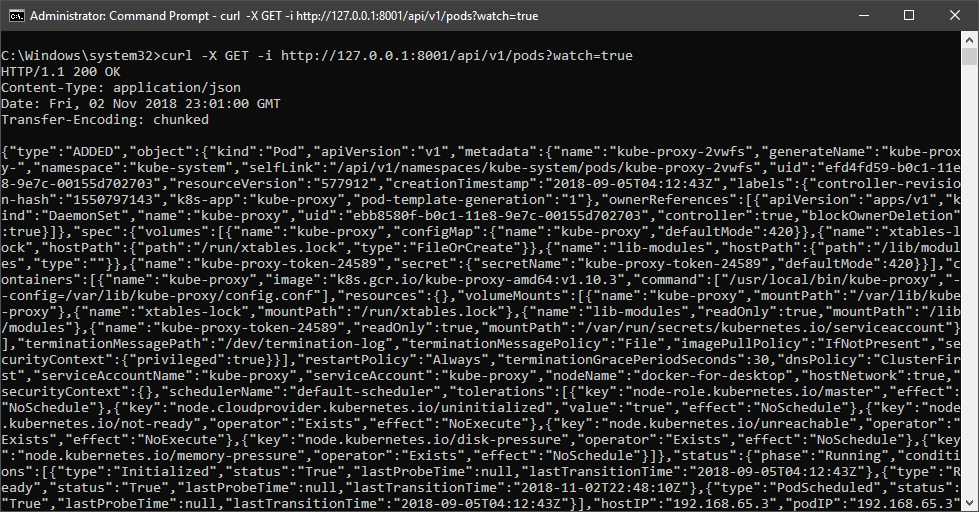
Figure 5: Output pod changes
You will notice that this request does not terminate, and that you will keep getting changes appended to the feed when a pod object changes. A Kubernetes daemon named raven is responsible for watching the changes using this feed and notifying the other components of the Kubernetes master whenever it detects a change.
When the scheduler gets a notification to create a new pod in the cluster, it finds the appropriate node in the cluster that will host the pod and responds to the API server with the details of the scheduled pod. The API server persists this information to the cluster store. Next, the daemon sends a notification to the kubelet that is running on the identified pod. The kubelet reads the desired pod configuration from the feed and triggers the Docker daemon to create a new container using the supplied image. The Docker daemon, or rkt (pronounced “rocket”), provides container management capabilities for Linux clusters, just like Docker.
Next, let’s discuss the components that are the workhorses of Kubernetes clusters that host your application workloads: nodes.
Nodes
In a cluster, a physical or virtual machine is a node. Each node can host many pods, which is the unit of deployment in Kubernetes. Additionally, every node in the cluster runs several Kubernetes components, most importantly, the kubelet and the kube proxy. Some nodes in the cluster run the Kubernetes master components, whose role in the cluster is to manage the nodes. The nodes host the application and are controlled by the Kubernetes master. The following diagram shows the high-level architecture of the Kubernetes node.
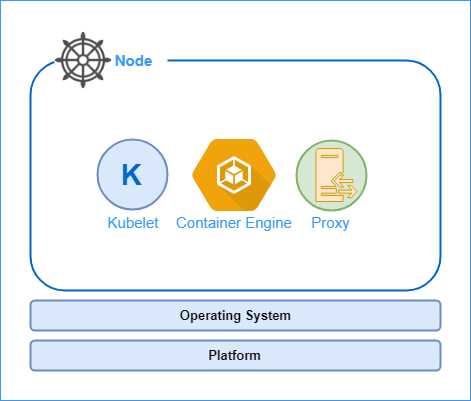
Figure 6: Kubernetes node
A Kubernetes node is made of three major components: a kubelet, a container engine, and a proxy. We will go through the components in detail shortly, but for now, let’s discuss the roles that these components play in the node.
As we previously discussed in the pod scheduling workflow, the kubelet agent registers the node with the cluster and watches the API server for changes. The kubelet instantiates pods and responds to the master with the operation status. The container engine (Docker or rkt) is responsible for creating containers from images and starting or stopping them. Another essential component of the node is the proxy. Every pod in the cluster gets an IP address, which is shared by all the containers that are present in the pod. The proxy helps load-balance traffic coming to pods that are part of a service.
Pods
The pod is the unit of deployment in Kubernetes. Each pod contains one or more containers. Although Kubernetes can work with any type of container, such as Docker and rkt, you will find a much better integration experience and ecosystem around Docker because of its popularity. Pods provide a persistent environment for containers to run in. Therefore, all containers in a pod share the same IP address, the same storage, and the same kernel namespace. Containers inside a pod can communicate with each other using localhost or inter-process communication.
Remember that pods, and not containers, are the deployment units in Kubernetes, so if a container crashes, the entire pod is replaced by the master. Likewise, if you want to scale out the cluster, new replicas of pods will be deployed in nodes.
A pod provides an isolated environment for its containers. A pod can host more than one container; however, since pods are atomic, all the containers that a pod hosts are lost when a pod is decommissioned. In general, you would host more than one container in a pod to implement sidecars, such as log scrapers, which have one-to-one dependency on the main application.
The following diagram illustrates the pod environment, which consists of isolated units of network stacks, cgroups, and namespaces. The diagram also illustrates the network mechanisms available to the containers to interact with each other.
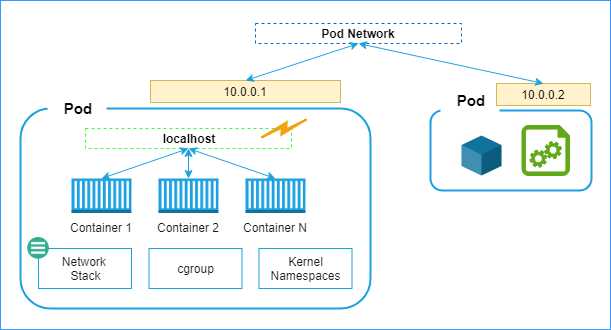
Figure 7: Pod network
You can see that containers present in the same pod can send requests to each other using different ports on the localhost. However, for communicating with containers across pods, they can use the pod network. Each pod gets a unique, network-visible IP address. Pods can send requests to other pods using their IP addresses and the known port numbers of the target containers. However, since pods can die, and new pods can be created any time, it becomes tough for an application to discover pods. Therefore, a higher-level object called Services should be used for networking. Amongst a host of features such as load balancing and high availability, services maintain an IP table of the associated pods, which provides a layer of indirection to the pod requests.
DNS
The DNS service, kube-dns, is scheduled as a regular pod in a Kubernetes cluster. A service in Kubernetes is a logical set of pods. Take an application that consists of a front-end application and a back-end application as an example. You can deploy replicas of each of the applications in multiple pods, and you can name the two types of pods front ends and back ends, each of which would be a service.
All services in Kubernetes receive a DNS name. So, if your front-end service wants to request some data from a back- end service, then it can resolve the address of the back-end cluster using the DNS. Using DNS, services can be placed anywhere in a cluster without requiring a change in the other services. Just like services, pods also get a DNS record, if enabled. Later in this book, we will interact with the DNS service to connect two services together.
Proxy
A node is made up of several components that render the node a part of the cluster. Only a node in the cluster can get pods scheduled and execute workloads. One of the components of the node is the proxy. The proxy, kube-proxy, takes care of the networking requirement of the node. It reflects Kubernetes REST API services and makes them available locally on the node. It also talks to the DNS service, has implicit knowledge of environment variables, and can use them to find out the cluster IP addresses. It can also help carry out communication between nodes and master through TCP and UDP forwarding.
Kubelet
The kubelet is the heart of the node. It connects the node to the master and manages the communication between the node and the master. It manages the lifecycle of pods scheduled on a container. Every time a pod is scheduled on the node, the kubelet carries out the following operations:
- Downloads pod secrets from the API server.
- Mounts storage volumes if requested by the scheduler.
- Runs the containers in pods.
- Runs container health probes.
- Reports health status of node and pods to the master.
Node supervisor
The node supervisor, supervisord, runs on each node and maintains and manages the availability of other services, such as kubelet, docker, or rkt, on the nodes. The supervisor creates subprocesses for each service, and its lifetime is managed by supervisord. If any subprocess crashes, supervisord is notified of that, and it takes necessary action based on the configuration.
Logging agent
The logging agent, such as fluentd, runs on each node and is responsible for log collection, parsing, and distribution. The logging agent is usually deployed as a daemon set replica since it must run on each node. The node-level logging agent is the most common approach in Kubernetes since it helps in the faster collection of logs and allows you to transfer them to a relevant aggregator or storage. We will discuss the logging agent (fluentd) further in Chapter 7.
There are a few more essential concepts that you need to be aware of before getting your hands dirty with Kubernetes.
Replica set
To ensure high availability of services, you can maintain multiple copies of pods running the same service. The traffic on a replica set is automatically load-balanced. Kubernetes tries to maintain replicas across nodes so that a node failure does not disrupt the service. A replica set can be configured to add and remove pods automatically.
Services
Services are collections of pods that expose functionality to users or other services. Any traffic sent to the service will be forwarded to one of the pods that are associated with the service. The assignment of pods to services happens through label selector, which is a Kubernetes grouping primitive for selecting any pods whose labels match the criteria specified in the selector. We will discuss the concept of services in much more detail in Chapter 4.
Why do we need services?
Pod-to-pod communication in a cluster can take place through IP addresses as each pod gets a new IP address. However, pods are ephemeral, and they get replaced by the cluster manager in several cases, such as scaling. New pods get a new IP, which can break the communication link between the pods. This is also true for external services or users trying to access functionality in a pod.
External users and pods require a permanent IP address that can be used to access the pods. Services group the pods and provide features such as load balancing, endpoints, and service discovery. Using services, you can group the pods that perform a specific functionality. This aggregation of functionality in a cohesive unit is called a microservice. Now you understand why Kubernetes is a platform that has microservices in its DNA.
While we are on the topic of services, let’s discuss the types of services in a little more detail. The different service types determine the behavior of services, based on which you can control service accessibility.
Types of services
For most applications, you would want to expose a part of the application (the front end) to the Internet. The different types of Kubernetes services control how the traffic originating from outside the cluster is routed to the pods. The following are the different types of services supported by Kubernetes.
Cluster IP
This service type is used when you want to expose the service within the cluster to other services or applications. It uses the cluster internal IP addresses and is the default service type. Another spinoff of this service type is the headless service that has no IP address, not even an internal cluster IP address, assigned to it. Headless services implement their own service discovery and load-balancing mechanisms. Since headless services can reach any pod directly, you will find that many load balancers and proxies are implemented using them.
Node port
This service type exposes your service externally to the outside world. It uses each node’s external IP address and a static port to expose the service. To reach such a service, a user can send a request to <Node IP>:<Node Port>, which will ultimately reach the desired node. All the nodes will forward any traffic that they receive on the port to the service. A cluster IP will be created for the service internally, so the nodes will forward the traffic that they receive to the internal cluster IP of the service.
Load balancer
This service type also exposes your service externally. It works for cloud-based clusters, which have external load balancers. It depends on cloud provider capabilities to support external IP addresses. Although its implementation varies with the cloud vendor, in general, for such a service, a node port and cluster IP are created, and the external load balancer will route traffic to the node port.
External name
This type of service acts as a proxy to an external service that has a valid DNS name. Any traffic directed to this service will ultimately be routed to the external service. An external name service does not have a string selector, and therefore, any requests to this service are redirected to the target service by the DNS. This approach is different from any other redirections we have read about so far that use proxying or port forwarding.
Daemon set
The daemon set is responsible for running a copy of a pod on each node. It ensures that at least one copy of a pod is running on each node (or some nodes, in a few scenarios). If a daemon set is deleted, all pods created by it will also get deleted. A common example includes running the metric/log collector or health probe pod on each node. The daemon set can also be defined using YAML spec with kind equal to DaemonSet. A daemon set specification requires apiVersion, kind, and metadata fields. We will see DaemonSet in action in the deployment chapter.
Deployment
Deployment controllers are used to update a replica set or a pod. You could use deployments to apply a rolling upgrade of applications on pods, and likewise, rollback an update that failed. For example, if your pods are running version 1.0 of an application and you want to apply version 1.1 of the application on each node, then a command like the following will do a controlled update of the image that your pods use.
Code Listing 3: Update image
kubectl set image deployment/your-deployment value-of-name=your-app-image:1.1 |
We will learn more about deployments in Chapter 3.
Volume
Applications can store data on the container on which they are running. However, a container’s data store goes away when the container dies. The Kubernetes volume is a directory that is accessible to all containers in the pod, and its lifetime is the same as that of the pod. The storage will survive container restarts, but will be cleared when a pod dies. The media used to provide this storage is determined by the volume type used.
There are a variety of volume types available that can persist volume data on the cloud or local data center, such as AWS EBS, Azure Disks, and local. We will learn more about volumes in Chapter 4.
Stateful set
Stateful applications require data to be persisted even after the pod dies. A stateful set is a collection of pods that require the state to be persisted across activations of the pod. Stateful set pods have:
- A stable hostname in DNS.
- An ordinal index, which is a number ranging from 0 to N-1, where N is the number of replicas of the stateful set.
- Storage mapped to the hostname and the ordinal index.
As you can imagine, in this case, a more persistent volume would be required to maintain the state of pods. This type of storage is called persistent volume (PV), and it is a cluster resource just like nodes. Just like with volumes, developers can choose the type of persistent volume that they want to use. Some commonly used persistent volume types are GCEPersistentDisk, AWSElasticBlockStore, AzureFile, and Cinder. We will learn more about stateful sets in Chapter 4.
Namespace
Kubernetes allows you to segregate your deployments into different namespaces, which act as virtual clusters within the same physical cluster. Like programming namespaces, Kubernetes namespaces also provide a scope boundary that allows you to have unique resource names within the namespace.
You can create an isolation boundary within a set of applications on a cluster using namespaces. A namespace is a virtual cluster, and it can communicate with another namespace using only public interfaces. Nodes and persistent volumes are not part of namespaces. Therefore, Kubernetes can schedule pods from different namespaces on a node. Similarly, pods from different namespaces can mount the same persistent volume.
Note: Namespaces should only be used if you have the proper use case for them, like segregating resources among different users, or applying different access controls. If you have different versions of the same resource, then you should always use labels to separate them.
You can create a Kubernetes namespace using the following command.
Code Listing 4: Create namespace
kubectl create namespace remindwebnamespace |
To view all namespaces in your cluster, you can use the following command.
Code Listing 5: Get namespaces
kubectl get namespaces |
By default, all resources are created in the default namespace. If you don’t specify the name of namespace in the specification of a Kubernetes object, it gets created in the default namespace.
Labels and annotations
A label is to Kubernetes what a group name is to a collection of people. Labels are key-value pairs that are used to identify objects or group a set of objects together. Just like people can be part of many groups (and thus have many group names), labels have a many-to-many relationship with objects. Labels have certain restrictions on their design. A label must have a unique key composed of two parts: a prefix and a name. The prefix is optional, but if present, it must be a valid DNS subdomain, and it must be at most 253 characters long. Names are required, and they can be at most 63 characters long. They must start with an alphanumeric value (a-z, A-Z, 0-9) and can contain alphanumeric characters, dots, dashes, and underscores. Values have similar restrictions as names.
Sometimes, you may want to associate metadata with objects, such as a version number, build number, or other human-readable information. You can use annotations to associate additional information specific to an object. Annotations can be simple values or complex blocks of nested JSON that you can apply on an object.
Tip: You should maintain a map of label names and their meaning or intention in your project’s ReadMe file (file with essential project details). Some of the common labels that you should have in your resources are: environment, version, application name, and service tier. This will later help you in querying resources using label selectors, such as kubectl get pods -l version=1.0.0.
You can refer to an object by using a label selector. A label selector is a simple statement consisting of a key name, operator, and a value. For example, the following statement will select all objects that label key as role and value as frontend:
role = frontend
A comma can delimit multiple conditions in selectors.
role = frontend, applicationName = fooBar
You can also use set-based operations to select objects that match one of the values.
role in (frontend, backend)
Names
Every object in Kubernetes has a unique identifier (UID) and a name. You can use the name of the object to refer to it. Names must be made of lowercase alphanumeric characters, dashes, and dots. They should be at most 253 characters long. While creating an object, you only specify its name; Kubernetes generates and maintains the object’s UID.
Secrets
You don’t need to package your application secrets with your application. Custom application secrets and cluster secrets (secrets generated by Kubernetes for its components) are stored as plain text in etcd. These are directly accessible by the REST API. However, you can mount the secrets on all the pods that need to use them. The secrets in a pod are only stored in memory and never written to the volume for better security.
If you don’t want to store secrets in etcd, you can add them as environment variables in pods, and the pods can read them from the variables available only to them. We will learn more about secrets in Chapter 4.
We have covered quite a lot of ground in this chapter. A knowledge of the terms and the components used in Kubernetes will help you map the components to the Kubernetes architecture later. Let’s wrap up this chapter with a short discussion of use cases where Kubernetes is gaining popularity. In the next chapter, we will prepare our developer terminals and create our first cluster on Kubernetes.
Use cases
Kubernetes gives developers and operations a consistent experience everywhere, from your laptop to popular public clouds such as Azure, AWS, and Google Cloud. Most enterprises don’t like to have their application vendor locked so that they’re still able to utilize features mostly available to cloud applications, such as load balancing, persistent storage, and autoscaling. With Kubernetes, you can migrate your applications without any change between clouds and create federated clusters that span multiple clouds.
Since Kubernetes is platform-independent, developers can build applications on any platform and use Kubernetes to orchestrate them. The operations team can also use a consistent experience to manage the applications without investing time and resources in different tools.
Organizations are also using Kubernetes to build their infrastructure platform. Developers can build and package their applications and host them on the platform without worrying about contentions with other applications hosted on the platform as namespaces segregate them. Developers also get a consistent environment in all stages of deployment, from development to production.
Summary
In this chapter, we covered some of the fundamental components that make up the Kubernetes platform. We will discuss the rest of them as we keep enriching our knowledge of the platform.
Reading about the many subcomponents of the Kubernetes platform might seem a little overwhelming to you at first. However, we will interact with several of the components that we previously discussed to deploy and manage a microservices application. As you follow along, you will be able to piece the various parts of the Kubernetes puzzle together in your mind. In the following chapter, we will prepare a Kubernetes cluster on bare metal and prepare our development environment for deploying applications on Kubernetes.
- Shared infrastructure for efficient resource management
- Self-service analytics for easy data exploration
- Enhanced security with row-level security and SSO
- Customizable dashboards to meet your specific needs