
Kubernetes Succinctly®

CHAPTER 3
Deploying Applications
The moment you have been waiting for has arrived. In a short while, we will deploy our first application on our Kubernetes cluster. To keep the examples relevant to the real world, we will incrementally develop our application and deliver value to our customers in phases. In every phase, we will make the solution a little better and deliver it to keep our customers happy and engaged for the entire duration of the project. Let’s go through the requirements for the application we will be building.
Requirement
Our target customers are highly particular about planning their day-to-day activities. They need an application that provides an easy-to-use interface to add reminders and send them an email every night to remind them about the events that they have planned for the following day. After an unusually lengthy discussion, the customers came up with a unique name for the application—Remind Me.
Remind Me logical design
Given the requirements we have, we came up with the following logical design of the solution that we will build.

Figure 19: Remind Me logical design diagram
The application itself is straightforward. However, it has most of the components required by almost all enterprise applications in the real world. The following is a brief description of the roles of the various components of the application:
- Remind-Me-Web: This is the front end of the application that accepts reminders from the users. A reminder consists of a title, which is the name of the reminder, and a time when the user should be notified.
- Remind-Me-Service: This is a simple microservice that performs CRUD (Create, Read, Update, Delete) operations on reminders. The service uses a persistent volume (see Chapter 1) to save the data.
- Remind-Me-Job: This is a daily scheduled job, which sends an email to the user if it finds any reminders scheduled for the day when this job is triggered.
The technology and the logic we used for building the applications are not essential. You can build these components using any platform and technology stack and deploy the application on Kubernetes. We chose the following stack to build our applications. If you don’t know anything about one or all these technologies, don’t worry, we are not going to refer to the application code anywhere in this book.
Table 2: Remind Me technology stack
Component | Technology |
|---|---|
Remind-Me-Web | Angular 5 SPA on Dot Net Core 2.1 |
Remind-Me-Service | .Net Core 2.1 WebAPI |
Remind-Me-Job | .Net Core 2.1 Console Application |
We have published the entire source code of all the components and the deployment instructions on GitHub. At relevant places, we will point you toward the repositories on GitHub where you can get the source code.
The first release
It is day one on the project and everyone is excited. In this iteration, we will build only the web application and deploy it on a Kubernetes cluster. Our developers put their heads down and produced a simple application that stores reminders in memory. This doesn’t look very exciting right now, but gets the job done.
Note: The source code for this application is available in this repo on GitHub. You can find the steps to build and deploy the application in the repository.
The following screenshot shows the application in action, and it looks good to go for production release.

Figure 20: Remind-Me web v1.0 on localhost
The application is packaged in a Docker image using a simple Docker file, available in the repository. Since this is the first release, we tagged the image with version 1.0.0 and released this image in the wild (public repository) by releasing it on the Kubernetes Succinctly Docker Hub repository.
Note: You can find all the images for this title on the Docker Hub repository for Kubernetes Succinctly.
It’s now time for deploying this image on our Kubernetes cluster. Let’s start with testing the deployment on Docker with Windows (or Minikube, if you prefer) on our machine before deploying the application on a production cluster.
Before we begin issuing commands to the cluster, kubectl needs to be told about the cluster so that it can interact with the REST API there. The file that contains the connection information is called the kubeconfig file. By default, kubectl searches for a file named config at $Home/.kube in Linux or %userprofile%/.kube/config in Windows. You can choose your file by setting the custom kubeconfig file path in the KUBECONFIG environment variable or by using the --kubeconfig flag in your kubectl command.
Installing Minikube or Docker on Windows with Kubernetes support adds the connection details of your local cluster in this file. The connection information for a cluster is grouped under a context element in the kubeconfig file. A name uniquely identifies the context element, and it consists of three elements: cluster, namespace (empty for default), and user. To view the config file in your terminal, execute the following command.
Code Listing 20: View cluster config
kubectl config view |
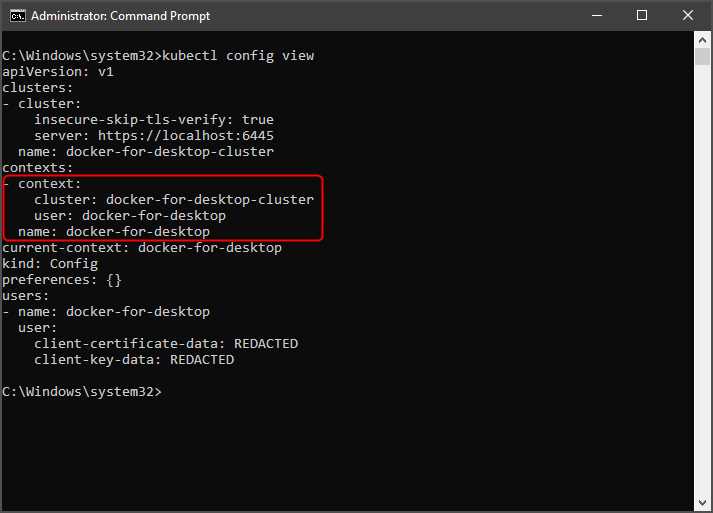
Figure 21: Kubectl config view output
If you have multiple clusters available, you can set the current context against which all the further commands will be executed.
Code Listing 21: Change context
kubectl config use-context docker-for-desktop |
There are two ways to deploy an application to Kubernetes: imperative approach and declarative approach. The imperative approach is to supply container creation options as part of command line arguments and follow up the command with further instructions to set up resources, such as external IP. For example, executing the following commands in sequence will create a pod using Google’s echo server image. This application simply relays whatever you pass to it.
Code Listing 22: Deploying image to cluster
# Create deployment with Google Echoserver image and expose it on port 8080. kubectl run relay --image=gcr.io/google_containers/echoserver:1.4 --port=8080 # Create a service of type NodePort for the relay deployment and expose the deployment on a random port on the cluster. kubectl expose deployment relay --type=NodePort # Get the port where the service is exposed. kubectl get service relay |
After executing the last command, you will get an output like the following, which presents the details of the service and the cluster port the service is available on. Notice how port 8080 of the service is mapped to 30722 of the cluster.

Figure 22: Kubectl get service relay output
Try sending a request to the service from the command line or your browser, and see the service relay the request details back to you. You can use the following command for this purpose.
Code Listing 23: Request relay
curl http://127.0.0.1:30722/we_love_kubernetes |
As you can imagine, running a set of commands from the terminal for a large system is error prone and not intuitive, and that’s where the declarative approach steps in. Kubernetes supports storing the desired configuration of your system in a YAML or JSON file and applying changes to the cluster using a simple kubectl apply command.
Tip: YAML originally stood for "Yet Another Markup Language," but was redefined as "YAML Ain't Markup Language." If you are not familiar with it, you should read more on the official website. It’s easy to understand and supports comments, unlike its JSON counterpart.
Storing the configuration of your cluster in a configuration file also allows you to track it in a version control system and treat it as a code. You can also create a composite configuration that is made up of several configuration files, which will keep the size of individual configuration files small. The -f parameter of the kubectl apply command lets you specify the location of your configuration file. The -R flag instructs the command to recursively parse the directories at the location to compose the parts of a composite deployment.
Let’s now create a cluster configuration file for our application and deploy it on our local cluster. We have decorated key statements with comments to make it easy for you to understand the elements in the file.
Code Listing 24: Remindmeweb YAML
# Create a deployment. This will deploy our app on multiple nodes. apiVersion: apps/v1 kind: Deployment metadata: name: remindmeweb-deployment # name of our deployment. spec: selector: matchLabels: app: remindmeweb # we'll deploy to all pods that have this label. replicas: 2 # run our app on 2 pods, please! template: # create pods using pod definition in this template. metadata: labels: app: remindmeweb # Label of the pods created by this template. spec: containers: - name: frontend # name of the container image: kubernetessuccinctly/remind-me-web:1.0.0 ports: - containerPort: 80 # port on which the service is running. protocol: TCP --- # Describe a service that consists of our web app pods. apiVersion: v1 kind: Service metadata: name: remind-me-web-svc labels: app: remind-me-web-svc spec: type: NodePort # type of service. ports: - port: 8080 # any service in the same namespace can talk to this service using this port. protocol: TCP targetPort: 80 # our web application is running on this port in the pod. By default, targetPort = port. nodePort: 31120 # external users can access this service on port 31120 using kube-proxy. selector: app: remindmeweb |
This manifest is available in the GitHub repository for this application. We now need to hand this manifest over to our Kubernetes cluster to execute it.
Kubernetes allows us to validate a configuration file for issues such as missing fields before deploying it by using the --validate option. The --dry-run option will show you the object that will be sent to the cluster to provision. Let’s first validate the configuration by executing the following command from the shell. Before executing the command, change to the kube-manifests folder.
Code Listing 25: Validating YAML
After running the command, you will see an output like the following. Otherwise, you will see an error that you can fix, and then validate the configuration again.

Figure 23: Output YAML validation
Finally, to deploy the application, execute the following command.
Code Listing 26: Deploying application to cluster
kubectl apply -f webspec.yaml |
You can also use the kubectl create command to apply the previous specification to your cluster.
Note: kubectl apply is part of the declarative approach, where changes applied are maintained even after applying more changes. kubectl create is another command that can be used, but it is part of the imperative approach, where you directly tell the Kubernetes API how you want to create or delete your resource, depending upon the configuration.
After the deployment succeeds, you can inspect the status of deployment by executing the following command.
Code Listing 27: Deployment status
kubectl describe deployment/remindmeweb-deployment |
If the deployment rolls out correctly, then you should see an output like the following.
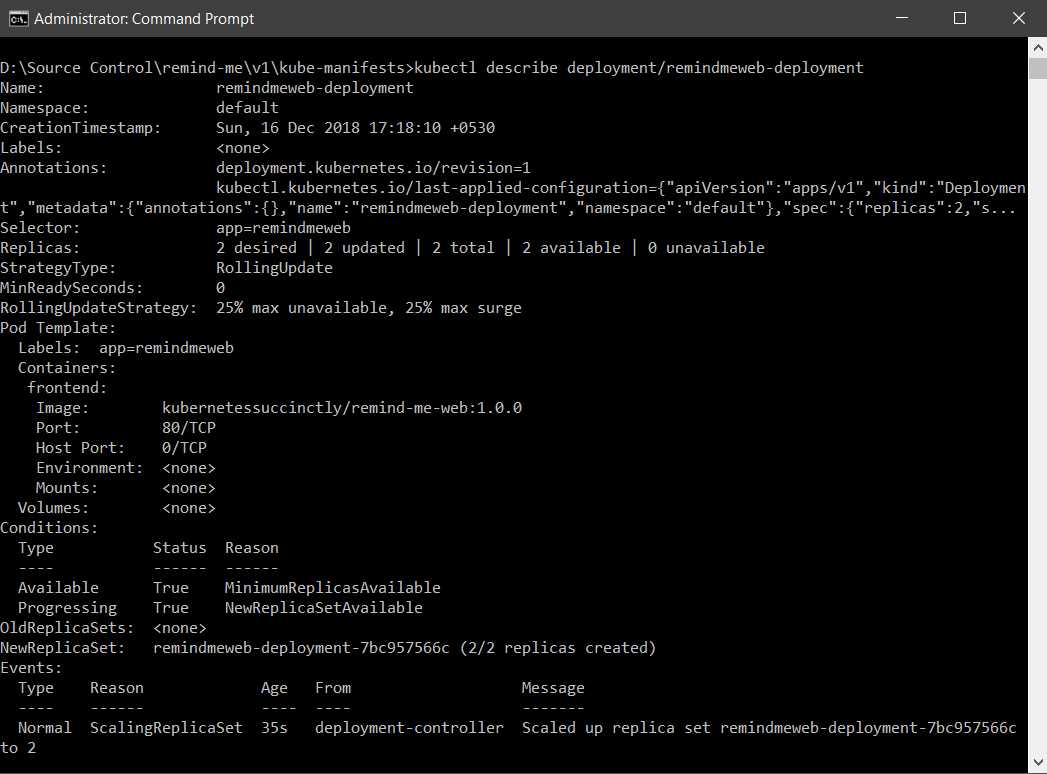
Figure 24: Output deployment status
Your application should be available on http://localhost:31120 (the node port) at this time. You can also view the details of your service by using the following command.
Code Listing 28: Get service details
This command will produce a response like the following, which shows the port on which your service is available.

Figure 25: Output get service
Congratulations, you have finished deploying the application to a cluster.
Deconstructing YAML configurations
A YAML file consists of only two types of structures: maps and lists. Apart from the two primitive structures, you will find different combinations of the structures in a standard configuration, such as lists of lists, maps of lists, lists of maps, and so on.
YAML maps are used to associate names with values. You will find that several elements in a standard YAML, such as apiVersion and kind, are described in this format. For example, the following configuration describes two keys and their respective values.
Code Listing 29: Simple maps in YAML
Three dashes in a row denote a separator. They are used to demarcate one structure from another in the same file.
You can extend the values in the maps to be another map, such as the one in the metadata section of the specification that we previously applied.
Code Listing 30: Maps with complex values
The metadata helps users or services select the objects in Kubernetes with which they want to work. For example, we used the metadata property named app to select all the pods that would be part of our service—remind-me-web-svc. As you can see in the previous code listing, the key named metadata has another key named label as its value. Since the keys name and label are at the same indentation level, they belong to the same parent, metadata. You should avoid using tabs to indent objects in YAML.
A list in YAML is just a sequence of objects. A simple list containing string values looks like the following.
Code Listing 31: Simple lists in YAML
The elements of the list are very easy to recognize because they start with a hyphen (-). Just like maps, a list can contain complex objects as values. For example, in the specification that we previously applied, you can see that values of the containers element are maps, and values such as ports are lists.
Code Listing 32: Lists with complex values
containers: - name: frontend # name of the container. image: kubernetessuccinctly/remind-me-web:1.0.0 ports: - containerPort: 80 # port on which the service is running. protocol: TCP |
You can see that using just two structures, lists and maps, we can create multiple complex structures with YAML.
Now that you understand the structure of YAML configurations, you might want to know the various fields that you can configure for a Kubernetes object and what they do. The Kubernetes command line tool, kubectl, has an excellent, built-in command called explain that you can use as a guide.
The following command will list the resources that you can get further information on.
Code Listing 33: kubectl explain
kubectl explain -h |
The following output generated by this command lists the resources that you can get further help on. We trimmed the output of the command in the following image to save space.

Figure 26: Output explain help
If we want to understand which fields are available to us to configure a service, we can use the same command with an argument.
Code Listing 34: Explain Service
kubectl explain service |
This will generate a concise documentation of the service object and the various fields that we can configure. We trimmed the output of the command in the following image to save space.
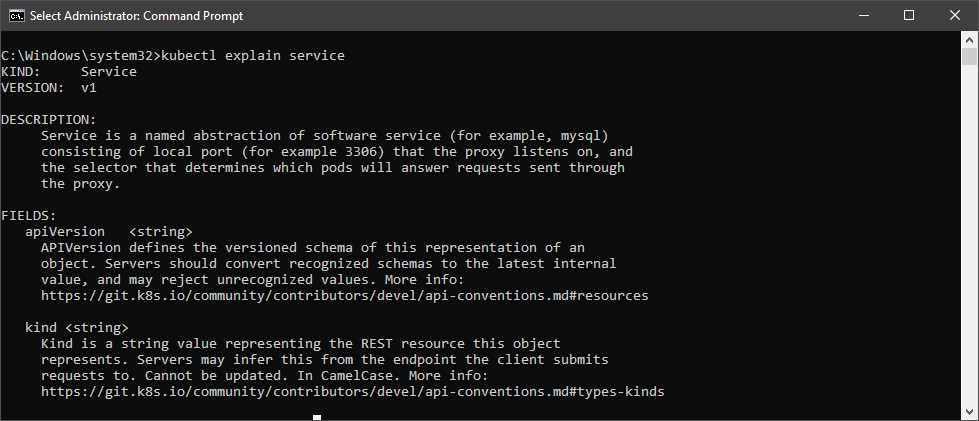
Figure 27: Output Explain Service
If you want more details, you can use the recursive flag with the explain command, which will list all the fields and subfields.
Code Listing 35: Explain service recursive
kubectl explain service --recursive |
The explain command can give you details for a particular field by specifying a scoped argument. You can scope the argument using dots in the format: parent.child1.child2, and so on. For example, to get further details about the label field, which is a child of the metadata field, we can execute the following command.
Code Listing 36: Explain child elements
As shown in the following output, executing the previous command will generate helpful documentation for the field.
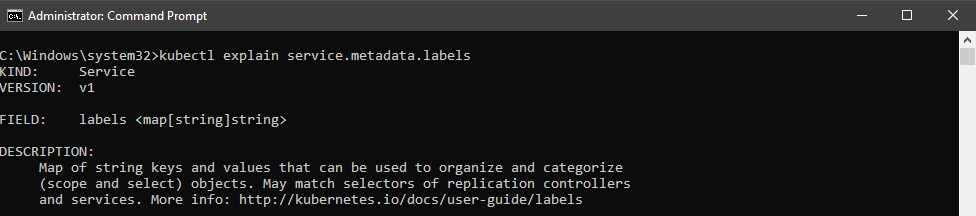
Figure 28: Output explain child elements
This tool will be very helpful to you during development or exploration of the Kubernetes platform.
Summary
In this chapter, we discussed how we can deploy a simple stateless application to a Kubernetes cluster. We also set the stage for the application that we will be iteratively building throughout this book. We hope that you are enjoying your journey so far, and having fun deploying applications on Kubernetes.
In the next chapter, we will cover some of the monitoring and logging options available on Kubernetes. We will then proceed to enhance our application and give it a stateful back end.
- Shared infrastructure for efficient resource management
- Self-service analytics for easy data exploration
- Enhanced security with row-level security and SSO
- Customizable dashboards to meet your specific needs