
Keystone.js Succinctly®

CHAPTER 5
Working with Views
Up until this point, we have seen how to retrieve data from the database (models) and how to use templates to display the data on the browser. The missing piece is the view, which is the link between the model and the templates. Views are responsible for handling data transmission to and from the template and the database.
Views are JavaScript modules and reside in a folder at /routes/views within the application.
Defining URL routes
Routes can be thought of as URL schemas that describe the mechanism for making requests to a web application. Routes are a combination of an HTTP request method (a.k.a. HTTP verb) and a path pattern used to define URLs in your application. Views are executed as a result of a route being serviced by the framework.
Routes are defined in a file residing at /routes/index.js.
Code Listing 53: Simple GET route
app.get('/', function (req, res) { res.send('welcome to nodepress'); }); |
Code Listing 53 illustrates a simple route. The route defines that the inline function should be executed as a result of receiving a request at the root/route in the application. The HTTP request should be an HTTP GET. The executed function receives both the request and response context objects as input. In the example, the string ‘welcome to nodepress’ is output on the screen as part of the response.
Keystone.js supports the following routing methods that correspond to HTTP methods:
- get
- post
- put
- head
- delete
- options
- trace
- copy
- lock
- mkcol
- move
- purge
- propfind
- proppatch
- unlock
- report
- mkactivity
- checkout
- merge
- m-search
- notify
- subscribe
- unsubscribe
- patch
- search
- connect
The most commonly used HTTP verbs are GET and POST. POST is used to send data to the server from web forms. The following example illustrates the syntax for a simple POST route.
Code Listing 54: Simple POST route
app.post('/addnews', function (req, res) { res.send('Received post to nodepress at addnews route'); }); |
There is a special routing method, app.all(), which is not derived from any HTTP method but can be used to respond to incoming requests on any HTTP verb.
Code Listing 55: Catch all route
app.all('/', function (req, res, next) { console.log('Will respond to all requests ...'); next(); // pass control to the next handler }); |
Building the list view
A list view is used to display a list of items with minimal information and links to a detailed view to see the data in depth. Let us see how to display a list of news items from our MongoDB database.
Add the following route to the application.
Code Listing 56: List view route
app.get('/news', routes.views.newslist); |
Next, define the newslist view in /routes/views/newslist.js with the following code.
Code Listing 57: List view
var keystone = require('keystone'); var async = require('async'); exports = module.exports = function (req, res) { var view = new keystone.View(req, res); var locals = res.locals; // Init locals locals.section = 'news';
locals.data = { news: [] }; // Load all news view.on('init', function (next) { keystone.list('News').model.find().sort('title').exec(function (err, results) { if (err || !results.length) { return next(err); } locals.data.news = results; next(err); }); });
// Render the template view.render('newslist'); }; |
The view is an instance of the keystone.View object. The view queries the database for all news posts in a sorted manner. The news items are stored in an array named data.news. At the end of the view, we invoke the render method and pass in the name of the template. This template will be combined with the data from the view and sent back to the browser to be rendered.
Code Listing 58: List view template
{% extends "../layouts/default.swig" %} {% block intro %} <div class="container"> <h1>News List</h1> </div> {% endblock %} {% block content %} <div class="container"> <div class="row"> <div class="col-sm-8 col-md-9">
{% if data.news.length %}
<div class="news"> <table class="table"> {% for news in data.news %} <tr> <td>{{news.title}}</td><td><a href='{{news.url()}}'>Read News</a></td> </tr> {% endfor %} </table> </div>
{% endif %} </div> </div> </div> {% endblock %} |
The template uses the Swig for loop to render the news posts. The rendered output will look like that shown in Figure 15.
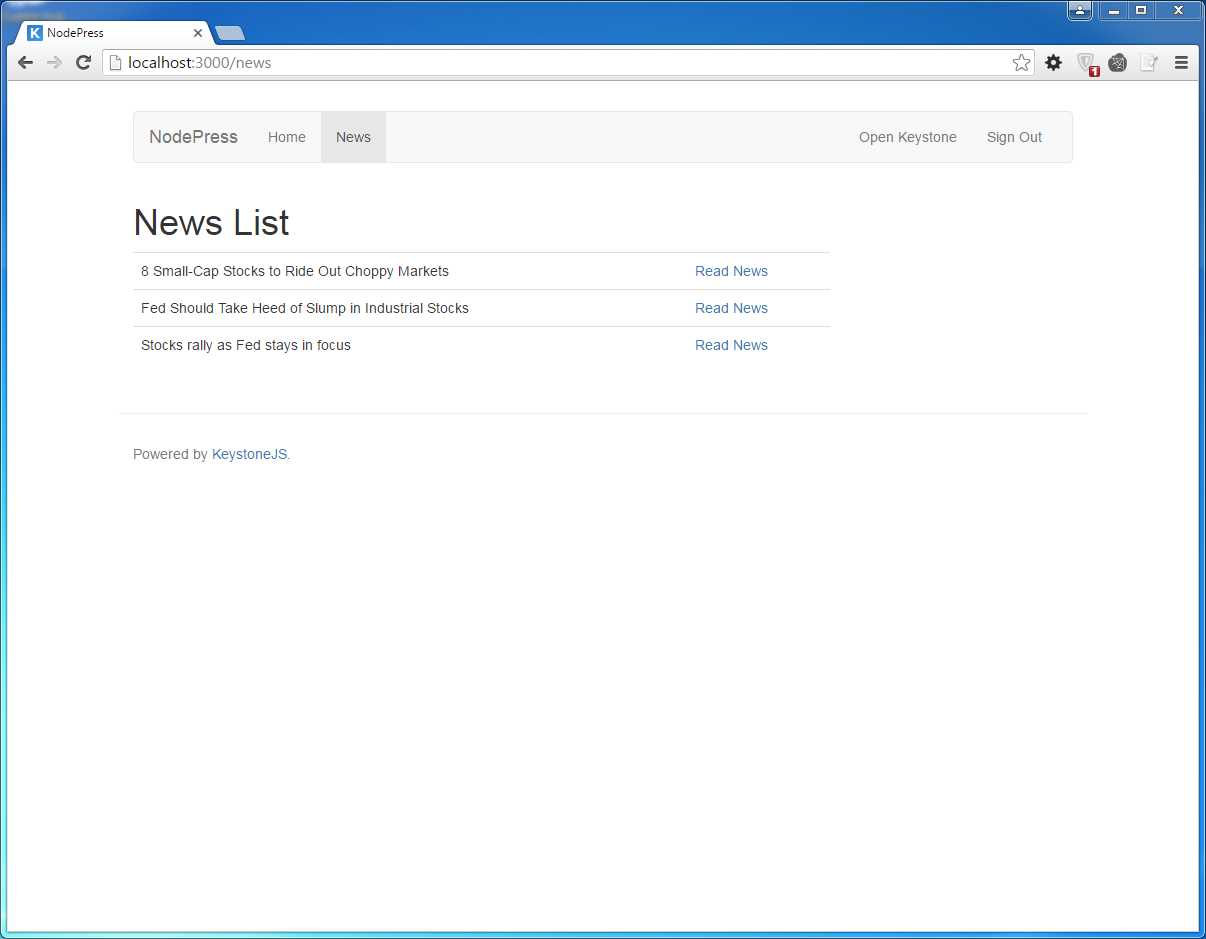
Figure 15: List of news
Building the detail view
Let us see how to use a detail view to display the details of a news post. Start off by creating a route for the news details.
Add the following route to the application.
Code Listing 59: List view route
app.get('/newsdetail/:slug', routes.views.newsdetail); |
The slug is specified as a parameter in the URL.
Next, define the newsdetail view in /routes/views/newsdetail.js with the following code.
Code Listing 60: Details view
var keystone = require('keystone'); exports = module.exports = function (req, res) { var view = new keystone.View(req, res); var locals = res.locals; // Set locals locals.section = 'news'; locals.filters = { slug: req.params.slug }; locals.data = { news: '' }; // Load the current news view.on('init', function (next) { var q = keystone.list('News').model.findOne({ state: 'published', slug: locals.filters.slug }).populate('author'); q.exec(function (err, result) { locals.data.news = result; next(err); }); });
// Render the template view.render('newsdetail'); }; |
Create a template named newsdetail.swig under the /templates/views folder with the following content.
Code Listing 61: Details template
{% extends "../layouts/default.swig" %} {% block intro %} <div class="container"> <h1>{{data.news.title}}</h1> </div> {% endblock %} {% block content %} <div class="container"> <div class="row"> <div class="col-sm-8 col-md-9">
{% if data.news.content %}
<div class="news"> {% autoescape false %} {{data.news.content}} {% endautoescape %} </div>
{% endif %} </div> </div> </div> {% endblock %} |
When the autoescape property is set to false, HTML will be displayed as it is rather than being escaped as HTML entities. The output will look like Figure 16.

Figure 16: News detail
Adding pagination links
Web applications generally need to display a large amount of data, and using pagination is a way of displaying chunks of data followed by links to load more data if needed.
Because pagination links are a feature that is used throughout the application, let's create the pagination included in our app's template directory.
Create a new template file in /templates/views named page_links.swig. Keystone.js pagination returns us an object from which we can determine, in the template, what page we are on, and how many pages there are in total.
Code Listing 62: Pagination links
{% if data.news.totalPages > 1 %} <ul class="pagination"> {% if data.news.previous %} <li> <a href="?page={{ data.news.previous }}"> <span class="glyphicon glyphicon-chevron-left"></span> </a> </li> {% else %} <li class="disabled"> <a href="?page=1"> <span class="glyphicon glyphicon-chevron-left"></span> </a> </li> {% endif %} {% for p in data.news.pages %} <li class="{% if data.news.currentPage == p %}active{% endif %}"> <a href="?page={% if p == "..." %}{% if i %}{{ data.news.totalPages }}{% else %}1{% endif %}{% else %}{{ p }}{% endif %}">{{ p }}</a> </li> {% endfor %} {% if data.news.next %} <li> <a href="?page={{ data.news.next }}"> <span class="glyphicon glyphicon-chevron-right"></span> </a> </li> {% else %} <li class="disabled"> <a href="?page={{ data.news.totalPages }}"> <span class="glyphicon glyphicon-chevron-right"></span> </a> </li> {% endif %} </ul> {% endif %} |
Keystone.js provides a very easy API to fetch data from MongoDB in a paginated manner with just a few lines of code. Let’s update the newslist.js view to fetch news in a paginated object.
Code Listing 63: Pagination view
var keystone = require('keystone'); exports = module.exports = function (req, res) { var view = new keystone.View(req, res); var locals = res.locals; // Set locals locals.section = 'news'; locals.filters = { slug: req.params.slug }; locals.data = { news: '' }; // Load the current news view.on('init', function (next) { var q = keystone.list('News').model.findOne({ state: 'published', slug: locals.filters.slug }).populate('author'); q.exec(function (err, result) { locals.data.news = result; next(err); }); }); // Render the view view.render('newsdetail'); }; |
Next, update the newslist.swig to display the paginated links.
Code Listing 64: Pagination template
{% extends "../layouts/default.swig" %} {% block intro %} <div class="container"> <h1>News List</h1> </div> {% endblock %} {% block content %} <div class="container"> <div class="row"> <div class="col-sm-8 col-md-9">
{% if data.news.results.length %}
<div class="news"> <table class="table"> {% for news in data.news.results %} <tr> <td>{{news.title}}</td><td><a href='{{news.url()}}'>Read News</a></td> </tr> {% endfor %} </table> </div> {% include 'page_links.swig' %} {% endif %} </div> </div> </div> {% endblock %} |
Restart the application, and the pagination links should appear as shown in the following figure.
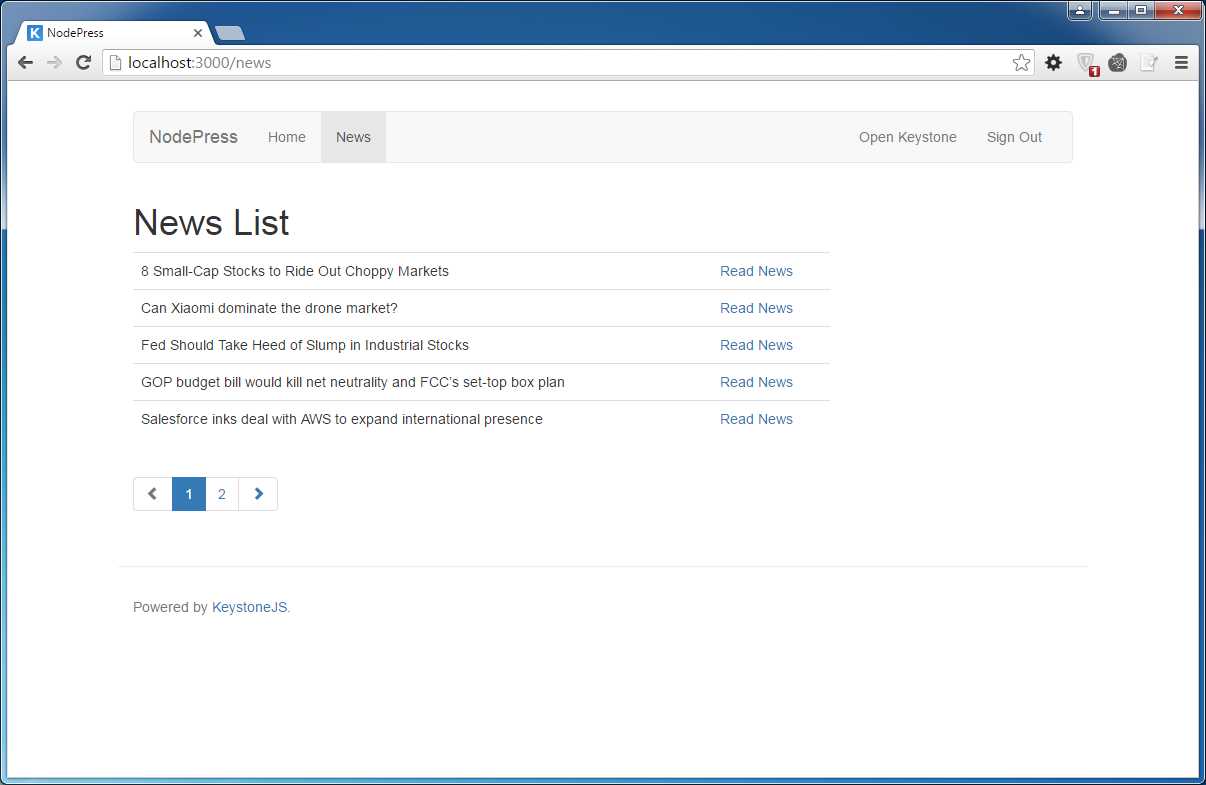
Figure 17: Pagination links
The Keystone.js pagination object returns a lot of useful metadata along with the results:
- total: All matching results (not just on this page).
- results: Array of results for this page.
- currentPage: Index of the current page.
- totalPages: Total number of pages.
- pages: Array of pages to display.
- previous: Index of the previous page; false if at the first page.
- next: Index of the next page, false if at the last page.
- first: Index of the first result included.
- last: Index of the last result included.
Serving static files
The /public directory holds static content related to the web application, such as images, CSS, fonts, and JavaScript. The LESS processor included within the framework will make sure that LESS files associated with the web application are compiled to CSS files during runtime.
Since Keystone.js uses the express.static built-in middleware function in Express to serve static assets, we reference assets as if they resided in the root of the application, as shown in Code Listing 65.
Code Listing 65: Link to CSS
<link href="/styles/nodepress.css" rel="stylesheet"> |
The styles folder must reside within the /public folder.
Summary
In this chapter, we were able to understand the link among data models, views, templates, and URLs in your application, including object pagination.
- 1800+ high-performance UI components.
- Includes popular controls such as Grid, Chart, Scheduler, and more.
- 24x5 unlimited support by developers.