
Keystone.js Succinctly®

CHAPTER 2
Creating Your First Project
The Keystone.js framework has very few requirements. We need to make sure we have the following installed:
- Node Runtime
- Node Package Manager
- MongoDB Database
- Yeoman package
Scaffolding an empty project
Keystone.js utilizes NPM to manage its dependencies. So, before using Keystone.js, make sure you have NPM installed on your machine. The Yeoman keystone application generator can be used to quickly scaffold an empty project. The generator will guide you through setting up the project with a few questions and then build the project by installing dependencies from NPM. Most of the defaults will suffice for the creation of a project. All the settings can be changed later within the new application.
Create a new project by issuing the following command at the command prompt within the folder you intend to keep the project in (in this case, NodePress).
Code Listing 5: Scaffold a Keystone.js project
c:\nodepress> yo keystone |
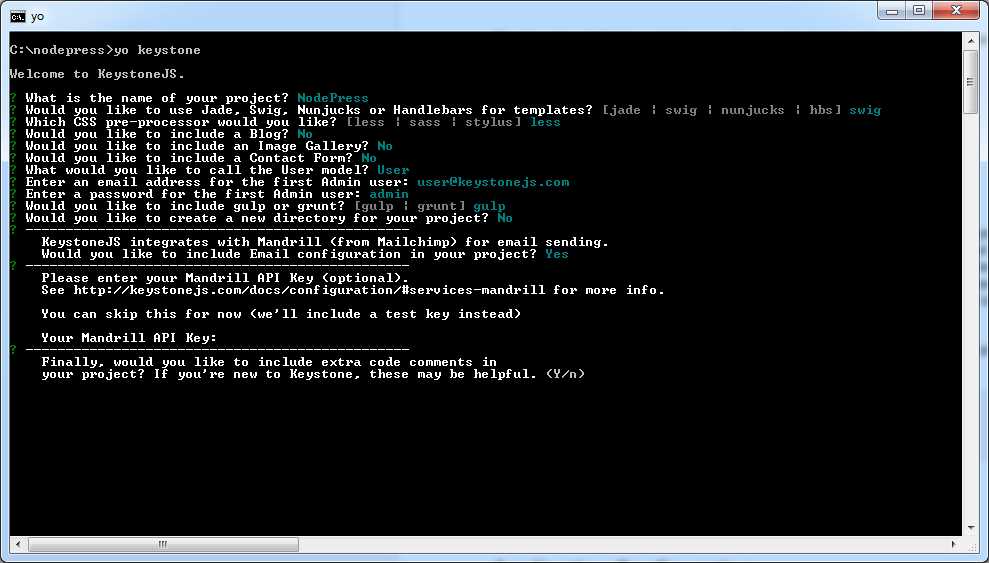
Figure 5: Scaffold project using Yeoman
I specified the following information when creating the demo project:
Name: NodePress Template: swig Blog: no Image Gallery: no Contact Form: No User: User Admin email: [email protected] Admin pwd: admin Gulp or Grunt: gulp New Directory: no Mandrill email: Yes Mandrill API Key: (none) Include Comments: Yes |
Application configuration
Keystone.js uses an excellent Node.js library, namely dotenv, to load the configuration data at runtime. In a fresh Keystone.js installation, the root directory of your application will contain a .env file. This file can be used to hold all our configuration data. All of the variables listed in this file will be loaded into the process.env global object when your application receives a request. It is recommended that you do not commit this file to version control.
Each of the variables in the .env is declared as a key value pair separated by an equal sign. Keys are generally written in upper case.
Code Listing 6: Configuration settings
COOKIE_SECRET=oQQ*s0pz5(bF4gpmoNwM|BDB~db+qwQ`K>Ik~*R2D MANDRILL_API_KEY=NY8RRKyv1Bure9bdP8-TOQ |
To access the configuration variables in our application, we can use them as presented in Code Listing 7.
Code Listing 7: Access Configuration settings
var madrillApiKey = process.env.MANDRILL_API_KEY; |
Note: To put a Keystone.js app into production mode, set the NODE_ENV=production key in the .env file. Setting this enables certain features, including template caching, simpler error reporting, and HTML minification.
By default, Keystone.js tries to connect to a local instance of MongoDB and uses no authentication. However, if you want to specify a MongoDB connection string, it’s pretty easy to do so using the .env file.
Code Listing 8: MongoDB Connection setting
MONGO_URI=mongodb://user:password@localhost:27017/databasename |
Launching the development server
After scaffolding the project, configuring the MongoDB connection setting, and starting the mongod.exe program, we can launch the development server using the following command.
Code Listing 9: Launch development server
c:\nodepress> node keystone.js |

Figure 6: First run of development server
This command will serve up your project on port 3000. At the first run, Keystone.js will attempt to apply an update—a framework function, which will try to create the admin user that was configured during the project scaffolding. Navigate to http://localhost:3000 and you should see the Keystone.js landing page.

Figure 7: Application landing page
Keystone.js administration site
Keystone.js comes with a built-in administration interface that is very useful for managing content. The Keystone.js admin site is built dynamically by reading the model metadata and providing a production-ready interface for editing content. You can use it out of the box, configuring how you want your models to be displayed in it.
Start up our app using the node keystone.js command and open http://127.0.0.1:3000/keystone/signin in your browser. You should see the administration login page shown in Figure 8.
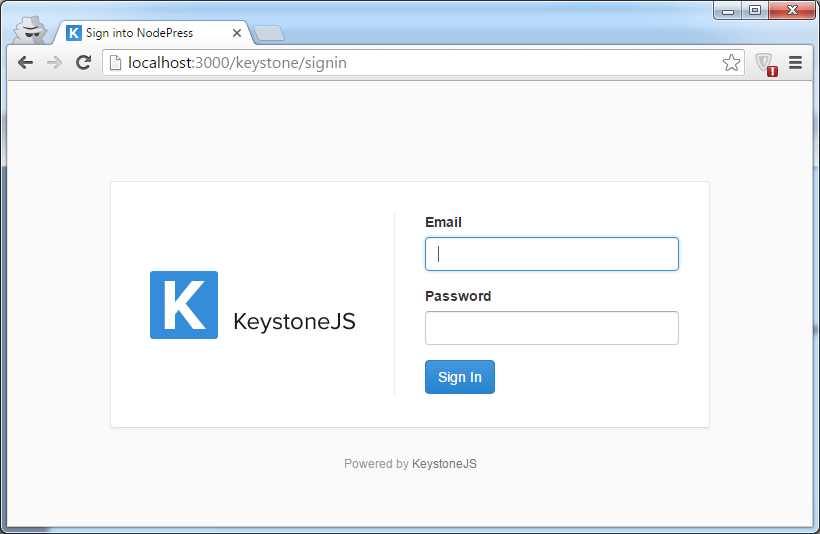
Figure 8: Administration login
Log in using the user credentials set up during the scaffolding step (for example, [email protected] and "admin"). You will see the admin site index page, as shown in Figure 9.

Figure 9: Administration UI
The user model on the page is automatically created for us by Keystone.js. If you click on Users, you will see the admin user created for us. You can edit the admin user’s email address and password to suit your needs and use the new credentials to log in to the application next time.
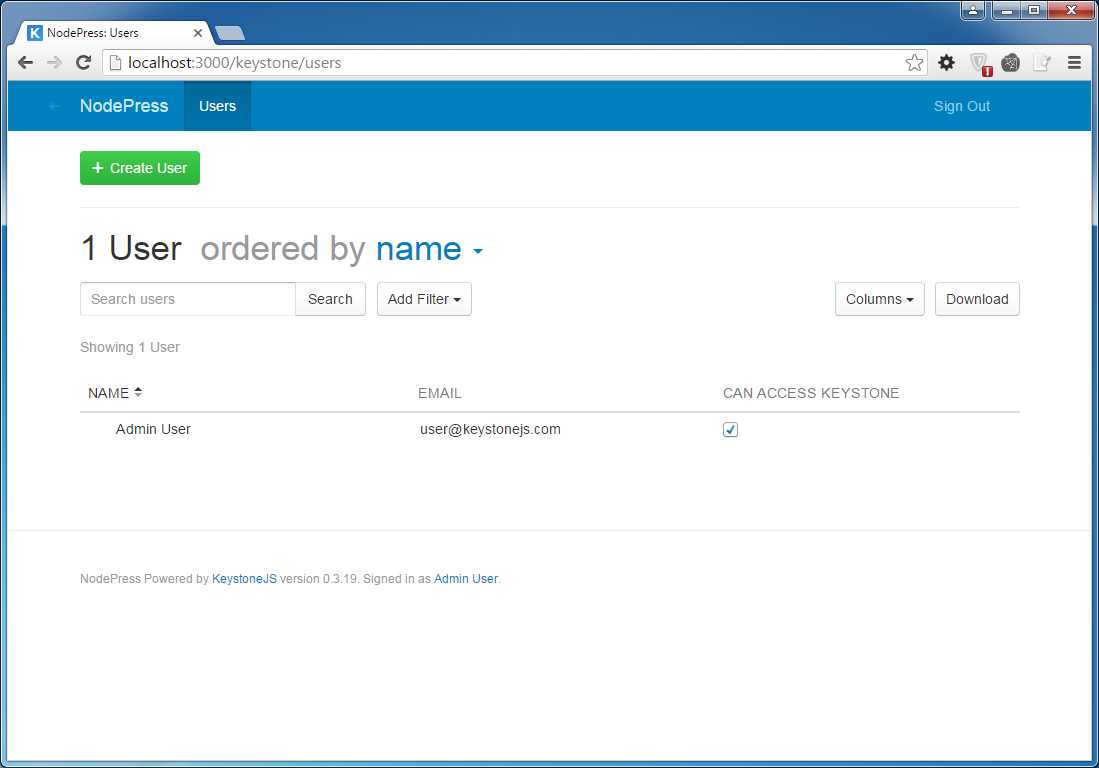
Figure 10: Manage users in administration UI
Summary
Now that we have set up our development environment and an empty project, we can move on to implementing advanced application features in Keystone.js. Before we can do anything visual, we need something to display. In the next chapter, you will be introduced to the Keystone.js models.
- 1800+ high-performance UI components.
- Includes popular controls such as Grid, Chart, Scheduler, and more.
- 24x5 unlimited support by developers.