
Java Succinctly® Part 2

CHAPTER 2
Reading and Writing to Files
Reading and writing to files is important because files retain their information even when the computer is turned off. Files are slower to read and write than RAM (which is where variables and classes are generally stored when the program runs), but files are more permanent. Hard drives represent a memory space called nonvolatile. RAM, however, is volatile—it is cleared when the machine powers down. In addition, hard drives are generally much larger than RAM. In fact, many modern hard drives are terabytes in size, whereas the RAM in a desktop computer is often only a few gigabytes.
There are two broad file categories in Java. The difference is arbitrary, and in reality, there is no separation between the two categories, except in how we want to treat the data from the files in our code. Figure 6 shows a binary file on the left and a text file on the right. The two files have been opened in Programmer's Notepad, which is a plaintext editor (available from http://www.pnotepad.org/).
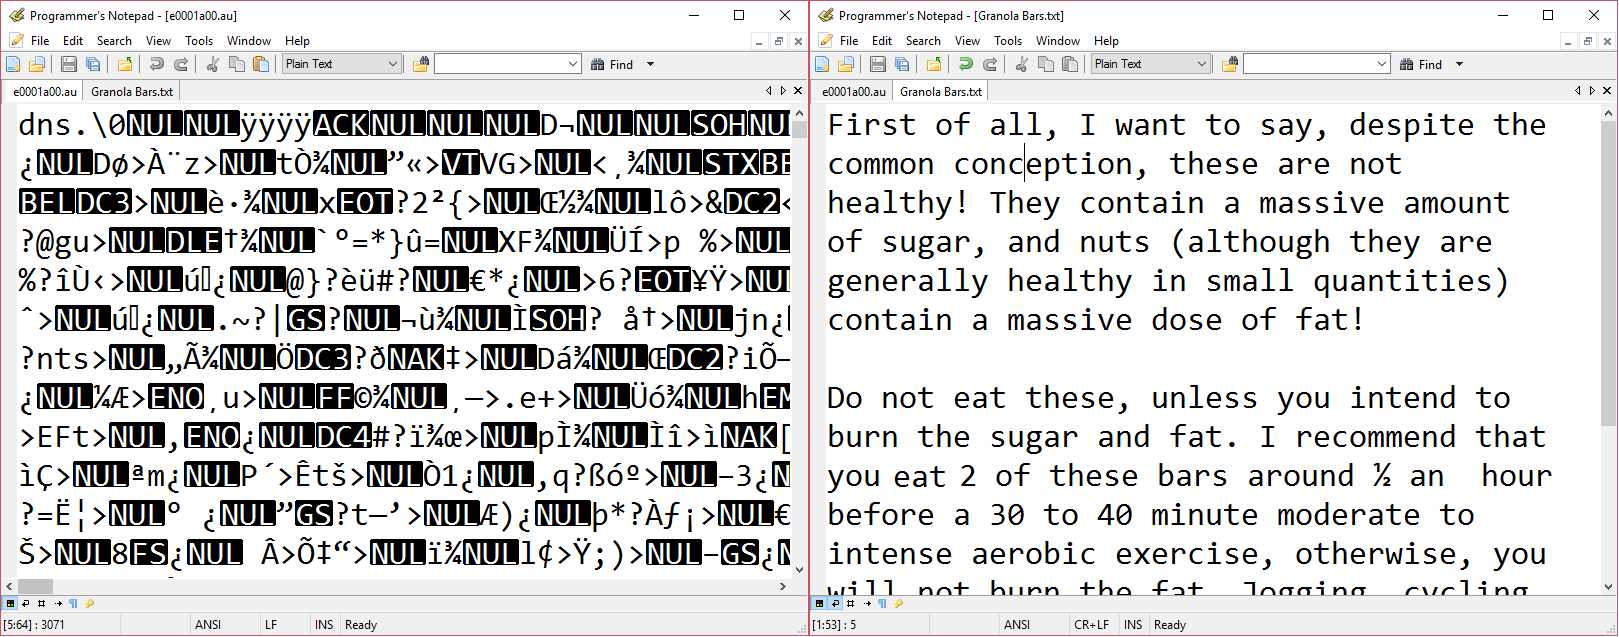
Figure 6: Binary File vs. Text File
In Figure 6, the binary file on the left is an audio file, and it looks like gibberish. It contains many strange characters and little or nothing is obviously human readable. Binary files represent data in a way that is easy for the computer to read—they are used to save information such as variables and objects in our programs. Common binary files are audio files such as WAV, MP3, etc., image files such as PNG or JPG, and files containing serialized versions of our objects (we will explore serialization in a moment).
On the right of Figure 6 is a text file. Text files consist mostly of human readable characters, such as letters of the alphabet, digits, and punctuation marks. The file on the right contains a description that can be easily read by a human but that a computer would not easily understand. Computers can read text files, but this often involves conversion, e.g., a computer can read the digits 128 from a text file but it must perform a conversion from the string 128 to the integer 128 before the number is readily useable.
In Java, when we open a file for reading or writing, we choose whether we want to open it as a text file or a binary file. The difference between the two is represented by the methods we can use to read and write data. In Java, reading and writing to text files is similar to reading from and writing to the console. Reading and writing to binary files is quite different.
Writing to a text file
Create a new project called TextFiles, then add a MainClass and a main method. Code Listing 2.0 shows some simple code for creating and writing a line of text to a text file.
Code Listing 2.0: Creating and Writing to a Text File
import java.io.File; import java.io.FileNotFoundException; import java.io.PrintWriter; public class MainClass { public static void main(String[] args) throws FileNotFoundException {
// Create a file: File myFile = new File("Example.txt");
// Create a writer using the file. PrintWriter writer = new PrintWriter(myFile);
// Write a line of text to the file. writer.println("This is some example text!");
// Close the writer. writer.close(); } } |
In Code Listing 2.0, the first line in the main method, “File myFile = new File("Example.txt");”, creates a new File object called myFile. The File constructor takes a single parameter that is the path and name of the file: Example.txt. In our case, there is no path, so the program will create the file in the current folder (which will be the folder from which our application is running). Also, notice at the top of Code Listing 2.0, we import java.io.File.
The File object in Code Listing 2.0 is simply a filename reference. In order to write to the file, we must open it as text using a PrintWriter. The next line, “PrintWriter writer = new PrintWriter(myFile);”, opens the file referenced by the File object for writing as text. Import java.io.PrintWriter in order to use the PrintWriter class.
If, for some reason, the file cannot be opened, the PrintWriter constructor will throw a FileNotFoundException. For this reason, I have imported java.io.FileNotFoundException and added a throws declaration to my main method.
The next line writes a line of text to our text file using the writer’s println method. The println method takes a string as an argument and writes the characters to the file, appending a new line character to the end.
Finally, the writer is closed on the last line using writer.close(). We must make sure that we close every file we open with our applications because reading and writing to files with multiple programs at once is very difficult to coordinate, and often the operating system will not allow multiple programs to access a single file. Close your files in order to enable other programs (or other instances of your program) to access the file.
Upon running the application, it will appear as though nothing happened. But if you right-click on your project in the Package Explorer and select Refresh, as in Figure 7, you will notice that Eclipse now includes the file “Example.txt” in our package. Double-click on the file in the Package Explorer and you should see the text that we printed to the file.
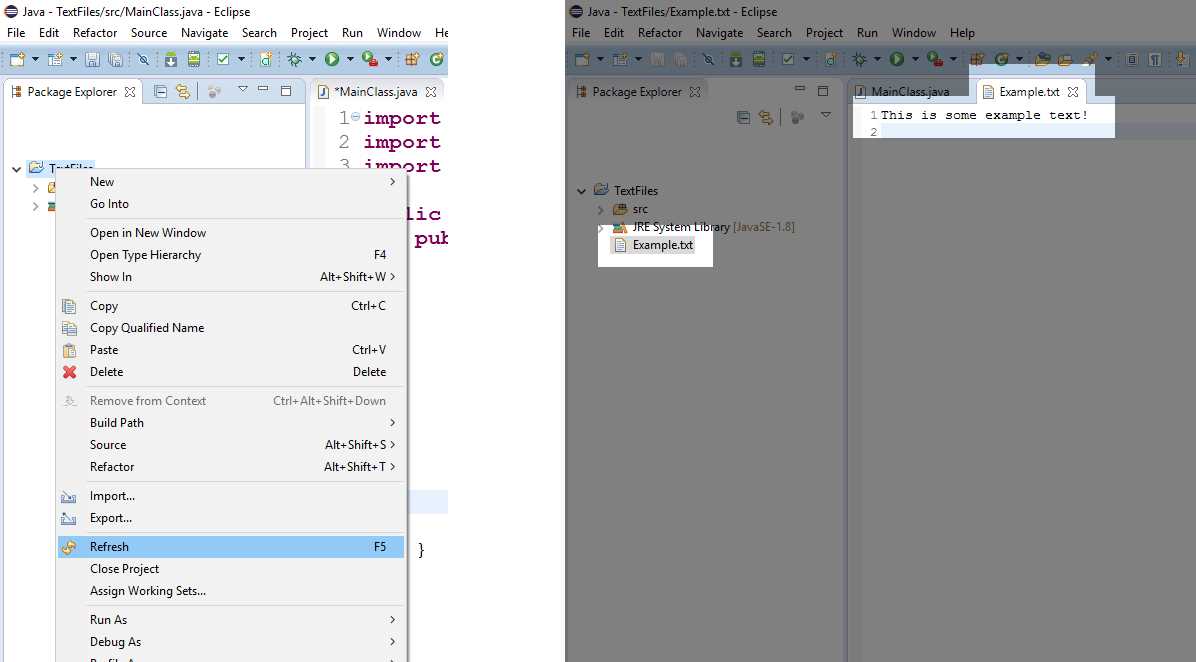
Figure 7: Refresh to Show the Example.txt File
We do not typically want to shut down our application when an error occurs, and instead of using a throws declaration for our main method, it is common to surround any code that deals with opening and saving files with try/catch blocks. Code Listing 2.1 shows the same program as above, except it uses a try/catch to respond to a FileNotFoundException more gracefully.
Code Listing 2.1: Surrounding File IO with Try/Catch
import java.io.File; import java.io.FileNotFoundException; import java.io.PrintWriter; public class MainClass { public static void main(String[] args) {
// Create a file. File myFile = new File("Example.txt");
// Surround all file manipulation with try/catch. try { // Create a writer using the file. PrintWriter writer = new PrintWriter(myFile);
// Write a line of text to the file. writer.println("This is some example text!");
// Close the writer. writer.close();
} catch (FileNotFoundException e) { // File could not be opened, show an error message. System.out.println("The file could not be opened."); } } } |
You might have noticed that each time you run the code from Code Listing 2.1, the data in the file is overwritten. We can also append new data to a file by using the FileWriter class and opening the file with the append parameter set to true (see Code Listing 2.2 for an example of appending text to a file). This is useful for logging purposes, when we do not want to overwrite the previously logged data each time the file is written to.
Code Listing 2.2: Appending Text to a File
import java.io.FileWriter; import java.io.IOException; import java.io.PrintWriter; public class MainClass { public static void main(String[] args) { try { // Create a file writer with the "append" parameter as "true": FileWriter file = new FileWriter("Example.txt", true);
// Create a writer object from the file: PrintWriter writer = new PrintWriter(file);
// Write some new text: writer.println("This text will be added to the end!"); // Close the writer: writer.close(); } catch (IOException e) { e.printStackTrace(); } } } |
We can write data and variables to a text file, but we must be aware that when we read the data, it must be parsed. Code Listing 2.3 shows an example of writing data to a text file, and we will see a much faster method for writing data in the section on serialization.
Code Listing 2.3: Writing Data/Variables to a Text File
import java.io.File; import java.io.FileNotFoundException; import java.io.PrintWriter; public class MainClass { public static void main(String[] args) { File file = new File("test.txt"); try { PrintWriter out = new PrintWriter(file); // Writing text out.println("Be good. If you can't be good, be lucky!\n\t~ Alan Davis");
// Characters/floats/Boolean/doubles are all written in // human readable form: out.println( 129 ); // Integers out.println( 2.7183f ); // Floats out.println( true ); // Boolean out.println( 1.618034 ); // Double // Close writers after using them so they can be opened by // other programs: out.close(); } catch (FileNotFoundException e) { System.out.println("File not found: " + e.getMessage()); } } } |
Notice that upon running the application, when you refresh your project in the Package Explorer and open the file “test.txt”, the file will contain the following:
Be good. If you can't be good, be lucky!
~ Alan Davis
129
2.7183
true
1.618034
The numbers are human readable, i.e. the float 2.7183f looks basically the same as it did in the code. This is very different from the way the computer actually stores a float in binary. Also note the use of “\n\t” in the quote from Alan Davis—this causes a new line and a tab character to be inserted into the file. These symbols are called escape sequences.
Tip: If you wish to find where the file is on your computer, navigate to your project's folder. You can navigate by right-clicking the project in the Package Explorer and selecting Properties. This will show the Project Properties dialog box. The project's folder is listed as its Location. Alternatively, you can right-click the file in the Package Explorer and select Show in and System Explorer. This will open the file’s location in the Windows Explorer.
Escape sequences
Before we go any further, let’s take a brief detour into escape sequences. When we print text to the screen, sometimes we need to use special symbols in order to add new lines, tabs, or characters that would otherwise end the string (i.e. printing the double-quote character: "). Escape sequences can be used anywhere in Java that writes strings to the screen or a file. This includes System.io and the PrintWriter.println method. Table 1 shows the escape sequences available in Java.
Note: Escape sequences are not inherent to strings. There is nothing about “\t” that makes the JVM print a tab character by itself. Escape sequences are a programmed behavior in some of the methods that deal with strings (such as println).
Table 1: Escape Sequences
Escape Sequence | Meaning |
|---|---|
\t | Tab |
\b | Backspace |
\n | New Line |
\r | Carriage Return |
\f | Form Feed |
\' | Single Quote |
\" | Double Quote |
\\ | Back Slash |
Code Listing 2.4: Escape Sequence Examples
// \n causes a new line: System.out.println("First line\nSecondline!");
// \t inserts a tab, i.e. a small block of whitespace. System.out.println("This will be separated from\tThis with a tab!");
// Use \" to write " and \' to write ' System.out.println("Then Jenny said, \"It\'s above the fridge\"."); // To print a slash System.out.println("\\ wears a top hat!");
// Some systems require \r\n in order to use a new line. // Other systems will read this as two new lines, i.e. one // carriage return and one new line, both of which look the same. System.out.println("New\r\nLine!"); |
Code Listing 2.4 shows some examples of using escape sequences in our code. Note that at the end we use the pair “\r\n” for a single new line. The Eclipse console treats this as a new line, whereas it does not treat “\n” as a new line. This brings up the important point that reading escape sequences is program dependent. If we write “\n” to a text file, most text editors will read it as a new line. Some text editors allow us to specify whether “\r\n” or “\r” or “\n” should represent a new line.
Reading a text file
We can read from a text file by using a scanner. This is similar to reading from the console, except that instead of creating the scanner and passing the System.in parameter, we pass our file. Code Listing 2.5 shows an example of reading the text from Code Listing 2.3.
Code Listing 2.5: Reading from a Text File
import java.io.File; import java.io.FileNotFoundException; import java.util.Scanner; public class MainClass { public static void main(String[] args) { File file = new File("test.txt");
try { // Create a scanner from our file: Scanner in = new Scanner(file);
// Read the first two lines into a string: String s = in.nextLine() + in.nextLine();
// Reading variables: int i = in.nextInt(); float f = in.nextFloat(); boolean b = in.nextBoolean(); double d = in.nextDouble(); // Close the scanner: in.close();
// Print out the results: System.out.println( "String: " + s + "\n" + "int: " + i + "\n" + "float: " + f + "\n" + "boolean: " + b + "\n" + "double: " + d ); } catch (FileNotFoundException e) { e.printStackTrace(); } } } |
Notice that the order in which we read the data must match the order in which we wrote it. When a numerical character is read from a file, it must match the data type or an exception will be thrown (for example, we cannot read “one” or “1” and expect that Java will automatically parse this text to the integer 1). Also, it is important to know that the reading and conversion of numerical data to numerical variables is very slow. We do not usually write variables in this manner, but instead tend to use text files mostly for reading and writing strings.
Serialization
We often want to save our objects to disk so that they can be restored later, after the machine has been switched off and on again. The act of converting an object into a format for saving to disk is called serialization. We could employ the preceding text reading/writing methods and specify each member variable to save to a text file, but this technique is slow and requires us to specify each member variable to be saved in the classes, as well making sure to read the members in exactly the same order as we wrote them.
Instead of employing text files for our objects, we can serialize them and read/write to binary files. In order to allow our objects to be serializable, we must implement the Serializable interface. The interface requires the import of java.io.Serializable. Code Listing 2.6 shows a basic class that implements Serializable.
Serializing objects
There are many ways that objects can be saved to disk. When we serialize an object, we typically use an ObjectOutputStream, which is a class that takes an object and performs the conversion from the RAM representation of the object to the disk representation (i.e. serializes the object). Likewise, when we come to deserialize or read our objects back from the disk into our program, we usually use an ObjectInputStream in order to perform the conversion from the disk's representation of the object back to the RAM representation.
Code Listing 2.6: Implementing the Serializable Interface
import java.io.Serializable; public class Animal implements Serializable { // Member variables float height; String name; boolean extinct;
// Constructor public Animal(String name, float height, boolean extinct) { this.name = name; this.height = height; this.extinct = extinct; } // Output method public void print() { System.out.println("Name: " + name + "\n" + "Height: " + height + "\n" + "Extinct: " + extinct + "\n"); } } |
In Code Listing 2.6, the only thing we must add to our class is the implement Serializable (we will look at interfaces and implements in more detail in the following chapter). Java takes care of the rest for us. Now that we have a serializable class, we need to create some objects, then save them to disk. Code Listing 2.7 shows how to write an Animal object to disk using serialization.
Code Listing 2.7: Serializing Objects
import java.io.File; import java.io.FileNotFoundException; import java.io.FileOutputStream; import java.io.IOException; import java.io.ObjectOutputStream; import java.io.Serializable; public class MainClass implements Serializable { public static void main(String[] args) throws FileNotFoundException, IOException {
// Create some animals from our Serializable class: Animal stego = new Animal("Stegosaurus", 12.5f, true); Animal croc = new Animal("Crocodile", 3.2f, false); Animal mozzie = new Animal("Mosquito", 0.2f, false); // Output to the console: stego.print(); croc.print(); mozzie.print();
// Specify the name of our file: File file = new File("animals.dat");
// Create a FileOutputStream for writing to the file. FileOutputStream fileOutput = new FileOutputStream(file);
// Create object output stream to write serialized objects // to the file stream: ObjectOutputStream objectOutput = new ObjectOutputStream(fileOutput);
// Write our objects to the stream: objectOutput.writeObject(stego); objectOutput.writeObject(croc); objectOutput.writeObject(mozzie);
// Close the streams: objectOutput.close(); fileOutput.close(); } } |
Code Listing 2.7 shows the steps to creating a serializable object from a class, then opening a file stream and an object stream.
If we run the program from Code Listing 2.7, then check the contents of the file (by refreshing the project in the Package Explorer, then double-clicking the file to open its contents), we will see that it no longer contains human readable data, but rather binary data (see Figure 8).
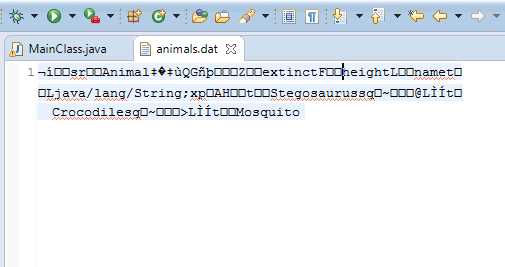
Figure 8: Serialized Objects
Figure 8 shows the contents of the file animals.dat after our three objects have been serialized. The contents of the file are not readable, and although there are a few scattered words, most of the file consists of nonsense characters (nonsense to humans, that is). This file presently contains data that is very fast and easy for the computer to read when we need to restore the exact values of our animals.
Reading serialized objects
Now that we have looked at how to serialize objects, let’s look at how to read them back from the disk into RAM. Code Listing 2.8 shows an example of reading serialized objects from a file.
Code Listing 2.8: Reading Serialized Objects
import java.io.File; import java.io.FileInputStream; import java.io.FileNotFoundException; import java.io.FileOutputStream; import java.io.IOException; import java.io.ObjectInputStream; import java.io.ObjectOutputStream; import java.io.Serializable; public class MainClass implements Serializable { public static void main(String[] args) throws FileNotFoundException, IOException { // Create some animals from our Serializable class: Animal stego = new Animal("Stegosaurus", 12.5f, true); Animal croc = new Animal("Crocodile", 3.2f, false); Animal mozzie = new Animal("Mosquito", 0.2f, false); // Output to the console: stego.print(); croc.print(); mozzie.print(); // Specify the name of our file: File file = new File("animals.dat"); // Create a FileOutputStream for writing to the file. FileOutputStream fileOutput = new FileOutputStream(file); // Create object output stream to write the serialized objects // to the file stream: ObjectOutputStream objectOutput = new ObjectOutputStream(fileOutput); // Write our objects to the stream: objectOutput.writeObject(stego); objectOutput.writeObject(croc); objectOutput.writeObject(mozzie); // Close the streams: objectOutput.close(); fileOutput.close(); ///////////////////////////////////////// // Reading the objects back into RAM: ///////////////////////////////////////// // Declare an array to hold the animals we read: Animal[] animals = new Animal[3]; // Create a file and an object input stream: FileInputStream fileInput = new FileInputStream(file); ObjectInputStream objectInput = new ObjectInputStream(fileInput);
// Read the objects from the file: try { animals[0] = (Animal) objectInput.readObject(); animals[1] = (Animal) objectInput.readObject(); animals[2] = (Animal) objectInput.readObject(); // Close the streams: objectInput.close(); fileInput.close(); } catch (ClassNotFoundException e) { e.printStackTrace(); } // Print the objects: System.out.println("Objects read from file: "); for(int i = 0; i < 3; i++) { animals[i].print(); } } } |
Code Listing 2.8 contains the code to serialize first, exactly the same as before. But the code highlighted in yellow shows how to deserialize the objects, then reads them back from disk into the array called animals.
Reading an unknown number of objects
If you do not know how many objects are serialized in a file, you can use a while loop without a terminating condition to read objects until an EOFException is thrown. EOFException stands for End-Of-File Exception. Code Listing 2.9 shows an example of reading the three animals into an ArrayList and catching the End-Of-File Exception. I’ve left out the code that serializes the three objects, but it would be exactly the same as Code Listing 2.7.
In Code Listing 2.9, we need to either catch or throw the ClassNotFoundException. If the file does not contain data that is serializable to our particular class, this exception will be thrown. We can either catch it or throw it. In Code Listing 2.9, I have dealt with the ClassNotFoundException by specifying that the main method throws it.
Code Listing 2.9: Reading an Unknown Number of Serialized Objects
import java.io.EOFException; import java.io.File; import java.io.FileInputStream; import java.io.FileNotFoundException; import java.io.FileOutputStream; import java.io.IOException; import java.io.ObjectInputStream; import java.io.ObjectOutputStream; import java.io.Serializable; import java.util.ArrayList; public class MainClass implements Serializable { public static void main(String[] args) throws FileNotFoundException, IOException, ClassNotFoundException { // ... // The code above this line is the serializing code.
// Deserializing an unknown number of objects:
// Declare an array to hold the animals we read: ArrayList<Animal> animals = new ArrayList<Animal>();
// Create a file and an object input stream: FileInputStream fileInput = new FileInputStream(file);
ObjectInputStream objectInput = new ObjectInputStream(fileInput); try { // Read all the animals specified in the file, // storing them in an array list: for(;;) { animals.add((Animal) objectInput.readObject()); } } catch (EOFException e) { // We do not have to do anything here; this is the normal // termination of the loop above when all objects have // been read. } // Close the streams: objectInput.close(); fileInput.close(); for(Animal a: animals) { a.print(); } } } |
- 1800+ high-performance UI components.
- Includes popular controls such as Grid, Chart, Scheduler, and more.
- 24x5 unlimited support by developers.