
Java Succinctly® Part 2

CHAPTER 6
Introduction to GUI Programming
In this chapter, we will look at some of the mechanisms provided by Java that allow us to design and implement Graphical User Interfaces (GUIs). We will create an application with a GUI in the next chapter using the windows builder, but in order for that code to make sense, we must examine how to manually build simple GUIs.
In Java, we can use one of two packages to offer users a GUI—Abstract Window Toolkit (AWT) or Swing. AWT has been largely superseded by Swing, and this chapter offers an introduction to GUI programming using Swing. The Swing toolkit is a wrapper around the AWT, which means we need to import both Swing and AWT when programming with the Swing toolkit.
A GUI is created by placing controls, such as buttons, picture boxes, combo boxes, etc., onto a window. The user interacts with the controls using the mouse or the pointer or the keyboard. Swing control names begin with the letter J, such as JPanel and JButton.
Begin by creating a new project. I have called mine GUITesting. Add a class that extends the JFrame class, as in Code Listing 6.0. A JFrame is a window—it has a control box in the upper corner that allows the user to close the window, and the window can be resized and moved around the user’s desktop like a normal window.
Code Listing 6.0: MainWindow.java
import java.awt.*; import javax.swing.*; public class MainClass extends JFrame{ // Main method public static void main(String[] args) { MainClass mainWindow = new MainClass(); }
// Constructor public MainClass() { // Set the size of the window. this.setSize(640, 480);
// Set the app to close when the window closes. this.setDefaultCloseOperation(EXIT_ON_CLOSE);
// Set the window to visible. this.setVisible(true); } } |
Code Listing 6.0 shows a simple class called MainClass that creates and shows a blank window (see Figure 14). The class consists of the main method, which does nothing but create a new MainClass object called mainWindow. In the constructor, we set the size of the window to 640 by 480 pixels, and we set the visibility of the window to true. Note the class extends the JFrame class. The method setDefaultCloseOperation causes the application to close when we close the window. Without the call to setDefaultCloseOperation, the application continues to run in the background even after the user has shut down the window.

Figure 14: Blank JFrame
In order to add controls, we can create a new JPanel object. A JPanel is a control that holds other controls. You can also add controls directly to the JFrame itself by creating a Container object and calling the this.getContentPane() method, but we will use a JPanel. Code Listing 6.1 shows how to create and add a new JPanel and some controls to our project.
Code Listing 6.1: Adding Controls to a JPanel
// Constructor public MainClass() { // Create a JPanel JPanel panel = new JPanel(new FlowLayout());
// Add some controls. panel.add(new JLabel("Test Button: ")); panel.add(new JButton("Click me!"));
// Set the current content pane to the panel. this.setContentPane(panel);
// Set the size of the window. this.setSize(640, 480);
// Set the app to close when the window closes. this.setDefaultCloseOperation(EXIT_ON_CLOSE);
// Set the window to visible. this.setVisible(true); } |
In order to add the label and button in Code Listing 6.1, we use the JPanel.add method. The method requires a control, and each control has a constructor that takes a String. The String is typically used as the caption for the control when it is displayed on the screen. Figure 15 shows the label and button from Code Listing 6.1.
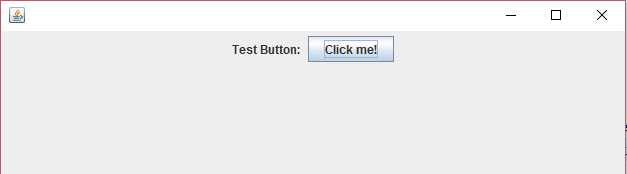
Figure 15: Adding Controls to a JPanel
Notice that in Code Listing 6.1 we create the JPanel and specify a layout in the constructor. When we add control to a JPanel, the JPanel organizes according to the layout. The FlowLayout is actually the default for JPanels. With a FlowLayout, all the controls are added in a single row. Table 2 contains all of the layouts and a brief description of each. For further information, visit https://docs.oracle.com/javase/tutorial/uiswing/layout/visual.html.
Table 2: Layouts
Layout | Description |
|---|---|
BorderLayout | The panel is split into top, bottom, left, right, and center. |
BoxLayout | Places controls in a single row or column. |
CardLayout | Allows us to switch among several sets of controls. |
FlowLayout | Lays out controls in a single row. |
GridBagLayout | Lays out controls in a grid where controls can occupy multiple cells. |
GridLayout | Lays out controls in a grid. |
GroupLayout | Supplies horizontal and vertical layouts seperately; designed for GUI builders. |
SpringLayout | Lays out controls with respect to relationships between their positions; designed for GUI builders. |
Controls are the crux of GUI. Each control type has a special purpose. The classes often offer specific methods for controls, but many methods are available for all controls, as Code Listing 6.2 demonstrates.
Code Listing 6.2: Useful Control Methods
JButton btn = new JButton("Initial Text");
// Useful control methods: btn.setText("New text!"); // Set the text on the button. String text = btn.getText(); // Read the current text. btn.setVisible(false); // Hide the control from view. btn.setVisible(true); // Show the control. btn.setMargin(new Insets(100, 100, 100, 100)); // Set margins. Dimension dim = btn.getSize();// Read the size of the control. btn.setBackground(Color.BLUE);// Set the background color. btn.setForeground(Color.WHITE);// Set the foreground/text color. btn.setEnabled(false);// Disable interactions with the control. btn.setEnabled(true); // Enable interactions with the control.
// Depending on the layout manager, these may do nothing: btn.setSize(new Dimension(10, 10)); // Set size of the control.
// Set size and position of the control: btn.setBounds(new Rectangle(20, 20, 200, 60)); |
Events and event listeners
In order to make our controls functional, we need to add ActionListeners.
ActionListeners are typically run on a separate thread from our main thread—they do nothing more than wait for the user to interact with our controls, then they call the appropriate method when the user does so. ActionListeners repeatedly monitor the state of the control and alert us to changes we are interested in, such as when the user clicks a button or changes the text in a text box. This is event-driven programming. We set up a collection of controls and assign them methods that we want to call when specific actions occur with the controls. We do not have to specifically check the state of our controls ourselves because Java does all of the back-end code for us. You can check Wikipedia’s page on event-driven programming for more information on this fascinating topic at https://en.wikipedia.org/wiki/Event-driven_programming.
Code Listing 6.3 shows how to implement the ActionListener interface and respond to the user clicking a button.
Code Listing 6.3: Implementing an ActionListener in MainClass
import java.awt.*; import java.awt.event.ActionEvent; import java.awt.event.ActionListener; import javax.swing.*; public class MainClass extends JFrame implements ActionListener { // Main method public static void main(String[] args) { MainClass mainWindow = new MainClass(); }
// Constructor public MainClass() { // Create a JPanel. JPanel panel = new JPanel(new FlowLayout());
// Add some controls: panel.add(new JLabel("Test Button: ")); JButton btnClickMe = new JButton("Click me!"); panel.add(btnClickMe);
// Set the current content pane to the panel: this.setContentPane(panel);
// Set this as the current action listener for the button btnClickMe.addActionListener(this);
// Set the size of the window. this.setSize(640, 480);
// Set the app to close when the window closes. this.setDefaultCloseOperation(EXIT_ON_CLOSE);
// Set the window to visible. this.setVisible(true); } // Method inherited from the ActionListener interface: public void actionPerformed(ActionEvent e) { // Show a message box: JOptionPane.showMessageDialog(null, "You clicked on the button!"); } } |
In Code Listing 6.3, I have changed the button to a local variable called btnClickMe. We implement the ActionListener interface and supply this as the ActionListener for the button. The ActionListener interface defines the function actionPerformed, and the code of this method will be executed when the user clicks the button. Upon running the program, you should be able to click the button and see a message box pop up.
Supplying the code that occurs for an event using an anonymous class is often more practical than implementing the ActionListener interface in some existing class. Code Listing 6.4 shows the same example as Code Listing 6.3, except that this time I have used an anonymous class to show the message box to the user when the button is clicked. Notice that in Code Listing 6.4 the MainClass no longer implements the ActionListener interface. This method for specifying events is what the windows builder uses, as we shall see in the next chapter.
Code Listing 6.4: ActionListener with Anonymous Class
import java.awt.*; import java.awt.event.ActionEvent; import java.awt.event.ActionListener; import javax.swing.*; public class MainClass extends JFrame { // Main method public static void main(String[] args) { MainClass mainWindow = new MainClass(); }
// Constructor public MainClass() { // Create a JPanel. JPanel panel = new JPanel(new FlowLayout());
// Add some controls. panel.add(new JLabel("Test Button: ")); JButton btnClickMe = new JButton("Click me!"); panel.add(btnClickMe);
// Set the current content pane to the panel. this.setContentPane(panel);
// ActionListener as anonymous class. btnClickMe.addActionListener(new ActionListener() { public void actionPerformed(ActionEvent e) { // Show a message box. JOptionPane.showMessageDialog(null, "You clicked on the button!"); } });
// Set the size of the window. this.setSize(640, 480);
// Set the app to close when the window closes. this.setDefaultCloseOperation(EXIT_ON_CLOSE);
// Set the window to visible. this.setVisible(true); } } |
Example BorderLayout
As a final example of manual GUI building, in this section we will explore the BorderLayout, add more than one ActionListener to a single project, and respond to events by altering the state of a TextArea. This section is intended to provide an additional, slightly more complex example of manually coding GUI before we move on to using the windows builder. Practicing at least some manual GUI programming helps because it is often faster to manually fix problems that are created when using the windows builder, and it helps us to understand the code that the builder provides. A BorderLayout manager allows us to add controls to five regions of a panel—PAGE_START, PAGE_END, LINE_START, LINE_END, and CENTER. Figure 16 shows an example panel with these regions colored and labelled.
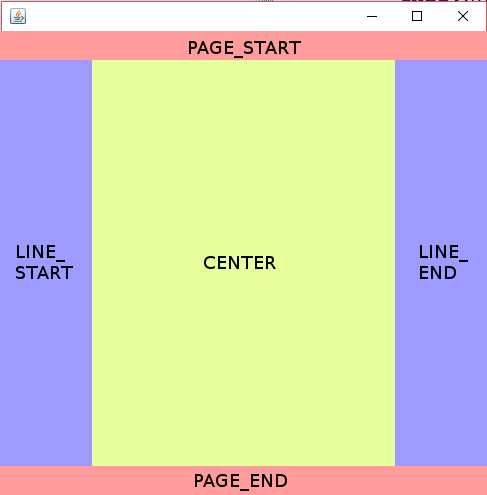
Figure 16: BorderLayout Regions
When we add a control to a BorderLayout, we specify the location of the control (PAGE_START or CENTER, etc.) and the layout manager takes care of resizing the controls so that they fill the entire region (with an optional gap surrounding each region).
Code Listing 6.5: Using the BorderLayout
import java.awt.*; import java.awt.event.ActionEvent; import java.awt.event.ActionListener; import javax.swing.*; public class MainClass extends JFrame implements ActionListener { public static void main(String[] args) { MainClass m = new MainClass(); m.run(); } // Declare txtInput. private JTextArea txtInput;
private void run() { // Create a new border layout and main panel for controls. BorderLayout layoutManager = new BorderLayout(); JPanel mainPanel = new JPanel(layoutManager); this.setDefaultCloseOperation(EXIT_ON_CLOSE); this.setSize(500, 500); this.setContentPane(mainPanel); this.setVisible(true);
// Set margins around control in layout. layoutManager.setHgap(25); layoutManager.setVgap(25);
// Create buttons. JButton btnTop = new JButton("Page Start"); JButton btnBottom = new JButton("Page End"); JButton btnLeft = new JButton("Line Start"); JButton btnRight = new JButton("Line End");
// Add the buttons to panel. mainPanel.add(btnTop, BorderLayout.PAGE_START); mainPanel.add(btnBottom, BorderLayout.PAGE_END); mainPanel.add(btnLeft, BorderLayout.LINE_START); mainPanel.add(btnRight, BorderLayout.LINE_END);
// Create and add a text area. txtInput = new JTextArea(5, 10); txtInput.setText("Click a button!"); JScrollPane jsp = new JScrollPane(txtInput); txtInput.setEditable(false); mainPanel.add(jsp, BorderLayout.CENTER);
// Add action listeners to respond to button clicks. btnTop.addActionListener(this); btnBottom.addActionListener(this); btnLeft.addActionListener(this); btnRight.addActionListener(this); // Redraw all controls to ensure all are visible. this.validate(); } // Action performed prints the clicked button's text to the // txtOutput control. public void actionPerformed(ActionEvent arg0) { txtInput.append("You clicked " + ((JButton)arg0.getSource()).getText() + "\n"); } } |
Using a BorderLayout, we can set the horizontal and vertical gap between controls using the setHGap and setVGap methods of the BorderLayout object. This effects the margins between controls. The manager resizes the controls in order to fill the entire region by default. After we add the controls in Code Listing 6.5, we use this.validate() to ensure that all controls are redrawn. Without this call, one or more of the controls may not be visible until the user resizes the panel (or performs some other action that causes the controls to be validated). Validating when you add or remove controls from a panel is always a good idea. Figure 17 shows an example of the program from Code Listing 6.5.
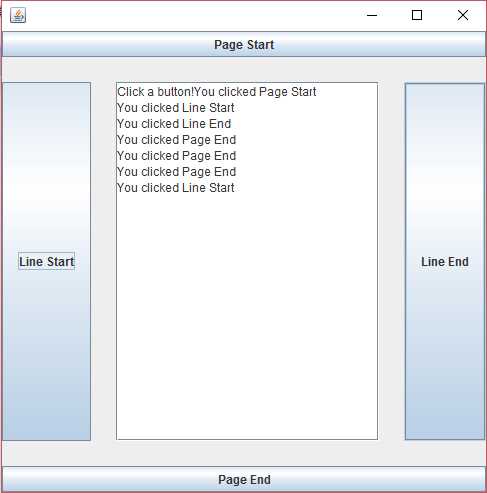
Figure 17: BorderLayout Example
- 1800+ high-performance UI components.
- Includes popular controls such as Grid, Chart, Scheduler, and more.
- 24x5 unlimited support by developers.