
Java Succinctly® Part 2

CHAPTER 7
GUI Windows Builder
In this section, we will use Eclipse's WindowBuilder to build a more complex GUI using a WYSIWYG (what you see is what you get) drag-and-drop system. This greatly increases the control and speed of GUI development. We will build a simple calculator application. I will only include basic arithmetic operations, but we will see that adding new functionality to our calculator is quick and easy.
Note: I have used Eclipse exclusively throughout this e-book, but there are other IDEs available, and some have their own GUI building tools—IntelliJ has IDEA, for example. It is also possible to use GUI builders, such as JFormDesigner, that are designed for multiple IDEs.
Adding a window
Next, let’s create a new Java project as we have done previously. I have called mine Calculator. When your new project is created, add a main window by right-clicking the src folder in the Package Explorer and clicking New and Other, as in Figure 18.
The Eclipse IDE does not come with the WindowBuilder packages already installed, which means you must install them separately. The detailed instructions on how to do this are outside the scope of this e-book, but they can be found with an Internet search. Briefly, you choose the Help | Install New Software menu item from the Eclipse toolbar, then use a step-by-step wizard to install the four or so packages (some, such as Documentation, are optional) that are used to create a GUI application using WindowBuilder/Swing.

Figure 18: Adding a Window Step 1

Figure 19: Adding a Window Step 2
After you select to add a new component, find the WindowBuilder > Swing Designer folder and the Application Window subfolder. Click the subfolder and click Next, as in Figure 19. This will open the New Swing Application window. You can also create a new project in this way from the file menu, instead of creating a Java application as we have done previously.
Note: Multiple window-building tools exist. If you are interested in IBM's SWT, you can also create windows using the SWT framework. This allows you to add multiple windows to your projects, and open and close them while the application runs.

Figure 20: New Swing Application Window
In the New Swing Application Window, type a name for your main class and a package. I have used calculatorApp as my package name and MainWindow for the name of my main class (see Figure 20). Click Finish when you have given your package and project names.
Eclipse will use the WindowBuilder tool to create a new blank window. When we add a window using the Swing builder, it automatically writes a main method for us, which creates and shows the window using code similar to that used in the previous chapter. Code Listing 7.0 is generated by the Swing Window Builder. We can edit the code however we like, but be careful—this is automatically generated code, and in order for the WindowBuilder to continue to manipulate and add new code, this code must be kept somewhat close to the format that the builder prefers. In general, we do not alter the program-generated code, but rather we add to it and program around it.
Code Listing 7.0: Swing WindowBuilder Generated Code
package calculatorApp; import java.awt.EventQueue; import javax.swing.JFrame; public class MainWindow { private JFrame frame; /** * Launch the application. */ public static void main(String[] args) { EventQueue.invokeLater(new Runnable() { public void run() { try { MainWindow window = new MainWindow(); window.frame.setVisible(true); } catch (Exception e) { e.printStackTrace(); } } }); } /** * Create the application. */ public MainWindow() { initialize(); } /** * Initialize the contents of the frame. */ private void initialize() { frame = new JFrame(); frame.setBounds(100, 100, 450, 300); frame.setDefaultCloseOperation(JFrame.EXIT_ON_CLOSE); } } |
Designing a GUI in Design View
The code in Code Listing 7.0 does little more than supply a main method and create and show a blank window. In Eclipse, there are Source and Design tabs at the lower side of the main code window. These are two views of our new application, while the source view is the normal code window. Select the Design View tab and Eclipse will open the window for editing using the Swing WindowBuilder (see Figure 21).

Figure 21: Switching to Design View
GUI design is a very large topic and a profession of its own. There are no strict rules to follow, but generally we should try to follow common conventions. Our users are familiar with thousands of layouts from their everyday lives—pocket calculators, food labels, office applications, etc. Users already understand these layouts, and if we want new users to understand our application with little effort, we should follow the principals of these established layouts. The gold standard for a new application is that a new user is able to use it without any instructions or manual at all. This is often not possible, but it is a very good standard to aim for, and something we should keep in mind whenever we design software.
Try drawing layouts using pen and paper or a drawing program and stylus. Even a project as simple as a calculator offers many options in terms of how we lay out our controls. Sketch out several possible layouts for the GUI, label them, and ask yourself why certain patterns in the layouts work while others do not. In Figure 22, I have taken inspiration from the layout of the CASIO fx series pocket calculator, which is very popular and well-designed—many people are familiar with its layout. We do not need to match the exact layout, and I have provided a space for “special function” buttons that will allow the functionality of our calculator to grow as we think of new features. I have also decided to include the arithmetic functions in a single column to save space, and I have increased the size of the Equals button because I believe this button is particularly important and will be used more often than any other button.
Note: We will not be programming expression parsing. Our calculator will compute the results of a single operation, and it will not include the use of parentheses. If you are interested in programming a calculator that is capable of parsing and computing the result of an expression, such as “4+2/(9*3)”, look up the Shunting Yard algorithm and Reverse Polish notation. The Shunting Yard algorithm converts an expression into Reverse Polish notation, and it is very easy to compute the result of a Reverse Polish notation expression. For the Shunting Yard algorithm, visit Wikipedia at https://en.wikipedia.org/wiki/Shunting-yard_algorithm. For more information on Reverse Polish, visit https://en.wikipedia.org/wiki/Reverse_Polish_notation.

Figure 22: Designing a Calculator
Converting a design to Swing
The next step is to look at your GUI and decide how it will work in Java. Note that our form has a different aspect ratio—we want our calculator to be taller than it is wide. Select the form in the GUI designer along the edges and you will see small black square control points. Grab the lower-right control point and drag the form so that it roughly matches the aspect of your design (see Figure 23).

Figure 23: Resizing the Form
We will be nesting several layouts and using them together to provide some flexibility. The main structure of our calculator will be a border layout. Click BorderLayout in the layout's section of the palette, then click somewhere on the form (see Figure 24).

Figure 24: Selecting BorderLayout
Next, click the JTextField control in the Components section of the palette and click the North region of the form. This will add the JTextField to the top of the form. This will be the main output display of our calculator. The layout manager will automatically resize the JTextField to take up the width of the window (Figure 25).
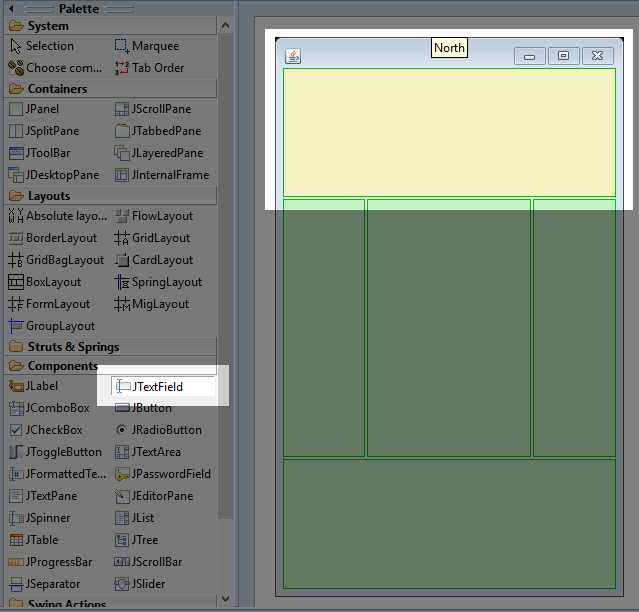
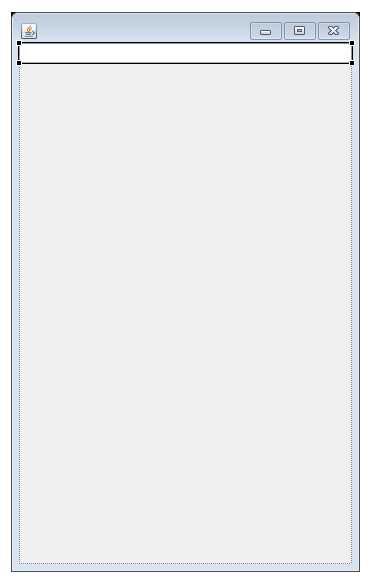
Figure 25: Adding a Text Field
When a control (or the form itself) is selected in the designer, the properties window shows the available settings for the control. Many aspects of the controls can be set through the properties box (see Figure 26). Make sure the txtOutput control is selected and change the Variable setting in the properties box to txtOutput (this is the name of the control). It is important to use logical control names, especially because projects often involve many controls.
Note: The “txt” prefix I use for my text field control is a reminder of the type of control. Adding a type prefix to the names of your controls helps speed up development and maintenance. If we type “txt” in the code, Eclipse's Content Assist will list all of the text fields—so long as we name all of them with the “txt” prefix. This means we do not need to remember the exact names of our controls, we only need to know their type. Content Assist will help us select the controls we need in our code. Likewise, we can name buttons with the “btn” prefix, check boxes with “chk” prefixes, etc. These prefixes are completely optional and represent a programming style choice.

Figure 26: Properties Box
In the txtOutput control’s properties, uncheck the Editable box. We will not allow our user to type expressions into our calculator. Select a font size of 24 and change the horizontalAlignment to “TRAILING”—this will make the numbers appear on the right side of the text field (which is how most calculators work). The final properties for the txtOutput control are in Figure 26.
Next, we will add a JPanel that will hold the buttons for our calculator. Select the JPanel container and add it to the center (as per the left side of Figure 27). Select a GridBagLayout and click the new Jpanel (as per the right side of Figure 27). This will create a GridBagLayout in the center portion of the BorderLayout. The BorderLayout’s components can, themselves, contain other layouts. This technique is called nesting—we have nested the GridBagLayout inside the BorderLayout. This allows us to combine layouts together in a complex and flexible way.

Figure 27: Adding a JPanel and GridBagLayout
Now that we have a GridBagLayout, click the JButton control and hover over the layout. You will see a guide showing the rows and columns of the GridBagLayoutlayout, as in Figure 27. Place your buttons to match Figure 28 (it does not matter if the exact placement of the controls is different for your calculator).

Figure 28: GridBagLayout Guide

Figure 29: Adding Buttons
Figure 29 shows the placement of all the buttons. You can change the text of a button when it is placed, or change it in the properties window. I have added twelve buttons labeled “f” in Figure 29 that will be special function buttons such as square root and trigonometry (the “f” is just a placeholder). Change all of the font sizes for these buttons to 24. You can select multiple controls by holding the shift key (the control key also works) while you click controls in the designer. Select all the buttons at once, then change the font size to 24 for all of them rather than changing the fonts one at a time. Click the Equals button and grab the control point on the right side. Move the control point two boxes to the right in the GridBagLayout. This will cause the button to consume three horizontal boxes of space, as in Figure 30.

Figure 30: Resizing Controls
The Equals button takes up three boxes worth of space in the GridBagLayout, but presently the space is not filled. When a control is selected, we have several layout options in a toolbar at the top of Eclipse. Make sure your Equals button is selected and click Fill. This will cause Eclipse to resize the control to consume all the space of the three boxes in the GridBagLayout (see Figure 31).
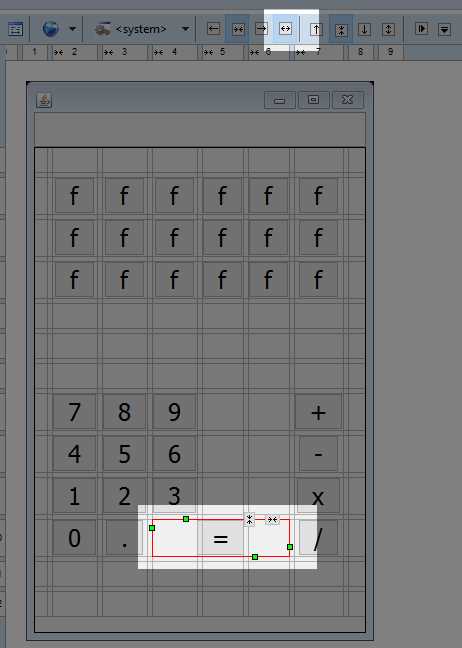
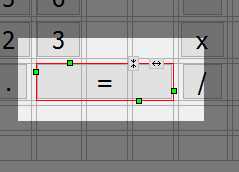
Figure 31: Filling a Control's Area
Quickly altering multiple controls
Our form has a lot of buttons. To quickly select them all, we can use the Components box in Eclipse. Click the first button's name in the Components box, hold down the shift key, then hold down the down arrow on your keyboard until all of the buttons are selected, as in Figure 32.
When all of your controls are selected, click Fill, exactly as we did with the Equals button. This will cause all of our controls to be resized to exactly the same size. Notice that before we click Fill, some of our controls are slightly different sizes, but default buttons are resized to surround their text (this is not true for all layouts), and the text in the buttons is not exactly the same width.

Figure 32: Selecting Multiple Controls in the Components Window
Spacing controls
When we run our program, we will see that the controls have very small gaps between them, despite what they look like in the designer (see Figure 33). We wish to place a small margin between the txtOutput control and our special functions, and we also want a small gap between the special function buttons and the digits and operator buttons.
In order to include gaps and margins in a GridBagLayout, we can set the sizes of the rows and columns. Click the Selection tool in the System palette, then click somewhere on your form that does not contain any buttons (i.e. select the GridBagLayout). You will see the grid has column and row headings numbered along the top and left side of the designer (see Figure 34).

Figure 33: Our Calculator without Spacing

Figure 34: GridBagLayout Row and Column Headings
If you have a GridBagLayout selected, you can right-click on the appropriate row or column and perform some very useful functions. We can easily add new rows or columns, delete existing rows or columns, and change the attributes for any existing rows or columns. We want to change the minimum sizes of several rows so that our controls are better spaced. Right-click the button for row 0 and select properties from the Context menu (as per Figure 35).
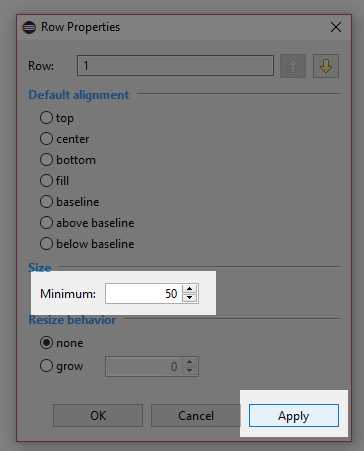
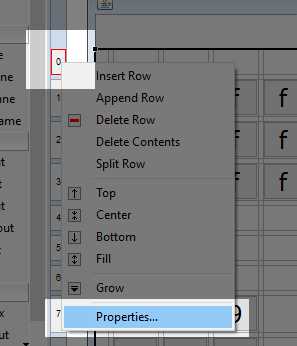
Figure 35: Row Properties
In the Row Properties box, change the minimum size to 50 and click Apply, as in Figure 35. This ensures a 50-pixel gap between the txtOutput control and our special function buttons. Next, change the minimum gap for row 5 in exactly the same way. This will add a gap of at least 50 pixels between our special function buttons and our Digit and Operator buttons. Notice that our calculator’s spacing looks slightly better in Figure 36.

Figure 36: Spaced Controls
Now that we are happy with the general layout of our controls, we can proceed to add functionality to our calculator.
Adding functionality
Many arithmetic operators take two operands, such as 1+4. We will maintain a state variable that will record which number we are reading (i.e. the left or right operand for an arithmetic operator). We will also keep a variable that indicates which operation the user has initially selected, and we will instruct the calculator to read the digits of the first number (the left operand for the operator). We will build two types of operations—those that require two operands, such as Addition and Subtraction, and those that require a single operand, such as Natural Log and Square Root.

Figure 37: State Diagram
Figure 37 shows a basic state diagram, depicting the operational flow of our calculator. Initially, the state variable will be set to 0, which corresponds to reading the first operand (called number1 in the following code). The user can input a number using the Digit buttons, then have two options—click a single operand operation (such as Square Root) or click a multiple operand operation (such as Addition).
When the user clicks a single operand operation, we can store the current digits that the user has clicked as number1 and compute the result of the operation using this value. We can then store the result back to number1, output it to the screen, and start the process again.
When the user clicks a two-operand operation, actions become slightly more complicated. We store the current digits in the number1 variable, we make a record of which operation the user has clicked (this is the operator variable in following code), and we set the state to 1, which means the program is reading the second value, number2. The user will input some new number and click Equals. When they click Equals, we store the current digits in number2, perform the selected operation between number1 and number2, write the result to txtOutput, and start again.
Open the code view, scroll the code to the position where all the control member variables are specified (these should be the first member variables defined in the class). Add the four new state variables, as in Code Listing 7.1. I have not included the entire listing in Code Listing 7.1, but I have included a few lines to give context—the added code is highlighted in yellow. The code surrounding the highlighted code might be different, depending on the order that you added controls to your calculator, but this is fine. The state variables can be added in any place where member variables are specified. I have also added a small array of doubles called memory, which we will use to allow the user to store results later.
Code Listing 7.1: State Member Variables
private JButton btnF_15; private JButton btnF_16; private JButton btnF_17; // State variables private int state = 0; // 0 to first number, 1 for second. private int operator = 0; // 0 means unknown. private double number1 = 0.0; // Variable for parsing 1st operand. private double number2 = 0.0; // Variable for parsing 2nd operand. private double[] memory = new double[5]; // For memory functions.
/** * Launch the application. */ public static void main(String[] args) { EventQueue.invokeLater(new Runnable() { public void run() { try { MainWindow window = new MainWindow(); window.frame.setVisible(true); } catch (Exception e) { e.printStackTrace(); } } }); } |
Next, return to the design view and double-click on the 7 Digit button. When we double-click on a button, Eclipse will automatically write an event handler to handle the most common event for the control. In this case, it will write a handler for when the button is clicked and take us to the position in the code where we can specify what happens when the user clicks this button. The event handling code should look very familiar—Eclipse uses an anonymous class that implements the ActionListener. Again, the button in your code might not actually be called “button” in code. I added the 7 Digit button first (it could be called “button_7” or any other number in your code), so do not change the button name!
Code Listing 7.2: Clicking the 7 Digit
button = new JButton("7"); button.addActionListener(new ActionListener() { public void actionPerformed(ActionEvent arg0) { txtOutput.setText(txtOutput.getText() + "7"); } }); |
When the user clicks a Digit button, we add the digit to the txtOutput box, as in Code Listing 7.2. The other nine digits are the same—except for the digits they add to the txtOutput string. In order to save space, I will not include a listing for all 10 digits, but you can implement all 10 digits in the same way as digit 7. Also, the Decimal Point button, “.”, is the same as the Digit buttons, which means this can be implemented in the same way, too. If we were making a more complete calculator, we would need a check to ensure that we have input a valid number, and we would need to ensure that, at most, one decimal point is used to avoid numbers such as 7.6.4.
The two-operand operator buttons need to update the currently selected operator variable and reset txtOutput so that the user can input another number. In the design view, double-click the addition operator and add the code in Code listing 7.3 that is highlighted in yellow.
Code Listing 7.3: Code for Addition
button_14 = new JButton("+"); button_14.addActionListener(new ActionListener() { public void actionPerformed(ActionEvent e) { operator = 0; number1 = Double.parseDouble(txtOutput.getText()); txtOutput.setText(""); } }); |
The three other arithmetic operators can be added in the same way, except that the operator variable should be set to different values. I will use 0 for addition, 1 for subtraction, 2 for multiplication, and 3 for division. I will not include the code for subtraction, multiplication, or division, but you can go add these operations in exactly the same way as addition, except that you must assign the integers 1, 2, and 3 for the operator variable. You can also specify an enumeration of operators. This would make the code clearer.
When the user hits the Equals button, we need to read the digits for number2, check the current operator, and perform the operation using the two numbers we have read. Then we store the resulting number as the current string in txtOutput. Code Listing 7.4 shows the code for the Equals button.
Code Listing 7.4: Equals Button
button_11 = new JButton("="); button_11.addActionListener(new ActionListener() { public void actionPerformed(ActionEvent e) { // Read number 2: number2 = Double.parseDouble(txtOutput.getText()); // Result variable double result = 0.0;
// Compute the result based on the operator: switch (operator) { case 0: result = number1 + number2; break; case 1: result = number1 - number2; break; case 2: result = number1 * number2; break; case 3: result = number1 / number2; break;
default: result = 0.0; break; }
// Save the result to the output. txtOutput.setText("" + result); } }); |
Tip: Note the use of the "" in the final call to txtOutput.setText in Code Listing 7.4. This causes the double to be converted to a string. If we try to setText or println and pass a double, such as println(2.5), our code will not compile. However, the addition operator is defined between strings and doubles, and it automatically converts the double to a string, so that instead of println(2.5) to print a double, we use println("" + 2.5).
Special functions
Tool tips and the clear button
We have included many special function buttons on our calculator, but I will specify only a few and let the reader design the functionality of the others. First, we need the ability to clear the output. I have made the lower-right special function button into a clear button by using the text “C.” The letter C is ambiguous, so I will also use a tool tip for this button. Tool tips are messages shown when users hover their cursor over the control. Change the text of the button to C and add the tool tip, as shown in Figure 38. Double-click the clear button to have Eclipse write the code for raising the event. Code Listing 7.5 shows the code.

Figure 38: Clear Button Design
Code Listing 7.5: Clear Button
btnF_17 = new JButton("C"); btnF_17.addActionListener(new ActionListener() { public void actionPerformed(ActionEvent arg0) { txtOutput.setText(""); operator = -1; } }); |
Trigonometry
Trigonometry functions are very useful for a calculator. I will add sine, cosine, and tangent function buttons as the three top-left buttons. In the designer, I have added tool tips and changed the font size of the buttons so that the words SIN, COS, and TAN fit onto our small buttons (see Figure 39). I have also clicked the Fill Vertical button above the designer so that the buttons are resized to fill the vertical area.

Figure 39: Sin, Cos, and Tan Designer
Code Listing 7.6: Sine Function
btnF = new JButton("SIN"); btnF.setToolTipText("Compute the Sine of an angle"); btnF.addActionListener(new ActionListener() { public void actionPerformed(ActionEvent e) { number1 = Double.parseDouble(txtOutput.getText()); number1 = Math.sin(number1); txtOutput.setText("" + number1); } }); |
Code Listing 7.6 shows the code for computing the sine of an angle. The highlighted code shows the actual computation. The other trig functions are similar, except for the cosine we call Math.cos and for the tangent we call Math.tan. Note that computing these trigonometry functions requires only a single number, which means we read txtOutput's text and compute the functions without waiting for the user to input a second number.
Raising a number to a power
We can easily add new two-operand functions to our calculator in the same way we added our original arithmetic operators. Here is an example that shows how to add a power function that takes two parameters and raises the first parameter to the power of the second. I used the text “^” for my power button in the designer (see Code Listing 7.7) and called the function Math.pow when the user clicked Equals (see Code Listing 7.8). I have called the power operation operator 4. Each time we add a new operator, the line “operator = xxx” must be unique, so the next two-operand operator would be called operator 5, and after that 6, etc.
Code Listing 7.7: Power Button
btnF = new JButton("SIN"); btnF_3 = new JButton("^"); btnF_3.addActionListener(new ActionListener() { public void actionPerformed(ActionEvent arg0) { operator = 4; // 4 is power number1 = Double.parseDouble(txtOutput.getText()); txtOutput.setText(""); } }); |
Code Listing 7.8: Equals Button with Power Operator
button_11 = new JButton("="); button_11.addActionListener(new ActionListener() { public void actionPerformed(ActionEvent e) { // Read number 2: number2 = Double.parseDouble(txtOutput.getText()); // Result variable double result = 0.0;
// Compute the result based on the operator: switch (operator) { case 0: result = number1 + number2; break; case 1: result = number1 - number2; break; case 2: result = number1 * number2; break; case 3: result = number1 / number2; break;
default: result = 0.0; break; }
// Special Functions if(operator == 4)result = Math.pow(number1, number2);
// Save the result to the output txtOutput.setText("" + result); } }); |
Memory buttons
Memory buttons are very useful for a calculator. I will add five memory buttons called M1, M2, M3, M4, and M5. They will be used to store and recall numbers in the memory array that we defined earlier.
First, when we click a memory button, we need to know if the user wants to store a value or recall one. By default, we will assume they are recalling a number. We will add a store button with the text STR so that the user can click store followed by a memory button, and, instead of recalling the value, we will store the current txtOutput. Add a button with the text STR for store and five buttons with the text M1, M2, M3, M4, and M5 (see Figure 40).

Figure 40: Memory Buttons
When the user clicks the STR function, we set the current operator to some new operator code. Our last operator was power, which we saved as operator 4, so I have used operator 5 as the Store operation in Code Listing 7.9. The code for each of our memory buttons is almost identical, except that each button accesses a different element from our memory[] array. I have included the code for M0 in Code Listing 7.10.
Code Listing 7.9: Store Button Code
btnF_5 = new JButton("STR"); btnF_5.addActionListener(new ActionListener() { public void actionPerformed(ActionEvent e) { operator = 5; number1 = Double.parseDouble(txtOutput.getText()); } }); |
Code Listing 7.10: M0 Button Code
btnF_12 = new JButton("M0"); btnF_12.addActionListener(new ActionListener() { public void actionPerformed(ActionEvent e) { if(operator == 5) memory[0] = number1; else txtOutput.setText("" + memory[0]); } }); |
At this point, I will stop and allow you to expand the functionality as you see fit. In this chapter, we have looked at how to implement a simple interface using the window designer tools in Eclipse. Our humble calculator is fairly straightforward, but the power and flexibility of these GUI designer tools is virtually limitless. You can add buttons for arc-sine, logarithms, and many other useful operations. We have looked primarily at buttons and text, but there are many other interesting controls available, and if you are new to GUI design or the windows builder tools, I encourage you to explore the tool palette more deeply in order to find the controls that best suit your applications.
Note: Many techniques have been developed for writing and maintaining large-scale projects. One of particular interest is MVVM, which stands for Model-View-View-Model. Using MVVM as a design principle, we intentionally split all of the functionality for our program from the code for generating the GUI. This helps maintain a clear distinction between the functionality and the GUI, and it can help scalability and maintainability of large-scale projects. Our calculator is small enough that MVVM design principles would be of little consequence, but the topic is worth reading up on. If you are interested in developing larger-scale GUI projects, visit https://en.wikipedia.org/wiki/Model%E2%80%93view%E2%80%93viewmodel.
For the remainder of this e-book, we will turn our attention to a completely different type of programming—2-D graphics and game programming.
- 1800+ high-performance UI components.
- Includes popular controls such as Grid, Chart, Scheduler, and more.
- 24x5 unlimited support by developers.