
Java Succinctly® Part 2

CHAPTER 8
2-D Game Programming
Java is frequently used in 2-D game programming. In this section, we will look at the basics for creating 2-D games using Java. Game programming is an extremely broad and complex topic, so we will address only some of its key concepts here. Practice is the key—you should take this final chapter and run with it, create a platformer or an endless runner, and explore 3-D game development and physics engines.
In this chapter, I will use larger listings of code, but I will supply only a comparatively small amount of explanation. One of the finest skills any programmer can develop is the ability to read other programmers’ code and to see where they are wrong (or could be improved upon). I encourage all folks who are new to programming to scour the Internet for useful techniques. When you find a useful technique, or snippet of code, make sure the original author has allowed you to use it for your own projects, and always make a record of where you got the code—that way you can credit the original author if you ever use the code in production programming. Feel free to use any of the code in this e-book for whatever purpose you like!
MainClass
There are many ways to set up a foundation for 2-D game programming. We want our code to be maintainable, easy to understand, and quick to implement new features. The difficulty in programming is not learning the syntax—an experienced programmer can learn the syntax to a new language relatively easily. The difficulty is employing structures in such a way that our projects remain stable as the project increases in size. We will create a basic MainClass that does little more than run an instance of another class—the game’s engine, which will be called Engine2D. The engine will run with a simple render/update loop, and we will use Java’s timing facilities and event handlers to create the illusion of real-time and to respond to the keyboard.
You should next create a new project. I have called my project Graphics2D. Add a MainClass, exactly as we have done previously. The MainClass will do little more than run an instance of the engine class. The code for the MainClass is presented in Code Listing 8.0 (please note this code will not run at this point because we have not built the Engine2D class yet!).
Code Listing 8.0: MainClass
import java.awt.EventQueue; import javax.swing.JFrame; public class MainClass extends JFrame { public static void main(String[] args) { EventQueue.invokeLater(new Runnable() { @Override public void run() { MainClass m = new MainClass(640, 480); } }); } private MainClass(int windowWidth, int windowHeight) { setSize(windowWidth, windowHeight); // Set window size setLocationRelativeTo(null); // Default location setDefaultCloseOperation(JFrame.EXIT_ON_CLOSE); // Exit on close setVisible(true); // Create and add the engine JPanel. final Engine2D engine = new Engine2D(windowWidth, windowHeight, 30); add(engine); } } |
Our MainClass extends the JFrame and will act as an application window. The MainClass contains a main method that creates a new instance of MainClass called m and that executes the instance using a new thread using the EventQueue.invokeLater method. This means our game will have its own thread and event queue. The constructor for the MainClass takes windowWidth and windowHeight arguments that will be the size of our window. After setting up the window, the MainClass constructor creates an Engine2D instance that is essentially a customized JPanel object, and it adds the panel to the frame's controls using the add method.
2-D game engine skeleton
Next, we will implement a new class called Engine2D. This class represents the main backbone of our games. It will handle the updating and rendering in our application. In order to render 2-D graphics, we need a control to render to, so the Engine2D class extends the JPanel. Code Listing 8.1 shows the blank skeleton of the new Engine2D class.
Code Listing 8.1: Engine2D Skeleton
import java.awt.Color; import java.awt.Graphics; import java.awt.Graphics2D; import java.awt.event.ActionEvent; import java.awt.event.ActionListener; import javax.swing.JPanel; import javax.swing.Timer; public class Engine2D extends JPanel implements ActionListener { // Width and height of the window. private int width, height;
// Constructor public Engine2D(int windowWidth, int windowHeight, int fps) { width = windowWidth; height = windowHeight; Timer timer = new Timer(1000/fps, this); timer.start(); } // This event is called when the timer fires at the specified fps. public void actionPerformed(ActionEvent e) { update(0.0, 0.0); repaint(); }
// public void paintComponent(Graphics g) { super.paintComponent(g); render((Graphics2D) g); }
private void update(double timeTotal, double timeDelta) { }
private void render(Graphics2D g) { // Clear the screen to blue. g.setBackground(Color.DARK_GRAY); g.clearRect(0, 0, width, height); } } |
One of the simplest and most common ways to implement a game engine is through the use of an update/render real-time game loop. We use a timer to repeatedly call two methods—update and render. We call the methods once for every frame of the game. The method calls can be seen in the code of Code Listing 8.1 in the actionPerformed method. First, we call the update method, in which we will compute the positions and logic of all of the objects in our game's world. Next, we call the render method, in which we render a pictorial version of our objects so that users have something to look at while they play (see Figure 41).
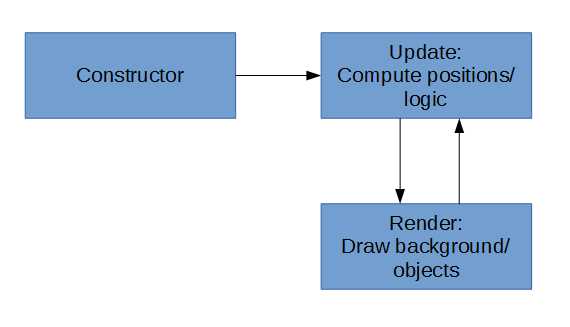
Figure 41: Real-Time Game Loop
In order to use a real-time game loop, we want our update and render methods to be called repeatedly at some specific interval. The interval is called the frames per second (FPS). A higher frame rate (60 or 100 FPS) will look smoother but will consume more power. If the frame rate is too high, the animation may become jerky as the processor falls behind and skips frames. A lower frame rate (12 or 16 FPS) does not look so smooth, but it consumes less power. There is a good chance that a lower frame rate can be rendered by the processor without skipping frames. One of the parameters to the constructor of our Engine2D is the frame rate. I have used 30 FPS for this value, which should look relatively smooth and should run without consuming too much power on portable devices (and thus conserve some battery for the players of our game).
We have employed a timer to call the actionPerformed method once per frame, and we have implemented the ActionListener class. If we perform too much computation in our update method, or if we attempt to render too many sprites in our render method, we might not achieve the desired frame rate. Each time the timer ticks, the actionPerformed method will be called, which calls update, followed by paintComponent (which calls super.paintcomponent to refresh the window), and render.
Note: Frame rates alone do not make animations look smooth. Even at a very high frame rate, an animated object will not appear smooth to human eyes. The true key to creating smooth animations is to employ a technique called motion blur. That topic is outside of the scope of this e-book, but you should visit the page http://www.testufo.com/ for some fantastic examples of how motion blur works and the effects of animation when implemented correctly.
At the moment, the update method has two parameters, timeTotal and timeDelta, that do nothing. And the render method simply clears the screen to DARK_GRAY. After adding the Engine2D class, you should be able to test your application. If you do not see a dark gray screen, as in Figure 42, something has gone wrong.
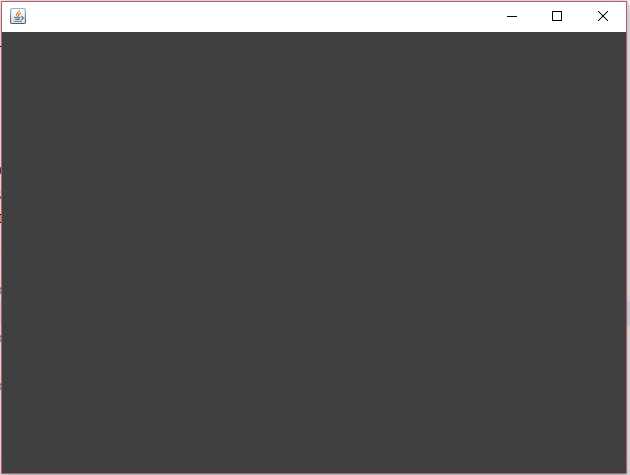
Figure 42: Clearing the Screen
Sprite sheet class
When we animate, we often draw images of our objects in quick succession that are slightly different from each other. For instance, an animation of the player walking might consist of eight frames, each slightly different from the last. We could store each image of our animation in a separate image file, but storing all the images of an animation in a single file is often more convenient. Such image files are called sprite sheets or sprite atlases.
There are many image formats—BMP, PNG, JPG, TIFF, etc. Each format is designed for specific purposes. PNG is the format of choice for sprites because it is compressed, is generally smaller than a bitmap, and it allows alpha transparency. And, unlike JPG (which is also compressed), the compression used for PNG images is lossless, which means we retain the exact values of every pixel we draw in our frames.
Code Listing 8.2: Sprite Sheet Class
import java.awt.Graphics2D; import java.awt.image.BufferedImage; import java.io.File; import java.io.IOException; import javax.imageio.ImageIO; public class SpriteSheet {
private BufferedImage bmp; // The loaded image. private int spritesAcross = -1;// Number of sprites across the image. private int totalSprites; // Total sprites in the image. private int spriteWidth, spriteHeight;// width/height of each sprite. // Constructor public SpriteSheet(String filename,int spriteWidth,int spriteHeight) { // Load the bitmap. try { bmp = ImageIO.read(new File(filename)); } catch(IOException e) { // File not found. spritesAcross = -1; return; } // Save the sprite width and height. this.spriteWidth = spriteWidth; this.spriteHeight = spriteHeight; // spritesAcross is used to compute the // source rectangles when rendering. spritesAcross = bmp.getWidth() / this.spriteWidth; // totalSprites is used to ensure we're not // trying to render sprites that do not exist. totalSprites = spritesAcross * (bmp.getHeight() / spriteHeight); } // This method can be used to test if the sprites loaded. public Boolean isValid() { return spritesAcross != -1; }
public void render(Graphics2D g, int spriteIndex, int x, int y) { // Make sure the sprite is actually on our spriteSheet. if(spriteIndex >= totalSprites) return; // Compute the source x and y. int srcX = (spriteIndex % spritesAcross) * spriteWidth; int srcY = (spriteIndex / spritesAcross) * spriteHeight; // Draw the image. g.drawImage(bmp, x, // Destination x1 y, // Destination y1 x + spriteWidth, // Destination x2 y + spriteHeight, // Destination y2 srcX, // Source x1 srcY, // Source y1 srcX + spriteWidth, // Source x2 srcY + spriteHeight,// Source y2 null); // Observer } } |
Code Listing 8.2 shows a simple sprite sheet class. The member variables are a buffered image (which is simply a method for storing an image loaded from the disk in RAM for quick access) and several simple records—spriteWidth/spriteHeight, totalSprites, and spritesAcross. The class takes a filename in the constructor and a width and height for the sprites. The file can be any standard 2-D image format, but we will use PNG.
GNU image manipulation program (Gimp)
I created the image for our test application for our sprite sheet by using Gimp (which is a very powerful drawing and photo manipulation program, available free from https://www.gimp.org/). The sprites in Figure 43 show a spaceship, a nasty-looking space critter, a bullet, a green wall, some stars, and a small explosion.
Note: I have used Gimp for creating my sprites in this text because it is popular, cross-platform, and powerful. Many other applications that readers might want to explore are also available. Piskel is an online sprite creation tool available from http://www.piskelapp.com/. Asesprite is an excellent, small-desktop sprite editor available from http://www.aseprite.org/. Spriter by BrashMonkey is an excellent sprite editor with free and paid versions available from https://brashmonkey.com/.
![]()
Figure 43: Sprites
Tip: When we draw an image in Gimp (or some other image editor), we do not want to lose any precision—we want to specify the exact color of every pixel. For this reason, I recommend that when you work on the image, save it in Gimp’s specialized format (which includes extra information for layers, pixel colors, masks, paths, etc.). When we come to use the image in our game, we export it as a PNG image (the PNG does not have multiple layers, paths, etc.—it only contains pixel color data). This way, the layering and selection information available in Gimp will be maintained if you need to edit the image further, and you will have all the flexibility of PNG in the final exported image.
Right-click Figure 43 and click Copy, then paste the image as a new image into Gimp (depending on the PDF reader you use, the details of this operation might differ slightly). Open Gimp (or some other image editor of your choice) and select New Image under Paste as, as per Figure 44.
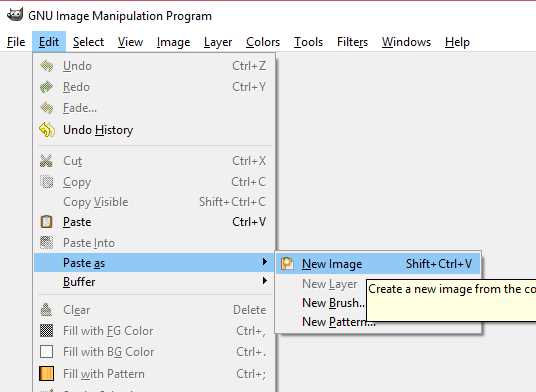
Figure 44: Paste as New Image
The copied and pasted image should look similar to the one pictured in Figure 43, except that the image will have black around the sprites where they are meant to be transparent (see Figure 45).
![]()
Figure 45: Sprites with Black Background
In order to change the background back to transparent, we need several windows open in Gimp. Choose the Windows item from the menu and open a Toolbox, Tool Options, and Layers window, as per Figure 46.
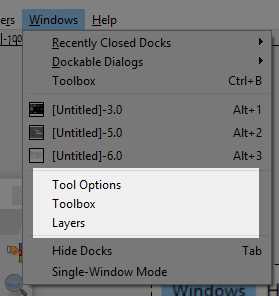
Figure 46: Gimp Windows
Next, we will add an Alpha Channel to the image. Right-click the layer in the Layers box and select Add Alpha Channel from the context menu (Figure 47). The Alpha Channel is used for transparency—we want the pixels outside of our animation frames to be transparent, so that there is not a white or black box around each sprite.
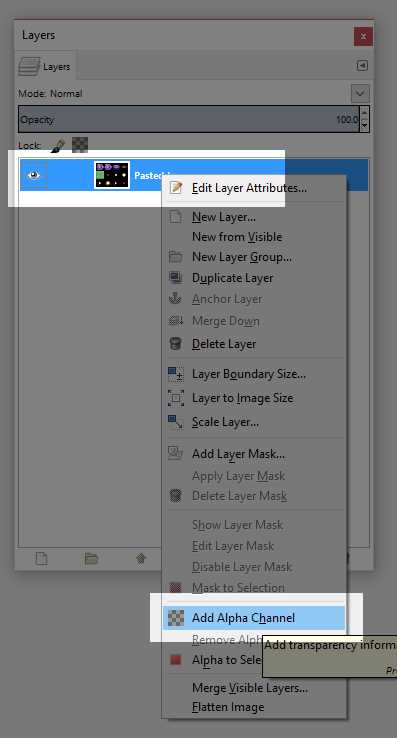
Figure 47: Add an Alpha Channel
Next, select the entire black region in order to remove the black boxes from our pasted image. There are several ways to do this, and I will use the Select by Color tool, as in Figure 48.
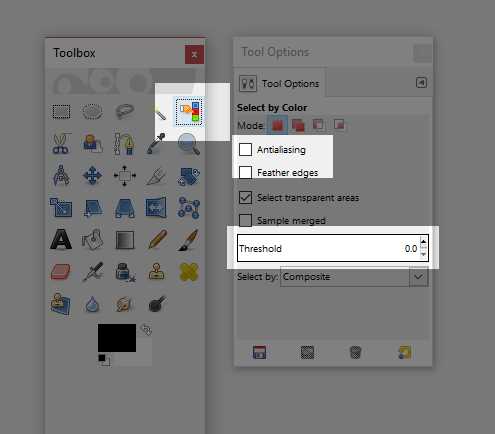
Figure 48: Select by Color
When you select by color, the Tool Options window is updated to include controls for manipulating how the selection should be performed. Turn off Anti-aliasing and turn off Feather Edges in the Tool Option box, as per Figure 48. Anti-aliasing and feather edges help selections appear smoother by adding slightly transparent edges to the selection—we do not want this. Make sure the Threshold is 0 so that we can select all the black regions without accidentally selecting nonblack but dark regions. After you have set up the Select by Color tool, click somewhere on the sprite’s black region. The Select by Color tool will select all the matching black pixels. Hit the delete key on your keyboard in order to delete the black pixels—doing so will replace them with transparent pixels (pixels with an alpha value of 0), as per Figure 49.
![]()
Figure 49: Deleting the Black Pixels
Next, export your image to the desktop (or some other place where it is easily accessible) by selecting File > Export As… and typing the name “spaceracer.png”.
Including an image in Java
We want to include this exported PNG sprite sheet in our Java application. Back in Eclipse, right-click your project in the Package Explorer and select New > Folder, as per Figure 50.
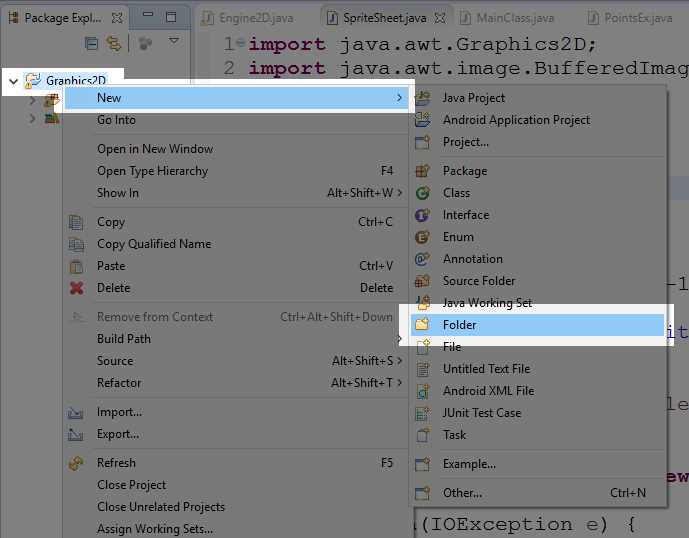
Figure 50: Adding a New Folder
Ensure the correct parent folder is selected (Graphics2D in my case), name the folder graphics, and click Finish, as per Figure 51.
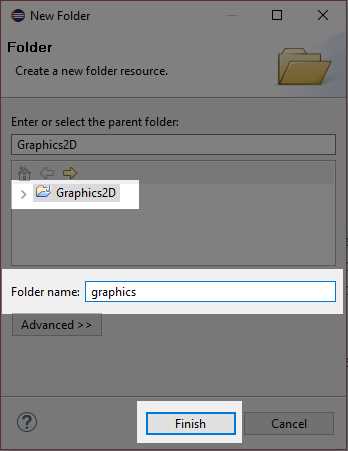
Figure 51: New Folder
Eclipse will create a new folder in your project. Copy the spacerace.png file that we exported earlier into this folder so that we can open it when our application runs. In order to copy a file to the project’s folder, we need to open the folder in the System Explorer (this is simply the normal Windows file explorer). We could find the folder using the System Explorer, but Eclipse provides a fast method for opening the project’s folders. As Figure 52 demonstrates, right-click the folder in the Package Explorer, and select Show In > System Explorer.
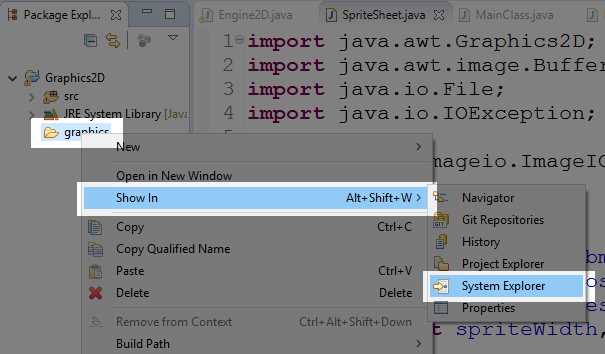
Figure 52: Show in System Explorer
Find the spaceracer.png file on your desktop (or wherever you exported it after adding transparency). Copy and paste this file into the graphics folder of the project in the System Explorer, as per Figure 53. Close the window in the Windows System Explorer and return to Eclipse.
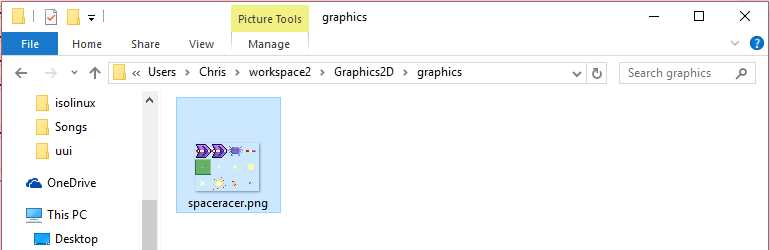
Figure 53: Graphics Folder in System Explorer
Our PNG image is now included in the graphics folder, but at present Eclipse is not aware of it. Right-click the graphics folder in the Package Explorer and select Refresh, as per Figure 54. This will cause Eclipse to include any files it finds in the folder in our application. Every time you update your sprites or add files to the folders in your application, you should refresh the folders in Eclipse.
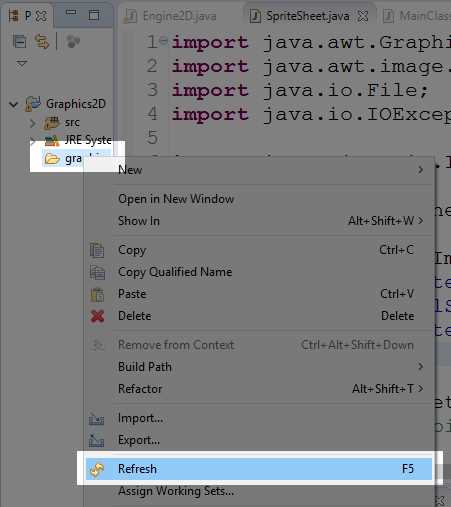
Figure 54: Refreshing the Graphics Folder
Loading and rendering sprites
Code Listing 8.3 shows the code that loads our sprites as a SpriteSheet instance in the constructor of our Engine2D. Be careful if you are copying and pasting this code—I have only included the important lines of code of Engine2D, so this is not the entire Engine2D class.
Code Listing 8.3: Loading spacerager.png
// Width and height of the window. private int width, height;
private SpriteSheet sprites; // Constructor public Engine2D(int windowWidth, int windowHeight, int fps) { width = windowWidth; height = windowHeight; // Load the sprites: sprites = new SpriteSheet("graphics/spaceracer.png", 16, 16);
// Start the render/update loop. Timer timer = new Timer(1000/fps, this); timer.start(); } |
Notice that the parameters for the sprite width and height are 16, which occurs because the spaceracer.png image was drawn to have each separate frame fit inside a 16x16 pixel box. When we render our sprite sheet, we have the option of rendering only a portion of it (as we will see in a moment). If you have sprites of differing sizes on your sprite sheet, you need to know where each sprite begins and ends (in terms of the x and y coordinates) in order to correctly render the portions of the sprite sheet. Because all the sprites are the same size, we can perform a simple calculation to correctly render the desired portion of the image. This is a very fast way of including sprite sheets when all the sprites are made to be exactly the same size and when they are properly spaced on a grid in the PNG file. When we have loaded our SpriteSheet object, we can render a test sprite in our Engine2D render method in order to make sure everything is running smoothly, as we see Code Listing 8.4.
Code Listing 8.4: Rendering a Test Sprite
// Temporary test, delete this line after making // sure the program animates: static int x = 0;
private void render(Graphics2D g) { // Clear the screen to blue g.setBackground(Color.DARK_GRAY); g.clearRect(0, 0, width, height); // Temporary test: sprites.render(g, x % 2, x, 0); x++; } |
In Code Listing 8.4, I have included an x member variable and incremented it each frame in the update method. In the render method, I have rendered sprite number “x%2” at position x. This will cause the first two frames of our sprite sheet to be drawn so that they slowly move across the screen from left to right, as per Figure 55.
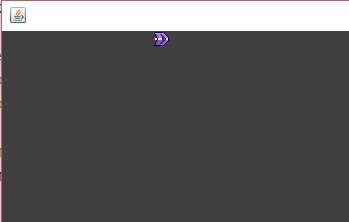
Figure 55: Small Spaceship (Cropped)
Scaling sprites
Our spaceship is very small. As a stylistic choice, we might want our sprites to appear larger and pixelated, similar to games from the 1990s. The sprites will be easy for the player to see, and our game will have a retro aesthetic. We can scale our sprites by multiplying the coordinates of the destination in the SpriteSheet.render method. When you run the test application after implementing the changes in Code Listing 8.5, you should see a much larger spaceship.
Code Listing 8.5: Scaling the Sprite
public void render(Graphics2D g, int spriteIndex, int x, int y) { // Make sure the sprite is actually on our spriteSheet. if(spriteIndex >= totalSprites) return; // Compute the source x and y. int srcX = (spriteIndex % spritesAcross) * spriteWidth; int srcY = (spriteIndex / spritesAcross) * spriteHeight; // Draw the image g.drawImage(bmp, x*2, // Destination x1 y*2, // Destination y1 (x + spriteWidth)*2, // Destination x2 (y + spriteHeight)*2, // Destination y2 srcX, // Source x1 srcY, // Source y1 srcX + spriteWidth, // Source x2 srcY + spriteHeight,// Source y2 null); // Observer } |
Timing and frame skipping
Many computing devices could potentially run our games and applications. Each device consists of different hardware, and each hardware has a specific performance—some devices are faster than others. In order to make our games run at a smooth, consistent rate, we need to move our sprites so that they appear to move at the same speed regardless of the hardware. We can do this by employing a technique called frame skipping.
A fast computer might be capable of rendering four frames in a short amount of time, and a slower computer might render only two frames in the same amount of time. However, our objects must move the same distance despite the number of frames. The faster computer might render frames more smoothly, but the game play must appear to run at the same speed. One way to achieve this effect is to scale the movement of our objects by the amount of time that has elapsed since the last call to update. We will include a new class called HPTimer (short for High-Precision Timer) that accurately records the amount of time passing so that we can use it in our call to the update method. Create the HPTimer class and add the code in Code Listing 8.6.
Code Listing 8.6: HPTimer Class
public class HPTimer { // Member variables long startTime, lastTime, currentTime; // Set the start, last and current times to now: public void reset() { startTime = System.currentTimeMillis(); // You can also use nano time: //startTime = System.nanoTime(); lastTime = startTime; currentTime = startTime; } // Reset the timer. public void start() { reset(); } // Record the current time. public void update() { lastTime = currentTime; currentTime = System.currentTimeMillis(); // If using nano time: //currentTime = System.nanoTime(); } // Return the time since the last call to update. public double timeDelta() { double d = (double) currentTime - (double) lastTime; d /= 1000.0; // If using nano time: // d /= 1000000000.0; return d; } // Return the time since the last call to reset. public double timeTotal() { double d = (double) currentTime - (double) startTime; d /= 1000.0; // If using nano time: //d /= 1000000000.0; return d; } } |
Code Listing 8.6 shows the code for our timer class. As our application develops, if you find that the timer is not accurate enough, you might want to try uncommenting the “nano time” lines in order to use System.nanoTime instead of reading milliseconds. The class does nothing more than read the time in milliseconds each time the update method is called, and it offers timeTotal and timeDelta methods that return the total amount of time that has elapsed since the start of the timer, along with the elapsed time since the last call to update. Add an HPTimer instance to the Engine2D class. In Code Listing 8.7, I have called my instance hpTimer.
Code Listing 8.7: Create an HPTimer
private SpriteSheet sprites; private HPTimer hpTimer; // Constructor public Engine2D(int windowWidth, int windowHeight, int fps) { width = windowWidth; height = windowHeight; // Load the sprites. sprites = new SpriteSheet("graphics/spaceracer.png", 16, 16);
// Start the HPTimer. hpTimer = new HPTimer(); hpTimer.start(); // Start the render/update loop. Timer timer = new Timer(1000/fps, this); timer.start(); } |
In the actionPerformed method, we want to pass the timeTotal and timeDelta parameters to our update function by calling hpTimer.update() to ensure the hpTimer has read the most up-to-date time, then we pass the total and delta times to the Engine2D.update method function, as in Code Listing 8.8.
Code Listing 8.8: Updating the Timer and Passing the Times
// This event is called when the timer fires at the specified fps. public void actionPerformed(ActionEvent e) { // Read the most up-to-date time: hpTimer.update();
// Pass HPTimer's times to our update method: update(hpTimer.timeTotal(), hpTimer.timeDelta());
repaint(); } |
We can now render our spaceship again, but this time we will scale the ship’s movement by the timeDelta. Code Listing 8.9 shows the altered test code. This time when we run the application, the ship will move at the rate of one pixel every second. We should note our hardware’s power doesn’t matter here. If a very slow computer runs this application, it will take the ship exactly the same amount of time to reach the right edge of the screen as it would with a very powerful computer—even if the slow computer is only able to render three frames, the ship's speed will be exactly the same. In general, when creating animations, we always want to scale by timeDelta (which is the elapsed time since the last call to update).
Code Listing 8.9: Very Slow Spaceship
// Temporary test, delete this line after making // sure the program animates: static double x = 0;
private void render(Graphics2D g) { // Clear the screen to blue. g.setBackground(Color.DARK_GRAY); g.clearRect(0, 0, width, height); // Temporary test: sprites.render(g, (int)x % 2, (int)x, 0); x+=hpTimer.timeDelta(); } |
Animation class
Many of the objects in our game will be rendered with repeating animations. These animations will consist of consecutive frames from our sprite sheet, such as the first two frames, which represent the ship. The animations have a specific time for the frames and a start time. Code Listing 68 shows the code for the Animation class.
Code Listing 8.10: Animation Class
public class Animation { private double speed, startTime; private int firstFrame, frameCount; private int currentFrame; private boolean isComplete = false; private boolean looping;
// Constructor for looping/multiframe animation. public Animation(double speed, double startTime, int firstFrame, int frameCount, boolean looping) { this.speed = speed; this.startTime = startTime; this.firstFrame = firstFrame; this.frameCount = frameCount;
// Reset currentFrame = firstFrame; isComplete = false; this.looping = looping; }
// Constructor for single-frame animation. public Animation(int frame) { speed = 1.0; startTime = 0.0; firstFrame = frame; frameCount = 1; // Reset currentFrame = firstFrame; isComplete = false; this.looping = true; }
// Compute the current frame and the // isComplete boolean. public void update(double timeTotal) { double elapsedTime = timeTotal - startTime; currentFrame = (int)(elapsedTime / speed);
if(currentFrame < 0) currentFrame = 0;
// If the frame is past the end of the animation, // set it to the last frame. if(currentFrame >= frameCount) { // If the animation does not loop, set it to the final // frame indefinitely. if(!looping) currentFrame = firstFrame + frameCount - 1; // If the animation is looping, // set it back to the first frame. else { currentFrame = firstFrame; startTime = timeTotal; }
isComplete = true; }
// Otherwise, the current frame is the first frame + // however many frames we've played so far: else currentFrame += firstFrame; }
// Returns the current frame. public int getCurrentFrame() { return currentFrame; }
// Determines if the animation has played all frames. public boolean getIsComplete() { return isComplete; } } |
Game objects
Our game will consist of many objects—the player, scrolling stars, and alien baddies. These objects have common features, such as an x and y position, the ability to update/render, and an animation. We will create a parent class called GameObject from which we will inherit to create the specific object types in our game. Code Listing 8.11 shows the GameObject class.
Code Listing 8.11: GameObject Class
import java.awt.Graphics2D; public abstract class GameObject { // Position public double x, y; // Is the object visible? private boolean visible = true;
// The object's animation private Animation animation = null;
// Update and Render public void update(double timeTotal, double timeDelta) { if(animation != null) animation.update(timeTotal); }
// Render the animation with the current frame if it exists and // is visible. public void render(Graphics2D graphics, SpriteSheet sprites) { if(visible && animation != null) sprites.render(graphics, animation.getCurrentFrame(), (int)x, (int)y); } // Getters and setters public double getX() { return x; } public double getY() { return y; }
public boolean getVisible() { return visible; }
public void setVisible(boolean visible) { this.visible = visible; }
public Animation getAnimation() { return animation; }
public void setAnimation(Animation animation) { this.animation = animation; }
// Location tests: // Test if the object is outside the screen to the left. public boolean isOffScreenLeft() { return x < -16; } // Test if the object is outside the screen to the right. public boolean isOffScreenRight() { return x >= 320; } // Test if the object is outside the screen at the top. public boolean isOffScreenTop() { return y < -16; } // Test is the object is outside the screen at the bottom. public boolean isOffScreenBottom() { return y >= 240; } // Compute the distance between the objects. public double getDistance(GameObject o) { // Faster, but less accurate detection: // return Math.abs(o.x - x) + Math.abs(o.y - y);
// More accurate, but slow version: return Math.sqrt((o.x - x) * (o.x - x) + (o.y - y) * (o.y - y)); } } |
Notice that the GameObject class is abstract. We will not create instances of GameObject directly, but we want to encapsulate all the elements that are the same for each object in the game so that we do not need to reprogram them for each object type. In addition to reducing our coding for each of the child classes, we will be able to store all of our game’s objects in a single ArrayList and call all of the object’s update/render methods very simply. This is an example of polymorphism in action.
Stars
In this section, we will create a scrolling background of stars. The stars will inherit from the GameObject class and call super.update in their update method. Add a new class to your application called Star. The code for this class is listed in Code Listing 8.12. One of the most important things to remember is that our GameObject parent class updates the current animation of the object, which means we should be sure to call super.update in the update method of all the child classes or else handle the animation updating in the child classes.
Code Listing 8.12: Scrolling Star Class
import java.awt.Graphics2D; public class Star extends GameObject { double speed; public Star() { // Begin the stars in a random location: x = Math.random() * 320.0; y = Math.random() * 240.0;
// Set the stars to a random speed: speed = Math.random() * 30.0 + 30; } public void update(double timeTotal, double timeDelta) { // Call the parent update. super.update(timeTotal, timeDelta);
// Move the star left. x -= speed * timeDelta;
// Reset the star on the right when it goes off screen. if(isOffScreenLeft()) { x = 320.0; // Just outside the right-hand edge y = Math.random() * 240.0 - 16; // Random Y location } } } |
Next, add an ArrayList for holding our GameObject objects to the Engine2D class and create 100 stars in the constructor (see Code Listing 3.13). You will also need to add an import for the ArrayList collection—“import java.util.ArrayList;”—at the start of the Engine2D class.
Code Listing 8.13: Creating gameObjects
// The GameObjects array list: ArrayList<GameObject> gameObjects = new ArrayList<GameObject>(); // Constructor public Engine2D(int windowWidth, int windowHeight, int fps) { width = windowWidth; height = windowHeight;
// Load the sprites. sprites = new SpriteSheet("graphics/spaceracer.png", 32, 32);
// Create 100 stars. for(int i = 0; i < 100; i++) { Star s = new Star(); s.setAnimation(new Animation(Math.random() * 2 + 0.2, Math.random(), 5, 3, true)); gameObjects.add(s); } |
Now that we have an array list for all the objects in our game, we want to call update and render for the elements of the array list in the update and render methods of the Engine2D class. Notice also that I have removed the test code from when we rendered our test spaceship (we will add the spaceship again in a moment, but it will be controlled by the keyboard).
Code Listing 8.14: Updating and Rendering GameObjects
private void update(double timeTotal, double timeDelta) { // Update the game objects: for(GameObject o: gameObjects) o.update(timeTotal, timeDelta); }
private void render(Graphics2D g) { // Clear the screen to blue. g.setBackground(Color.DARK_GRAY); g.clearRect(0, 0, width, height); // Render the game objects: for(GameObject o: gameObjects) o.render(g, sprites); } |
You should be able to run the application and see a scrolling background of animated stars. The technique used here is a simple version of a technique called parallax scrolling. We create a series of background images (stars), rendering them on top of each other, and scroll those that are nearer to the camera faster than those that are farther away. Figure 56 shows a screenshot of our game so far.
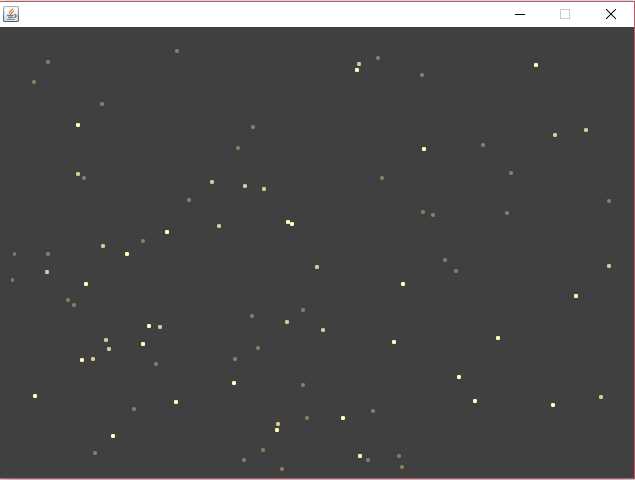
Figure 56: Stars
Walls
The stars are meant to be in the background. Our game will consist of a series of scrolling walls that the player must avoid and baddies that the player must either avoid or shoot. The walls are similar to the stars, except that we will generate them on the fly along the right edge of the screen and delete from the gameObjects array list as they reach the left side of the screen. Code Listing 8.15 shows the new Wall class. Note that this class also includes a method called collisionWithShip that we will use later to determine if the ship has collided with a wall.
Code Listing 8.15: Wall Class
import java.awt.Graphics2D; public class Wall extends GameObject { public Wall(double x, double y) { this.x = x; this.y = y; this.setAnimation(new Animation(4)); }
// Move the wall to the left. public void update(double timeTotal, double timeDelta) { super.update(timeTotal, timeDelta);
x -= 80 * timeDelta; } } |
In order to use this class, we will implement several new variables in our Engine2D class (see Code Listing 8.16). One interesting note—if you pass an argument to the Random() constructor (i.e. Random(1238)), the walls will be generated in exactly the same pattern each time. You will also have to import “java.util.Random” at the top of the Engine2D class.
Code Listing 8.16: Wall Variables in Engine2D
// The GameObjects array list: ArrayList<GameObject> gameObjects = new ArrayList<GameObject>(); // Wall variables double nextWallGenerationTime = 1.0; Random wallRNG = new Random(); // Any argument will // cause walls to be generated with the same pattern // every time!
// Constructor public Engine2D(int windowWidth, int windowHeight, int fps) { |
Next, we generate the walls and remove them as they leave the left edge of the screen in the Engine2D’s update method (see Code Listing 8.17). Note that in order to delete walls from the ArrayList, it is no longer safe to employ the for each loop (we should never modify a collection by adding or removing items while iterating through it using a for each loop), and I have rewritten the Engine2D update with a for loop. Figure 57 shows a screenshot of the game with stars and walls.
Code Listing 8.17: Generating and Deleting Walls
private void update(double timeTotal, double timeDelta) { // Generate new walls: if(timeTotal >= nextWallGenerationTime) { // Add 0.5 seconds to the wall generation time. nextWallGenerationTime += 0.5; for(int i = 0; i < 14; i++) { if(wallRNG.nextInt(3) == 0) { gameObjects.add(new Wall(640, i * 32)); } } } for(int i = 0; i < gameObjects.size(); i++) { GameObject o = gameObjects.get(i); o.update(timeTotal, timeDelta); // If the object is a wall: if(o instanceof Wall) { if(o.isOffScreenLeft()) { // Delete as they go off the screen to the left. gameObjects.remove(i); i--; continue; } } } } |
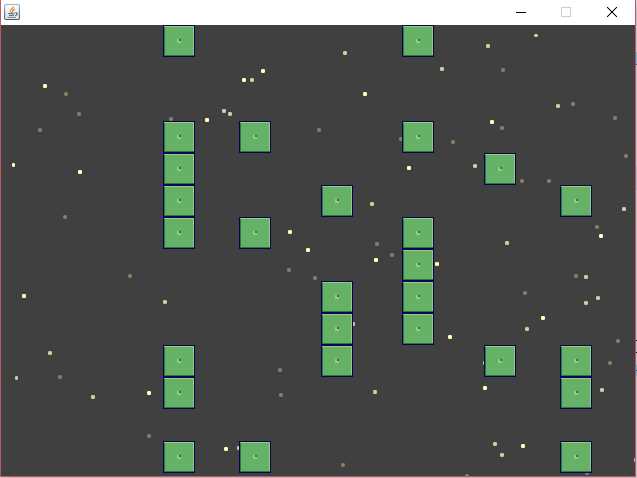
Figure 57: Stars and Walls
Baddies
Next, we will add some baddies. The baddies are essentially the same as the walls, except that we will enable to the player to shoot them and they will move with a clever sine-wave pattern, which will make them harder to avoid and shoot. The code for the new Baddie class is presented in Code Listing 8.18.
Code Listing 8.18: Baddie Class
import java.awt.Graphics2D; import java.util.Random; public class Baddie extends GameObject { private double startY;
private double frequency; private double amplitude;
// Constructor public Baddie(double x, double y) { this.x = x; this.y = y;
startY = y;
// Create random frequency and amplitude. Random r = new Random(); frequency = r.nextDouble() * 2.0 + 2.0; amplitude = r.nextDouble() * 45 + 45;
// Set the animation: this.setAnimation(new Animation(2)); }
// Move the baddie to the left. public void update(double timeTotal, double timeDelta) { super.update(timeTotal, timeDelta);
x -= 60 * timeDelta;
y = startY + (Math.sin(timeTotal * frequency) * amplitude); } } |
Adding the baddies to our game is similar to adding the walls. In Code Listing 8.19, I have added several variables to the Engine2D class below the wall variables that will be used to generate baddies. Once again, if you would like to generate baddies in exactly the same pattern every time, you can pass an argument to the Random constructor (e.g., Random(678763)). Code Listing 8.20 shows the new Engine2D update method for generating and updating the baddies.
Code Listing 8.19: Engine2D Baddie Variables
// Wall variables double nextWallGenerationTime = 1.0; Random wallRNG = new Random(); // Any argument will // cause walls to be generated with the same pattern // every time!
// Baddie variables double nextBaddieGenerationTime = 2.0; Random baddieRNG = new Random();
// Constructor public Engine2D(int windowWidth, int windowHeight, int fps) { |
Code Listing 8.20: Generating and Updating Baddies
private void update(double timeTotal, double timeDelta) { // Generate new walls: if(timeTotal >= nextWallGenerationTime) { // Add 0.5 seconds to the wall generation time. nextWallGenerationTime += 0.5; for(int i = 0; i < 14; i++) { if(wallRNG.nextInt(3) == 0) { gameObjects.add(new Wall(320, i * 32)); } } } // Generate new Baddies. if(timeTotal >= nextBaddieGenerationTime) { // Death wave: //nextBaddieGenerationTime += baddieRNG.nextDouble() * 0.2 + 0.1; // Normal wave: nextBaddieGenerationTime += baddieRNG.nextDouble() * 4.0 + 0.5; gameObjects.add(new Baddie(320,baddieRNG.nextInt(280)-40)); } for(int i = 0; i < gameObjects.size(); i++) { GameObject o = gameObjects.get(i); o.update(timeTotal, timeDelta); // If the object is a wall, or a baddie: if(o instanceof Wall || o instanceof Baddie) { if(o.isOffScreenLeft()) { // Delete if they go off the screen to the left. gameObjects.remove(i); i--; continue; } } } } |
For a little fun, I have included a Death Wave mode that we can switch to for five seconds at a rate of once every 30 seconds or so. This will greatly increase the challenge of our game, and it will add a degree of progress while the player plays. The mode is commented out in Code Listing 8.20, but it consists of very fast generation of baddies. I will leave the in-game switching of this mode as an exercise for you to implement.
When you start the game, after a moment you should see baddies being generated on the right side of the screen—they bob up and down using a sine-wave pattern, and they exit on the left. Play around with the frequency and amplitude values in the Baddie constructor in order to explore the attributes of the sine wave. Setting the frequency to values higher than 2.0 will cause the baddies to bob up and down very rapidly, and setting the amplitude value to higher values will increase the vertical range of their pattern. Be careful not to set these values too high—our collision detection will be most accurate if objects are not allowed to move more than 16 pixels per frame.
Figure 8.17 shows a screenshot of our game with stars, walls, and baddies. This is actually a screenshot of the Death Wave. Without the Death Wave option, the number of baddies generate at a speed that means there will be only one or two on screen at once.
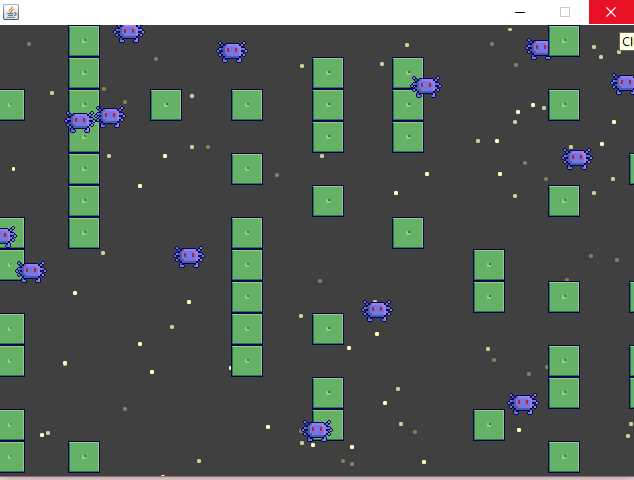
Figure 58: Stars, Walls, and Baddies
Reading the keyboard
Before we can add our hero’s spaceship, we need to implement a method for controlling it. Let’s now look at how to respond to events caused by the user pressing and holding keys on the keyboard. In order to allow our application to respond to input from the keyboard, add a new class called Keyboard that implements the KeyListener interface.
The Keyboard class in Code Listing 8.21 is an example of a singleton. This means we will design a single keyboard and never create multiple instances from the class. A singleton class can be designed in Java in many ways. I have marked the constructor as private, which prevents instances of the class from being created (instead, we will call Keyboard.Init to initialize the singleton—using this approach is sometimes called a Factory Pattern). Note also—the methods of this class and the keyStates array are all static. They belong to the class rather than an instance of it. This effectively means that the Keyboard class exists as a single, static object. We cannot create nor interact with instances, instead we interact with the class itself.
Code Listing 8.21: Keyboard Class
import java.awt.event.KeyEvent; import java.awt.event.KeyListener; public class Keyboard implements KeyListener { // 256 key states: true means the key is down // false means the key is up. private boolean[] keyStates = null;
// The only instance of this class is the following // private, static instance: private static Keyboard staticInstance = null;
// Private Constructor: private Keyboard() { keyStates = new boolean[256]; }
// Public init method that creates the // static key states if they do not exist. public static void init() { staticInstance = new Keyboard();
reset(); }
public static Keyboard getInstance() { return staticInstance; }
// Set all key states to false. public static void reset() { for(int i = 0; i < 256; i++) staticInstance.keyStates[i] = false; }
// Test if a key is down. public static boolean isKeyDown(int keyCode) { return staticInstance.keyStates[keyCode & 255]; }
// Set a key to down; true. public void keyPressed(KeyEvent e) { staticInstance.keyStates[e.getKeyCode() & 255] = true; } // Set a key to up; false. public void keyReleased(KeyEvent e) { staticInstance.keyStates[e.getKeyCode() & 255] = false; } // Extra, unused method from KeyListener interface. public void keyTyped(KeyEvent e) { } } |
The Keyboard class consists of a static array of boolean variables. We will use one element of this array for each of 256 possible keys. A value of true will mean that a particular key is held down, and a value of false will mean it is not. In reality, there are more than 256 possible keys that could be down on a modern keyboard (taking into consideration languages other than English). In game programming, we are typically interested only in tracking keys such as the letters A to Z, digits 0 to 9, the arrow keys, space bar, etc. So, we will only store an array of 256 different keys at most, and we will read only the lowest byte of any keys that the user hits (rather than reading the entire Unicode short int—which would require an array of 2^16 different key states). After the array is created in the init method, we call reset to clear all key states to false and ensure that the initial state of the keyboard has no keys held down.
The isKeyDown method returns the current state of specified keyCode. So, if the key is down, this method returns true, and if it is up, the method returns false. In the keyPressed event, we read the keyCode of the key the user has just pressed, we limit the range of the code from 0 to 255 with a bitwise &, and we set the corresponding keyState to true, which means the key is now being held down. KeyReleased is similar to keyPressed, except that we clear the key's state to false, which means the key is no longer being held down.
When users press a key, the keyPressed event will occur. When users release a key, the keyReleased event will occur. And, when users type a key, the keyTyped event will occur. Note that the keyTyped responds repeatedly if the user holds down the key, but we do not need this event in our game. However, we must provide it because it is required by the KeyListener interface.
Next, we need to add a keyListener to our MainClass. The updated constructor for the MainClass is listed in Code Listing 8.22. A keylistener is any class that implements the KeyListener interface.
Code Listing 8.22: Initializing the Keyboard in the MainClass
private MainClass(int windowWidth, int windowHeight) { setSize(windowWidth, windowHeight); // Set window size. setLocationRelativeTo(null); // Default location. setDefaultCloseOperation(JFrame.EXIT_ON_CLOSE); // Exit on close. setVisible(true);
// Init the static singleton keyboard: Keyboard.init();
// Add a keylistener. addKeyListener(Keyboard.getInstance());
// Create and add the engine JPanel: final Engine2D engine = new Engine2D(windowWidth, windowHeight, 30); add(engine); } |
Keyboard controlled player
Now that we have a Keyboard class, we can add the player GameObject, which will be a player that can use the keyboard. Code Listing 8.23 shows the basic Player class.
Code Listing 8.23: Player Class
public class Player extends GameObject { double shipSpeed = 320.0;
public Player(double x, double y) { // Set the x/y. this.x = x; this.y = y;
// Set the animation. this.setAnimation(new Animation(0.1, 0.0, 0, 2, true)); }
public void update(double timeTotal, double timeDelta) { // Call parent's update: super.update(timeTotal, timeDelta);
//Up/down if(Keyboard.isKeyDown(40)) y += shipSpeed * timeDelta; if(Keyboard.isKeyDown(38)) y -= shipSpeed * timeDelta;
// Left/right if(Keyboard.isKeyDown(37)) x -= shipSpeed * timeDelta; if(Keyboard.isKeyDown(39)) x += shipSpeed * timeDelta;
// Make sure the player is on the screen. if(x < 0) x = 0; if(y < 0) y = 0; if(x > 320 - 32.0) x = 320 - 32.0; if(y > 240 - 32.0) y = 240 - 32.0; } } |
Notice that in Code Listing 8.23, when we read the keys, we use numbers, such as 40, 38, etc. These are virtual keycodes, and there is a different code for each key on the keyboard. For a complete list of the codes for every key, see the following: http://docs.oracle.com/javase/6/docs/api/constant-values.html#java.awt.event.KeyEvent.VK_0. We are reading only the keydown and keyup events, so the user will be able to hold down two keys at once and the ship will move diagonally.
The ship can be added to the gameObjects array after we add the stars in the Engine2D constructor. I have added a separate copy of the player to the Engine2D class as a member variable, too. We do this because we need to test collisions between the player and the walls/baddies, so we need to know which object is in the array. As it happens, the player will always be object number 100 in the array, so we can simply use item number 100 in the gameObjects list, too. Also note that this is not a different instance of the Player class but rather a different reference to the same instance. Code Listing 8.24 shows the new player variables that will be added to the Engine2D class and the changes for adding the new player object to the gameObjects array.
Code Listing 8.24: Adding the Layer to Engine2D
Random baddieRNG = new Random();
// Player variables: Player player; boolean playerExploded = false;
// Constructor public Engine2D(int windowWidth, int windowHeight, int fps) { width = windowWidth; height = windowHeight;
// Load the sprites. sprites = new SpriteSheet("graphics/spaceracer.png", 16, 16);
// Create 100 stars. for(int i = 0; i < 100; i++) { Star s = new Star(); s.setAnimation(new Animation(Math.random() * 2 + 0.2, Math.random(), 5, 3, true)); gameObjects.add(s); }
// Create the player: player = new Player(16.0, 100.0); gameObjects.add(player);
// Start the HPTimer. |
At this point, you should be able to run the application and control the ship. You will be able to fly through walls and baddies because we have not yet implemented collision detection, but your ship should stop at the edges of the screen. I have also declared a boolean called playerExploded, which we will use in a moment.
Collision detection
Our walls do not do anything at the moment. We want to explode the spaceship when it hits a wall or a baddie, and we can do this by testing the distance between the player object and the center of the walls/baddies. If the player object is closer than, say, 14 pixels to the center of an obstacle, we will deem this too close for comfort and we will explode the ship, then reset the player back to the start by destroying all walls and baddies. These changes are all in the Engine2D update method and highlighted in Code Listing 8.25. I have included the entire Engine2D update method.
Code Listing 8.25: Update Method with Exploding Ship
private void update(double timeTotal, double timeDelta) { // Generate new walls. if(timeTotal >= nextWallGenerationTime) { nextWallGenerationTime += 0.5;// Add 0.5 second to the wall generation time. for(int i = 0; i < 14; i++) { if(wallRNG.nextInt(3) == 0) { gameObjects.add(new Wall(320, i * 32)); } } } // Generate new Baddies. if(timeTotal >= nextBaddieGenerationTime) { // Death wave: //nextBaddieGenerationTime += baddieRNG.nextDouble() * 0.2 + 0.1; // Normal wave: nextBaddieGenerationTime += baddieRNG.nextDouble() * 4.0 + 0.5; gameObjects.add(new Baddie(320, baddieRNG.nextInt(280)-40)); } for(int i = 0; i < gameObjects.size(); i++) { GameObject o = gameObjects.get(i); o.update(timeTotal, timeDelta); // If the object is a wall or a baddie: if(o instanceof Wall || o instanceof Baddie) {
// Test if the wall/baddie has hit the player. if(o.getDistance(player) < 14 && !playerExploded) { player.setAnimation(new Animation(0.5, hpTimer.timeTotal(), 8, 4, false)); playerExploded = true; }
if(o.isOffScreenLeft()) { // Delete if they go off the screen to the left. gameObjects.remove(i); i--; continue; } } }
// When the explosion animation for the payer is finished, destroy all walls and baddies // and reset the player. if(playerExploded && player.getAnimation().getIsComplete()) { player.x = 16; player.y = 100; playerExploded = false; player.setAnimation(new Animation(0.1, 0.0, 0, 2, true)); for(int i = 0; i < gameObjects.size(); i++) { if(gameObjects.get(i) instanceof Wall ||gameObjects.get(i) instanceof Baddie) { gameObjects.remove(i); i--; } } } } |
Player bullets
At the moment, our game does not seem particularly fair (or fun), so we will allow the player to shoot bullets. These will destroy the baddies but not the walls. Code Listing 8.26 shows the new Bullet class.
Code Listing 8.26: Bullet Class
import java.awt.Graphics2D; public class Bullet extends GameObject { // Constructor public Bullet(double x, double y) { this.x = x; this.y = y;
// Set the animation. this.setAnimation(new Animation(3)); }
// Move the bullet to the right. public void update(double timeTotal, double timeDelta) { super.update(timeTotal, timeDelta);
x += 800 * timeDelta; } } |
When the player holds down the space bar, we want to create bullets and fire them to the right. We do not want the player to have too much firepower, so we will limit the speed that bullets are created by adding several variables to the Engine2D class. Code Listing 8.27 shows the new variables that will be added to the class.
Code Listing 8.27: Bullet Variables
boolean playerExploded = false;
// Bullet variables double lastBulletTime = 0.0; double bulletCreationSpeed = 0.25; // 4 bullets per second
// Constructor public Engine2D(int windowWidth, int windowHeight, int fps) { |
Code Listing 8.28 shows the code used to create the bullet once every 0.25 seconds that the space bar is held down. This code should be placed in the Engine2D update.
Code Listing 8.28: Creating Bullets
// Create bullets if(Keyboard.isKeyDown(32) && hpTimer.timeTotal() - lastBulletTime > bulletCreationSpeed && !playerExploded) { gameObjects.add(new Bullet(player.x, player.y)); lastBulletTime = hpTimer.timeTotal(); }
// When the explosion animation for the player is finished, destroy all walls and baddies. |
Finally, we should test collisions between all the objects that are instances of bullet and all objects that are instances baddie. If any bullets collide with any baddies, we will simply remove the baddie from the gameObjects list. It would make more sense to explode the baddies, but I will leave the implementation of such explosions to you. The routine in Code Listing 8.29 is very slow, and it highlights the difficulty in collision detection—if there are 1000 objects, there are a lot of possible collisions. For this reason, I have included a quick and dirty collision detection routine in the GameObject class that you might consider if your game begins to lag when there are too many collisions to detect. Alternately, we could organize our objects into search trees and greatly reduce the number of collisions we need to check.
Code Listing 8.29: Checking Baddie Collisions
for(int i = 0; i < gameObjects.size(); i++) { GameObject o = gameObjects.get(i); o.update(timeTotal, timeDelta); // If this object is a bullet: if(o instanceof Bullet) { // Delete the bullet if it goes off the screen // to the right. if(o.isOffScreenRight()) { gameObjects.remove(i); i--; continue; }
// Check all baddies for collisions. for(int j = 100; j < gameObjects.size(); j++) { GameObject g = gameObjects.get(j); // If this is a baddie: if(g instanceof Baddie) { // If the baddie has hit the bullet: if(o.getDistance(g) < 14) { // Remove the baddie. gameObjects.remove(j); j--; i--; } } } }
// If the object is a wall, or a baddie: |
You should be able to run the game and shoot baddies. At this point, a score system might be added to give the player a feeling of progress. The scoring should use an increasing difficulty curve and deadly waves of many baddies. All of these things can be implemented easily and quickly, and I will again leave those adventures up to you to implement.
Our game seems pretty crummy (I wouldn’t play it for more than a few minutes before becoming bored and getting back to programming). However, the techniques in this chapter are virtually identical to those we might use to easily create Android games (the Android platform runs Java programs almost exclusively). If you are interested in developing Android applications, download and explore the Android Studio—you will find that this IDE is very similar in many ways to Eclipse (in fact, for a long time, Eclipse was the IDE of choice for Android developers). You will also find the GUI tools in Android Studio very similar to those offered by Eclipse.
- 1800+ high-performance UI components.
- Includes popular controls such as Grid, Chart, Scheduler, and more.
- 24x5 unlimited support by developers.