
Java Succinctly® Part 1

CHAPTER 4
Reading Input
Reading System.in
The program in Code Listing 4.0 illustrates how to read input from the user. Specifically, we ask users for their names and to read some text that they type at the keyboard.
Code Listing 4.0: Reading Input
1: import java.util.Scanner; 2: public class MainClass { 3: public static void main(String[] args) { 4: Scanner scanner = new Scanner(System.in); 5: System.out.println("What is your name?"); 6: String str = scanner.nextLine(); 7: System.out.println("Nice to meet you, " + str + "!"); 8: } 9: } |
Line 1 imports the Scanner class from the java.util package. A Scanner scans a stream, waiting for and reading data. There are literally thousands of prewritten tools included with Java that we can import in a similar way if we wish to use them. Code Listing 4.0 uses a scanner to scan System.in, which is a stream of bytes representing the data the user types to the console.
Line 2 is the opening declaration for the MainClass.
Line 3 is the opening declaration for the main method.
Line 4 is where we declare a java.util.Scanner object. We specify that our scanner is to scan the System.in stream. The Scanner class has a constructor that takes a stream as a parameter (a constructor is simply a special method used to create an instance of a class). A scanner object (called scanner with a lowercase s because it is an object, not a class) is created when we use the new operator to call the constructor. We will look at exactly what this line does in a lot more detail when we cover the new operator in the chapter on object-oriented programming. For the moment, this line means create a Scanner object called scanner and have it scan the input stream System.in.
Line 5 prints a prompt to the console asking for the user’s name.
Line 6 is where we read text from the keyboard. We do this by calling the scanner object’s nextLine method. The method takes no parameters, so we supply empty brackets ( and ). This line will read text until the newline symbol is read (i.e. until the user hits enter or return on the keyboard). Scanner.nextLine will return the text the user typed as a String that we assign to the String variable str with the assignment operator String str =.
Line 7 prints out the string “Nice to meet you, Chris!” in which Chris is replaced with whatever name the user typed at the prompt. Notice how the string “Nice to meet you,” has the variable str added to the middle by closing the double quotes and employing the string concatenation operator +. This is an example of how we join or concatenate two or more strings together.
Line 8 is the matching closing brace for the main method’s code block. At this point, the object scanner and the String variable str fall out of scope (this means they no longer exist). Programs begin at the start of the main method, and they end at the closing brace of the main method. So this line is really the close of our application. We can also use the return keyword in the body of the main method in order to return from the method, although note that this would also terminate the application. We will look more at the return keyword when we look at defining methods.
Line 9 is the matching closing brace for the MainClass class.
In order to run the program, we can use the Debug or Run buttons. We will see that the program halts after it prints the message “What is your name?”. In order to input a string, click in the Console tab at the prompt. You should see a blinking cursor. Type your name (or any other string) and hit enter. After you hit enter, the scanner object has a line of text to read, and, where we set the value to the str variable, it will return this to the caller. (Figure 19 shows an example interaction with the program in Code Listing 4.0, in which the green text is what I typed at the prompt).

Figure 19: Code Listing 4.0 Output
In this e-book, Java Succinctly Part 1, we will concentrate on the core mechanisms of the Java language, and we will be restricted to this Console for input and output. We can create fully functional graphical user interfaces with Java, and in Java Succinctly Part 2 we will look at how to do this.
Warnings and errors
When we debug or run the program in Code Listing 4.0, we will see that Eclipse gives us a warning. A warning is a potential problem with our code, but one that does not prevent the code from executing. Eclipse can detect two types of problems in our code: warnings (which do not prevent the code from running, but which should probably be fixed) and errors (which are problems that prevent the code from running).
Generally, if we have any warnings in our programs, we should fix them because they can lead to unwanted behavior later if they go unchecked. In the next program, we will see two extra lines of code that are designed to close the scanner and fix the warning that Eclipse is highlighting.

Figure 20: Warning
Figure 20 shows the warning that our code has generated. This warning will only be visible when we attempt to debug or run our program. The warning tells us that the problem is 'scanner' is never closed. It tells us that the problem is in the file MainClass.java, and it occurs on line 4. If we double-click this warning in the Problems panel, Eclipse will take us to line 4 of the MainClass.java file so that we can fix the problem or gain some understanding as to what is causing it. Figure 21 shows an example of an error.

Figure 21: Error
In order to cause this error (Figure 21), I purposely changed line 6 of Code Listing 4.0 to read String str = Scanner.nextLine();. Note the capital S in Scanner. This small change is a mistake, and it means that the program will not compile and run. Looking at the Problems panel, we get a cryptic error message that explains that nextLine is not static, and we are attempting to use it as if it was. Error messages are often very difficult to understand, but a solid foundation in the basics of Java will help you make sense of them. Essentially, this error is saying that we need to use the object scanner rather than the class Scanner if we wish to call the method nextLine(). Otherwise, the program will not compile and run.
Eclipse perspectives
A perspective is a layout of windows and panels in Eclipse. By default, Eclipse is set to the Java perspective (Figure 22). But when we debug our code, or when our program fails to compile due to errors, Eclipse will switch to the Debug perspective (Figure 23). The Debug perspective offers extra panels of information that might help us track down and fix bugs (later we will look at watching variables and stepping through code in the Debug perspective).
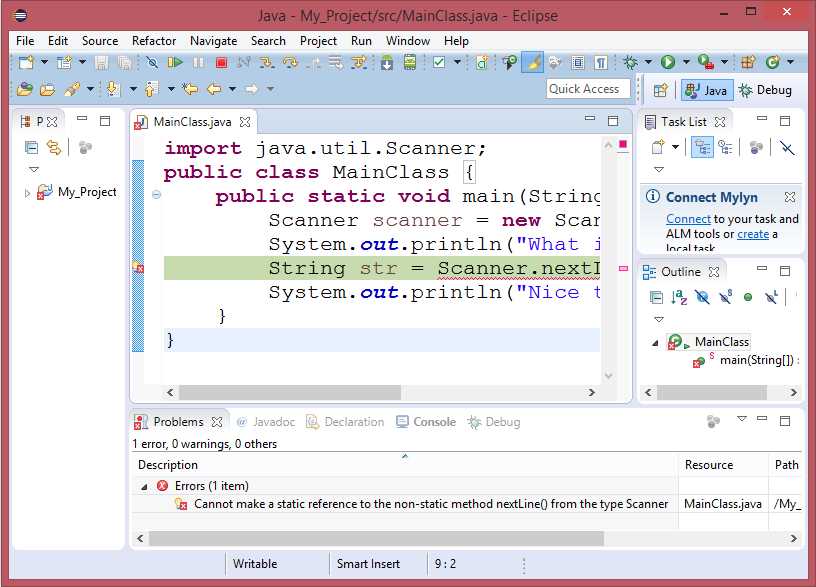
Figure 22: Java Perspective

Figure 23: Debug Perspective
In order to switch between the two perspectives, we use the two perspective buttons in the upper-right corner of Eclipse (marked Java and Debug, as in Figure 24).

Figure 24: Java and Debug Perspective Buttons
When we debug or run our program and Eclipse pauses it, it will take us to the Debug perspective, but our program will not shut down. In order to stop the program (shut it down completely, so that it is no longer running), we need to press the Stop button, which is in the main control panel of both the Java and Debug perspectives (see Figure 25). If we do not stop our applications, they will continue to take up resources in the system.

Figure 25: Stopping a Running Application
Figure 25 shows the Stop button highlighted when Eclipse has paused our application. When you are in the Debug perspective, the Debug panel on the upper-left side of the screen shows all the running instances of our application (in Figure 25, there is only one instance). If you have multiple instances running, you can close each individually by selecting it in the panel, and clicking the Stop button.
Reading multiple values
Our next example code illustrates how Java code is usually executed in order, from top to bottom, one line after the other. Program 3 asks the user for both a name and a password. The program will not proceed past the first occurrence of scanner.nextLine() until the user has input a line of text at the console.
Code Listing 4.1: Reading Multiple Strings
import java.util.Scanner; public class MainClass { public static void main(String[] args) { // Declare all variables. String userName; String userPassword; Scanner scanner = new Scanner(System.in);
// Request the user's name. System.out.print("What is your name? "); userName = scanner.nextLine();
// Request the user's password. System.out.print("Ok, and what is your password? "); userPassword = scanner.nextLine();
// Print out the info we read in a message. System.out.println("Whoa! That was too easy! You're crazy, " + userName + ", you just told a complete stranger " + "that your password is " + userPassword + "!");
// Close the scanner to avoid memory leaks. if(scanner != null) scanner.close(); } } |
Code Listing 4.1 shows some common conventions. First, I have declared all the variables at the beginning of the method (we will look at variable declarations in the next chapter). And, at the end of the method, I have called a method called “close” to ensure my scanner object does not cause any memory leaks (these two lines of code fix the warning we were getting in the first program of this chapter). I have also used an if statement (we will look at method calls and if statements shortly). The program illustrates that we can potentially read as many strings from a scanner as we like and print out prompts between each.
I have used System.out.print in place of println. The print method prints the strings in the same way as println, except that it does not place a new line at the end of the string. Figure 26 shows an example interaction with the program from Code Listing 4.1. Notice how the user input (the green text) is on the same line as the prompt. Had we used println, the green text would be on its own line.

Figure 26: Example Output from Code Listing 4.1 Code blocks and curly braces
The following program is intended as a study in code blocks. Java is one of many languages that inherits from a very old language called C. The languages are collectively called curly brace languages because they use the curly braces { and } to designate blocks or areas of code (these languages are also sometimes also called C-like languages). Each opening brace, {, has a matching closing brace, }, and each pair contains one or more lines of code between, which is called a code block. You can open and close a code block for no reason at all almost anywhere in Java source code, but code blocks are usually a mechanism for joining together several lines of code into a unit for some specific purpose. The specific purposes are generally to define the bodies of loops, methods, and classes.
Code Listing 4.2 shows a program with the code blocks highlighted. This program is much more complicated than the programs we have seen so far. The details of how this program works will become apparent by the time we look at methods in a future chapter. For now, the program is meant to illustrate matching { and } braces and nested code blocks.
Code Listing 4.2: Code Blocks
public class MainClass {
// Method to return lowest prime factor of the integer x. private static int GetLowestFactor(int x) { int sqrt = (int)Math.sqrt(x); if(x % 2 == 0) { return 2; } for(int q = 3; q <= sqrt; q+=2) { if(x % q == 0) { return q; } } return x; }
// Determines if x is prime by seeing if it is equal to // its own lowest factor. private static Boolean IsPrime(int x) { return GetLowestFactor(x) == x; } // This program lists the prime numbers in the range 1 to 1000. public static void main(String[] args) { // Declare local variables. int i = 2, count = 0, countPerLine = 10; // Show a description of the program. System.out.println("Prime numbers from 1 to 1000 are: "); // Loop that finds the primes. while(i <= 1000) { // If i is prime... if(IsPrime(i)) { // Add it to the list... System.out.print(i + ", "); // Increment the count. count++; // If there's countPerLine items on this line, // print a new line. if(count % countPerLine == 0) { System.out.println(); } } // Increment i to the next number. i++; } } } |
If you copy and paste the code from Code Listing 4.2 into Eclipse, you should get a list of the prime numbers between 1 and 1000. In Code Listing 4.2, each pair of matching braces has been highlighted in a different color. Notice that code blocks are nested inside other code blocks. That is—smaller code blocks begin and end within the braces of outer code blocks. The yellow braces surround the body of the MainClass, and the MainClass contains the code blocks for several methods, each of which contains its own code blocks.
Notice also that code blocks can be created for many different mechanisms—classes, loops, If statements, and methods all have associated code blocks depicted in Code Listing 4.2.
We will now take a brief detour into a completely different but very useful aspect of programming—debugging code.
Detour: debugging code
The ability to debug and maintain code is one of the most important attributes a programmer can have. With that in mind, when you first test your program in Eclipse, select the Debug icon, instead of the Run icon.
Printing out values
We often need to know the value of variables while our program runs. The most basic form of discerning the value of a variable is to output this value to the screen. We can use a System.out.println to do this, such as System.out.println("The value of i is " + i);. This is a very primitive method for debugging, but in many circumstances it is all we will need. Generally, it is better to place a breakpoint and a watch on the variable, as described in the following section.
Setting breakpoints
A breakpoint is a position in the code at which we want the program to pause and give us control so that we can examine exactly what is happening in the code. When a program pauses at a breakpoint, we can inspect the values of variables and step through the code—one line at a time. To set a breakpoint, right-click in the margin of the code view in Eclipse. This will bring up a context menu with the option Toggle Breakpoint, as per Figure 27.

Figure 27: Toggle Breakpoint
When a breakpoint is active (i.e. if the program will pause when it reaches the breakpoint), you will see a small breakpoint symbol in the margin of the code window, as illustrated in Figure 28.

Figure 28: Active Breakpoint
When the breakpoint indicator is blue, as in Figure 28, it means the breakpoint is active. You can disable a breakpoint by right-clicking the breakpoint symbol and selecting Disable Breakpoint from the context menu. When a breakpoint is disabled, the circle is white and the program will not pause when it reaches the breakpoint.
Debug perspective in Eclipse
When the program reaches an active breakpoint, it pauses and gives us control. The first time you break in Eclipse, you might get a message box, as shown in Figure 29. Eclipse is designed to offer several extra tools specific to debugging, and it offers to change the view to the Debug perspective. Click the box marked “Remember my decision” and select “Yes” to enter the Debug perspective.
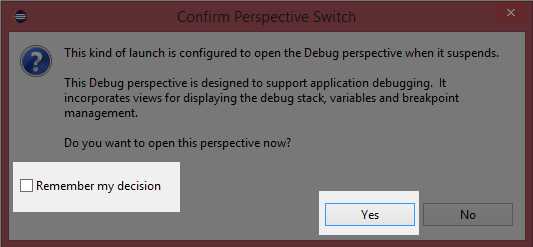
Figure 29: Confirm Perspective Switch
The Debug perspective is illustrated in Figure 30.

Figure 30: Debug Perspective
Notice the line highlighted in green in Figure 30. This is the line that the program is ready to execute. At the top of the Eclipse screen, you will see a green Play button, a Pause button, and a Stop button. In order to stop the program from executing, click Stop. In order to resume normal execution (i.e. to begin executing again until the program finds the next breakpoint), click Play. And, if your program is executing already and has not hit a breakpoint, you can pause it without adding a breakpoint by using the Pause button (see Figure 31). Depending on the circumstance, some or all of these buttons may be greyed out (for instance, if the program is already paused at a breakpoint, the Pause button is not available).

Figure 31: Play, Pause, and Stop Buttons
Tip: You can skip all breakpoints by clicking the button to the left of the Play button in Figure 29. This is handy when you have set a lot of breakpoints in order to examine the exact flow of the program, but you want to test the overall functionality without permanently disabling the breakpoints.
You can switch between the Java and Debugging perspective by clicking the buttons in the top-right corner of Eclipse, as illustrated in Figure 32.
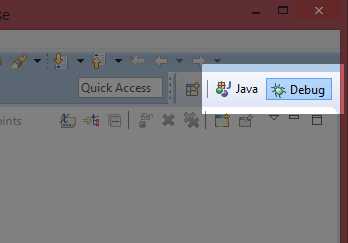
Figure 32: Changing the Perspective of Eclipse
Stepping Over and Into code
Stepping through code can be done in two ways:
- Step Over
- Step Into
When the program is paused, we can look very closely at exactly what is happening to all the variables while it executes one line at a time. We do this by employing the Step Over and Step Into buttons (see Figure 33). You will find these buttons at the top of Eclipse when the program is paused.

Figure 33: Step Over and Step Into Buttons
Step Over means the program will execute the current line of code, then pause again. It will not jump into method calls. Instead, it will execute the method as a single step. Step Into means the program will execute the next line, but if the line is a method call, it will jump to the body of the method and pause. The shortcut key for Stepping Into is F5, and the shortcut for Stepping Over is F6.
Watching variables
As we Step Over and Step Into our code, we can view exactly which values our variables contain by looking in the Variables tab, as in Figure 34.

Figure 34: Variables Tab
When the application is paused, the Variables tab shows all the variables that are presently in scope. The variables highlighted in yellow have changed during the last Step Over or Step Into.
This has been a very brief tour of some of Eclipse’s debugging tools. They can greatly help us track down problems in our code, but they can also be used to teach us how Java works. Later, when we look at control structures, I strongly recommend that you set breakpoints in the programs and step through the code, watching the way the program branches and executes loops. There is no better indication as to how Java works than looking at it one line at a time.
Challenges
Challenge 4.0: Change the program in Code Listing 4.0 to ask for the user's age instead of name.
Challenge 4.1: Change the program in Code Listing 4.1. Make it ask for a third string called website, which is the user's website used with the username and password. Ask the user to input the website after the user name and password are read.
Challenge 4.2: Code Listing 4.2 prints primes from 1 to 1000, at 10 per line. Without knowing the details of how this program works, can you change the program to print out the primes, from 1 to 50, and print two primes on a line instead of 10?
Challenge Answers
Challenge 4.0
Code Listing 4.3: Challenge 4.0
import java.util.Scanner; public class MainClass { public static void main(String[] args) { Scanner scanner = new Scanner(System.in); System.out.println("What is your age?"); String age = scanner.nextLine(); System.out.println("You are " + age + " years old!"); } } |
Challenge 4.1
Code Listing 4.4: Challenge 4.1
import java.util.Scanner; public class MainClass { public static void main(String[] args) { // Declare all variables. String userName; String userPassword; String website; Scanner scanner = new Scanner(System.in); // Request the user's name. System.out.print("What is your name? "); userName = scanner.nextLine(); // Request the user's password. System.out.print("Ok, and what is your password? "); userPassword = scanner.nextLine(); System.out.print("And what website is this the password for? "); website = scanner.nextLine(); // Print out a message: System.out.println("Ok, gotta go. I have to quickly check " + website + "."); // Close the scanner to avoid memory leaks. if(scanner != null) scanner.close(); } } |
Challenge 4.2
I have only included the relevant sections in the listing here, and I have highlighted the changes we need to make in yellow.
Code Listing 4.5: Challenge 4.2
int i = 2, count = 0, countPerLine = 2; // Show a description of the program. System.out.println("Prime numbers from 1 to 50 are as follows: "); // Loop that finds the primes while(i <= 50) { // If i is prime... if(IsPrime(i)) { |
- 1800+ high-performance UI components.
- Includes popular controls such as Grid, Chart, Scheduler, and more.
- 24x5 unlimited support by developers.