
Istio Succinctly®

CHAPTER 5
Traffic Management: Part 1
Traffic management is a core capability of any service mesh. To fully understand the traffic management capabilities of Istio, we need to understand the life cycle of a request in an Istio-enabled cluster. Istio supports many networking APIs that enable you to control deployment propagation (canary deployment), set timeouts and retries, and test your application by deliberately injecting controlled faults. The networking APIs are also used to control the flow of traffic in and out of the service mesh.
Life of a network packet
Envoy and Pilot are the key components of Istio that enable service discovery and decide the direction of traffic between hosts. Envoy intercepts all traffic inside the service mesh at runtime using iptables rules or a Berkeley Packet Filter (BPF) program, which is a small, stateless, in-kernel program that provides user-level network packet capture. Whenever a network packet is received, the BPF program is executed to determine whether the packet should reach a user-space process (a memory area where applications and drivers execute). Envoy uses request attributes such as hostname, Server Name Indication (SNI), or a virtual IP address to determine the service to which the client wants to send the request (target service). Envoy then uses the target service routing rules to determine the actual service to which it sends the request (destination service). Then it applies destination routing rules, such as the load-balancer strategy, to pick an endpoint for the pod. Finally, Envoy sends traffic to the selected destination service endpoint.
Note: Allowing the application to communicate with a sidecar without TLS encryption gives you the ability to use L7 policies (such as routing traffic based on user-agent, such as browsers and devices) since Istio can collect L7 metadata about requests. Otherwise, you will be limited to L4 policies that work on the contents of the IP packet, the source and destination address, and the port number.
Pilot understands the topology of the mesh and the networking configurations supplied by the cluster administrator, which helps it build service proxies. Pilot stores the knowledge of the endpoints of all the services in the cluster in its registry. Pilot pushes this information to the Envoy proxy, and Envoy only understands the hostnames made available to it by Pilot. Envoy can only direct traffic to an endpoint inside the mesh by resolving the IP address of the service itself from the hostname (remember, it has access to the service registry), but it can be configured to forward traffic to a service outside the cluster only if the IP address of the target is specified.
Istio also supports client-side load balancing using the various configurable algorithms: round-robin, random, and least connection. Client-side load balancing removes the need to use a reverse proxy load balancer, and thus removes the need for an additional network hop by request.
Let’s go through the life cycle of a single data packet across the mesh, which will help us understand the interactions between the various services in the mesh. The following diagram illustrates the path of a single packet across the mesh.
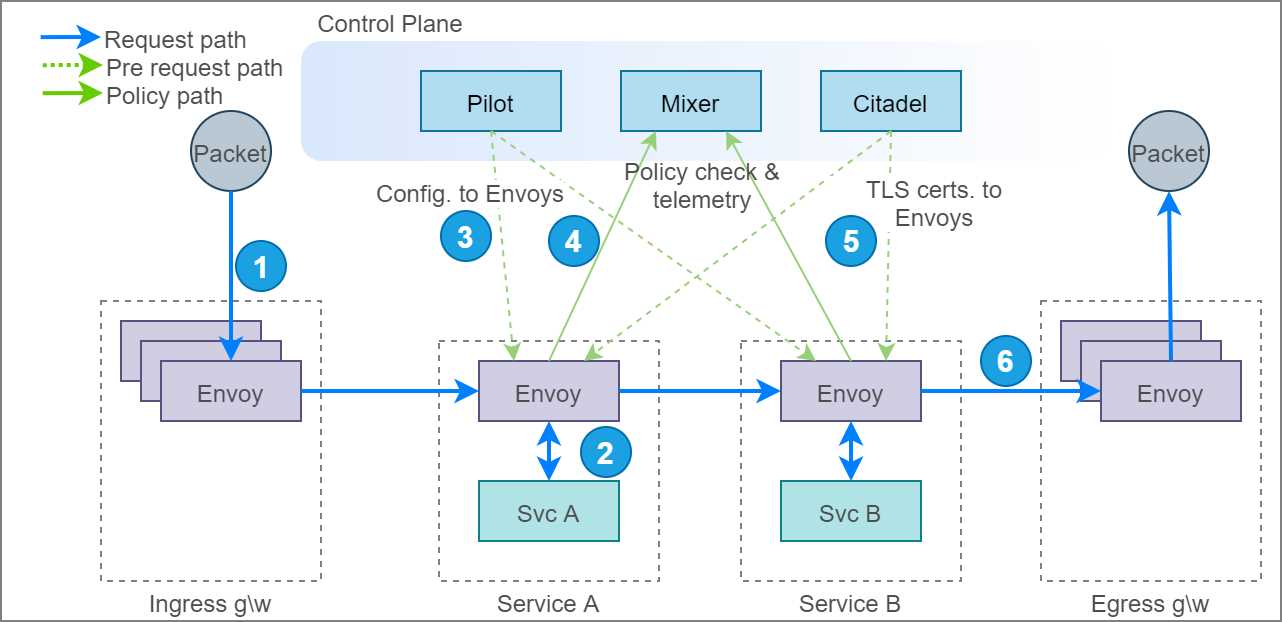
Figure 12: Life cycle of a packet across service mesh
The following steps illustrate the life cycle of a request that originates outside the cluster and moves through services A and B before leaving the mesh.
- The request meets the ingress gateway, which is a pool of Envoy proxies, which resolves the destination of the packet by making decisions on layer 7 attributes of the request, such as host and path. The ingress directs the packet to another Envoy proxy that is responsible for intercepting requests for the service that should receive the request.
- The Envoy proxy forwards the request to service A and receives the response. You can configure resilience policies such as timeouts and retries in the proxy so that requests don’t fail immediately. Let’s assume that the request succeeded; service A now wants to send a request to service B. We now have a challenging problem of resolving IP addresses of pods that are running service B.
- Kubernetes exposes an API endpoint called endpoints that returns a list of endpoints of a service when you provide the name of a service as input. To reduce latency in service discovery, Pilot prefetches the service endpoints and sends them to Envoy instances so that the information necessary to discover services is available locally to them. Going back to our example, Envoy now has several endpoints of service B for forwarding the request.
Note: You can see the in-cluster addresses of the endpoints of the fruits-api service that is available to Envoy by executing this command: kubectl get endpoints/fruits-api-service -n micro-shake-factory. This is the same data that Pilot receives from the Kubernetes endpoint API. Envoy performs client-side load balancing to route traffic to one of the endpoints.
- Before forwarding the request to an Envoy instance running service B, the Envoy instance on service A asynchronously sends the request details to the Mixer that maintains policies such as rate limits and whitelists. Mixer determines whether the request may reach service B and sends the appropriate response back to Envoy. Executing the policy on every request is not optimal; therefore, Mixer also sends a cache key that Envoy can use to persist the response that it received from Mixer. The cache stays valid for a fixed number of requests or a duration. For subsequent requests, Envoy queries the cache until it becomes invalid before forwarding the request again to Mixer. Another role of Mixer is to aggregate logs, metrics, and traces, which happens asynchronously with Envoy.
- The final step before forwarding the request is to apply the right certificate on the request so that the request travels through a secure channel using mutual TLS authentication (mTLS). Citadel is responsible for supplying and rotating service certificates to Envoy that remain valid for a short duration. With the certificates in place, the request is securely transmitted to Envoy's instance of service B.
- Finally, the request packet reaches the egress gateway, which is essentially the gateway for the services on the mesh to the internet, and it can apply policies such as whitelist and rate limits on the request. The egress gateway accesses the policies from the same set of control plane components as other Envoy instances.
- The missing bit in this diagram is a component named Galley, which we discussed in Chapter 1. Galley will be the only component that interacts natively with the underlying platform and supply necessary configurations to Pilot and Mixer.
Now that you understand the interactions between the components of Istio, let’s dig deep into the Networking APIs of Istio that help you bring traffic management into effect in your service mesh.
Networking API
All of Istio’s networking APIs use hostnames resolved by DNS instead of IP addresses to discover services. IP addresses are ephemeral, and can also follow different formats (v4 or v6), depending on the environment. The hostname-centric model is similar to what Kubernetes services use to discover and route traffic to pods. Overall, Istio has six networking APIs that pack all the features you need for shifting networking concerns of applications to the platform:
- ServiceEntry: Adds additional entries to the service registry, such as virtual machines outside the cluster, or services outside the mesh that require communicating with the services in the mesh.
- DestinationRule: Defines policies such as load balancing and connection pool size that get applied after routing has taken effect.
- VirtualService: Defines routing rules that control the behavior of traffic routing to services.
- Gateway: Used to configure L4–L6 policies in the form of the load balancer for HTTP/TCP traffic at the edge of the mesh.
- EnvoyFilter: Describes a filter for Envoy that can be used to customize the proxy configuration generated by Pilot. This is a very potent filter that can alter the internal working of Istio, and a wrong implementation can cripple the entire cluster. You will hardly find scenarios that require manipulating Envoy filters, and therefore, it is outside the scope of this book.
- Sidecar: Describes configuration of the sidecar proxy (remember, Envoy is just an implementation of sidecar). By default, Istio allows all traffic to a workload to go through a proxy and the proxy to reach all instances in the mesh. You can use this resource to restrict access of the proxy to a set of services and to restrict the proxy to accept and forward traffic received on a set of ports and protocols. The sidecar networking API is outside the scope of this book.
Let’s briefly discuss how the various APIs work together to logically drive a request to its target. Assume that a client wants to access version 1 of service A by sending a request to hostname foo.com. The following diagram presents the logical path that the request takes to reach the destination service both from outside the cluster and inside the cluster.
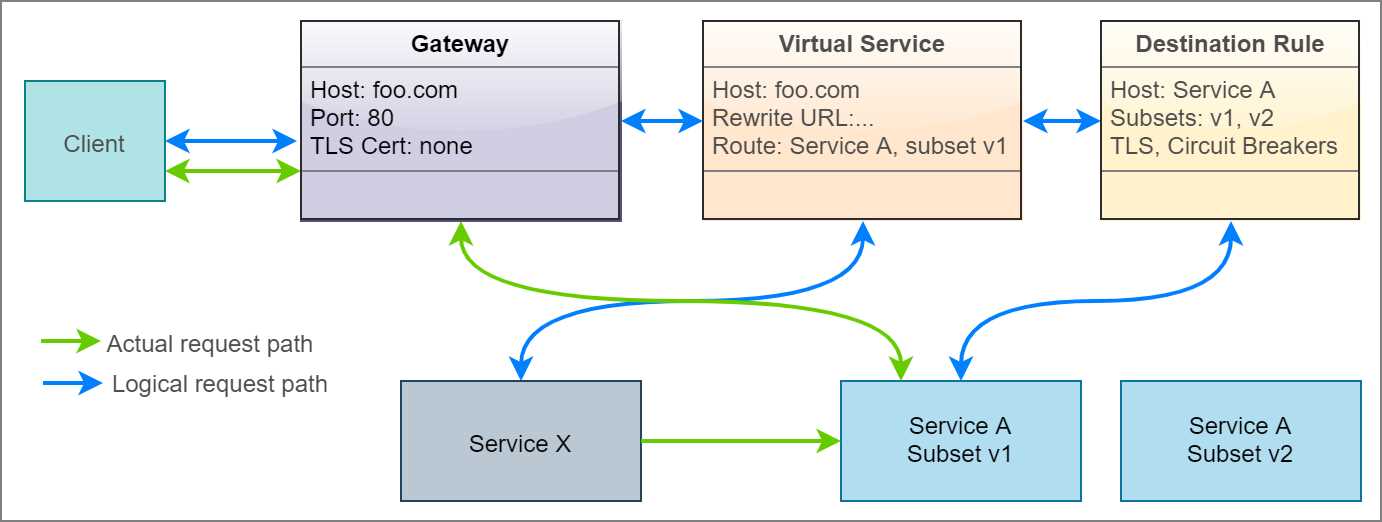
Figure 13: Actual and logical flow of request
The requests originating outside the cluster first meet the ingress gateway, which is configured to only accept HTTP requests to hostname foo.com on port 80. A virtual service is bound to the gateway so that it receives any request received by the gateway. For services that communicate within the mesh, the gateway component is absent, and therefore, the request is received directly by the virtual service, which then rewrites the input URL of the service to the URL of service A within the cluster (for example, foo.com to serviceA.svc.default.cluster.local). A destination rule defines the subsets of service A, (for example, version 1 and version 2), and the virtual service directs the requests to one of the subsets based on match conditions that you can specify on layer 7 request attributes.
Remember that the gateway, virtual service, and destination rule are just programming constructs that execute within the Envoy proxy, and therefore, physically, the request only travels from the ingress gateway Envoy instance to the destination service Envoy instance, from where it reaches the destination service.
Service entry
Using service entry, you can add or remove a service listing from the service registry of Istio. Once defined, the service names become well known to Istio, and they can then be mapped to other Istio configurations. By default, Istio allows services to send requests to hostnames that are not present in the service registry. To reduce the attack surface area of the application, this setting should be inverted, and only legitimate services outside the cluster should be whitelisted by creating service entries for them.
Tip: The istioctl utility has several useful commands that can help verify a policy before you end up applying it. The command istioctl validate -f filename can verify the syntax of the specification. The command istioctl verify-install -f filename can verify whether the resources specified in the specification are in a ready state.
The following are the keys of the service entry object in YAML format.
Code Listing 26: Service entry specification
apiVersion: networking.istio.io/v1alpha3 kind: ServiceEntry spec: hosts: addresses: ports: - number: name: protocol: resolution: STATIC | DNS | NONE location: MESH_INTERNAL | MESH_EXTERNAL endpoints: - address: locality: labels: app: version: ports: <portname>: <portnumber> exportTo: subjectAltNames: |
Creating a service entry does not create a DNS record in Kubernetes, so you won’t be able to perform a DNS lookup from the application to fetch the resolved IP address. A core DNS Istio plugin can generate DNS records from service entry records, which enables Istio to populate DNS records outside Istio. Let’s go through the various keys in the service entry definition and the values that they support.
- hosts*: string[]
DNS name with wildcard prefix, such as *.foo.com. For HTTP traffic, the HTTP host/Authority header will be matched against the specified value. For HTTPS/TLS traffic, the SNI value will be compared against the specified value. If resolution is set to DNS and endpoints are empty, the specified value will be used as a DNS name to which traffic is sent.
- ports*: port[]
Ports associated with the external service. Every port specification requires a name, port number, and protocol name.
- addresses: string[]
The virtual IP address of the service whose name is specified in the hosts field to enable services in the mesh to send requests to an IP address. The value can also be in the CIDR format (IP address/decimal number). The destination of the request is identified by matching the IP address to one of the IP addresses or CIDR range; otherwise, the request is mapped by using the port specified in the request. In this case, no other service in the mesh should be using the same port.
- location: location
- MESH_INTERNAL: Indicates that a service is part of the mesh. It is used for services inside the cluster but not part of the mesh, such as virtual machines and databases.
- MESH_EXTERNAL: Indicates that a service is external to the mesh. It is used for external services that are consumed through APIs. Istio will not use mTLS to communicate with the service.
- resolution*: resolution
The value determines how the proxy will resolve the IP address of the network endpoint of the destination service, so that it can route the request to the service.
- NONE: Assumes that the destination IP address has already been resolved. This doesn’t trigger lookup, and the connection will be forwarded to the target.
- DNS: The proxy will attempt to discover the IP address using the host DNS (in the case of Kubernetes, CoreDNS). If no endpoints are specified and no wildcards are used in hosts, proxy will use the values in the host's field to look up the DNS. If endpoints are specified, the address specified will be used for the DNS lookup.
- STATIC: The proxy will use the static IP address specified in the endpoints/address field.
- endpoints: endpoint[]
An endpoint defines an IP address or a hostname associated with the service. It consists of the following fields:
- address*: IP address without the port or a hostname, which can be specified if the resolution is set to DNS. It also supports Unix domain socket endpoints.
- ports: Denotes a set of ports associated with an endpoint in the format map<string,uint32>, where the key is the name of the port, and the value is the number of the port.
- labels: Denotes labels associated with the endpoint in the form of map<string, string>, where the key is the name of the label, and the value is the value of the label.
- network: Instructs Istio to group endpoints in the same network as specified in the string value of this field. All endpoints in the same network can communicate with each other.
- locality: A string value that denotes the fault domain that the endpoint belongs to. In general, endpoints sharing the same fault domain share the same physical rack in a data center. Sidecar proxies prefer the endpoints that are in the same fault domain as them, as it guarantees the least latency.
- weight: Denotes the load balancer weightage for the endpoint. The endpoint with higher weightage receives more traffic.
- exportTo: string[]
This field contains the names of namespaces in which the sidecars, gateways, and virtual services can use this service. It is a mechanism for cluster administrators to restrict the visibility of services across network boundaries. Currently, this field only supports . and * as values to denote the current namespace and all namespaces.
- subjectAltNames: string[]
This is a security feature that helps Envoy verify whether the server certificate’s subject alternate name matches one of the names specified as a value of this field.
Service entries are not only useful for making external services visible to the mesh; they are also useful for making services that are not part of the mesh visible to it.
Tip: DNS resolution capability in Istio is provided by the host platform. In Kubernetes, the kube-dns service (which uses CoreDNS) is responsible for resolving the fully qualified domain name (FQDN). You can test DNS resolution by installing BusyBox (a small utility that gives you a shell) in your cluster and then resolving the name of an external service and an internal service as follows.
$ kubectl apply -f https://k8s.io/examples/admin/dns/busybox.yaml
$ kubectl exec -ti busybox -- nslookup kubernetes.io
$ kubectl exec -ti busybox -- nslookup fruits-api-service.micro-shake-factory.svc.cluster.local
Let’s investigate the specifications for some common service entry scenarios. Note that the following listings contain only the value of the spec key for brevity.
- Assign a hostname to an IP address so that services in the mesh can use a hostname to communicate with an external resource. The following specification assigns hostname- host.domain.com to IP address 1.2.3.4.
Code Listing 27: Specification to assign a hostname to an IP address
spec: hosts: - host.domain.com ports: - number: 80 name: http protocol: http resolution: STATIC endpoints: - address: 1.2.3.4 |
- Translate one hostname or IP address (a virtual IP address or VIP) to another name so that the target hostname is abstracted from the workload on the mesh. The following specification forwards requests to either hostname service1.micro-shake-factory.com or IP address 1.2.3.4 to service2.com.
Code Listing 28: Specification to forward request to an IP address or hostname
spec: hosts: - service1.micro-shake-factory.com addresses: - 1.2.3.4 location: MESH_EXTERNAL ports: - number: 443 name: https protocol: HTTP resolution: DNS endpoints: - address: service2.com |
- Make a service on the Kubernetes cluster addressable by Istio. This helps services on the mesh communicate with other services in the cluster in the same manner as they communicate with other services on the mesh. The following specification will configure Istio to forward any requests to hostname service2 to reach service1 on the Kubernetes cluster.
Code Listing 29: Specification to make non-Isito service addressable
# Kubernetes spec for creating a service and its endpoint apiVersion: v1 kind: Service metadata: name: service1 spec: selector: app: MyApp ports: - protocol: TCP port: 80 --- apiVersion: v1 kind: Endpoints metadata: name: service1 subsets: - addresses: - ip: 1.2.3.4 ports: - port: 80 --- # Partial Istio spec for making service1 accessible to services on mesh spec: hosts: - service2 ports: - number: 80 name: http protocol: HTTP resolution: STATIC endpoints: - address: 1.2.3.4 |
Our juice-shop API service communicates with an external service to fetch exotic fruits for buyers. In the sample, the external service is modeled as a raw JSON document hosted on GitHub (at a raw.githubusercontent.com endpoint). The following specification creates a service entry that enables our service to communicate with the external service.
Code Listing 30: Service entry specification
apiVersion: networking.istio.io/v1alpha3 kind: ServiceEntry metadata: name: exotic-fruits-service-entry namespace: micro-shake-factory spec: hosts: - raw.githubusercontent.com location: MESH_EXTERNAL ports: - number: 443 name: https protocol: TLS resolution: DNS |
For this demo, we will first find out what happens when the juice-shop API service tries to invoke an external API that the service registry cannot resolve.
Tip: To fetch service entry configurations available in your mesh, execute the following command: kubectl get serviceentry.
To start afresh, delete the namespace micro-shake-factory and deploy the juice-shop API service and a gateway to expose it. Remember to substitute the & operator with the && operator in the following command if you are using the Bash terminal.
Code Listing 31: Apply new specification
$ kubectl delete namespace micro-shake-factory & kubectl apply -f juice-shop-api.yml & kubectl apply -f juice-shop-api-vs-gw.yml namespace/micro-shake-factory deleted namespace/micro-shake-factory created deployment.apps/juice-shop-api-deployment created service/juice-shop-api-service created gateway.networking.istio.io/juice-shop-api-gateway created virtualservice.networking.istio.io/juice-shop-api-vservice created |
Before we can proceed with checking the response of the service, we must invert the generous traffic passthrough policy by updating the ConfigMap of Istio named istio. The various keys of this ConfigMap act as the switches that control the behavior of Istio.
Tip: If you ever forget to turn on a setting while deploying Istio, you can edit the ConfigMap file and turn it on later.
Let’s retrieve this configmap object in YAML format by executing the following command.
Code Listing 32: Get Istio configmap
$ kubectl get configmap istio -n istio-system -o yaml |
Copy the object in the result and locate the setting key named outboundTrafficPolicy, whose mode property is currently set to ALLOW_ANY to allow unbound access to external services. For a tightly regulated cluster, you might not want to allow services to have uncontrolled access to the internet. To alter this behavior, replace the value with REGISTRY_ONLY and save and apply this file back to the cluster. You can execute the following command in PowerShell Core or use the sed command in Bash.
Code Listing 33: Configure configmap
$ kubectl get configmap istio -n istio-system -o yaml | Foreach {$_ -replace "mode: ALLOW_ANY", "mode: REGISTRY_ONLY"} | kubectl apply -f - configmap/istio configured |
The previous command will update the mode property and apply the resulting configuration to the cluster.
Note: To enable the test scripts to work across platforms, we have used PowerShell Core, which is a cross-platform shell built on the .NET Core runtime. The home page and installation instructions for PowerShell Core are available here.
Let’s now try issuing a request to the exoticFruits endpoint to fetch some fruits.
Code Listing 34: Invoke exoticFruits endpoint
curl http://localhost/api/juice-shop/exoticFruits -H "Host: juice-shop.istio-succinctly.io" {"code":"Internal","message":"Error: FetchError: request to https://raw.githubusercontent.com/Istio-Succinctly/ExoticFruits/master/fruits.json failed, reason: Client network socket disconnected before secure TLS connection was established"} |
The result of the previous command indicates that the egress gateway is terminating requests before they leave the mesh. Let’s create a service entry object that adds the external service to the registry.
Code Listing 35: Create service entry
$ kubectl apply -f exotic-fruits-se.yml serviceentry.networking.istio.io/exotic-fruits-service-entry created |
Let’s issue another HTTP request to the exoticFruits endpoint.
Code Listing 36: Invoke exoticFruits endpoint
$ curl http://localhost/api/juice-shop/exoticFruits -H "Host: juice-shop.istio-succinctly.io" {"fruits":["Chom Chom","Mangosteen","Longan","Persimmon","Sapodilla"]} |
The endpoint now works as expected. While we are on the topic of service-to-service communication, let’s also discuss how services within the mesh communicate with each other. Services inside the mesh already have their DNS records present in the registry, and therefore, they can be easily addressed using their hostnames within the cluster. Also, service-to-service communication does not require gateway instances, which are only used to expose a service to the internet. Let’s deploy the fruits API service without a gateway by executing the following command.
Code Listing 37: Apply updated specification
$ kubectl apply -f fruits-api.yml & kubectl apply -f fruits-api-vs.yml namespace/micro-shake-factory unchanged deployment.apps/fruits-api-deployment-v1 created service/fruits-api-service created virtualservice.networking.istio.io/fruits-api-vservice created |
If you explore the specification present in the juice-shop-api.yml document, you see that we have set the value of environment variable FRUITS_API as http://fruits-api-service. The juice-shop API is programmed to treat this value as the hostname of the fruits API service. Let’s invoke the blender endpoint of the juice-shop API to make it fetch prices of fruits from the fruits API and return the name and price of the juice requested.
Code Listing 38: Invoke blender endpoint
$ curl -H "Host: juice-shop.istio-succinctly.io" -H "Content-Type: application/json" -H "country: au" -d "{\"fruits\":[\"kiwi\",\"mandarin\"]}" http://localhost/api/juice-shop/blender {"juice":"kiwi-mandarin juice","price":4.9} |
You can see that service entry records do not alter the behavior of services in the mesh. Even with Istio’s default traffic policy in place, you can use service entry in conjunction with virtual service to force external traffic through an egress gateway. However, there are limited use cases of such implementations.
Destination rule
The destination rules determine how the destination services are invoked by the services on the mesh. The destination rules are applied to the connection after the route of the request has been determined by the proxy. The rules allow cluster operators to configure the following features:
- Load balancing strategy such as round robin and least connection.
- Ability to select a subset of services based on a condition, typically the version.
- Network-level and application-level connection pool settings to control connections that can be established with the destination service.
- SSL/TLS settings for the server.
- Outlier detection to remove unhealthy instances from the load balancer pool.
Since there are several independent features that are implemented by the destination rule, we will discuss the keys and supported values of the destination rule object in context of the feature under discussion. Overall, the destination rule specification uses the following scheme.
Code Listing 39: Destination rule specification
apiVersion: networking.istio.io/v1alpha3 kind: DestinationRule metadata: name: name-of-destination-rule spec: host: host.namespace.svc.cluster.local trafficPolicy: subsets: exportTo: |
The following are the values that each of the keys in the previous listing support:
- host*: string
FQDN of the service in the service registry. Applies to both HTTP and TCP services. Service names are looked up in the Kubernetes service registry and in hosts declared in service entry.
- trafficPolicy: TrafficPolicy
One or more of the traffic policies to apply: Load balancing, connection pool size, and outlier detection.
- subsets: Subset[]
One or more named sets that represent different versions of the service. Setting here has a higher priority than those in trafficPolicy.
- exportTo: string[]
List of namespaces to which the policies are visible. Currently, only . and * are supported to denote current namespace and all namespaces.
In the following discussion, you will see only partial specifications (for brevity) that are values of the key spec in the structure shown previously.
As you can see in the previous code listing, the destination rule is composed of two families of settings or keys: trafficPolicy and subset. Let’s begin by exploring the traffic policy setting.
The traffic policy setting can be applied to all ports of the destination service or can be scoped to a specific port of the service. The following listing outlines the keys to the traffic policy setting. Since the same setting is scoped to two different levels, you will find that you can use the same policies at two scope levels.
Code Listing 40: Traffic policy specification
trafficPolicy: connectionPool: loadBalancer: outlierDetection: tls:
portLevelSettings: - port: number: name: loadBalancer: connectionPool: outlierDetection: tls: |
We will discuss the individual policies scoped to both a destination and a port in detail in the next section. Here, I would like to draw your attention to the portLevelSettings element. You can specify the port on which the policy should be applied by setting either the port number by specifying a value for the key number, or by specifying the name of the port in the format <protocol name>-<DNS label>, for example, http-message with the port number. If you don’t specify port-level settings, the traffic policy settings are applied to all the ports of the host. Port-level settings have higher precedence than host-level settings.
With the policy specificity out of the way, let’s continue our discussion of the various traffic policy settings. Just remember that you can apply any of the following policies at the scope that you desire.
Connection pool settings
The connection pool settings help you control the velocity of data transmitted to the destination service by limiting the number of concurrent HTTP or TCP connections that can be maintained with the host. For protocols that use HTTP (HTTP1.1, HTTP2, and gRPC), this setting allows you to limit the number of outstanding requests to the destination and limit the number of retries of each request to an overwhelmed service. The connection pool settings are further classified as the following:
- TCP settings: TCP is the underlying protocol for HTTP, and therefore, these settings are common to both HTTP and TCP server connections.
- HTTP settings: These settings apply to HTTP1.1/2 and gRPC server connections.
The following listing outlines the keys of TCP settings of the connection pool policy in YAML format.
Code Listing 41: TCP settings specification
host: trafficPolicy: connectionPool: tcp: maxConnections: connectTimeout: tcpKeepalive: time: interval: |
The following list explains the supported values for each key in the previous structure:
- maxConnections: int32
The maximum number of connections allowed to a destination host. The default number is 1,024.
- connectTimeout: protobuf.Duration
The TCP connection timeout.
- tcpKeepalive: tcpKeepalive
The SO_KEEPALIVE socket option is used to enable a heartbeat, which keeps the socket open by sending keep-alive packets at regular intervals over the socket connection. This key consists of the following fields:
- probes: int32: The number of unacknowledged SO_KEEPALIVE probes that cause the connection to terminate. The default value is 9 in Linux.
- time: protobuf.Duration: The duration at which if the connection is idle, keep-alive probes will be sent. The default value is 2 (hours).
- interval: protobuf.Duration: The time duration between KEEPALIVE probes. The default value is 75 seconds.
Next, we will discuss the keys in the HTTP settings of the connection pool policy.
Note: Duration in protobuf is expressed in seconds and nanoseconds (10-9 seconds). The value of seconds must be from -315,576,000,000 to +315,576,000,000 inclusive. The value of nanoseconds must be from -999,999,999 to +999,999,999 inclusive. The format of values understood by Istio is 1h/1m/1s/1ms.
The following listing outlines the keys of HTTP settings of the connection pool policy in YAML format.
Code Listing 42: HTTP settings specification
host: trafficPolicy: connectionPool: http: http1MaxPendingRequests: http2MaxRequests: maxRequestsPerConnection: maxRetries: idleTimeout: h2UpgradePolicy: |
The following section describes the values that the keys presented in Code Listing 42 support:
- http1MaxPendingRequests: int32
The maximum number of pending HTTP requests to destination. The default value is 1,024.
- http2MaxRequests: int32
The maximum number of HTTP requests that can be made to the server. The default value is 1,024.
- maxRequestsPerConnection: int32
The maximum number of requests that can be sent on a single connection. Setting it to 1 disables the SO_KEEPALIVE setting.
- maxRetries: int32
The maximum number of retries that can be outstanding for this host across all the connections. The default value is 1,024.
- idleTimeout: protobuf.Duration
The duration, after which an inactive connection will be closed. If not set, the connection will be closed after sending each request.
- h2UpgradePolicy: H2UpgradePolicy
It supports one of these values: DEFAULT, DO_NOT_UPGRADE, or UPGRADE. The connection will be updated to HTTP/2 based on the specified policy.
Let us now discuss another family of settings in the TLS settings destination rule.
TLS settings
These settings enforce how a sidecar should secure a connection with the destination endpoint on any channel (HTTP or TCP). The following is an extract of this setting that shows the various keys in it.
Code Listing 43: TLS settings specification
host: trafficPolicy: tls: mode: MUTUAL | SIMPLE | ISTIO_MUTUAL | DISABLE clientCertificate: privateKey: caCertificates: subjectAltNames: sni: |
There are four security modes that this setting supports. This is a required value in the specification.
- DISABLE: Disable TLS for TCP/HTTP connections.
- SIMPLE: Establish a TLS (also known as SSL) connection to the destination endpoint.
- MUTUAL: Establish a secure connection to the destination endpoint using mutual TLS (mTLS).
- ISTIO_MUTUAL: Just like the MUTUAL mode, this mode uses mTLS to establish a secure connection with the host. However, unlike the MUTUAL mode, this mode uses certificates generated by Istio for authentication.
Here is the gist of how these protocols function, which will bring out the differences between TLS and mTLS:
- TLS: The client requests a valid certificate issued by a trusted certificate authority (CA), which is trusted by the client and server, from the server. The client matches the DNS name on the certificate with the DNS name of the server, among other properties. Next, the client encrypts the data with the public key of the certificate, which the server can subsequently decrypt with its private key.
- mTLS: This is commonly used for server-to-server communication. The servers first exchange certificates issued by a mutually trusted CA with each other to prove their identity. Subsequently, servers can securely communicate with each other using the certificates.
Let’s now go through the supported values of the remaining keys in the specification:
- clientCertificate*: string
This is required only if the mode is MUTUAL. The value is the path to the client-side TLS certificate to use for communication.
- privateKey*: string
This is required only if the mode is MUTUAL. The value is the path to the private key of the client, which will be used to decrypt data.
- caCertificates: string
Used to specify the path to the file containing CA certificates if you wish to verify whether the presented certificate is issued by a trusted CA.
- subjectAltNames: string[]
A list of alternate names that the proxy will use to match against the subject identity of the certificate of the destination service.
- sni: string
Server Name Indication (SNI) is an enabler for servers to host multiple TLS certificates for multiple sites under a single IP address. In this mechanism, the client needs to specify the hostname that it wants to connect to, and the server responds with a certificate that the client can use to connect with just that resource over the shared IP address. This setting is used to supply the desired hostname to the proxy.
Let’s now discuss the versatile load balancing features that you can configure through destination rules.
Load balancer settings
Client-side load balancing is a crucial feature that you can configure through destination rules. By enabling clients to implement load balancing, we can eliminate the need for an external load balancer and enable clients to select the backend to send a request based on factors such as error rate (outlier detection).
Load balancing policies support two types of load-balancing strategies:
- Simple: This policy is used to specify a built-in load balancing algorithm, such as round robin, that will be applied to the destination service.
- Consistent hash: This is an HTTP-only Envoy configuration that provides session affinity based on attributes such as HTTP headers and cookies. This enables you to implement a custom load-balancing strategy strongly tied to your needs.
Note: The consistent hashing strategy uses the Ketama hashing algorithm that models hashed addresses of servers or a hashed key as points on a ring. One or more points on the computed ring maps to a server. Adding or removing servers from the ring affects only a small number of hashes, and therefore, all the hashes won’t need to be recomputed with each operation.
The following listing shows the keys of the simple load balancing setting.
Code Listing 44: Simple load balancing specification
spec: host: trafficPolicy: loadBalancer: simple: |
The simple load balancing has just one value to configure: simple.
- simple: SimpleLB
A single value out of ROUND_ROBIN, LEAST_CONN, RANDOM, and PASSTHROUGH that signifies the algorithm to use to select a destination service endpoint for a routing request. ROUND_ROBIN is the default algorithm. LEAST_CONN selects one of the healthy hosts with the least requests and routs traffic to it. RANDOM sends traffic to a random endpoint, and it performs better than ROUND_ROBIN if no health-check policy is configured. PASSTHROUGH forwards requests to a destination IP address to the destination without executing any load balancing algorithm.
The second category of load balancing strategy is consistent hashing. The following listing presents the keys that are used to configure this setting.
Code Listing 45: Consistent hashing specification
spec: host: trafficPolicy: loadBalancer: consistentHash: httpHeaderName: useSourceIp: httpCookie: name: path: ttl: minimumRingSize: |
Let’s discuss the values that each of the keys in the previous listing supports:
- httpHeaderName: string
As you know, the Ketama hashing algorithm requires a key to generate a hashed value. In this case, the hashed value of the header that you specify will be considered for selecting the destination service endpoint. You can select only one of httpHeaderName, useSourceIp, or httpCookie to generate a hash, not all of them.
- httpCookie: HttpCookie
The values of this setting help determine the cookie whose hashed value will be used to determine the endpoint to which the request should be forwarded. It consists of the following keys:
- name*: string: Name of the cookie.
- path: string: Path of the cookie.
- ttl*: protobuf.Duration: Lifetime of the cookie.
- useSourceIp: bool
The value of this setting instructs Envoy to compute the hash using the IP address of the source.
- minimumRingSize: uint64
Ketama models the various hash values as points on a ring that has a many-to-one relationship with the host or destination endpoint. With this setting, you can specify the minimum number of points that you want on the Ketama ring. As you can guess, the more points there are, the finer the load distribution will be. If the number of destination service endpoints is higher than this value, their instance count will be considered instead of the value that you specify.
The last setting in the family of traffic policy settings is outlier detection. Let’s now discuss how this policy can be configured.
Outlier detection
Circuit breaker is a typical pattern used in distributed systems to eliminate unresponsive services from processing requests. The basic idea behind the pattern is that you wrap every request in a monitoring component that monitors for failures. After the count of failures for a particular endpoint reaches a threshold, the circuit breaker trips for some time and requests are no longer routed to the endpoint. This gives the faulty service time to recover without getting overwhelmed with requests.
The outlier detection feature helps eliminate faulty endpoints from an active load balancing set based on the error threshold that you configure. Outlier detection applies to both HTTP and TCP services. For HTTP services, HTTP status codes 5xx are treated as errors. For TCP services, connection timeouts and connection failures are treated as errors. Envoy performs outlier detection for each client, since the error received from the server might be specific to a client. The following listing shows the keys that make up the configuration of this feature.
Code Listing 46: Outlier detection specification
spec: host: trafficPolicy: outlierDetection: consecutiveErrors: interval: baseEjectionTime: maxEjectionPercent: minHealthPercent: |
Let’s now go through the values that are supported by the keys of the policy:
- consecutiveErrors: int32
This is the threshold of the number of consecutive errors received by Envoy before evicting the host endpoint from the pool of active endpoints. The default value is 5.
- interval: protobuf.Duration
The value of this key denotes the periodic interval, after which Envoy scans all the endpoints and decides whether an endpoint should be evicted or included in the pool of active endpoints. The default value is 10s.
- baseEjectionTime: protobuf.Duration
An unhealthy endpoint remains evicted from the active connection pool for the duration (= baseEjectionTime * number of times the host has been ejected). This adds an exponential delay to the time during which the service can recover. The default value is 30s.
- maxEjectionPercent: int32
The maximum percent of endpoints of the destination service that can be ejected. The default value is 10%.
- minHealthPercent: int32
If the percentage of healthy endpoints falls below the percentage specified as the value of this key, the outlier detection setting will be disabled, and the traffic will be routed to all endpoints, regardless of their health. The outlier detection service will resume once the number of healthy endpoints crosses this threshold. The default value is 50%.
Let’s go through a sample policy that adds clarity to what we previously discussed.
Code Listing 47: Traffic policy example
apiVersion: networking.istio.io/v1alpha3 kind: DestinationRule metadata: name: serviceA-dest-rule spec: host: serviceA.default.svc.cluster.local trafficPolicy: outlierDetection: consecutiveErrors: 10 interval: 1m baseEjectionTime: 3m maxEjectionPercent: 10 |
In the previous example, the destination rule instructs Envoy to evict the endpoints of serviceA that have reported 10 consecutive errors in three minutes. Every minute, Envoy cycles through all the endpoints of serviceA and decides whether it needs to be added or removed from the pool of active endpoints. Envoy keeps repeating the process until it removes 10 percent of endpoints from the endpoint pool of serviceA.
This concludes our discussion of the traffic settings in the destination rule policy. The other family of settings of destination rule policy is the subset, which we will discuss next.
Subset
Subset helps you classify a single destination service into subsets using labels. Within each subset of a service, you can configure all the traffic policies that we previously discussed. Subset settings have higher priority than traffic policy settings. In general, you will find that services are classified by a version using a label with the same name. Using versions and subsets, we can implement microservices patterns such as canary deployments, with which we can gradually shift traffic from an old version of a service to the new version.
The following listing presents the schema of the subset setting in the destination rule policy.
Code Listing 48: Destination rule subset specification
spec: host: subsets: - name: labels: <label-name>: <label-value> trafficPolicy: |
Just like traffic settings, subset settings are applied to a host, which you specify as the value of the host key. Let’s discuss the supported values of the rest of the keys:
- name*: string
This is the name of the subset. The destination service name (host) and subset name are used together for defining a routing rule in the virtual service. We will discuss the virtual service resource in detail in the next chapter.
- labels: map<string,string>
Labels are used to select the appropriate destination service endpoints from the service registry. If multiple label conditions are specified, then an endpoint must satisfy all of them for being selected (conditions are ANDed).
- trafficPolicy: TrafficPolicy
Specifies the traffic policies that apply to the subset. Subsets inherit traffic policies specified for the host, but will override any matching settings.
This concludes our discussion of two of the networking APIs in Istio: service entry and destination rule. There are two other networking APIs that we will discuss in the next chapter: virtual service and gateway. You will rarely find a practical use of individual networking APIs. However, when they are combined, they act as knobs that you can turn and tune to achieve fine-grained control over your services and implement several microservice architectural patterns. We will study several microservice networking patterns in the next chapter.
Summary
There are several APIs in Istio that help you manage network traffic. In this chapter, we covered two of them in detail: service entry and destination rule. We learned the various settings of service entry and destination rule that we can configure. In the next chapter, we will discuss the remaining networking APIs of Istio and discuss the application of these APIs on our demo application.
- 1800+ high-performance UI components.
- Includes popular controls such as Grid, Chart, Scheduler, and more.
- 24x5 unlimited support by developers.